MITSUBISHI OUTLANDER 2014 3.G MMCS Manual
Manufacturer: MITSUBISHI, Model Year: 2014, Model line: OUTLANDER, Model: MITSUBISHI OUTLANDER 2014 3.GPages: 226, PDF Size: 31.21 MB
Page 31 of 226
Navigation Screen 31
NAVIBasic Operation
Individual Icons
This section explains the icons displayed on
the current location screen (P29).
Displayed when connected to
Bluetooth.
→“Bluetooth Setting”(P209)
Displays the signal strength
and whether or not the phone is
roaming.
Displayed when the phone is
used.
Redisplays the phone operation
panel
(P148).
AV icon Displays the status of the audio
source currently being used.
Touching this switches to the
audio screen.
For details, see
“AV Icons”(P81).
Whether or not to display can
be selected with [Screen] “Other
Indicator Icons”.
→“Navi Settings”(P195)
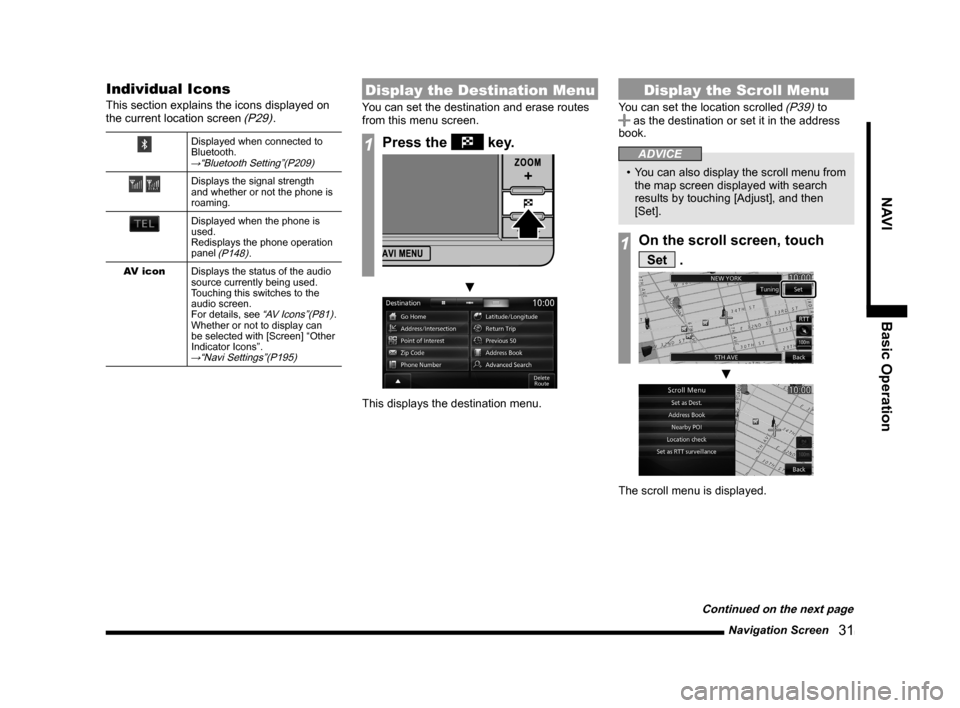
Display the Destination Menu
You can set the destination and erase routes
from this menu screen.
1Press the key.
▼
This displays the destination menu.
Display the Scroll Menu
You can set the location scrolled (P39) to as the destination or set it in the address
book.
ADVICE
• You can also display the scroll menu from
the map screen displayed with search
results by touching [Adjust], and then
[Set].
1On the scroll screen, touch
Set .
▼
The scroll menu is displayed.
Continued on the next page
Page 32 of 226
32 Navigation Screen
Set as Dest.
The location can be set as the
destination.
→“Set as the Destination”(P41)
Address Book The location can be
registered.→“Set in the Address
Book”(P42)
POI nearby Establishments around the
location can be searched for.
→“Search for Nearby
Establishments”(P42)
Location check The position of location
relative to the current location can
be checked.
→“Check the Location of Your
Car.”(P43)
Set as RTT
sur veillance Areas (around the location)
can be registered to check traffic
messages.
→“Registering the
RTT Surveillance Map”(P78)
Back Returns to the previous screen.
Display the Sub-menu
This section explains how to display the sub-
menu displayed from the current location
screen
(P29).
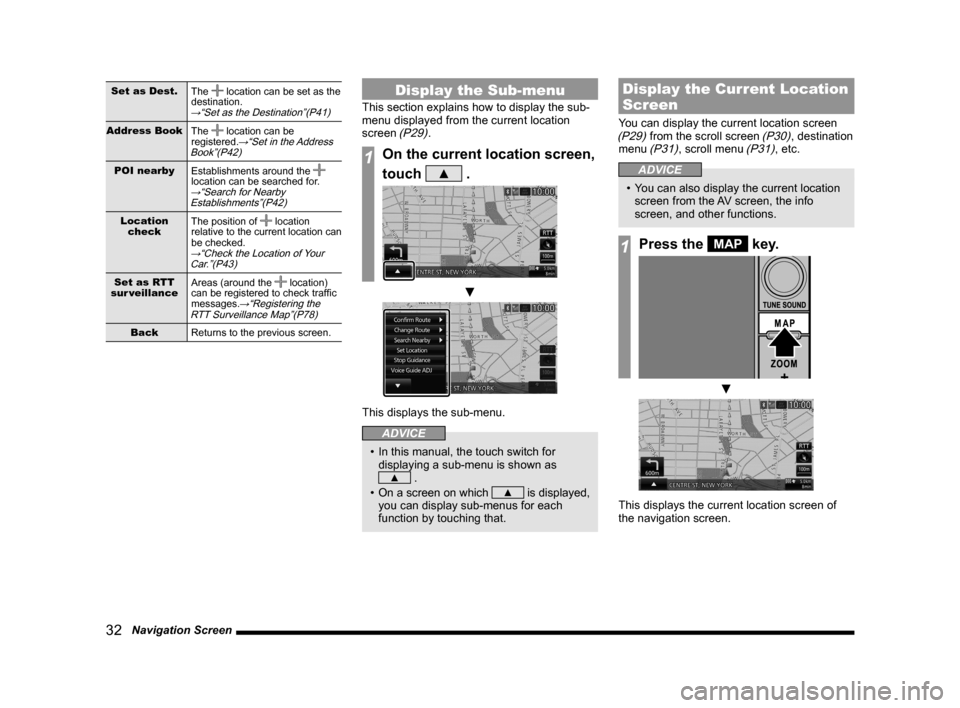
1On the current location screen,
touch
▲ .
▼
This displays the sub-menu.
ADVICE
• In this manual, the touch switch for
displaying a sub-menu is shown as
▲ .
• On a screen on which
▲ is displayed,
you can display sub-menus for each
function by touching that.
Display the Current Location
Screen
You can display the current location screen (P29) from the scroll screen (P30), destination
menu (P31), scroll menu (P31), etc.
ADVICE
• You can also display the current location
screen from the AV screen, the info
screen, and other functions.
1Press the MAP key.
▼
This displays the current location screen of
the navigation screen.
Page 33 of 226
Select the Map Screen 33
NAVIBasic Operation
Select the Map
Screen
You can change the map type and reference
orientation.
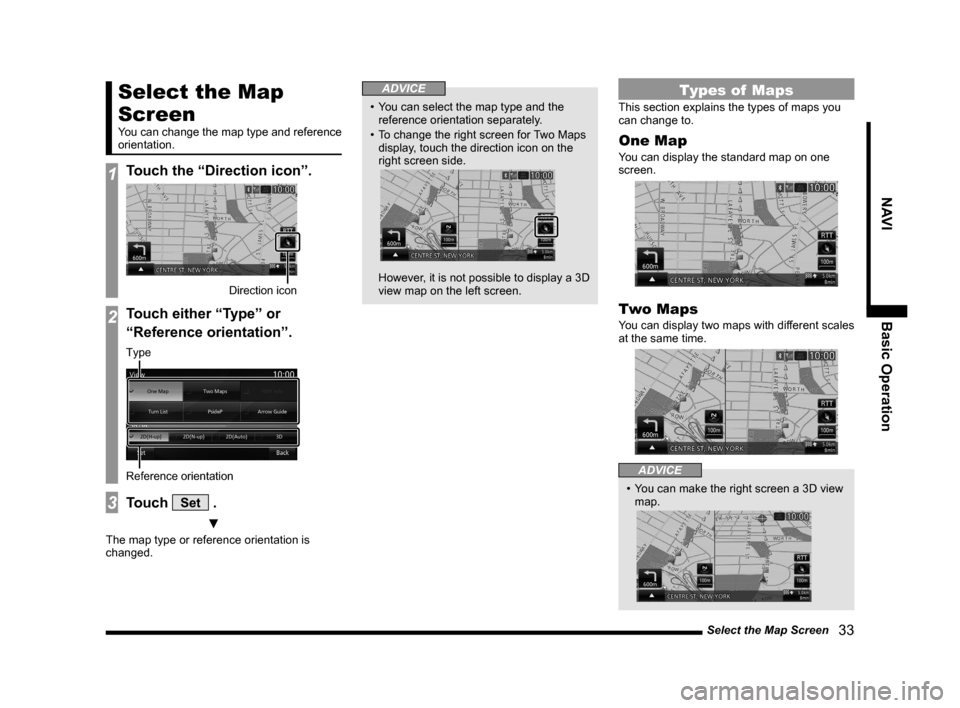
1Touch the “Direction icon”.
Direction icon
2Touch either “Type” or
“Reference orientation”.
Reference orientation
Type
3Touch Set .
▼
The map type or reference orientation is
changed.
ADVICE
• You can select the map type and the
reference orientation separately.
• To change the right screen for Two Maps
display, touch the direction icon on the
right screen side.
However, it is not possible to display a 3D
view map on the left screen.
Types of Maps
This section explains the types of maps you
can change to.
One Map
You can display the standard map on one
screen.
Two Maps
You can display two maps with different scales
at the same time.
ADVICE
• You can make the right screen a 3D view
map.
Page 34 of 226
34 Select the Map Screen
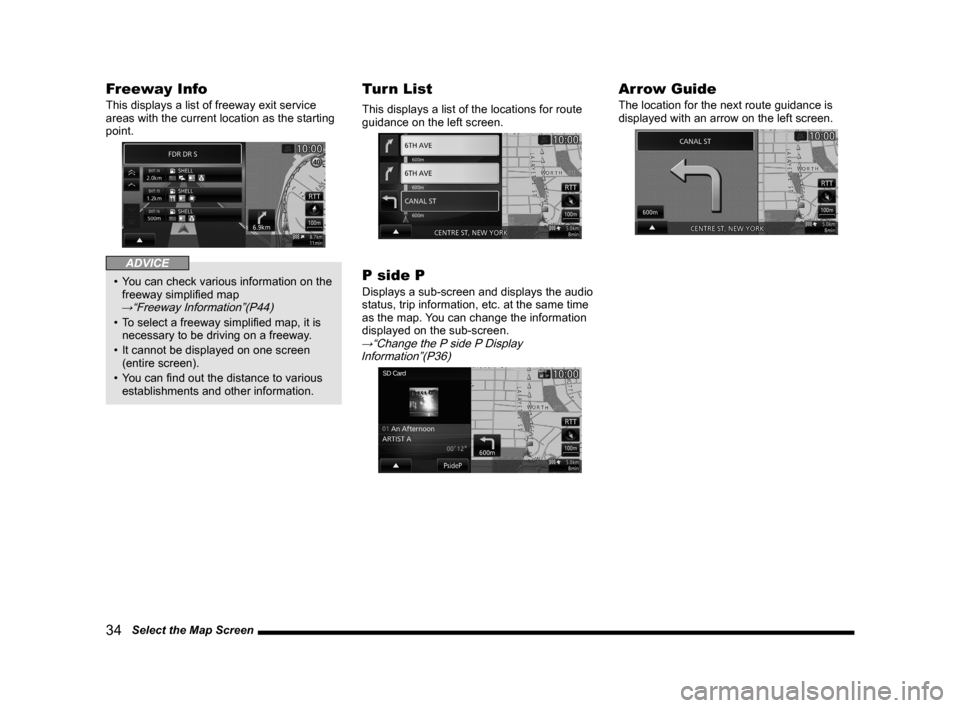
Freeway Info
This displays a list of freeway exit service
areas with the current location as the starting
point.
ADVICE
• You can check various information on the
freeway simplified map
→“Freeway Information”(P44)
• To select a freeway simplified map, it is
necessary to be driving on a freeway.
• It cannot be displayed on one screen
(entire screen).
• You can find out the distance to various
establishments and other information.
Turn List
This displays a list of the locations for route
guidance on the left screen.
P side P
Displays a sub-screen and displays the audio
status, trip information, etc. at the same time
as the map. You can change the information
displayed on the sub-screen.
→“Change the P side P Display
Information”(P36)
Arrow Guide
The location for the next route guidance is
displayed with an arrow on the left screen.
Page 35 of 226
Select the Map Screen 35
NAVIBasic Operation
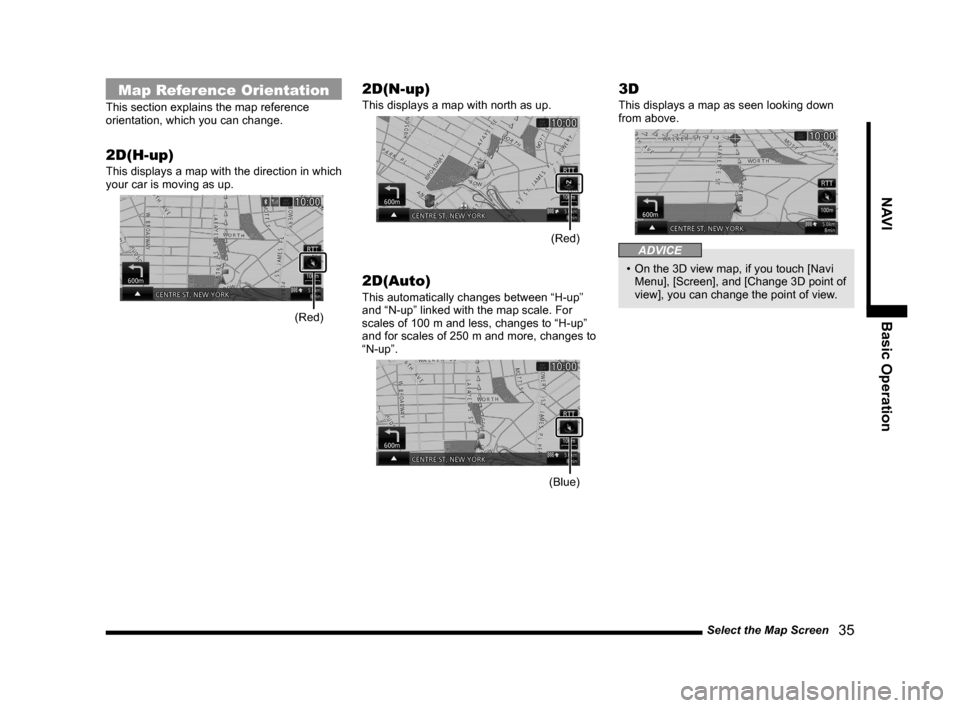
Map Reference Orientation
This section explains the map reference
orientation, which you can change.
2D(H-up)
This displays a map with the direction in which
your car is moving as up.
(Red)
2D(N-up)
This displays a map with north as up.
(Red)
2D(Auto)
This automatically changes between “H-up”
and “N-up” linked with the map scale. For
scales of 100 m and less, changes to “H-up”
and for scales of 250 m and more, changes to
“N-up”.
(Blue)
3D
This displays a map as seen looking down
from above.
ADVICE
• On the 3D view map, if you touch [Navi
Menu], [Screen], and [Change 3D point of
view], you can change the point of view.
Page 36 of 226
36 Select the Map Screen
Change the P side P Display
Information
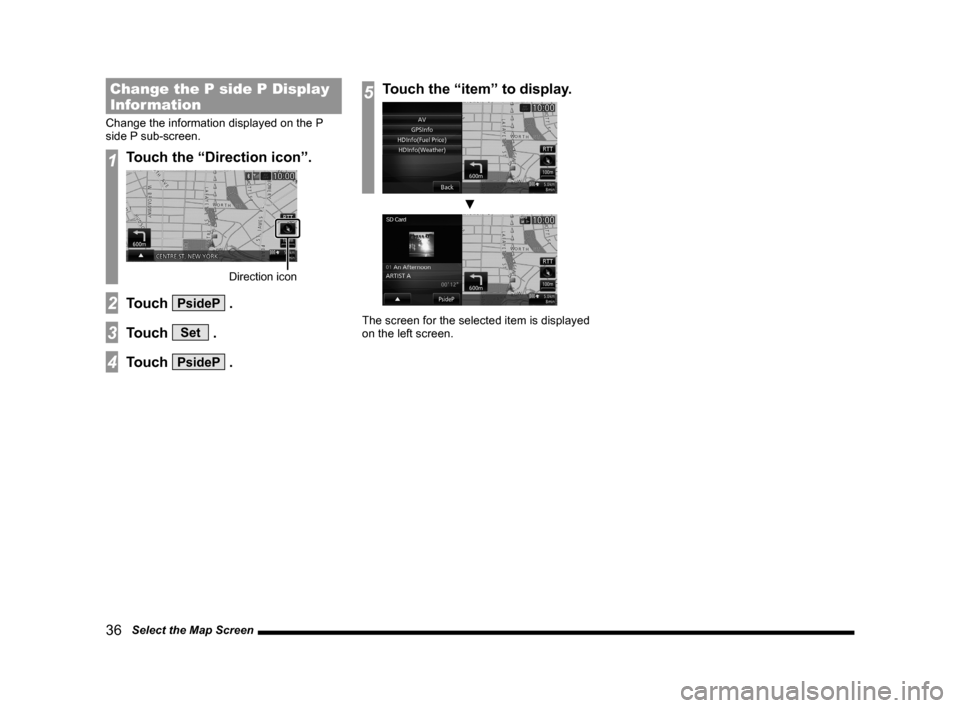
Change the information displayed on the P
side P sub-screen.
1Touch the “Direction icon”.
Direction icon
2Touch PsideP .
3Touch Set .
4Touch PsideP .
5Touch the “item” to display.
▼
The screen for the selected item is displayed
on the left screen.
Page 37 of 226
Guidance Display 37
NAVI Basic Operation
Guidance Display
This product displays various guidance
according to the situation.
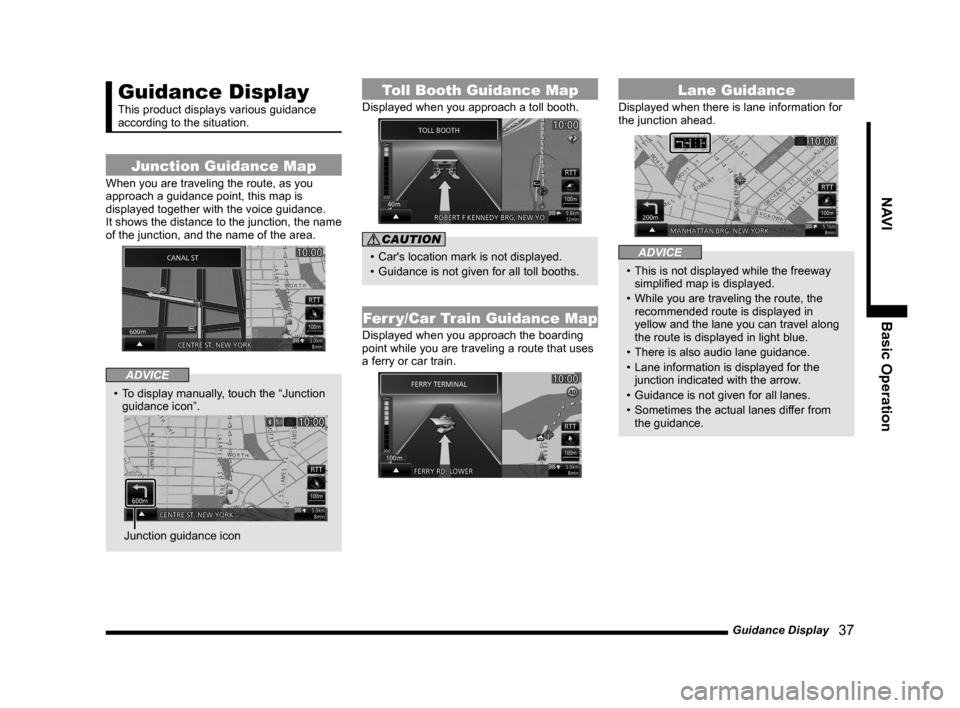
Junction Guidance Map
When you are traveling the route, as you
approach a guidance point, this map is
displayed together with the voice guidance.
It shows the distance to the junction, the name
of the junction, and the name of the area.
ADVICE
• To display manually, touch the “Junction
guidance icon”.
Junction guidance icon
Toll Booth Guidance Map
Displayed when you approach a toll booth.
CAUTION
• Car's location mark is not displayed.
• Guidance is not given for all toll booths.
Ferr y/Car Train Guidance Map
Displayed when you approach the boarding
point while you are traveling a route that uses
a ferry or car train.
Lane Guidance
Displayed when there is lane information for
the junction ahead.
ADVICE
• This is not displayed while the freeway
simplified map is displayed.
• While you are traveling the route, the
recommended route is displayed in
yellow and the lane you can travel along
the route is displayed in light blue.
• There is also audio lane guidance.
• Lane information is displayed for the
junction indicated with the arrow.
• Guidance is not given for all lanes.
• Sometimes the actual lanes differ from
the guidance.
Page 38 of 226
38 Guidance Display
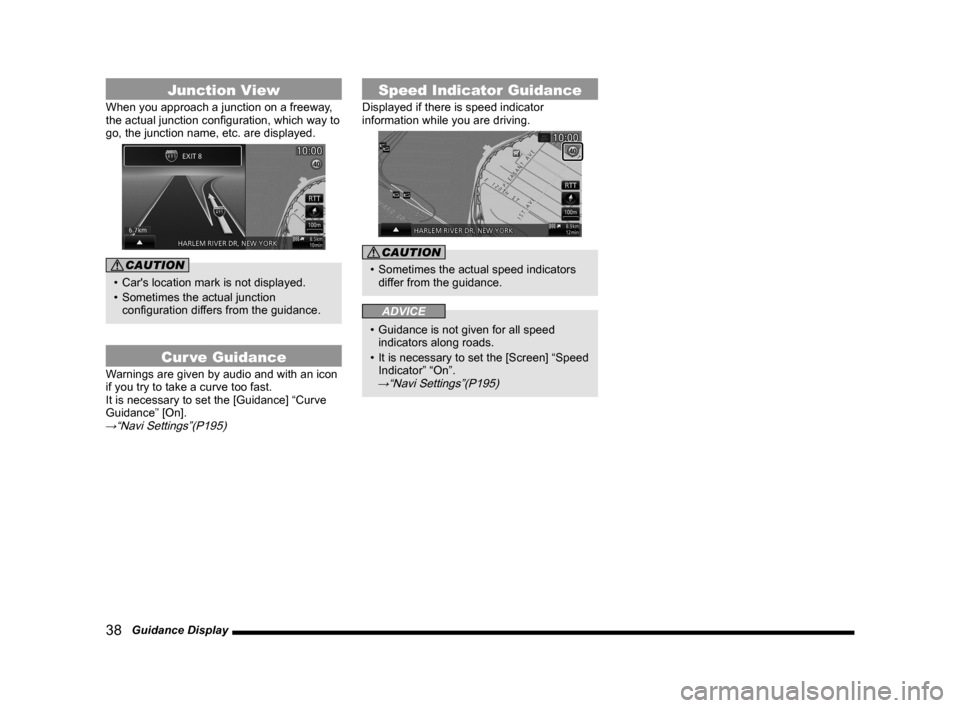
Junction View
When you approach a junction on a freeway,
the actual junction configuration, which way to
go, the junction name, etc. are displayed.
CAUTION
• Car's location mark is not displayed.
• Sometimes the actual junction
configuration differs from the guidance.
Cur ve Guidance
Warnings are given by audio and with an icon
if you try to take a curve too fast.
It is necessary to set the [Guidance] “Curve
Guidance” [On].
→“Navi Settings”(P195)
Speed Indicator Guidance
Displayed if there is speed indicator
information while you are driving.
CAUTION
• Sometimes the actual speed indicators
differ from the guidance.
ADVICE
• Guidance is not given for all speed
indicators along roads.
• It is necessary to set the [Screen] “Speed
Indicator” “On”.
→“Navi Settings”(P195)
Page 39 of 226
Operate the Map 39
NAVI Basic Operation
Operate the Map
This section explains how to perform such
operations as changing the scale and
scrolling the map.
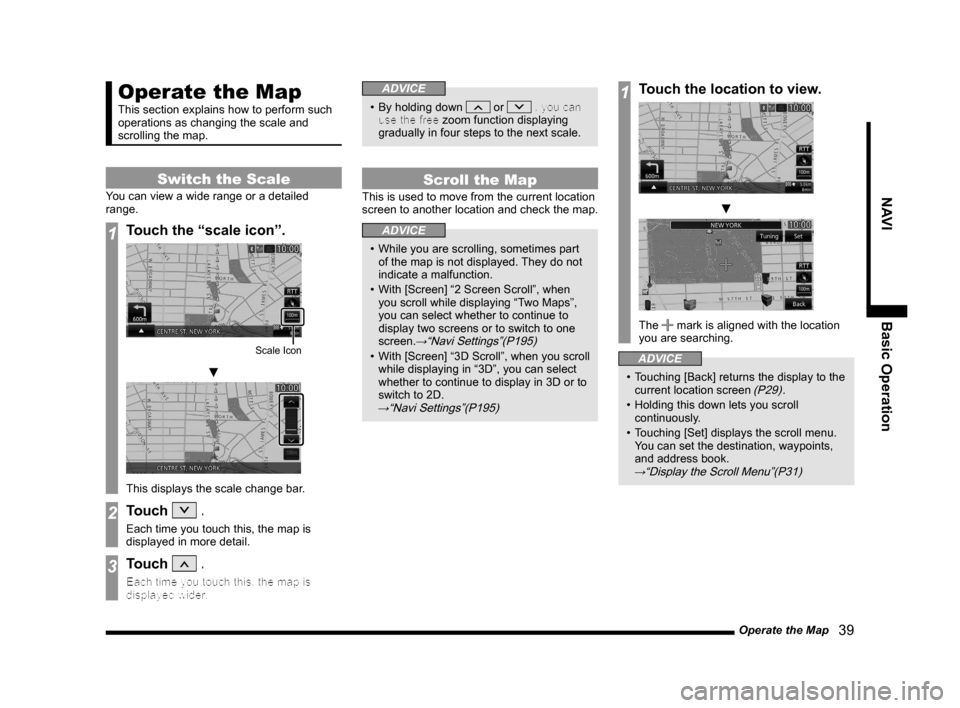
Switch the Scale
You can view a wide range or a detailed
range.
1Touch the “scale icon”.
Scale Icon
▼
This displays the scale change bar.
2Touch .
Each time you touch this, the map is
displayed in more detail.
3Touch .
Each time you touch this, the map is
displayed wider.
ADVICE
• By holding down or , you can
use the free zoom function displaying
gradually in four steps to the next scale.
Scroll the Map
This is used to move from the current location
screen to another location and check the map.
ADVICE
• While you are scrolling, sometimes part
of the map is not displayed. They do not
indicate a malfunction.
• With [Screen] “2 Screen Scroll”, when
you scroll while displaying “Two Maps”,
you can select whether to continue to
display two screens or to switch to one
screen.
→“Navi Settings”(P195)
• With [Screen] “3D Scroll”, when you scroll
while displaying in “3D”, you can select
whether to continue to display in 3D or to
switch to 2D.
→“Navi Settings”(P195)
1Touch the location to view.
▼
The mark is aligned with the location
you are searching.
ADVICE
• Touching [Back] returns the display to the
current location screen (P29).
• Holding this down lets you scroll
continuously.
• Touching [Set] displays the scroll menu.
You can set the destination, waypoints,
and address book.
→“Display the Scroll Menu”(P31)
Page 40 of 226
40 Operate the Map
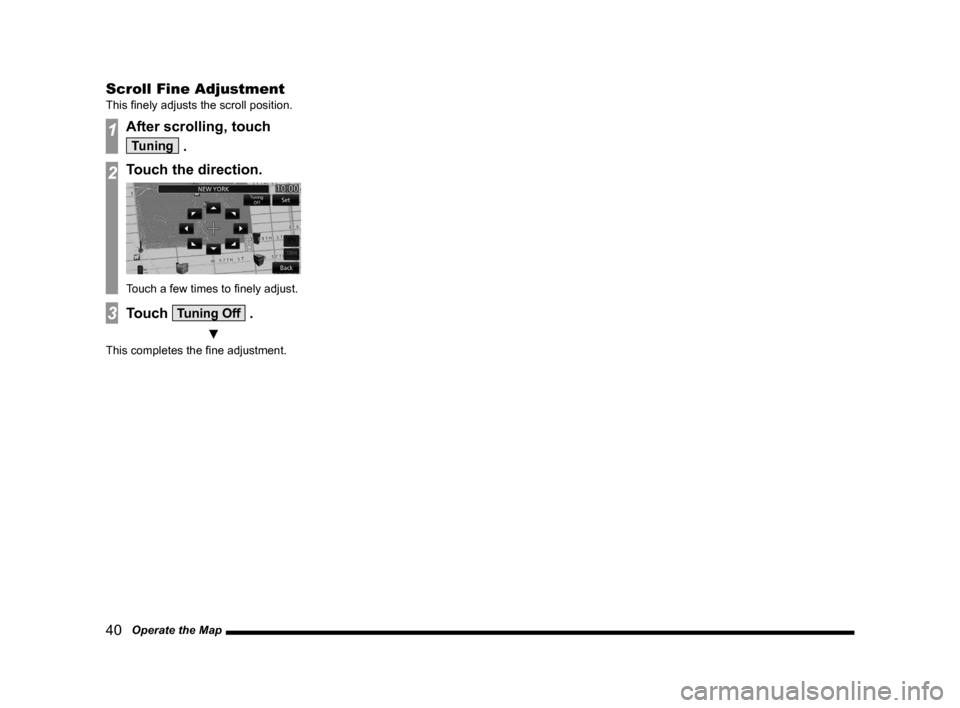
Scroll Fine Adjustment
This finely adjusts the scroll position.
1After scrolling, touch
Tuning .
2Touch the direction.
Touch a few times to finely adjust.
3Touch Tuning Off .
▼
This completes the fine adjustment.