warning light MITSUBISHI SHOGUN 2003 Owner's Manual (in English)
[x] Cancel search | Manufacturer: MITSUBISHI, Model Year: 2003, Model line: SHOGUN, Model: MITSUBISHI SHOGUN 2003Pages: 392, PDF Size: 14.34 MB
Page 3 of 392
Instruments and Controls
B21A601T
LHD
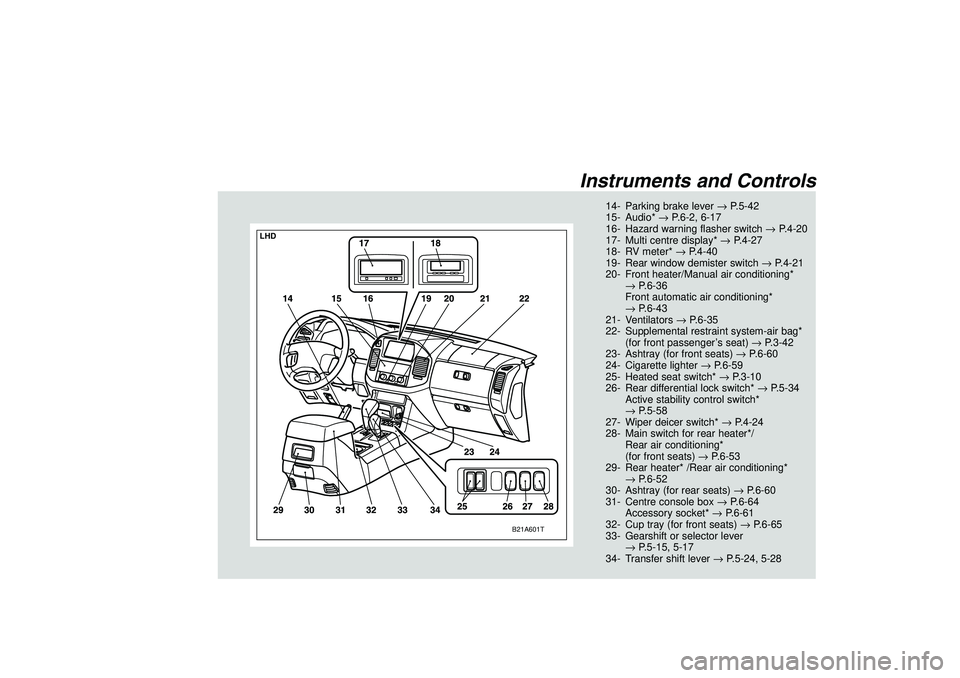
14- Parking brake lever→P.5-42
15- Audio*→P.6-2, 6-17
16- Hazard warning flasher switch→P.4-20
17- Multi centre display*→P.4-27
18- RV meter*→P.4-40
19- Rear window demister switch→P.4-21
20- Front heater/Manual air conditioning*
→P.6-36
Front automatic air conditioning*
→P.6-43
21- Ventilators→P.6-35
22- Supplemental restraint system-air bag*
(for front passenger’s seat)→P.3-42
23- Ashtray (for front seats)→P.6-60
24- Cigarette lighter→P.6-59
25- Heated seat switch*→P.3-10
26- Rear differential lock switch*→P.5-34
Active stability control switch*
→P.5-58
27- Wiper deicer switch*→P.4-24
28- Main switch for rear heater*/
Rear air conditioning*
(for front seats)→P.6-53
29- Rear heater* /Rear air conditioning*
→P.6-52
30- Ashtray (for rear seats)→P.6-60
31- Centre console box→P.6-64
Accessory socket*→P.6-61
32- Cup tray (for front seats)→P.6-65
33- Gearshift or selector lever
→P.5-15, 5-17
34- Transfer shift lever→P.5-24, 5-28
Div:
Out put date:
Page 5 of 392
Instruments and Controls
B21A571T
RHD
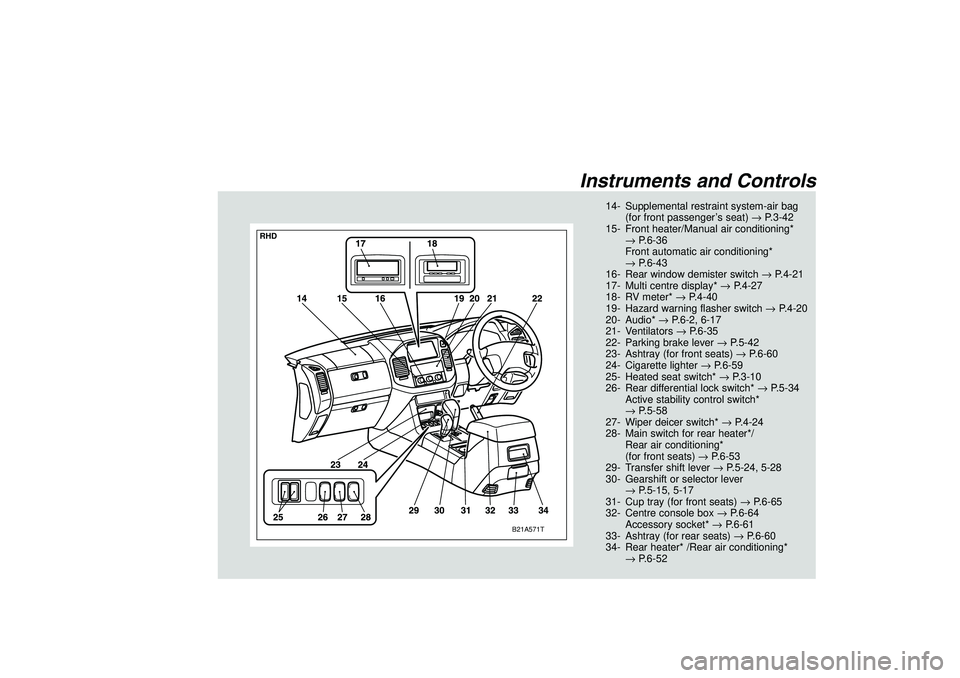
14- Supplemental restraint system-air bag
(for front passenger’s seat)→P.3-42
15- Front heater/Manual air conditioning*
→P.6-36
Front automatic air conditioning*
→P.6-43
16- Rear window demister switch→P.4-21
17- Multi centre display*→P.4-27
18- RV meter*→P.4-40
19- Hazard warning flasher switch→P.4-20
20- Audio*→P.6-2, 6-17
21- Ventilators→P.6-35
22- Parking brake lever→P.5-42
23- Ashtray (for front seats)→P.6-60
24- Cigarette lighter→P.6-59
25- Heated seat switch*→P.3-10
26- Rear differential lock switch*→P.5-34
Active stability control switch*
→P.5-58
27- Wiper deicer switch*→P.4-24
28- Main switch for rear heater*/
Rear air conditioning*
(for front seats)→P.6-53
29- Transfer shift lever→P.5-24, 5-28
30- Gearshift or selector lever
→P.5-15, 5-17
31- Cup tray (for front seats)→P.6-65
32- Centre console box→P.6-64
Accessory socket*→P.6-61
33- Ashtray (for rear seats)→P.6-60
34- Rear heater* /Rear air conditioning*
→P.6-52
Div:
Out put date:
Page 24 of 392
F13A257A
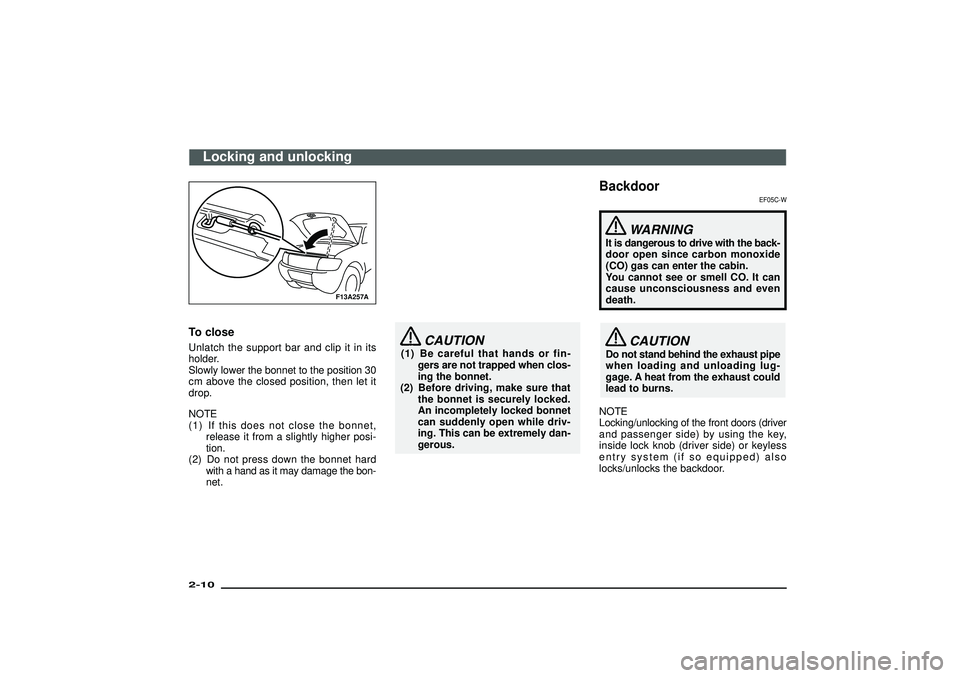
To closeUnlatch the support bar and clip it in its
holder.
Slowly lower the bonnet to the position 30
cm above the closed position, then let it
drop.
NOTE
(1) If this does not close the bonnet,
release it from a slightly higher posi-
tion.
(2) Do not press down the bonnet hard
with a hand as it may damage the bon-
net.
CAUTION
(1) Be careful that hands or fin-
gers are not trapped when clos-
ing the bonnet.
(2) Before driving, make sure that
the bonnet is securely locked.
An incompletely locked bonnet
can suddenly open while driv-
ing. This can be extremely dan-
gerous.
Backdoor
EF05C-W
WARNING
It is dangerous to drive with the back-
door open since carbon monoxide
(CO) gas can enter the cabin.
You cannot see or smell CO. It can
cause unconsciousness and even
death.
CAUTION
Do not stand behind the exhaust pipe
when loading and unloading lug-
gage. A heat from the exhaust could
lead to burns.
NOTE
Locking/unlocking of the front doors (driver
and passenger side) by using the key,
inside lock knob (driver side) or keyless
entry system (if so equipped) also
locks/unlocks the backdoor.
Locking and unlocking
2-10Div:
Out put date:
Page 27 of 392
F17A183A
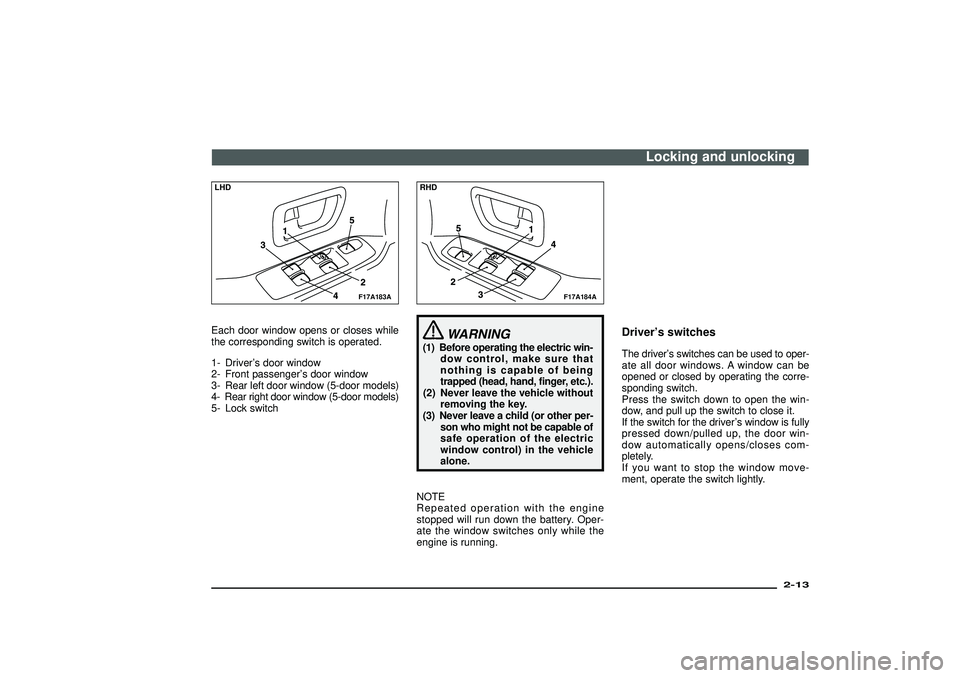
LHDEach door window opens or closes while
the corresponding switch is operated.
1- Driver’s door window
2- Front passenger’s door window
3- Rear left door window (5-door models)
4- Rear right door window (5-door models)
5- Lock switch
F17A184A
RHD
WARNING
(1) Before operating the electric win-
dow control, make sure that
nothing is capable of being
trapped (head, hand, finger, etc.).
(2) Never leave the vehicle without
removing the key.
(3) Never leave a child (or other per-
son who might not be capable of
safe operation of the electric
window control) in the vehicle
alone.
NOTE
Repeated operation with the engine
stopped will run down the battery. Oper-
ate the window switches only while the
engine is running.
Driver’s switchesThe driver’s switches can be used to oper-
ate all door windows. A window can be
opened or closed by operating the corre-
sponding switch.
Press the switch down to open the win-
dow, and pull up the switch to close it.
If the switch for the driver’s window is fully
pressed down/pulled up, the door win-
dow automatically opens/closes com-
pletely.
If you want to stop the window move-
ment, operate the switch lightly.
Locking and unlocking
2-13
Div:
Out put date:
Page 31 of 392
F19A085A
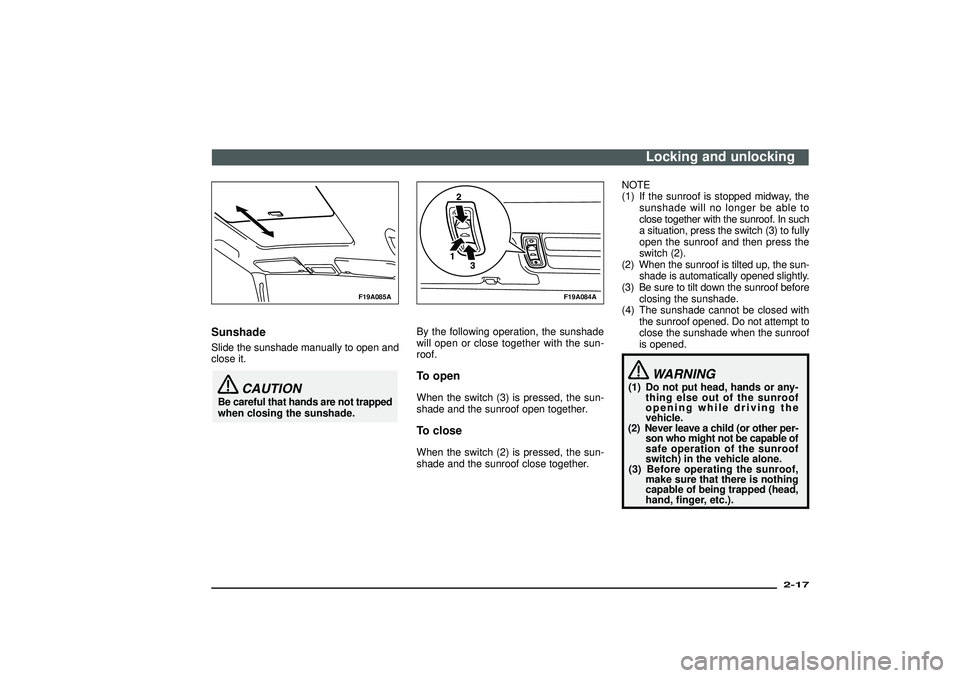
SunshadeSlide the sunshade manually to open and
close it.
CAUTION
Be careful that hands are not trapped
when closing the sunshade.
F19A084A
By the following operation, the sunshade
will open or close together with the sun-
roof.To openWhen the switch (3) is pressed, the sun-
shade and the sunroof open together.To closeWhen the switch (2) is pressed, the sun-
shade and the sunroof close together.NOTE
(1) If the sunroof is stopped midway, the
sunshade will no longer be able to
close together with the sunroof. In such
a situation, press the switch (3) to fully
open the sunroof and then press the
switch (2).
(2) When the sunroof is tilted up, the sun-
shade is automatically opened slightly.
(3) Be sure to tilt down the sunroof before
closing the sunshade.
(4) The sunshade cannot be closed with
the sunroof opened. Do not attempt to
close the sunshade when the sunroof
is opened.
WARNING
(1) Do not put head, hands or any-
thing else out of the sunroof
opening while driving the
vehicle.
(2) Never leave a child (or other per-
son who might not be capable of
safe operation of the sunroof
switch) in the vehicle alone.
(3) Before operating the sunroof,
make sure that there is nothing
capable of being trapped (head,
hand, finger, etc.).
Locking and unlocking
2-17
Div:
Out put date:
Page 42 of 392
CAUTION
(1) Use a foot to operate the pedal
(2).
(2) The reclining mechanism of the
seatback is spring loaded, caus-
ing it to return to the vertical
position when the lock lever is
operated. When using the lever,
sit close to the seatback or hold
it with your hand.
WARNING
The front seatbacks also serve the
purpose of protecting passengers in
the rear seat from being thrown for-
wards in case of an accident. Thus,
in order to prevent serious injury, the
vehicle should not be driven with a
seatback tilted forward.
G16A030A
Heated seats*
EG16A-J
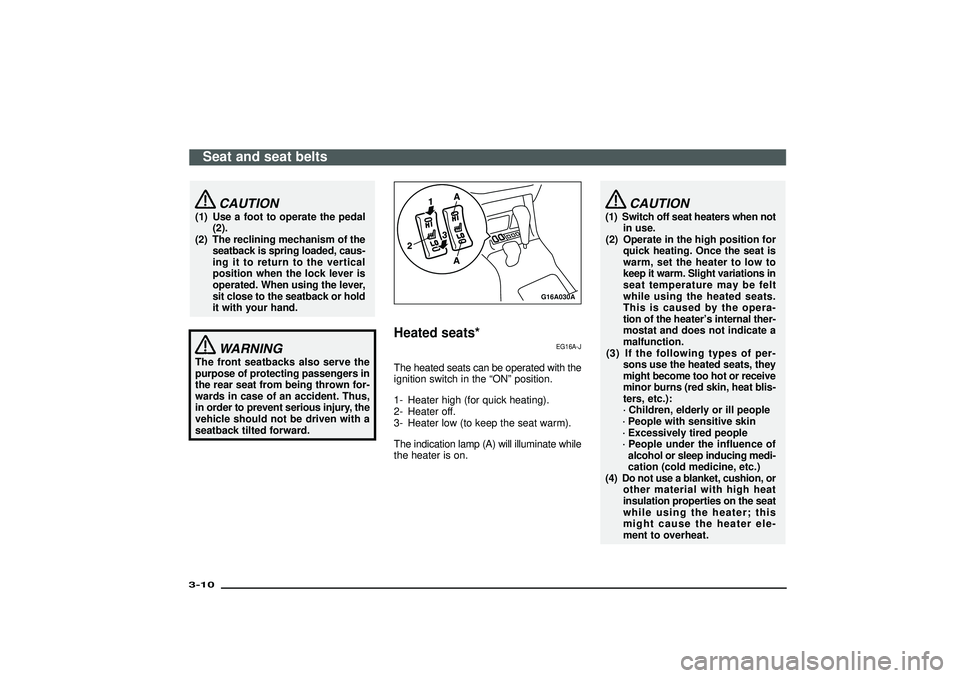
The heated seats can be operated with the
ignition switch in the“ON”position.
1- Heater high (for quick heating).
2- Heater off.
3- Heater low (to keep the seat warm).
The indication lamp (A) will illuminate while
the heater is on.
CAUTION
(1) Switch off seat heaters when not
in use.
(2) Operate in the high position for
quick heating. Once the seat is
warm, set the heater to low to
keep it warm. Slight variations in
seat temperature may be felt
while using the heated seats.
This is caused by the opera-
tion of the heater’s internal ther-
mostat and does not indicate a
malfunction.
(3) If the following types of per-
sons use the heated seats, they
might become too hot or receive
minor burns (red skin, heat blis-
ters, etc.):
·Children, elderly or ill people
·People with sensitive skin
·Excessively tired people
·People under the influence of
alcohol or sleep inducing medi-
cation (cold medicine, etc.)
(4) Do not use a blanket, cushion, or
other material with high heat
insulation properties on the seat
while using the heater; this
might cause the heater ele-
ment to overheat.
Seat and seat belts
3-10Div:
Out put date:
Page 46 of 392

G27A059A
5-door models
Tilt the armrest while pulling up the strap
(C).
G24A015A
Third seat
(5-door models)*
EG24A-Sa
To recline the seatbackIn order to recline the seatback, lean for-
ward slightly, pull the seatback lock lever
as shown in the illustration, and then lean
backward to the desired position and
release the lever. The seatback will lock in
that position.
CAUTION
The reclining mechanism of the seat-
back is spring loaded, causing it to
return to the vertical position when
the lock lever is operated. When
using the lever, sit close to the seat-
back or hold it with your hand.
Making a luggage area
EG23I-Ia
WARNING
(1) If required, always operate the
seating before the vehicle is in
motion.
(2) After seat operations are made,
ensure the seating is locked in
position by attempting to move
the seat and seatback forward
and rearward without using the
adjusting mechanism.
(3) The luggage area in the rear of
the vehicle should never be
used as a play area by chil-
dren. Children should be seated
with seat belts fastened when
the vehicle is in motion. Be sure
that the rear seatbacks are
returned to their fully upright
position and locked in place.
Seat and seat belts
3-14Div:
Out put date:
Page 58 of 392
G24E048A
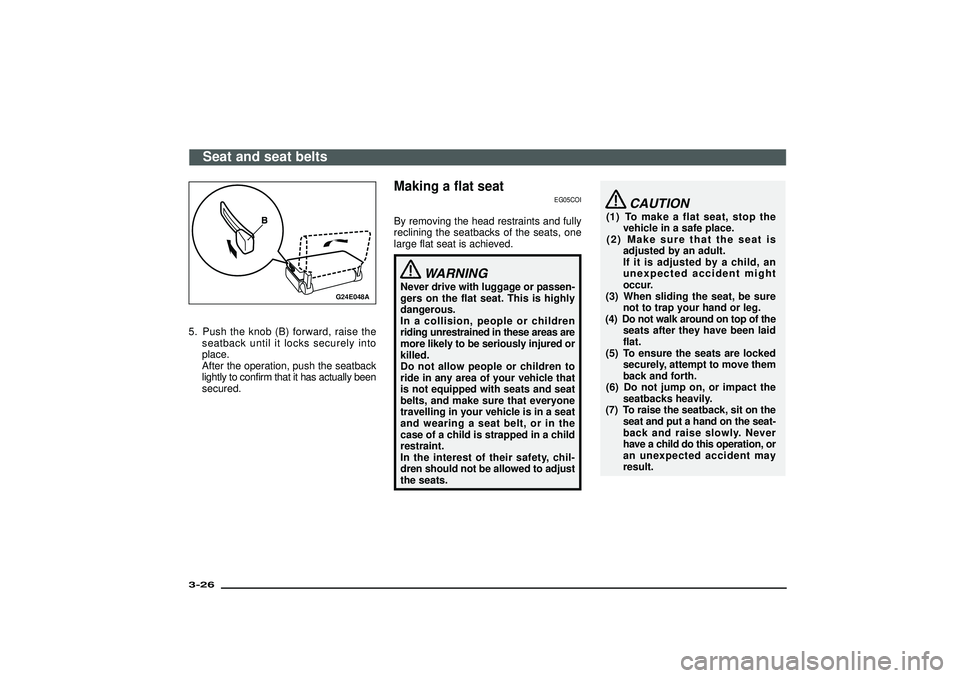
5. Push the knob (B) forward, raise the
seatback until it locks securely into
place.
After the operation, push the seatback
lightly to confirm that it has actually been
secured.
Making a flat seat
EG05COI
By removing the head restraints and fully
reclining the seatbacks of the seats, one
large flat seat is achieved.
WARNING
Never drive with luggage or passen-
gers on the flat seat. This is highly
dangerous.
In a collision, people or children
riding unrestrained in these areas are
more likely to be seriously injured or
killed.
Do not allow people or children to
ride in any area of your vehicle that
is not equipped with seats and seat
belts, and make sure that everyone
travelling in your vehicle is in a seat
and wearing a seat belt, or in the
case of a child is strapped in a child
restraint.
In the interest of their safety, chil-
dren should not be allowed to adjust
the seats.
CAUTION
(1) To make a flat seat, stop the
vehicle in a safe place.
(2) Make sure that the seat is
adjusted by an adult.
If it is adjusted by a child, an
unexpected accident might
occur.
(3) When sliding the seat, be sure
not to trap your hand or leg.
(4) Do not walk around on top of the
seats after they have been laid
flat.
(5) To ensure the seats are locked
securely, attempt to move them
back and forth.
(6) Do not jump on, or impact the
seatbacks heavily.
(7) To raise the seatback, sit on the
seat and put a hand on the seat-
back and raise slowly. Never
have a child do this operation, or
an unexpected accident may
result.
Seat and seat belts
3-26Div:
Out put date:
Page 63 of 392
WARNING
(4) Seat belts should always be
worn by every adult who drives
or rides in this vehicle, and by all
children who are large enough
to wear seat belts properly.
(5) Remove any twists when using
the belt.
(6) No modifications or additions
should be made by the user
which will either prevent the seat
belt adjusting devices from oper-
ating to remove slack, or pre-
vent the seat belt assembly from
being adjusted to remove slack.
(7) To reduce risk of serious or fatal
injury in an accident, including
from a deploying driver air bag,
the driver should adjust the driv-
er’s seat to the most rear posi-
tion that still allows good
visibility and good control of the
steering wheel, the brake and
accelerator, and vehicle con-
trols.
G28A089A
WARNING
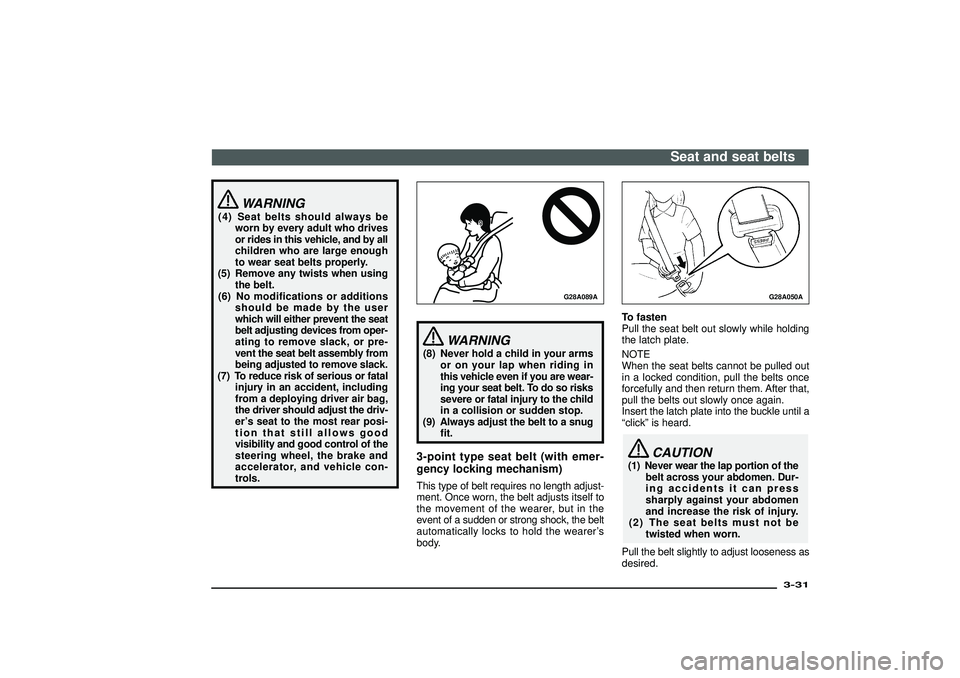
(8) Never hold a child in your arms
or on your lap when riding in
this vehicle even if you are wear-
ing your seat belt. To do so risks
severe or fatal injury to the child
in a collision or sudden stop.
(9) Always adjust the belt to a snug
fit.3-point type seat belt (with emer-
gency locking mechanism)This type of belt requires no length adjust-
ment. Once worn, the belt adjusts itself to
the movement of the wearer, but in the
event of a sudden or strong shock, the belt
automatically locks to hold the wearer’s
body.
G28A050A
To fasten
Pull the seat belt out slowly while holding
the latch plate.
NOTE
When the seat belts cannot be pulled out
in a locked condition, pull the belts once
forcefully and then return them. After that,
pull the belts out slowly once again.
Insert the latch plate into the buckle until a
“click”is heard.
CAUTION
(1) Never wear the lap portion of the
belt across your abdomen. Dur-
ing accidents it can press
sharply against your abdomen
and increase the risk of injury.
(2) The seat belts must not be
twisted when worn.
Pull the belt slightly to adjust looseness as
desired.
Seat and seat belts
3-31
Div:
Out put date:
Page 101 of 392
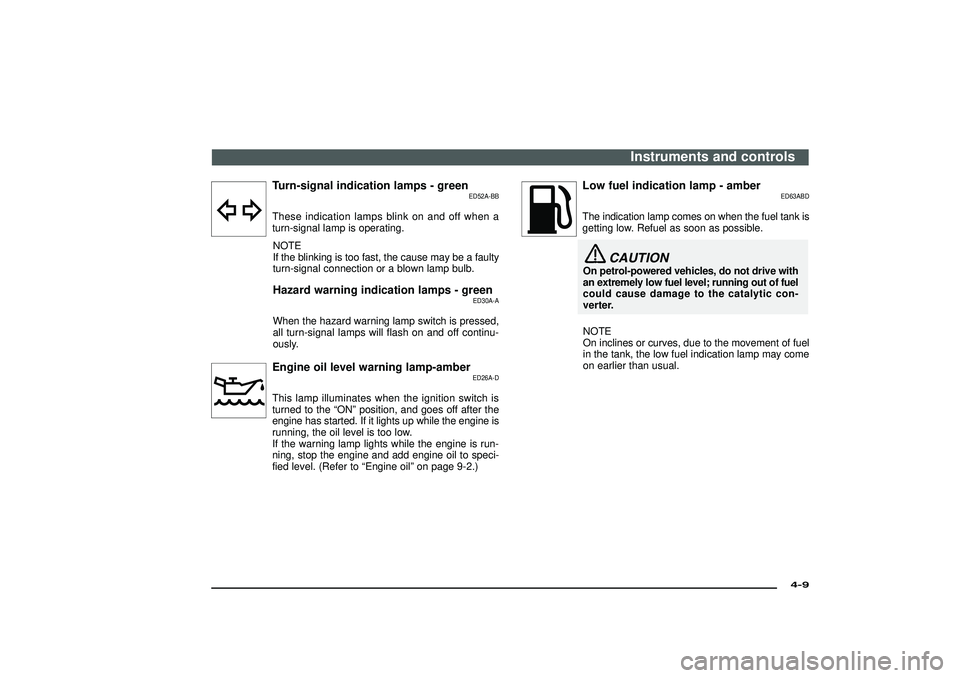
Turn-signal indication lamps - green
ED52A-BB
These indication lamps blink on and off when a
turn-signal lamp is operating.NOTE
If the blinking is too fast, the cause may be a faulty
turn-signal connection or a blown lamp bulb.Hazard warning indication lamps - green
ED30A-A
When the hazard warning lamp switch is pressed,
all turn-signal lamps will flash on and off continu-
ously.Engine oil level warning lamp-amber
ED26A-D
This lamp illuminates when the ignition switch is
turned to the “ON” position, and goes off after theengine has started. If it lights up while the engine is
running, the oil level is too low.
If the warning lamp lights while the engine is run-
ning, stop the engine and add engine oil to speci-
fied level. (Refer to “Engine oil” on page 9-2.)
Low fuel indication lamp - amber
ED63ABD
The indication lamp comes on when the fuel tank is
getting low. Refuel as soon as possible.
CAUTION
On petrol-powered vehicles, do not drive with
an extremely low fuel level; running out of fuel
could cause damage to the catalytic con-
verter.
NOTE
On inclines or curves, due to the movement of fuel
in the tank, the low fuel indication lamp may come
on earlier than usual.
Instruments and controls
4-9
Div:
Out put date: