engine MITSUBISHI SHOGUN 2008 (in English) User Guide
[x] Cancel search | Manufacturer: MITSUBISHI, Model Year: 2008, Model line: SHOGUN, Model: MITSUBISHI SHOGUN 2008Pages: 538, PDF Size: 25.09 MB
Page 45 of 538
Locking and unlocking
1-25
1
NOTE●
The sunroof stops just before
reaching the fully open posi-
tion. If the vehicle is driven with the sunroof in this position, wind throb is lower than with the sunroof fully open.
●
When leaving the vehicle un
attended, make sure you
close the sunroof and remove the ignition key.
●
Do not try to operate the su
nroof if it is frozen closed
(after snow fall or
during extr
eme cold).
●
Do not sit or place heavy lu
ggage on the sunroof or roof
opening edge.
●
Release the switch as soon as the sunroof reaches the fully open or fully closed position.
●
If the sunroof does not operat
e when the sunroof switch is
operated, release the switch
and check whether something
is trapped by the sunroof. If no
thing is trapped, we recom-
mend you to have the sunroof checked.
●
Depending on the model of ski carriers or roof carriers, the sunroof may make contact
with the carrier when the
sunroof is tilted up. Be careful when tilting up the sunroofif such a ski carrier or a
roof carrier is installed.
●
Be sure to close the sunroof completely when washing the vehicle or when leaving the vehicle.
●
Be careful, not to put any wa
x on the weatherstrip (black
rubber) around the sunroof ope
ning. If stained with wax,
the weatherstrip cannot maintain a weatherproof seal withthe sunroof.
●
After washing the vehicle or after it has rained, wipe off any water that is on the sunroof before operating it.
●
Operating the sunroof repeated
ly with the engine station-
ary will run down the battery
. Operate the sunroof while
the engine is running.
BK-BK2008E1ENUK.en-uk-Section4.fm Page
25 Wednesday, January 9, 2008 4:22 PM
Page 52 of 538
2-6 Seat and seat belts
2
Front seats
E00400400100
To adjust forward or backward
E00400500055
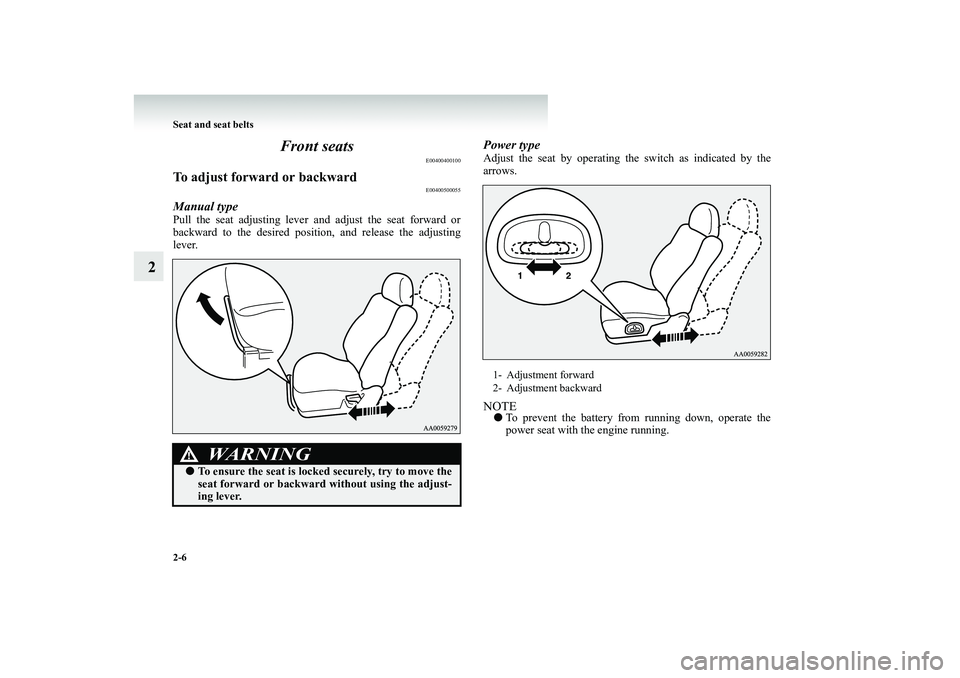
Manual typePull the seat adjusting lever
and adjust the seat forward or
backward to the desired positi
on, and release the adjusting
lever.
Power typeAdjust the seat by operating
the switch as indicated by the
arrows.NOTE●
To prevent the battery from running down, operate the power seat with the engine running.
WARNING
!●
To ensure the seat is locked securely, try to move the seat forward or backward
without using the adjust-
ing lever.
1- Adjustment forward 2- Adjustment backward
BK-BK2008E1ENUK.en-uk-Section5.fm Page 6 Wednesday, January 9, 2008 4:28 PM
Page 53 of 538
Seat and seat belts
2-7
2
To recline the seatback
E00400600056
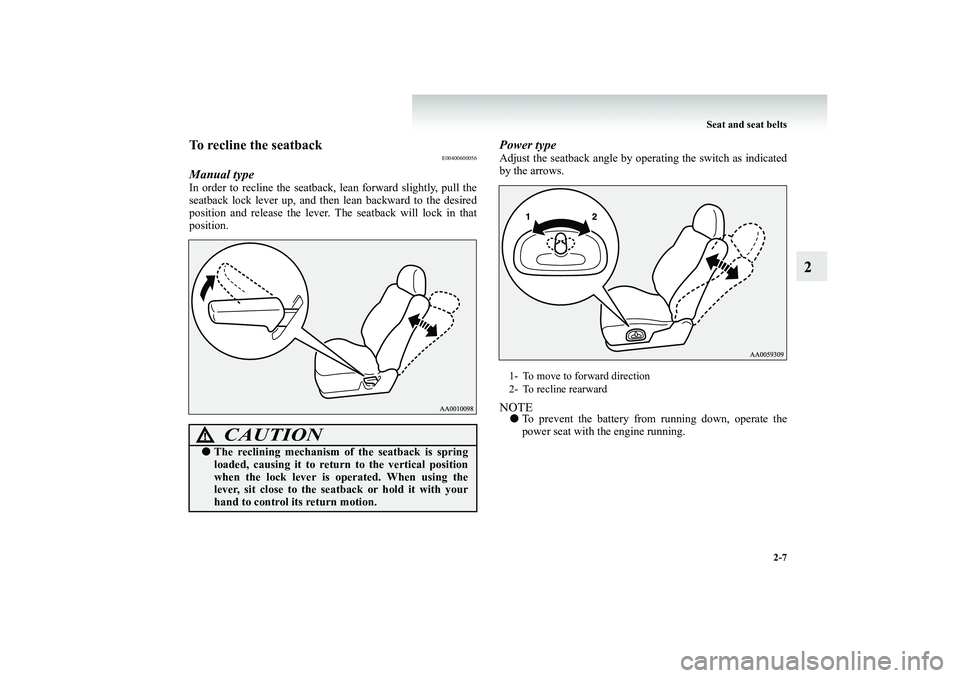
Manual typeIn order to recline the seatback
, lean forward slightly, pull the
seatback lock lever up, and then
lean backward to the desired
position and release the lever. Th
e seatback will lock in that
position.
Power typeAdjust the seatback angle by
operating the switch as indicated
by the arrows.NOTE●
To prevent the battery from running down, operate the power seat with the engine running.
CAUTION
!●
The reclining mechanism of
the seatback is spring
loaded, causing it to return
to the vertical position
when the lock lever is operated. When using thelever, sit close to the seatback or hold it with your hand to control its return motion.
1- To move to forward direction 2- To recline rearward
BK-BK2008E1ENUK.en-uk-Section5.fm Page 7 Wednesday, January 9, 2008 4:28 PM
Page 55 of 538
Seat and seat belts
2-9
2
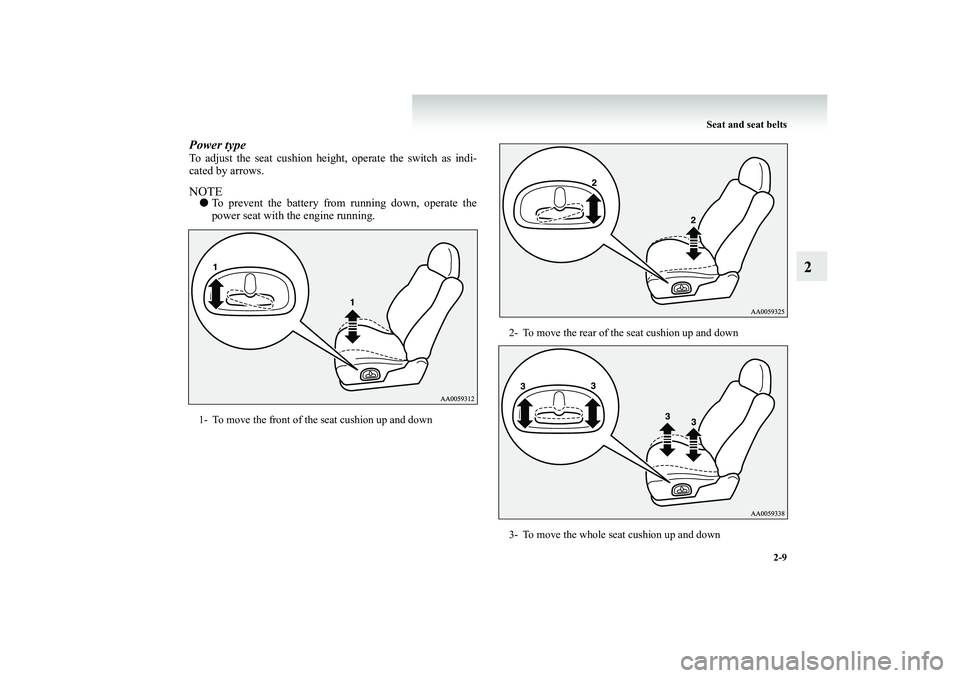
Power typeTo adjust the seat cushion heig
ht, operate the switch as indi-
cated by arrows.NOTE●
To prevent the battery from running down, operate the power seat with the engine running.
1- To move the front of the seat cushion up and down
2- To move the rear of the seat cushion up and down 3- To move the whole seat cushion up and down
BK-BK2008E1ENUK.en-uk-Section5.fm Page 9 Wednesday, January 9, 2008 4:28 PM
Page 56 of 538
2-10 Seat and seat belts
2
Lumbar support adjustment (Power type, driver’s seat)
E00400800032
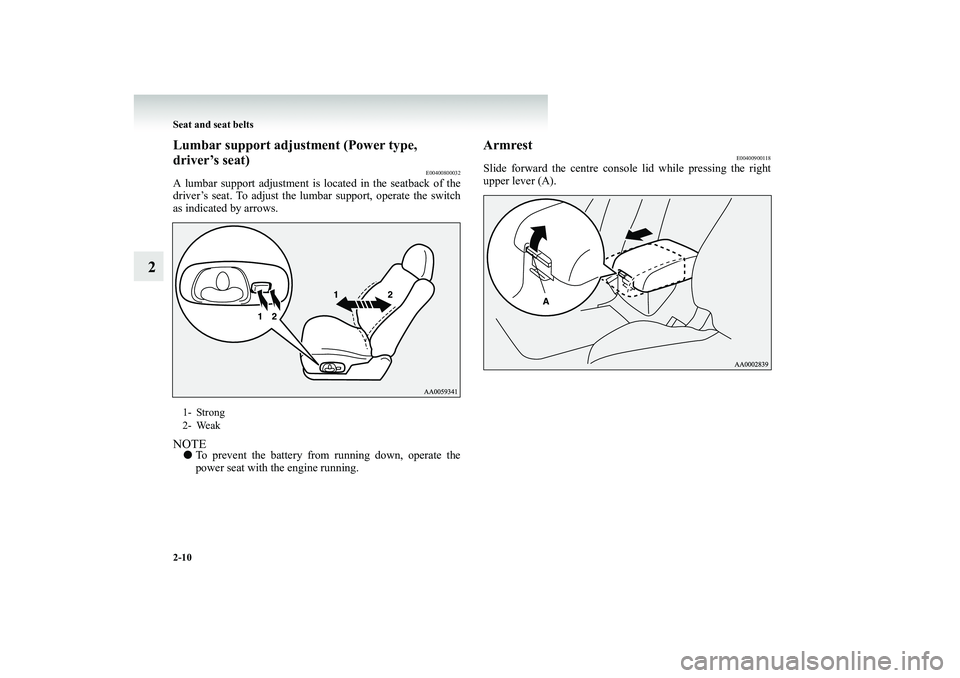
A lumbar support adjustment is located in the seatback of the driver’s seat. To adjust the lu
mbar support, operate the switch
as indicated by arrows.NOTE●
To prevent the battery from running down, operate the power seat with the engine running.
Armrest
E00400900118
Slide forward the centre consol
e lid while pressing the right
upper lever (A).
1- Strong 2- Weak
BK-BK2008E1ENUK.en-uk-Section5.fm Page
10 Wednesday, January 9, 2008 4:28 PM
Page 126 of 538
3-2 Instruments and controls
3
Instruments
E00500100241
Tachometer
E00500300458
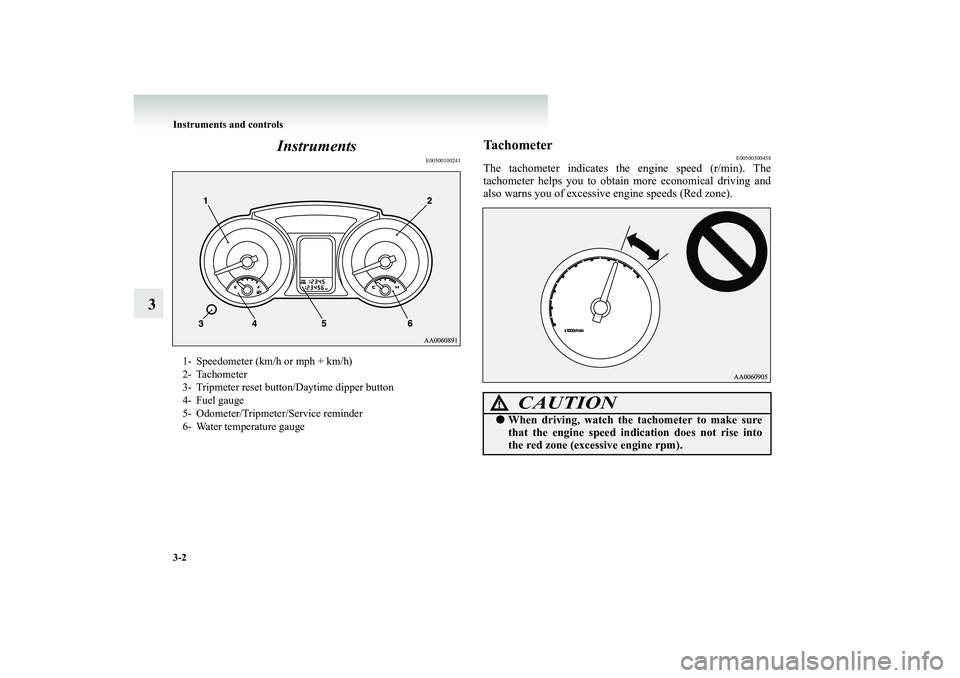
The tachometer indicates the
engine speed (r/min). The
tachometer helps you to obtain more economical driving and also warns you of excessive engine speeds (Red zone).
1- Speedometer (km/h or mph + km/h) 2- Tachometer 3- Tripmeter reset button/Daytime dipper button 4- Fuel gauge5- Odometer/Tripmeter/Service reminder 6- Water temperature gauge
CAUTION
!●
When driving, watch the
tachometer to make sure
that the engine speed indi
cation does not rise into
the red zone (excessive engine rpm).
BK-BK2008E1ENUK.en-uk-Section6.fm Page 2 Wednesday, January 9, 2008 4:32 PM
Page 132 of 538
3-8 Instruments and controls
3
NOTE●
When the vehicle has been re
fuelled, the pointer in the
fuel gauge takes a short while to stabilize.
●
The fuel gauge will not give
an accurate indication if the
vehicle is refuelled with the ignition switch in the “ON”position.
●
When the engine on diesel-pow
ered vehicles fails to oper-
ate owing to running out of fuel, it may sometimes be dif-ficult to start after refuelling.
This is due to air entering
the fuel system. Therefore, ai
r must be bled from the sys-
tem. (Refer to “Bleeding th
e fuel system” on page 6-9.)
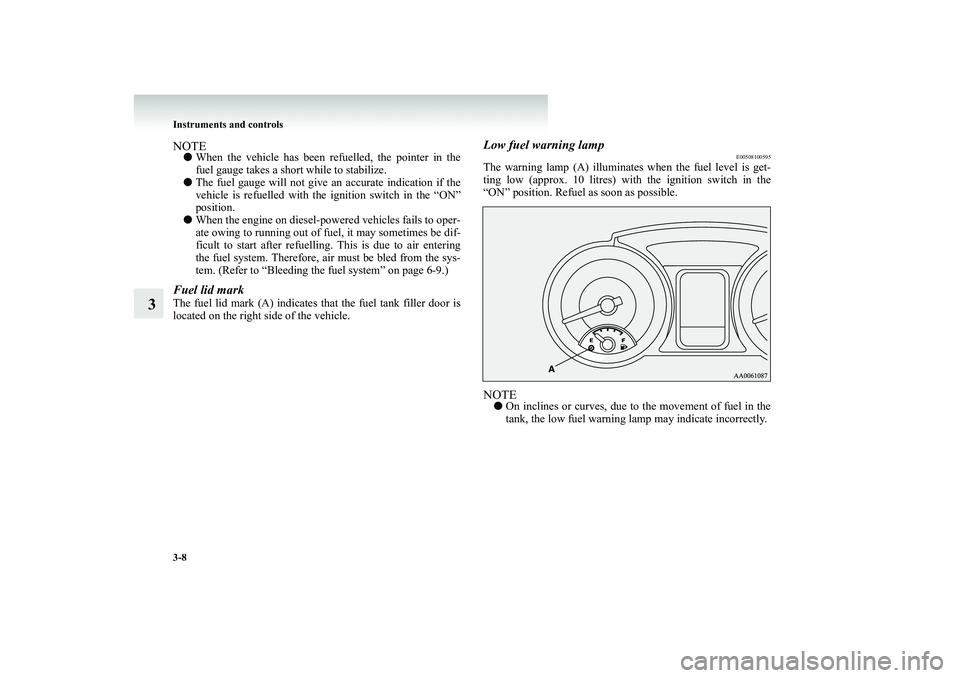
Fuel lid markThe fuel lid mark (A) indicates
that the fuel tank filler door is
located on the right side of the vehicle.
Low fuel warning lamp
E00508100595
The warning lamp (A) illuminates when the fuel level is get-ting low (approx. 10 litres) with the ignition switch in the “ON” position. Refuel as soon as possible.NOTE●
On inclines or curves, due to
the movement of fuel in the
tank, the low fuel warning lamp may indicate incorrectly.
BK-BK2008E1ENUK.en-uk-Section6.fm Page 8 Wednesday, January 9, 2008 4:32 PM
Page 133 of 538
Instruments and controls
3-9
3
Water temperature gauge
E00500800408
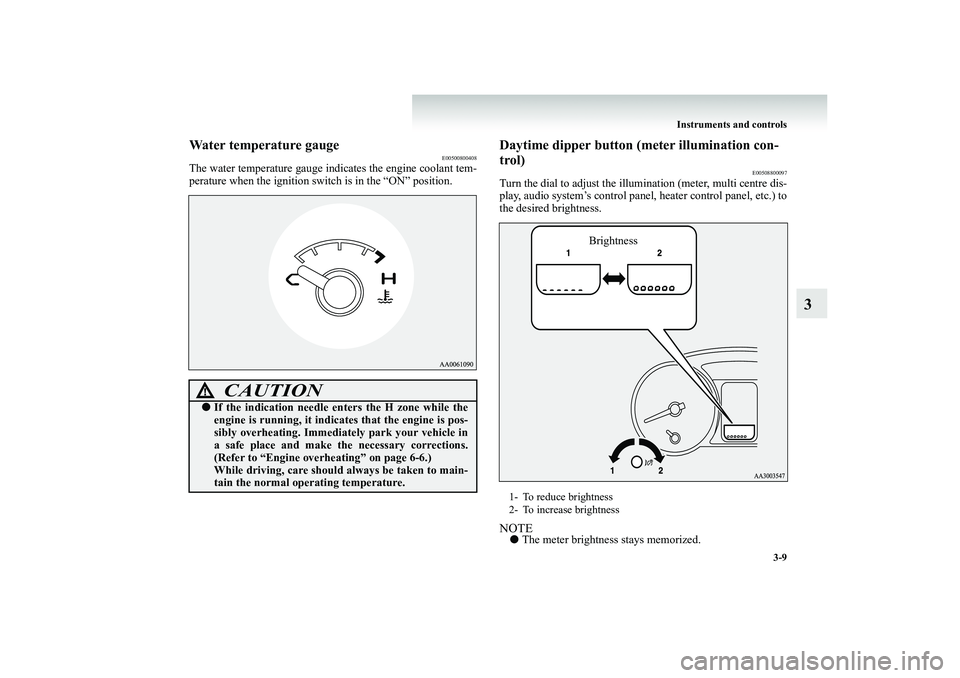
The water temperature gauge indi
cates the engine coolant tem-
perature when the ignition switch is in the “ON” position.
Daytime dipper button (meter illumination con- trol)
E00508800097
Turn the dial to adjust the i
llumination (meter, multi centre dis-
play, audio system’s control panel, heater control panel, etc.) tothe desired brightness.NOTE●
The meter brightness
stays memorized.
CAUTION
!●
If the indication needle en
ters the H zone while the
engine is running, it indica
tes that the engine is pos-
sibly overheating. Immediat
ely park your vehicle in
a safe place and make th
e necessary corrections.
(Refer to “Engine overheating” on page 6-6.) While driving, care should always be taken to main-tain the normal operating temperature.
1- To reduce brightness 2- To increase brightness
Brightness
BK-BK2008E1ENUK.en-uk-Section6.fm Page 9 Wednesday, January 9, 2008 4:32 PM
Page 134 of 538
3-10 Instruments and controls
3
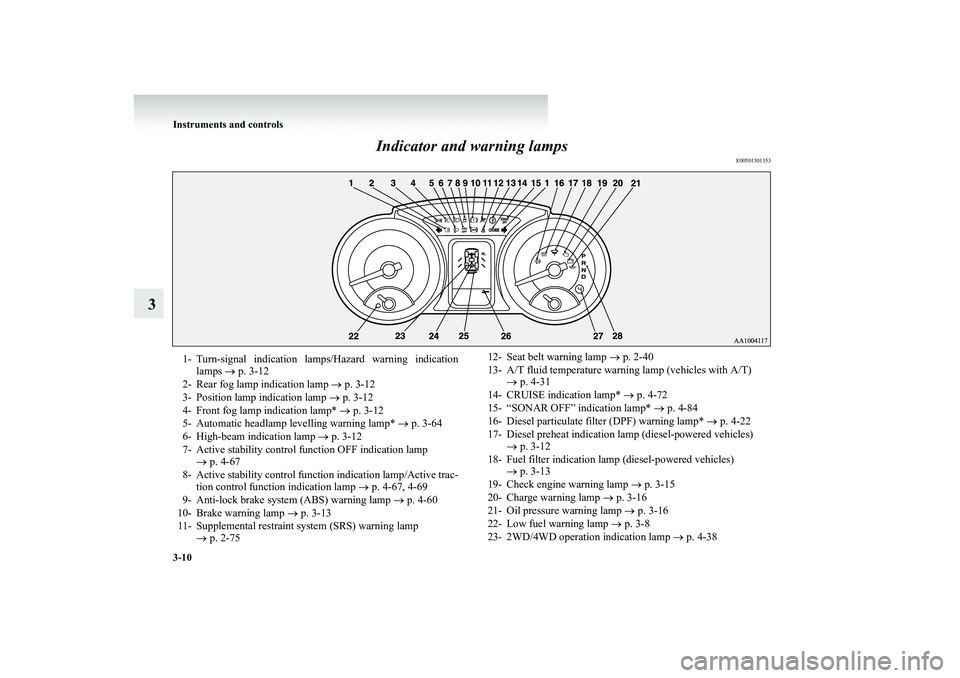
Indicator and warning lamps
E00501501353
1- Turn-signal indication lamps/Hazard warning indication
lamps
→ p. 3-12
2- Rear fog lamp indication lamp
→ p. 3-12
3- Position lamp indication lamp
→ p. 3-12
4- Front fog lamp indication lamp*
→ p. 3-12
5- Automatic headlamp levelling warning lamp*
→ p. 3-64
6- High-beam indication lamp
→ p. 3-12
7- Active stability control function OFF indication lamp
→ p. 4-67
8- Active stability control function indication lamp/Active trac-
tion control function indication lamp
→ p. 4-67, 4-69
9- Anti-lock brake system (ABS) warning lamp
→ p. 4-60
10- Brake warning lamp
→ p. 3-13
11- Supplemental restraint system (SRS) warning lamp
→ p. 2-75
12- Seat belt warning lamp
→ p. 2-40
13- A/T fluid temperature warning lamp (vehicles with A/T)
→ p. 4-31
14- CRUISE indication lamp*
→ p. 4-72
15- “SONAR OFF” indication lamp*
→ p. 4-84
16- Diesel particulate filter (DPF) warning lamp*
→ p. 4-22
17- Diesel preheat indication lamp (diesel-powered vehicles)
→ p. 3-12
18- Fuel filter indication lamp (diesel-powered vehicles)
→ p. 3-13
19- Check engine warning lamp
→ p. 3-15
20- Charge warning lamp
→ p. 3-16
21- Oil pressure warning lamp
→ p. 3-16
22- Low fuel warning lamp
→ p. 3-8
23- 2WD/4WD operation indication lamp
→ p. 4-38
BK-BK2008E1ENUK.en-uk-Section6.fm Page
10 Wednesday, January 9, 2008 4:32 PM
Page 136 of 538
3-12 Instruments and controls
3
Indicator lamps
E00501600012
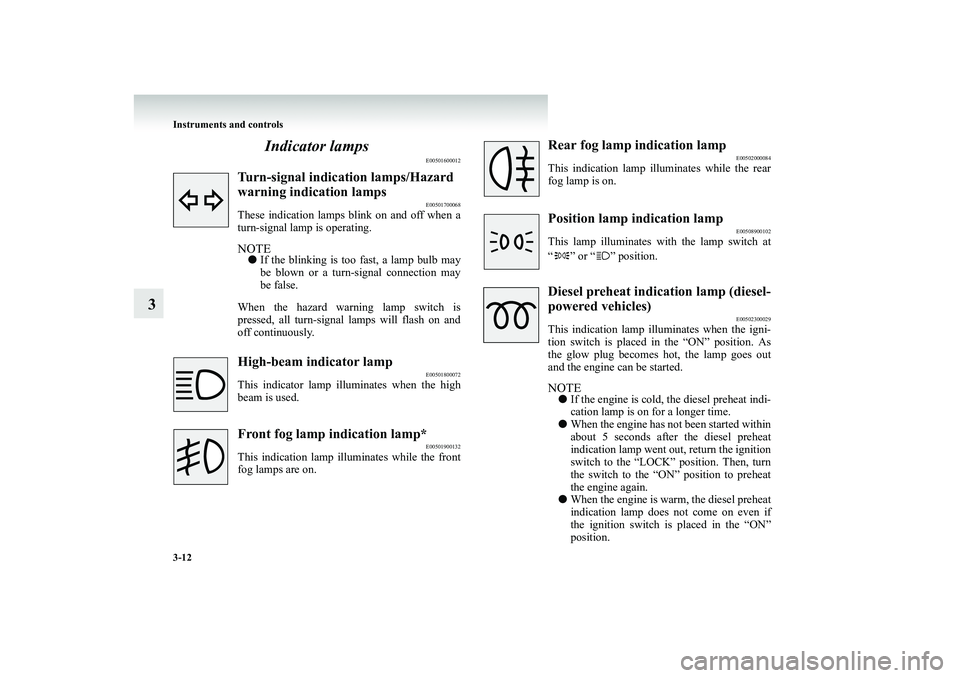
Turn-signal indication lamps/Hazard warning indication lamps
E00501700068
These indication lamps blink on and off when a turn-signal lamp is operating.NOTE●
If the blinking is too fast, a lamp bulb may be blown or a turn-signal connection may be false.
When the hazard warning lamp switch is pressed, all turn-signal lamps will flash on andoff continuously.High-beam indicator lamp
E00501800072
This indicator lamp illuminates when the highbeam is used.Front fog lamp indication lamp*
E00501900132
This indication lamp illuminates while the frontfog lamps are on.
Rear fog lamp indication lamp
E00502000084
This indication lamp illuminates while the rearfog lamp is on.Position lamp indication lamp
E00508900102
This lamp illuminates with the lamp switch at “ ” or “ ” position.Diesel preheat indica
tion lamp (diesel-
powered vehicles)
E00502300029
This indication lamp illuminates when the igni- tion switch is placed in the “ON” position. Asthe glow plug becomes hot, the lamp goes out and the engine can be started.NOTE●
If the engine is cold,
the diesel preheat indi-
cation lamp is on for a longer time.
●
When the engine has not been started within about 5 seconds after the diesel preheatindication lamp went out, return the ignition switch to the “LOCK” position. Then, turn the switch to the “ON” position to preheat the engine again.
●
When the engine is warm, the diesel preheat indication lamp does not come on even if the ignition switch is placed in the “ON” position.
BK-BK2008E1ENUK.en-uk-Section6.fm Page
12 Wednesday, January 9, 2008 4:32 PM