MITSUBISHI SHOGUN 2008 Owner's Manual (in English)
Manufacturer: MITSUBISHI, Model Year: 2008, Model line: SHOGUN, Model: MITSUBISHI SHOGUN 2008Pages: 538, PDF Size: 25.09 MB
Page 211 of 538
Starting and driving
4-9
4
Inside rear-view mirror
E00600800148
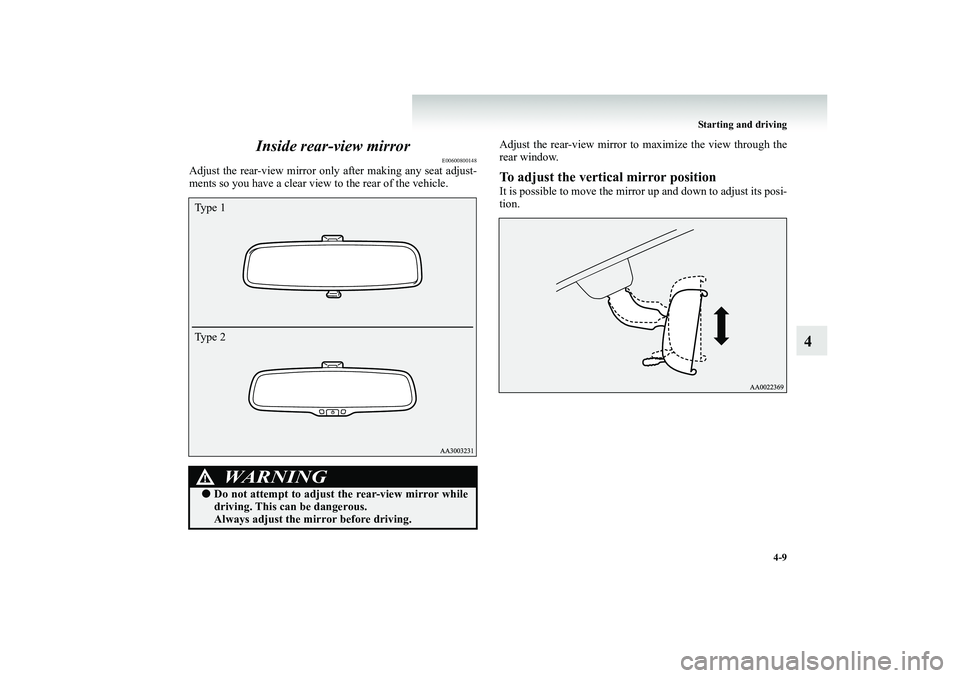
Adjust the rear-view mirror only
after making any seat adjust-
ments so you have a clear view
to the rear of the vehicle.
Adjust the rear-view mirror to maximize the view through the rear window.To adjust the vertical mirror positionIt is possible to move the mirror up and down to adjust its posi- tion.
WARNING
!●
Do not attempt to adjust the rear-view mirror while driving. This can be dangerous. Always adjust the mirror before driving.
Type 1 Type 2
BK-BK2008E1ENUK.en-uk-Section7.fm Page 9 Wednesday, January 9, 2008 4:36 PM
Page 212 of 538
4-10 Starting and driving
4
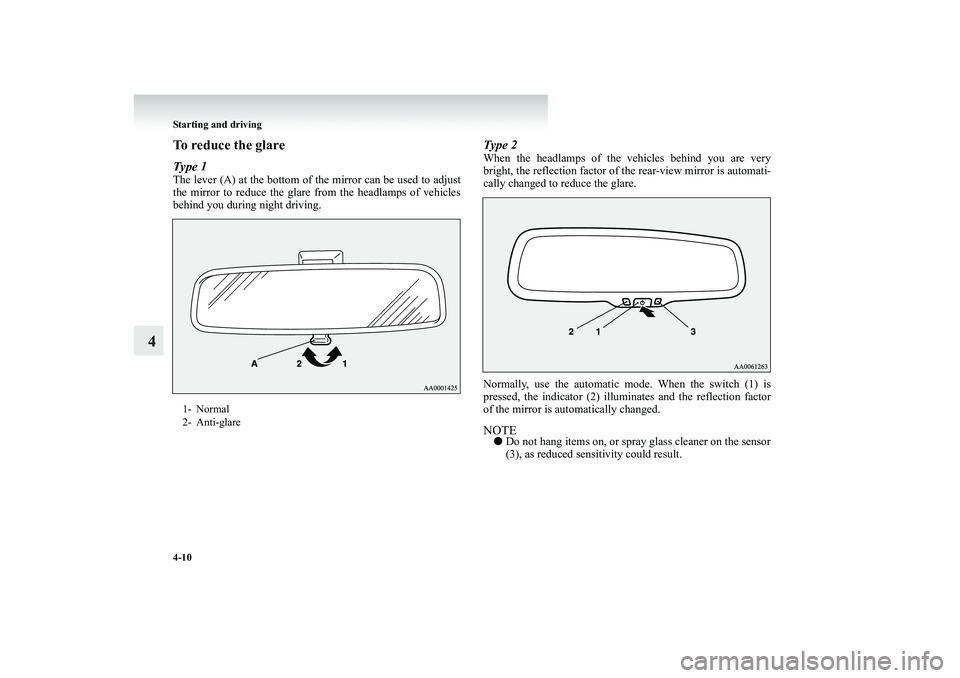
To reduce the glareType 1The lever (A) at the bottom of th
e mirror can be used to adjust
the mirror to reduce the glare
from the headlamps of vehicles
behind you during night driving.
Type 2When the headlamps of the vehicles behind you are verybright, the reflection factor of
the rear-view mirror is automati-
cally changed to
reduce the glare.
Normally, use the automatic mo
de. When the switch (1) is
pressed, the indicator (2) illu
minates and the reflection factor
of the mirror is automatically changed.NOTE●
Do not hang items on, or spray glass cleaner on the sensor (3), as reduced sensitivity could result.
1- Normal 2- Anti-glare
BK-BK2008E1ENUK.en-uk-Section7.fm Page
10 Wednesday, January 9, 2008 4:36 PM
Page 213 of 538
Starting and driving
4-11
4
Outside rear-view mirrors
E00600900484
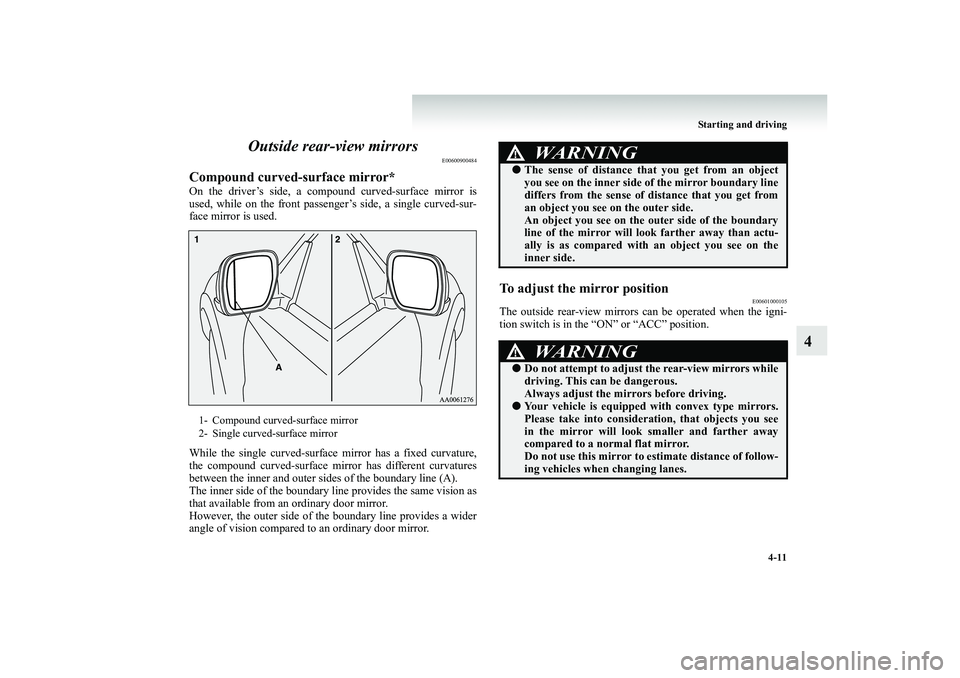
Compound curved-surface mirror*On the driver’s side, a compound curved-surface mirror is used, while on the front passenger’s side, a single curved-sur- face mirror is used. While the single curved-surface
mirror has a fixed curvature,
the compound curved-surface mirr
or has different curvatures
between the inner and outer sides of the boundary line (A).The inner side of the boundary line provides the same vision as that available from an ordinary door mirror. However, the outer side of the boundary line provides a widerangle of vision compared to an ordinary door mirror.
To adjust the mirror position
E00601000105
The outside rear-view mirrors can
be operated when the igni-
tion switch is in the “ON” or “ACC” position.
1- Compound curved-surface mirror 2- Single curved-surface mirror
WARNING
!●
The sense of distance that
you get from an object
you see on the inner side of
the mirror boundary line
differs from the sense of distance that you get from an object you see on the outer side. An object you see on the
outer side of the boundary
line of the mirror will look farther away than actu- ally is as compared with
an object you see on the
inner side.WARNING
!●
Do not attempt to adjust the rear-view mirrors while driving. This can be dangerous. Always adjust the mirrors before driving.
●
Your vehicle is equipped
with convex type mirrors.
Please take into considera
tion, that objects you see
in the mirror will look
smaller and farther away
compared to a normal flat mirror. Do not use this mirror to estimate distance of follow- ing vehicles when changing lanes.
BK-BK2008E1ENUK.en-uk-Section7.fm Page
11 Wednesday, January 9, 2008 4:36 PM
Page 214 of 538
4-12 Starting and driving
4
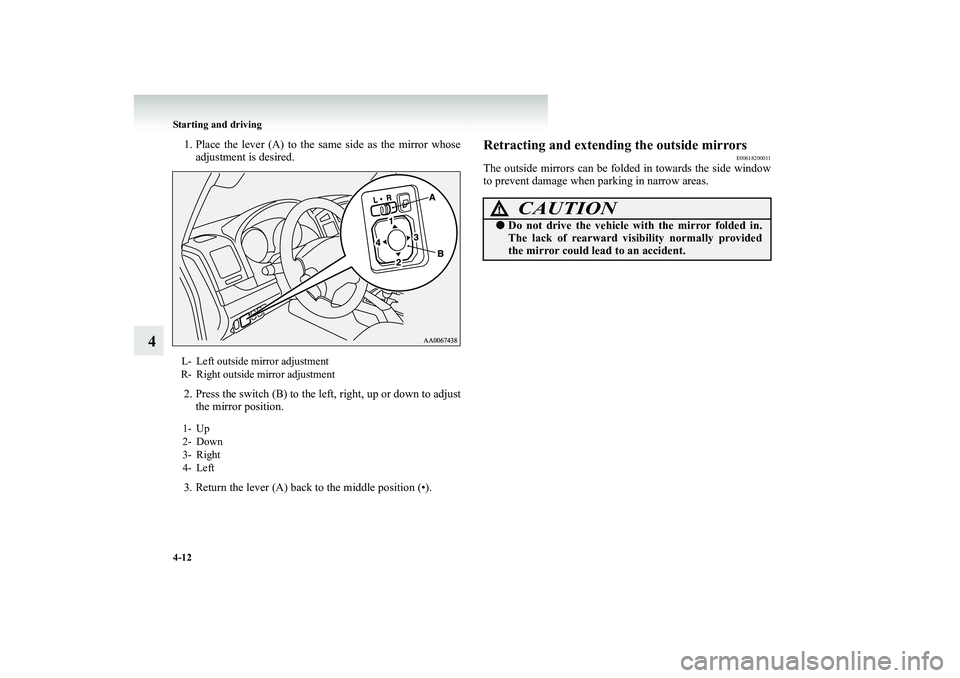
1. Place the lever (A) to the sa
me side as the mirror whose
adjustment is desired.
2. Press the switch (B) to the left, right, up or down to adjust
the mirror position.
3. Return the lever (A) back to the middle position (•).
Retracting and extending the outside mirrors
E00618200011
The outside mirrors can be folded in towards the side window to prevent damage when
parking in narrow areas.
L- Left outside mirror adjustment R- Right outside mirror adjustment 1- Up 2- Down3- Right 4- Left
CAUTION
!●
Do not drive the vehicle wi
th the mirror folded in.
The lack of rearward visibility normally provided the mirror could lead
to an accident.
BK-BK2008E1ENUK.en-uk-Section7.fm Page
12 Wednesday, January 9, 2008 4:36 PM
Page 215 of 538
Starting and driving
4-13
4
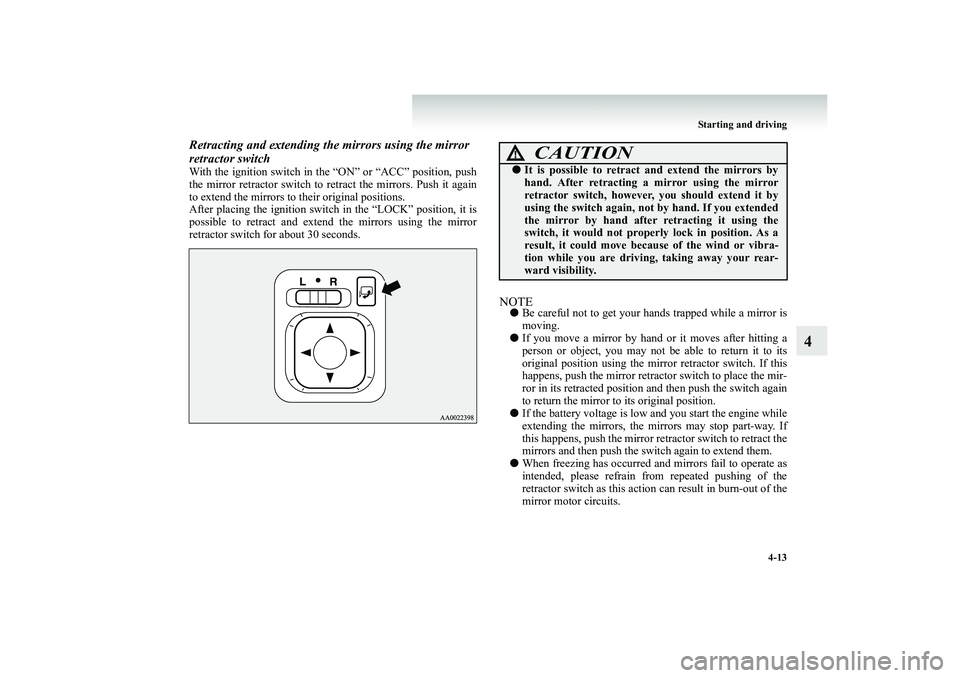
Retracting and extending the mirrors using the mirror retractor switchWith the ignition switch in the “ON” or “ACC” position, push the mirror retractor switch to retract the mirrors. Push it again to extend the mirrors to their original positions. After placing the ignition switch in the “LOCK” position, it ispossible to retract and extend the mirrors using the mirror retractor switch for about 30 seconds.
NOTE●
Be careful not to get your hands trapped while a mirror is moving.
●
If you move a mirror by hand or it moves after hitting a person or object, you may not be able to return it to its original position using the mirr
or retractor switch. If this
happens, push the mirror retract
or switch to place the mir-
ror in its retracted position a
nd then push the switch again
to return the mirror to its original position.
●
If the battery voltage is low
and you start the engine while
extending the mirrors, the mirrors may stop part-way. If this happens, push the mirror retractor switch to retract themirrors and then push the switch again to extend them.
●
When freezing has occurred an
d mirrors fail to operate as
intended, please refrain from repeated pushing of theretractor switch as this action
can result in burn-out of the
mirror motor circuits.
CAUTION
!●
It is possible to retract and extend the mirrors by hand. After retracting a mirror using the mirrorretractor switch, however, you should extend it by using the switch again, not by hand. If you extended the mirror by hand after retracting it using theswitch, it would not properly lock in position. As a result, it could move beca
use of the wind or vibra-
tion while you are driving, taking away your rear-ward visibility.
BK-BK2008E1ENUK.en-uk-Section7.fm Page
13 Wednesday, January 9, 2008 4:36 PM
Page 216 of 538

4-14 Starting and driving
4
Automatic extension of mirrorsIf the engine is stopped and st
arted with the mirrors retracted,
the mirrors automatically extend
for safety when the vehicle
speed reaches 30 km/h (19 mph).Heated mirror*
E00601200312
To demist or defrost the outside rear-view mirrors, press the rear window demister switch. The indication lamp (C) will illuminate while the demister is on.The heater will be turned off automatically in about 20 minutes.
Ignition switch
E00601400822
LOCKThe engine is stopped and the steering wheel locked. The keycan only be inserted and removed in this position.ACCThe engine is stopped, but the
electrical devices such as the
radio and cigarette lighter can be operated.ONThe engine is running, and al
l the vehicle’s electrical devices
can be operated.STARTThe starter motor operates. After
the engine has started, release
the key and it will automatically return to the “ON” position.Vehicles with M/T Vehicles with A/T
BK-BK2008E1ENUK.en-uk-Section7.fm Page
14 Wednesday, January 9, 2008 4:36 PM
Page 217 of 538
Starting and driving
4-15
4
NOTE●
For vehicles equipped with Daytime Running Lamps, when the ignition switch is in the “ON” position, the headlamp low beams etc. are turned on. Refer to “Headlamps” on page 3-58.
●
Your vehicle is equipped wi
th an electronic immobilizer.
To start the engine, the ID code which the transponder inside the key sends must match the one registered to theimmobilizer computer. Refer to “Electronic immobilizer” on page 1-3.
Ignition switch illuminationIn the situations listed below, the ignition switch illumination comes on to facilitate insertion or removal of the ignition key.●
When any door or the backdoor is opened, the ignition switch illumination comes on. When it is closed, the igni- tion switch illumination becomes steadily dimmer untilcompletely going off about 15 seconds later.
●
When the ignition key is removed with all the doors and the backdoor closed, the ignition switch illuminationcomes on and stays on
for about 15 seconds.
The ignition switch illumination immediately goes off if any of the following actions is taken while it is on. ●
All the doors and the backdoor are closed, and the ignition switch is turned to the “ON” position.
●
All the doors and the backdoor
are locked using the cen-
tral door locking function.
●
All the doors and the backdoo
r are locked using the key-
less entry system (if so equipped).
BK-BK2008E1ENUK.en-uk-Section7.fm Page
15 Wednesday, January 9, 2008 4:36 PM
Page 218 of 538
4-16 Starting and driving
4
NOTE●
It is possible to adjust the period of ignition switch illumi- nation (the period until the ignition switch illumination goes off). For details, we recommend you to consult a MITSUBISHI MOTORS Auth
orized Service Point.
●
If the illumination period of the room & map lamps or rear personal lamps (the period until these lamps go off) is adjusted, the period of ignition switch illumination (theperiod until the ignition switch illumination goes off) will automatically be changed at the same time. If the illumination period of the room & map lamps or rearpersonal lamps is set to zero (in other words, the illumina- tion keep-on function is deactivated), the ignition switch illumination will not come on when the ignition switch isremoved. For information, we recommend you to consult a MIT- SUBISHI MOTORS Authorized Service Point.
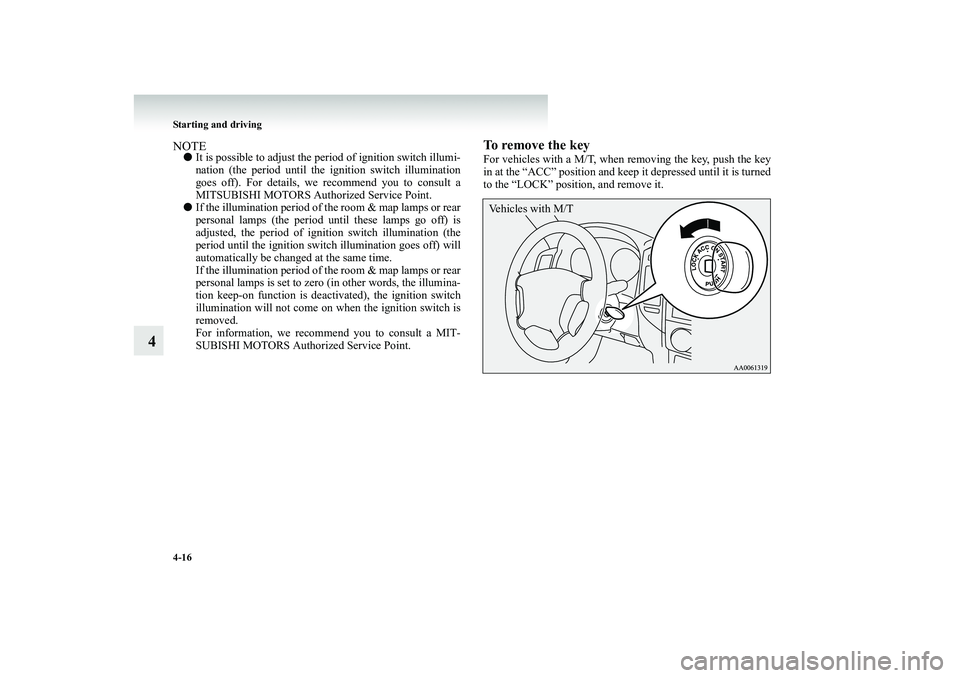
To remove the keyFor vehicles with a M/T, when removing the key, push the keyin at the “ACC” position and keep it depressed until it is turnedto the “LOCK” position, and remove it.Vehicles with M/T
BK-BK2008E1ENUK.en-uk-Section7.fm Page
16 Wednesday, January 9, 2008 4:36 PM
Page 219 of 538
Starting and driving
4-17
4
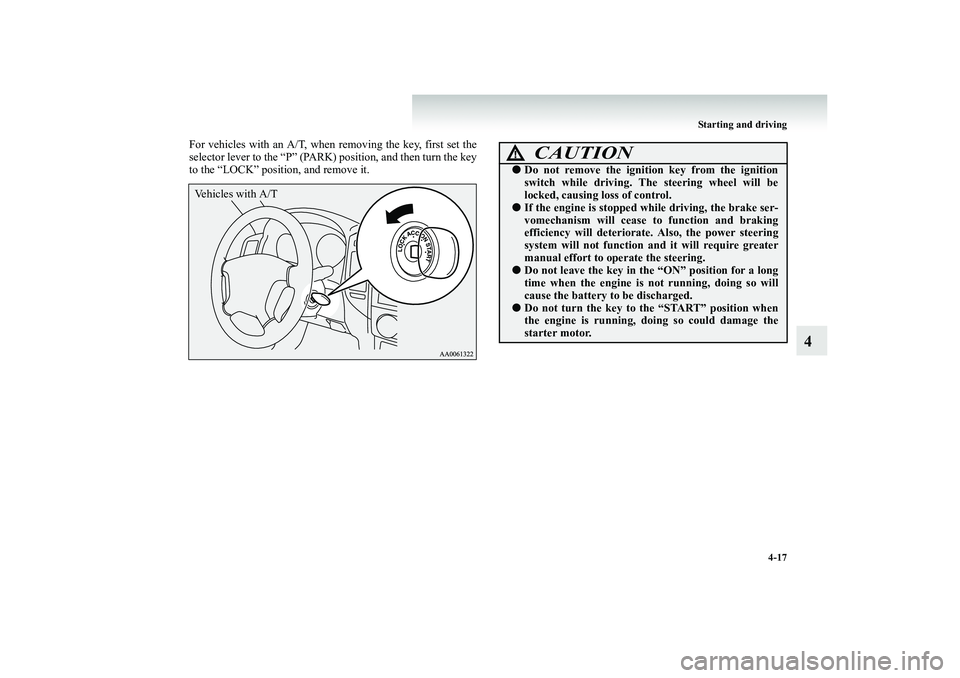
For vehicles with an A/T, when
removing the key, first set the
selector lever to the “P” (PARK) position, and then turn the key to the “LOCK” position, and remove it.Vehicles with A/T
CAUTION
!●
Do not remove the ignition key from the ignition switch while driving.
The steering wheel will be
locked, causing loss of control.
●
If the engine is stopped wh
ile driving, the brake ser-
vomechanism will cease to function and brakingefficiency will deteriorat
e. Also, the power steering
system will not function and it will require greater manual effort to op
erate the steering.
●
Do not leave the key in the “ON” position for a long time when the engine is not running, doing so will cause the battery to be discharged.
●
Do not turn the key to the “START” position when the engine is running, doing so could damage thestarter motor.
BK-BK2008E1ENUK.en-uk-Section7.fm Page
17 Wednesday, January 9, 2008 4:36 PM
Page 220 of 538
4-18 Starting and driving
4
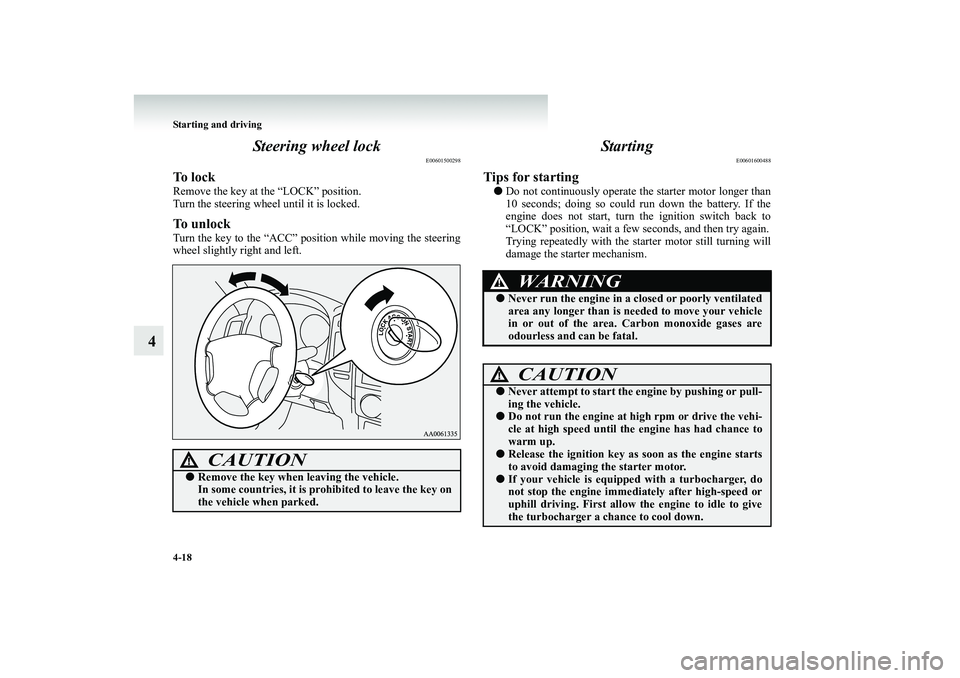
Steering wheel lock
E00601500298
To l o c kRemove the key at the “LOCK” position. Turn the steering wheel until it is locked.To unlockTurn the key to the “ACC” position while moving the steering wheel slightly right and left.
Starting
E00601600488
Tips for starting●
Do not continuously operate the starter motor longer than 10 seconds; doing so could run down the battery. If the engine does not start, turn the ignition switch back to“LOCK” position, wait a few seconds, and then try again. Trying repeatedly with the starter motor still turning will damage the starter mechanism.
CAUTION
!●
Remove the key when leaving the vehicle. In some countries, it is pr
ohibited to leave the key on
the vehicle when parked.
WARNING
!●
Never run the engine in a cl
osed or poorly ventilated
area any longer than is needed to move your vehiclein or out of the area. Carbon monoxide gases are odourless and can be fatal.CAUTION
!●
Never attempt to start the engine by pushing or pull- ing the vehicle.
●
Do not run the engine at hi
gh rpm or drive the vehi-
cle at high speed until th
e engine has had chance to
warm up.
●
Release the ignition key as
soon as the engine starts
to avoid damaging the starter motor.
●
If your vehicle is equipp
ed with a turbocharger, do
not stop the engine immedi
ately after high-speed or
uphill driving. First allow the engine to idle to give the turbocharger a chance to cool down.
BK-BK2008E1ENUK.en-uk-Section7.fm Page
18 Wednesday, January 9, 2008 4:36 PM