NISSAN 350Z 2007 Z33 Exterior And Interior Owner's Guide
Manufacturer: NISSAN, Model Year: 2007, Model line: 350Z, Model: NISSAN 350Z 2007 Z33Pages: 50, PDF Size: 2.09 MB
Page 31 of 50
ROOF SIDE MOLDING
EI-31
C
D
E
F
G
H
J
K
L
MA
B
EI
Revision: 2006 November2007 350Z
ROOF SIDE MOLDINGPFP:73854
Removal and Installation (for Coupe Models)NIS0008O
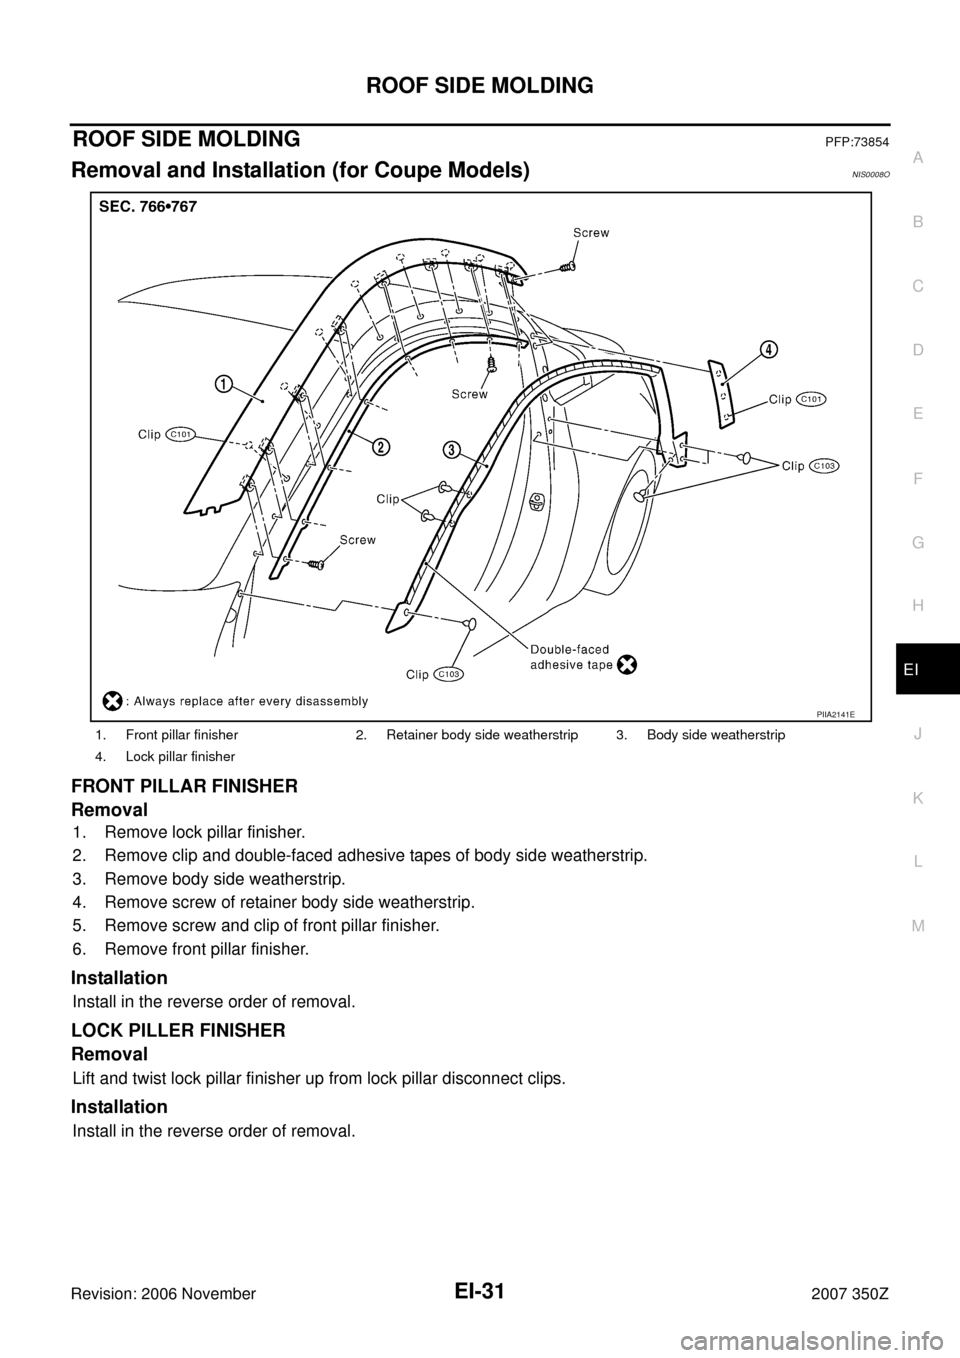
FRONT PILLAR FINISHER
Removal
1. Remove lock pillar finisher.
2. Remove clip and double-faced adhesive tapes of body side weatherstrip.
3. Remove body side weatherstrip.
4. Remove screw of retainer body side weatherstrip.
5. Remove screw and clip of front pillar finisher.
6. Remove front pillar finisher.
Installation
Install in the reverse order of removal.
LOCK PILLER FINISHER
Removal
Lift and twist lock pillar finisher up from lock pillar disconnect clips.
Installation
Install in the reverse order of removal.
1. Front pillar finisher 2. Retainer body side weatherstrip 3. Body side weatherstrip
4. Lock pillar finisher
PIIA2141E
Page 32 of 50
EI-32
ROOF SIDE MOLDING
Revision: 2006 November2007 350Z
Removal and Installation (for Roadster Models)NIS0008P
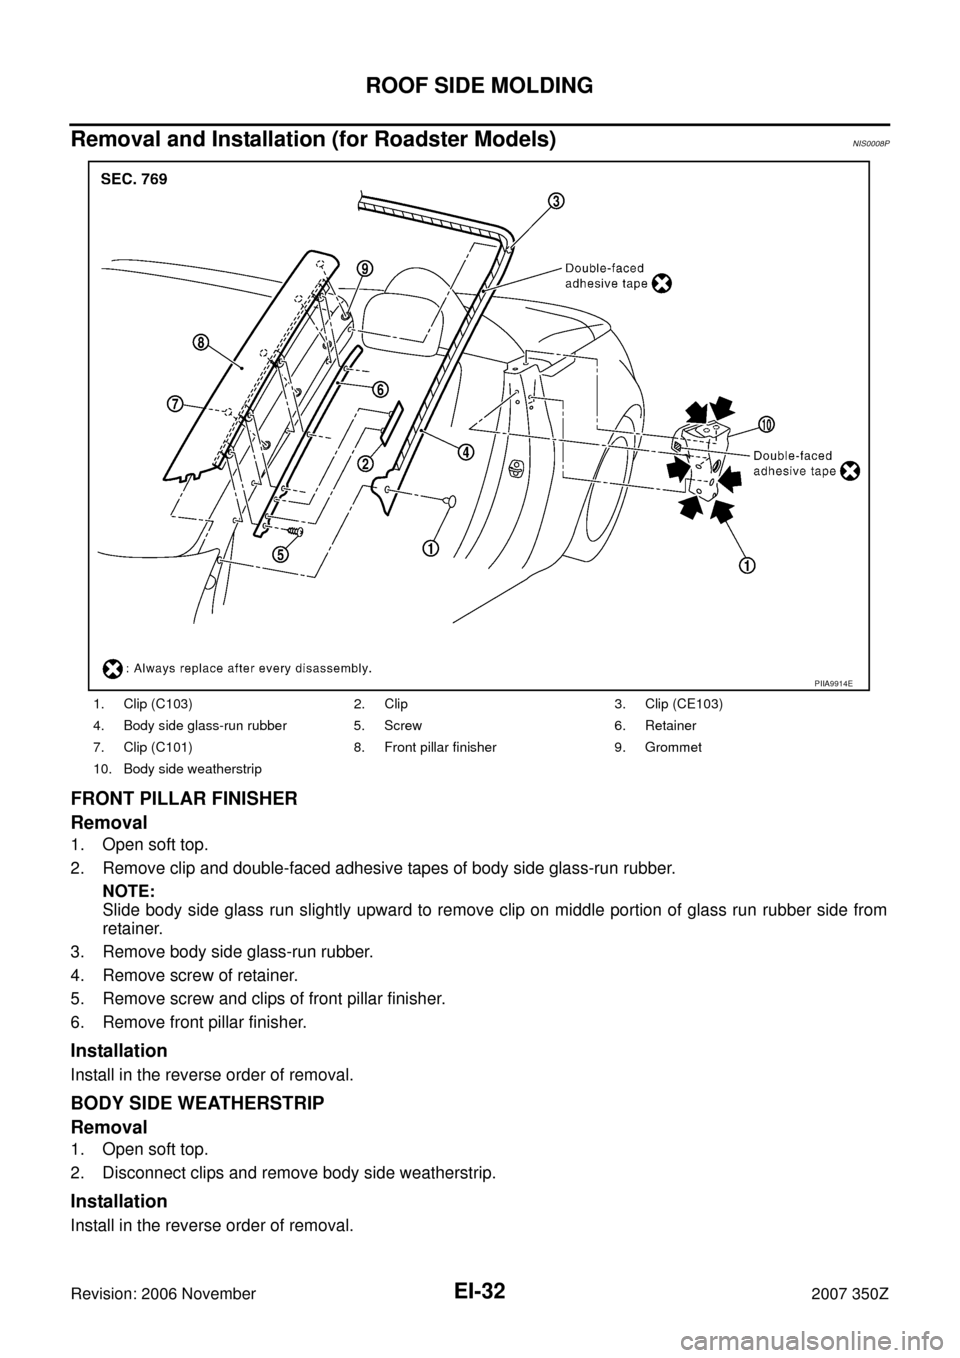
FRONT PILLAR FINISHER
Removal
1. Open soft top.
2. Remove clip and double-faced adhesive tapes of body side glass-run rubber.
NOTE:
Slide body side glass run slightly upward to remove clip on middle portion of glass run rubber side from
retainer.
3. Remove body side glass-run rubber.
4. Remove screw of retainer.
5. Remove screw and clips of front pillar finisher.
6. Remove front pillar finisher.
Installation
Install in the reverse order of removal.
BODY SIDE WEATHERSTRIP
Removal
1. Open soft top.
2. Disconnect clips and remove body side weatherstrip.
Installation
Install in the reverse order of removal.
1. Clip (C103) 2. Clip 3. Clip (CE103)
4. Body side glass-run rubber 5. Screw 6. Retainer
7. Clip (C101) 8. Front pillar finisher 9. Grommet
10. Body side weatherstrip
PIIA9914E
Page 33 of 50
DOOR FINISHER
EI-33
C
D
E
F
G
H
J
K
L
MA
B
EI
Revision: 2006 November2007 350Z
DOOR FINISHERPFP:80900
Removal and InstallationNIS0008Q
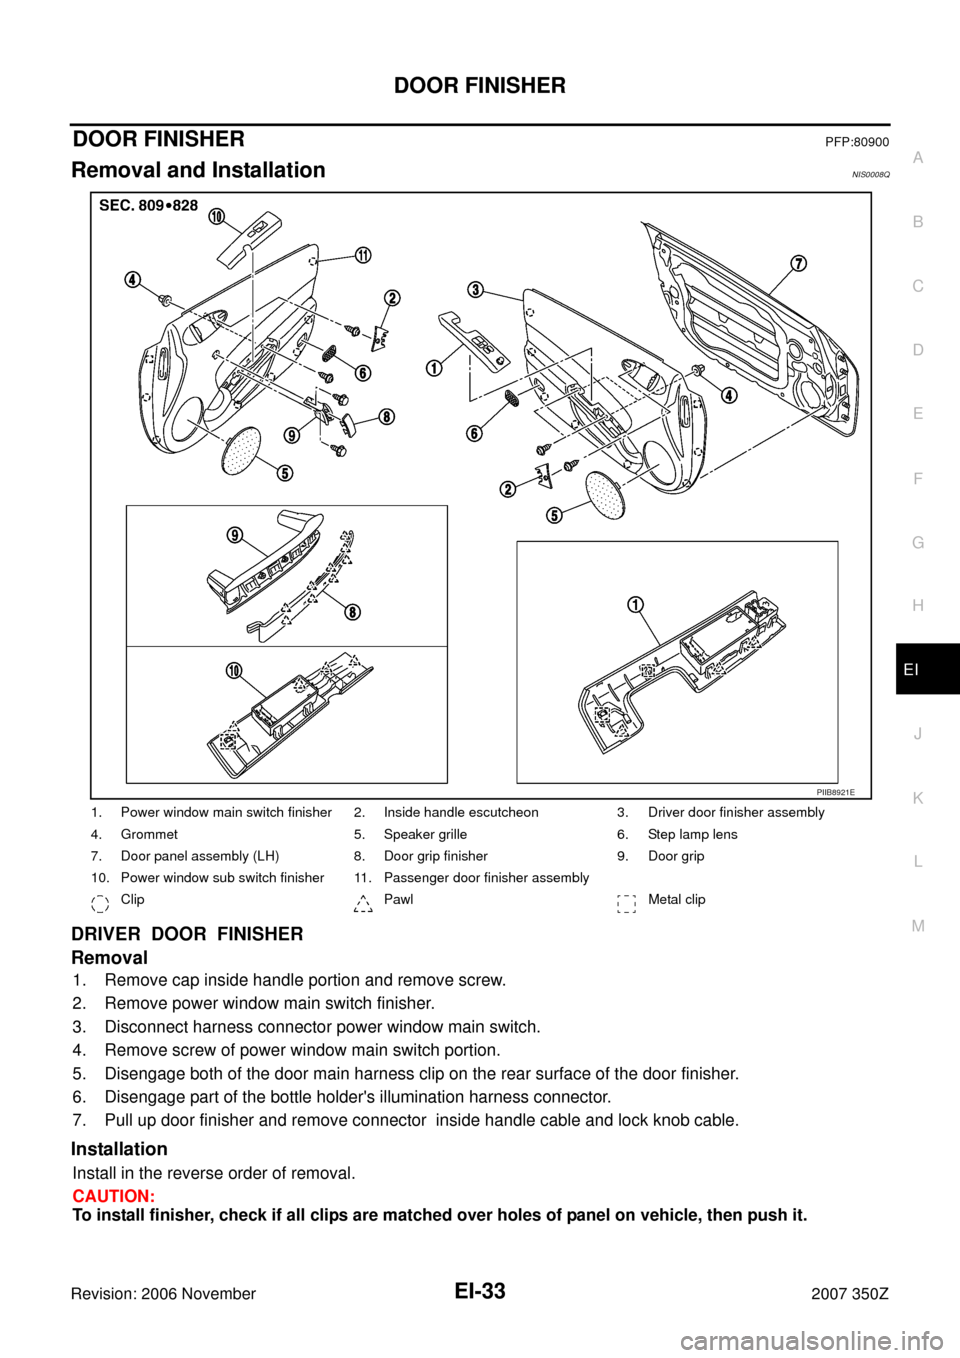
DRIVER DOOR FINISHER
Removal
1. Remove cap inside handle portion and remove screw.
2. Remove power window main switch finisher.
3. Disconnect harness connector power window main switch.
4. Remove screw of power window main switch portion.
5. Disengage both of the door main harness clip on the rear surface of the door finisher.
6. Disengage part of the bottle holder's illumination harness connector.
7. Pull up door finisher and remove connector inside handle cable and lock knob cable.
Installation
Install in the reverse order of removal.
CAUTION:
To install finisher, check if all clips are matched over holes of panel on vehicle, then push it.
1. Power window main switch finisher 2. Inside handle escutcheon 3. Driver door finisher assembly
4. Grommet 5. Speaker grille 6. Step lamp lens
7. Door panel assembly (LH) 8. Door grip finisher 9. Door grip
10. Power window sub switch finisher 11. Passenger door finisher assembly
Clip Pawl Metal clip
PIIB8921E
Page 34 of 50

EI-34
DOOR FINISHER
Revision: 2006 November2007 350Z
PASSENGER DOOR FINISHER
Removal
1. Remove cap inside handle portion and remove screw.
2. Insert taping flat-bladed screwdriver into edge portion, disconnect pawls, and remove door grip finisher.
3. Remove screw of door grip portion.
4. Remove power window sub switch finisher.
5. Disconnect harness connector power window sub switch.
6. Disengage both of the door main harness clip on the rear surface of the door finisher.
7. Disengage part of the bottle holder's illumination harness connector.
8. Remove screw of power window sub switch portion.
9. Pull up door finisher and remove connector inside handle cable and lock knob cable.
Installation
Install in the reverse order of removal.
CAUTION:
To install finisher, check if all clips are matched over holes of panel on vehicle, then push it.
Page 35 of 50
BODY SIDE TRIM
EI-35
C
D
E
F
G
H
J
K
L
MA
B
EI
Revision: 2006 November2007 350Z
BODY SIDE TRIMPFP:76913
Removal and Installation (for Coupe Models)NIS0008R
CAUTION:
Wrap the tip of flat-bladed screwdriver with a cloth when removing metal clips from garnishes.
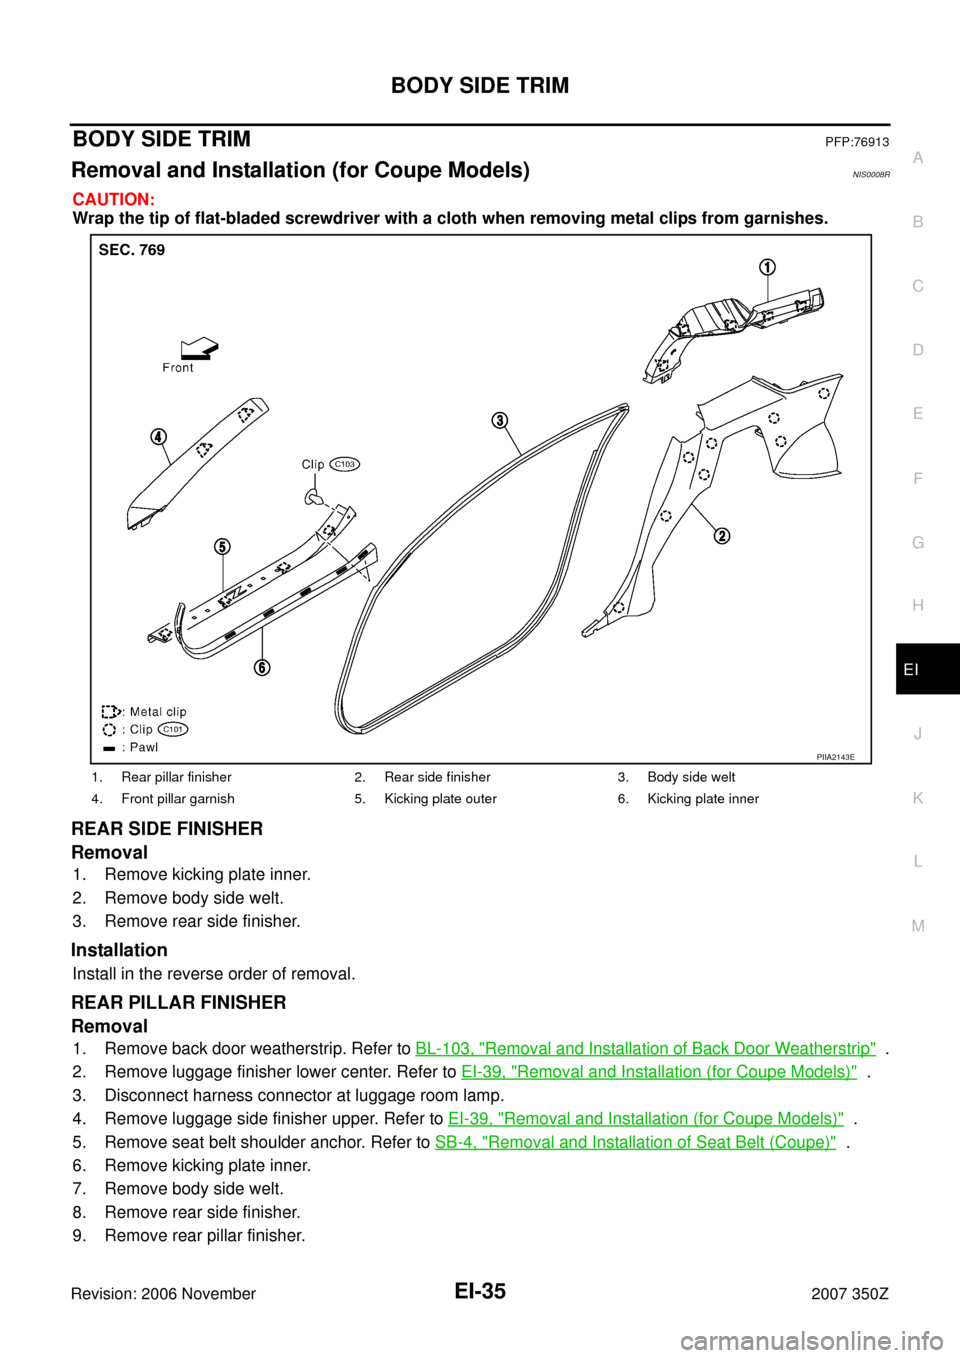
REAR SIDE FINISHER
Removal
1. Remove kicking plate inner.
2. Remove body side welt.
3. Remove rear side finisher.
Installation
Install in the reverse order of removal.
REAR PILLAR FINISHER
Removal
1. Remove back door weatherstrip. Refer to BL-103, "Removal and Installation of Back Door Weatherstrip" .
2. Remove luggage finisher lower center. Refer to EI-39, "
Removal and Installation (for Coupe Models)" .
3. Disconnect harness connector at luggage room lamp.
4. Remove luggage side finisher upper. Refer to EI-39, "
Removal and Installation (for Coupe Models)" .
5. Remove seat belt shoulder anchor. Refer to SB-4, "
Removal and Installation of Seat Belt (Coupe)" .
6. Remove kicking plate inner.
7. Remove body side welt.
8. Remove rear side finisher.
9. Remove rear pillar finisher.
1. Rear pillar finisher 2. Rear side finisher 3. Body side welt
4. Front pillar garnish 5. Kicking plate outer 6. Kicking plate inner
PIIA2143E
Page 36 of 50

EI-36
BODY SIDE TRIM
Revision: 2006 November2007 350Z
Installation
Install in the reverse order of removal.
FRONT PILLAR GARNISH
Removal
1. Remove body side welt.
2. Remove front pillar garnish.
Installation
Install in the reverse order of removal.
KICKING PLATE
Removal
1. Remove kicking plate inner.
2. Remove body side welt.
3. Remove clip of kicking plate outer.
4. Remove kicking plate outer.
Installation
Install in the reverse order of removal.
BODY SIDE WELT
Removal
1. Remove kicking plate inner.
2. Remove body side welt.
Installation
Install in the reverse order of removal.
CAUTION:
To install, check if all clips are matched over holes of panel on vehicle, then push on.
Page 37 of 50
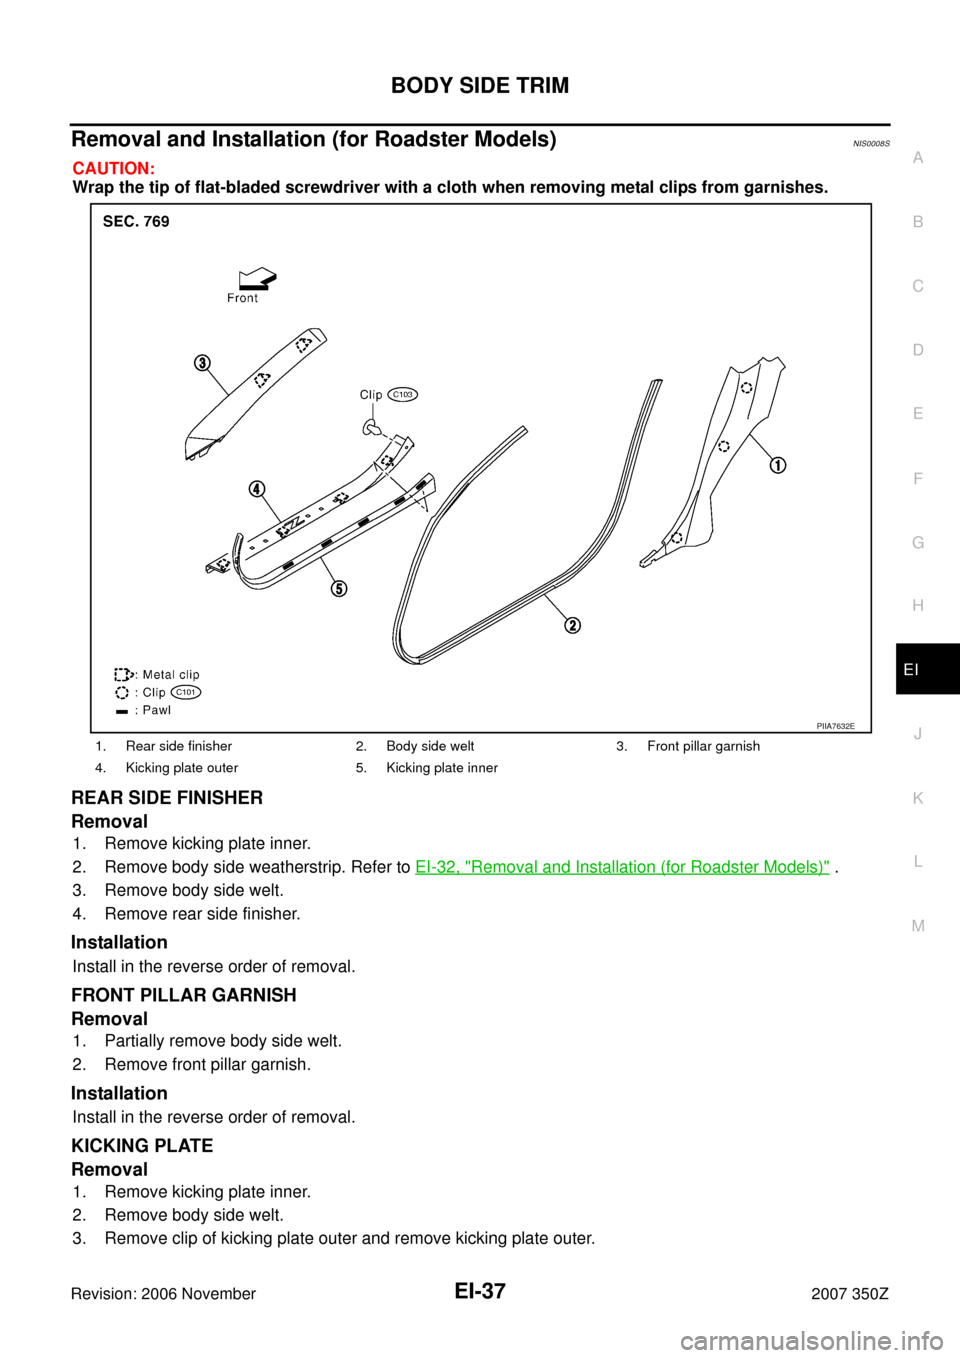
BODY SIDE TRIM
EI-37
C
D
E
F
G
H
J
K
L
MA
B
EI
Revision: 2006 November2007 350Z
Removal and Installation (for Roadster Models)NIS0008S
CAUTION:
Wrap the tip of flat-bladed screwdriver with a cloth when removing metal clips from garnishes.
REAR SIDE FINISHER
Removal
1. Remove kicking plate inner.
2. Remove body side weatherstrip. Refer to EI-32, "
Removal and Installation (for Roadster Models)" .
3. Remove body side welt.
4. Remove rear side finisher.
Installation
Install in the reverse order of removal.
FRONT PILLAR GARNISH
Removal
1. Partially remove body side welt.
2. Remove front pillar garnish.
Installation
Install in the reverse order of removal.
KICKING PLATE
Removal
1. Remove kicking plate inner.
2. Remove body side welt.
3. Remove clip of kicking plate outer and remove kicking plate outer.
1. Rear side finisher 2. Body side welt 3. Front pillar garnish
4. Kicking plate outer 5. Kicking plate inner
PIIA7632E
Page 38 of 50

EI-38
BODY SIDE TRIM
Revision: 2006 November2007 350Z
Installation
Install in the reverse order of removal.
BODY SIDE WELT
Removal
1. Remove kicking plate inner.
2. Remove body side welt.
Installation
Install in the reverse order of removal.
CAUTION:
To install, check if all clips are matched over holes of panel on vehicle, then push on.
Page 39 of 50
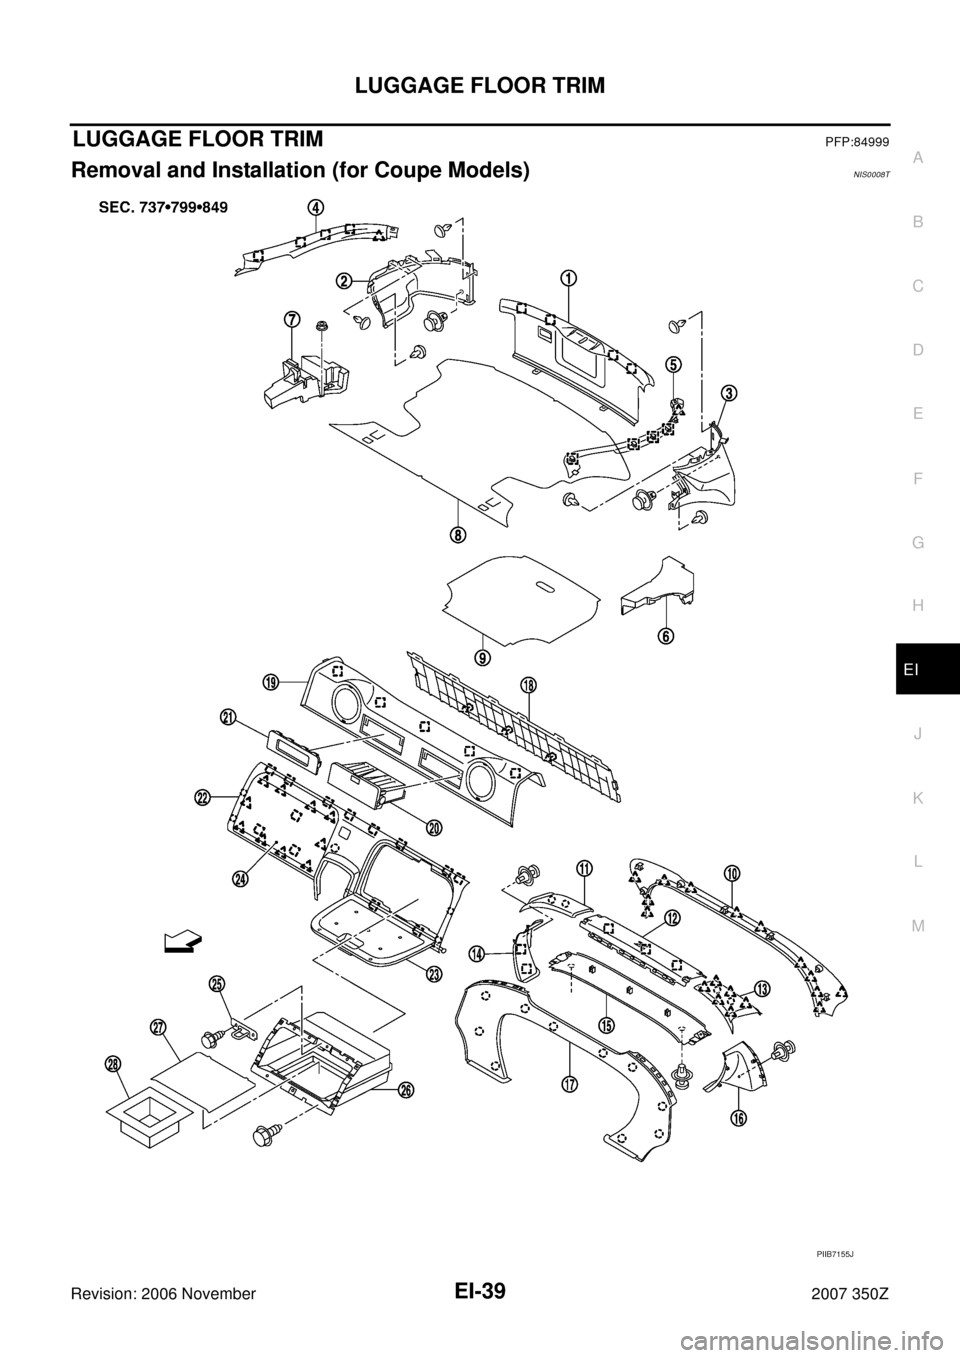
LUGGAGE FLOOR TRIM
EI-39
C
D
E
F
G
H
J
K
L
MA
B
EI
Revision: 2006 November2007 350Z
LUGGAGE FLOOR TRIMPFP:84999
Removal and Installation (for Coupe Models)NIS0008T
PIIB7155J
Page 40 of 50

EI-40
LUGGAGE FLOOR TRIM
Revision: 2006 November2007 350Z
LUGGAGE FLOOR TRIM
Removal
1. Remove back door welt. Refer to EI-47, "BACK DOOR" .
2. Remove luggage floor carpet.
3. Remove spare tire cover.
4. Remove luggage finisher lower (center).
5. Remove luggage side finisher upper (RH/LH).
6. Remove strut cover upper (RH/LH).
7. Remove strut cover rear.
8. Remove clip of luggage side finisher lower and remove luggage side finisher lower.
9. Remove strut cover front.
10. Remove strut cover upper (center).
11. Remove clip of strut cover lower (RH/LH) and remove strut cover lower.
12. Remove strut cover lower (center).
Installation
Install in the reverse order of removal.
REAR FLOOR BOX
Removal
1. Remove kicking plate inner. Refer to EI-35, "BODY SIDE TRIM" .
2. Remove body side welt. Refer to EI-35, "
BODY SIDE TRIM" .
3. Remove rear side finisher. Refer to EI-35, "
BODY SIDE TRIM" .
4. Remove console box. Refer to IP-10, "
INSTRUMENT PANEL ASSEMBLY" .
5. Remove screw of rear floor box and remove rear floor box.
6. Remove pins of rear floor box lid and remove rear floor box lid.
7. Remove luggage floor finisher mask.
8. Remove screws of rear floor box lock and remove rear floor box lock.
9. Remove tray.
Installation
Install in the reverse order of removal.
CAUTION:
To install, check if all clips are matched over holes panel on vehicle, then push on.
1. Luggage finisher lower (center) 2. Luggage side finisher lower (RH) 3. Luggage side finisher lower (LH)
4. Luggage side finisher upper (RH) 5. Luggage side finisher upper (LH) 6. Trunk side box
7. Tool box 8. Luggage floor carpet 9. Spare tire cover
10. Strut cover rear 11. Strut cover upper (RH) 12. Strut cover upper (center)
13. Strut cover upper (LH) 14. Strut cover lower (RH) 15. Strut cover lower (center)
16. Strut cover lower (LH) 17. Strut cover front 18. Luggage floor finisher upper (rear)
19. Luggage floor finisher upper (front) 20. Rear parcel box 21. Rear parcel escutcheon
22. Luggage floor finisher lower 23. Rear floor box lid 24. Luggage floor finisher mask
25. Rear floor box striker 26. Rear floor box 27. Rear floor box mat
28. Tray Clip Pawl
Metal clip