lock NISSAN ALMERA 2001 Manual PDF
[x] Cancel search | Manufacturer: NISSAN, Model Year: 2001, Model line: ALMERA, Model: NISSAN ALMERA 2001Pages: 2898, PDF Size: 60.76 MB
Page 493 of 2898
Wheel Hub and Knuckle
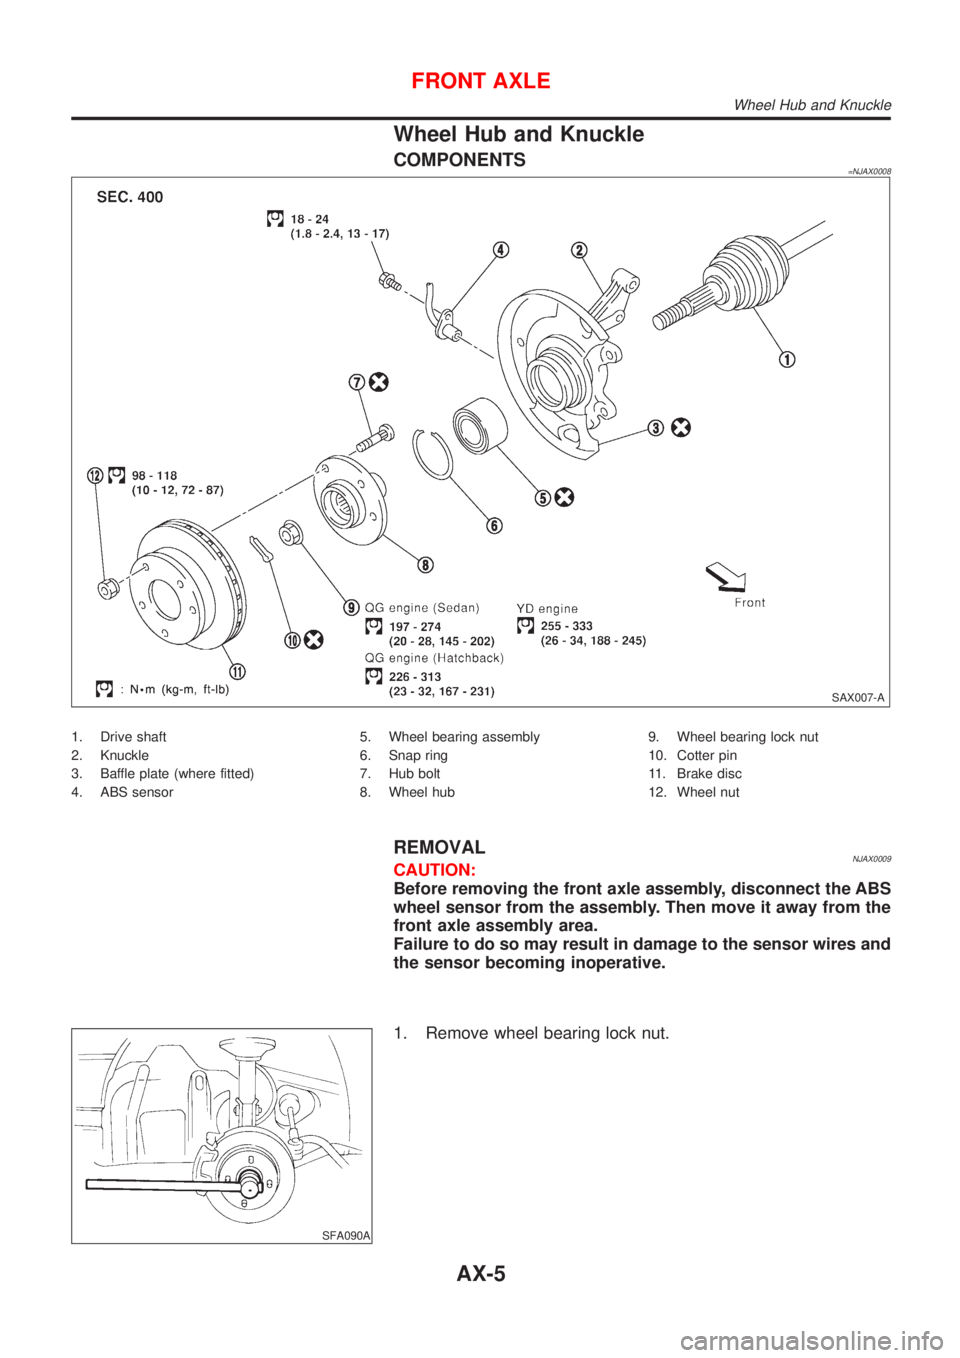
COMPONENTS=NJAX0008
SAX007-A
1. Drive shaft
2. Knuckle
3. Baffle plate (where fitted)
4. ABS sensor5. Wheel bearing assembly
6. Snap ring
7. Hub bolt
8. Wheel hub9. Wheel bearing lock nut
10. Cotter pin
11. Brake disc
12. Wheel nut
REMOVALNJAX0009CAUTION:
Before removing the front axle assembly, disconnect the ABS
wheel sensor from the assembly. Then move it away from the
front axle assembly area.
Failure to do so may result in damage to the sensor wires and
the sensor becoming inoperative.
SFA090A
1. Remove wheel bearing lock nut.
FRONT AXLE
Wheel Hub and Knuckle
AX-5
Page 495 of 2898
SFA114A
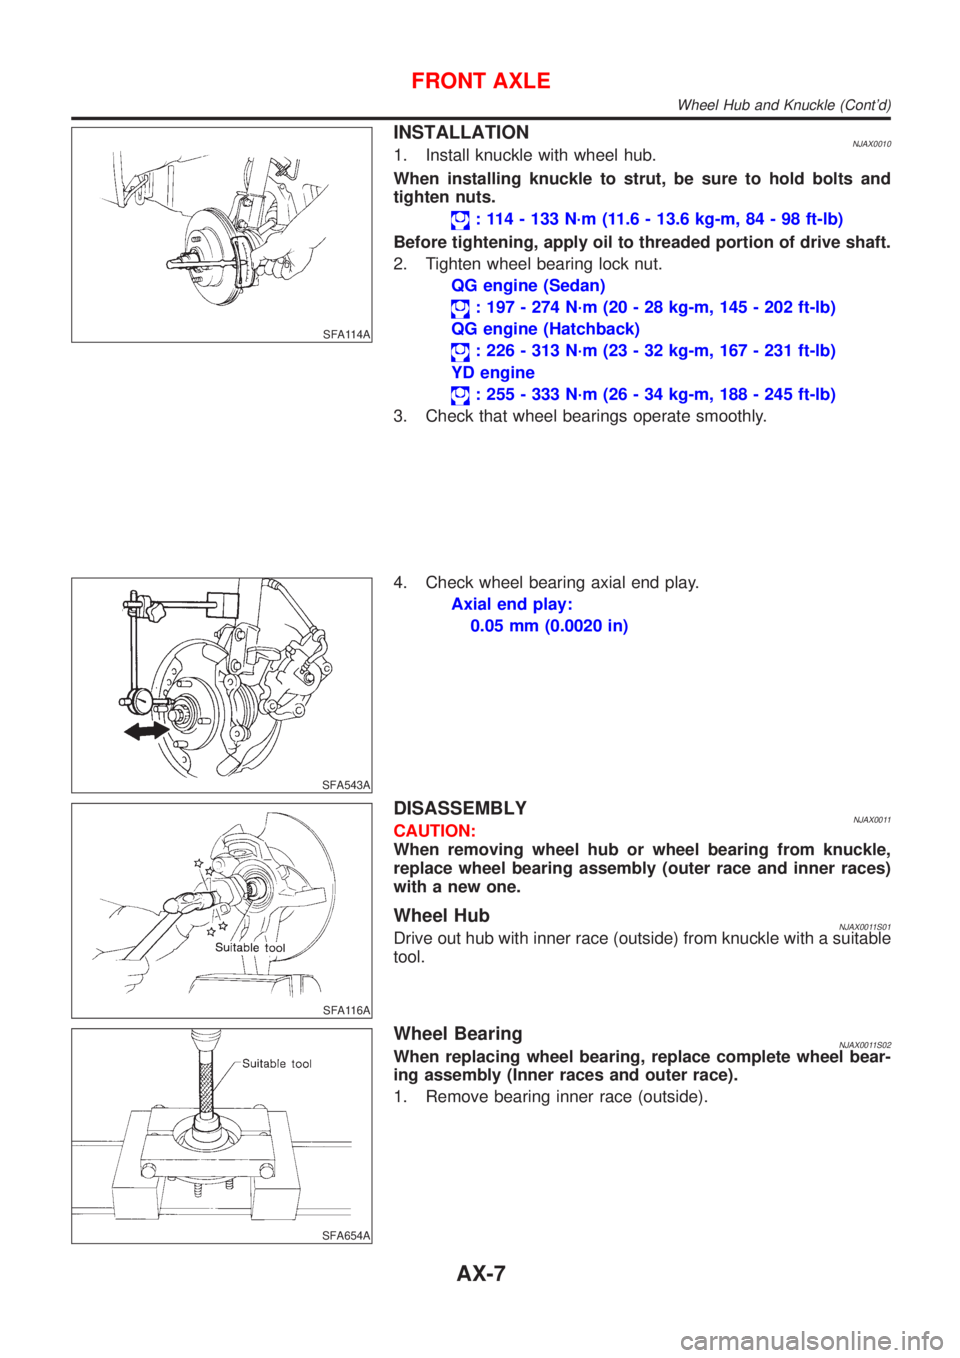
INSTALLATIONNJAX00101. Install knuckle with wheel hub.
When installing knuckle to strut, be sure to hold bolts and
tighten nuts.
: 114 - 133 N´m (11.6 - 13.6 kg-m, 84 - 98 ft-lb)
Before tightening, apply oil to threaded portion of drive shaft.
2. Tighten wheel bearing lock nut.
QG engine (Sedan)
: 197 - 274 N´m (20 - 28 kg-m, 145 - 202 ft-lb)
QG engine (Hatchback)
: 226 - 313 N´m (23 - 32 kg-m, 167 - 231 ft-lb)
YD engine
: 255 - 333 N´m (26 - 34 kg-m, 188 - 245 ft-lb)
3. Check that wheel bearings operate smoothly.
SFA543A
4. Check wheel bearing axial end play.
Axial end play:
0.05 mm (0.0020 in)
SFA116A
DISASSEMBLYNJAX0011CAUTION:
When removing wheel hub or wheel bearing from knuckle,
replace wheel bearing assembly (outer race and inner races)
with a new one.
Wheel HubNJAX0011S01Drive out hub with inner race (outside) from knuckle with a suitable
tool.
SFA654A
Wheel BearingNJAX0011S02When replacing wheel bearing, replace complete wheel bear-
ing assembly (Inner races and outer race).
1. Remove bearing inner race (outside).
FRONT AXLE
Wheel Hub and Knuckle (Cont'd)
AX-7
Page 499 of 2898
SFA090A
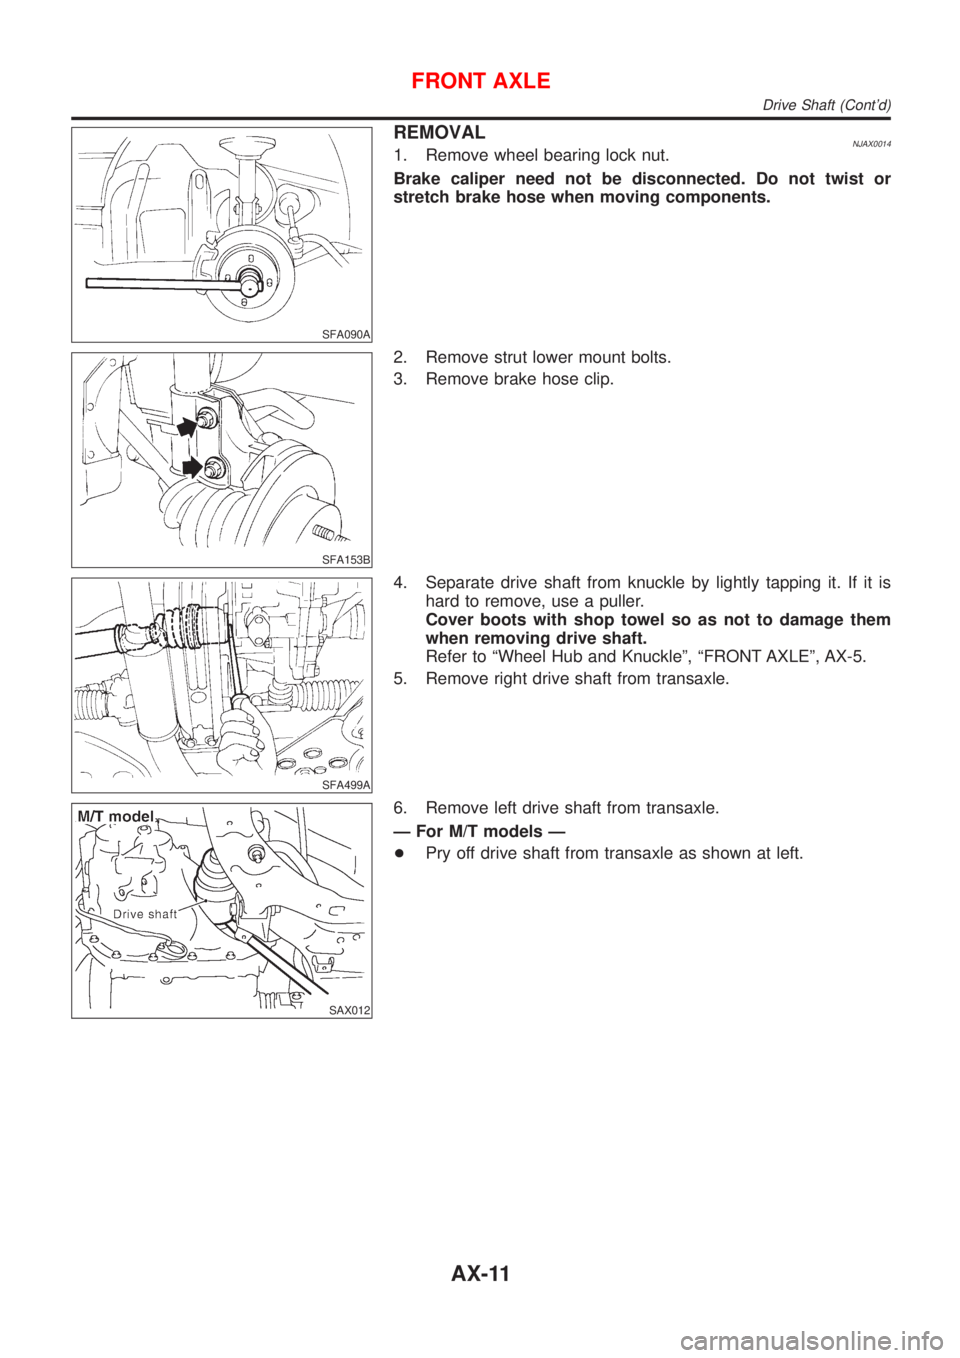
REMOVALNJAX00141. Remove wheel bearing lock nut.
Brake caliper need not be disconnected. Do not twist or
stretch brake hose when moving components.
SFA153B
2. Remove strut lower mount bolts.
3. Remove brake hose clip.
SFA499A
4. Separate drive shaft from knuckle by lightly tapping it. If it is
hard to remove, use a puller.
Cover boots with shop towel so as not to damage them
when removing drive shaft.
Refer to ªWheel Hub and Knuckleº, ªFRONT AXLEº, AX-5.
5. Remove right drive shaft from transaxle.
SAX012
6. Remove left drive shaft from transaxle.
Ð For M/T models Ð
+Pry off drive shaft from transaxle as shown at left.
FRONT AXLE
Drive Shaft (Cont'd)
AX-11
Page 500 of 2898
SFA730
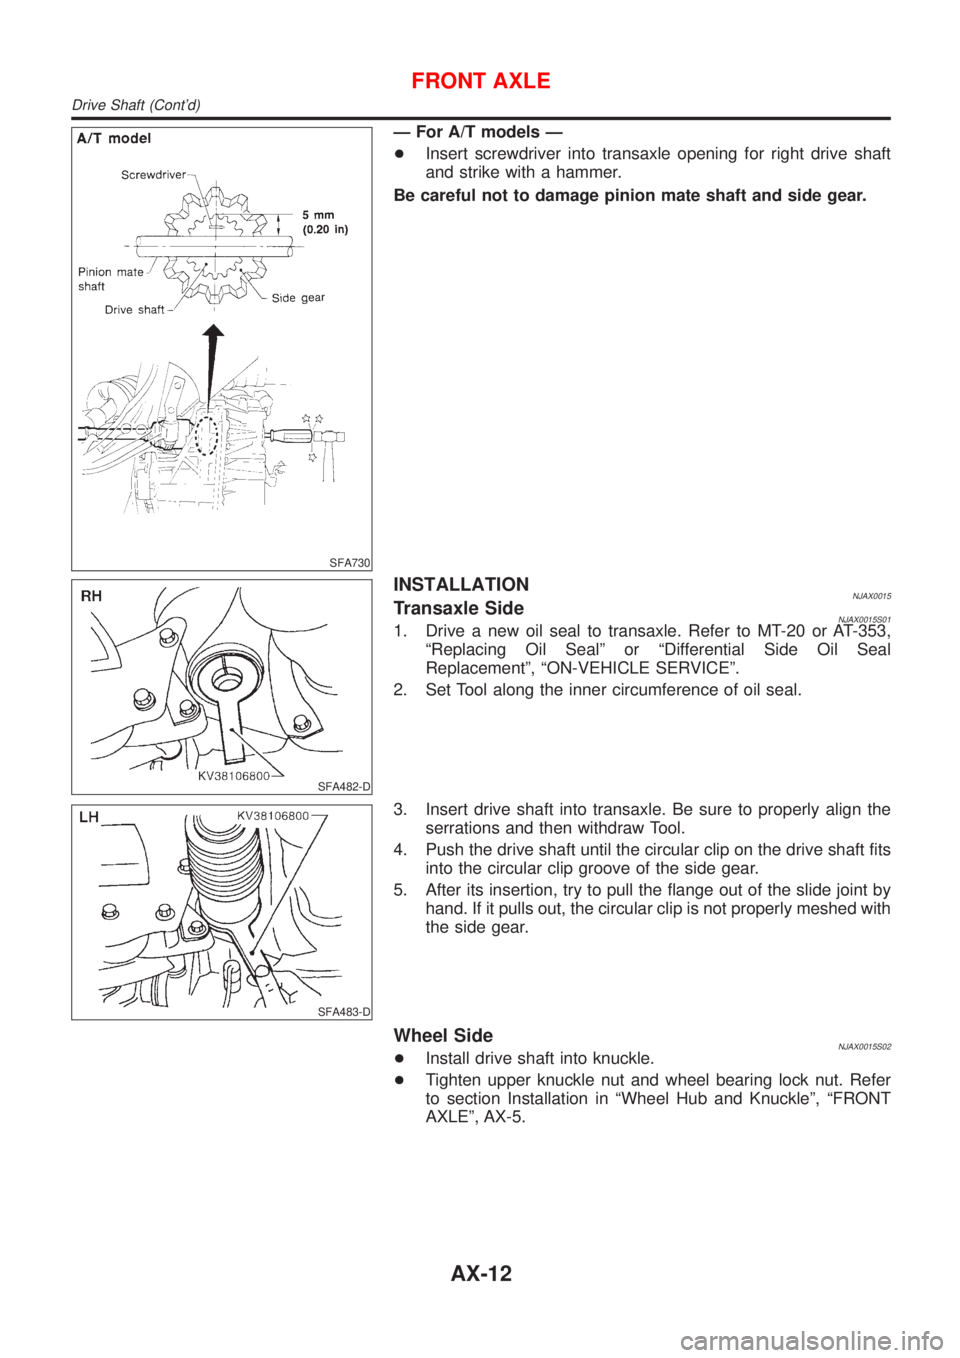
Ð For A/T models Ð
+Insert screwdriver into transaxle opening for right drive shaft
and strike with a hammer.
Be careful not to damage pinion mate shaft and side gear.
SFA482-D
INSTALLATIONNJAX0015Transaxle SideNJAX0015S011. Drive a new oil seal to transaxle. Refer to MT-20 or AT-353,
ªReplacing Oil Sealº or ªDifferential Side Oil Seal
Replacementº, ªON-VEHICLE SERVICEº.
2. Set Tool along the inner circumference of oil seal.
SFA483-D
3. Insert drive shaft into transaxle. Be sure to properly align the
serrations and then withdraw Tool.
4. Push the drive shaft until the circular clip on the drive shaft fits
into the circular clip groove of the side gear.
5. After its insertion, try to pull the flange out of the slide joint by
hand. If it pulls out, the circular clip is not properly meshed with
the side gear.
Wheel SideNJAX0015S02+Install drive shaft into knuckle.
+Tighten upper knuckle nut and wheel bearing lock nut. Refer
to section Installation in ªWheel Hub and Knuckleº, ªFRONT
AXLEº, AX-5.
FRONT AXLE
Drive Shaft (Cont'd)
AX-12
Page 505 of 2898
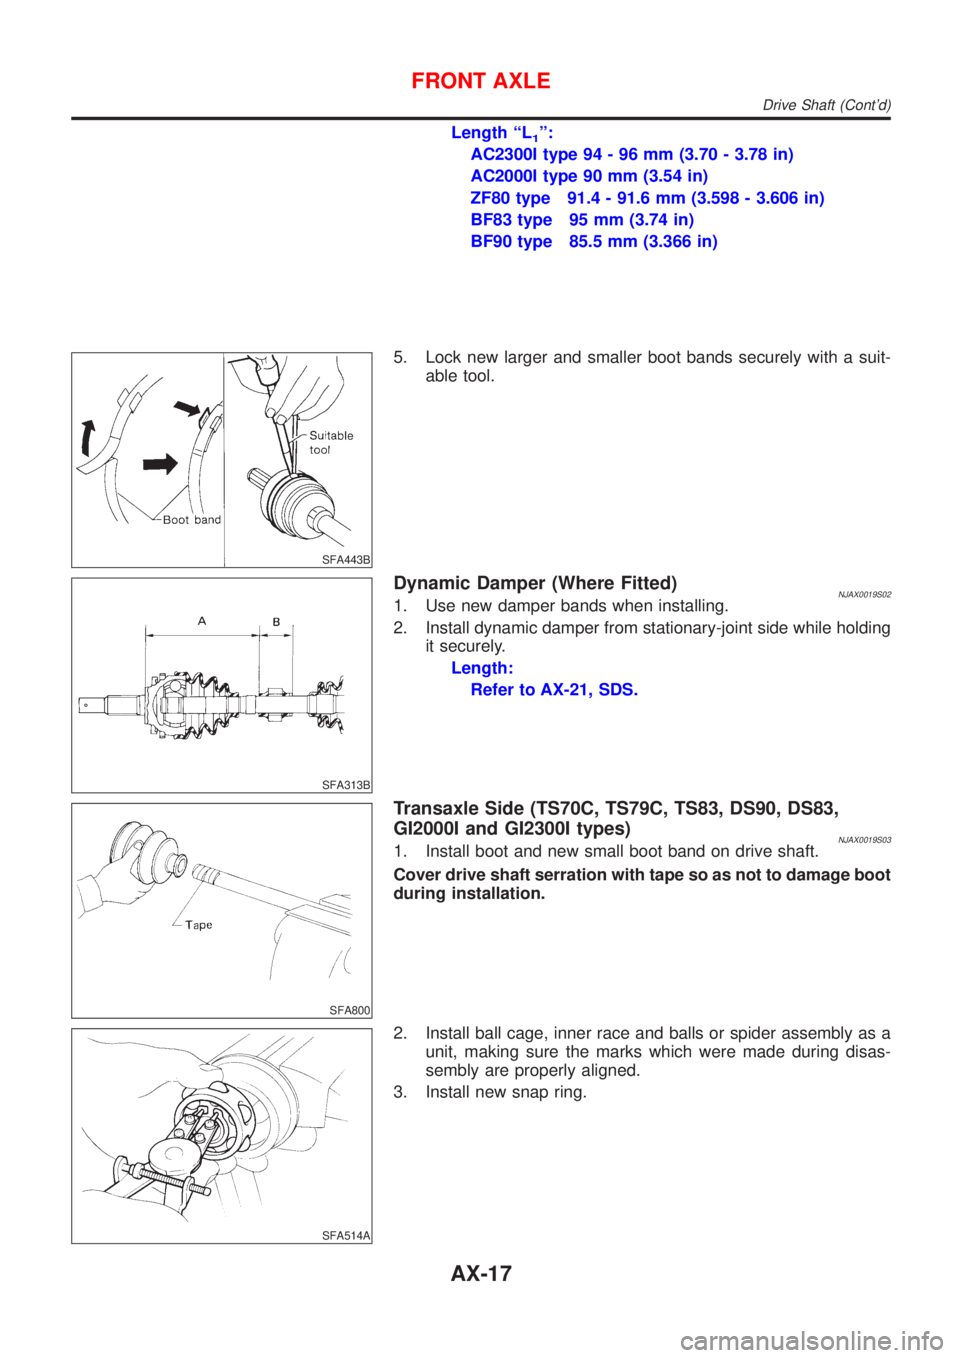
Length ªL1º:
AC2300I type 94 - 96 mm (3.70 - 3.78 in)
AC2000I type 90 mm (3.54 in)
ZF80 type 91.4 - 91.6 mm (3.598 - 3.606 in)
BF83 type 95 mm (3.74 in)
BF90 type 85.5 mm (3.366 in)
SFA443B
5. Lock new larger and smaller boot bands securely with a suit-
able tool.
SFA313B
Dynamic Damper (Where Fitted)NJAX0019S021. Use new damper bands when installing.
2. Install dynamic damper from stationary-joint side while holding
it securely.
Length:
Refer to AX-21, SDS.
SFA800
Transaxle Side (TS70C, TS79C, TS83, DS90, DS83,
GI2000I and GI2300I types)
NJAX0019S031. Install boot and new small boot band on drive shaft.
Cover drive shaft serration with tape so as not to damage boot
during installation.
SFA514A
2. Install ball cage, inner race and balls or spider assembly as a
unit, making sure the marks which were made during disas-
sembly are properly aligned.
3. Install new snap ring.
FRONT AXLE
Drive Shaft (Cont'd)
AX-17
Page 506 of 2898
SFA149A
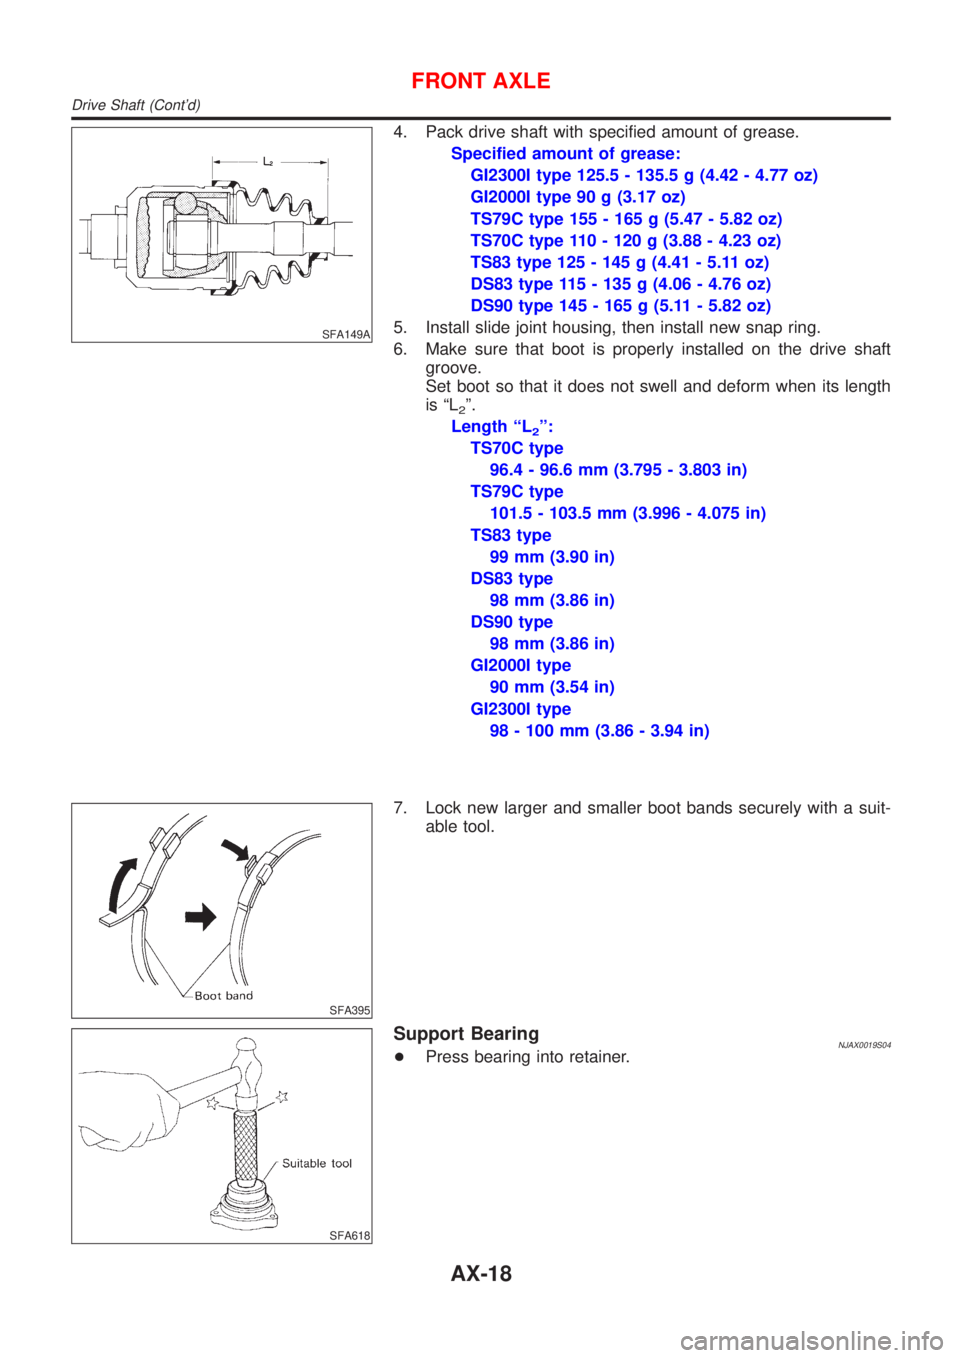
4. Pack drive shaft with specified amount of grease.
Specified amount of grease:
GI2300I type 125.5 - 135.5 g (4.42 - 4.77 oz)
GI2000I type 90 g (3.17 oz)
TS79C type 155 - 165 g (5.47 - 5.82 oz)
TS70C type 110 - 120 g (3.88 - 4.23 oz)
TS83 type 125 - 145 g (4.41 - 5.11 oz)
DS83 type 115 - 135 g (4.06 - 4.76 oz)
DS90 type 145 - 165 g (5.11 - 5.82 oz)
5. Install slide joint housing, then install new snap ring.
6. Make sure that boot is properly installed on the drive shaft
groove.
Set boot so that it does not swell and deform when its length
is ªL
2º.
Length ªL
2º:
TS70C type
96.4 - 96.6 mm (3.795 - 3.803 in)
TS79C type
101.5 - 103.5 mm (3.996 - 4.075 in)
TS83 type
99 mm (3.90 in)
DS83 type
98 mm (3.86 in)
DS90 type
98 mm (3.86 in)
GI2000I type
90 mm (3.54 in)
GI2300I type
98 - 100 mm (3.86 - 3.94 in)
SFA395
7. Lock new larger and smaller boot bands securely with a suit-
able tool.
SFA618
Support BearingNJAX0019S04+Press bearing into retainer.
FRONT AXLE
Drive Shaft (Cont'd)
AX-18
Page 509 of 2898
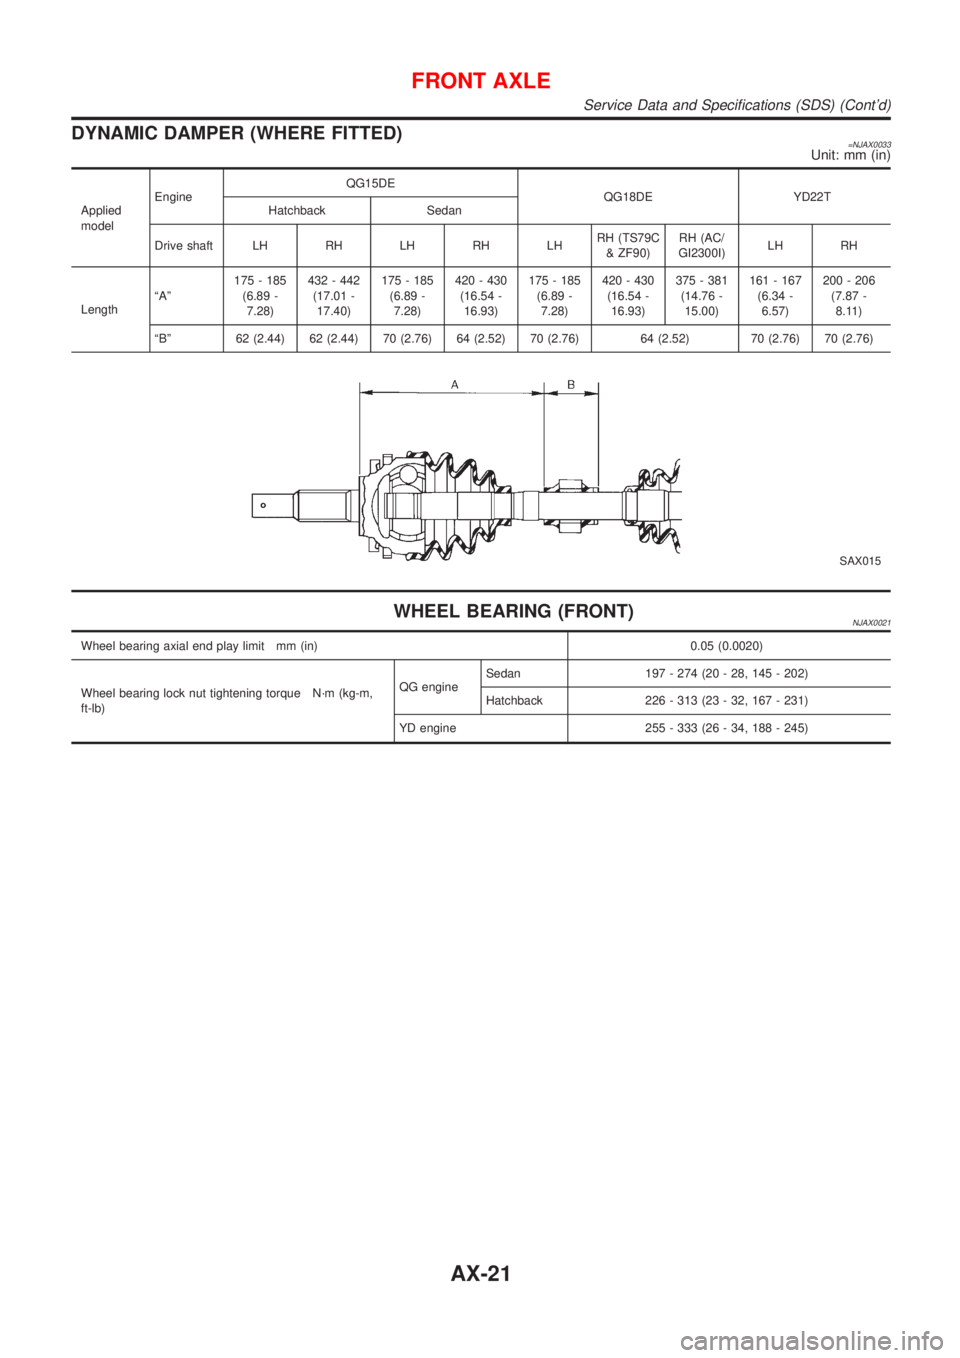
DYNAMIC DAMPER (WHERE FITTED)=NJAX0033Unit: mm (in)
Applied
modelEngineQG15DE
QG18DE YD22T
Hatchback Sedan
Drive shaft LH RH LH RH LHRH (TS79C
& ZF90)RH (AC/
GI2300I)LH RH
LengthªAº175 - 185
(6.89 -
7.28)432 - 442
(17.01 -
17.40)175 - 185
(6.89 -
7.28)420 - 430
(16.54 -
16.93)175 - 185
(6.89 -
7.28)420 - 430
(16.54 -
16.93)375 - 381
(14.76 -
15.00)161 - 167
(6.34 -
6.57)200 - 206
(7.87 -
8.11)
ªBº 62 (2.44) 62 (2.44) 70 (2.76) 64 (2.52) 70 (2.76) 64 (2.52) 70 (2.76) 70 (2.76)
SAX015
WHEEL BEARING (FRONT)NJAX0021
Wheel bearing axial end play limit mm (in) 0.05 (0.0020)
Wheel bearing lock nut tightening torque N´m (kg-m,
ft-lb)QG engineSedan 197 - 274 (20 - 28, 145 - 202)
Hatchback 226 - 313 (23 - 32, 167 - 231)
YD engine 255 - 333 (26 - 34, 188 - 245)
FRONT AXLE
Service Data and Specifications (SDS) (Cont'd)
AX-21
Page 511 of 2898
Noise, Vibration and Harshness (NVH)
Troubleshooting
NJAX0025Refer to ªNoise, Vibration and Harshness (NVH) Troubleshootingº,
ªFRONT AXLEº, AX-3.
SMA525A
On-vehicle Service
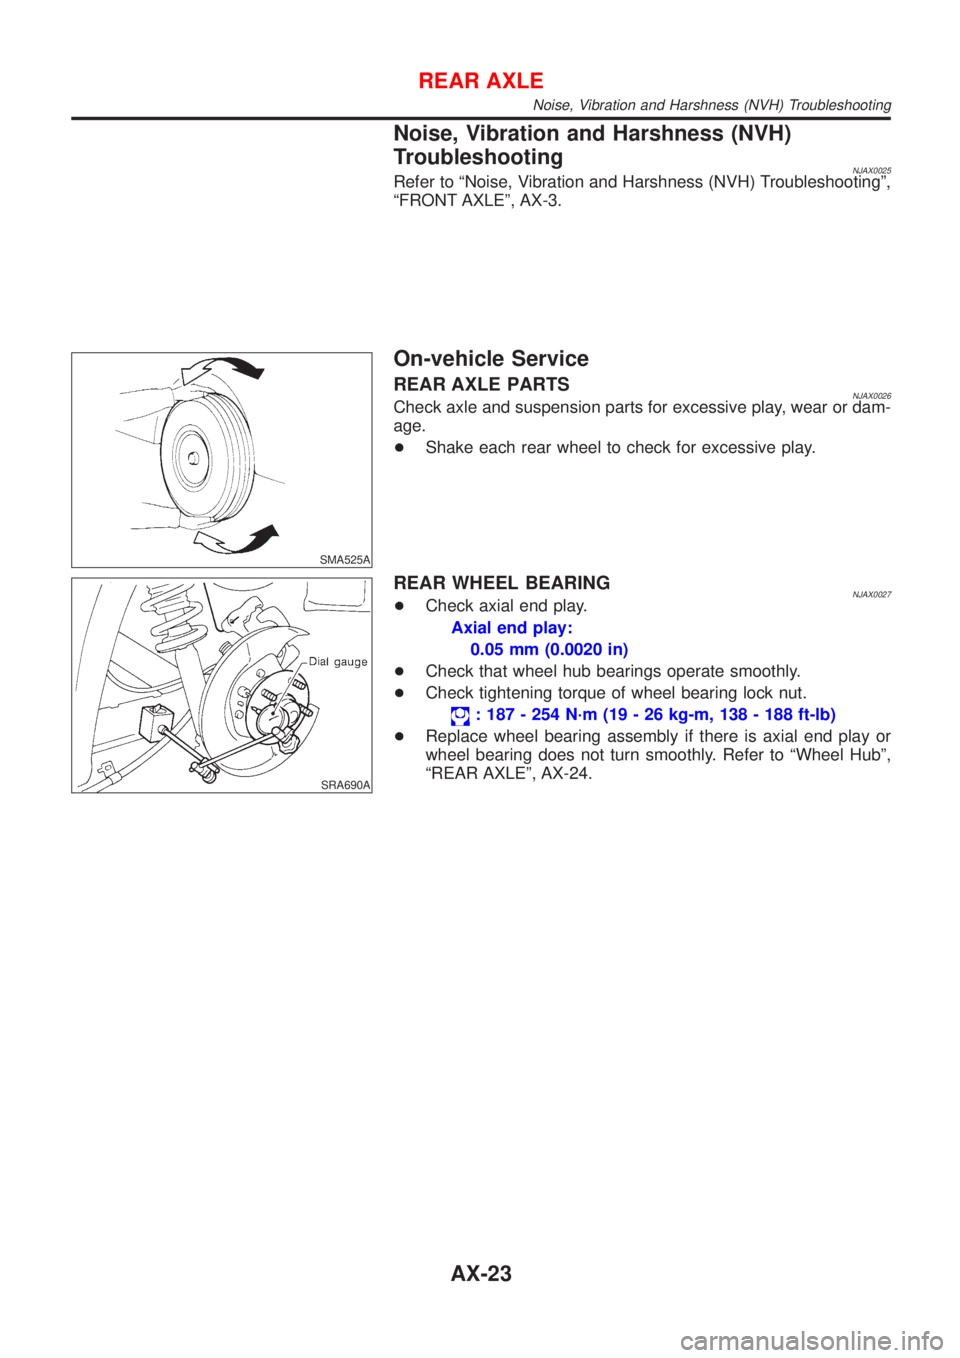
REAR AXLE PARTSNJAX0026Check axle and suspension parts for excessive play, wear or dam-
age.
+Shake each rear wheel to check for excessive play.
SRA690A
REAR WHEEL BEARINGNJAX0027+Check axial end play.
Axial end play:
0.05 mm (0.0020 in)
+Check that wheel hub bearings operate smoothly.
+Check tightening torque of wheel bearing lock nut.
: 187 - 254 N´m (19 - 26 kg-m, 138 - 188 ft-lb)
+Replace wheel bearing assembly if there is axial end play or
wheel bearing does not turn smoothly. Refer to ªWheel Hubº,
ªREAR AXLEº, AX-24.
REAR AXLE
Noise, Vibration and Harshness (NVH) Troubleshooting
AX-23
Page 512 of 2898
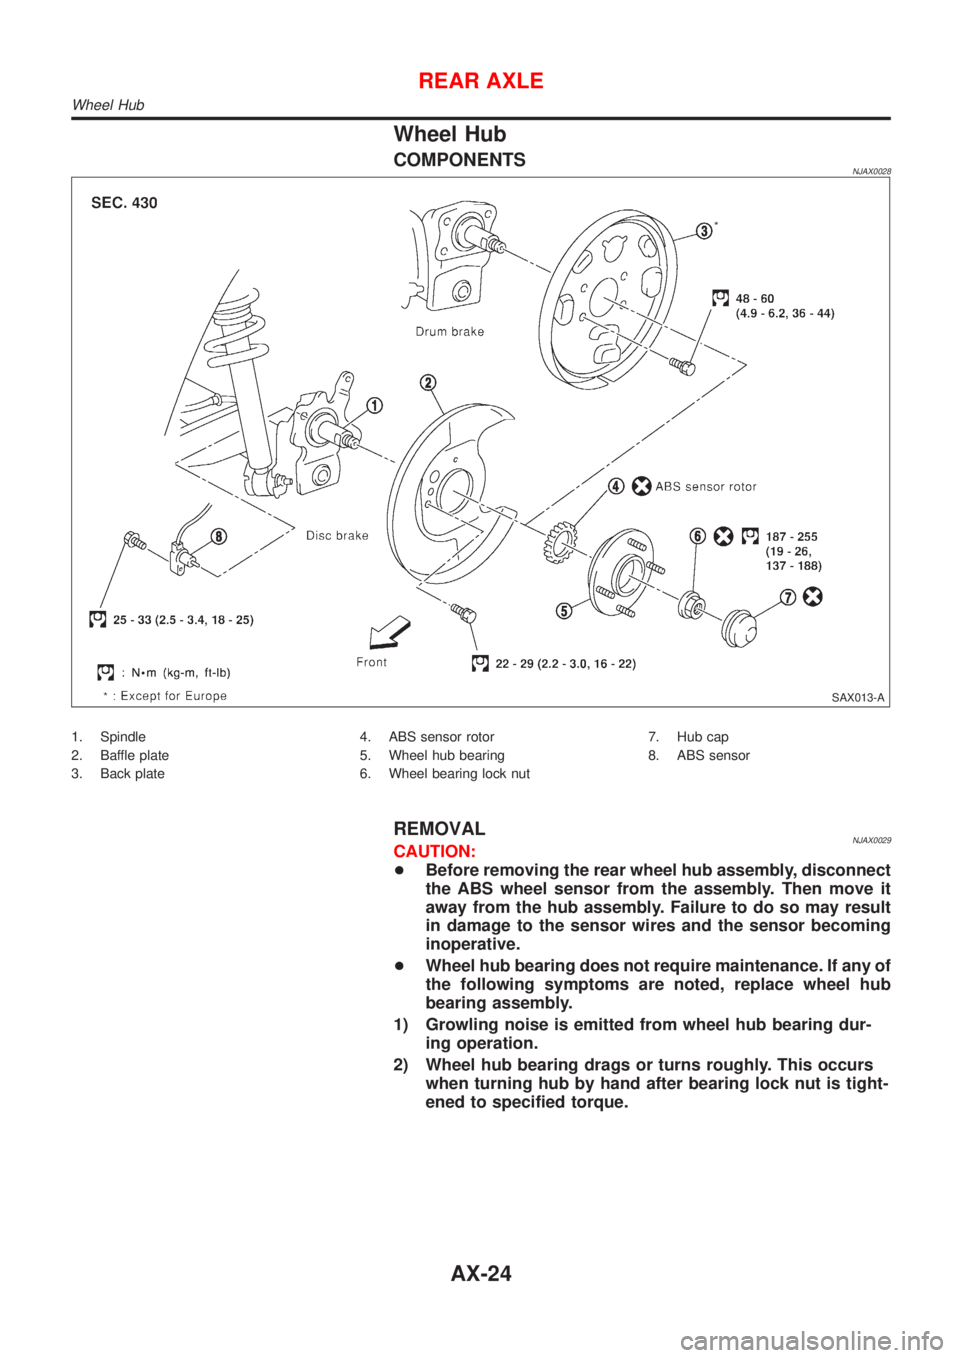
Wheel Hub
COMPONENTSNJAX0028
SAX013-A
1. Spindle
2. Baffle plate
3. Back plate4. ABS sensor rotor
5. Wheel hub bearing
6. Wheel bearing lock nut7. Hub cap
8. ABS sensor
REMOVALNJAX0029CAUTION:
+Before removing the rear wheel hub assembly, disconnect
the ABS wheel sensor from the assembly. Then move it
away from the hub assembly. Failure to do so may result
in damage to the sensor wires and the sensor becoming
inoperative.
+Wheel hub bearing does not require maintenance. If any of
the following symptoms are noted, replace wheel hub
bearing assembly.
1) Growling noise is emitted from wheel hub bearing dur-
ing operation.
2) Wheel hub bearing drags or turns roughly. This occurs
when turning hub by hand after bearing lock nut is tight-
ened to specified torque.
REAR AXLE
Wheel Hub
AX-24
Page 513 of 2898
SRA711A
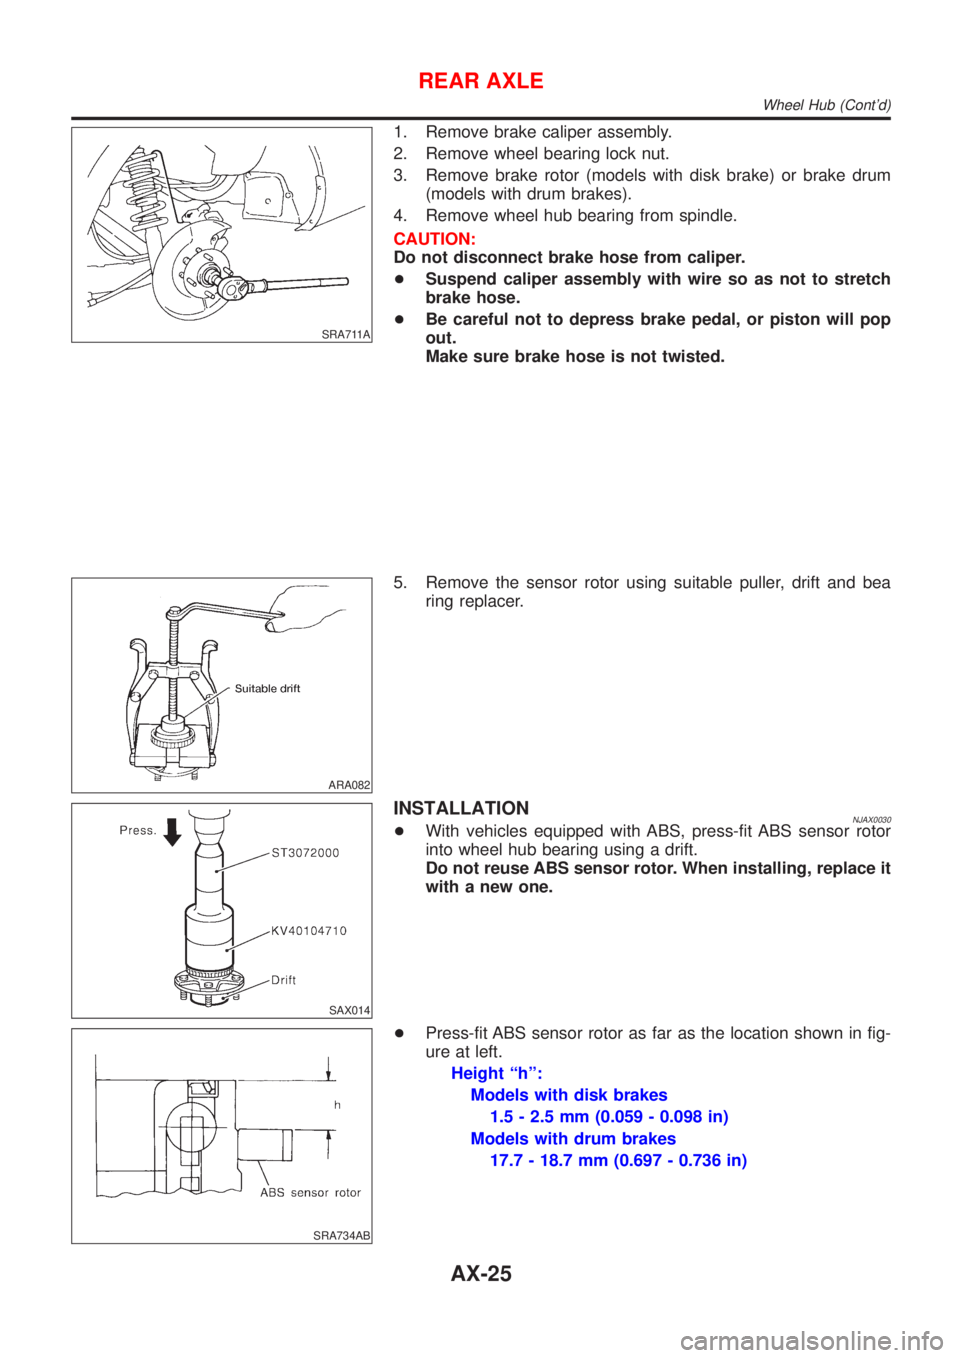
1. Remove brake caliper assembly.
2. Remove wheel bearing lock nut.
3. Remove brake rotor (models with disk brake) or brake drum
(models with drum brakes).
4. Remove wheel hub bearing from spindle.
CAUTION:
Do not disconnect brake hose from caliper.
+Suspend caliper assembly with wire so as not to stretch
brake hose.
+Be careful not to depress brake pedal, or piston will pop
out.
Make sure brake hose is not twisted.
ARA082
5. Remove the sensor rotor using suitable puller, drift and bea
ring replacer.
SAX014
INSTALLATIONNJAX0030+With vehicles equipped with ABS, press-fit ABS sensor rotor
into wheel hub bearing using a drift.
Do not reuse ABS sensor rotor. When installing, replace it
with a new one.
SRA734AB
+Press-fit ABS sensor rotor as far as the location shown in fig-
ure at left.
Height ªhº:
Models with disk brakes
1.5 - 2.5 mm (0.059 - 0.098 in)
Models with drum brakes
17.7 - 18.7 mm (0.697 - 0.736 in)
REAR AXLE
Wheel Hub (Cont'd)
AX-25