NISSAN ALMERA N16 2001 Electronic Repair Manual
ALMERA N16 2001
NISSAN
NISSAN
https://www.carmanualsonline.info/img/5/57351/w960_57351-0.png
NISSAN ALMERA N16 2001 Electronic Repair Manual
Trending: diagnostic menu, brakes, Clutch, radio antenna, bolt pattern, clock, length
Page 731 of 2493
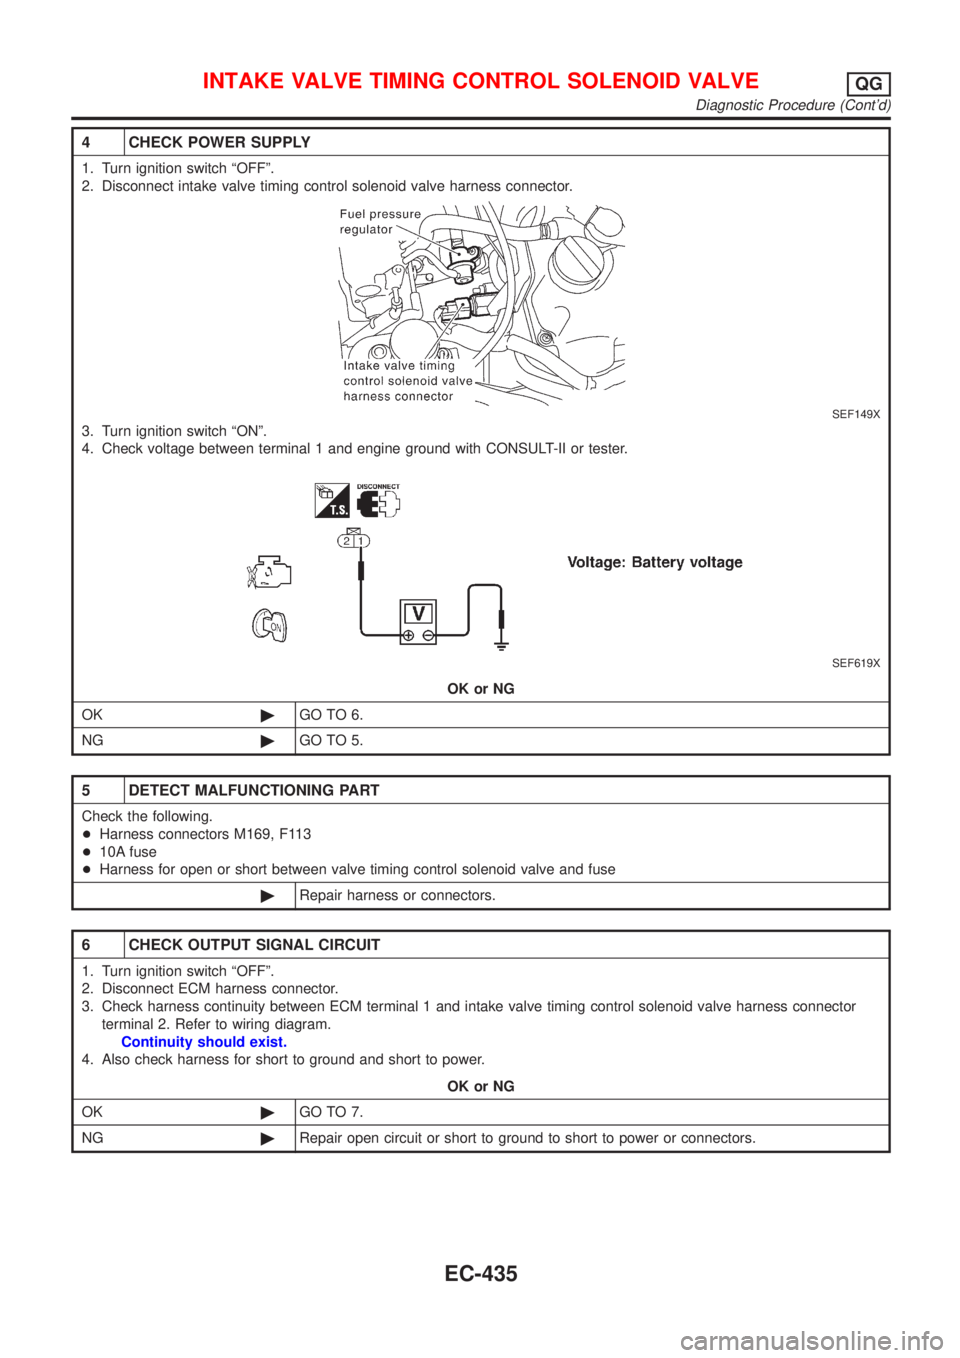
4 CHECK POWER SUPPLY
1. Turn ignition switch ªOFFº.
2. Disconnect intake valve timing control solenoid valve harness connector.
SEF149X
3. Turn ignition switch ªONº.
4. Check voltage between terminal 1 and engine ground with CONSULT-II or tester.
SEF619X
OK or NG
OK©GO TO 6.
NG©GO TO 5.
5 DETECT MALFUNCTIONING PART
Check the following.
+Harness connectors M169, F113
+10A fuse
+Harness for open or short between valve timing control solenoid valve and fuse
©Repair harness or connectors.
6 CHECK OUTPUT SIGNAL CIRCUIT
1. Turn ignition switch ªOFFº.
2. Disconnect ECM harness connector.
3. Check harness continuity between ECM terminal 1 and intake valve timing control solenoid valve harness connector
terminal 2. Refer to wiring diagram.
Continuity should exist.
4. Also check harness for short to ground and short to power.
OK or NG
OK©GO TO 7.
NG©Repair open circuit or short to ground to short to power or connectors.
INTAKE VALVE TIMING CONTROL SOLENOID VALVEQG
Diagnostic Procedure (Cont'd)
EC-435
Page 732 of 2493
7 CHECK VALVE TIMING CONTROL SOLENOID VALVE
Refer to ªComponent Inspectionº, EC-436.
OK or NG
OK©GO TO 8.
NG©Replace valve timing control solenoid valve.
8 CHECK INTERMITTENT INCIDENT
Perform ªTROUBLE DIAGNOSIS FOR INTERMITTENT INCIDENTº, EC-144.
©INSPECTION END
SEF159Y
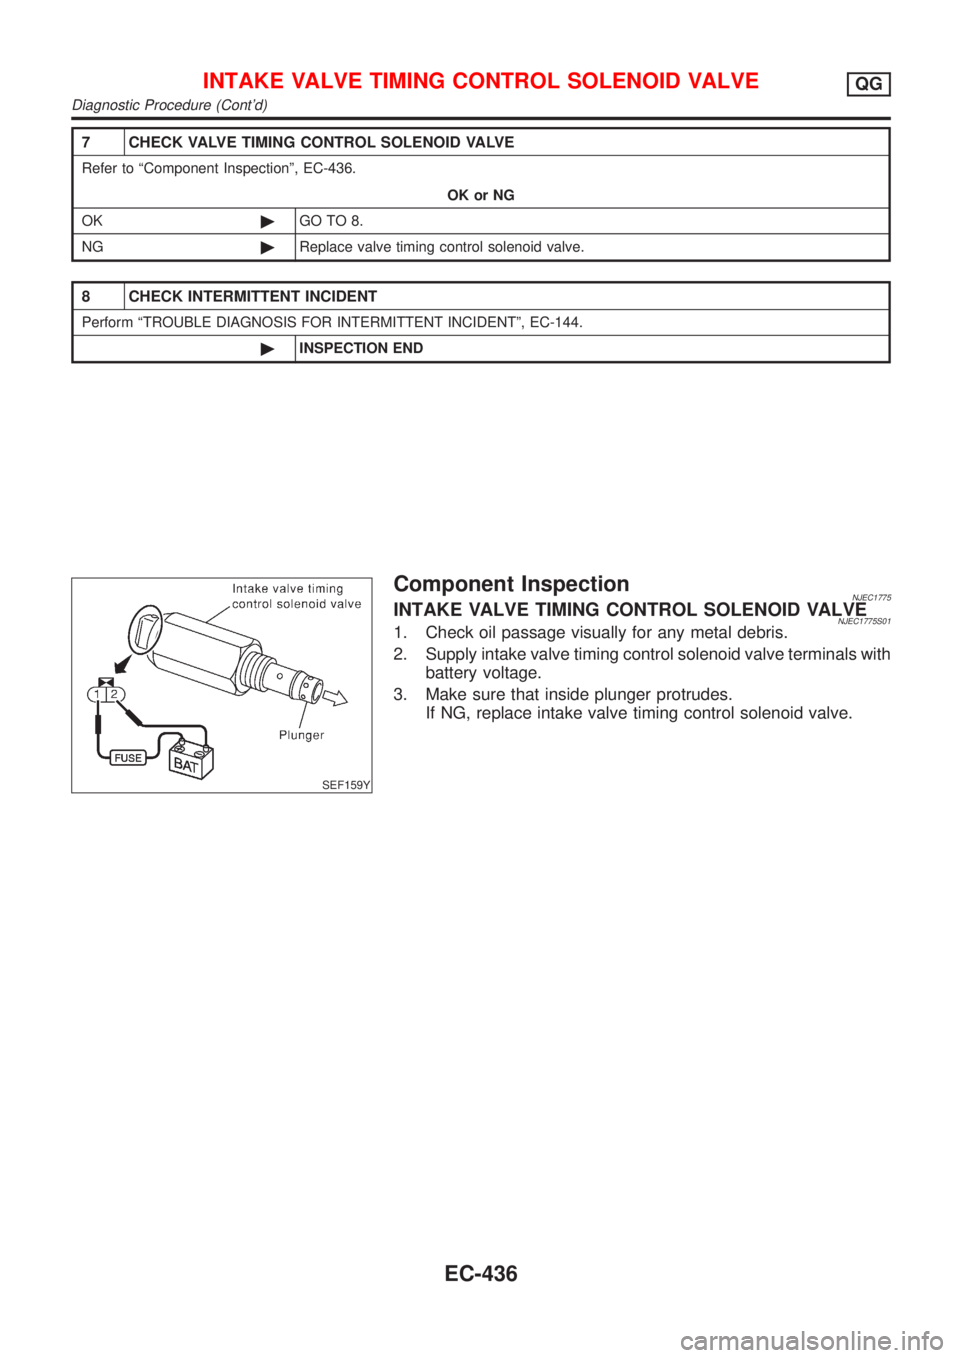
Component InspectionNJEC1775INTAKE VALVE TIMING CONTROL SOLENOID VALVENJEC1775S011. Check oil passage visually for any metal debris.
2. Supply intake valve timing control solenoid valve terminals with
battery voltage.
3. Make sure that inside plunger protrudes.
If NG, replace intake valve timing control solenoid valve.
INTAKE VALVE TIMING CONTROL SOLENOID VALVEQG
Diagnostic Procedure (Cont'd)
EC-436
Page 733 of 2493
System DescriptionNJEC1776These circuit lines are used to control the smooth shifting up and down of A/T during the hard acceleration/
deceleration.
Voltage signals are exchanged between ECM and TCM (Transmission Control Module).
A/T COMMUNICATION LINEQG
System Description
EC-437
Page 734 of 2493
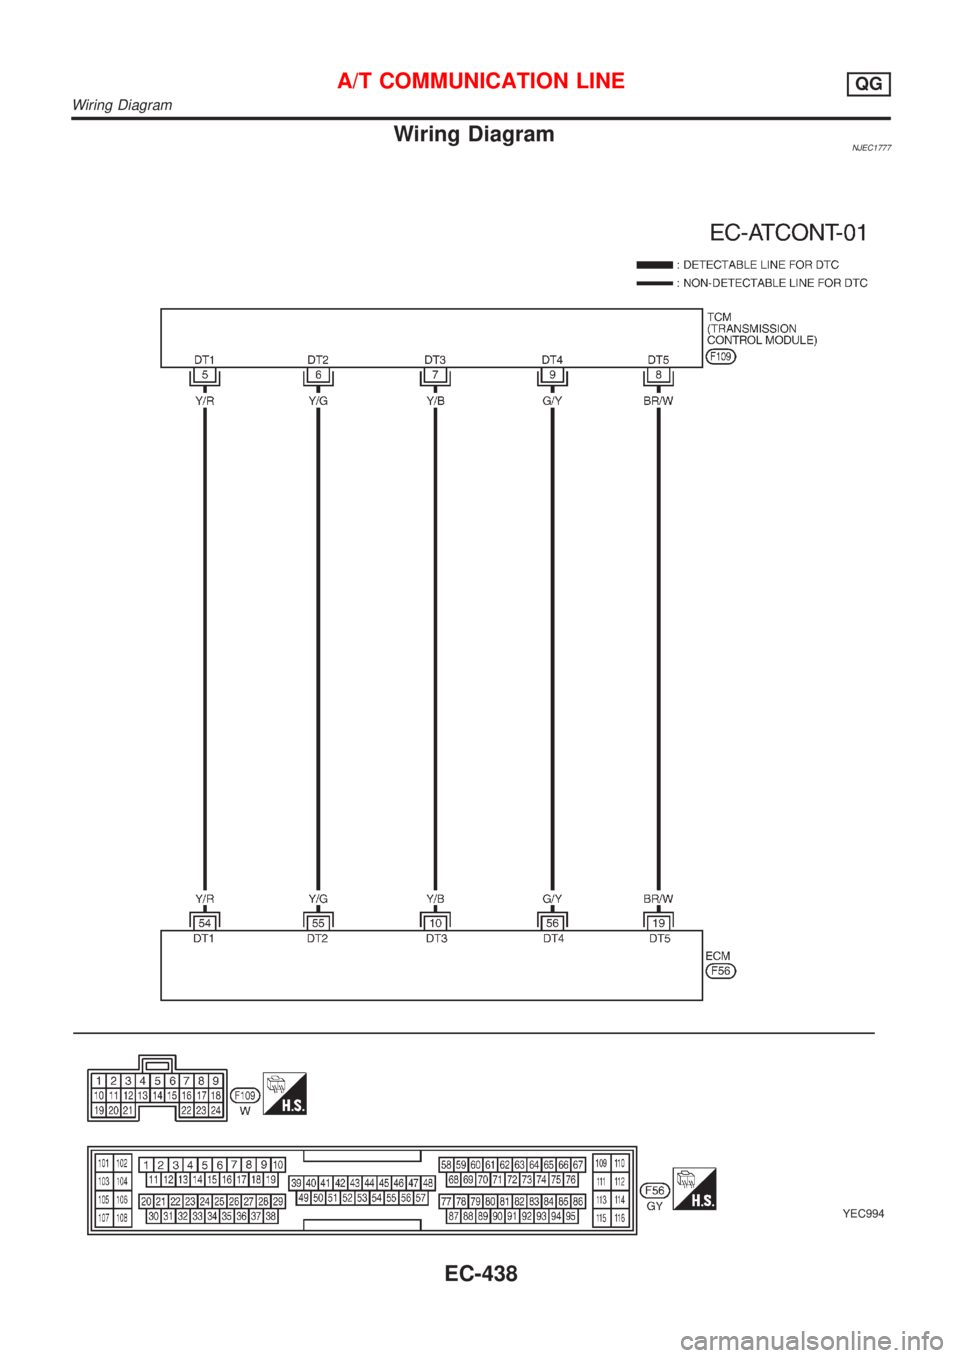
Wiring DiagramNJEC1777
YEC994
A/T COMMUNICATION LINEQG
Wiring Diagram
EC-438
Page 735 of 2493
Diagnostic ProcedureNJEC1778
1 CHECK OVERALL FUNCTION
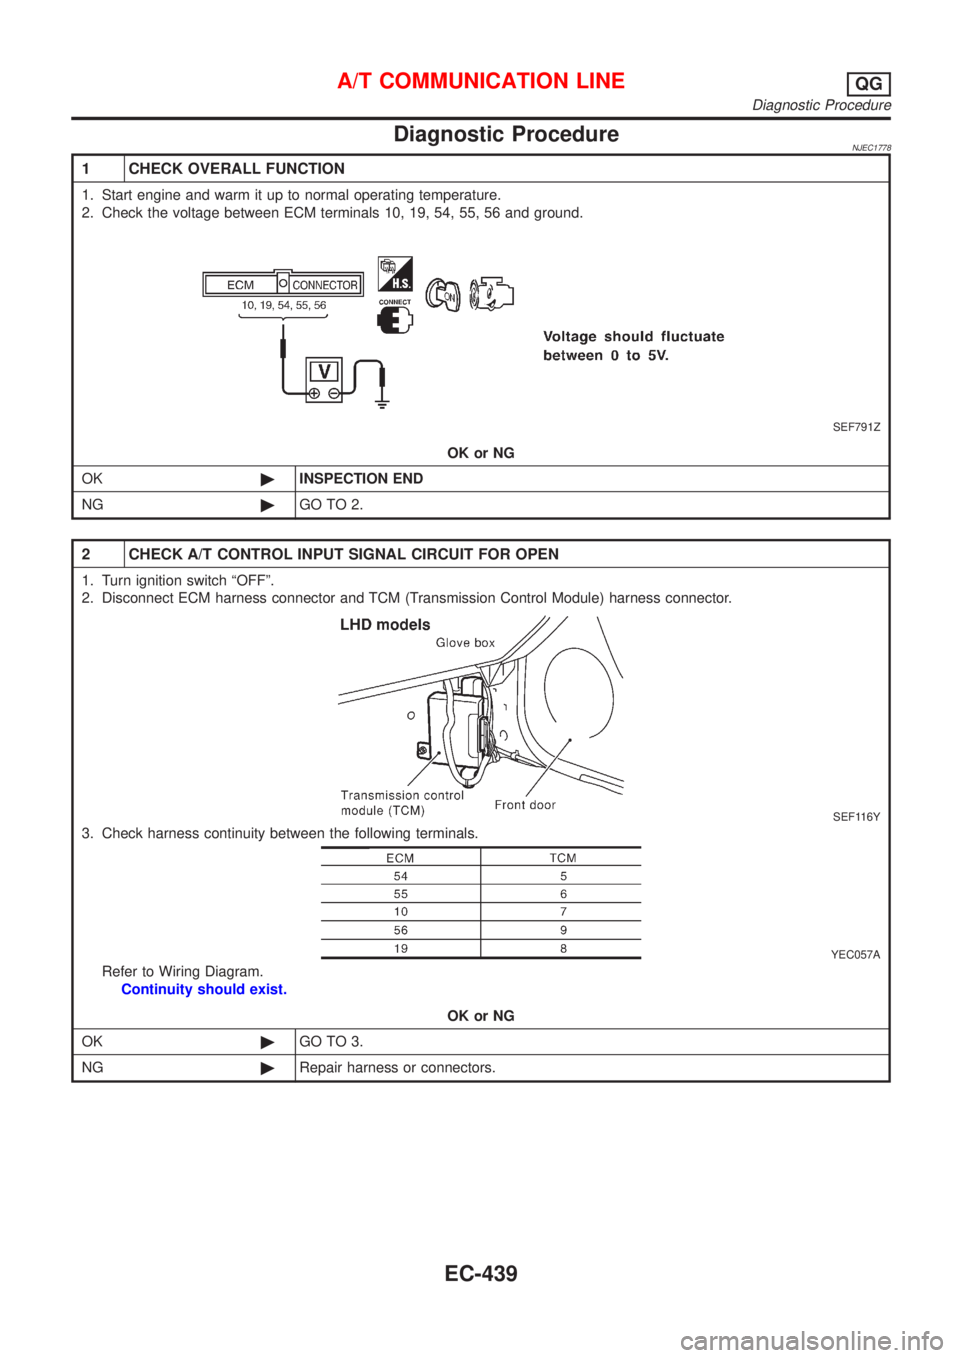
1. Start engine and warm it up to normal operating temperature.
2. Check the voltage between ECM terminals 10, 19, 54, 55, 56 and ground.
SEF791Z
OK or NG
OK©INSPECTION END
NG©GO TO 2.
2 CHECK A/T CONTROL INPUT SIGNAL CIRCUIT FOR OPEN
1. Turn ignition switch ªOFFº.
2. Disconnect ECM harness connector and TCM (Transmission Control Module) harness connector.
SEF116Y
3. Check harness continuity between the following terminals.
YEC057A
Refer to Wiring Diagram.
Continuity should exist.
OK or NG
OK©GO TO 3.
NG©Repair harness or connectors.
A/T COMMUNICATION LINEQG
Diagnostic Procedure
EC-439
Page 736 of 2493
3 CHECK A/T CONTROL INPUT SIGNAL CIRCUIT FOR SHORT
1. Check harness continuity between ECM terminals 10, 19, 54, 55, 56 and ground.
Refer to Wiring Diagram.
Continuity should not exist.
2. Also check harness for short to power.
OK or NG
OK©GO TO 4.
NG©Repair short to ground or short to power in harness or connectos.
4 CHECK INTERMITTENT INCIDENT
Refer to ªTROUBLE DIAGNOSIS FOR INTERMITTENT INCIDENTº, EC-144.
©INSPECTION END
A/T COMMUNICATION LINEQG
Diagnostic Procedure (Cont'd)
EC-440
Page 737 of 2493
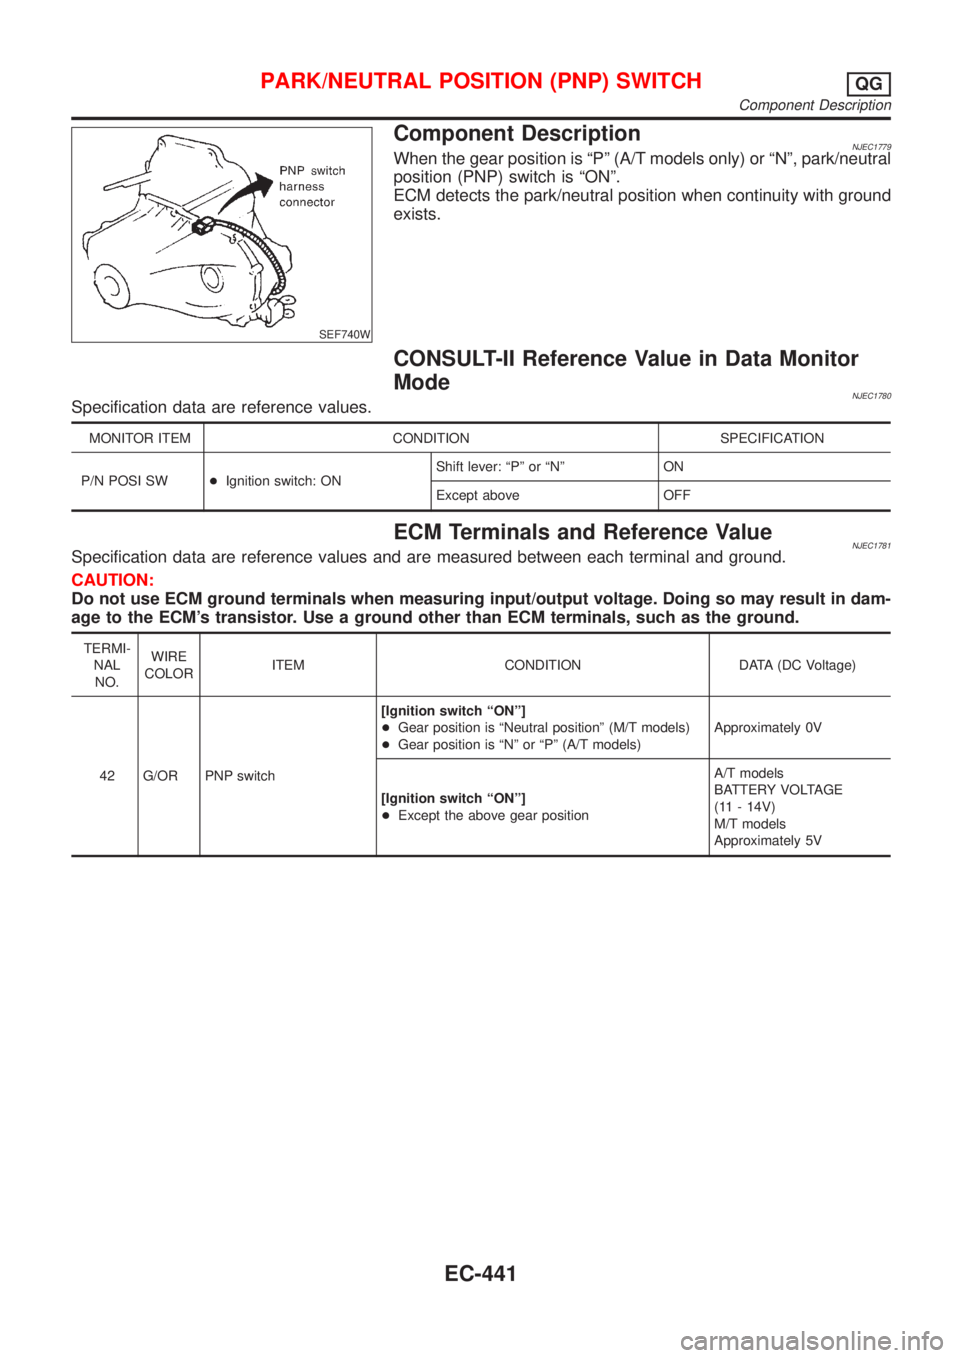
SEF740W
Component DescriptionNJEC1779When the gear position is ªPº (A/T models only) or ªNº, park/neutral
position (PNP) switch is ªONº.
ECM detects the park/neutral position when continuity with ground
exists.
CONSULT-II Reference Value in Data Monitor
Mode
NJEC1780Specification data are reference values.
MONITOR ITEM CONDITION SPECIFICATION
P/N POSI SW+Ignition switch: ONShift lever: ªPº or ªNº ON
Except above OFF
ECM Terminals and Reference ValueNJEC1781Specification data are reference values and are measured between each terminal and ground.
CAUTION:
Do not use ECM ground terminals when measuring input/output voltage. Doing so may result in dam-
age to the ECM's transistor. Use a ground other than ECM terminals, such as the ground.
TERMI-
NAL
NO.WIRE
COLORITEM CONDITION DATA (DC Voltage)
42 G/OR PNP switch[Ignition switch ªONº]
+Gear position is ªNeutral positionº (M/T models)
+Gear position is ªNº or ªPº (A/T models)Approximately 0V
[Ignition switch ªONº]
+Except the above gear positionA/T models
BATTERY VOLTAGE
(11 - 14V)
M/T models
Approximately 5V
PARK/NEUTRAL POSITION (PNP) SWITCHQG
Component Description
EC-441
Page 738 of 2493
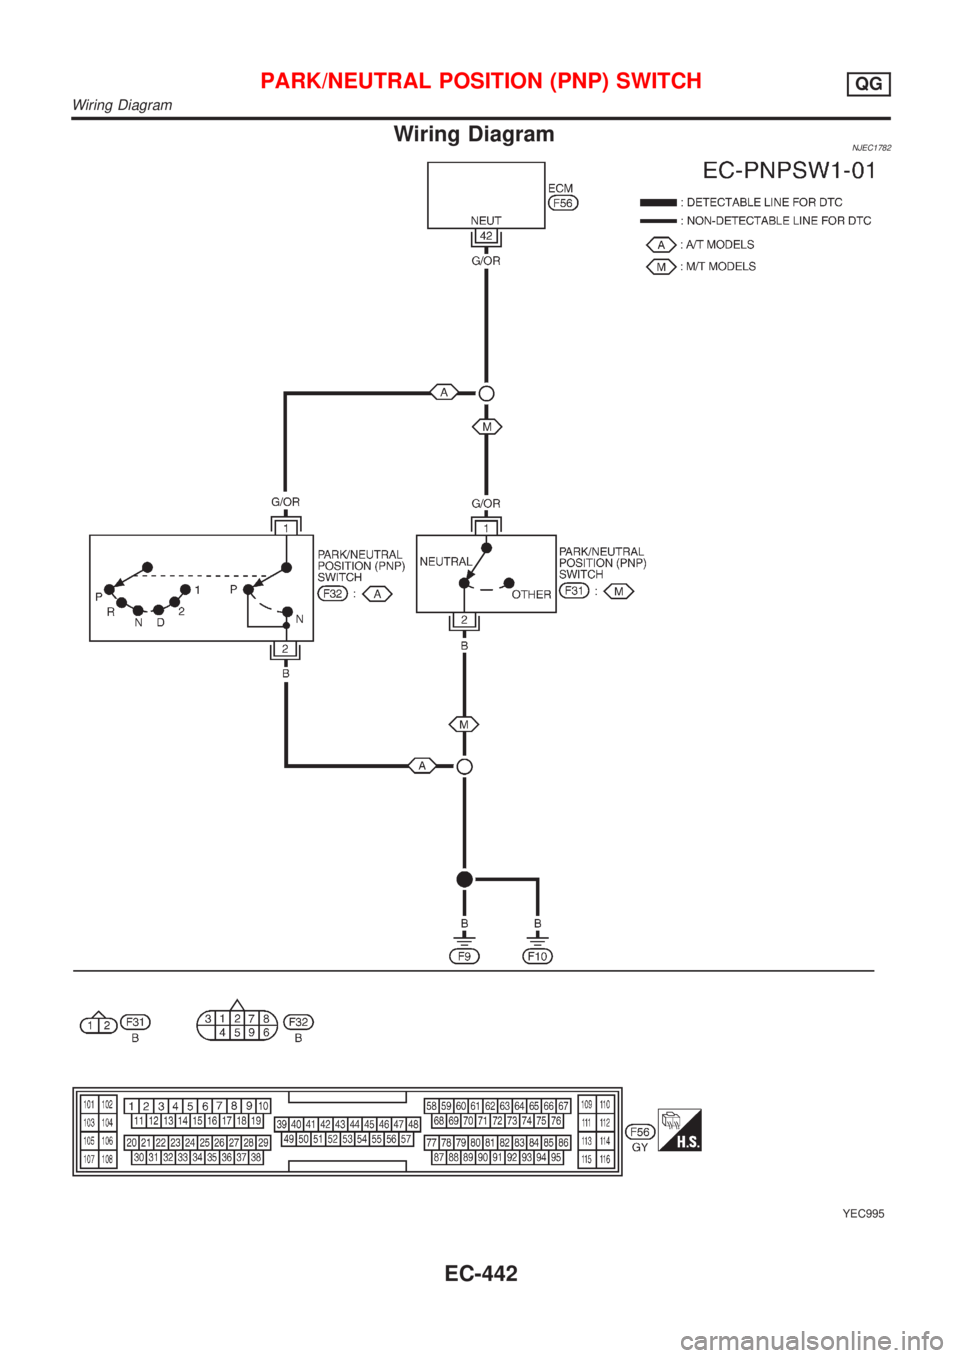
Wiring DiagramNJEC1782
YEC995
PARK/NEUTRAL POSITION (PNP) SWITCHQG
Wiring Diagram
EC-442
Page 739 of 2493
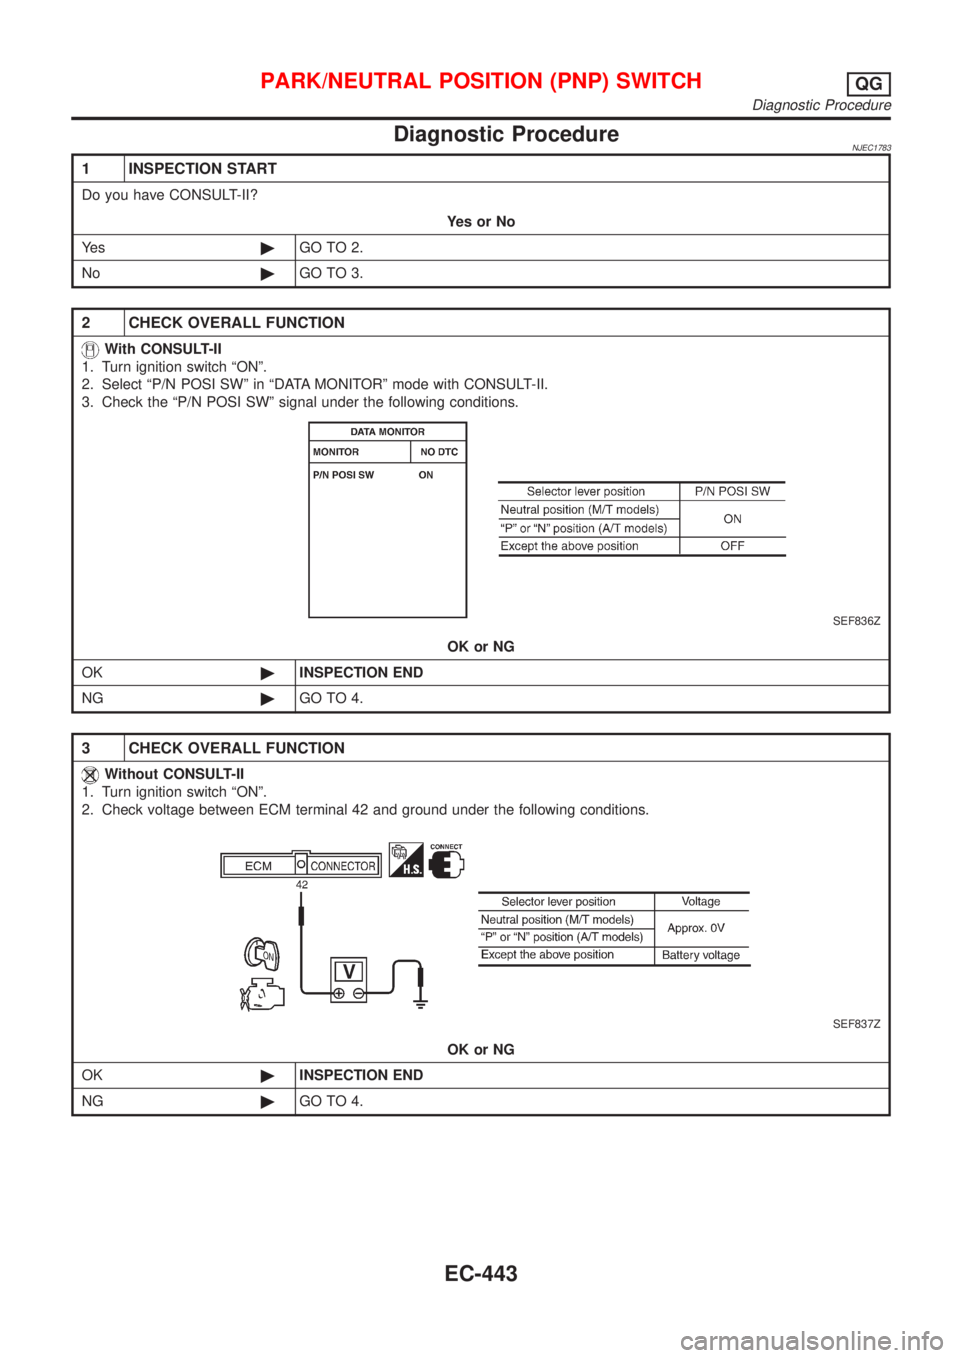
Diagnostic ProcedureNJEC1783
1 INSPECTION START
Do you have CONSULT-II?
YesorNo
Ye s©GO TO 2.
No©GO TO 3.
2 CHECK OVERALL FUNCTION
With CONSULT-II
1. Turn ignition switch ªONº.
2. Select ªP/N POSI SWº in ªDATA MONITORº mode with CONSULT-II.
3. Check the ªP/N POSI SWº signal under the following conditions.
SEF836Z
OK or NG
OK©INSPECTION END
NG©GO TO 4.
3 CHECK OVERALL FUNCTION
Without CONSULT-II
1. Turn ignition switch ªONº.
2. Check voltage between ECM terminal 42 and ground under the following conditions.
SEF837Z
OK or NG
OK©INSPECTION END
NG©GO TO 4.
PARK/NEUTRAL POSITION (PNP) SWITCHQG
Diagnostic Procedure
EC-443
Page 740 of 2493
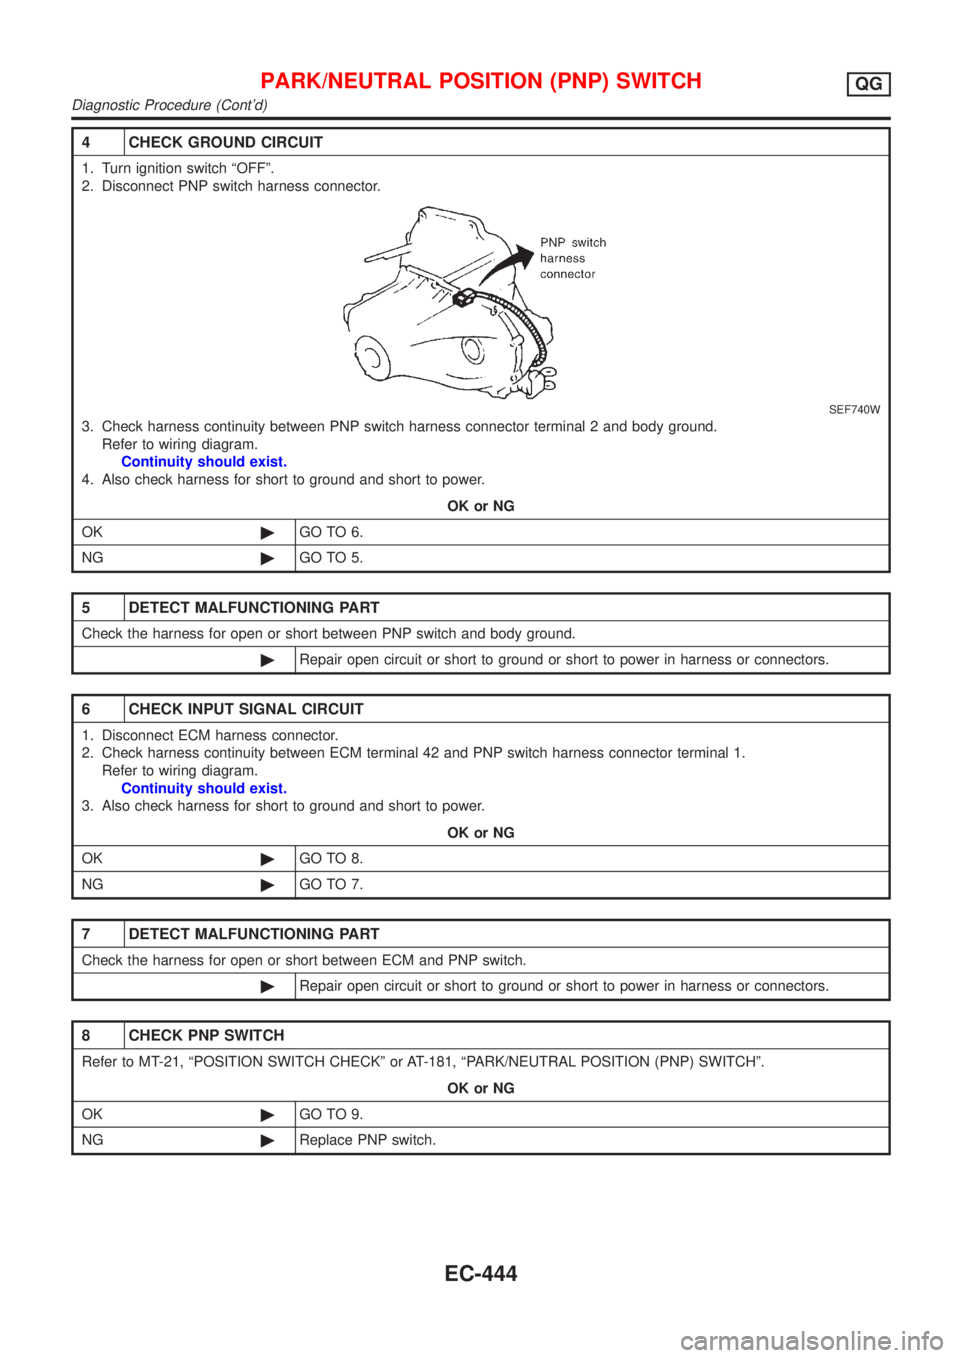
4 CHECK GROUND CIRCUIT
1. Turn ignition switch ªOFFº.
2. Disconnect PNP switch harness connector.
SEF740W
3. Check harness continuity between PNP switch harness connector terminal 2 and body ground.
Refer to wiring diagram.
Continuity should exist.
4. Also check harness for short to ground and short to power.
OK or NG
OK©GO TO 6.
NG©GO TO 5.
5 DETECT MALFUNCTIONING PART
Check the harness for open or short between PNP switch and body ground.
©Repair open circuit or short to ground or short to power in harness or connectors.
6 CHECK INPUT SIGNAL CIRCUIT
1. Disconnect ECM harness connector.
2. Check harness continuity between ECM terminal 42 and PNP switch harness connector terminal 1.
Refer to wiring diagram.
Continuity should exist.
3. Also check harness for short to ground and short to power.
OK or NG
OK©GO TO 8.
NG©GO TO 7.
7 DETECT MALFUNCTIONING PART
Check the harness for open or short between ECM and PNP switch.
©Repair open circuit or short to ground or short to power in harness or connectors.
8 CHECK PNP SWITCH
Refer to MT-21, ªPOSITION SWITCH CHECKº or AT-181, ªPARK/NEUTRAL POSITION (PNP) SWITCHº.
OK or NG
OK©GO TO 9.
NG©Replace PNP switch.
PARK/NEUTRAL POSITION (PNP) SWITCHQG
Diagnostic Procedure (Cont'd)
EC-444
Trending: towing, starter motor, jump start, jacking, brake pads, filter, clock setting

