NISSAN ALMERA TINO 2001 Service Repair Manual
Manufacturer: NISSAN, Model Year: 2001, Model line: ALMERA TINO, Model: NISSAN ALMERA TINO 2001Pages: 3051, PDF Size: 46.38 MB
Page 1391 of 3051
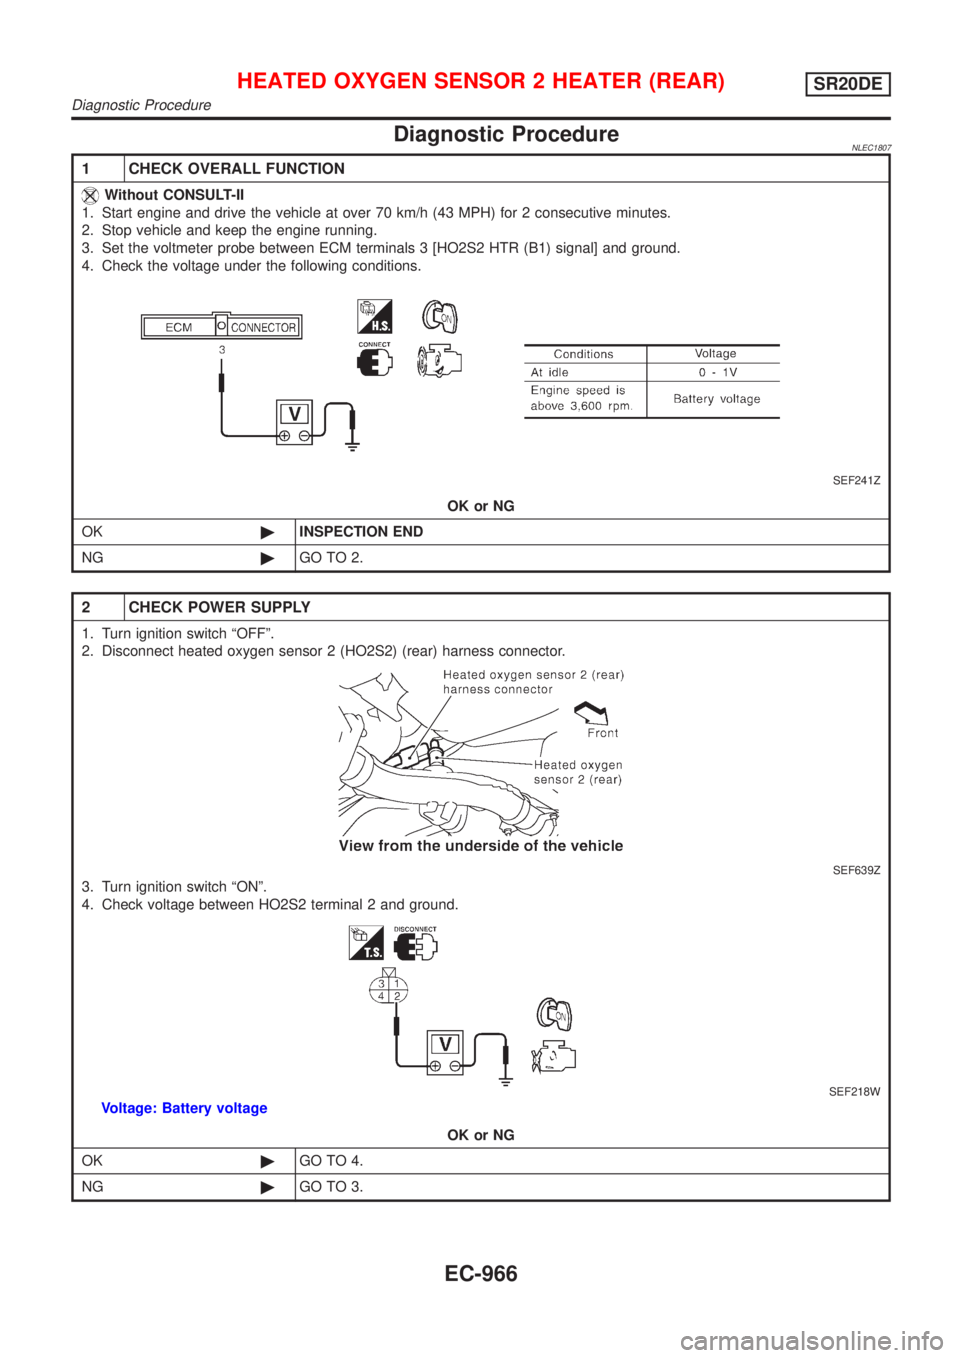
Diagnostic ProcedureNLEC1807
1 CHECK OVERALL FUNCTION
Without CONSULT-II
1. Start engine and drive the vehicle at over 70 km/h (43 MPH) for 2 consecutive minutes.
2. Stop vehicle and keep the engine running.
3. Set the voltmeter probe between ECM terminals 3 [HO2S2 HTR (B1) signal] and ground.
4. Check the voltage under the following conditions.
SEF241Z
OK or NG
OK©INSPECTION END
NG©GO TO 2.
2 CHECK POWER SUPPLY
1. Turn ignition switch ªOFFº.
2. Disconnect heated oxygen sensor 2 (HO2S2) (rear) harness connector.
SEF639Z
3. Turn ignition switch ªONº.
4. Check voltage between HO2S2 terminal 2 and ground.
SEF218W
Voltage: Battery voltage
OK or NG
OK©GO TO 4.
NG©GO TO 3.
HEATED OXYGEN SENSOR 2 HEATER (REAR)SR20DE
Diagnostic Procedure
EC-966
Page 1392 of 3051

3 DETECT MALFUNCTIONING PART
Check the following.
+Harness connectors F38, M50 (where fitted)
+Harness connectors M72, F44 (where fitted)
+10A fuse
+Harness for open or short between heated oxygen sensor 2 (rear) and fuse
©Repair harness or connectors.
4 CHECK OUTPUT CIRCUIT
1. Turn ignition switch ªOFFº.
2. Disconnect ECM harness connector.
3. Check harness continuity between HO2S2 terminal 3 and ECM terminal 3.
Refer to wiring diagram.
Continuity should exist.
4. Also check harness for short to ground and short to power.
OK or NG
OK©GO TO 6.
NG©GO TO 5.
5 DETECT MALFUNCTIONING PART
Check the harness for open or short between heated oxygen sensor 2 heater (rear) and ECM.
©Repair open circuit or short to ground or short to power in harness or connectors.
6 CHECK HEATED OXYGEN SENSOR 2 HEATER (REAR)
Refer to ªComponent Inspectionº, EC-968.
OK or NG
OK©GO TO 7.
NG©Replace heated oxygen sensor 2 (rear).
7 CHECK INTERMITTENT INCIDENT
Perform ªTROUBLE DIAGNOSIS FOR INTERMITTENT INCIDENTº, EC-670.
©INSPECTION END
HEATED OXYGEN SENSOR 2 HEATER (REAR)SR20DE
Diagnostic Procedure (Cont'd)
EC-967
Page 1393 of 3051
SEF221W
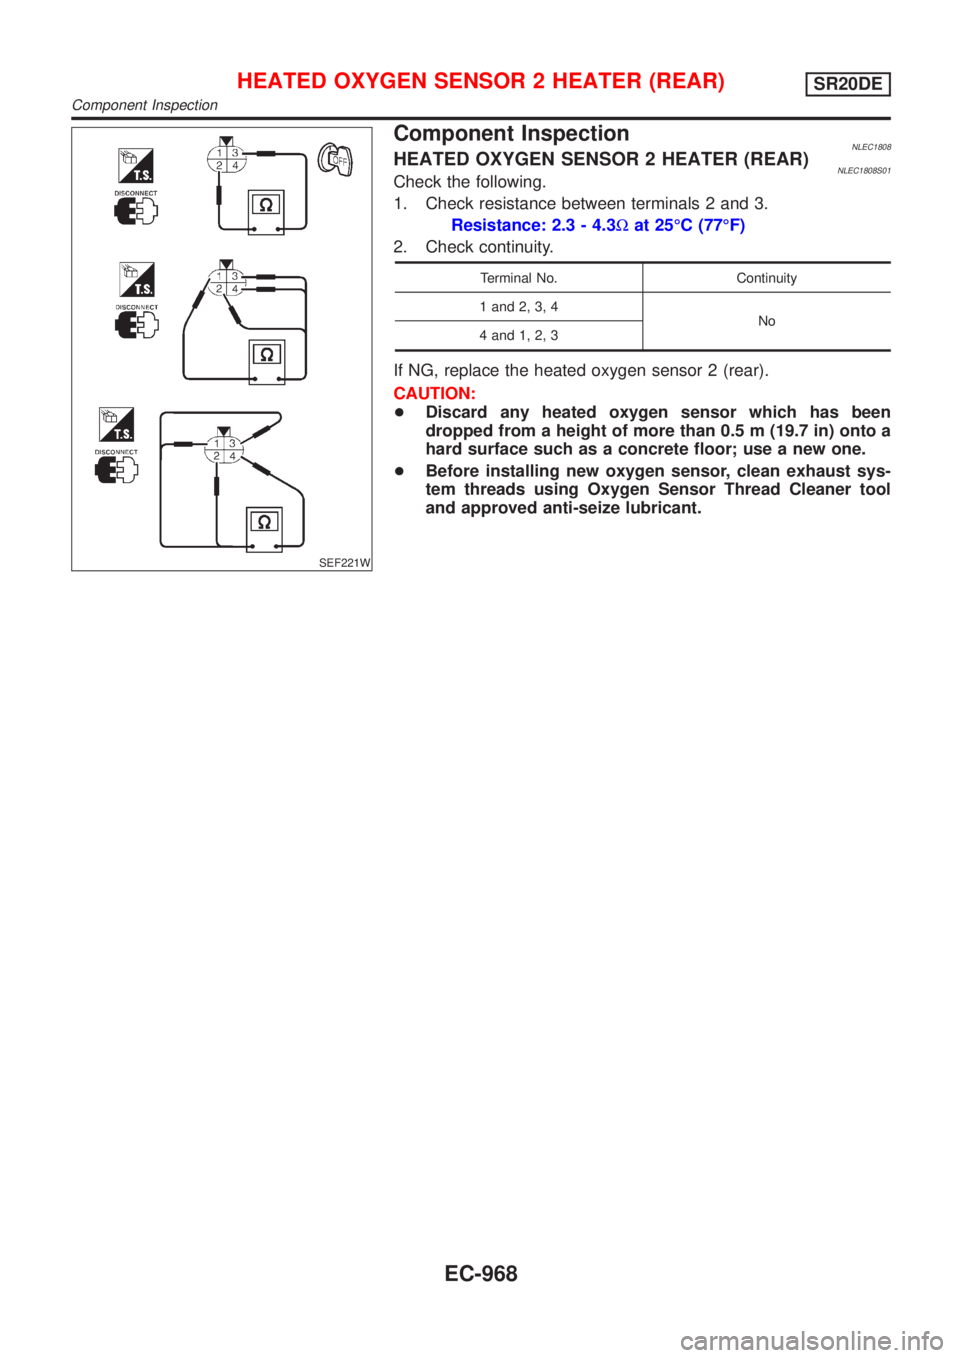
Component InspectionNLEC1808HEATED OXYGEN SENSOR 2 HEATER (REAR)NLEC1808S01Check the following.
1. Check resistance between terminals 2 and 3.
Resistance: 2.3 - 4.3Wat 25ÉC (77ÉF)
2. Check continuity.
Terminal No. Continuity
1 and 2, 3, 4
No
4 and 1, 2, 3
If NG, replace the heated oxygen sensor 2 (rear).
CAUTION:
+Discard any heated oxygen sensor which has been
dropped from a height of more than 0.5 m (19.7 in) onto a
hard surface such as a concrete floor; use a new one.
+Before installing new oxygen sensor, clean exhaust sys-
tem threads using Oxygen Sensor Thread Cleaner tool
and approved anti-seize lubricant.
HEATED OXYGEN SENSOR 2 HEATER (REAR)SR20DE
Component Inspection
EC-968
Page 1394 of 3051
SEF956N
SEF777Z
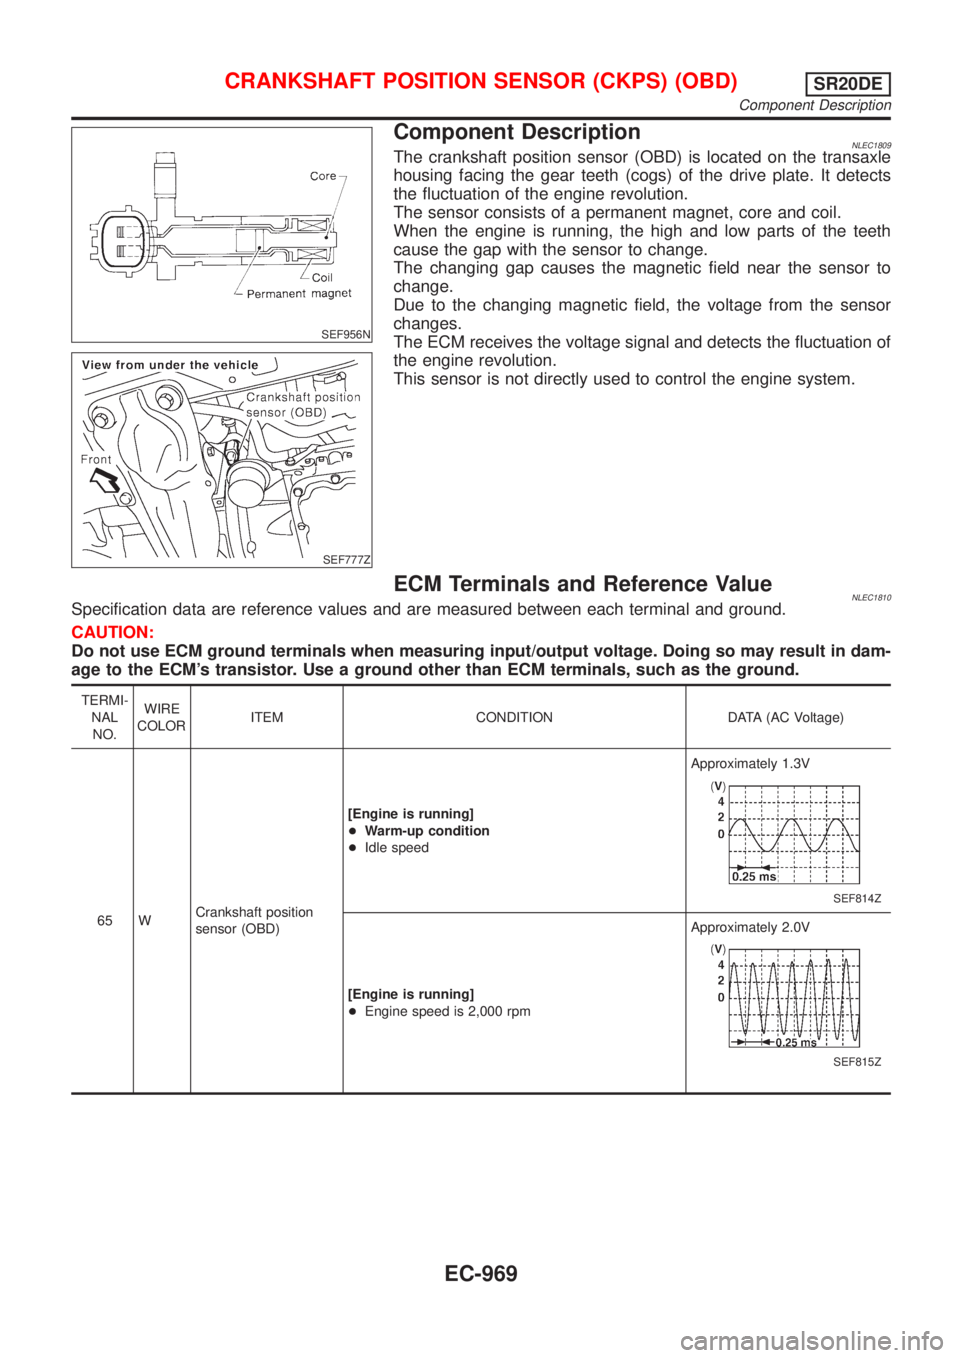
Component DescriptionNLEC1809The crankshaft position sensor (OBD) is located on the transaxle
housing facing the gear teeth (cogs) of the drive plate. It detects
the fluctuation of the engine revolution.
The sensor consists of a permanent magnet, core and coil.
When the engine is running, the high and low parts of the teeth
cause the gap with the sensor to change.
The changing gap causes the magnetic field near the sensor to
change.
Due to the changing magnetic field, the voltage from the sensor
changes.
The ECM receives the voltage signal and detects the fluctuation of
the engine revolution.
This sensor is not directly used to control the engine system.
ECM Terminals and Reference ValueNLEC1810Specification data are reference values and are measured between each terminal and ground.
CAUTION:
Do not use ECM ground terminals when measuring input/output voltage. Doing so may result in dam-
age to the ECM's transistor. Use a ground other than ECM terminals, such as the ground.
TERMI-
NAL
NO.WIRE
COLORITEM CONDITION DATA (AC Voltage)
65 WCrankshaft position
sensor (OBD)[Engine is running]
+Warm-up condition
+Idle speedApproximately 1.3V
SEF814Z
[Engine is running]
+Engine speed is 2,000 rpmApproximately 2.0V
SEF815Z
CRANKSHAFT POSITION SENSOR (CKPS) (OBD)SR20DE
Component Description
EC-969
Page 1395 of 3051
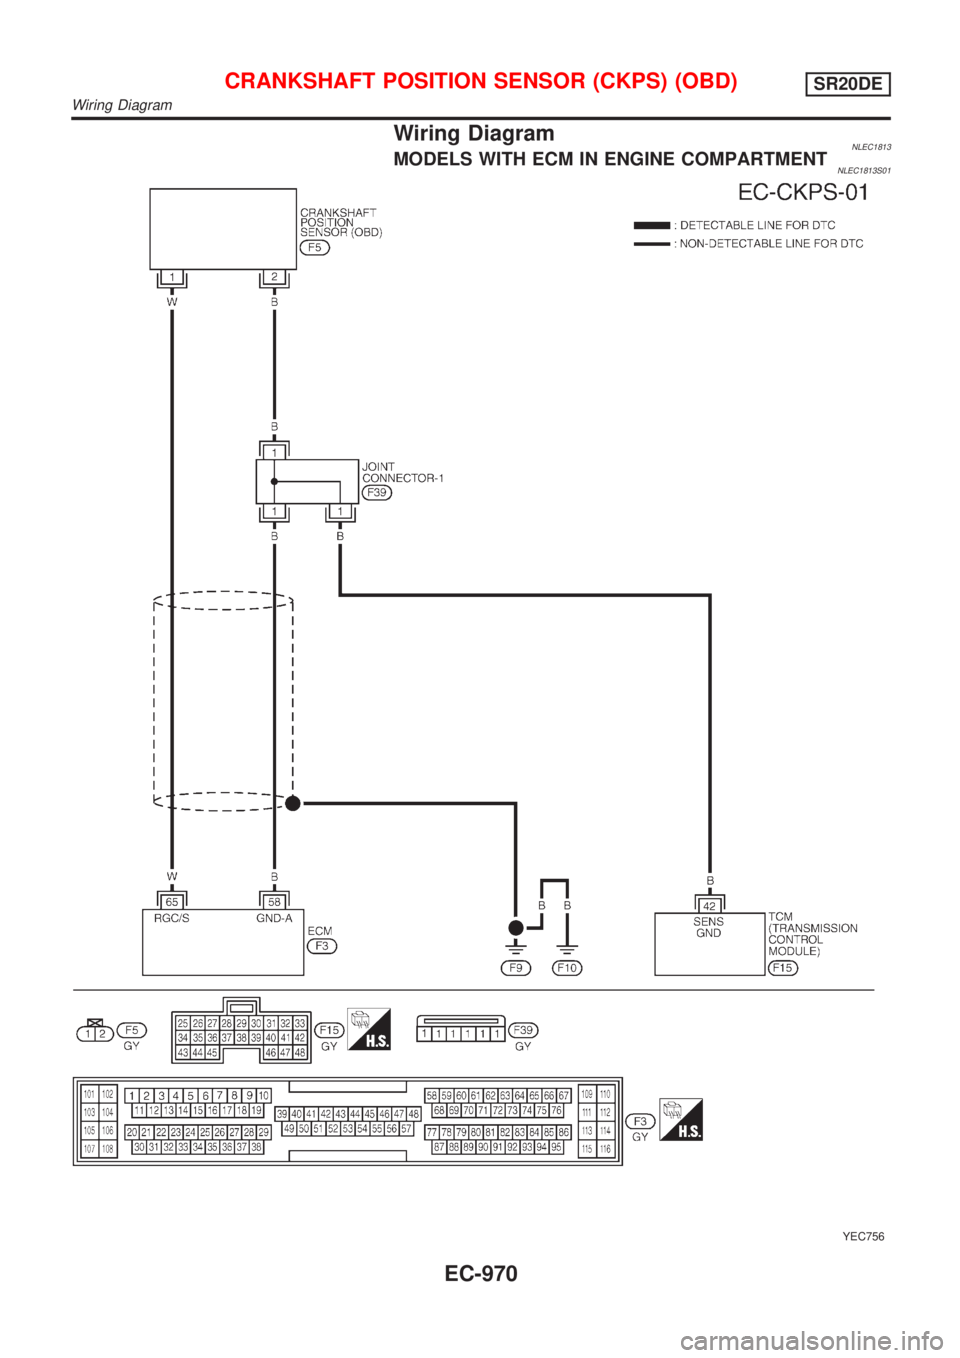
Wiring DiagramNLEC1813MODELS WITH ECM IN ENGINE COMPARTMENTNLEC1813S01
YEC756
CRANKSHAFT POSITION SENSOR (CKPS) (OBD)SR20DE
Wiring Diagram
EC-970
Page 1396 of 3051
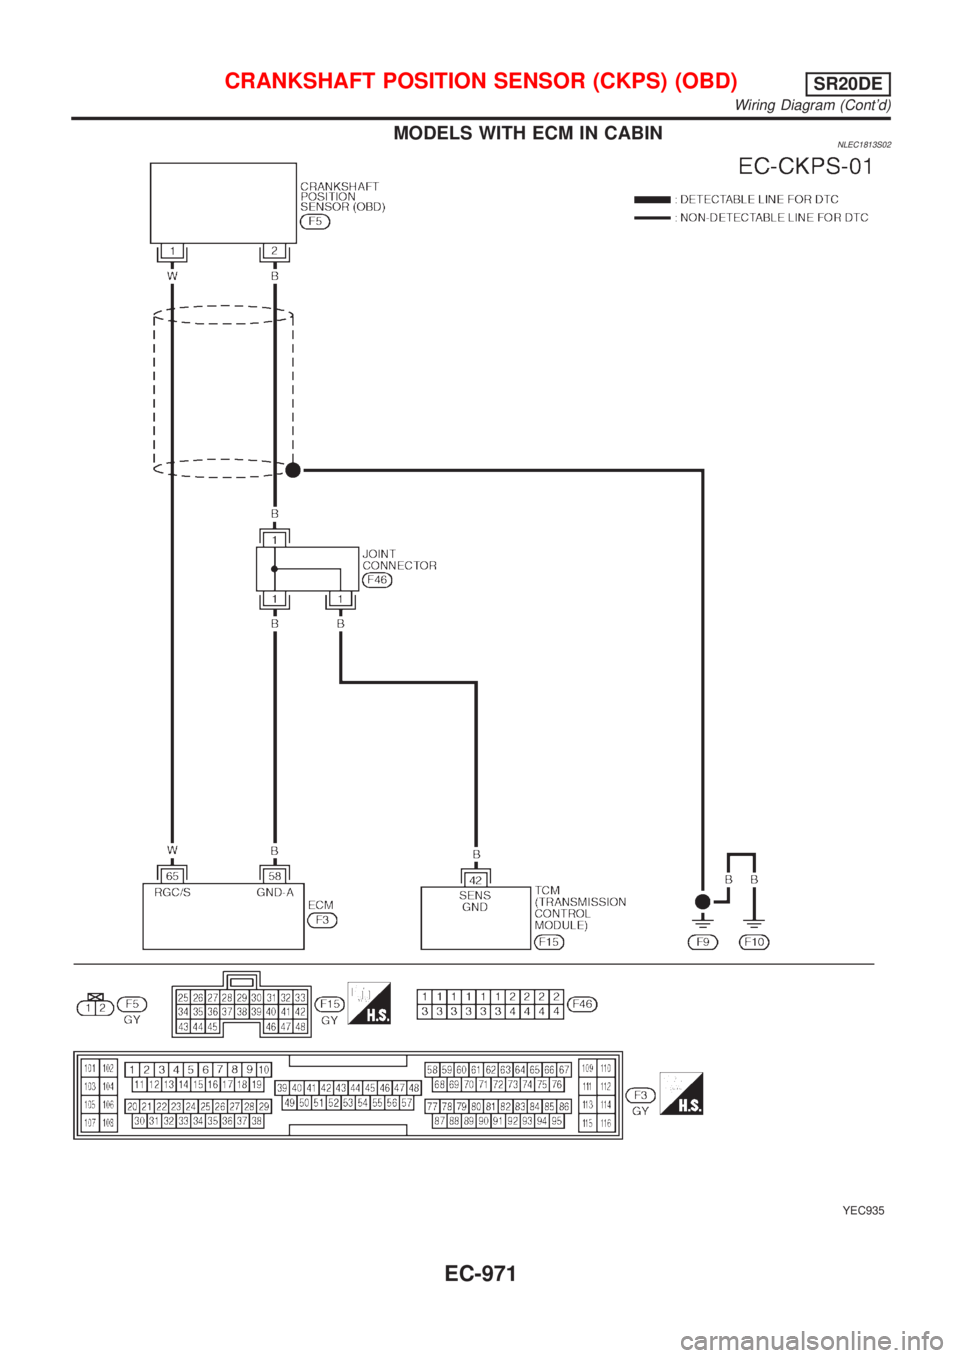
MODELS WITH ECM IN CABINNLEC1813S02
YEC935
CRANKSHAFT POSITION SENSOR (CKPS) (OBD)SR20DE
Wiring Diagram (Cont'd)
EC-971
Page 1397 of 3051
Diagnostic ProcedureNLEC1816
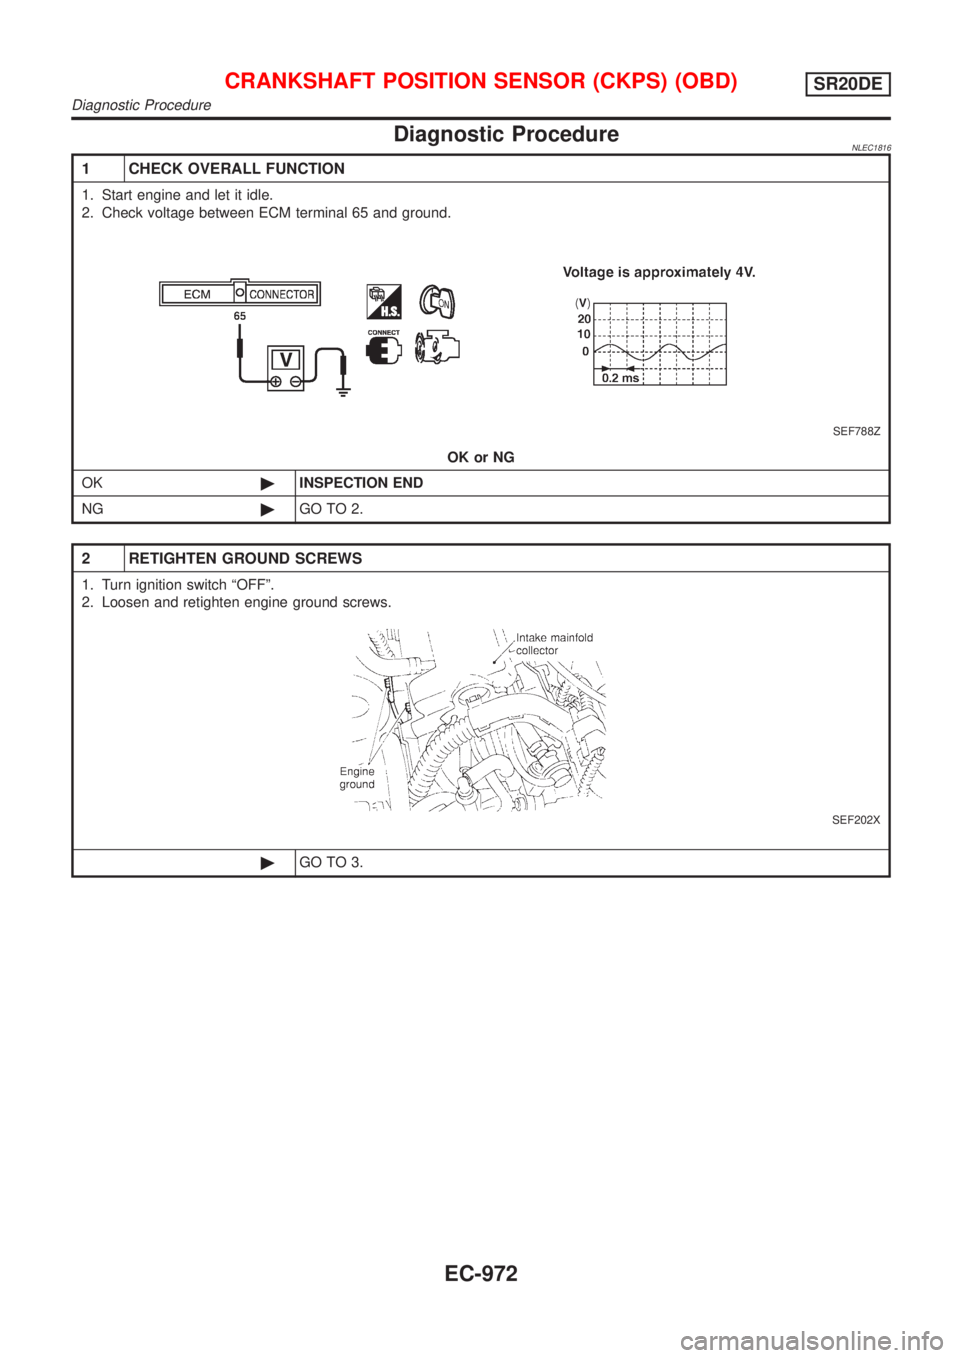
1 CHECK OVERALL FUNCTION
1. Start engine and let it idle.
2. Check voltage between ECM terminal 65 and ground.
SEF788Z
OK or NG
OK©INSPECTION END
NG©GO TO 2.
2 RETIGHTEN GROUND SCREWS
1. Turn ignition switch ªOFFº.
2. Loosen and retighten engine ground screws.
SEF202X
©GO TO 3.
CRANKSHAFT POSITION SENSOR (CKPS) (OBD)SR20DE
Diagnostic Procedure
EC-972
Page 1398 of 3051
3 CHECK INPUT SIGNAL CIRCUIT
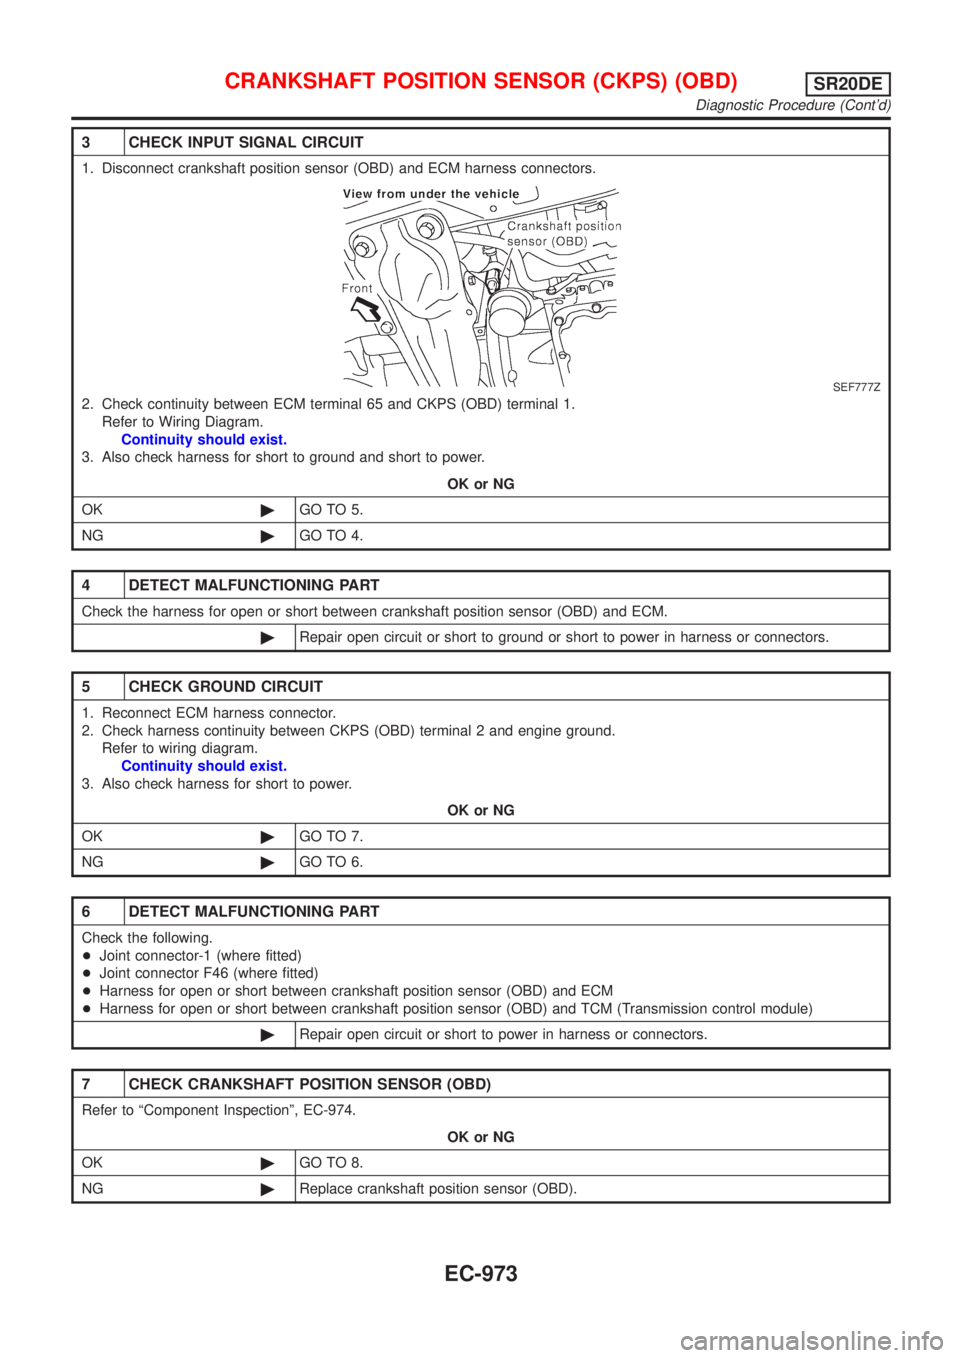
1. Disconnect crankshaft position sensor (OBD) and ECM harness connectors.
SEF777Z
2. Check continuity between ECM terminal 65 and CKPS (OBD) terminal 1.
Refer to Wiring Diagram.
Continuity should exist.
3. Also check harness for short to ground and short to power.
OK or NG
OK©GO TO 5.
NG©GO TO 4.
4 DETECT MALFUNCTIONING PART
Check the harness for open or short between crankshaft position sensor (OBD) and ECM.
©Repair open circuit or short to ground or short to power in harness or connectors.
5 CHECK GROUND CIRCUIT
1. Reconnect ECM harness connector.
2. Check harness continuity between CKPS (OBD) terminal 2 and engine ground.
Refer to wiring diagram.
Continuity should exist.
3. Also check harness for short to power.
OK or NG
OK©GO TO 7.
NG©GO TO 6.
6 DETECT MALFUNCTIONING PART
Check the following.
+Joint connector-1 (where fitted)
+Joint connector F46 (where fitted)
+Harness for open or short between crankshaft position sensor (OBD) and ECM
+Harness for open or short between crankshaft position sensor (OBD) and TCM (Transmission control module)
©Repair open circuit or short to power in harness or connectors.
7 CHECK CRANKSHAFT POSITION SENSOR (OBD)
Refer to ªComponent Inspectionº, EC-974.
OK or NG
OK©GO TO 8.
NG©Replace crankshaft position sensor (OBD).
CRANKSHAFT POSITION SENSOR (CKPS) (OBD)SR20DE
Diagnostic Procedure (Cont'd)
EC-973
Page 1399 of 3051
8 CHECK INTERMITTENT INCIDENT
Perform ªTROUBLE DIAGNOSIS FOR INTERMITTENT INCIDENTº, EC-670.
©INSPECTION END
SEF960N
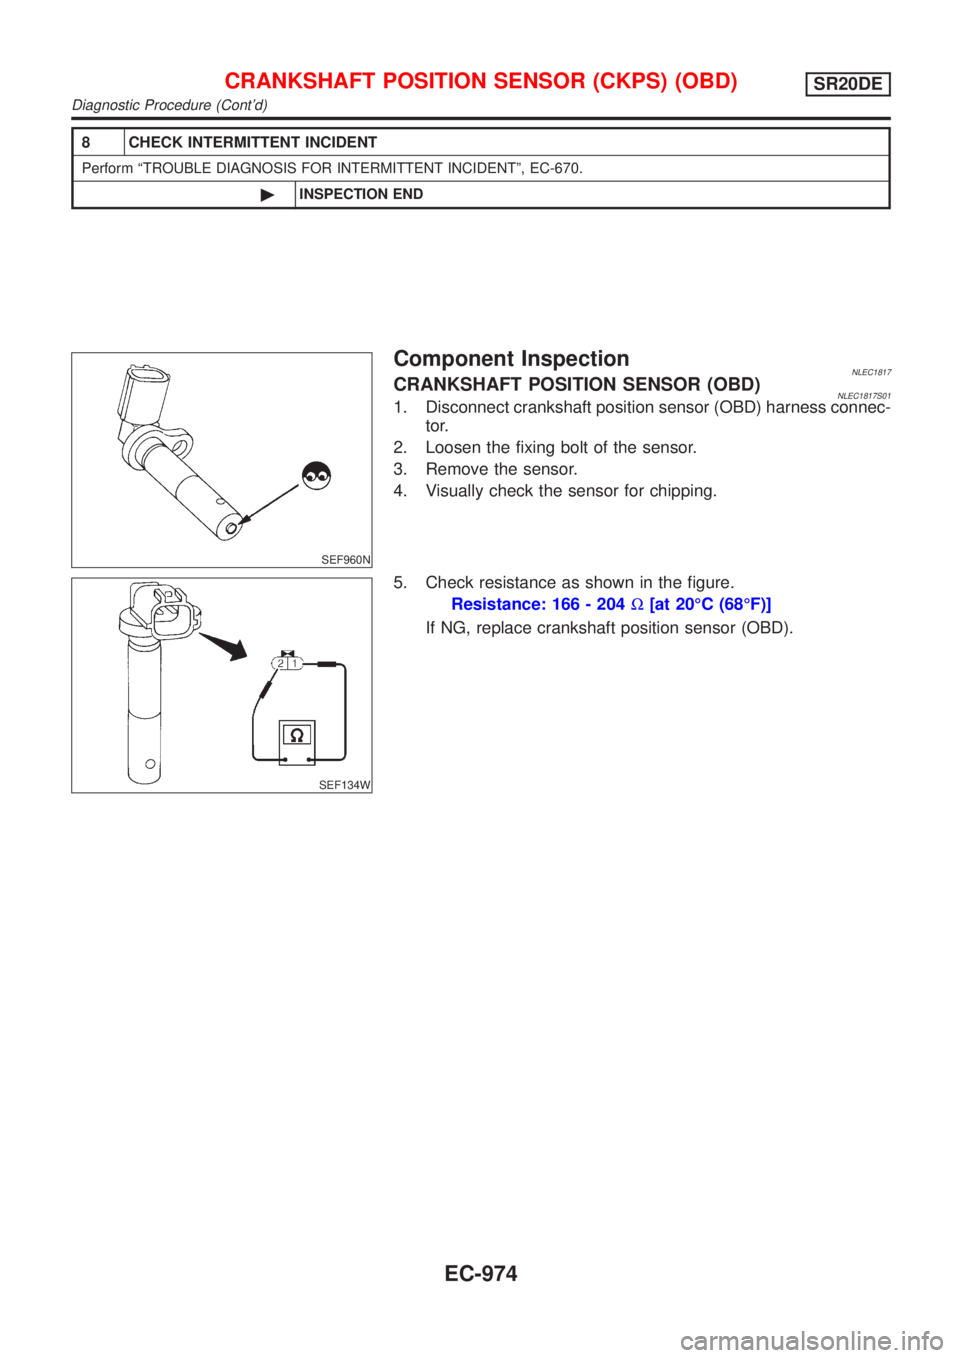
Component InspectionNLEC1817CRANKSHAFT POSITION SENSOR (OBD)NLEC1817S011. Disconnect crankshaft position sensor (OBD) harness connec-
tor.
2. Loosen the fixing bolt of the sensor.
3. Remove the sensor.
4. Visually check the sensor for chipping.
SEF134W
5. Check resistance as shown in the figure.
Resistance: 166 - 204W[at 20ÉC (68ÉF)]
If NG, replace crankshaft position sensor (OBD).
CRANKSHAFT POSITION SENSOR (CKPS) (OBD)SR20DE
Diagnostic Procedure (Cont'd)
EC-974
Page 1400 of 3051
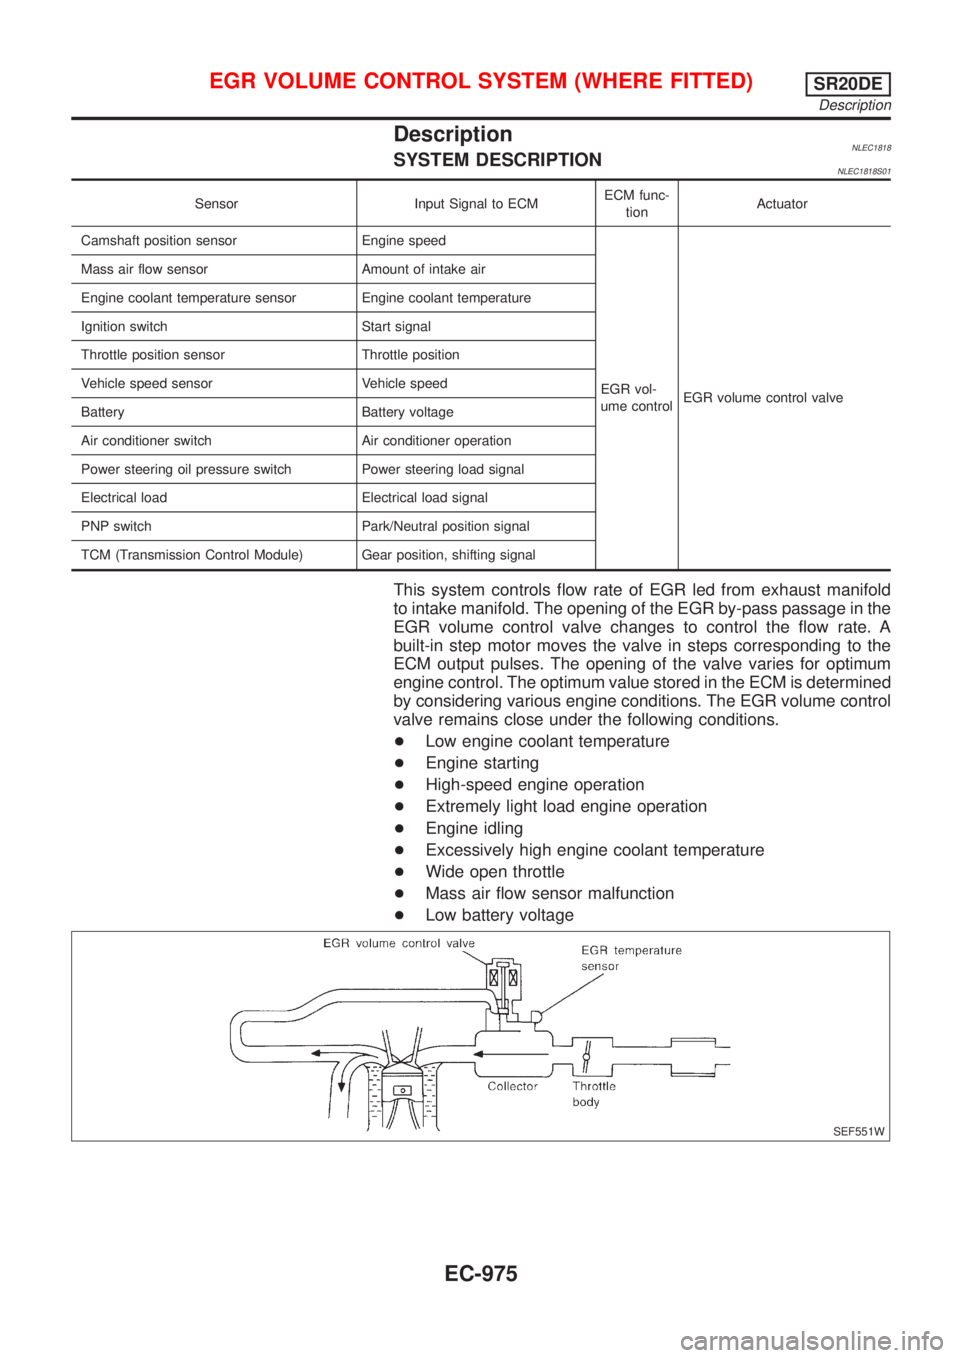
DescriptionNLEC1818SYSTEM DESCRIPTIONNLEC1818S01
Sensor Input Signal to ECMECM func-
tionActuator
Camshaft position sensor Engine speed
EGR vol-
ume controlEGR volume control valve Mass air flow sensor Amount of intake air
Engine coolant temperature sensor Engine coolant temperature
Ignition switch Start signal
Throttle position sensor Throttle position
Vehicle speed sensor Vehicle speed
Battery Battery voltage
Air conditioner switch Air conditioner operation
Power steering oil pressure switch Power steering load signal
Electrical load Electrical load signal
PNP switch Park/Neutral position signal
TCM (Transmission Control Module) Gear position, shifting signal
This system controls flow rate of EGR led from exhaust manifold
to intake manifold. The opening of the EGR by-pass passage in the
EGR volume control valve changes to control the flow rate. A
built-in step motor moves the valve in steps corresponding to the
ECM output pulses. The opening of the valve varies for optimum
engine control. The optimum value stored in the ECM is determined
by considering various engine conditions. The EGR volume control
valve remains close under the following conditions.
+Low engine coolant temperature
+Engine starting
+High-speed engine operation
+Extremely light load engine operation
+Engine idling
+Excessively high engine coolant temperature
+Wide open throttle
+Mass air flow sensor malfunction
+Low battery voltage
SEF551W
EGR VOLUME CONTROL SYSTEM (WHERE FITTED)SR20DE
Description
EC-975