check engine light NISSAN GT-R 1998 Service Manual
[x] Cancel search | Manufacturer: NISSAN, Model Year: 1998, Model line: GT-R, Model: NISSAN GT-R 1998Pages: 230, PDF Size: 12.66 MB
Page 24 of 230
TROUBLE DIAGNOSES
Self-diagnosis (Cont'd)
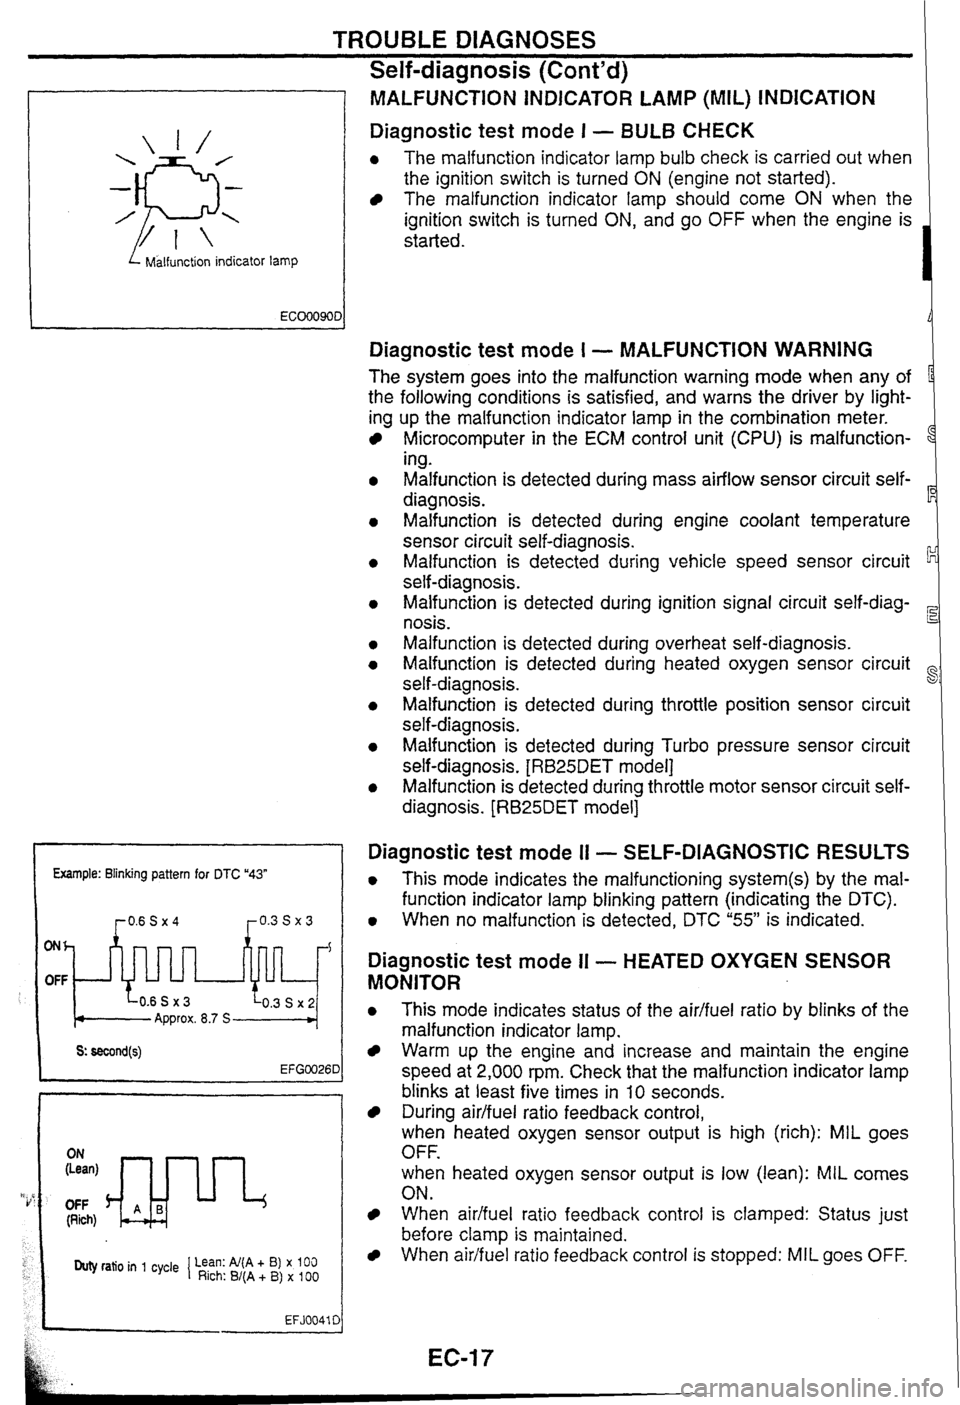
I Malfunction indicator lamp
MALFUNCTiON INDICATOR LAMP (MIL) INDICATION
Diagnostic test mode I - BULB CHECK
0 The malfunction indicator lamp bulb check is carried out when
the ignition switch is turned
ON (engine not started).
The malfunction indicator lamp should come ON when the
ignition switch is turned
ON, and go OFF when the engine is
started.
Example: Blinking pattern for DTC "43"
ONh
OFF
Approx. 8.7 S
OFF (Rich)
Duty ratio in 1 cycle 1 Lean: Al(A + B) x 100 Rich: B/(A + B) x 100
EFJ0041 C
Diagnostic test mode I - MALFUNCTION WARNING
The system goes into the malfunction warning mode when any of
the following conditions is satisfied, and warns the driver by light-
ing up the malfunction indicator lamp in the combination meter.
Microcomputer in the ECM control unit (CPU) is malfunction-
1
ing.
Malfunction is detected during mass airflow sensor circuit self-
diagnosis.
Malfunction is detected during engine coolant temperature
sensor circuit self-diagnosis.
Malfunction is detected during vehicle speed sensor circuit
self-diagnosis.
Malfunction is detected during ignition signal circuit
self-diag-
nosis.
Malfunction is detected during overheat self-diagnosis.
Malfunction is detected during heated oxygen sensor circuit
self-diagnosis.
~alfunsion is detected during throttle position sensor circuit
self-diagnosis.
Malfunction is detected during Turbo pressure sensor circuit
self-diagnosis.
[RB25DET model]
Malfunction is detected during throttle motor sensor circuit self-
diagnosis.
[RB25DET model]
Diagnostic test mode I1 - SELF-DIAGNOSTIC RESULTS
0 This mode indicates the malfunctioning system(s) by the mal-
function indicator lamp blinking pattern (indicating the DTC).
0 When no malfunction is detected, DTC "55" is indicated.
Diagnostic test mode II - HEATED OXYGEN SENSOR
MONITOR
0 This mode indicates status of the aidfuel ratio by blinks of the
malfunction indicator lamp.
Warm up the engine and increase and maintain the engine
speed at 2,000 rpm. Check that the malfunction indicator lamp
blinks at least five times in
10 seconds.
During airlfuel ratio feedback control,
when heated oxygen sensor output is high (rich): MIL goes
OFF.
when heated oxygen sensor output is low (lean):
MIL comes
ON.
When aidfuel ratio feedback control is clamped: Status just
before clamp
is maintained.
When airifuel ratio feedback control is stopped: MIL goes OFF.
Page 25 of 230
TROUBLE DIAGNOSES
Self-diagnosis
(Cont'd)
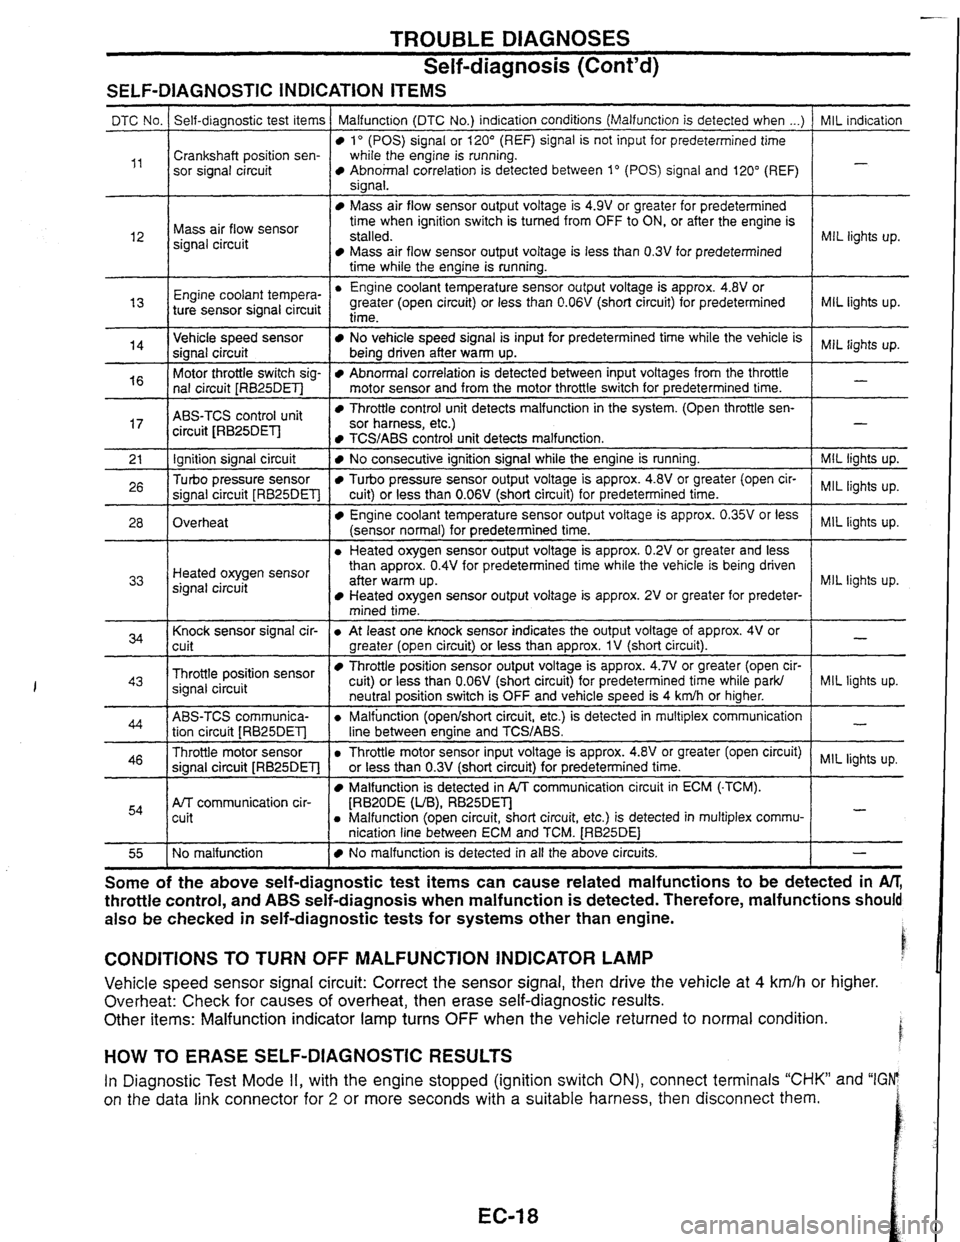
SELF-DIAGNOSTIC INDICATION ITEMS
I time while the engine is running. I
MIL indication
-
DTC No.
,,
MIL lights up. l2
Self-diagnostic test items
Crankshaft position sen-
sor signal circuit Malfunction (DTC No.)
indication conditions (Malfunction is detected when ...)
lo (POS) signal or 120" (REF) signal is not input for predetermined time
while the engine is running.
Abnohal correlation is detected between 1" (POS) signal and 120" (REF)
sianal.
Mass air flow sensor
signal circuit
MIL lights up.
Engine coo'ant tempera-
"
Mass air flow sensor output voltage is 4.9V or greater for predetermined
time when ignition switch is turned from OFF to ON, or after the engine is
stalled.
Mass air flow sensor output voltage is less than 0.3V for predetermined
Engine coolant temperature sensor output voltage is approx.
4.8V or
greater (open circuit) or less than
0.06V (short circuit) for predetermined
MIL lights up.
-
14
ABS-TCS control unit
circuit JRB25DEl-l
ture sensor signal circuit Throttle control unit detects malfunction
in the system. (Open throttle sen- sor harness, etc.)
Ignition signal circuit
Turbo pressure sensor
signal circuit
[RB25DET]
Overheat
I 1 mined time. I
time-
Vehicle speed sensor
signal circuit
Motor throttle switch sig-
nal circuit
[RB25DET]
TCS/ABS control unit detects malfunction. 1 -
I Knock sensor signal cir-
cuit
- --
No vehicle speed signal is input for predetermined time while the vehicle is
being driven after warm up.
Abnormal correlation is detected between input voltages from the throttle
motor sensor and from the motor throttle switch for predetermined time.
I
MIL lights up. Heated oxygen sensor
signal circuit
Throttle position sensor
signal circuit
No consecutive ignition signal while the engine is running.
Turbo pressure sensor output voltage is approx. 4.8V or greater (open cir-
cuit) or less than
0.06V (short circuit) for predetermined time.
Engine coolant temperature sensor output voltage is approx. 0.35V or less
(sensor normal) for predetermined time.
a Heated oxygen sensor output voltage is approx. 0.2V or greater and less
than approx.
0.4V for predetermined time while the vehicle is being driven
aner warm up. Heated oxygen sensor output voltage is approx. 2V or greater for predeter-
ABS-TCS communica- tion circuit
[RB25DET]
Throttle motor sensor
signal circuit
[RB25DET]
Afr communication cir-
cuit
MIL lights up.
lights
up.
MIL lights up.
NQ malfunction
I a At least one knock sensor indicates the output voltage of approx. 4V or
greater (open circuit) or less than approx.
1V (short circuit).
Throttle position sensor output voltage is approx. 4.7V or greater (open cir-
cuit) or less than
0.06V
(short circuit) for predetermined time while ark/
a Throttle motor sensor input voltage is approx. 418~or greater (open circuit) MIL lights up.
or less than
0.3V
(short circuit) for predetermined time. I
-
MIL liqhts up. neutral position switch is OFF and vehicle speed is 4 kdh or higher.
a Malfunction (openlshort circuit, etc.) is detected in multiplex communication
line between enaine and
TCWABS.
Malfunction is detected in PA communication circuit in ECM (-TCM).
[RBZODE (UB), RB25Dm a Malfunction (open circuit, short circuit, etc.) is detected in multiplex commu-
nication line between ECM and TCM.
[RB25DE1
-
-
No malfunction is detected in all the above circuits. I - - --
Some of the above ~elfaia~nostic test items can cause related malfunctions to be detected in M,
throttle control, and ABS seif-diagnosis when malfunction is detected. Therefore, malfunctions should
also be checked in self-diagnostic tests for systems other than engine.
CONDITIONS TO TURN OFF MALFUNCTION INDICATOR LAMP
Vehicle speed sensor signal circuit: Correct the sensor signal, then drive the vehicle at 4 km/h or higher.
Overheat: Check
for causes of overheat, then erase self-diagnostic results.
Other items: Malfunction indicator lamp turns
OFF when the vehicle returned to normal condition.
HOW TO ERASE SELF-DIAGNOSTIC RESULTS
In Diagnostic Test Mode II, with the engine stopped (ignition switch ON), connect terminals "CHK" and "IGFP
on the data link connector for
2 or more seconds with a suitable harness, then disconnect them.
Page 31 of 230
TROUBLE DIAGNOSES
CONSULT (Cont'd)
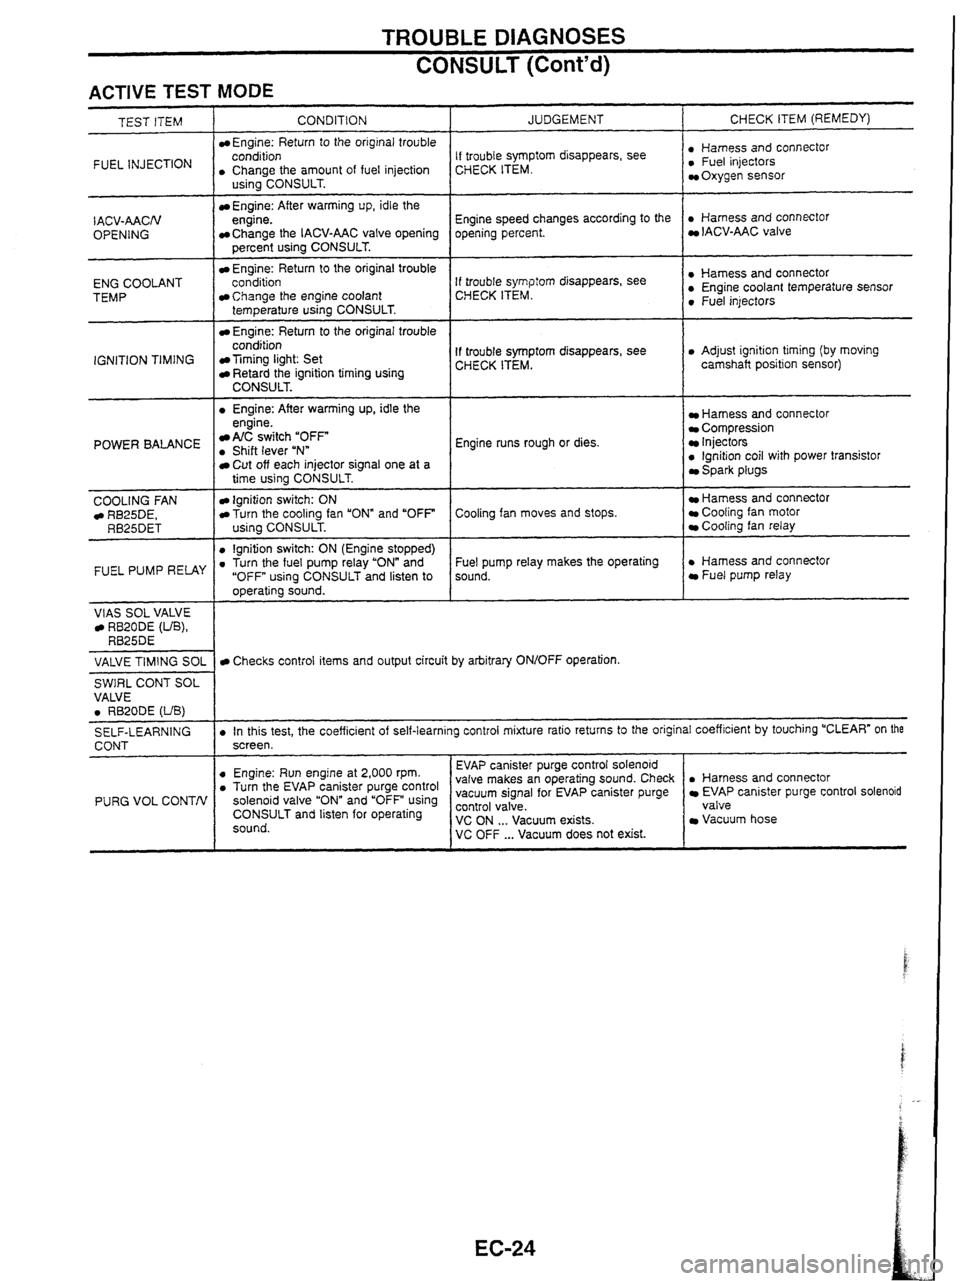
ACTIVE TEST MODE
INJECTION I . CCohArthe amount of fuel injection
TEST ITEM
CONDITION
Engine: Return
to the original trouble
- I . Engine: After warming up, idle the
IACV-AACN
OPENING
ENG COOLANT
TEMP
IGNITION TIMING
US~~~CONSULT.
Engine: After warming up, idle the
engine.
Change the IACV-AAC valve opening
percent using CONSULT.
Engine: Return to the original trouble
conditioo
Change the engine coolant
temperature using CONSULT.
Engine: Return to the original trouble
condition
Timing light: Set Retard the ignition timing using CONSULT.
POWER BALANCE engine. A/C switch "OFF . Shift lever uNn
COOLING
FAN RB25DE, RB25DET
FUEL PUMP RELAY
VlAS SOL VALVE RB20DE (UB), RB25DE
JUDGEMENT
Cut off each injector signal one at a
time using CONSULT.
Ignition switch: ON Turn the cooling fan "ON" and "OFF
using CONSULT.
0 lgnition switch: ON (Engine stopped) . Turn the fuel pump relay "ON" and
"OFF using CONSULT and listen to
operating sound. CHECK
ITEM (REMEDY)
If trouble symptom disappears, see
CHECK ITEM. : ~,"~~,,,~scOnnectOr Oxygen sensor
Engine speed changes according to the
opening percent.
. Harness and connector IACV-AAC valve
If trouble
symp:orn disappears, see
CHECK ITEM. : Sensor 0 Fuel injectors
If trouble symptom disappears, see
CHECK ITEM. 0 Adjust ignition timing (by moving
camshaft position sensor)
Engine runs rough or dies.
Harness and connector Compression Injectors 0 lgnition coil with power transistor Spark plugs
Cooling fan moves and stops.
Hamess and connector Cooling fan motor Cooling fan relay
Fuel pump relay makes the operating
sound.
. Harness and connector Fuel pump relay
VALVE
TIMING
SOL
SWIRL CONT SOL
VALVE
0 RB20DE (UB)
SELF-LEARNING
CONT
PURG VOL CONTN
Checks control items and output circuit by arbitrary ON/OFF operation.
. In this test, the coefficient of self-learning control mixture ratio returns to the original coefficient by touching "CLEAR" on the
screen.
. Harness and connector EVAP canister purge control solenoid
valve
Vacuum hose
0 Engine: Run engine at 2,000 rpm. . Turn the EV~P canister purge control solenoid valve and using CONSULT and listen for operating
sound. EVAP
canister purge control solenoid
valve makes an operating sound. Check
vacuum signal for EVAP canister purge ~~~~~~a'cuum exists. VC OFF ... Vacuum does not exist.
Page 34 of 230
TROUBLE DIAGNOSES
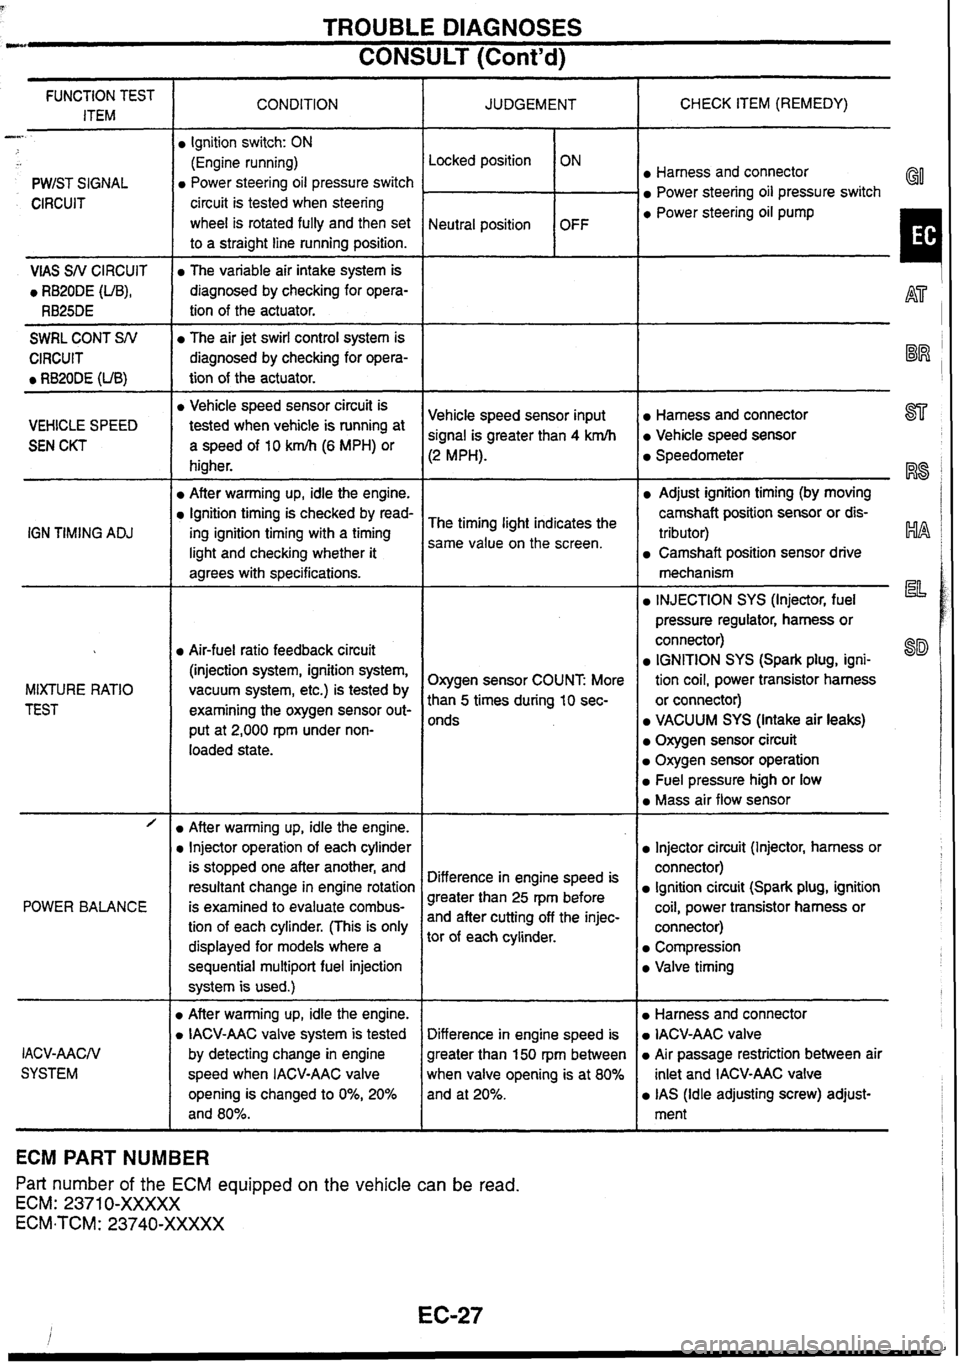
CONSULT (Cont'd) --
CHECK ITEM (REMEDY)
FUNCTION TEST
ITEM CONDITION
JUDGEMENT
-
PWIST SIGNAL Locked position
Neutral position
Ignition
switch: ON
(Engine running)
Power steering oil pressure switch
circuit is tested when steering
wheel is rotated fully and then set
to a straight line running position. ON
OFF Harness and connector
Power steering oil pressure switch GO
CIRCUIT a Power steering oil pump
I VlAS SN CIRCUIT
0 RB20DE (UB),
RB25DE
The variable air intake system is
diagnosed by checking for opera-
tion of the actuator.
-
SWRL CONT SN
CIRCUIT
0 RB20DE (UB)
The air jet swirl control system is
diagnosed by checking for opera-
tion of the actuator.
-- -- -
a Vehicle speed sensor circuit is
tested when vehicle
is running at
a speed of 10 km/h (6 MPH) or
higher.
After warming up, idle the engine.
Ignition timing is checked by read-
ing ignition timing with a timing
light and checking whether it
agrees with specifications.
Harness and connector 877
Vehicle speed sensor
Vehicle
speed sensor input
signal is greater than 4 krnlh
(2 MPH).
VEHICLE SPEED
SEN CKT Speedometer
RS
Adjust ignition timing (by moving
camshaft position sensor or dis-
tributor)
HA
Camshaft position sensor drive
The
timing light indicates the
same value on the screen.
IGN
TIMING
ADJ
mechanism
la INJECTION SYS (Injector, fuel
pressure regulator, harness or
connector)
IGNITION SYS (Spark plug, igni-
tion coil, power transistor harness
or connector)
VACUUM SYS (Intake air leaks)
Oxygen sensor circuit
Oxygen sensor operation
Fuel pressure high or low
Mass air flow sensor
Air-fuel ratio feedback circuit
(injection system, ignition system,
vacuum system, etc.) is tested by
examining the oxygen sensor out-
put at 2,000
rpm under non-
loaded state. Oxygen sensor COUNT
More
than
5 times during 10 sec-
onds
MIXTURE
RATIO
TEST
- -- /
POWER BALANCE
Injector circuit (Injector, harness or
connector)
Ignition circuit (Spark plug, ignition
coil, power transistor harness or
connector)
Compression
Valve timing
After warming up, idle the engine.
Injector operation of each cylinder
is stopped one after another, and
resultant change in engine rotation
is examined to evaluate combus-
tion of each cylinder. (This is only
displayed for models where a
sequential
multipart fuel injection
system is used.)
D After warming up, idle the engine.
D IACV-AAC valve system is tested
by detecting change in engine
speed when IACV-AAC valve
opening is changed to
0%, 20%
and 80%. Difference
in engine speed is
greater than 25 rpm before
and after cutting off the injec-
tor of each cylinder.
Harness and connector
IACV-AAC valve
Air passage restriction between air
inlet and IACV-AAC valve
IAS (Idle adjusting screw) adjust-
ment
Difference
in engine speed is
greater than 150
rpm
between
when valve opening is at 80%
and at 20%.
IACV-AACN
SYSTEM
ECM PART NUMBER
Part number of the ECM equipped on the vehicle
can be read.
ECM: 2371 0-XXXXX
ECM-TCM: 23740-XXXXX
Page 41 of 230
TROUBLE DIAGNOSES
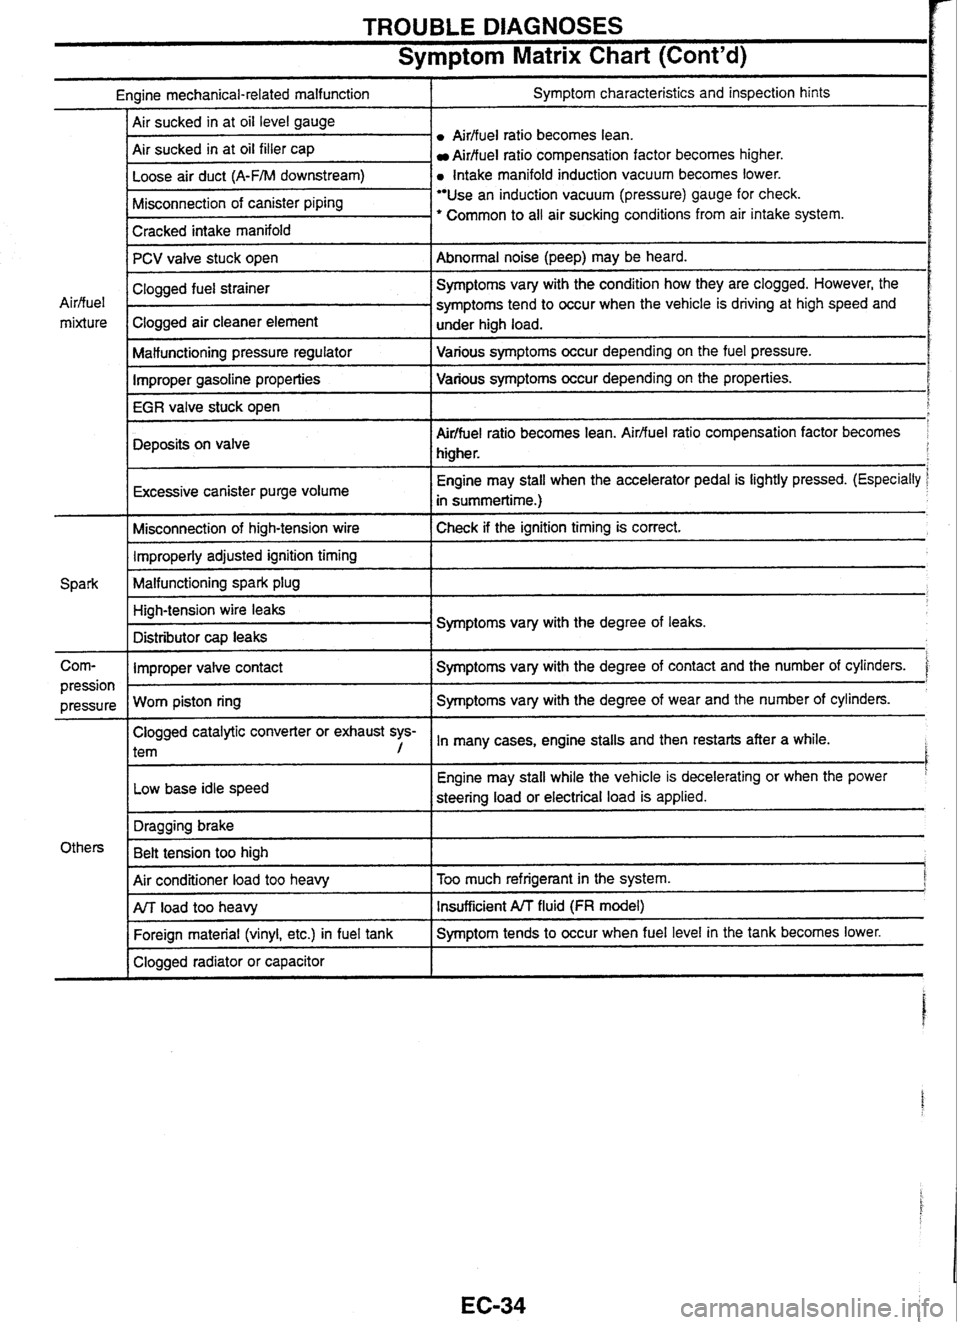
Symptom Matrix Chart (Cont'd)
Engine mechanical-related malfunction I Symptom characteristics and inspection hints
Airffuel
ratio becomes lean.
Air sucked in at oil filler cap
Aidfuel ratio compensation factor becomes higher.
a Intake manifold induction vacuum becomes lower.
I Cracked intake manifold I
Misconnection of canister piping Use an induction vacuum (pressure) gauge for check.
' Common to all air sucking conditions from air intake system.
-
PCV valve stuck open
I Malfunctioning pressure regulator I Various symptoms occur depending on the fuel pressure.
Abnormal noise (peep) may
be heard.
Air/fuel
mixture
Improper gasoline properties Various
symptoms occur depending on the properties.
IEGRiale
stuck open
I
Clogged fuel strainer .
Clogged air cleaner element
Deposits on valve
r
Symptoms vary with the condition how they are clogged. However, the
symptoms tend to occur when the vehicle is driving at high speed and
under high load.
I
Air/fuel ratio becomes lean. Airfluel ratio compensation factor becomes
higher.
Excessive canister purge volume
I
Engine may stall when the accelerator pedal is lightly pressed. (Especially
in summertime.)
Misconnection of high-tension wire Check if the ignition timing
is correct. 1 Improperly adjusted ignition timing 1
Malfunctioning spark plug 1
Corn- I Improper valve contact I Symptoms vary with the degree of contact and the number of cylinders. '
High-tension wire leaks
Distributor
cap leaks Symptoms
vary with the degree of leaks.
Clogged catalytic converter or exhaust sys-
l tem , In many cases, engine stalls and then restarts after a while. I
pression I
Low base idle speed
pressure
Worn piston ring I
Engine may
stall while the vehicle is decelerating or when the power '
steering load or electrical load is applied.
Symptoms vary
with the degree of wear and the number of cylinders.
I
Air conditioner load too heavy I Too much refrigerant in the system. j
Others Dragging
brake
Belt tension too high
1
I Clogged radiator or capacitor I
ArJ load too heavy
Foreign material (vinyl, etc.) in fuel tank Insufficient A/T fluid (FR model)
Symptom tends to occur when fuel level in the tank becomes lower.
Page 43 of 230
TROUBLE DlAGNOSES
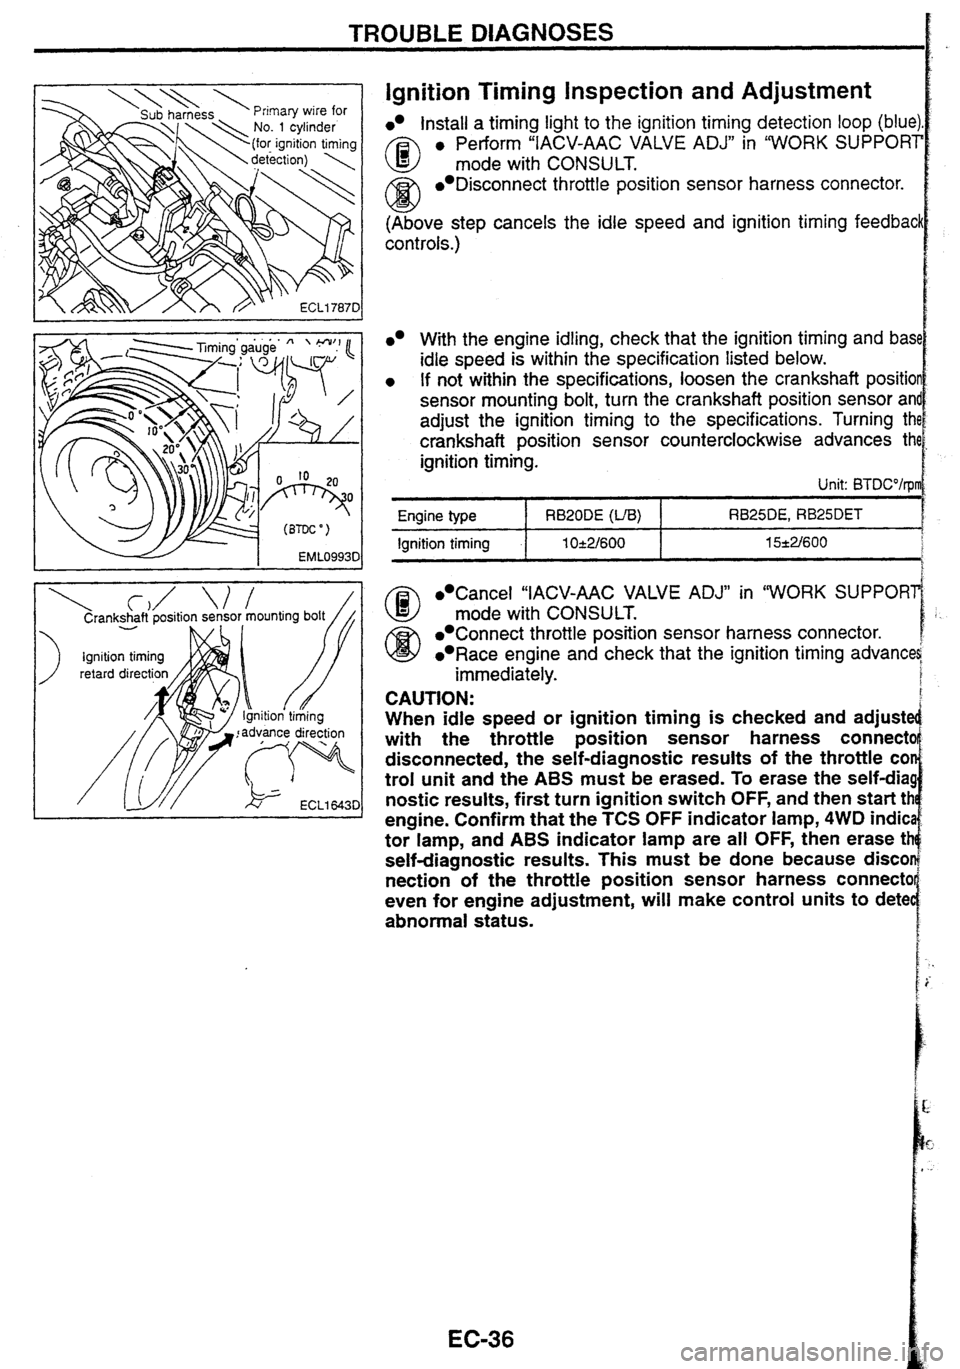
Ignition Timing inspection and Adjustment
lnstall a timing light to the ignition timing detection loop (blue)
A3 e Perform "IACV-AAC VALVE ADJ" in "WORK SUPPORT
mode with CONSULT.
/Ci3 Disconnect throttle position sensor harness connector.
w (Above step cancels the idle speed and ignition timing feedbacl
cont rots.)
Cancel "IACV-AAC VALVE ADJ" in "WORK SUPPORl
@ mode with CONSULT.
Connect throttle position sensor harness connector.
Race engine and check that the ignition timing advana
immediately.
With the engine idling, check that the ignition timing and bas1
idle speed is within the specification listed below.
If not within the specifications, loosen the crankshaft positio
sensor mounting bolt, turn the crankshaft position sensor
an
adjust the ignition timing to the specifications. Turning th
crankshaft position sensor counterclockwise advances th
ignition timing.
Unit: BTDCO/rpl
CAUTION:
When idle speed or ignition timing is checked and adjuste
with the throttle position sensor harness
connectc
disconnected, the self-diagnostic results of the throttle
COI
trol unit and the ABS must be erased. To erase the self-dia!
nostic
results, first turn ignition switch OFF, and then start tt
engine. Confirm that the
TCS OFF indicator lamp, 4WD indic
tor lamp, and
ABS indicator lamp are all OFF, then erase tt
self-diagnostic results. This must be done because disco
nection
of the throttle position sensor harness connectc
even for engine adjustment,
will make control units to dete
abnormal status.
RB25DE, RB25DET
15*2/600 Engine type
Ignition timing
RB20DE (VB)
1 O-e2/600
Page 71 of 230
TROUBLE DIAGNOSES
DESCRIPTION
CONSULT indicates operation timing of each solenoid such as electrical shift timing and lock-up timing.
Therefore, when there is a definite difference between shift timing detected from shift shock (or engine
speed variation) and the one indicated by CONSULT, mechanical parts other than solenoids and sensors
(including hydraulic circuit) may be malfunctioning. In this case, check the mechanical parts using appli-
cable diagnostic procedures.
Shift schedule (which implies gear position) displayed on CONSULT and that indicated in Service Manual
may differ slightly. This occurs because of the following reasons:
Actual shift schedule has more or less tolerance or allowance.
Shift schedule indicated in Service Manual refers to the point where shifts start, and gear position dis-
played on CONSULT indicates the point where shifts are completed.
Shift solenoid valve A or B (ON/OFF) is displayed on CONSULT at the start of shifting. Gear position
is displayed upon completion of shifting (which is computed by TCM).
To make sure the part No. of ECM-TCM on CONSULT, touch "ENGINE" to verify "C/U PART NUMBER".
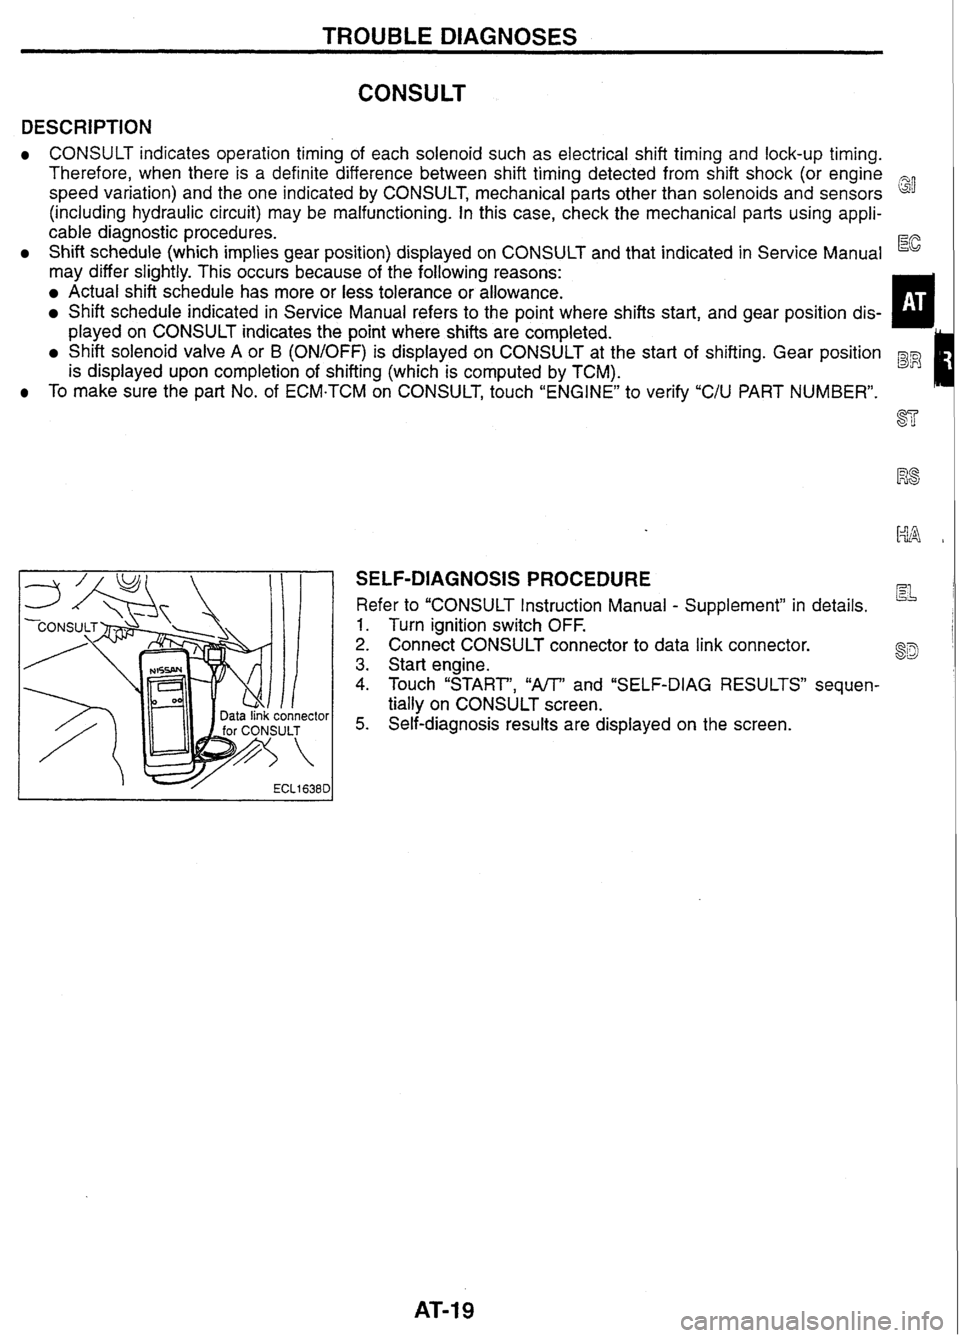
SELF-DIAGNOSIS PROCEDURE
Refer to "CONSULT Instruction Manual - Supplement" in details.
1. Turn ignition switch OFF.
2. Connect CONSULT connector to data link connector.
3. Start engine.
4. Touch "START', "NT and "SELF-DIAG RESULTS" sequen-
tially on CONSULT screen.
5. Self-diagnosis results are displayed on the screen.
Page 89 of 230
![NISSAN GT-R 1998 Service Manual
ANTI-LOCK BRAKE SYSTEM
CONSULT (Contd) - -
Diagnostic item
CONTROL UNIT --
BAnERY "OLTAGE
[VB-HIGH]
"OLTAGE
[VB- LO
W]
Function of calculation in ABS control unit has failed.
Diagnost NISSAN GT-R 1998 Service Manual
ANTI-LOCK BRAKE SYSTEM
CONSULT (Contd) - -
Diagnostic item
CONTROL UNIT --
BAnERY "OLTAGE
[VB-HIGH]
"OLTAGE
[VB- LO
W]
Function of calculation in ABS control unit has failed.
Diagnost](/img/5/57354/w960_57354-88.png)
ANTI-LOCK BRAKE SYSTEM
CONSULT (Cont'd) - -
Diagnostic item
CONTROL UNIT --
BAnERY "OLTAGE
[VB-HIGH]
"OLTAGE
[VB- LO
W]
Function of calculation in ABS control unit has failed.
Diagnostic
item is detected when
...
Control unit,
control
unit
power supply
and ground
circuit
Check item
ABS control unit battery voltage
is abnormally high.
ABS control unit battery voltage is abnormally low.
. ABS MOTOR
[LOCK FAILURE] Control
unit
power supply
circuit ABS motor speed is abnormally low. AES motor,
motor relay
and circuit
1 I
'1 : ABS warning lamp turns on if a wheel or wheels spin for I0 to 80 seconds (depending on the wheel speed) with the vehicle
stuck in snow. ice, or mud. This is a normal condition.
'2: After repairing short-circuited sensor, turning ignition switch ON lights up ABS warning lamp. Check that ABS warning lamp
turns
off when the vehicle is driven at approx. 30 krnh for approx. 1 minute as shown in the self-diagnosis procedure. NOTE: If "ABSn is not displayed on "SELECT SYSTEM" screen, check ABS control unit and data link connector circuit, and make sure
of the CONSULT card number.
DATA MONITOR PROCEDURE
Refer to CONSULT Instruction Manual for details on data
monitor function.
1. Turn ignition switch OFF.
2. Connect CONSULT connector to data link connector for CON-
SULT.
3. Turn ignition switch ON.
4. Touch "START' on CONSULT screen.
5. Touch "ABS" on CONSULT screen.
If "START" is touched immediately after engine is started
or ignition switch is turned on,
"ABS" may not be dis-
played on "SELECT SYSTEM" screen. To display "ABS",
repeat the data monitor procedure from the beginning.
6. Touch "DATA MONITORn.
7. Touch "SETTING" to set recording condition.
8. Touch "AUTO TRIG", "LONG TIME" and then "ENTER".
9. Return to "SELECT MONITOR ITEM" screen and touch "CIU
INPUT ITEM", "ALL SIGNALS" or 'SELECTION FROM
MENU". Refer to "DATA MONITOR MODE" on the next page.
10. Touch "START'.
11. Display data monitor.
12. If necessary, sequentially touch "REC START, "REC STOP",
"DATA DISPLAY", "NUMBER PRINT' and "PRINT' to print out
the data.
Page 96 of 230

TCSIABS SYSTEM
System
Description
ABS FUNCTION
During ABS operation, the brake pedal pulsates along with a mechanical noise. This ensures that the ABS
is working properly. mP
When starting up the engine or immediately after the vehicle starts to run, the brake pedal pulsates and G'
a motor noise from the engine compartment can be heard. They are caused by the ABS operation check
and should not be considered abnormal.
A vehicle with the ABS may stop in a longer distance than a vehicle without the ABS when the brake is
EC
applied on a bad road, gravel road, or deep fresh snow.
TCS FUNCTION
TCS/ABS control unit monitors the speed of the driving wheels through 4 wheel speed sensors. If driving
wheel slip is detected, fuel to the engine is cut
ol
and the throttle valve is adjusted so that the engine
a
torque is reduced. On vehicles with automatic transmission, transmission shift schedule is also changed
to control the rear wheel driving torque, which results
in the reduction of wheel slip. This system enables
the throttle valve to be controlled so that optimum engine torque can be achieved in accordance with the
driver's acceleration request.
The driver may not feel satisfied with acceleration on some road surfaces. This poor acceleration occurs
because the operating TCS gives priority to maintaining optimum traction. Therefore, this condition should
R8
be considered normal.
When shiftdown is made or the acceleration pedal is depressed while the vehicle is driven on the road
surface that has different friction coefficients, the TCS may operate temporarily.
r-- 4 Lrd[-i
On vehicles with manual transmission, the SLlP indicator lamp and the TCS OFF indicator lamp may light
up when the engine is about to stall in the conditions shown below.
If the lamps go off when engine speed
increases, there is no problem in the system.
At start, the engine almost stalls and the engine speed is much lower than the idle speed.
The vehicle is driven at an extremely low speed with a high-speed gear engaged.
The clutch has been engaged until the vehicle almost stops. 8D
FAIL-SAFE FUNCTION
ABS system
If any malfunction is detected in the system, the ABS warning lamp, the TCS OFF indicator lamp and the SLlP
indicator lamp in the instrument panel is turned on with the TCSIABS deactivated and the vehicle's brake sys-
tem reverts to normal operation.
TCS system
If any malfunction is detected in the system, both the SLlP indicator lamp and the TCS indicator lamp on the
instrument panel light up and the TCS is shut down. The vehicle operates in the same manner as a vehicle
without the
TCS, while the ABS is operational.
If there is a malfunction in the throttle control system, the TCS becomes inoperative while the ABS
remains functional.
When fail-safe operation is activated, perform the self-diagnosis procedure for the TCSIABS first.
Refer to
BR-27 for details.
Page 105 of 230

TCSlABS SYSTEM
Precautions for Trouble
Diagnosis
After performing trouble diagnosis, be sure to erase trouble stored in memory.
Refer to "CONSULT for
TCS/ABS Control Unit Control System"
(BR-27), "Self-diagnosis for TCSIABS
Control Unit Control System"
(BR-34), "CONSULT for Throttle Control Unit Control System" (BR-37) or
"Self-diagnosis for Throttle Control Unit Control System"
(BR-41).
The concerns that are difficult to duplicate may be caused by faulty electrical connections. Move harnesses
or harness connectors by hand to check if there is any poor mating of connector halves or faulty connec-
tion. Do not force to open a connector terminal when using a circuit tester for inspection.
Read GI section thoroughly in advance and make sure of all the general precautions.
Basic Inspection
BASIC INSPECTION 1 - Brake fluid level and leakage
1. Check brake fluid level in reservoir tank. Replenish brake fluid if necessary.
2. Check for leakage at or around brake piping and ABS actuator. If leakage or seepage is noted, proceed
as follows:
If ABS actuator connectors are loose, tighten to specified torque. Recheck to ensure that leakage is no
longer present.
If flare nut threads at piping connectors or actuator threads are damaged, replace faulty parts with new
ones. Recheck to ensure that leakage is no longer present.
If brake fluid leaks through areas other than actuator connectors, wipe off using a clean cloth. Recheck
for leakage or seepage. If necessary, replace faulty parts with new ones.
If brake fluid leaks at or seeps through ABS actuator, wipe off using a clean cloth.
Recheck for leakage or seepage. If necessary, replace ABS actuator with new one.
CAUTION:
ABS actuator cannot be disassembled. Do not attempt to disassemble it.
3. Check brake disc rotors and pads for proper operation.
BASIC INSPECTION 2 - Loose power line terminal
Check battery terminals (positive and negative) and battery mounting (ground) for looseness. If necessary,
tighten to specified torque. Check the battery for lower voltage.
BASIC INSPECTION 3 - SLlP indicator lamp, TCS OFF indicator lamp and ABS warning
lamp
Turn ignition switch "ON" to ensure that TCS OFF indicator lamp lights up. If TCS OFF indicator lamp does
not light, check TCS OFF indicator lamp circuit.
Turn ignition switch
"ON" to ensure that SLlP indicator lamp lights
up. If SLlP indicator lamp does not light,
check SLlP indicator lamp circuit.
Turn ignition switch "ON" to ensure that ABS warning lamp lights up. If ABS warning lamp does not light,
check ABS warning lamp circuit.
Check that the SLlP indicator lamp and the ABS warning lamp go off approx.
1 second after the engine
has started. If either of the lamps still remains on, perform the self-diagnosis for TCSIABS control unit
control system and the self-diagnosis for throttle control unit control system.
After driving vehicle at approx. 30
km/h
for approx.
1 minute, check to ensure that the SLlP indicator lamp
and the ABS warning lamp are off. If either of the lamps still remains on, perform the self-diagnosis for
TCS/ABS
control unit control system and the self-diagnosis for throttle control unit control system.
Check that the TCS OFF indicator lamp turns ON and OFF when the TCS OFF switch is turned to
ON
and OFF respectively, with the engine running. If the lamp status does not correspond to the switch
position, check the TCS OFF switch circuit.
Check that the TCS OFF indicator lamp goes off when the engine has started with the TCS OFF switch
OFF. If the TCS
OFF indicator lamp does not go off even 10 seconds after the engine has started, per-
form the self-diagnosis for TCSIABS control unit control system and the self-diagnosis for throttle control
unit control system.
After driving vehicle at approx.
30 kmlh for approx. 1 minute with the TCS OFF switch OFF, check to ensure
that the TCS OFF indicator lamp is off. If the TCS OFF indicator lamp lights up, perform the
self-diagno-
sis for
TCS/ABS
control unit control system and the self-diagnosis for throttle control unit control system.
After performing self-diagnosis procedures, be sure to erase trouble stored in memory.