NISSAN GT-R 2013 R35 Multi Function Display Service Manual
Manufacturer: NISSAN, Model Year: 2013,
Model line: GT-R,
Model: NISSAN GT-R 2013 R35
Pages: 315, PDF Size: 6.96 MB
NISSAN GT-R 2013 R35 Multi Function Display Service Manual
GT-R 2013 R35
NISSAN
NISSAN
https://www.carmanualsonline.info/img/5/316/w960_316-0.png
NISSAN GT-R 2013 R35 Multi Function Display Service Manual
Trending: instrument panel, light, recommended oil, height, maintenance, navigation system, door lock
Page 41 of 315
5. Highlight the preferred item and push.
Setting by voice command
1. Push <
>located on the steering wheel.
2. After the tone sounds, speak a command.
. To display the 2D map:
“Plan View map” (Alternate Command
Mode)
. To display the Birdview
TMmap:
“Birdview map” (Alternate Command Mode)
MAP VIEW SETTINGS
Other settings are also available for the map
screen, such as changing the map direction,
map color, Birdview
TMangle, etc.
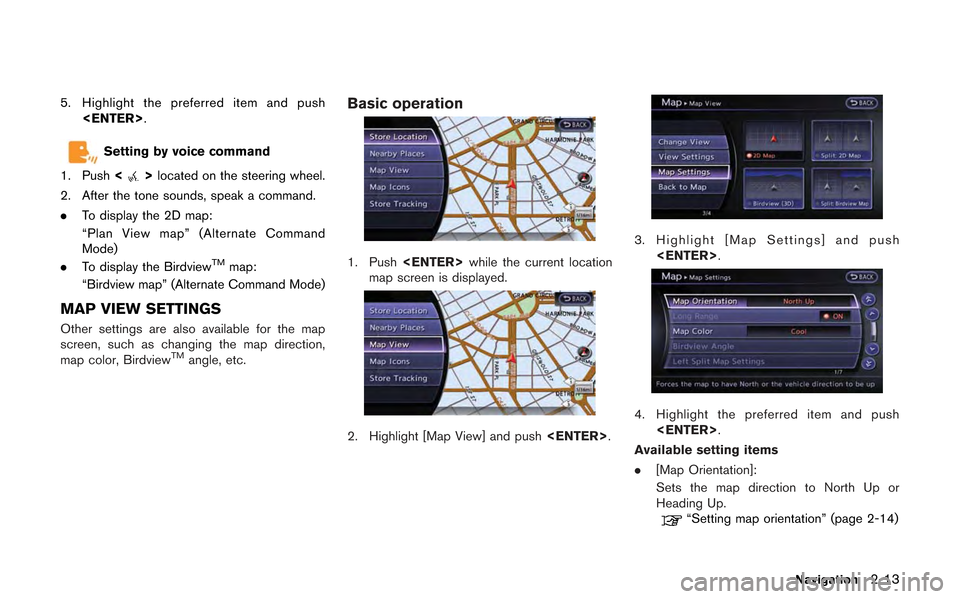
Basic operation
1. Push while the current location
map screen is displayed.
2. Highlight [Map View] and push .
3. Highlight [Map Settings] and push
.
4. Highlight the preferred item and push.
Available setting items
. [Map Orientation]:
Sets the map direction to North Up or
Heading Up.
“Setting map orientation” (page 2-14)
Navigation2-13
Page 42 of 315
![NISSAN GT-R 2013 R35 Multi Function Display Service Manual 2-14Navigation
.[Long Range]:
Sets the long range map view display on/off.
“Settings long range map view”
(page 2-15)
. [Map Color]:
Changes the map color.
“Setting map color ” (page 2-15)
. [ NISSAN GT-R 2013 R35 Multi Function Display Service Manual 2-14Navigation
.[Long Range]:
Sets the long range map view display on/off.
“Settings long range map view”
(page 2-15)
. [Map Color]:
Changes the map color.
“Setting map color ” (page 2-15)
. [](/img/5/316/w960_316-41.png)
2-14Navigation
.[Long Range]:
Sets the long range map view display on/off.
“Settings long range map view”
(page 2-15)
. [Map Color]:
Changes the map color.
“Setting map color ” (page 2-15)
. [Birdview Angle]:
Changes the Birdview
TMangle.“Changing BirdviewTMangle”
(page 2-16)
. [Left Split Map Settings]:
Sets the map settings for the left screen of
the split map.
“Setting left screen display”
(page 2-16)
. [Show all Freeway Exits on Route]/[Auto.
Show Turn List on Freeway]:
Sets the display of the freeway exit informa-
tion on/off.
“Show exit information on freeways”
(page 2-52)
Other settings:
The orientation of the map can also be set by
performing the following procedure.
1. Push .
2. Highlight [Navigation] and push .
3. Highlight [Map View] and push .
Setting map orientation
The map direction (orientation) can also be
changed in the 2D map. These settings are
available only in the 2D map or 2D/2D split map.
1. Highlight [Map Orientation] and push
.
2. Highlight the preferred map orientation and push . The indicator of the
selected map orientation illuminates.
3. Push
Page 43 of 315
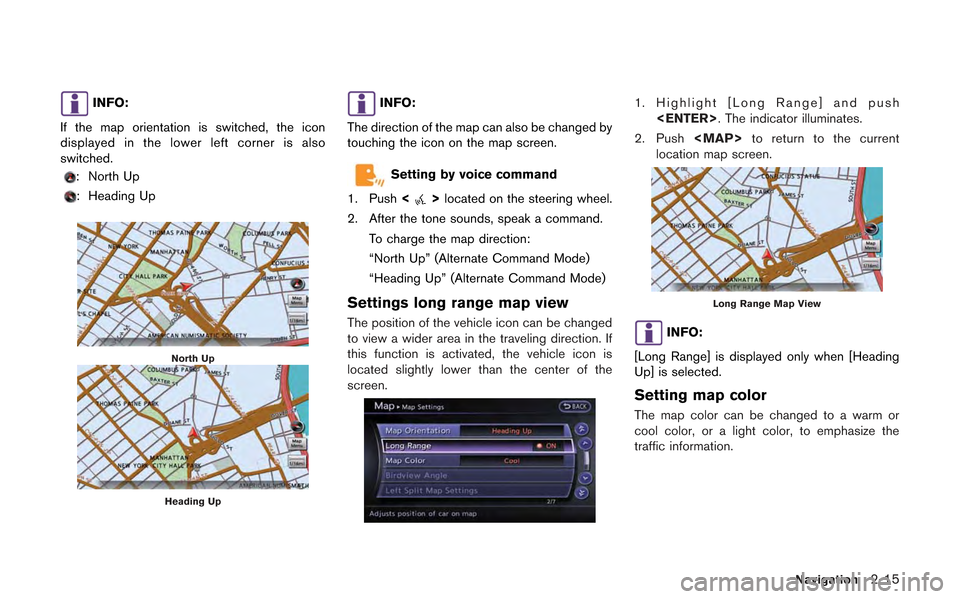
INFO:
If the map orientation is switched, the icon
displayed in the lower left corner is also
switched.
: North Up
: Heading Up
North Up
Heading Up
INFO:
The direction of the map can also be changed by
touching the icon on the map screen.
Setting by voice command
1. Push <
>located on the steering wheel.
2. After the tone sounds, speak a command.
To charge the map direction:
“North Up” (Alternate Command Mode)
“Heading Up” (Alternate Command Mode)
Settings long range map view
The position of the vehicle icon can be changed
to view a wider area in the traveling direction. If
this function is activated, the vehicle icon is
located slightly lower than the center of the
screen.
1. Highlight [Long Range] and push . The indicator illuminates.
2. Push
Page 44 of 315
2-16Navigation
1. Highlight [Map Color] and push.
2. Highlight the preferred map color and push
. The indicator light of the se-
lected color illuminates.
Available map colors
The following map colors are available.
. [Warm]:
Sets warm colors for the map coloring. .
[Cool]:
Sets cool colors for the map coloring.
. [Traffic Emphasis]:
Sets light colors for the map coloring to
emphasize the traffic information.
INFO:
The effect of the setting changes can be
confirmed on the preview displayed on the right
side of the screen.
Changing BirdviewTMangle
The BirdviewTMangle can be changed.
This setting is available only in the BirdviewTM
map or 2D/BirdviewTMsplit map.
1. Highlight [Birdview Angle] and push .
2. Adjust the BirdviewTMangle by pushing the
main directional buttons or rotating the
center dial.
3. Push
Page 45 of 315
![NISSAN GT-R 2013 R35 Multi Function Display Service Manual 1. Highlight [Left Split Map Settings] and push<ENTER>.
2. Highlight the preferred map setting andpush <ENTER>.
3. Push <MAP>to return to the current
location map screen.
Available setting items
. [Ma NISSAN GT-R 2013 R35 Multi Function Display Service Manual 1. Highlight [Left Split Map Settings] and push<ENTER>.
2. Highlight the preferred map setting andpush <ENTER>.
3. Push <MAP>to return to the current
location map screen.
Available setting items
. [Ma](/img/5/316/w960_316-44.png)
1. Highlight [Left Split Map Settings] and push.
2. Highlight the preferred map setting andpush .
3. Push
Page 46 of 315
2-18Navigation
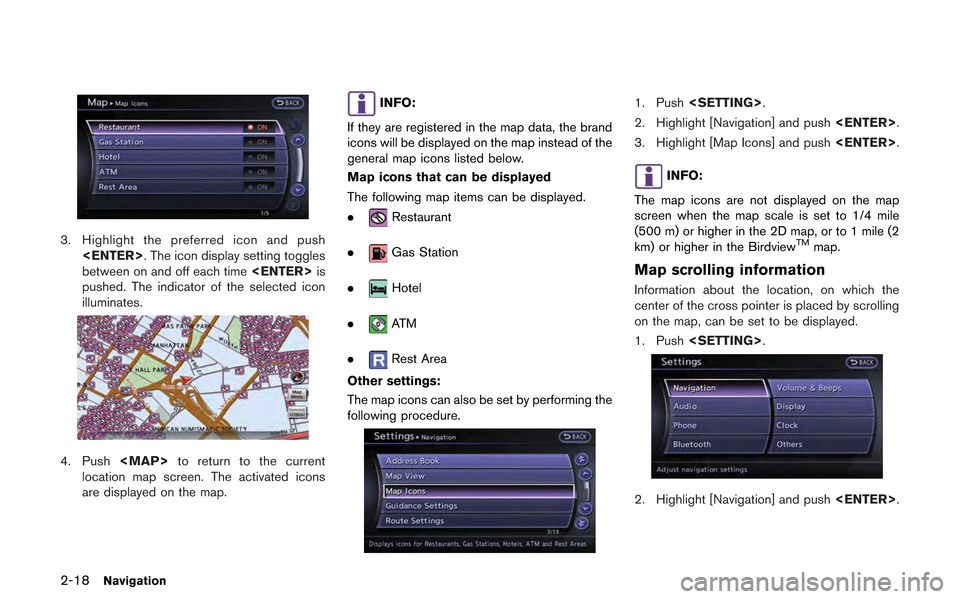
3. Highlight the preferred icon and push. The icon display setting toggles
between on and off each time is
pushed. The indicator of the selected icon
illuminates.
4. Push
Page 47 of 315
![NISSAN GT-R 2013 R35 Multi Function Display Service Manual 3. Highlight [Others] and push<ENTER>.
4. Highlight [Map Scrolling Information] and
push <ENTER>.
5. Highlight the preferred information item and
push <ENTER>. The indicator of the
selected informatio NISSAN GT-R 2013 R35 Multi Function Display Service Manual 3. Highlight [Others] and push<ENTER>.
4. Highlight [Map Scrolling Information] and
push <ENTER>.
5. Highlight the preferred information item and
push <ENTER>. The indicator of the
selected informatio](/img/5/316/w960_316-46.png)
3. Highlight [Others] and push.
4. Highlight [Map Scrolling Information] and
push .
5. Highlight the preferred information item and
push . The indicator of the
selected information item illuminates.
The following information items are available.
.[Address Book Icons]
.[Destination/Waypoint Icons]
.[Latitude/Longitude Info]
6. Push
Page 48 of 315
![NISSAN GT-R 2013 R35 Multi Function Display Service Manual 2-20Navigation
location map screen is displayed, the following
options are available.
.[Store Location]:
Stores the current vehicle location in the
Address Book. The stored location can be
retrieved a NISSAN GT-R 2013 R35 Multi Function Display Service Manual 2-20Navigation
location map screen is displayed, the following
options are available.
.[Store Location]:
Stores the current vehicle location in the
Address Book. The stored location can be
retrieved a](/img/5/316/w960_316-47.png)
2-20Navigation
location map screen is displayed, the following
options are available.
.[Store Location]:
Stores the current vehicle location in the
Address Book. The stored location can be
retrieved as necessary to set it as a
destination (waypoint) .
“Storing location” (page 2-72)
. [Nearby Places]:
Searches for points of interest near the
current vehicle location, such as restaurants
and gas stations, etc.
“Finding nearby place” (page 2-27)
. [Map View]:
Performs map operations such as the
switching of map type and the setting of
map orientation and scale.
“Map settings” (page 2-5)
. [Map Icons]:
Displays map icons of certain points of
interest (such as restaurants and gas sta-
tions, etc.) on the map around the current
vehicle location.
“Displaying map icons” (page 2-17)
. [Store Tracking]:
Stores in the Address Book the route
travelled from the starting point to the
current location.
“Storing tracked route” (page 2-76)
Scrolled location map screen
If is pushed while a scrolled map
screen is displayed, the following options are
available.
. [New Dest.]:
Sets the destination to the map location
where was pushed. If a destina-
tion is already set, the location will be set as
the new destination.
“Setting point on map” (page 2-42)
. [Add to Route]:
Sets the map location where
was pushed as the destination or a way-
point. This is available only when a sug-
gested route is already set.
“Setting destination or waypoint”
(page 2-56) .
[Nearby Places]:
Searches for points of interest near the map
location where was pushed and
sets them as a destination or waypoint.
Use the same search method as the one for
[Places].
“Finding nearby place” (page 2-27)
. [Store Location]:
Store the map location where
was pushed in the Address Book. The
stored location can be retrieved to set it as
a destination or waypoint.
“Storing location” (page 2-72)
. [Delete]:
Deletes a stored location. To delete, place
the cross pointer over the corresponding
icon.
. [Incident Detail]:
This function can be selected only when the
traffic information icon is displayed. Displays
the details of the traffic information icon.
Place the cross pointer over the icon to be
checked.
Page 49 of 315
INFO:
Incident details are a feature of Traffic Informa-
tion, and an XM NavTraffic
®subscription is
required in order to receive Traffic Information.
Navigation2-21
Page 50 of 315
2-22Navigation
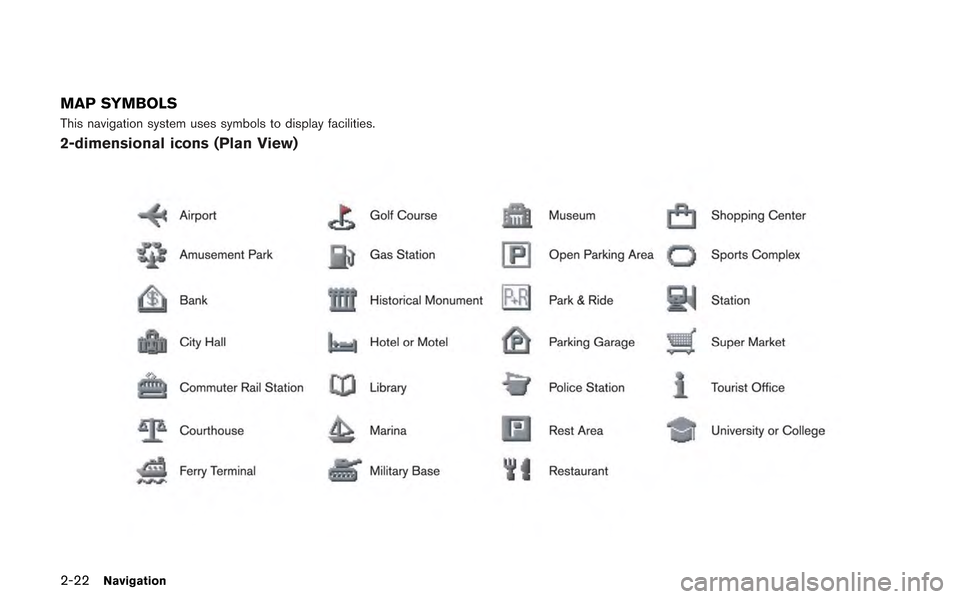
MAP SYMBOLS
This navigation system uses symbols to display facilities.
2-dimensional icons (Plan View)
Trending: parking brake, fog light, lock, maintenance schedule, brake, reset, window
![NISSAN GT-R 2013 R35 Multi Function Display Service Manual 2-14Navigation
.[Long Range]:
Sets the long range map view display on/off.
“Settings long range map view”
(page 2-15)
. [Map Color]:
Changes the map color.
“Setting map color ” (page 2-15)
. [ NISSAN GT-R 2013 R35 Multi Function Display Service Manual 2-14Navigation
.[Long Range]:
Sets the long range map view display on/off.
“Settings long range map view”
(page 2-15)
. [Map Color]:
Changes the map color.
“Setting map color ” (page 2-15)
. [](/img/5/316/w960_316-41.png)

![NISSAN GT-R 2013 R35 Multi Function Display Service Manual 2-16Navigation
1. Highlight [Map Color] and push<ENTER>.
2. Highlight the preferred map color and push
<ENTER>. The indicator light of the se-
lected color illuminates.
Available map colors
The follow NISSAN GT-R 2013 R35 Multi Function Display Service Manual 2-16Navigation
1. Highlight [Map Color] and push<ENTER>.
2. Highlight the preferred map color and push
<ENTER>. The indicator light of the se-
lected color illuminates.
Available map colors
The follow](/img/5/316/w960_316-43.png)
![NISSAN GT-R 2013 R35 Multi Function Display Service Manual 1. Highlight [Left Split Map Settings] and push<ENTER>.
2. Highlight the preferred map setting andpush <ENTER>.
3. Push <MAP>to return to the current
location map screen.
Available setting items
. [Ma NISSAN GT-R 2013 R35 Multi Function Display Service Manual 1. Highlight [Left Split Map Settings] and push<ENTER>.
2. Highlight the preferred map setting andpush <ENTER>.
3. Push <MAP>to return to the current
location map screen.
Available setting items
. [Ma](/img/5/316/w960_316-44.png)

![NISSAN GT-R 2013 R35 Multi Function Display Service Manual 3. Highlight [Others] and push<ENTER>.
4. Highlight [Map Scrolling Information] and
push <ENTER>.
5. Highlight the preferred information item and
push <ENTER>. The indicator of the
selected informatio NISSAN GT-R 2013 R35 Multi Function Display Service Manual 3. Highlight [Others] and push<ENTER>.
4. Highlight [Map Scrolling Information] and
push <ENTER>.
5. Highlight the preferred information item and
push <ENTER>. The indicator of the
selected informatio](/img/5/316/w960_316-46.png)
![NISSAN GT-R 2013 R35 Multi Function Display Service Manual 2-20Navigation
location map screen is displayed, the following
options are available.
.[Store Location]:
Stores the current vehicle location in the
Address Book. The stored location can be
retrieved a NISSAN GT-R 2013 R35 Multi Function Display Service Manual 2-20Navigation
location map screen is displayed, the following
options are available.
.[Store Location]:
Stores the current vehicle location in the
Address Book. The stored location can be
retrieved a](/img/5/316/w960_316-47.png)

![NISSAN GT-R 2013 R35 Multi Function Display Service Manual 2-14Navigation
.[Long Range]:
Sets the long range map view display on/off.
“Settings long range map view”
(page 2-15)
. [Map Color]:
Changes the map color.
“Setting map color ” (page 2-15)
. [ NISSAN GT-R 2013 R35 Multi Function Display Service Manual 2-14Navigation
.[Long Range]:
Sets the long range map view display on/off.
“Settings long range map view”
(page 2-15)
. [Map Color]:
Changes the map color.
“Setting map color ” (page 2-15)
. [](/img/5/316/w960_316-41.png)

![NISSAN GT-R 2013 R35 Multi Function Display Service Manual 2-16Navigation
1. Highlight [Map Color] and push<ENTER>.
2. Highlight the preferred map color and push
<ENTER>. The indicator light of the se-
lected color illuminates.
Available map colors
The follow NISSAN GT-R 2013 R35 Multi Function Display Service Manual 2-16Navigation
1. Highlight [Map Color] and push<ENTER>.
2. Highlight the preferred map color and push
<ENTER>. The indicator light of the se-
lected color illuminates.
Available map colors
The follow](/img/5/316/w960_316-43.png)
![NISSAN GT-R 2013 R35 Multi Function Display Service Manual 1. Highlight [Left Split Map Settings] and push<ENTER>.
2. Highlight the preferred map setting andpush <ENTER>.
3. Push <MAP>to return to the current
location map screen.
Available setting items
. [Ma NISSAN GT-R 2013 R35 Multi Function Display Service Manual 1. Highlight [Left Split Map Settings] and push<ENTER>.
2. Highlight the preferred map setting andpush <ENTER>.
3. Push <MAP>to return to the current
location map screen.
Available setting items
. [Ma](/img/5/316/w960_316-44.png)

![NISSAN GT-R 2013 R35 Multi Function Display Service Manual 3. Highlight [Others] and push<ENTER>.
4. Highlight [Map Scrolling Information] and
push <ENTER>.
5. Highlight the preferred information item and
push <ENTER>. The indicator of the
selected informatio NISSAN GT-R 2013 R35 Multi Function Display Service Manual 3. Highlight [Others] and push<ENTER>.
4. Highlight [Map Scrolling Information] and
push <ENTER>.
5. Highlight the preferred information item and
push <ENTER>. The indicator of the
selected informatio](/img/5/316/w960_316-46.png)
![NISSAN GT-R 2013 R35 Multi Function Display Service Manual 2-20Navigation
location map screen is displayed, the following
options are available.
.[Store Location]:
Stores the current vehicle location in the
Address Book. The stored location can be
retrieved a NISSAN GT-R 2013 R35 Multi Function Display Service Manual 2-20Navigation
location map screen is displayed, the following
options are available.
.[Store Location]:
Stores the current vehicle location in the
Address Book. The stored location can be
retrieved a](/img/5/316/w960_316-47.png)

