NISSAN LATIO 2008 Service Repair Manual
Manufacturer: NISSAN, Model Year: 2008, Model line: LATIO, Model: NISSAN LATIO 2008Pages: 2771, PDF Size: 60.61 MB
Page 2661 of 2771

TROUBLE DIAGNOSIS
SRS-27
< SYMPTOM DIAGNOSIS >
C
D
E
F
G
I
J
K
L
MA
B
SRS
N
O
P
NOTE:
Follow the procedures in numerical order when performing repairs. Confirm whether the repair has been suc-
cessful using air bag warning lamp or CONSULT-III after each repair. If malfunction is still observed, proceed
to the next step. When malfunction has been eliminated, further repair work is not required.
Trouble Diagnosis without CONSULT-IIIINFOID:0000000001703923
DIAGNOSTIC PROCEDURE 6
Inspect SRS Malfunction Using "AIR BAG" Warning Lamp—Diagnosis Mode
NOTE:
SRS will not enter Diagnosis mode if no malfunction is detected in User mode.
1. Turn ignition switch ON.
2. After “AIR BAG” warning lamp lights for 7 seconds, turn ignition switch OFF within 1 second.
3. Wait more than 3 seconds.
4. Repeat steps 1 to 3 two times.
5. Turn ignition switch ON.
SRS is now in Diagnosis mode.
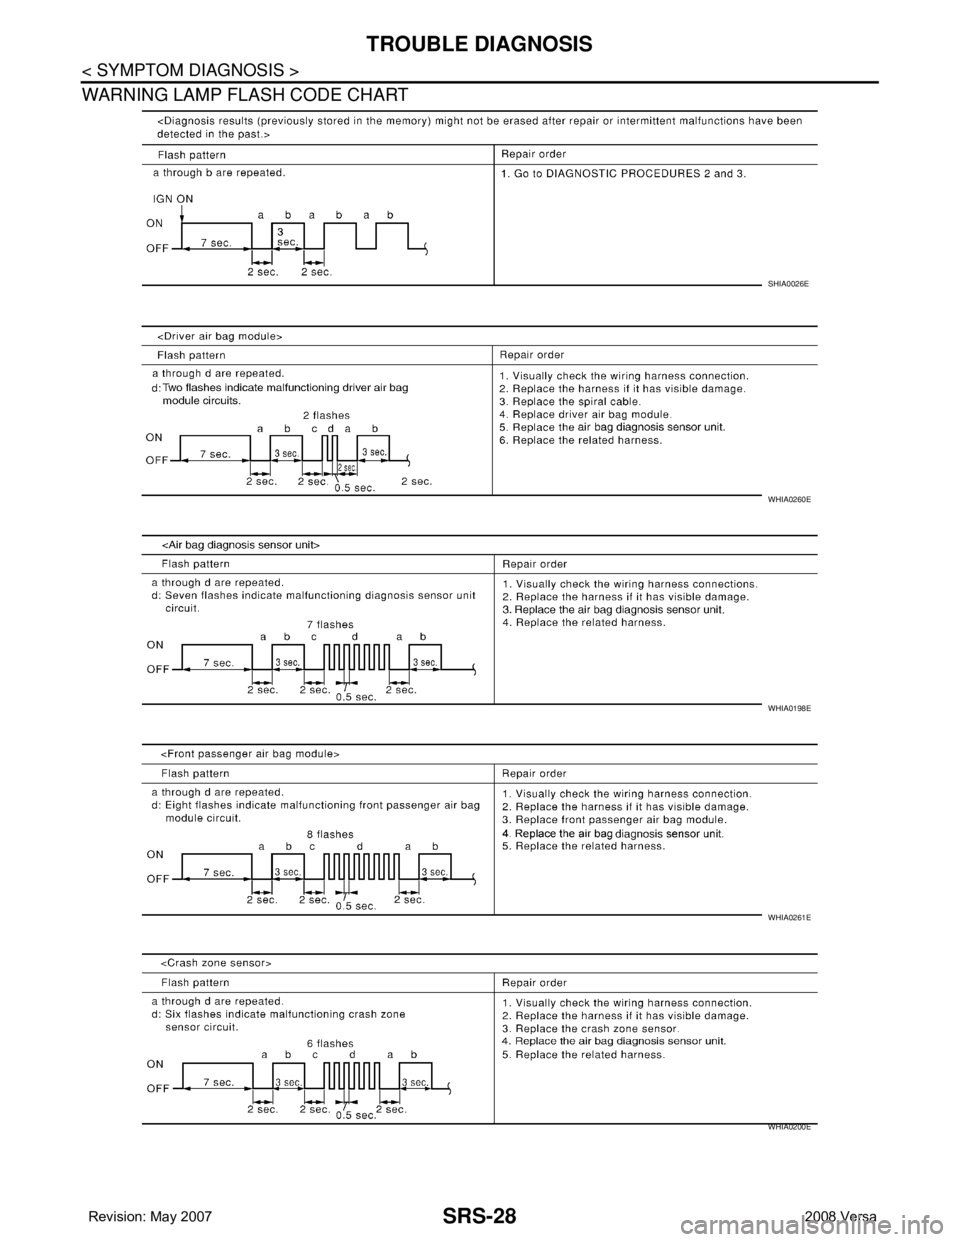
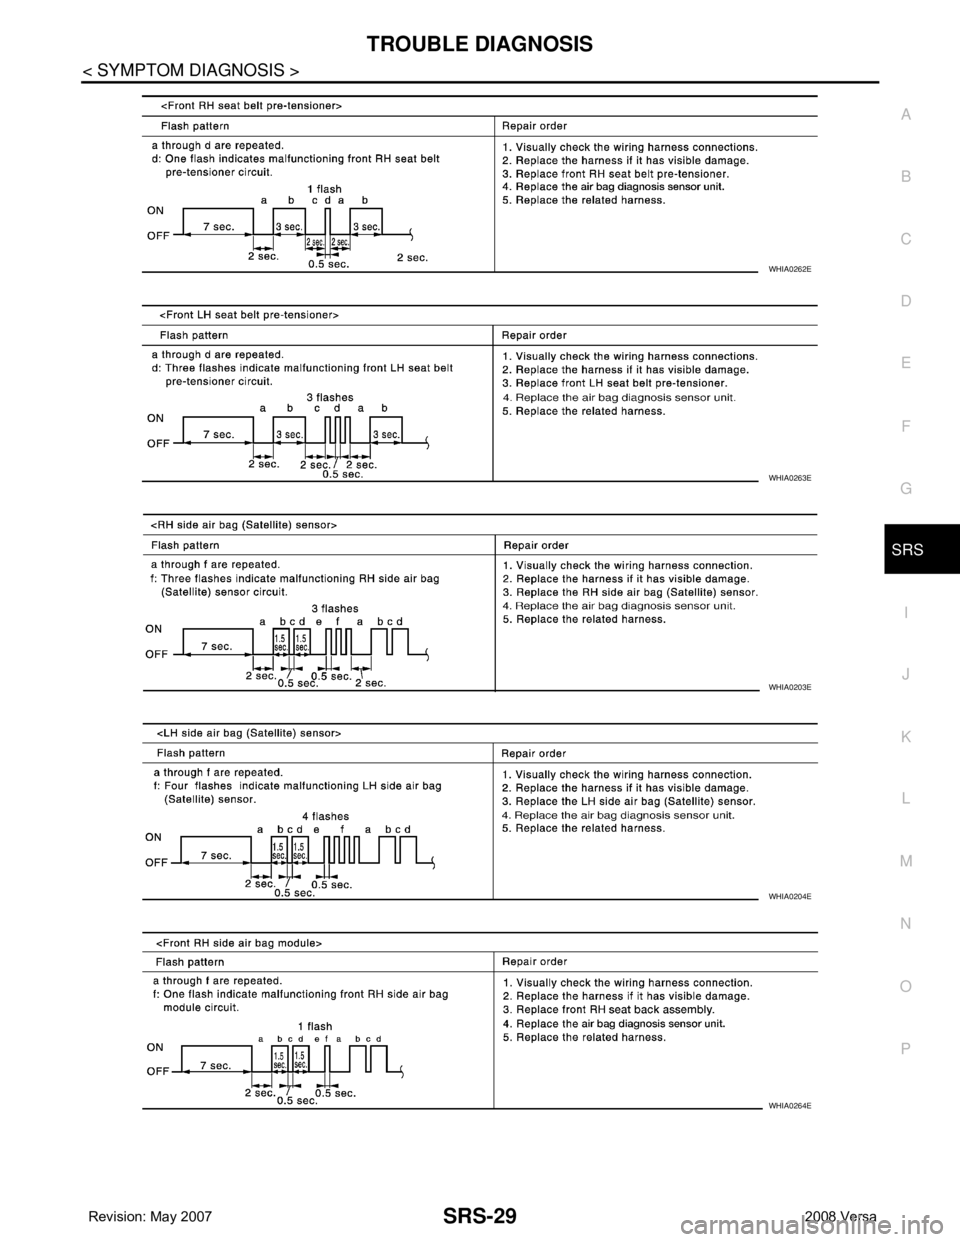
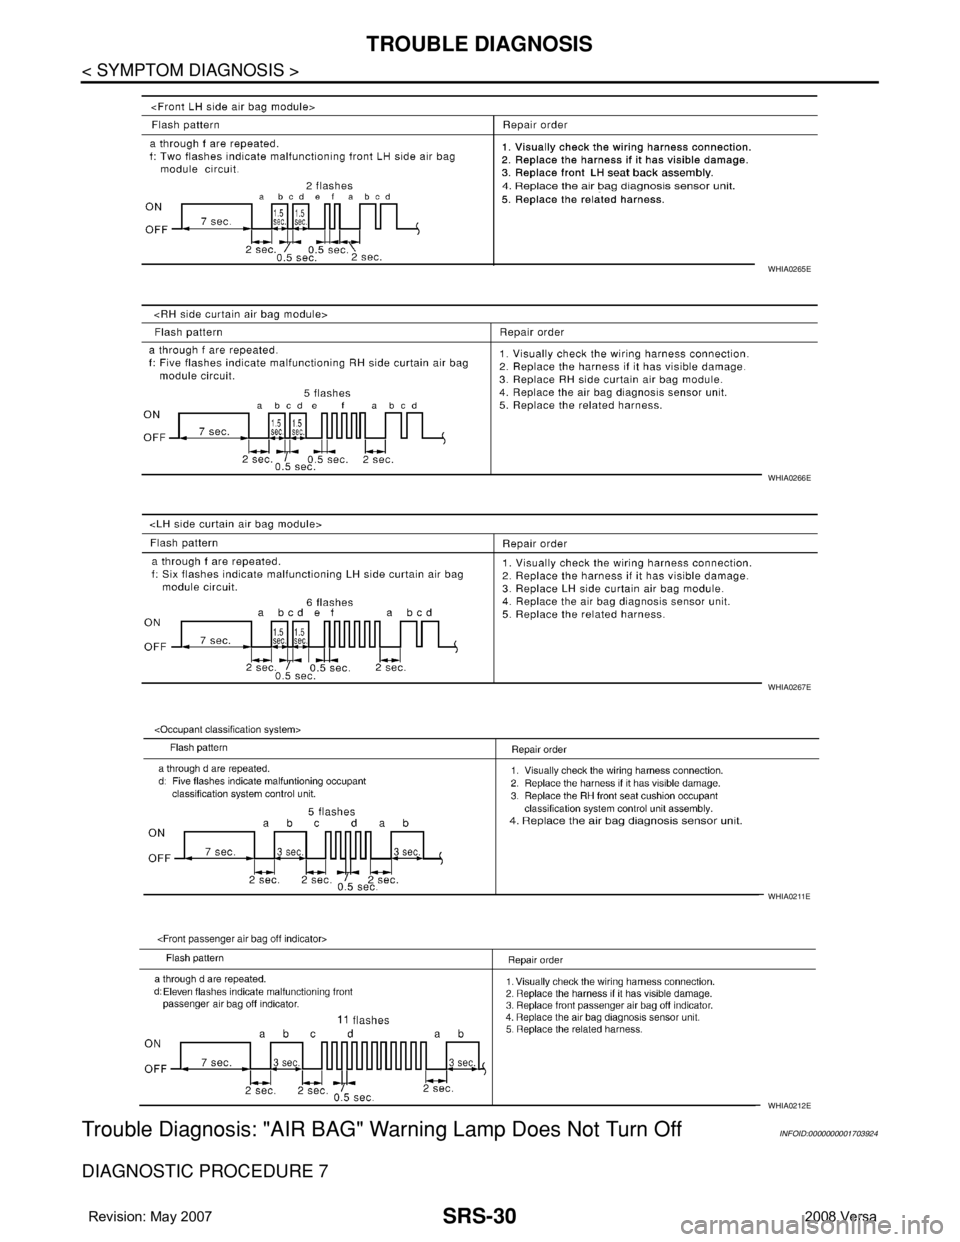
"AIR BAG" warning lamp operates in Diagnosis mode according to the Warning Lamp Flash Code Chart:
OCCUPANT SENS C/U
[COMM FAIL]
[B1022]Communication between the occupant classification system
control unit and air bag diagnosis sensor unit is interrupted.1. Visually check the wiring harness
connection.
2. Replace the harness if it has visi-
ble damage.
3. Replace RH front seat cushion/
occupant classification system
control unit assembly.
4. Replace the air bag diagnosis
sensor unit.
5. Replace the related harness.
OCCUPANT SENS
[UNIT FAIL]
[B1018]Occupant classification sensor is malfunctioning. 1. Replace RH front seat cushion/
occupant classification system
control unit assembly.
BELT TENSION SENS
[UNIT FAIL]
[B1019]Belt tension sensor is malfunctioning. 1. Visually check the wiring harness
connection.
2. Replace the harness if it has visi-
ble damage.
3. Replace RH front seat belt as-
sembly.
4. Replace RH front seat cushion/
occupant classification system
control unit assembly.
PASS A/B INDCTR CKT
[B1023]Front passenger air bag off indicator is malfunctioning. 1. Visually check the wiring harness
connection.
2. Replace the harness if it has visi-
ble damage.
3. Replace front passenger air bag
off indicator.
4. Replace the air bag diagnosis
sensor unit.
5. Replace the related harness.
FRONTAL COLLISION
DETECTION
[B1209]Driver and front passenger air bag modules are deployed. Refer to SRS-46
.
SIDE COLLISION
DETECTION
[B1210]Side or curtain air bag modules are deployed. Diagnostic item ExplanationRepair order
Recheck SRS at each replacement
Page 2662 of 2771
SRS-28
< SYMPTOM DIAGNOSIS >
TROUBLE DIAGNOSIS
WARNING LAMP FLASH CODE CHART
SHIA0026E
WHIA0260E
WHIA0198E
WHIA0261E
WHIA0200E
Page 2663 of 2771
TROUBLE DIAGNOSIS
SRS-29
< SYMPTOM DIAGNOSIS >
C
D
E
F
G
I
J
K
L
MA
B
SRS
N
O
P
WHIA0262E
WHIA0263E
WHIA0203E
WHIA0204E
WHIA0264E
Page 2664 of 2771
SRS-30
< SYMPTOM DIAGNOSIS >
TROUBLE DIAGNOSIS
Trouble Diagnosis: "AIR BAG" Warning Lamp Does Not Turn Off
INFOID:0000000001703924
DIAGNOSTIC PROCEDURE 7
WHIA0265E
WHIA0266E
WHIA0267E
WHIA0211E
WHIA0212E
Page 2665 of 2771
TROUBLE DIAGNOSIS
SRS-31
< SYMPTOM DIAGNOSIS >
C
D
E
F
G
I
J
K
L
MA
B
SRS
N
O
P
1.CHECK CONDITION OF AIR BAG MODULE
Inspect for any deployed air bag modules or seat belt pre-tensioners.
Are any air bag modules or seat belt pre-tensioners deployed?
Yes >> Refer to SRS-46.
No >> GO TO 2.
2.CHECK THE AIR BAG FUSE
Check 10A fuse [No. 1, located in the fuse block (J/B)].
Refer to PG-3
.
OK or NG
OK >> GO TO 4.
NG >> GO TO 3.
3.CHECK AIR BAG FUSE AGAIN
Replace 10A fuse [No. 1, located in the fuse block (J/B)] and turn ignition switch ON.
Does the fuse blow again?
Yes >> Repair harness.
No >> Inspection End.
4.CHECK AIR BAG DIAGNOSIS SENSOR UNIT
Connect CONSULT-III and touch “START”.
Is
“AIR BAG” displayed on CONSULT-III?
Yes >> GO TO 5.
No >> Visually inspect the air bag diagnosis sensor unit harness connections. If the connections are OK,
replace the air bag diagnosis sensor unit. Refer to SRS-44, "
Removal and Installation".
5.CHECK HARNESS CONNECTION
Check for loose connections between the combination meter and the air bag diagnosis sensor unit.
OK or NG
OK >> Replace air bag diagnosis sensor unit. Refer to SRS-44, "Removal and Installation".
NG >> Properly connect the combination meter and air bag diagnosis sensor unit harness connectors. If
“AIR BAG” warning lamp still does not turn off, replace the wiring harness.
Trouble Diagnosis: "AIR BAG" Warning Lamp Does Not Turn OnINFOID:0000000001703925
DIAGNOSTIC PROCEDURE 8
1.CHECK METER FUSE
Check the 10A fuse [No. 13, located in the fuse block (J/B)] .
Refer to PG-3
.
OK or NG
OK >> GO TO 3.
NG >> GO TO 2.
2.REPLACE METER FUSE AND CHECK AGAIN
Replace 10A fuse [No. 13, located in the fuse block (J/B)] and turn ignition switch ON.
Does the fuse blow again?
Yes >> Replace harness.
No >> Inspection End.
3.CHECK HARNESS CONNECTIONS BETWEEN AIR BAG DIAGNOSIS SENSOR UNIT AND COMBINA-
TION METER
Inspect the harness and connectors between the air bag diagnosis sensor unit and the combination meter.
Do the harness or connectors have any visible damage?
Yes >> Replace harness.
Page 2666 of 2771

SRS-32
< SYMPTOM DIAGNOSIS >
TROUBLE DIAGNOSIS
No >> GO TO 4.
4.CHECK COMBINATION METER
Disconnect the air bag diagnosis sensor unit harness connectors and turn ignition switch ON.
Does
“AIR BAG” warning lamp turn on?
Yes >> Replace the air bag diagnosis sensor unit. Refer to SRS-44, "Removal and Installation".
No >> Replace the combination meter. Refer to IP-11, "
Removal and Installation".
Page 2667 of 2771
DRIVER AIR BAG MODULE
SRS-33
< ON-VEHICLE REPAIR >
C
D
E
F
G
I
J
K
L
MA
B
SRS
N
O
P
ON-VEHICLE REPAIR
DRIVER AIR BAG MODULE
Removal and InstallationINFOID:0000000001703926
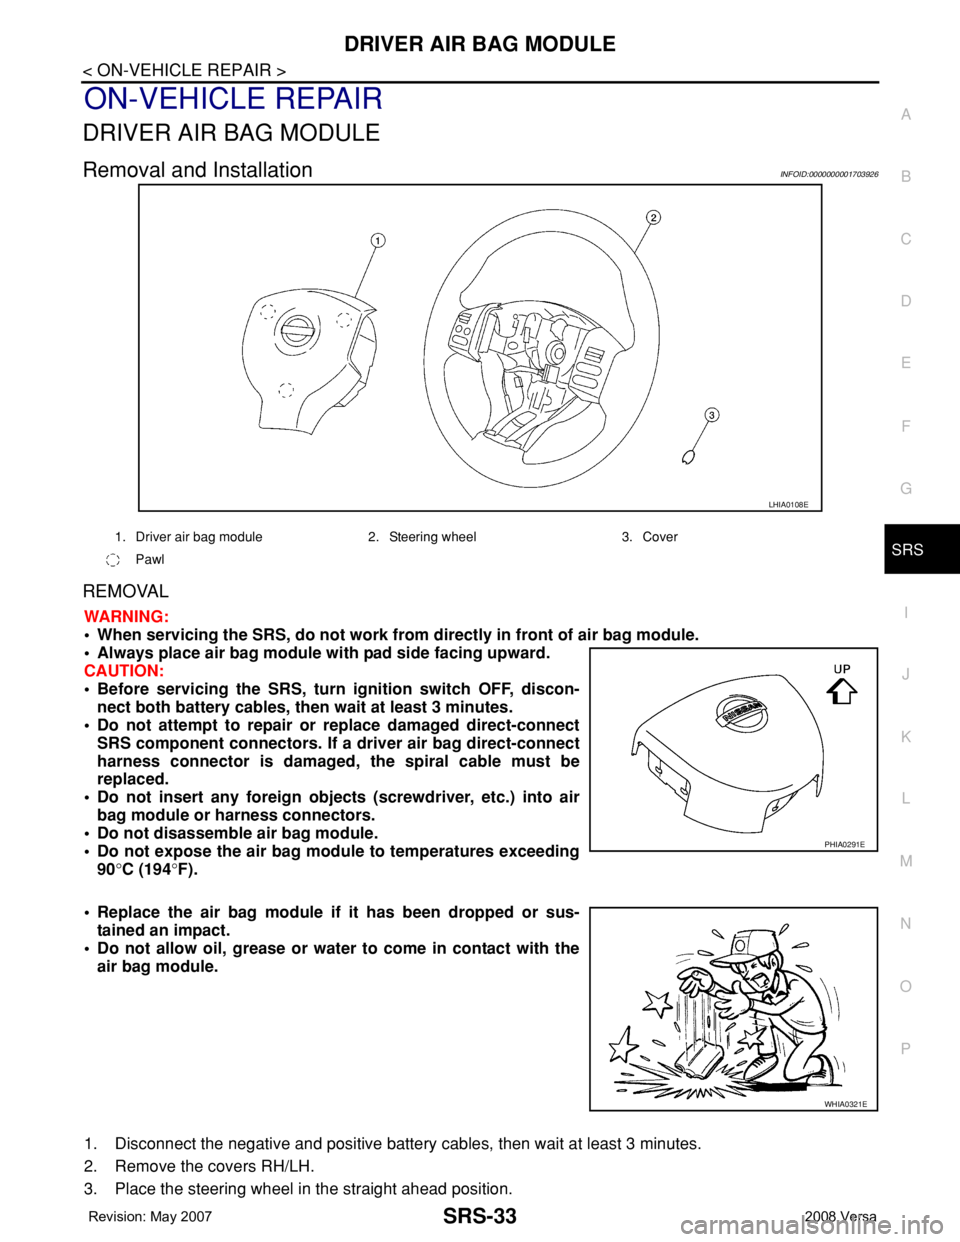
REMOVAL
WARNING:
• When servicing the SRS, do not work from directly in front of air bag module.
• Always place air bag module with pad side facing upward.
CAUTION:
• Before servicing the SRS, turn ignition switch OFF, discon-
nect both battery cables, then wait at least 3 minutes.
• Do not attempt to repair or replace damaged direct-connect
SRS component connectors. If a driver air bag direct-connect
harness connector is damaged, the spiral cable must be
replaced.
• Do not insert any foreign objects (screwdriver, etc.) into air
bag module or harness connectors.
• Do not disassemble air bag module.
• Do not expose the air bag module to temperatures exceeding
90°C (194°F).
• Replace the air bag module if it has been dropped or sus-
tained an impact.
• Do not allow oil, grease or water to come in contact with the
air bag module.
1. Disconnect the negative and positive battery cables, then wait at least 3 minutes.
2. Remove the covers RH/LH.
3. Place the steering wheel in the straight ahead position.
LHIA0108E
1. Driver air bag module 2. Steering wheel 3. Cover
Pawl
PHIA0291E
WHIA0321E
Page 2668 of 2771
SRS-34
< ON-VEHICLE REPAIR >
DRIVER AIR BAG MODULE
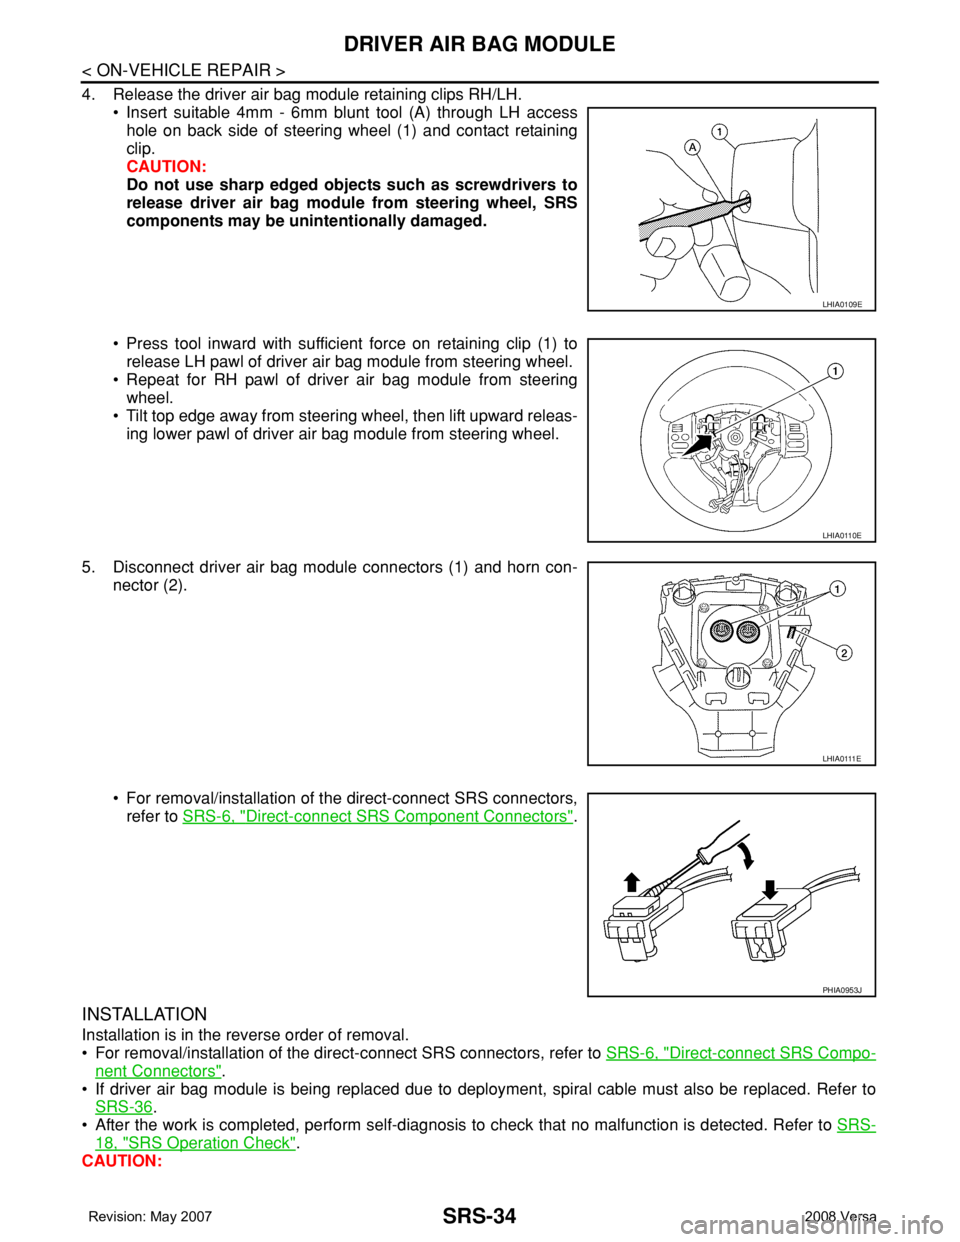
4. Release the driver air bag module retaining clips RH/LH.
• Insert suitable 4mm - 6mm blunt tool (A) through LH access
hole on back side of steering wheel (1) and contact retaining
clip.
CAUTION:
Do not use sharp edged objects such as screwdrivers to
release driver air bag module from steering wheel, SRS
components may be unintentionally damaged.
• Press tool inward with sufficient force on retaining clip (1) to
release LH pawl of driver air bag module from steering wheel.
• Repeat for RH pawl of driver air bag module from steering
wheel.
• Tilt top edge away from steering wheel, then lift upward releas-
ing lower pawl of driver air bag module from steering wheel.
5. Disconnect driver air bag module connectors (1) and horn con-
nector (2).
• For removal/installation of the direct-connect SRS connectors,
refer to SRS-6, "
Direct-connect SRS Component Connectors".
INSTALLATION
Installation is in the reverse order of removal.
• For removal/installation of the direct-connect SRS connectors, refer to SRS-6, "
Direct-connect SRS Compo-
nent Connectors".
• If driver air bag module is being replaced due to deployment, spiral cable must also be replaced. Refer to
SRS-36
.
• After the work is completed, perform self-diagnosis to check that no malfunction is detected. Refer to SRS-
18, "SRS Operation Check".
CAUTION:
LHIA0109E
LHIA0110E
LHIA0111E
PHIA0953J
Page 2669 of 2771
DRIVER AIR BAG MODULE
SRS-35
< ON-VEHICLE REPAIR >
C
D
E
F
G
I
J
K
L
MA
B
SRS
N
O
P
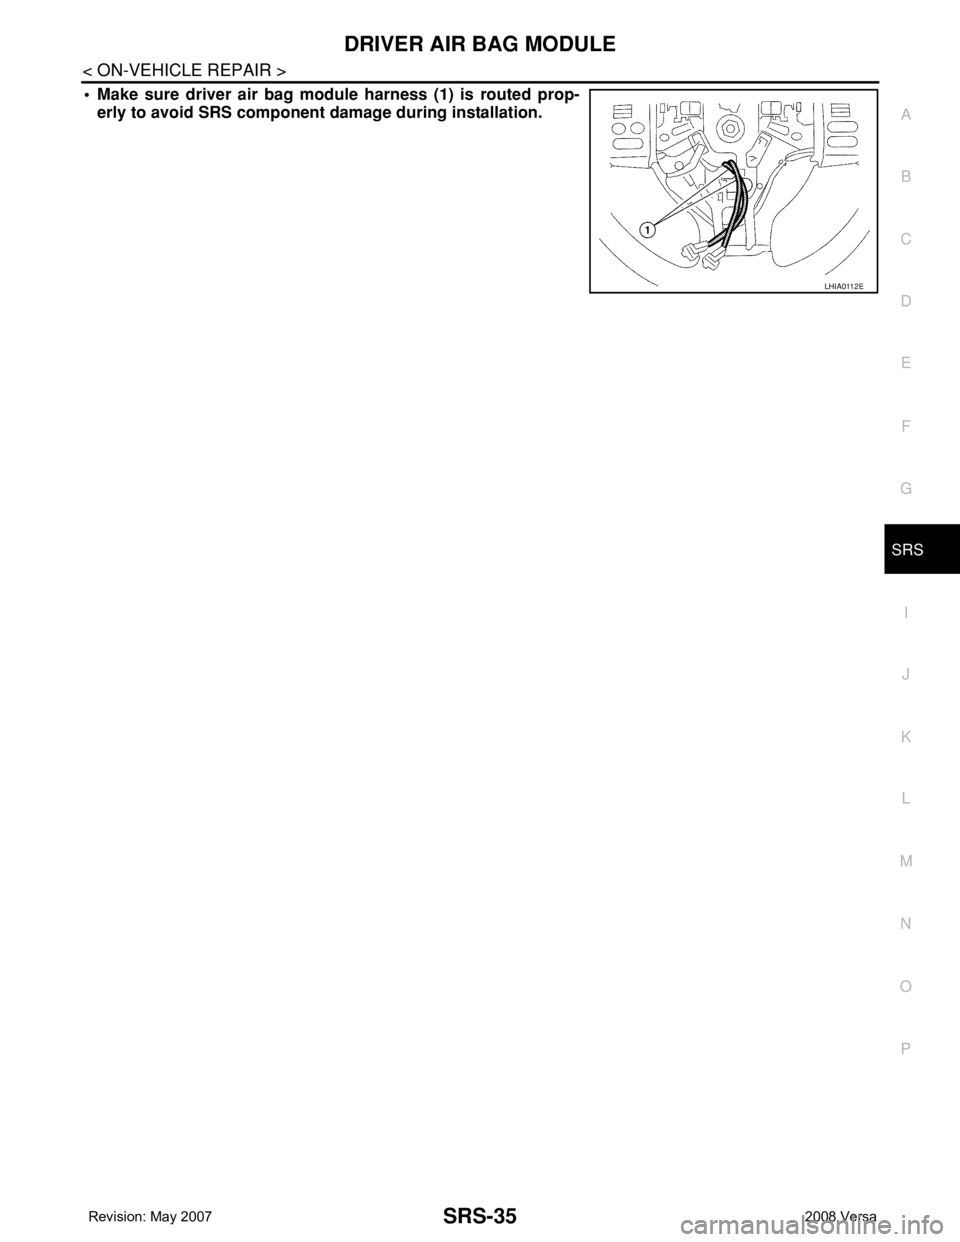
• Make sure driver air bag module harness (1) is routed prop-
erly to avoid SRS component damage during installation.
LHIA0112E
Page 2670 of 2771
SRS-36
< ON-VEHICLE REPAIR >
SPIRAL CABLE
SPIRAL CABLE
Removal and InstallationINFOID:0000000001703927
REMOVAL
WARNING:
When servicing the SRS, do not work from directly in front of air bag module.
CAUTION:
• Before servicing the SRS, turn ignition switch OFF, disconnect both battery cables and wait at least
3 minutes.
• Do not tap or bump the steering wheel.
• Do not disassemble the spiral cable.
• Do not allow oil, grease or water to come in contact with the spiral cable.
• Replace the spiral cable if it has been dropped or sustained an impact.
• With the steering linkage disconnected, the spiral cable may snap by turning the steering wheel
beyond the limited number of turns. The spiral cable can be turned counterclockwise about 2.5 turns
from the neutral position.
1. Disconnect the negative and positive battery cables, then wait at least 3 minutes.
2. Set the front wheels to the straight-ahead/neutral position.
3. Remove the steering wheel. Refer to PS-6
.
4. Remove the column cover upper and lower.
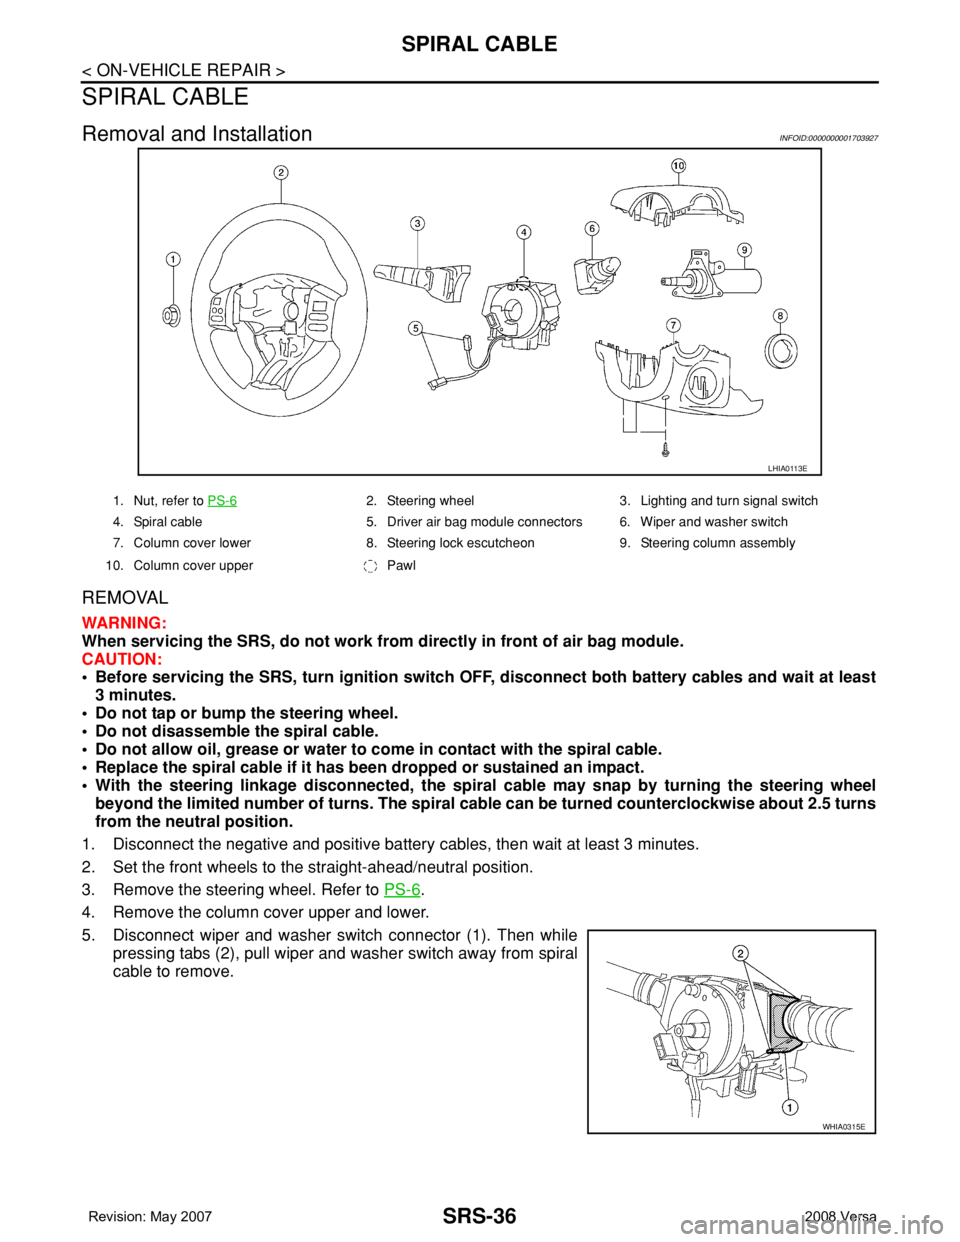
5. Disconnect wiper and washer switch connector (1). Then while
pressing tabs (2), pull wiper and washer switch away from spiral
cable to remove.
LHIA0113E
1. Nut, refer to PS-62. Steering wheel 3. Lighting and turn signal switch
4. Spiral cable 5. Driver air bag module connectors 6. Wiper and washer switch
7. Column cover lower 8. Steering lock escutcheon 9. Steering column assembly
10. Column cover upper Pawl
WHIA0315E