NISSAN LATIO 2008 Service Repair Manual
LATIO 2008
NISSAN
NISSAN
https://www.carmanualsonline.info/img/5/57360/w960_57360-0.png
NISSAN LATIO 2008 Service Repair Manual
Trending: Indicator light, bluetooth, headrest, fog light, trunk, brake pads, fuse chart
Page 2621 of 2771
FRONT SEAT
SE-13
< SERVICE INFORMATION >
C
D
E
F
G
H
J
K
L
MA
B
SE
N
O
P
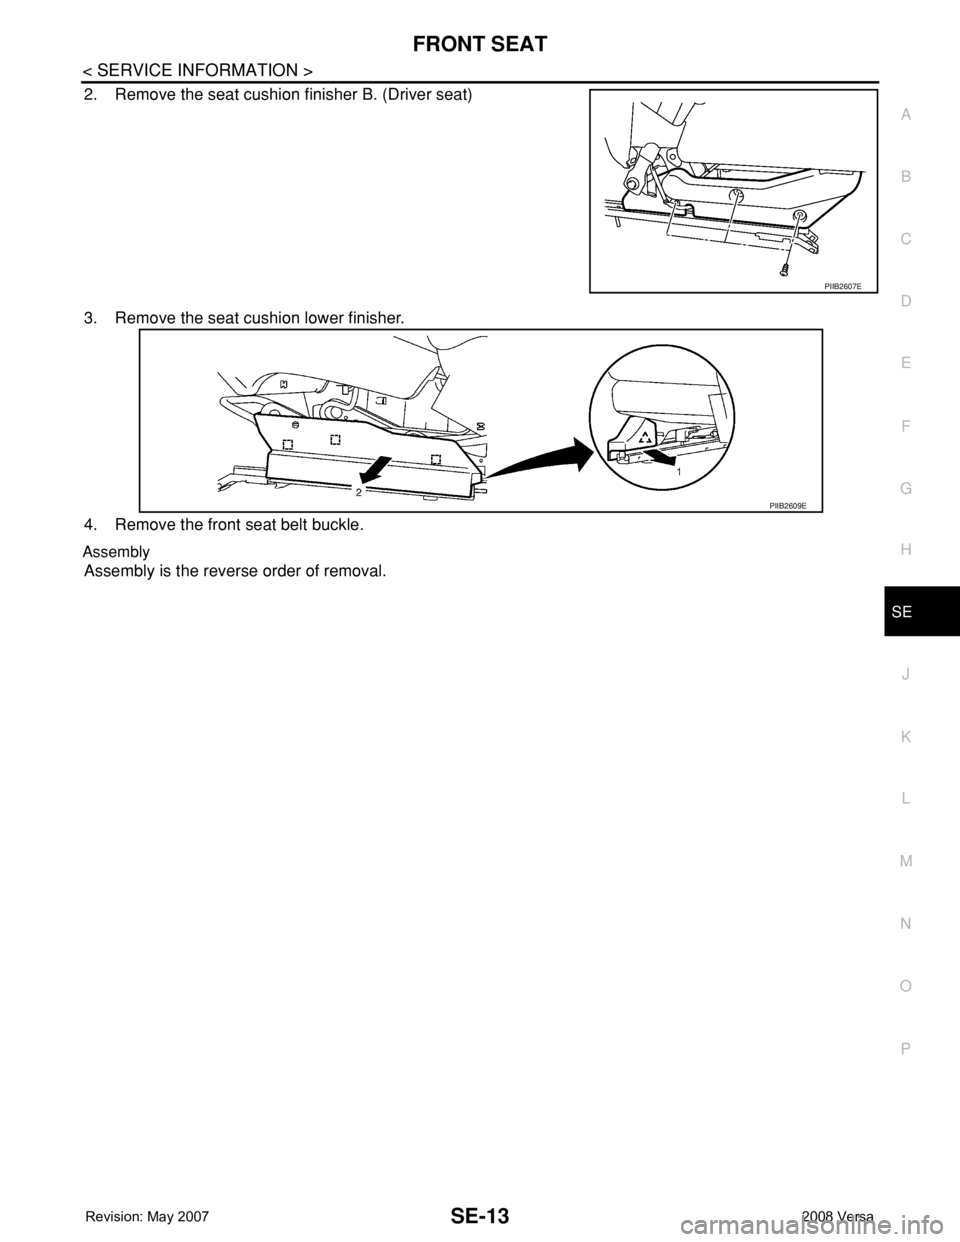
2. Remove the seat cushion finisher B. (Driver seat)
3. Remove the seat cushion lower finisher.
4. Remove the front seat belt buckle.
Assembly
Assembly is the reverse order of removal.
PIIB2607E
PIIB2609E
Page 2622 of 2771
SE-14
< SERVICE INFORMATION >
REAR SEAT
REAR SEAT
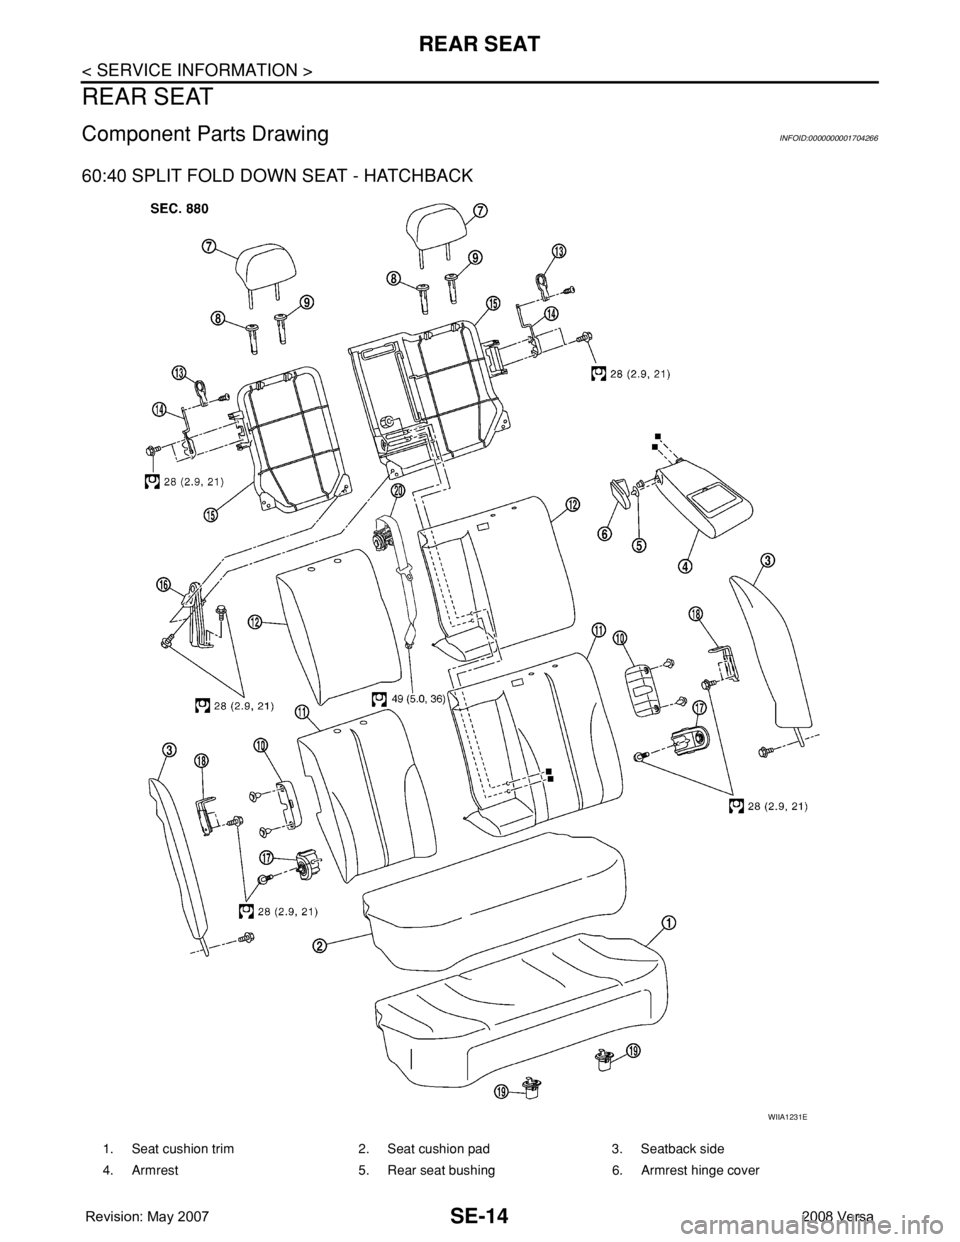
Component Parts DrawingINFOID:0000000001704266
60:40 SPLIT FOLD DOWN SEAT - HATCHBACK
WIIA1231E
1. Seat cushion trim 2. Seat cushion pad 3. Seatback side
4. Armrest 5. Rear seat bushing 6. Armrest hinge cover
Page 2623 of 2771
REAR SEAT
SE-15
< SERVICE INFORMATION >
C
D
E
F
G
H
J
K
L
MA
B
SE
N
O
P
Removal and InstallationINFOID:0000000001704267
CAUTION:
When removing and installing, use shop cloths to protect parts from damage.
60:40 SPLIT FOLD DOWN SEAT - HATCHBACK
Removal
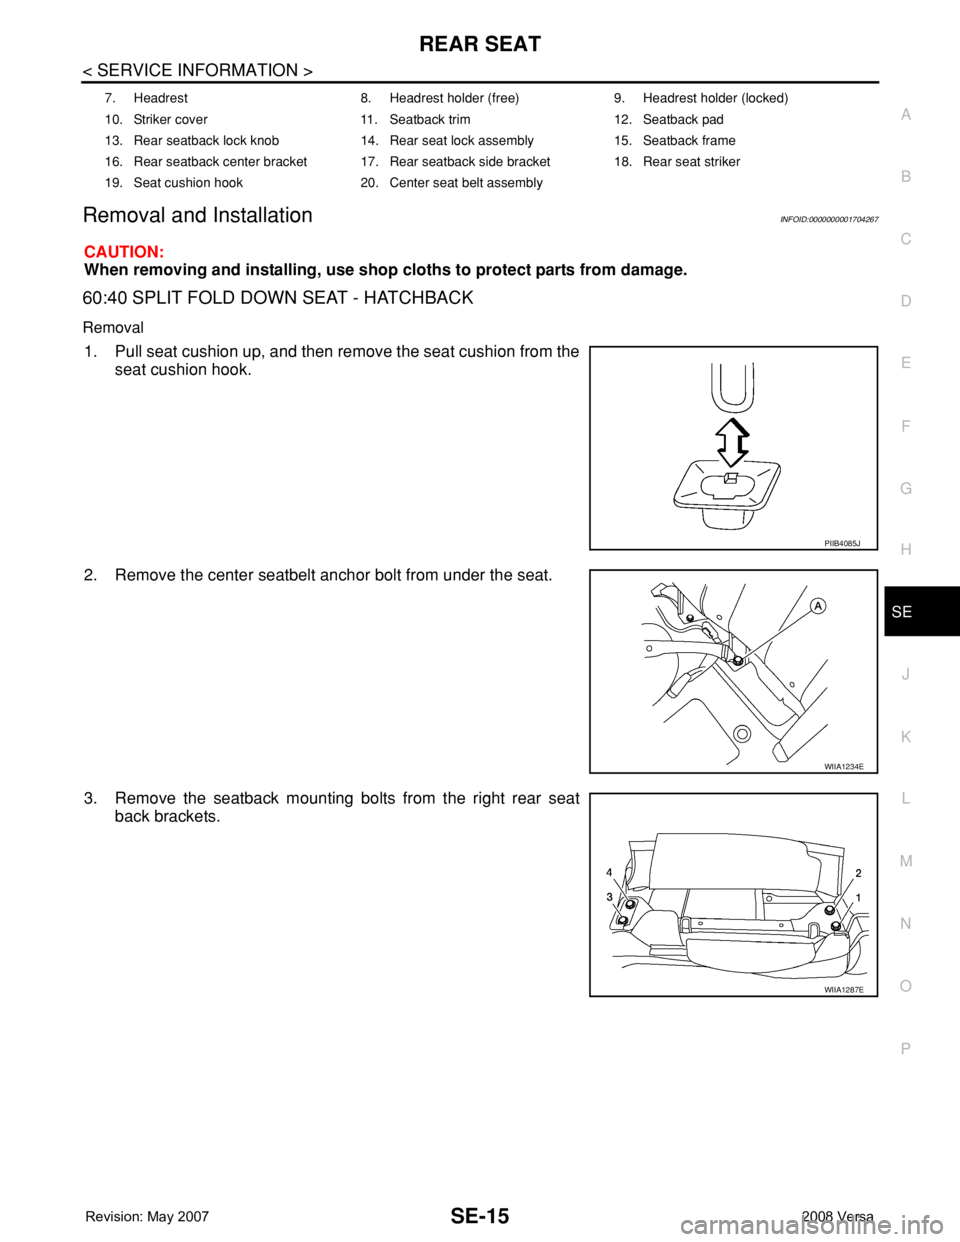
1. Pull seat cushion up, and then remove the seat cushion from the
seat cushion hook.
2. Remove the center seatbelt anchor bolt from under the seat.
3. Remove the seatback mounting bolts from the right rear seat
back brackets.
7. Headrest 8. Headrest holder (free) 9. Headrest holder (locked)
10. Striker cover 11. Seatback trim 12. Seatback pad
13. Rear seatback lock knob 14. Rear seat lock assembly 15. Seatback frame
16. Rear seatback center bracket 17. Rear seatback side bracket 18. Rear seat striker
19. Seat cushion hook 20. Center seat belt assembly
PIIB4085J
WIIA1234E
WIIA1287E
Page 2624 of 2771
SE-16
< SERVICE INFORMATION >
REAR SEAT
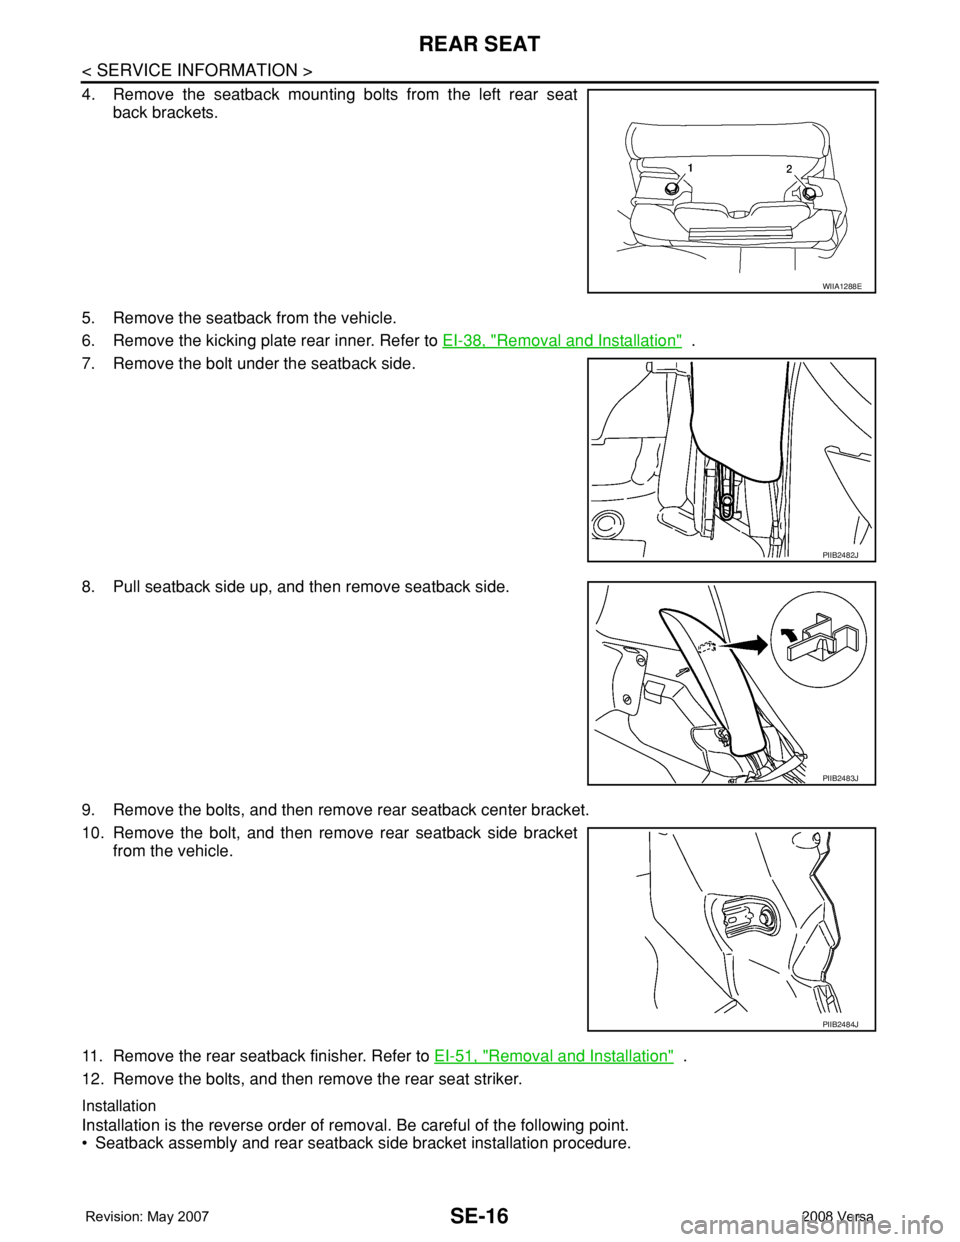
4. Remove the seatback mounting bolts from the left rear seat
back brackets.
5. Remove the seatback from the vehicle.
6. Remove the kicking plate rear inner. Refer to EI-38, "
Removal and Installation" .
7. Remove the bolt under the seatback side.
8. Pull seatback side up, and then remove seatback side.
9. Remove the bolts, and then remove rear seatback center bracket.
10. Remove the bolt, and then remove rear seatback side bracket
from the vehicle.
11. Remove the rear seatback finisher. Refer to EI-51, "
Removal and Installation" .
12. Remove the bolts, and then remove the rear seat striker.
Installation
Installation is the reverse order of removal. Be careful of the following point.
• Seatback assembly and rear seatback side bracket installation procedure.
WIIA1288E
PIIB2482J
PIIB2483J
PIIB2484J
Page 2625 of 2771
REAR SEAT
SE-17
< SERVICE INFORMATION >
C
D
E
F
G
H
J
K
L
MA
B
SE
N
O
P
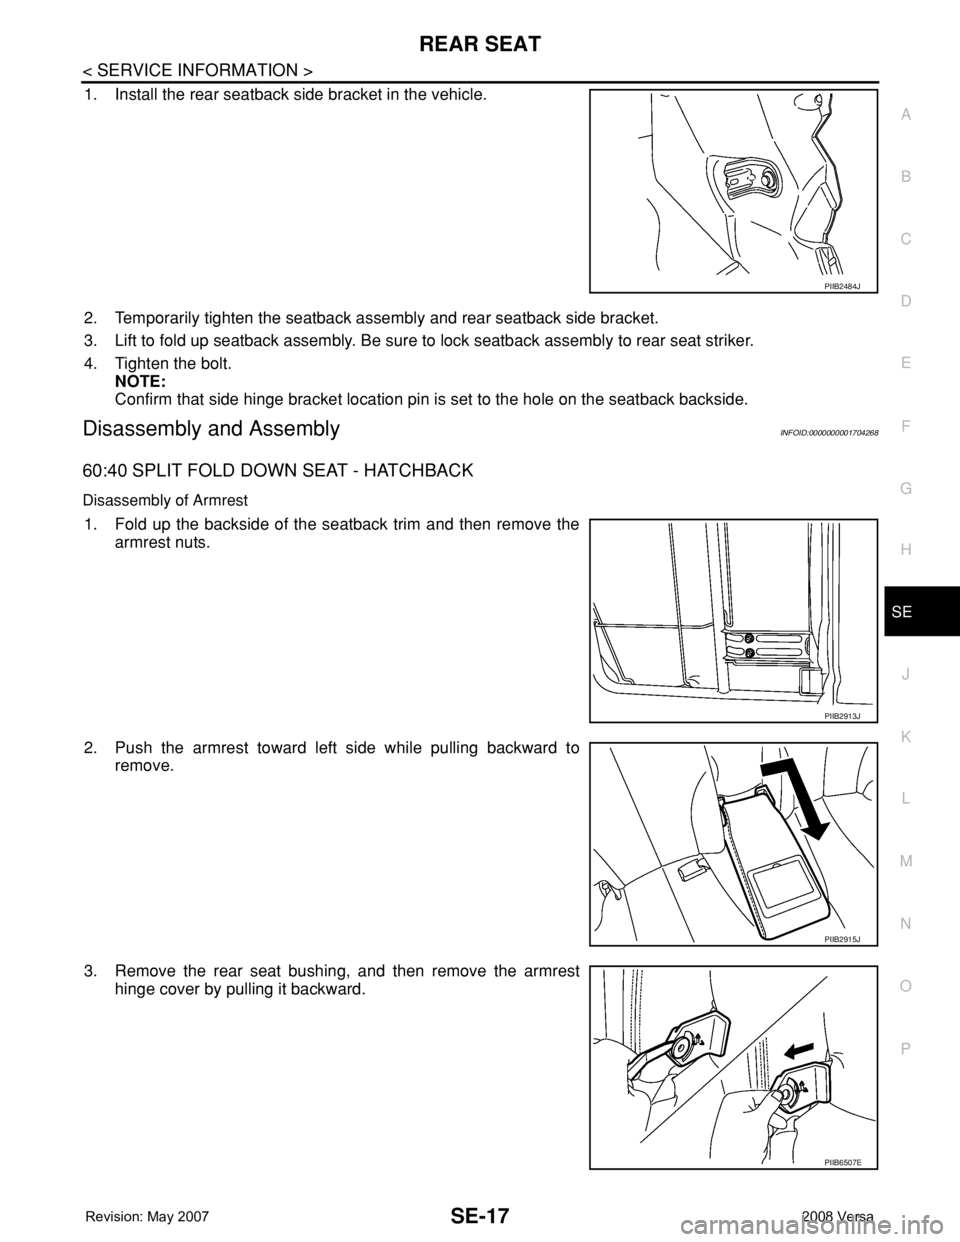
1. Install the rear seatback side bracket in the vehicle.
2. Temporarily tighten the seatback assembly and rear seatback side bracket.
3. Lift to fold up seatback assembly. Be sure to lock seatback assembly to rear seat striker.
4. Tighten the bolt.
NOTE:
Confirm that side hinge bracket location pin is set to the hole on the seatback backside.
Disassembly and AssemblyINFOID:0000000001704268
60:40 SPLIT FOLD DOWN SEAT - HATCHBACK
Disassembly of Armrest
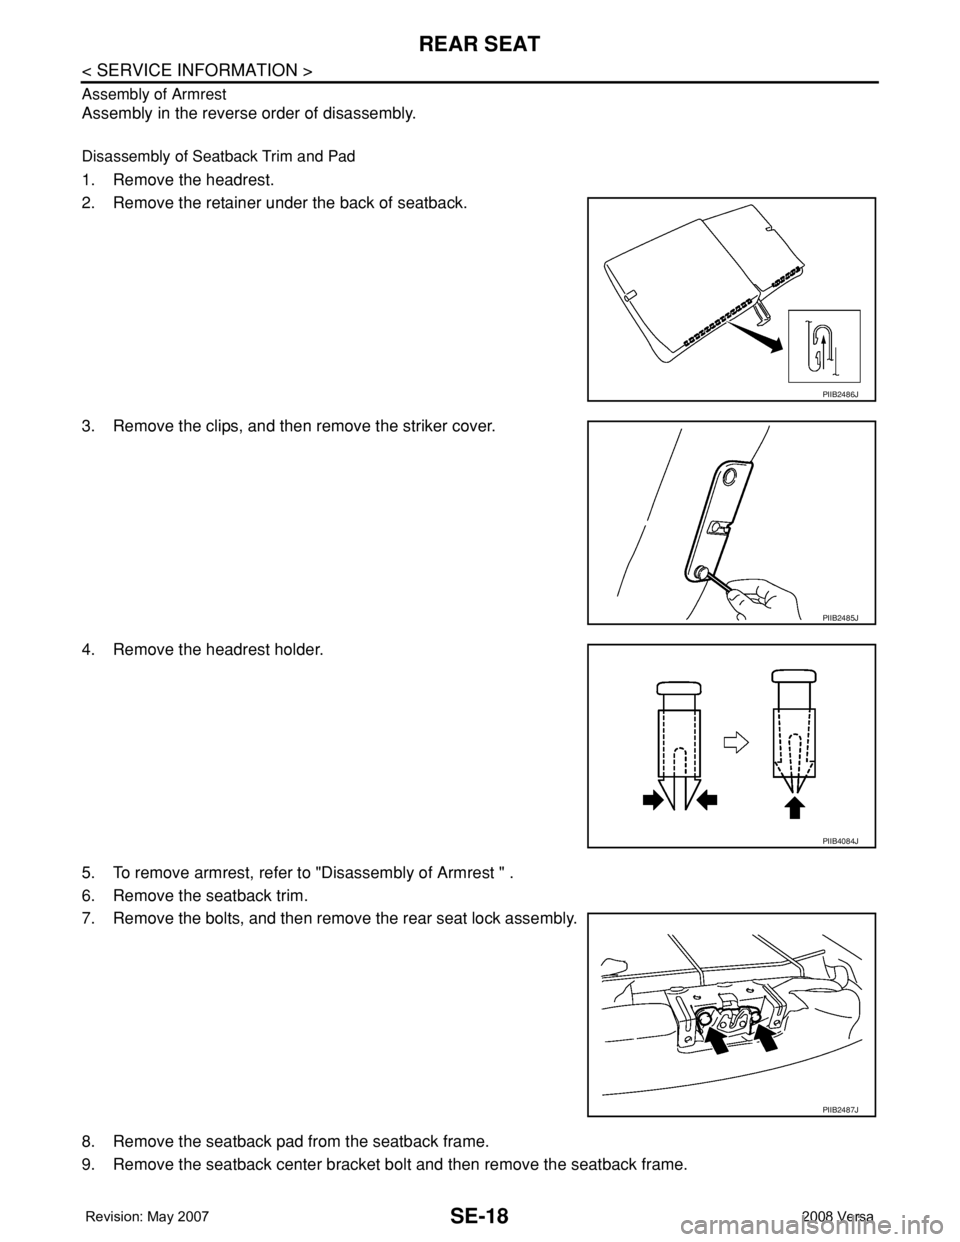
1. Fold up the backside of the seatback trim and then remove the
armrest nuts.
2. Push the armrest toward left side while pulling backward to
remove.
3. Remove the rear seat bushing, and then remove the armrest
hinge cover by pulling it backward.
PIIB2484J
PIIB2913J
PIIB2915J
PIIB6507E
Page 2626 of 2771
SE-18
< SERVICE INFORMATION >
REAR SEAT
Assembly of Armrest
Assembly in the reverse order of disassembly.
Disassembly of Seatback Trim and Pad
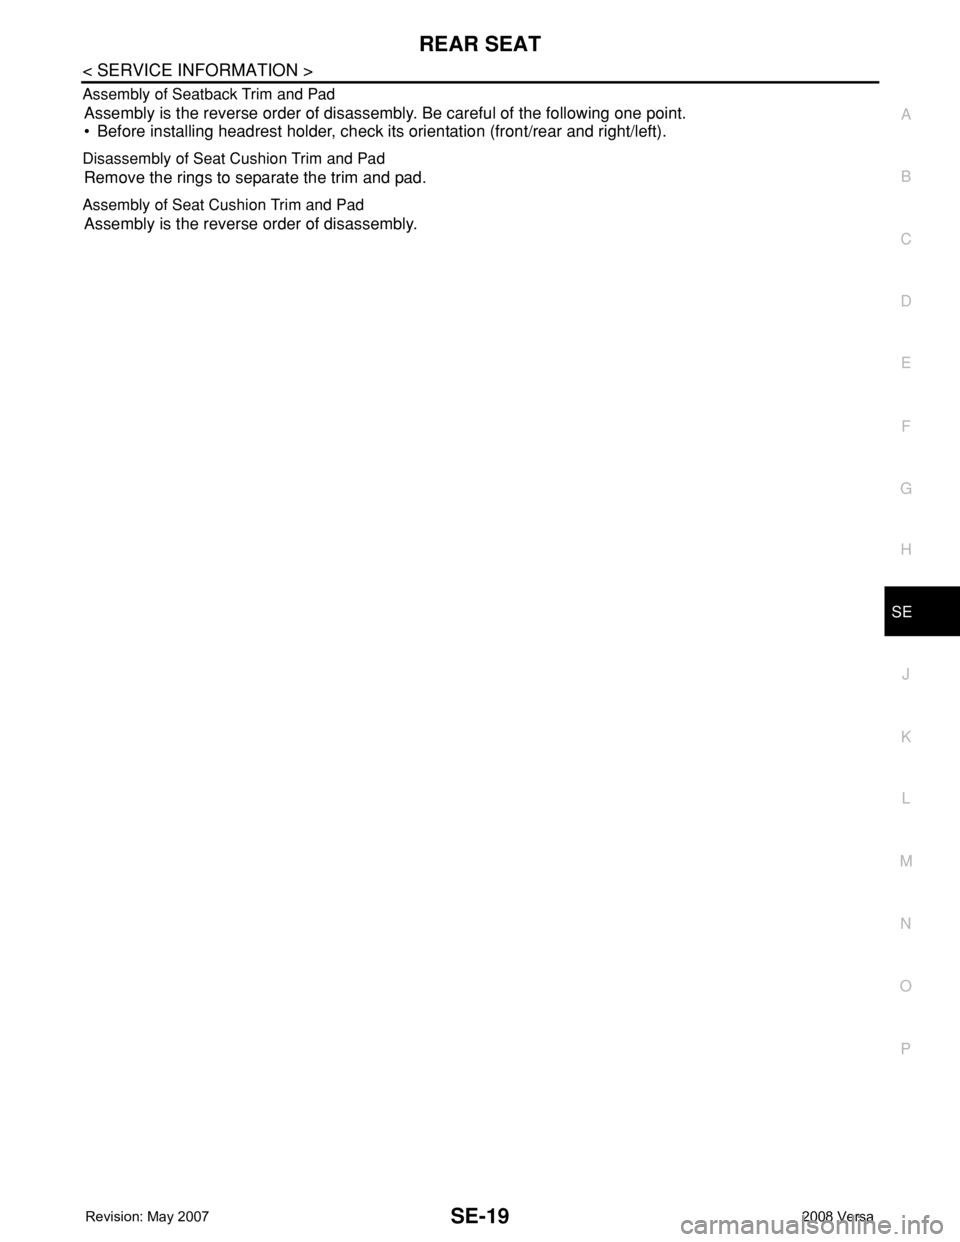
1. Remove the headrest.
2. Remove the retainer under the back of seatback.
3. Remove the clips, and then remove the striker cover.
4. Remove the headrest holder.
5. To remove armrest, refer to "Disassembly of Armrest " .
6. Remove the seatback trim.
7. Remove the bolts, and then remove the rear seat lock assembly.
8. Remove the seatback pad from the seatback frame.
9. Remove the seatback center bracket bolt and then remove the seatback frame.
PIIB2486J
PIIB2485J
PIIB4084J
PIIB2487J
Page 2627 of 2771
REAR SEAT
SE-19
< SERVICE INFORMATION >
C
D
E
F
G
H
J
K
L
MA
B
SE
N
O
P Assembly of Seatback Trim and Pad
Assembly is the reverse order of disassembly. Be careful of the following one point.
• Before installing headrest holder, check its orientation (front/rear and right/left).
Disassembly of Seat Cushion Trim and Pad
Remove the rings to separate the trim and pad.
Assembly of Seat Cushion Trim and Pad
Assembly is the reverse order of disassembly.
Page 2628 of 2771
SE-20
< SERVICE INFORMATION >
REAR SEAT
Component Parts Drawing
INFOID:0000000001704269
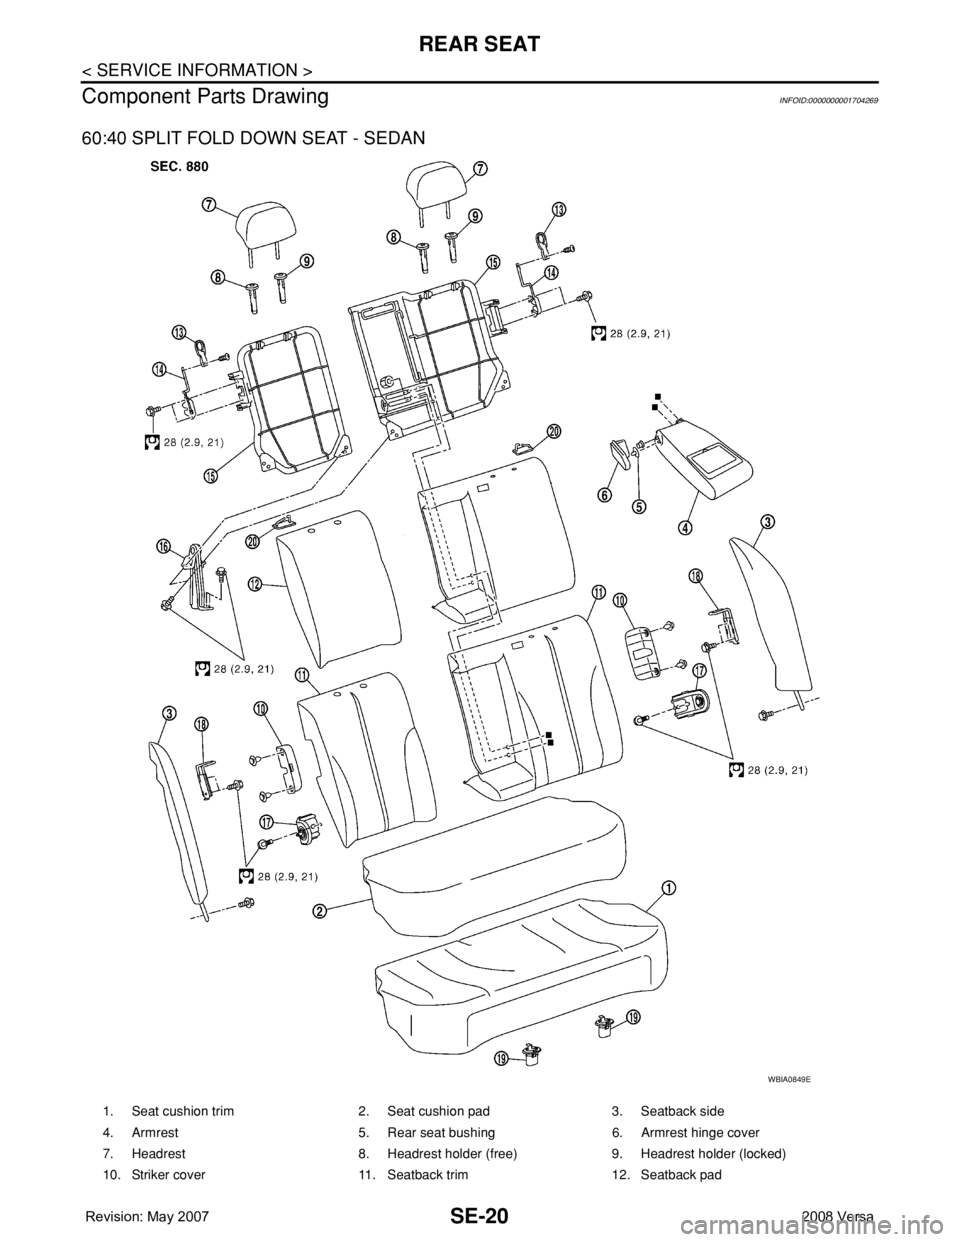
60:40 SPLIT FOLD DOWN SEAT - SEDAN
WBIA0849E
1. Seat cushion trim 2. Seat cushion pad 3. Seatback side
4. Armrest 5. Rear seat bushing 6. Armrest hinge cover
7. Headrest 8. Headrest holder (free) 9. Headrest holder (locked)
10. Striker cover 11. Seatback trim 12. Seatback pad
Page 2629 of 2771
REAR SEAT
SE-21
< SERVICE INFORMATION >
C
D
E
F
G
H
J
K
L
MA
B
SE
N
O
P
Removal and InstallationINFOID:0000000001704270
CAUTION:
When removing and installing, use shop cloths to protect parts from damage.
60:40 SPLIT FOLD DOWN SEAT - SEDAN
Removal
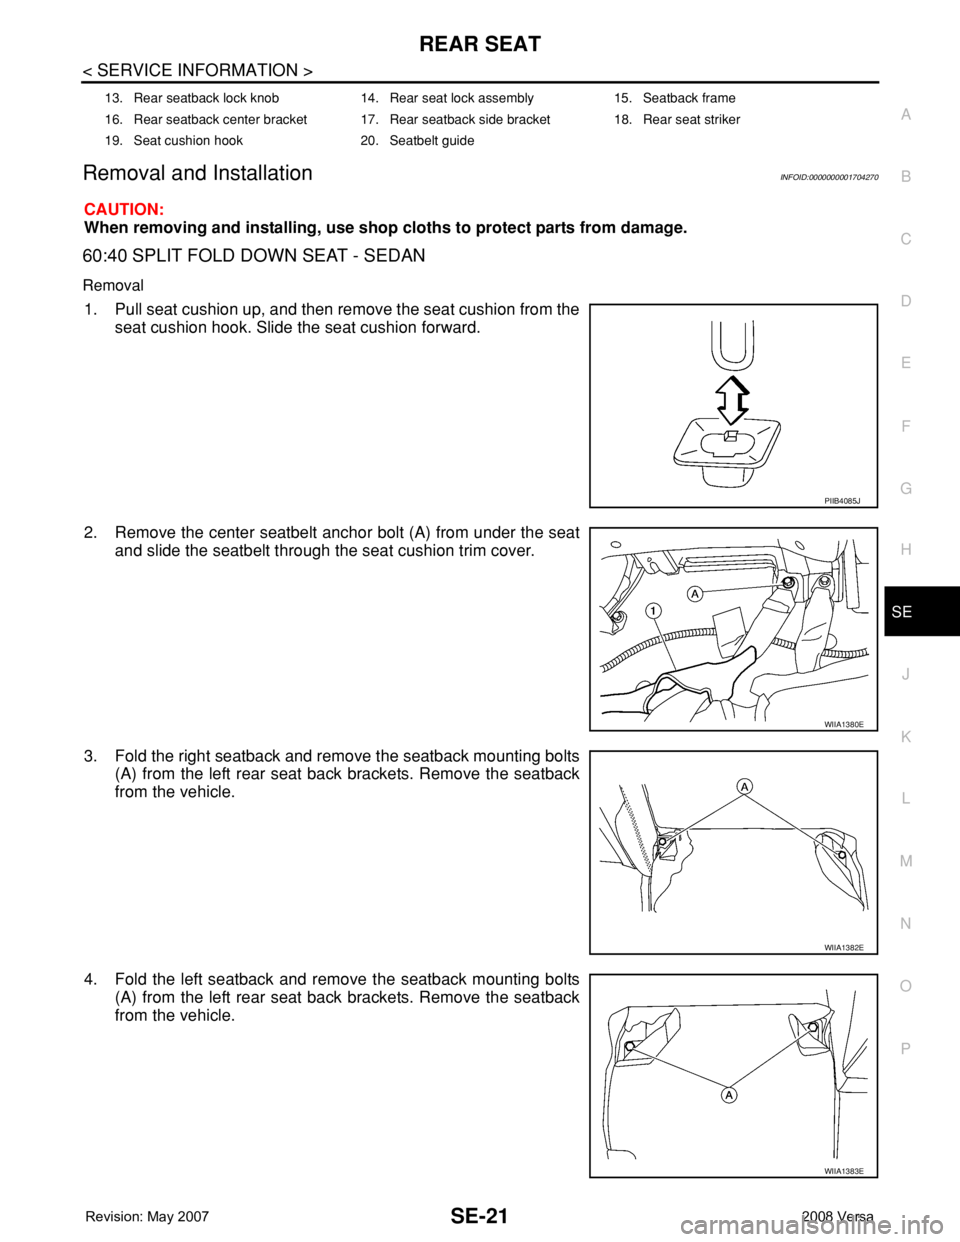
1. Pull seat cushion up, and then remove the seat cushion from the
seat cushion hook. Slide the seat cushion forward.
2. Remove the center seatbelt anchor bolt (A) from under the seat
and slide the seatbelt through the seat cushion trim cover.
3. Fold the right seatback and remove the seatback mounting bolts
(A) from the left rear seat back brackets. Remove the seatback
from the vehicle.
4. Fold the left seatback and remove the seatback mounting bolts
(A) from the left rear seat back brackets. Remove the seatback
from the vehicle.
13. Rear seatback lock knob 14. Rear seat lock assembly 15. Seatback frame
16. Rear seatback center bracket 17. Rear seatback side bracket 18. Rear seat striker
19. Seat cushion hook 20. Seatbelt guide
PIIB4085J
WIIA1380E
WIIA1382E
WIIA1383E
Page 2630 of 2771
SE-22
< SERVICE INFORMATION >
REAR SEAT
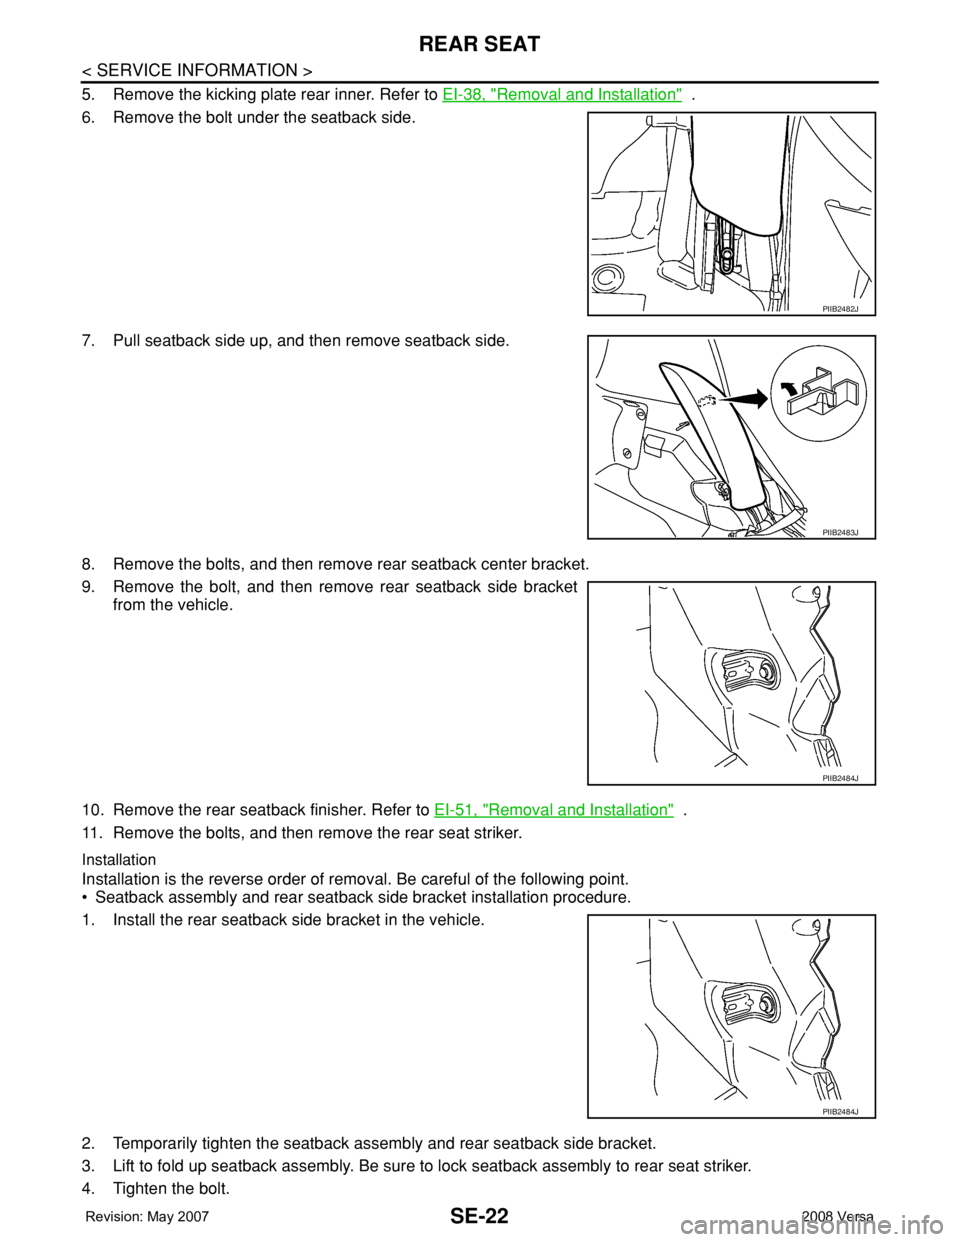
5. Remove the kicking plate rear inner. Refer to EI-38, "Removal and Installation" .
6. Remove the bolt under the seatback side.
7. Pull seatback side up, and then remove seatback side.
8. Remove the bolts, and then remove rear seatback center bracket.
9. Remove the bolt, and then remove rear seatback side bracket
from the vehicle.
10. Remove the rear seatback finisher. Refer to EI-51, "
Removal and Installation" .
11. Remove the bolts, and then remove the rear seat striker.
Installation
Installation is the reverse order of removal. Be careful of the following point.
• Seatback assembly and rear seatback side bracket installation procedure.
1. Install the rear seatback side bracket in the vehicle.
2. Temporarily tighten the seatback assembly and rear seatback side bracket.
3. Lift to fold up seatback assembly. Be sure to lock seatback assembly to rear seat striker.
4. Tighten the bolt.
PIIB2482J
PIIB2483J
PIIB2484J
PIIB2484J
Trending: cruise control, set clock, octane, fuel cap release, low beam, change time, coolant capacity
