NISSAN LATIO 2008 Service Repair Manual
Manufacturer: NISSAN, Model Year: 2008, Model line: LATIO, Model: NISSAN LATIO 2008Pages: 2771, PDF Size: 60.61 MB
Page 2631 of 2771
REAR SEAT
SE-23
< SERVICE INFORMATION >
C
D
E
F
G
H
J
K
L
MA
B
SE
N
O
P
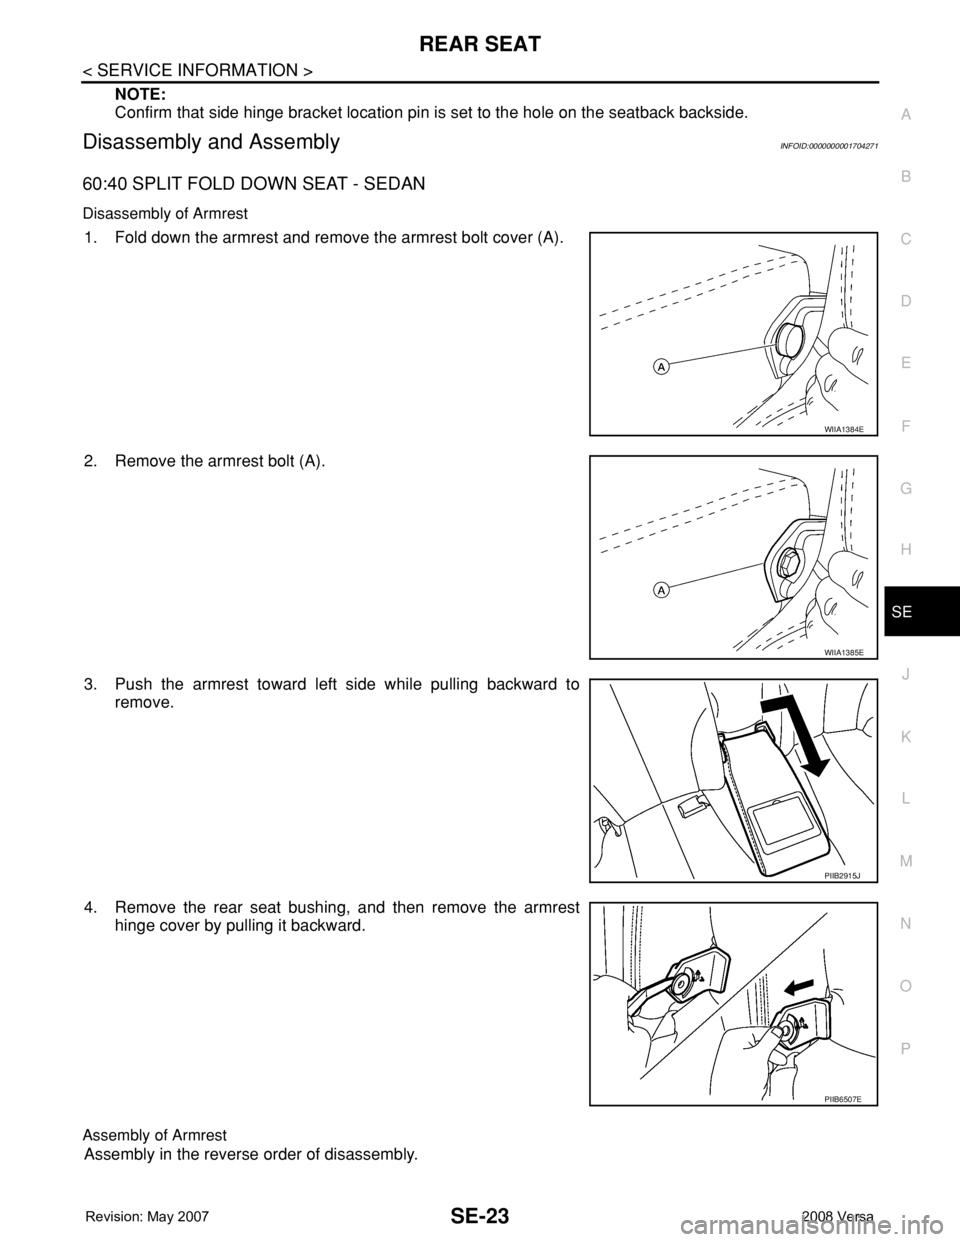
NOTE:
Confirm that side hinge bracket location pin is set to the hole on the seatback backside.
Disassembly and AssemblyINFOID:0000000001704271
60:40 SPLIT FOLD DOWN SEAT - SEDAN
Disassembly of Armrest
1. Fold down the armrest and remove the armrest bolt cover (A).
2. Remove the armrest bolt (A).
3. Push the armrest toward left side while pulling backward to
remove.
4. Remove the rear seat bushing, and then remove the armrest
hinge cover by pulling it backward.
Assembly of Armrest
Assembly in the reverse order of disassembly.
WIIA1384E
WIIA1385E
PIIB2915J
PIIB6507E
Page 2632 of 2771
SE-24
< SERVICE INFORMATION >
REAR SEAT
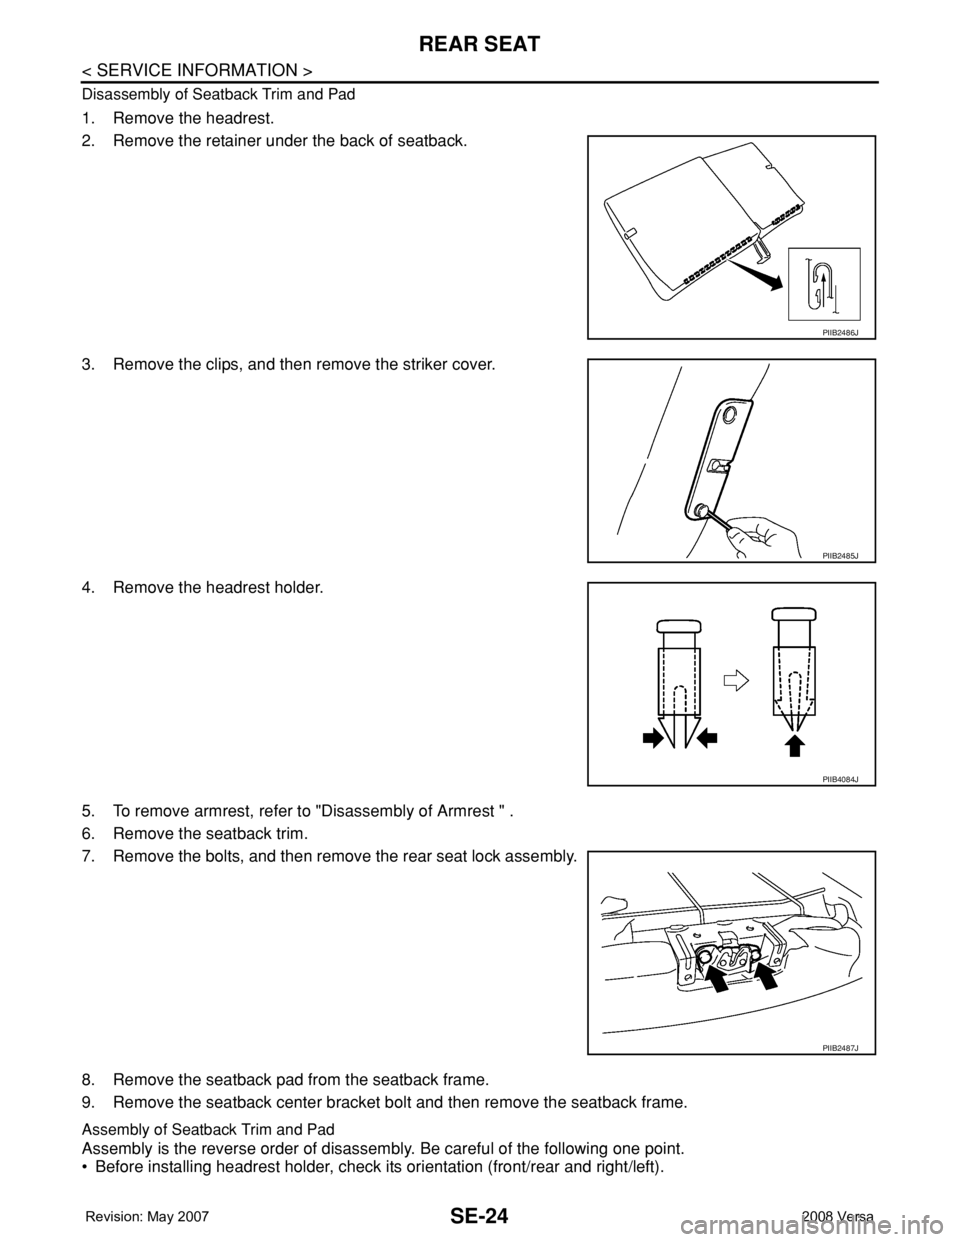
Disassembly of Seatback Trim and Pad
1. Remove the headrest.
2. Remove the retainer under the back of seatback.
3. Remove the clips, and then remove the striker cover.
4. Remove the headrest holder.
5. To remove armrest, refer to "Disassembly of Armrest " .
6. Remove the seatback trim.
7. Remove the bolts, and then remove the rear seat lock assembly.
8. Remove the seatback pad from the seatback frame.
9. Remove the seatback center bracket bolt and then remove the seatback frame.
Assembly of Seatback Trim and Pad
Assembly is the reverse order of disassembly. Be careful of the following one point.
• Before installing headrest holder, check its orientation (front/rear and right/left).
PIIB2486J
PIIB2485J
PIIB4084J
PIIB2487J
Page 2633 of 2771
REAR SEAT
SE-25
< SERVICE INFORMATION >
C
D
E
F
G
H
J
K
L
MA
B
SE
N
O
P Disassembly of Seat Cushion Trim and Pad
Remove the rings to separate the trim and pad.
Assembly of Seat Cushion Trim and Pad
Assembly is the reverse order of disassembly.
Removal and InstallationINFOID:0000000001704272
CAUTION:
When removing and installing, use shop cloths to protect parts from damage.
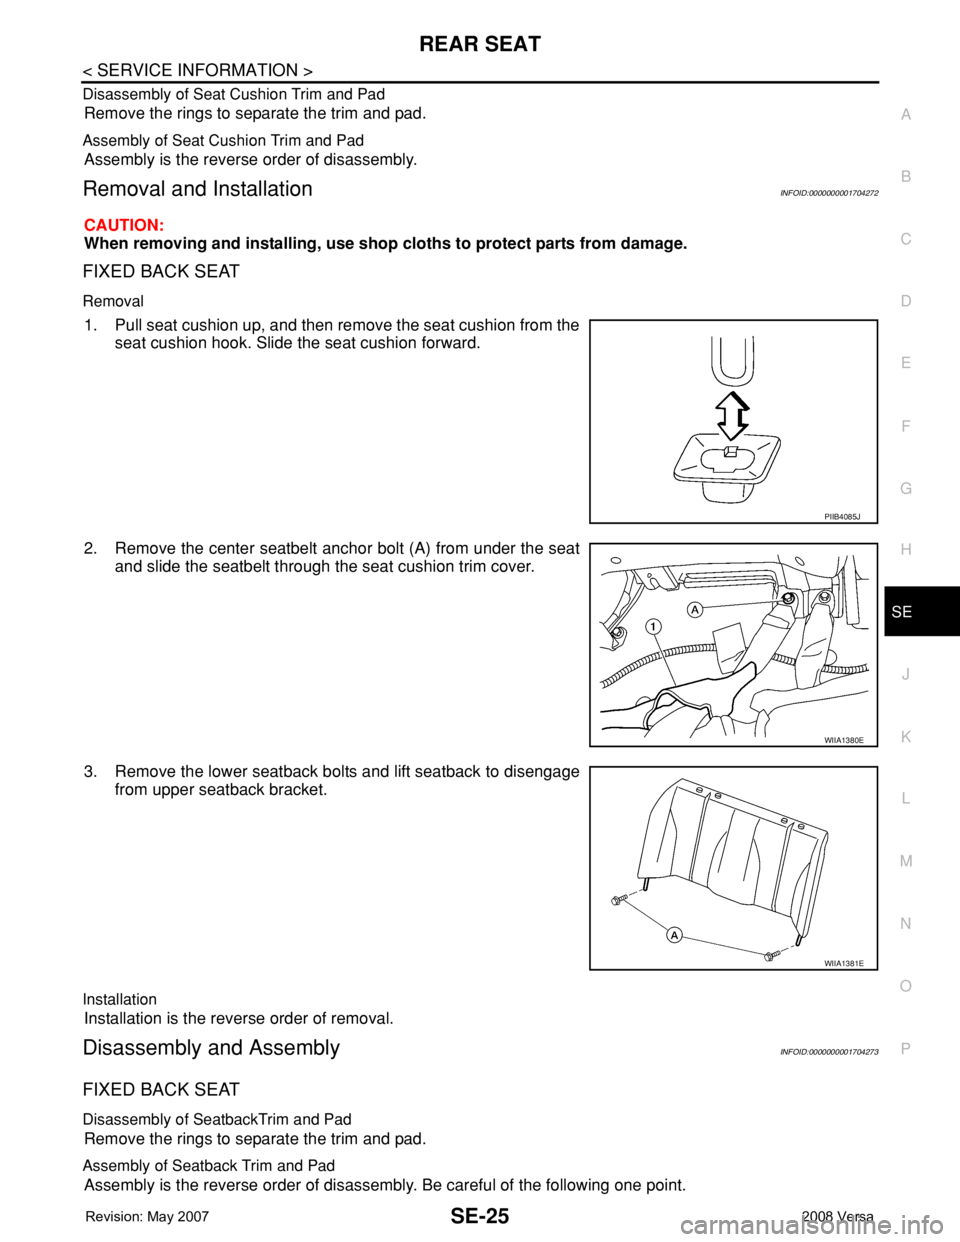
FIXED BACK SEAT
Removal
1. Pull seat cushion up, and then remove the seat cushion from the
seat cushion hook. Slide the seat cushion forward.
2. Remove the center seatbelt anchor bolt (A) from under the seat
and slide the seatbelt through the seat cushion trim cover.
3. Remove the lower seatback bolts and lift seatback to disengage
from upper seatback bracket.
Installation
Installation is the reverse order of removal.
Disassembly and AssemblyINFOID:0000000001704273
FIXED BACK SEAT
Disassembly of SeatbackTrim and Pad
Remove the rings to separate the trim and pad.
Assembly of Seatback Trim and Pad
Assembly is the reverse order of disassembly. Be careful of the following one point.
PIIB4085J
WIIA1380E
WIIA1381E
Page 2634 of 2771

SE-26
< SERVICE INFORMATION >
REAR SEAT
Disassembly of Seat Cushion Trim and Pad
Remove the rings to separate the trim and pad.
Assembly of Seat Cushion Trim and Pad
Assembly is the reverse order of disassembly.
Page 2635 of 2771

SRS-1
RESTRAINTS
C
D
E
F
G
I
J
K
L
M
SECTION SRS
A
B
SRS
N
O
P
CONTENTS
SUPPLEMENTAL RESTRAINT SYSTEM (SRS)
PRECAUTION ...............................................2
PRECAUTIONS ...................................................2
Precaution for Supplemental Restraint System
(SRS) "AIR BAG" and "SEAT BELT PRE-TEN-
SIONER" ...................................................................
2
Precaution for SRS "AIR BAG" and "SEAT BELT
PRE-TENSIONER" Service ......................................
2
Occupant Classification System Precaution .............2
SYMPTOM DIAGNOSIS ...............................3
SUPPLEMENTAL RESTRAINT SYSTEM
(SRS) ...................................................................
3
SRS Configuration ....................................................3
Driver Air Bag Module ...............................................4
Front Passenger Air Bag Module ..............................4
Front Side Air Bag .....................................................4
Side Curtain Air Bag ..................................................4
Front Seat Belt Pre-tensioner with Load Limiter .......5
Occupant Classification System (OCS) ....................5
Direct-connect SRS Component Connectors ............6
TROUBLE DIAGNOSIS ......................................7
Trouble Diagnosis Introduction .................................7
SRS Component Parts Location ...............................9
Schematic ...............................................................10
Wiring Diagram - SRS- ............................................11
CONSULT-III Function (AIR BAG) ..........................16
Self-Diagnosis Function (Without CONSULT-III) ....17
SRS Operation Check .............................................18
Trouble Diagnosis with CONSULT-III .....................19
Trouble Diagnosis without CONSULT-III ................27
Trouble Diagnosis: "AIR BAG" Warning Lamp
Does Not Turn Off ...................................................
30
Trouble Diagnosis: "AIR BAG" Warning Lamp
Does Not Turn On ...................................................
31
ON-VEHICLE REPAIR .................................33
DRIVER AIR BAG MODULE ............................33
Removal and Installation .........................................33
SPIRAL CABLE ................................................36
Removal and Installation .........................................36
FRONT PASSENGER AIR BAG MODULE ......38
Removal and Installation .........................................38
SIDE CURTAIN AIR BAG MODULE ................39
Component ..............................................................39
Removal and Installation .........................................39
CRASH ZONE SENSOR ...................................41
Removal and Installation .........................................41
SIDE AIR BAG (SATELLITE) SENSOR ...........42
Removal and Installation .........................................42
FRONT SEAT BELT PRE-TENSIONER ...........43
Removal and Installation .........................................43
DIAGNOSIS SENSOR UNIT .............................44
Removal and Installation .........................................44
OCCUPANT CLASSIFICATION SYSTEM
CONTROL UNIT ................................................
45
Removal and Installation .........................................45
COLLISION DIAGNOSIS ..................................46
For Frontal Collision ................................................46
For Side and Rollover Collision ...............................47
Page 2636 of 2771

SRS-2
< PRECAUTION >
PRECAUTIONS
PRECAUTION
PRECAUTIONS
Precaution for Supplemental Restraint System (SRS) "AIR BAG" and "SEAT BELT
PRE-TENSIONER"
INFOID:0000000001703904
The Supplemental Restraint System such as “AIR BAG” and “SEAT BELT PRE-TENSIONER”, used along
with a front seat belt, helps to reduce the risk or severity of injury to the driver and front passenger for certain
types of collision. This system includes seat belt switch inputs and dual stage front air bag modules. The SRS
system uses the seat belt switches to determine the front air bag deployment, and may only deploy one front
air bag, depending on the severity of a collision and whether the front occupants are belted or unbelted.
Information necessary to service the system safely is included in the SR and SB section of this Service Man-
ual.
WARNING:
• To avoid rendering the SRS inoperative, which could increase the risk of personal injury or death in
the event of a collision which would result in air bag inflation, all maintenance must be performed by
an authorized NISSAN/INFINITI dealer.
• Improper maintenance, including incorrect removal and installation of the SRS, can lead to personal
injury caused by unintentional activation of the system. For removal of Spiral Cable and Air Bag
Module, see the SR section.
• Do not use electrical test equipment on any circuit related to the SRS unless instructed to in this
Service Manual. SRS wiring harnesses can be identified by yellow and/or orange harnesses or har-
ness connectors.
Precaution for SRS "AIR BAG" and "SEAT BELT PRE-TENSIONER" Service
INFOID:0000000001703905
• Do not use electrical test equipment to check SRS circuits unless instructed to in this Service Manual.
• Before servicing the SRS, turn ignition switch OFF, disconnect both battery cables and wait at least 3 min-
utes.
For approximately 3 minutes after the cables are removed, it is still possible for the air bag and seat belt pre-
tensioner to deploy. Therefore, do not work on any SRS connectors or wires until at least 3 minutes have
passed.
• The air bag diagnosis sensor unit must always be installed with the arrow mark “⇐” pointing toward the front
of the vehicle for proper operation. Also check air bag diagnosis sensor unit for cracks, deformities or rust
before installation and replace as required.
• The spiral cable must be aligned with the neutral position since its rotations are limited. Do not attempt to
turn steering wheel or column after removal of steering gear.
• Handle air bag module carefully. Always place driver and front passenger air bag modules with the pad side
facing upward and seat mounted front side air bag module standing with the stud bolt side facing down.
• Conduct self-diagnosis to check entire SRS for proper function after replacing any components.
• After air bag inflates, the front instrument panel assembly should be replaced if damaged.
• Do not reuse center pillar upper garnish if removed.
Occupant Classification System PrecautionINFOID:0000000001703906
Replace control unit and passenger front seat cushion as an assembly.
Page 2637 of 2771
SUPPLEMENTAL RESTRAINT SYSTEM (SRS)
SRS-3
< SYMPTOM DIAGNOSIS >
C
D
E
F
G
I
J
K
L
MA
B
SRS
N
O
P
SYMPTOM DIAGNOSIS
SUPPLEMENTAL RESTRAINT SYSTEM (SRS)
SRS ConfigurationINFOID:0000000001703907
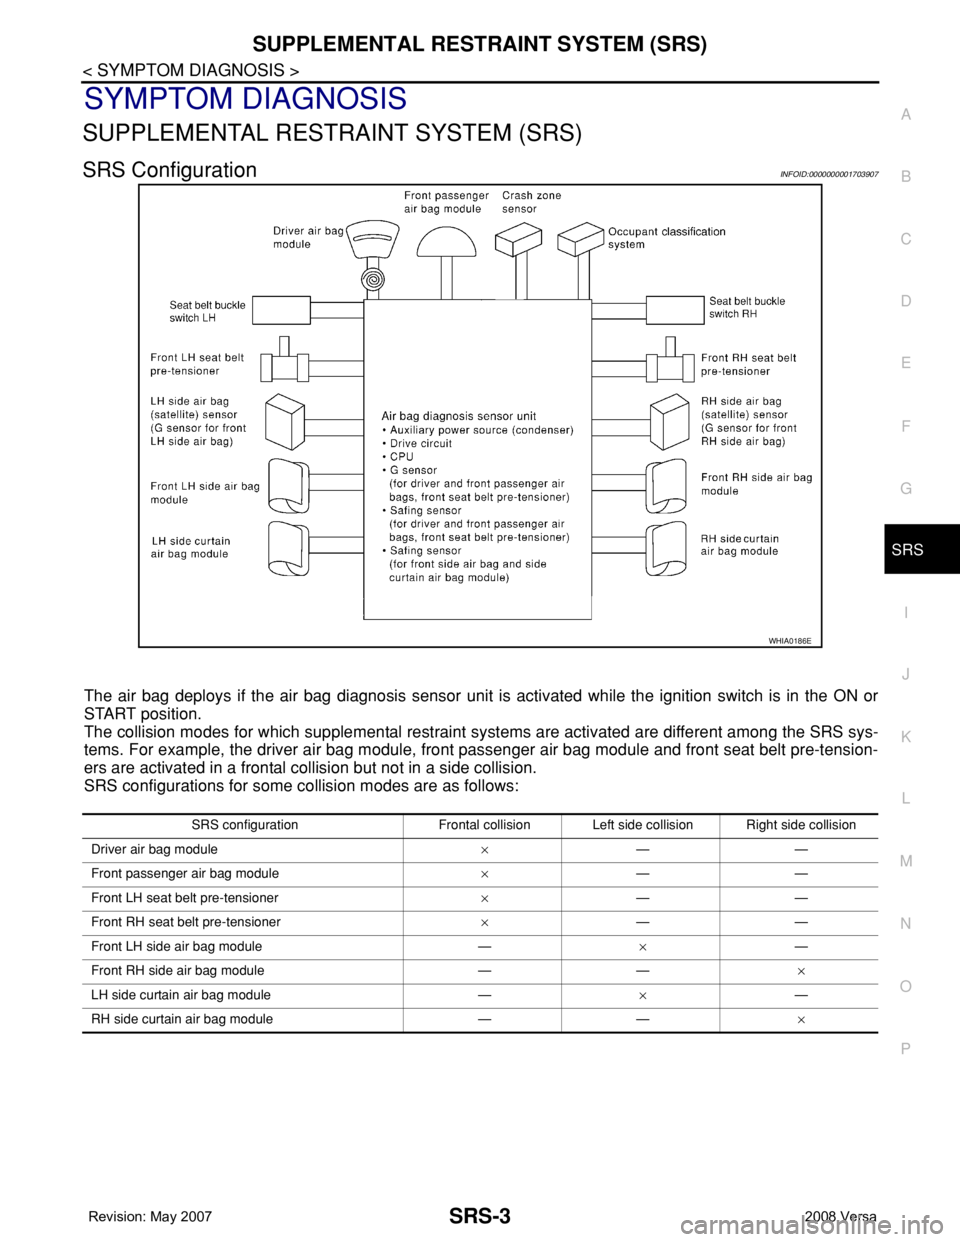
The air bag deploys if the air bag diagnosis sensor unit is activated while the ignition switch is in the ON or
START position.
The collision modes for which supplemental restraint systems are activated are different among the SRS sys-
tems. For example, the driver air bag module, front passenger air bag module and front seat belt pre-tension-
ers are activated in a frontal collision but not in a side collision.
SRS configurations for some collision modes are as follows:
WHIA0186E
SRS configuration Frontal collision Left side collision Right side collision
Driver air bag module×——
Front passenger air bag module×——
Front LH seat belt pre-tensioner×——
Front RH seat belt pre-tensioner×——
Front LH side air bag module —×—
Front RH side air bag module — —×
LH side curtain air bag module —×—
RH side curtain air bag module — —×
Page 2638 of 2771
SRS-4
< SYMPTOM DIAGNOSIS >
SUPPLEMENTAL RESTRAINT SYSTEM (SRS)
Driver Air Bag Module
INFOID:0000000001703908
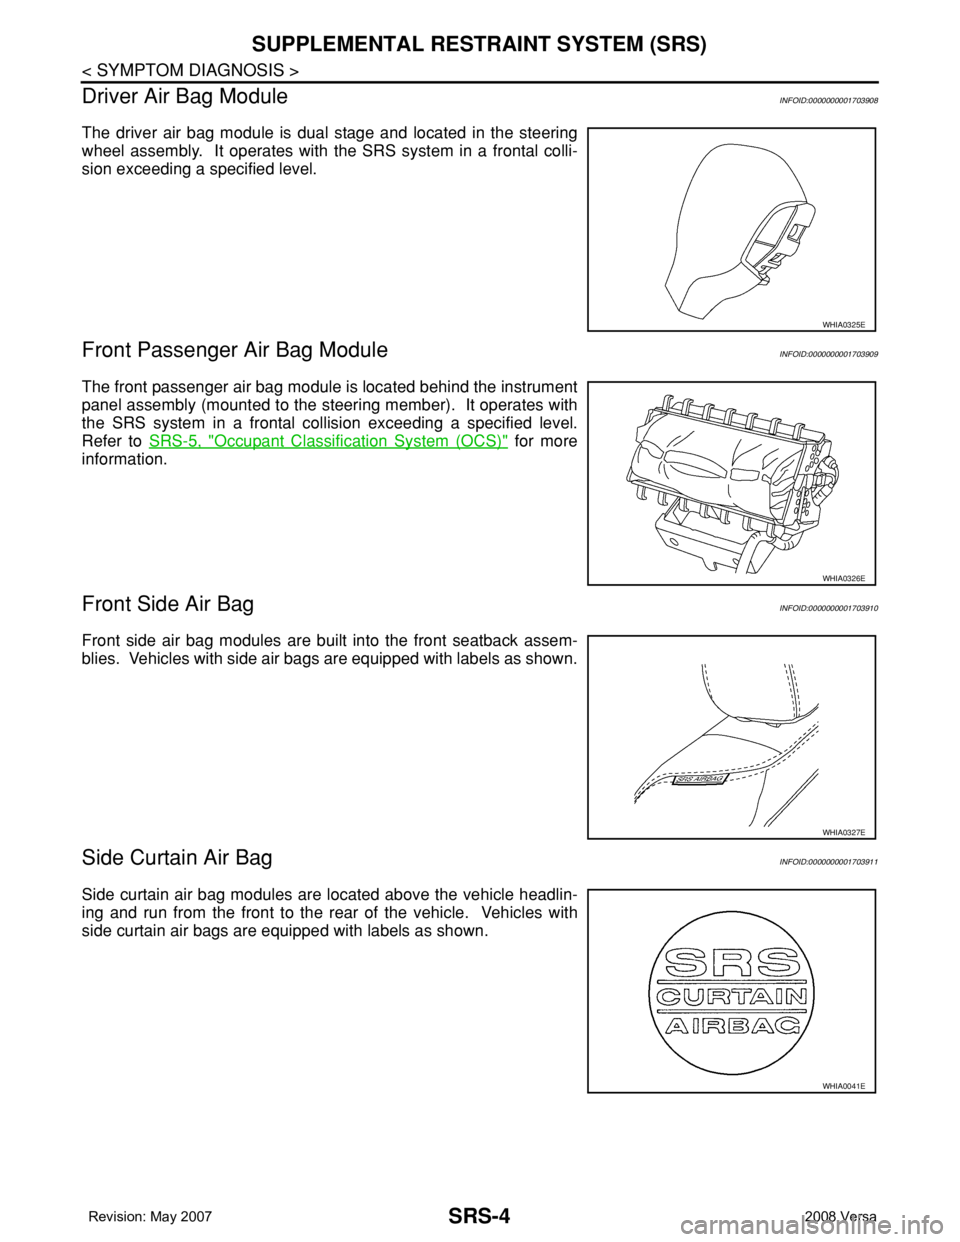
The driver air bag module is dual stage and located in the steering
wheel assembly. It operates with the SRS system in a frontal colli-
sion exceeding a specified level.
Front Passenger Air Bag ModuleINFOID:0000000001703909
The front passenger air bag module is located behind the instrument
panel assembly (mounted to the steering member). It operates with
the SRS system in a frontal collision exceeding a specified level.
Refer to SRS-5, "
Occupant Classification System (OCS)" for more
information.
Front Side Air BagINFOID:0000000001703910
Front side air bag modules are built into the front seatback assem-
blies. Vehicles with side air bags are equipped with labels as shown.
Side Curtain Air BagINFOID:0000000001703911
Side curtain air bag modules are located above the vehicle headlin-
ing and run from the front to the rear of the vehicle. Vehicles with
side curtain air bags are equipped with labels as shown.
WHIA0325E
WHIA0326E
WHIA0327E
WHIA0041E
Page 2639 of 2771
SUPPLEMENTAL RESTRAINT SYSTEM (SRS)
SRS-5
< SYMPTOM DIAGNOSIS >
C
D
E
F
G
I
J
K
L
MA
B
SRS
N
O
P
Front Seat Belt Pre-tensioner with Load LimiterINFOID:0000000001703912
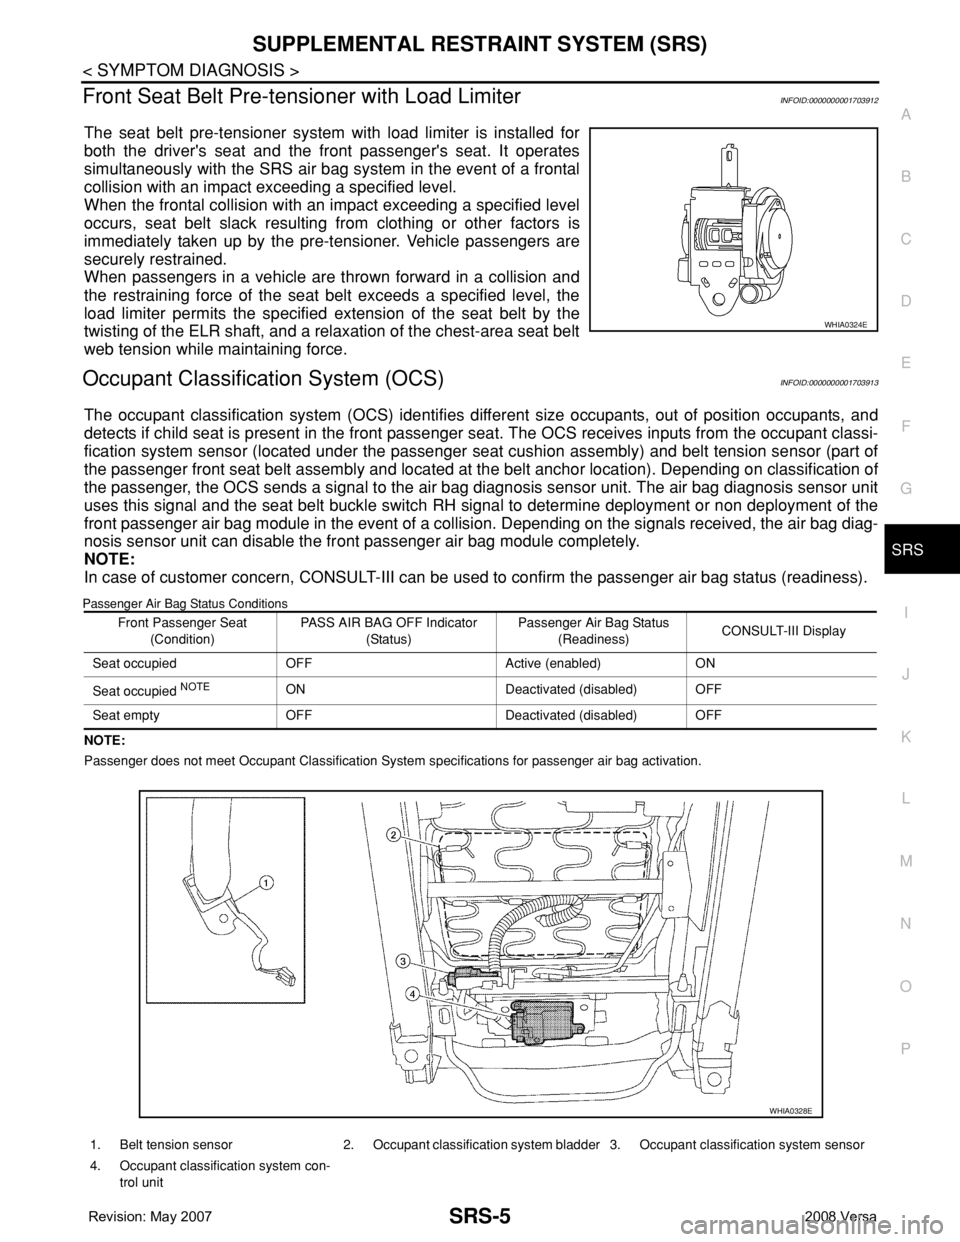
The seat belt pre-tensioner system with load limiter is installed for
both the driver's seat and the front passenger's seat. It operates
simultaneously with the SRS air bag system in the event of a frontal
collision with an impact exceeding a specified level.
When the frontal collision with an impact exceeding a specified level
occurs, seat belt slack resulting from clothing or other factors is
immediately taken up by the pre-tensioner. Vehicle passengers are
securely restrained.
When passengers in a vehicle are thrown forward in a collision and
the restraining force of the seat belt exceeds a specified level, the
load limiter permits the specified extension of the seat belt by the
twisting of the ELR shaft, and a relaxation of the chest-area seat belt
web tension while maintaining force.
Occupant Classification System (OCS)INFOID:0000000001703913
The occupant classification system (OCS) identifies different size occupants, out of position occupants, and
detects if child seat is present in the front passenger seat. The OCS receives inputs from the occupant classi-
fication system sensor (located under the passenger seat cushion assembly) and belt tension sensor (part of
the passenger front seat belt assembly and located at the belt anchor location). Depending on classification of
the passenger, the OCS sends a signal to the air bag diagnosis sensor unit. The air bag diagnosis sensor unit
uses this signal and the seat belt buckle switch RH signal to determine deployment or non deployment of the
front passenger air bag module in the event of a collision. Depending on the signals received, the air bag diag-
nosis sensor unit can disable the front passenger air bag module completely.
NOTE:
In case of customer concern, CONSULT-III can be used to confirm the passenger air bag status (readiness).
Passenger Air Bag Status Conditions
NOTE:
Passenger does not meet Occupant Classification System specifications for passenger air bag activation.
WHIA0324E
Front Passenger Seat
(Condition)PASS AIR BAG OFF Indicator
(Status)Passenger Air Bag Status
(Readiness)CONSULT-III Display
Seat occupied OFF Active (enabled) ON
Seat occupied
NOTEON Deactivated (disabled) OFF
Seat empty OFF Deactivated (disabled) OFF
1. Belt tension sensor 2. Occupant classification system bladder 3. Occupant classification system sensor
4. Occupant classification system con-
trol unit
WHIA0328E
Page 2640 of 2771
SRS-6
< SYMPTOM DIAGNOSIS >
SUPPLEMENTAL RESTRAINT SYSTEM (SRS)
Direct-connect SRS Component Connectors
INFOID:0000000001703914
The following SRS components use direct-connect style harness connectors.
• Driver air bag module
• Passenger air bag module
• LH side curtain air bag module
• RH side curtain air bag module
• Front LH seat belt pre-tensioner
• Front RH seat belt pre-tensioner
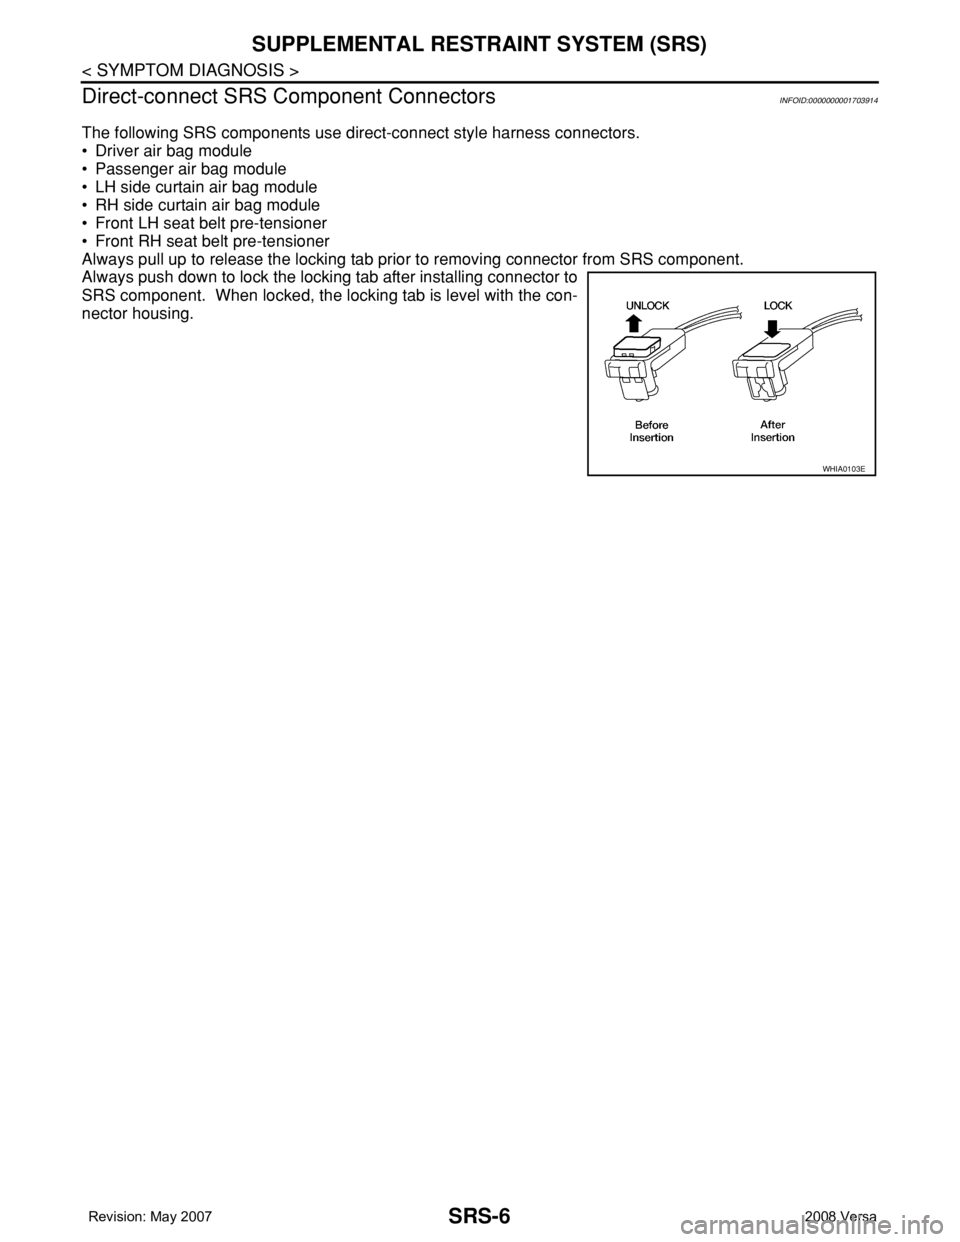
Always pull up to release the locking tab prior to removing connector from SRS component.
Always push down to lock the locking tab after installing connector to
SRS component. When locked, the locking tab is level with the con-
nector housing.
WHIA0103E