NISSAN LATIO 2010 Service Repair Manual
LATIO 2010
NISSAN
NISSAN
https://www.carmanualsonline.info/img/5/57358/w960_57358-0.png
NISSAN LATIO 2010 Service Repair Manual
Trending: mirror controls, ESP inoperative, length, flat tire, differential, recommended oil, jack points
Page 1241 of 3745
WARNING LAMPSDI-31
< SERVICE INFORMATION >
C
DE
F
G H
I
J
L
M A
B
DI
N
O P
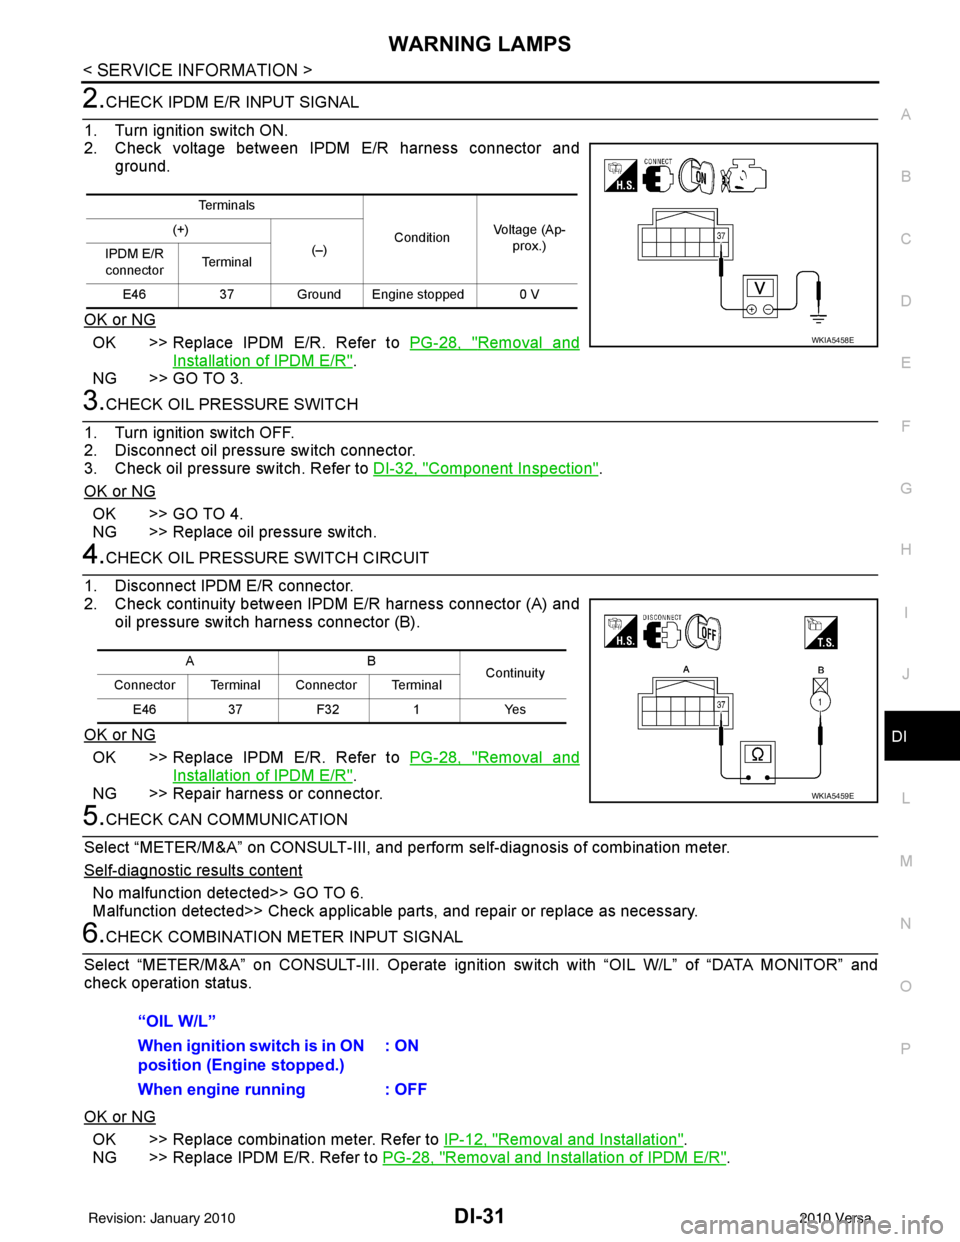
2.CHECK IPDM E/R INPUT SIGNAL
1. Turn ignition switch ON.
2. Check voltage between IPDM E/R harness connector and ground.
OK or NG
OK >> Replace IPDM E/R. Refer to PG-28, "Removal and
Installation of IPDM E/R".
NG >> GO TO 3.
3.CHECK OIL PRESSURE SWITCH
1. Turn ignition switch OFF.
2. Disconnect oil pressure switch connector.
3. Check oil pressure switch. Refer to DI-32, "
Component Inspection".
OK or NG
OK >> GO TO 4.
NG >> Replace oil pressure switch.
4.CHECK OIL PRESSURE SWITCH CIRCUIT
1. Disconnect IPDM E/R connector.
2. Check continuity between IPDM E/R harness connector (A) and oil pressure switch harness connector (B).
OK or NG
OK >> Replace IPDM E/R. Refer to PG-28, "Removal and
Installation of IPDM E/R".
NG >> Repair harness or connector.
5.CHECK CAN COMMUNICATION
Select “METER/M&A” on CONSULT-III, and per form self-diagnosis of combination meter.
Self
-diagnostic results content
No malfunction detected>> GO TO 6.
Malfunction detected>> Check applicable parts, and repair or replace as necessary.
6.CHECK COMBINATION METER INPUT SIGNAL
Select “METER/M&A” on CONS ULT-III. Operate ignition switch with “OIL W/L” of “DATA MONITOR” and
check operation status.
OK or NG
OK >> Replace combination meter. Refer to IP-12, "Removal and Installation".
NG >> Replace IPDM E/R. Refer to PG-28, "
Removal and Installation of IPDM E/R".
Te r m i n a l s
ConditionVoltage (Ap-
prox.)
(+)
(–)
IPDM E/R
connector Te r m i n a l
E46 37 Ground Engine stopped 0 V
WKIA5458E
AB
Continuity
Connector Terminal Connector Terminal
E46 37 F32 1 Yes
WKIA5459E
“OIL W/L”
When ignition switch is in ON
position (Engine stopped.) : ON
When engine running : OFF
Revision: January 20102010 Versa
Page 1242 of 3745
DI-32
< SERVICE INFORMATION >
WARNING LAMPS
Oil Pressure Warning Lamp Does Not Turn Off (Oil Pressure Is Normal)
INFOID:0000000005395030
NOTE:
For oil pressure inspection, refer to LU-17, "
Inspection".
1.CHECK OIL PRESSURE WARNING LAMP OPERATION
Activate IPDM E/R auto active test. Refer to PG-20, "
Auto Active Test".
Does oil pressure warning lamp blink?
YES >> GO TO 2.
NO >> GO TO 5.
2.CHECK IPDM E/R OUTPUT SIGNAL
1. Turn ignition switch OFF.
2. Disconnect oil pressure switch connector.
3. Turn ignition switch ON.
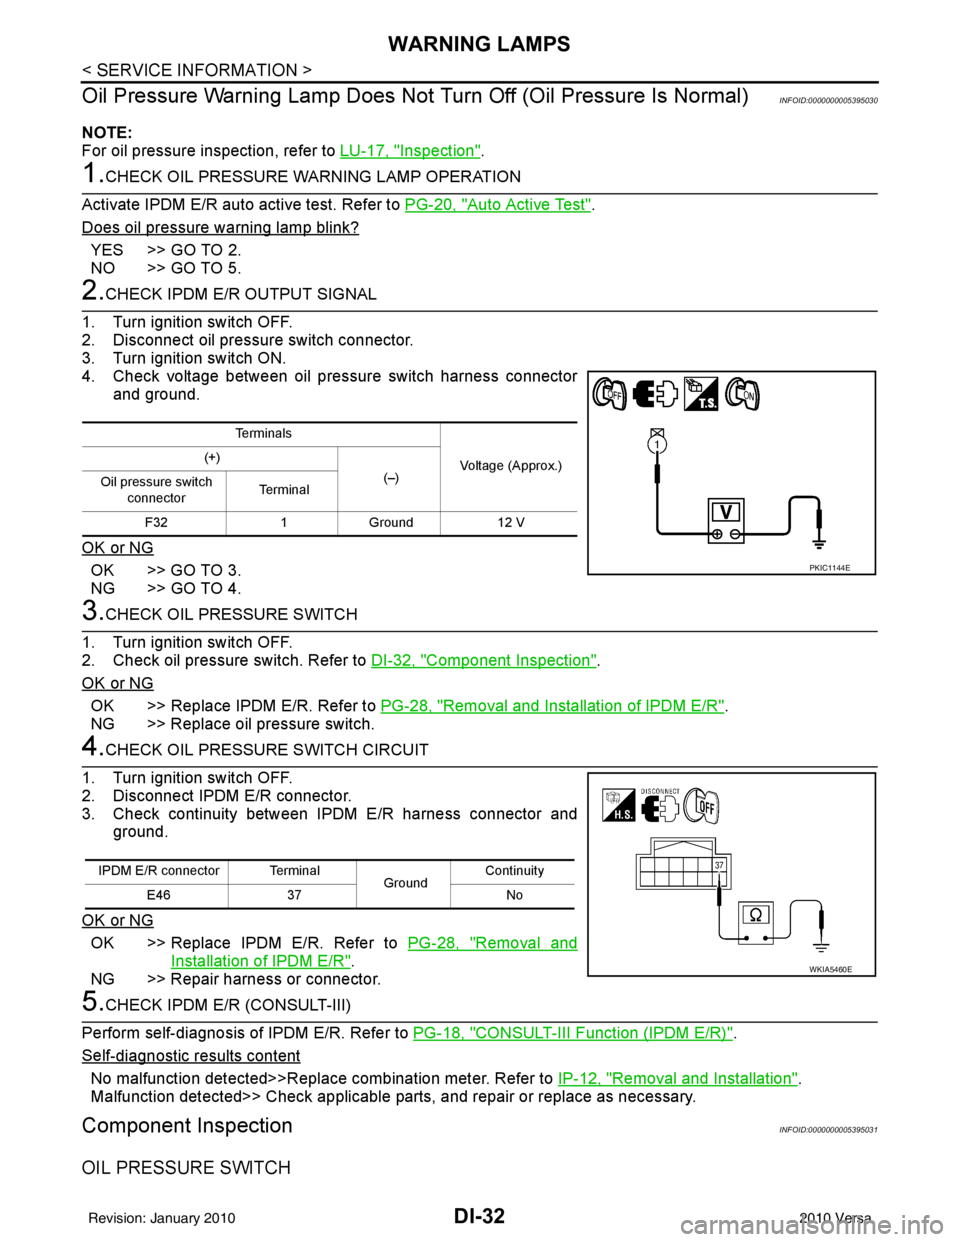
4. Check voltage between oil pressure switch harness connector and ground.
OK or NG
OK >> GO TO 3.
NG >> GO TO 4.
3.CHECK OIL PRESSURE SWITCH
1. Turn ignition switch OFF.
2. Check oil pressure switch. Refer to DI-32, "
Component Inspection".
OK or NG
OK >> Replace IPDM E/R. Refer to PG-28, "Removal and Installation of IPDM E/R".
NG >> Replace oil pressure switch.
4.CHECK OIL PRESSURE SWITCH CIRCUIT
1. Turn ignition switch OFF.
2. Disconnect IPDM E/R connector.
3. Check continuity between IPDM E/R harness connector and ground.
OK or NG
OK >> Replace IPDM E/R. Refer to PG-28, "Removal and
Installation of IPDM E/R".
NG >> Repair harness or connector.
5.CHECK IPDM E/R (CONSULT-III)
Perform self-diagnosis of IPDM E/R. Refer to PG-18, "
CONSULT-III Function (IPDM E/R)".
Self
-diagnostic results content
No malfunction detected>>Replace combination meter. Refer to IP-12, "Removal and Installation".
Malfunction detected>> Check applicable parts, and repair or replace as necessary.
Component InspectionINFOID:0000000005395031
OIL PRESSURE SWITCH
Te r m i n a l s
Voltage (Approx.)
(+)
(–)
Oil pressure switch
connector Te r m i n a l
F32 1Ground 12 V
PKIC1144E
IPDM E/R connector Terminal
GroundContinuity
E46 37 No
WKIA5460E
Revision: January 20102010 Versa
Page 1243 of 3745
WARNING LAMPSDI-33
< SERVICE INFORMATION >
C
DE
F
G H
I
J
L
M A
B
DI
N
O P
Check continuity between oil pressure switch and ground.
Condition Oil pressure [kPa (bar, kg/cm2, psi)]Continuity
Engine stopped Less than 29 (0.3, 0.3, 4) Yes
Engine running More than 29 (0.3, 0.3, 4) No
ELF0044D
Revision: January 20102010 Versa
Page 1244 of 3745
DI-34
< SERVICE INFORMATION >
A/T INDICATOR
A/T INDICATOR
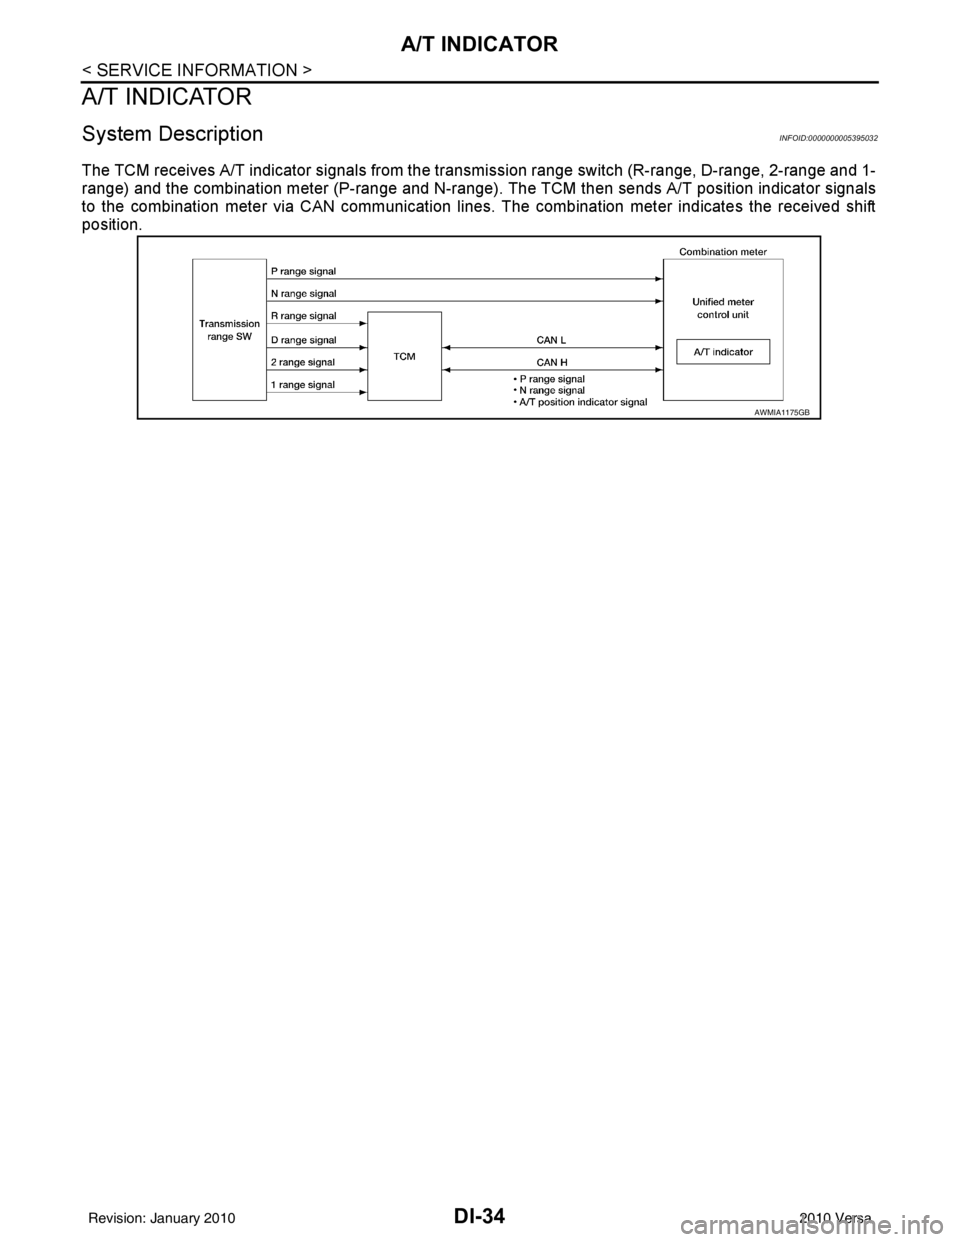
System DescriptionINFOID:0000000005395032
The TCM receives A/T indicator signals from the transmission range switch (R-range, D-range, 2-range and 1-
range) and the combination meter (P-range and N-range). The TCM then sends A/T position indicator signals
to the combination meter via CAN communication lines. The combination meter indicates the received shift
position.
AWMIA1175GB
Revision: January 20102010 Versa
Page 1245 of 3745
A/T INDICATORDI-35
< SERVICE INFORMATION >
C
DE
F
G H
I
J
L
M A
B
DI
N
O P
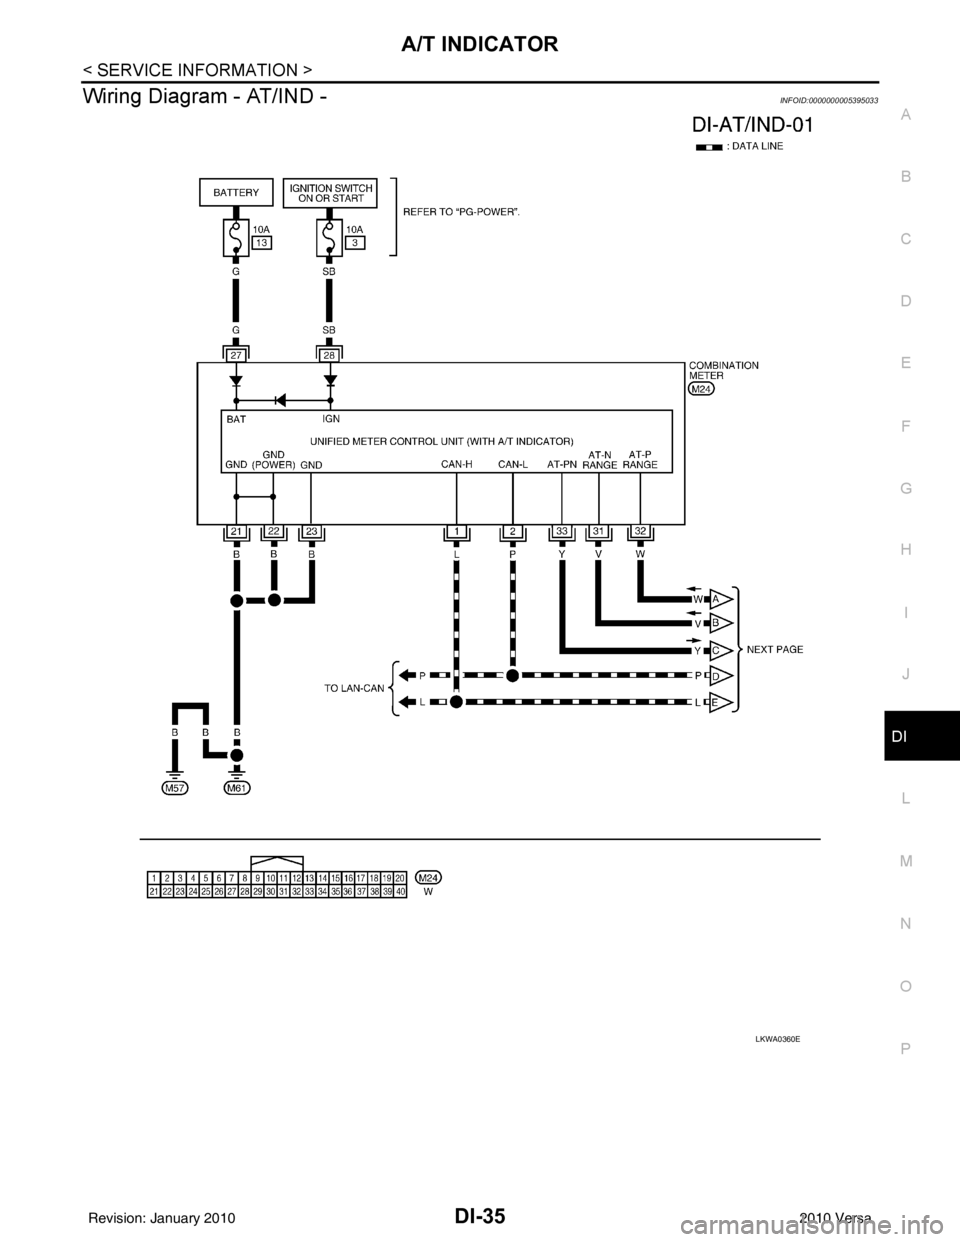
Wiring Diagram - AT/IND -INFOID:0000000005395033
LKWA0360E
Revision: January 20102010 Versa
Page 1246 of 3745
DI-36
< SERVICE INFORMATION >
A/T INDICATOR
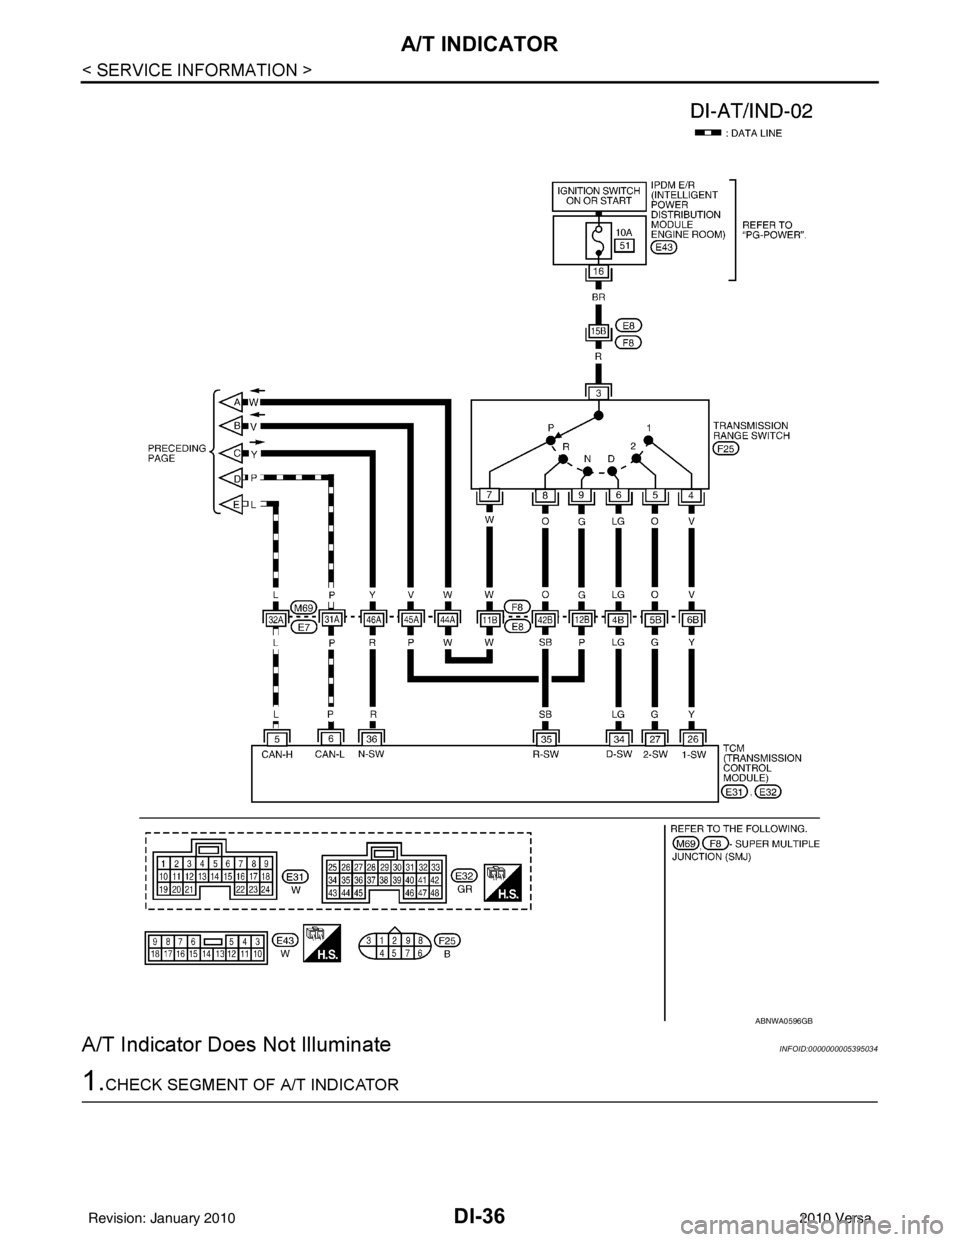
A/T Indicator Does Not Illuminate
INFOID:0000000005395034
1.CHECK SEGMENT OF A/T INDICATOR
ABNWA0596GB
Revision: January 20102010 Versa
Page 1247 of 3745
A/T INDICATORDI-37
< SERVICE INFORMATION >
C
DE
F
G H
I
J
L
M A
B
DI
N
O P
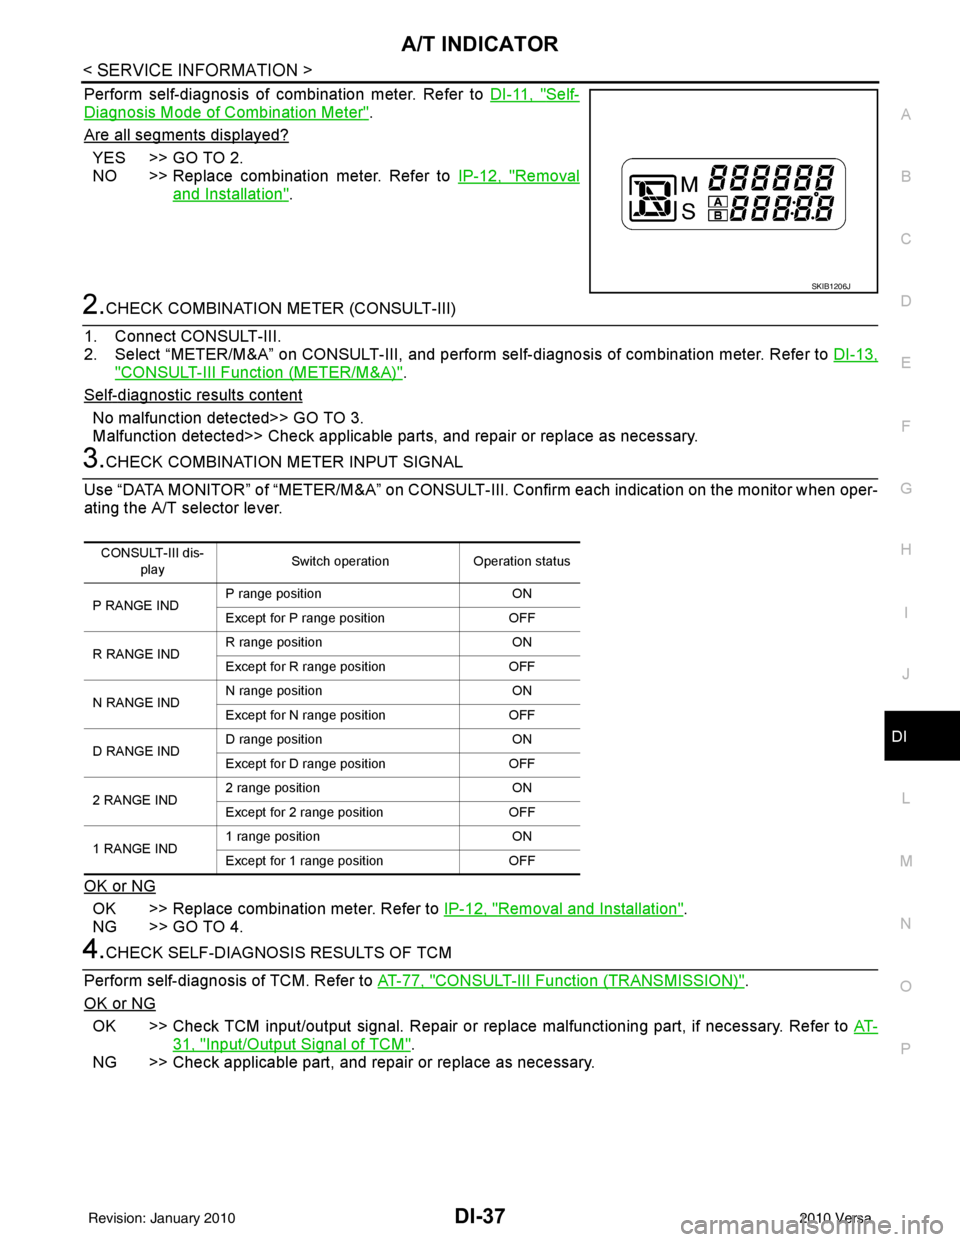
Perform self-diagnosis of combination meter. Refer to DI-11, "Self-
Diagnosis Mode of Combination Meter".
Are all segments displayed?
YES >> GO TO 2.
NO >> Replace combination meter. Refer to IP-12, "
Removal
and Installation".
2.CHECK COMBINATION METER (CONSULT-III)
1. Connect CONSULT-III.
2. Select “METER/M&A” on CONSULT-III, and perform se lf-diagnosis of combination meter. Refer to DI-13,
"CONSULT-III Function (METER/M&A)".
Self
-diagnostic results content
No malfunction detected>> GO TO 3.
Malfunction detected>> Check applicable parts, and repair or replace as necessary.
3.CHECK COMBINATION METER INPUT SIGNAL
Use “DATA MONITOR” of “METER/M&A” on CONSULT-II I. Confirm each indication on the monitor when oper-
ating the A/T selector lever.
OK or NG
OK >> Replace combination meter. Refer to IP-12, "Removal and Installation".
NG >> GO TO 4.
4.CHECK SELF-DIAGNOSIS RESULTS OF TCM
Perform self-diagnosis of TCM. Refer to AT-77, "
CONSULT-III Function (TRANSMISSION)".
OK or NG
OK >> Check TCM input/output signal. Repair or replace malfunctioning part, if necessary. Refer to AT-
31, "Input/Output Signal of TCM".
NG >> Check applicable part, and repair or replace as necessary.
SKIB1206J
CONSULT-III dis-
play Switch operation
Operation status
P RANGE IND P range position
ON
Except for P range position OFF
R RANGE IND R range position
ON
Except for R range position OFF
N RANGE IND N range position
ON
Except for N range position OFF
D RANGE IND D range position
ON
Except for D range position OFF
2 RANGE IND 2 range position
ON
Except for 2 range position OFF
1 RANGE IND 1 range position
ON
Except for 1 range position OFF
Revision: January 20102010 Versa
Page 1248 of 3745
DI-38
< SERVICE INFORMATION >
CVT INDICATOR
CVT INDICATOR
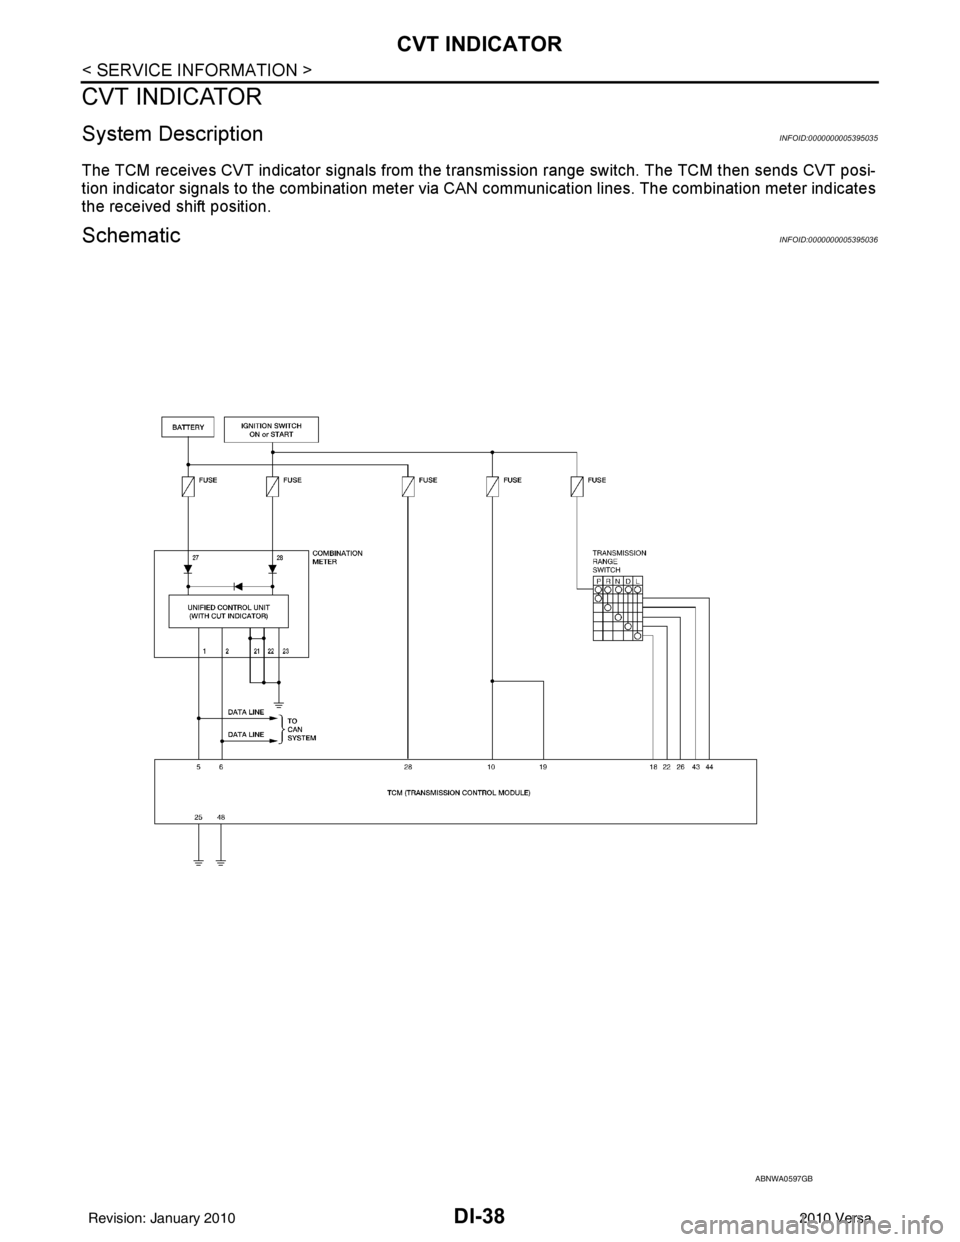
System DescriptionINFOID:0000000005395035
The TCM receives CVT indicator signals from the transmission range switch. The TCM then sends CVT posi-
tion indicator signals to the combination meter via CAN communication lines. The combination meter indicates
the received shift position.
SchematicINFOID:0000000005395036
ABNWA0597GB
Revision: January 20102010 Versa
Page 1249 of 3745
CVT INDICATORDI-39
< SERVICE INFORMATION >
C
DE
F
G H
I
J
L
M A
B
DI
N
O P
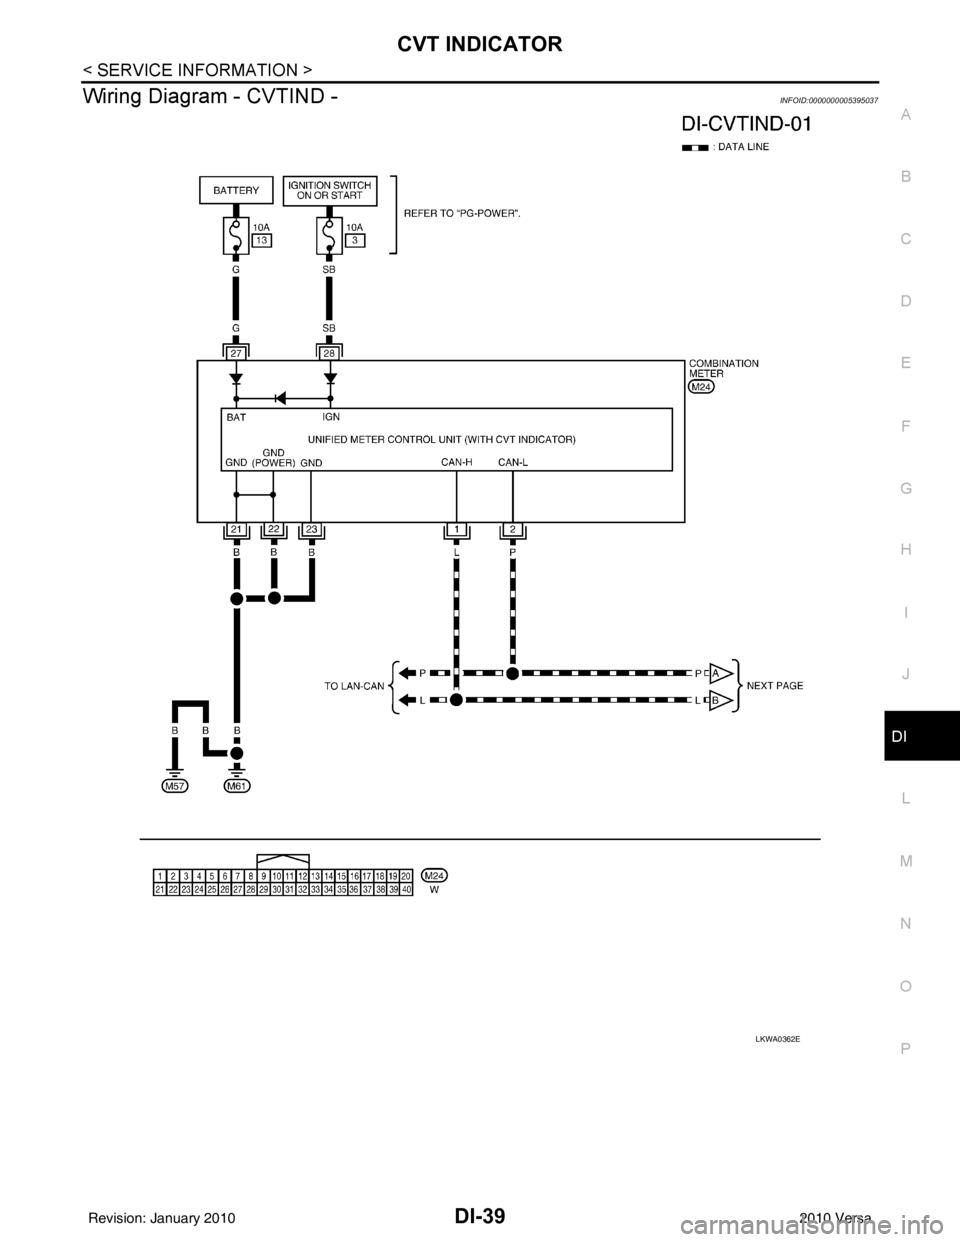
Wiring Diagram - CVTIND -INFOID:0000000005395037
LKWA0362E
Revision: January 20102010 Versa
Page 1250 of 3745
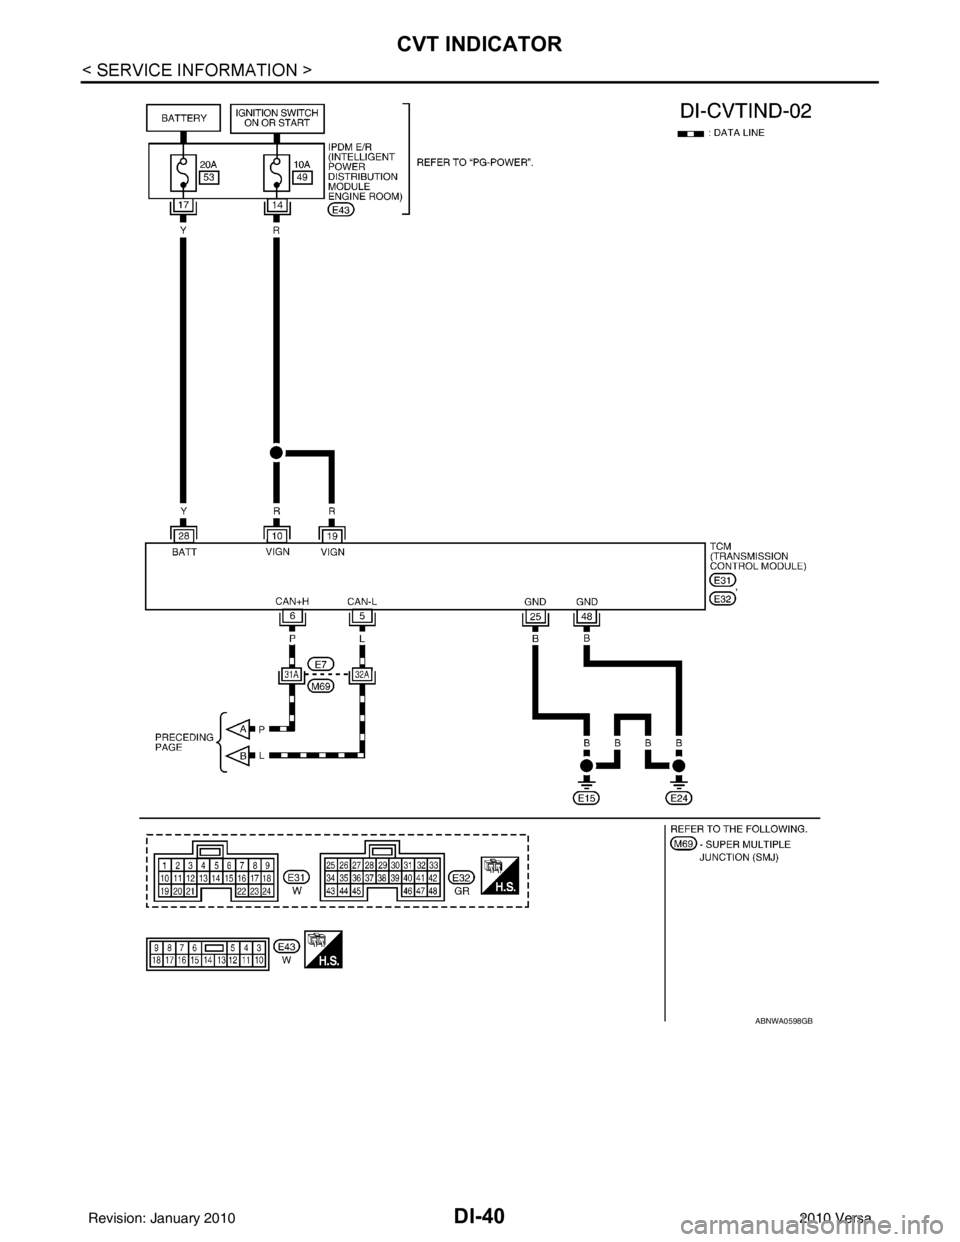
DI-40
< SERVICE INFORMATION >
CVT INDICATOR
ABNWA0598GB
Revision: January 20102010 Versa
Trending: fuel pressure, charging, roof rack, Electrical, alarm, engine overheat, remote control


![NISSAN LATIO 2010 Service Repair Manual WARNING LAMPSDI-33
< SERVICE INFORMATION >
C
DE
F
G H
I
J
L
M A
B
DI
N
O P
Check continuity between oil pressure switch and ground.
Condition Oil pressure [kPa (bar, kg/cm2, psi)]Continuity
Engine sto NISSAN LATIO 2010 Service Repair Manual WARNING LAMPSDI-33
< SERVICE INFORMATION >
C
DE
F
G H
I
J
L
M A
B
DI
N
O P
Check continuity between oil pressure switch and ground.
Condition Oil pressure [kPa (bar, kg/cm2, psi)]Continuity
Engine sto](/img/5/57358/w960_57358-1242.png)
