NISSAN LEAF 2013 1.G Navigation Manual
Manufacturer: NISSAN, Model Year: 2013, Model line: LEAF, Model: NISSAN LEAF 2013 1.GPages: 275, PDF Size: 6.66 MB
Page 221 of 275
objects viewed in the monitor are
closer than they appear. Use the
mirrors or actually look to properly
judge distances to other objects.
The vehicle width and predictive course lines are
wider than the actual width and course.
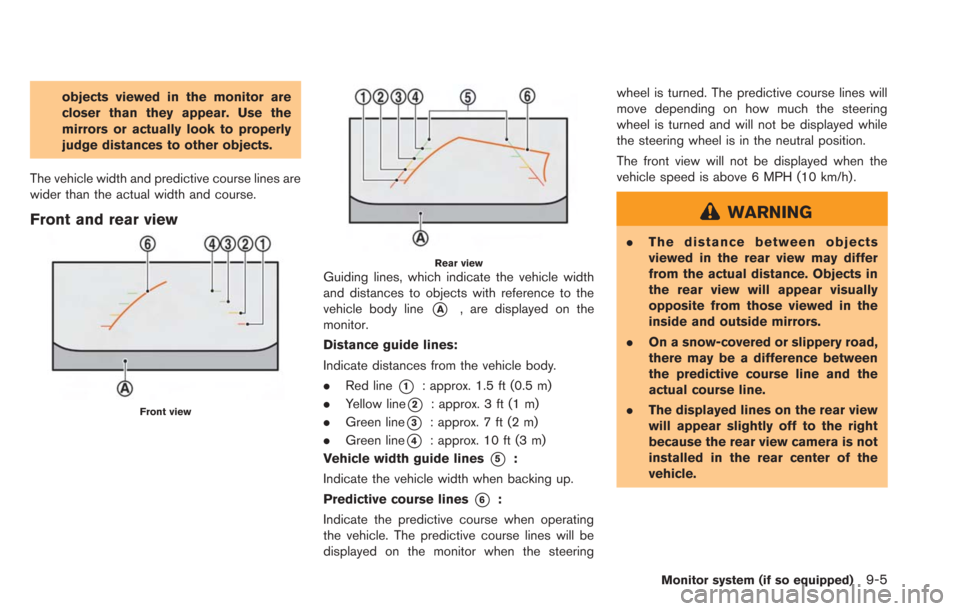
Front and rear view
Front view
Rear viewGuiding lines, which indicate the vehicle width
and distances to objects with reference to the
vehicle body line
*A, are displayed on the
monitor.
Distance guide lines:
Indicate distances from the vehicle body.
. Red line
*1: approx. 1.5 ft (0.5 m)
. Yellow line
*2: approx. 3 ft (1 m)
. Green line
*3: approx. 7 ft (2 m)
. Green line
*4: approx. 10 ft (3 m)
Vehicle width guide lines
*5:
Indicate the vehicle width when backing up.
Predictive course lines
*6:
Indicate the predictive course when operating
the vehicle. The predictive course lines will be
displayed on the monitor when the steering wheel is turned. The predictive course lines will
move depending on how much the steering
wheel is turned and will not be displayed while
the steering wheel is in the neutral position.
The front view will not be displayed when the
vehicle speed is above 6 MPH (10 km/h).
WARNING
.
The distance between objects
viewed in the rear view may differ
from the actual distance. Objects in
the rear view will appear visually
opposite from those viewed in the
inside and outside mirrors.
. On a snow-covered or slippery road,
there may be a difference between
the predictive course line and the
actual course line.
. The displayed lines on the rear view
will appear slightly off to the right
because the rear view camera is not
installed in the rear center of the
vehicle.
Monitor system (if so equipped)9-5
Page 222 of 275
9-6Monitor system (if so equipped)
CAUTION
When the monitor displays the front
view and the steering wheel turns about
90 degrees or less from the neutral
position, both the right and left pre-
dictive course lines
*6are displayed.
When the steering wheel turns about 90
degrees or more, a predictive course
line is displayed only on the opposite
side of the turn.
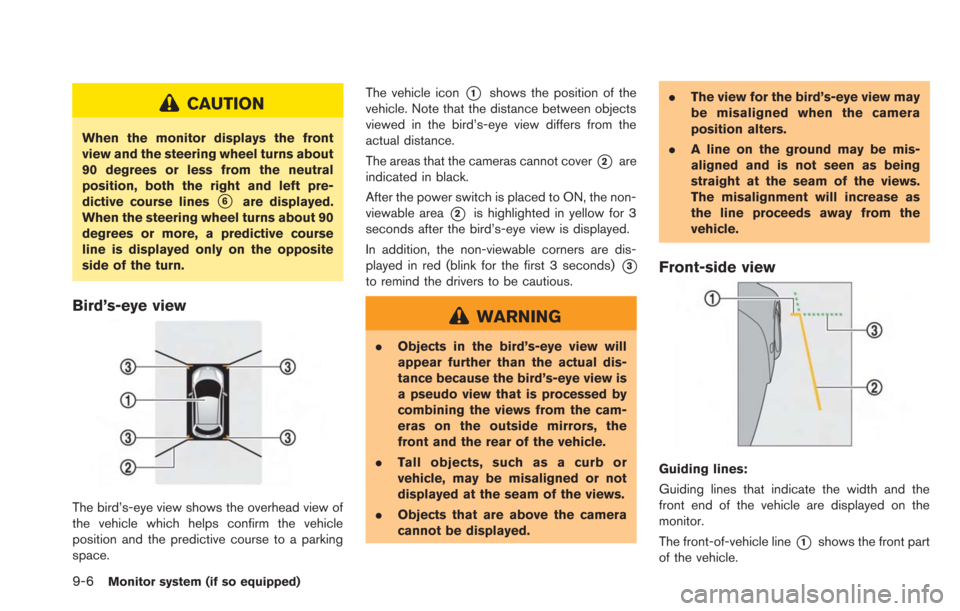
Bird’s-eye view
The bird’s-eye view shows the overhead view of
the vehicle which helps confirm the vehicle
position and the predictive course to a parking
space. The vehicle icon
*1shows the position of the
vehicle. Note that the distance between objects
viewed in the bird’s-eye view differs from the
actual distance.
The areas that the cameras cannot cover
*2are
indicated in black.
After the power switch is placed to ON, the non-
viewable area
*2is highlighted in yellow for 3
seconds after the bird’s-eye view is displayed.
In addition, the non-viewable corners are dis-
played in red (blink for the first 3 seconds)
*3
to remind the drivers to be cautious.
WARNING
. Objects in the bird’s-eye view will
appear further than the actual dis-
tance because the bird’s-eye view is
a pseudo view that is processed by
combining the views from the cam-
eras on the outside mirrors, the
front and the rear of the vehicle.
. Tall objects, such as a curb or
vehicle, may be misaligned or not
displayed at the seam of the views.
. Objects that are above the camera
cannot be displayed. .
The view for the bird’s-eye view may
be misaligned when the camera
position alters.
. A line on the ground may be mis-
aligned and is not seen as being
straight at the seam of the views.
The misalignment will increase as
the line proceeds away from the
vehicle.
Front-side view
Guiding lines:
Guiding lines that indicate the width and the
front end of the vehicle are displayed on the
monitor.
The front-of-vehicle line
*1shows the front part
of the vehicle.
Page 223 of 275
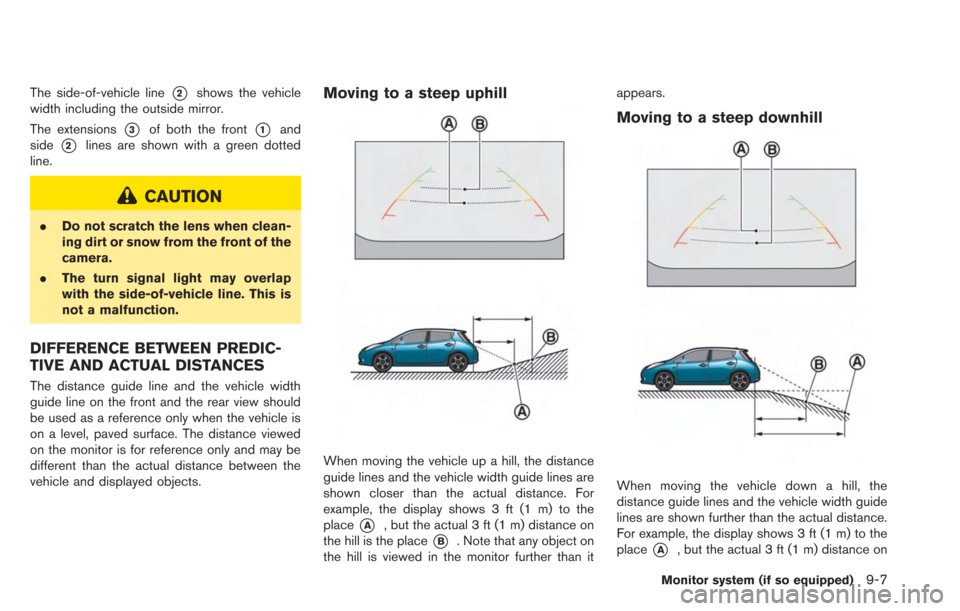
The side-of-vehicle line*2shows the vehicle
width including the outside mirror.
The extensions
*3of both the front*1and
side
*2lines are shown with a green dotted
line.
CAUTION
. Do not scratch the lens when clean-
ing dirt or snow from the front of the
camera.
. The turn signal light may overlap
with the side-of-vehicle line. This is
not a malfunction.
DIFFERENCE BETWEEN PREDIC-
TIVE AND ACTUAL DISTANCES
The distance guide line and the vehicle width
guide line on the front and the rear view should
be used as a reference only when the vehicle is
on a level, paved surface. The distance viewed
on the monitor is for reference only and may be
different than the actual distance between the
vehicle and displayed objects.
Moving to a steep uphill
When moving the vehicle up a hill, the distance
guide lines and the vehicle width guide lines are
shown closer than the actual distance. For
example, the display shows 3 ft (1 m) to the
place
*A, but the actual 3 ft (1 m) distance on
the hill is the place
*B. Note that any object on
the hill is viewed in the monitor further than it appears.
Moving to a steep downhill
When moving the vehicle down a hill, the
distance guide lines and the vehicle width guide
lines are shown further than the actual distance.
For example, the display shows 3 ft (1 m) to the
place
*A, but the actual 3 ft (1 m) distance on
Monitor system (if so equipped)9-7
Page 224 of 275
9-8Monitor system (if so equipped)
the hill is the place*B. Note that any object on
the hill is viewed in the monitor closer than it
appears.
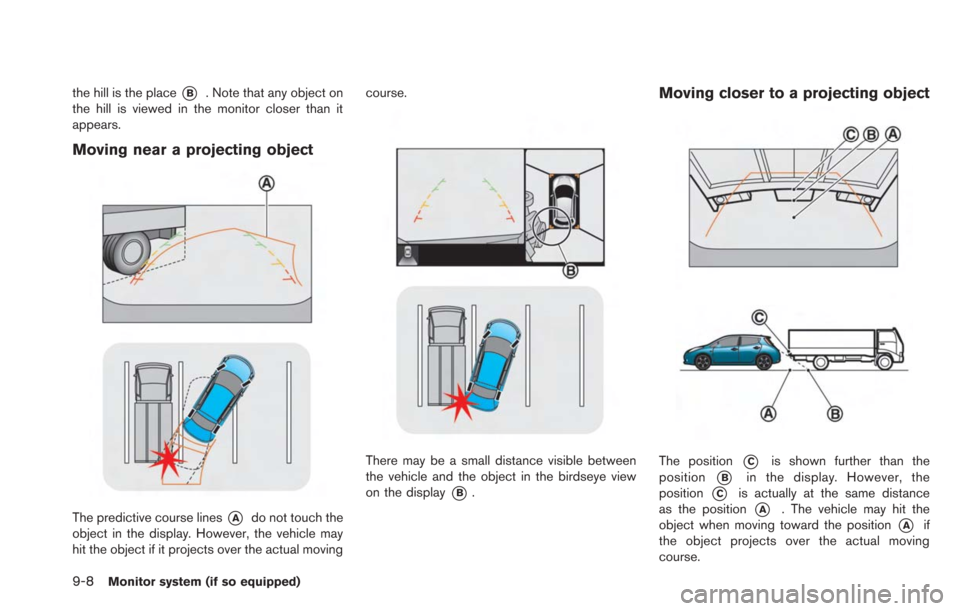
Moving near a projecting object
The predictive course lines*Ado not touch the
object in the display. However, the vehicle may
hit the object if it projects over the actual moving course.
There may be a small distance visible between
the vehicle and the object in the birdseye view
on the display
*B.
Moving closer to a projecting object
The position*Cis shown further than the
position
*Bin the display. However, the
position
*Cis actually at the same distance
as the position
*A. The vehicle may hit the
object when moving toward the position
*Aif
the object projects over the actual moving
course.
Page 225 of 275
OPERATING TIPS
.The screen displayed on the Around View
Monitor will automatically return to the
previous screen when no operation takes
place for 3 minutes after the CAMERA
button has been pushed while the selector
lever is in a position other than the “R”
(Reverse) position.
. The display of images on the screen may be
delayed after screens are switched. Objects
in the Around View Monitor may be distorted
momentarily until the Around View Monitor
screen is displayed completely.
. When the temperature is extremely high or
low, the screen may not display objects
clearly. This is not a malfunction.
. When strong light directly shines on the
camera, objects may not be displayed
clearly. This is not a malfunction.
. The screen may flicker under fluorescent
light. This is not a malfunction.
. The colors of objects on the Around View
Monitor may differ somewhat from those of
the actual object.
. Objects on the monitor may not be clear and
the color of the object may differ in a dark
location or at night. This is not a malfunction. .
There may be differences in clearness
between each camera view of the bird’seye
view.
. If dirt, rain or snow attaches to the camera,
the Around View Monitor may not display
objects clearly. Clean the camera.
. Do not use alcohol, benzine or thinner to
clean the camera. This will cause discolora-
tion. To clean the camera, wipe with a cloth
that has been dampened with a diluted mild
cleaning agent and then wipe with a dry
cloth.
. Do not damage the camera because the
monitor screen may be adversely affected.
. Do not use wax on the camera window.
Wipe off any wax with a clean cloth that has
been dampened with a mild detergent
diluted with water.
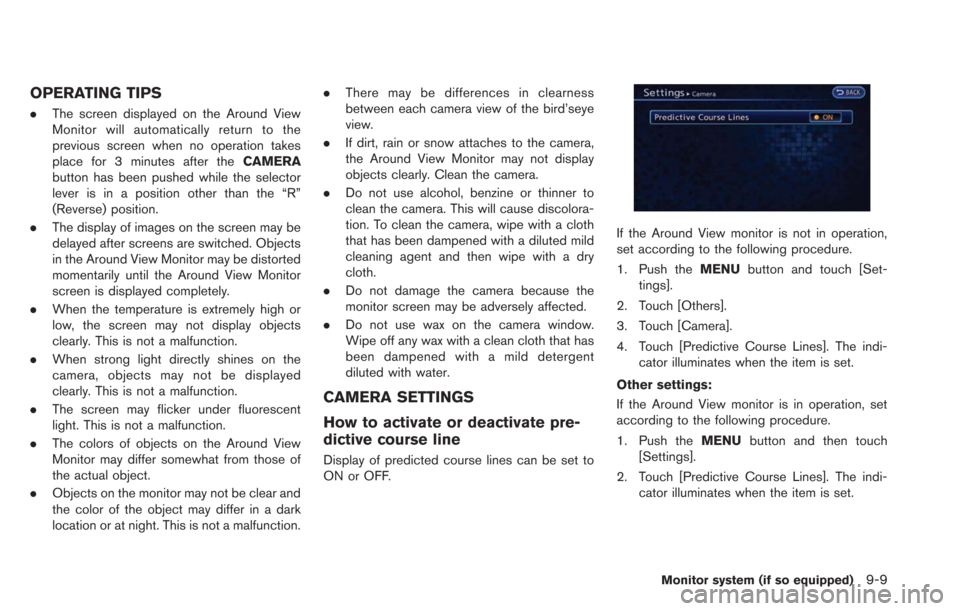
CAMERA SETTINGS
How to activate or deactivate pre-
dictive course line
Display of predicted course lines can be set to
ON or OFF.
If the Around View monitor is not in operation,
set according to the following procedure.
1. Push the MENUbutton and touch [Set-
tings].
2. Touch [Others].
3. Touch [Camera].
4. Touch [Predictive Course Lines]. The indi- cator illuminates when the item is set.
Other settings:
If the Around View monitor is in operation, set
according to the following procedure.
1. Push the MENUbutton and then touch
[Settings].
2. Touch [Predictive Course Lines]. The indi- cator illuminates when the item is set.
Monitor system (if so equipped)9-9
Page 226 of 275
![NISSAN LEAF 2013 1.G Navigation Manual 9-10Monitor system (if so equipped)
How to adjust Around View screen
1. Push theMENUbutton with the Around
View Monitor on.
2. Touch [Display].
3. Touch the preferred setting items.
Available setting NISSAN LEAF 2013 1.G Navigation Manual 9-10Monitor system (if so equipped)
How to adjust Around View screen
1. Push theMENUbutton with the Around
View Monitor on.
2. Touch [Display].
3. Touch the preferred setting items.
Available setting](/img/5/324/w960_324-225.png)
9-10Monitor system (if so equipped)
How to adjust Around View screen
1. Push theMENUbutton with the Around
View Monitor on.
2. Touch [Display].
3. Touch the preferred setting items.
Available setting items:
. Brightness
. Tint
. Color
. Contrast
. Black Level
Do not adjust the Around View Monitor screen
while the vehicle is moving.
Page 227 of 275
10 Troubleshooting guide/General systeminformation
Troubleshooting guide ........................................................... 10-2
Customer assistance ....................................................... 10-2
System unit ........................................................................\
. 10-2
Unique EV functions ........................................................ 10-4
Navigation ........................................................................\
... 10-9
CARWINGS
TM............................................................... 10-16
Audio system .................................................................. 10-17
Bluetooth
®Hands-Free Phone System ................... 10-23
Voice recognition ........................................................... 10-26
Monitor system (if so equipped) ................................ 10-27 General system information .............................................. 10-28
Current vehicle location ............................................. 10-28
Route calculation ......................................................... 10-31
Route guidance ............................................................ 10-33
Notes on Nav Traffic information ............................. 10-37
Map data ........................................................................\
10-37
How to handle display................................................ 10-41
How to handle the SD card ..................................... 10-42
How to handle CD and USB memory ................... 10-42
Page 228 of 275
10-2Troubleshooting guide/General system information
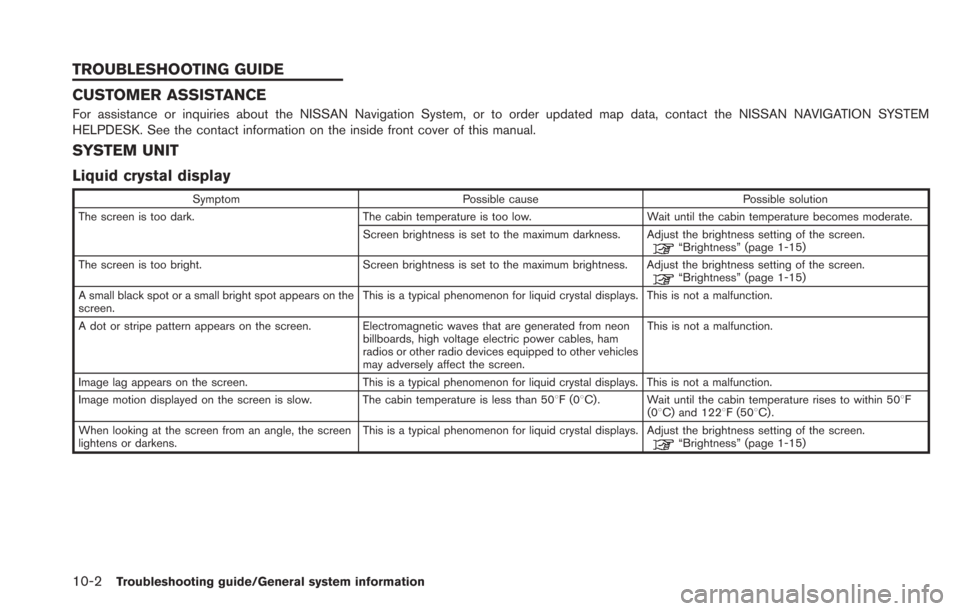
CUSTOMER ASSISTANCE
For assistance or inquiries about the NISSAN Navigation System, or to order updated map data, contact the NISSAN NAVIGATION SYSTEM
HELPDESK. See the contact information on the inside front cover of this manual.
SYSTEM UNIT
Liquid crystal display
SymptomPossible cause Possible solution
The screen is too dark. The cabin temperature is too low.Wait until the cabin temperature becomes moderate.
Screen brightness is set to the maximum darkness. Adjust the brightness setting of the screen.
“Brightness” (page 1-15)
The screen is too bright. Screen brightness is set to the maximum brightness. Adjust the brightness setting of the screen.
“Brightness” (page 1-15)
A small black spot or a small bright spot appears on the
screen. This is a typical phenomenon for liquid crystal displays. This is not a malfunction.
A dot or stripe pattern appears on the screen. Electromagnetic waves that are generated from neon billboards, high voltage electric power cables, ham
radios or other radio devices equipped to other vehicles
may adversely affect the screen.This is not a malfunction.
Image lag appears on the screen. This is a typical phenomenon for liquid crystal displays. This is not a malfunction.
Image motion displayed on the screen is slow. The cabin temperature is less than 508F(0 8C) . Wait until the cabin temperature rises to within 508F
(08C) and 1228F (508C) .
When looking at the screen from an angle, the screen
lightens or darkens. This is a typical phenomenon for liquid crystal displays. Adjust the brightness setting of the screen.
“Brightness” (page 1-15)
TROUBLESHOOTING GUIDE
Page 229 of 275

SD card memory
SymptomPossible cause Possible solution
The screen turns blue or an error message is displayed. A system malfunction has occurred. Contact a NISSAN certified LEAF dealer for an
inspection.
Troubleshooting guide/General system information10-3
Page 230 of 275
10-4Troubleshooting guide/General system information
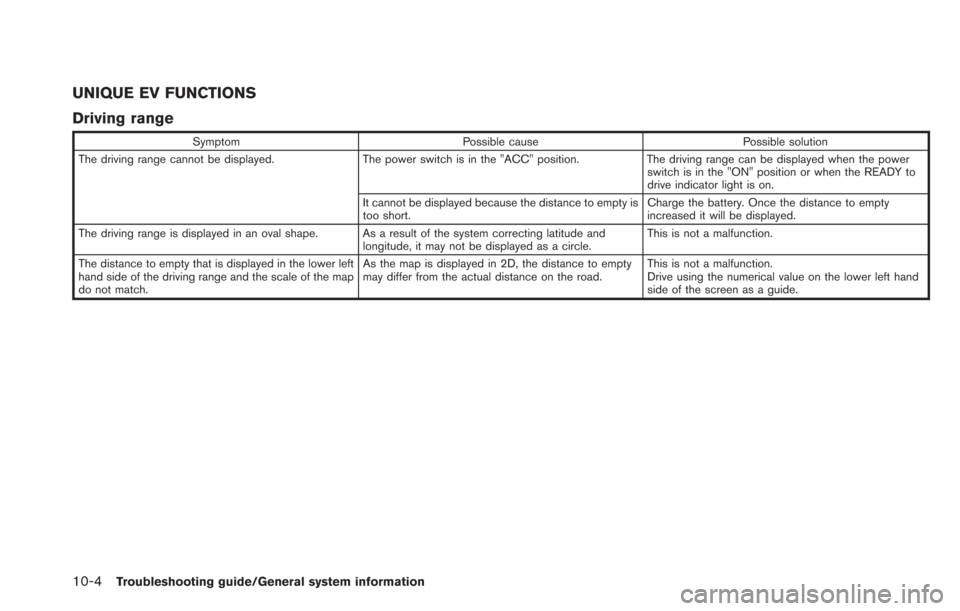
UNIQUE EV FUNCTIONS
Driving range
SymptomPossible cause Possible solution
The driving range cannot be displayed. The power switch is in the "ACC" position.The driving range can be displayed when the power
switch is in the "ON" position or when the READY to
drive indicator light is on.
It cannot be displayed because the distance to empty is
too short. Charge the battery. Once the distance to empty
increased it will be displayed.
The driving range is displayed in an oval shape. As a result of the system correcting latitude and longitude, it may not be displayed as a circle.This is not a malfunction.
The distance to empty that is displayed in the lower left
hand side of the driving range and the scale of the map
do not match. As the map is displayed in 2D, the distance to empty
may differ from the actual distance on the road.
This is not a malfunction.
Drive using the numerical value on the lower left hand
side of the screen as a guide.