sensor NISSAN MAXIMA 2021 Owner´s Manual
[x] Cancel search | Manufacturer: NISSAN, Model Year: 2021, Model line: MAXIMA, Model: NISSAN MAXIMA 2021Pages: 476, PDF Size: 3.32 MB
Page 334 of 476
Action to take:
When the conditions listed above are no
longer present, the warning message will
no longer be available in the vehicle infor-
mation display. If the “Forward Driving Aids
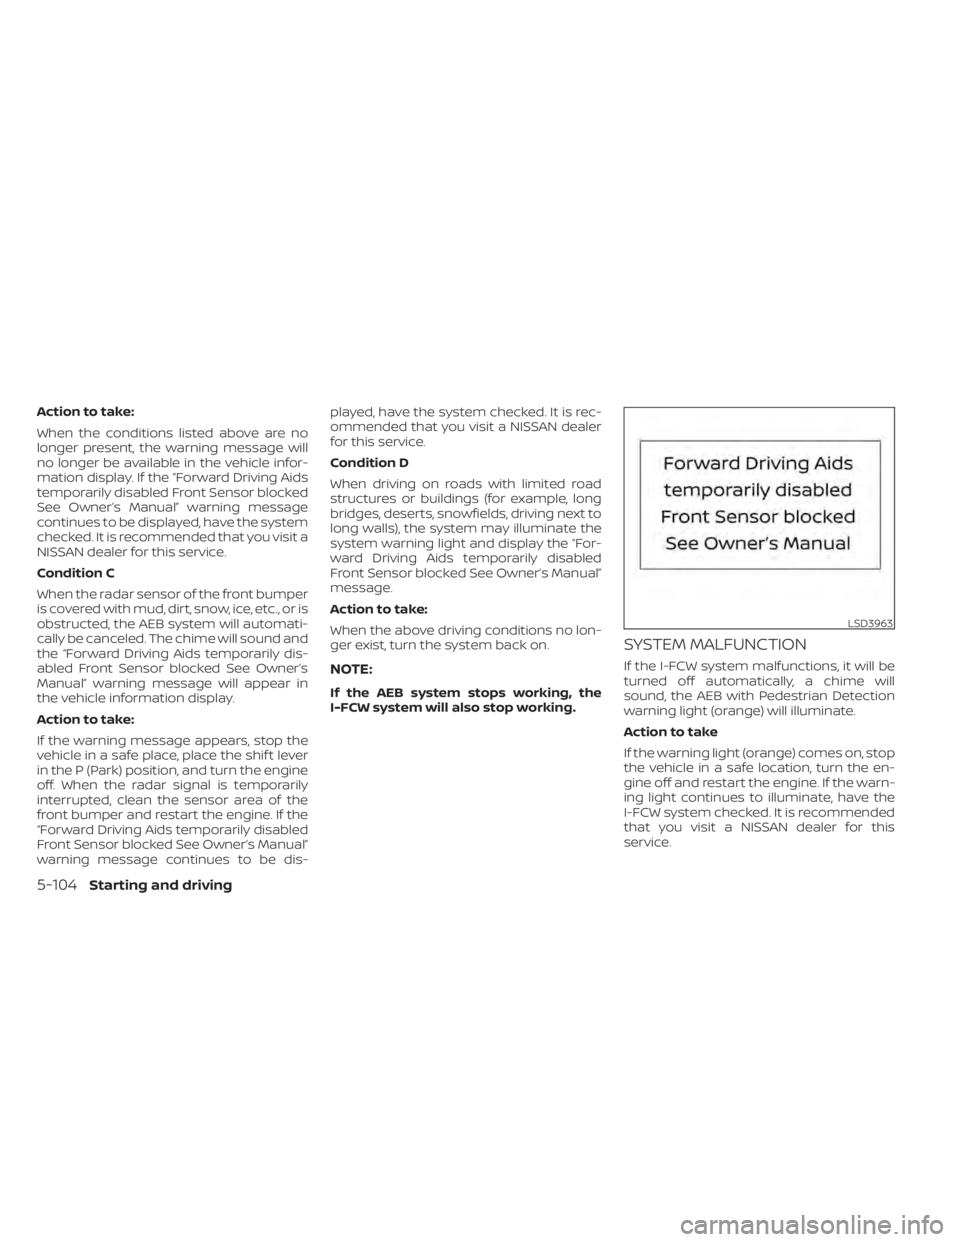
temporarily disabled Front Sensor blocked
See Owner’s Manual” warning message
continues to be displayed, have the system
checked. It is recommended that you visit a
NISSAN dealer for this service.
Condition C
When the radar sensor of the front bumper
is covered with mud, dirt, snow, ice, etc., or is
obstructed, the AEB system will automati-
cally be canceled. The chime will sound and
the “Forward Driving Aids temporarily dis-
abled Front Sensor blocked See Owner’s
Manual” warning message will appear in
the vehicle information display.
Action to take:
If the warning message appears, stop the
vehicle in a safe place, place the shif t lever
in the P (Park) position, and turn the engine
off. When the radar signal is temporarily
interrupted, clean the sensor area of the
front bumper and restart the engine. If the
“Forward Driving Aids temporarily disabled
Front Sensor blocked See Owner’s Manual”
warning message continues to be dis-played, have the system checked. It is rec-
ommended that you visit a NISSAN dealer
for this service.
Condition D
When driving on roads with limited road
structures or buildings (for example, long
bridges, deserts, snowfields, driving next to
long walls), the system may illuminate the
system warning light and display the “For-
ward Driving Aids temporarily disabled
Front Sensor blocked See Owner’s Manual”
message.
Action to take:
When the above driving conditions no lon-
ger exist, turn the system back on.
NOTE:
If the AEB system stops working, the
I-FCW system will also stop working.
SYSTEM MALFUNCTION
If the I-FCW system malfunctions, it will be
turned off automatically, a chime will
sound, the AEB with Pedestrian Detection
warning light (orange) will illuminate.
Action to take
If the warning light (orange) comes on, stop
the vehicle in a safe location, turn the en-
gine off and restart the engine. If the warn-
ing light continues to illuminate, have the
I-FCW system checked. It is recommended
that you visit a NISSAN dealer for this
service.
LSD3963
5-104Starting and driving
Page 335 of 476
SYSTEM MAINTENANCE
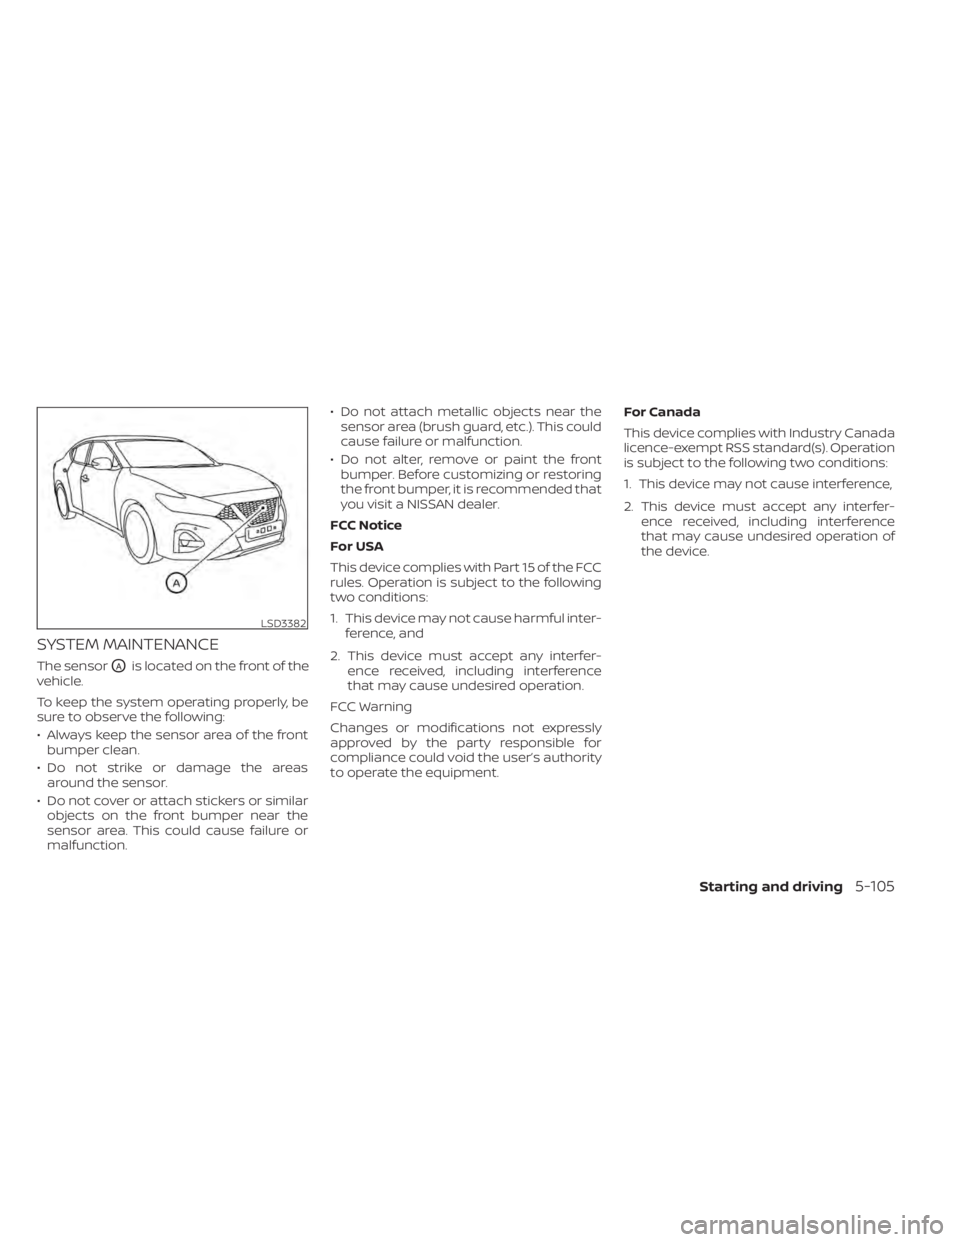
The sensorOAis located on the front of the
vehicle.
To keep the system operating properly, be
sure to observe the following:
• Always keep the sensor area of the front bumper clean.
• Do not strike or damage the areas around the sensor.
• Do not cover or attach stickers or similar objects on the front bumper near the
sensor area. This could cause failure or
malfunction. • Do not attach metallic objects near the
sensor area (brush guard, etc.). This could
cause failure or malfunction.
• Do not alter, remove or paint the front bumper. Before customizing or restoring
the front bumper, it is recommended that
you visit a NISSAN dealer.
FCC Notice
For USA
This device complies with Part 15 of the FCC
rules. Operation is subject to the following
two conditions:
1. This device may not cause harmful inter- ference, and
2. This device must accept any interfer- ence received, including interference
that may cause undesired operation.
FCC Warning
Changes or modifications not expressly
approved by the party responsible for
compliance could void the user’s authority
to operate the equipment. For Canada
This device complies with Industry Canada
licence-exempt RSS standard(s). Operation
is subject to the following two conditions:
1. This device may not cause interference,
2. This device must accept any interfer-
ence received, including interference
that may cause undesired operation of
the device.
LSD3382
Starting and driving5-105
Page 343 of 476

The VDC system uses various sensors to
monitor driver inputs and vehicle motion.
Under certain driving conditions, the VDC
system helps to perform the following
functions:
• Controls brake pressure to reduce wheelslip on one slipping drive wheel so power
is transferred to a non-slipping drive
wheel on the same axle.
• Controls brake pressure and engine out- put to reduce drive wheel slip based on
vehicle speed (traction control function).
• Controls brake pressure at individual wheels and engine output to help the
driver maintain control of the vehicle in
the following conditions:– Understeer (vehicle tends to not follow the steered path despite increased
steering input)
– Oversteer (vehicle tends to spin due to certain road or driving conditions)
The VDC system can help the driver to
maintain control of the vehicle, but it can-
not prevent loss of vehicle control in all driv-
ing situations. When the VDC system operates, theindicator light in the instrument panel
flashes to note the following:
• The road may be slippery or the system
may determine some action is required
to help keep the vehicle on the steered
path.
• You may feel a pulsation in the brake pedal and hear a noise or vibration from
under the hood. This is normal and indi-
cates that the VDC system is working
properly.
• Adjust your speed and driving to the road conditions.
For additional information, see “Slip indica-
tor light” (P. 2-15) and “Vehicle Dynamic Con-
trol (VDC) OFF indicator light” (P. 2-15).
If a malfunction occurs in the system, the
indicator light comes on in the instru-
ment panel. The VDC system automatically
turns off when the indicator light is on.
The VDC OFF switch is used to turn off the
VDC system. The
, RAB, and AEB with
Pedestrian Detection indicator lights illumi-
nate to indicate the VDC, RAB, and AEB with
Pedestrian Detection systems are off. When the vehicle information display is
used to turn off the system, the VDC sys-
tem still operates to prevent one drive
wheel from slipping by transferring power
to a non-slipping drive wheel. The
indicator light flashes if this occurs. All
other VDC functions are off and the
indicator light will not flash.
The VDC system is automatically reset to
ON when the ignition switch is placed in the
OFF position then back to the ON position.
The computer has a built-in diagnostic fea-
ture that tests the system each time you
start the engine and move the vehicle for-
ward or in reverse at a slow speed. When
the self-test occurs, you may hear a clunk
noise and/or feel a pulsation in the brake
pedal. This is normal and is not an indica-
tion of a malfunction.
VEHICLE DYNAMIC CONTROL (VDC)
SYSTEM
Starting and driving5-113
Page 346 of 476
The I–EB can be set to ON (enabled) or OFF
(disabled) through the vehicle information
display “Settings” page. For additional infor-
mation, see “Vehicle information display”
(P. 2-17).
If the Chassis Control System Error warn-
ing message appears in the vehicle infor-
mation display, it may indicate that the I–EB
is not functioning properly. Have the sys-
tem checked as soon as possible. It is rec-
ommended that you visit a NISSAN dealer
for this service.
WARNING
The I–EB may not be effective depend-
ing on driving conditions. Always drive
carefully and attentively.
When the I–EB is operating, the needle of
the tachometer will rise up and you may
hear an engine noise. This is normal and
indicates that the I–EB is operating
properly.
ACTIVE RIDE CONTROL (ARC)
This system senses upper body motion
(based on wheel speed information) and
controls engine torque and four wheel
brake pressure. This will enhance ride com-
fort in effort to restrain uncomfortable up- per body movement when passing over
undulated road surfaces. This system
comes into effect above 25 mph (40 km/h).
When the VDC OFF switch is used to turn off
the VDC system, the ARC is also turned off.
If the Chassis Control System Error warn-
ing message appears in the vehicle infor-
mation display, it may indicate that the ARC
is not functioning properly. Have the sys-
tem checked as soon as possible. It is rec-
ommended that you visit a NISSAN dealer
for this service.
When the ARC is operating, you may hear
noise and sense slight deceleration. This is
normal and indicates that the ARC is oper-
ating properly.
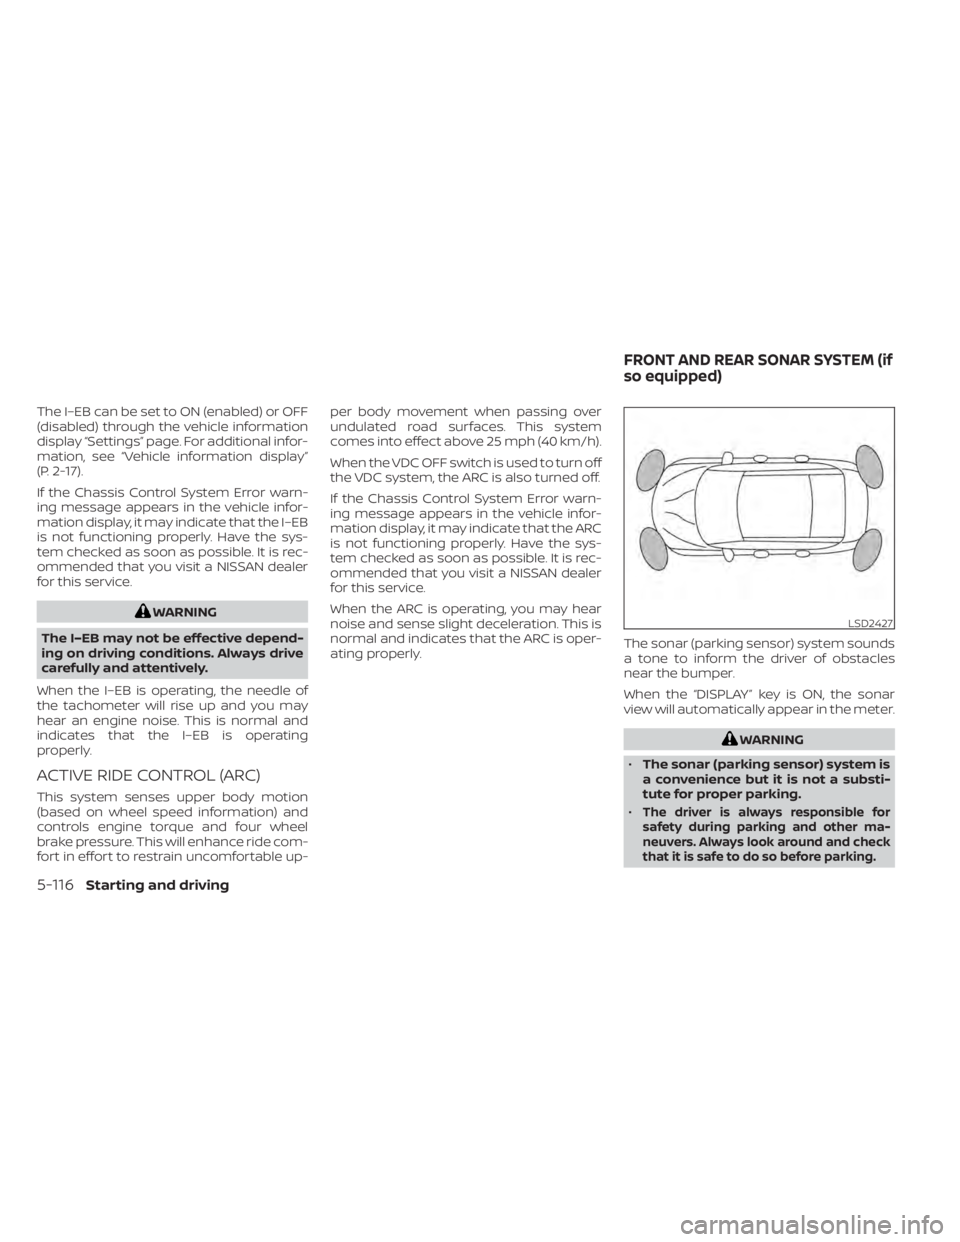
The sonar (parking sensor) system sounds
a tone to inform the driver of obstacles
near the bumper.
When the “DISPLAY” key is ON, the sonar
view will automatically appear in the meter.
WARNING
• The sonar (parking sensor) system is
a convenience but it is not a substi-
tute for proper parking.
•
The driver is always responsible for
safety during parking and other ma-
neuvers. Always look around and check
that it is safe to do so before parking.
LSD2427
FRONT AND REAR SONAR SYSTEM (if
so equipped)
5-116Starting and driving
Page 347 of 476
•Read and understand the limitations
of the sonar (parking sensor) system
as contained in this section. The col-
ors of the corner sonar indicator and
the distance guide lines in the front/
rear view indicate different distances
to the object.
• Inclement weather or ultrasonic
sources such as an automatic car
wash, a truck's compressed-air
brakes or a pneumatic drill may af-
fect the function of the system; this
may include reduced performance or
a false activation.
• This function is designed as an aid to
the driver in detecting large station-
ary objects to help avoid damaging
the vehicle.
• The system is not designed to pre-
vent contact with small or moving
objects. Always move slowly. The
system will not detect small objects
below the bumper, and may not de-
tect objects close to the bumper or
on the ground.
•
The system may not detect the follow-
ing objects: fluff y objects such as
snow, cloth, cotton, glass, wool, etc.,
and thin objects such as rope, wire and
chain, etc., or wedge-shaped objects.
• The sonar sensors may cause mal-
function when a horn, etc. sounds or
there is an ultrasonic source (such as
parking sensors of other vehicles)
around the vehicle because the so-
nar sensors detect the distance be-
tween the vehicle and the obstacle
by detecting the sound wave re-
flected from the surface of an
obstacle.
If your vehicle sustains damage to the
bumper fascia, leaving it misaligned or
bent, the sensing zone may be altered
causing inaccurate measurement of ob-
stacles or false alarms.
CAUTION
• Excessive noise (such as audio sys-
tem volume or an open vehicle win-
dow) will interfere with the tone and
it may not be heard.
• Keep the sonar sensors (located on
the bumper fascia) free from snow,
ice and large accumulations of dirt.
Do not clean the sensors with sharp
objects. If the sensors are covered,
the accuracy of the sonar function
will be diminished.
SYSTEM OPERATION
The system informs with a visual and au-
dible alert of front obstacles when the shif t
lever is in the D (Drive) position and both
front and rear obstacles when the shif t le-
ver is in the R (Reverse) position.
Sonar Operation Table
FR Sensor RR Sensor
Range Sound Display Sound Display Px†x †
Rooo o
Nx†x † Do o x †
o – Display/Beep when detect
† – Display on camera view
x – No Display and Beep
The system is deactivated at speeds above
6 mph (10 km/h). It is reactivated at lower
speeds.
Starting and driving5-117
Page 348 of 476

While the vehicle is moving the audible alert
will stop af ter 3 seconds when an obstacle
is detected by only the corner sensor and
distance does not change. The audible
alert will also stop when the obstacle
moves away from the vehicle. At any time
the lef t side button of the steering wheel (
buttons) is available to cancel the au-
dible alert.
When the object is detected, the indicator
(green) appears and blinks and the tone
sounds intermittently. When the vehicle
moves closer to the object, the color of the
indicator turns yellow and the rate of the
blinking increases. When the vehicle is very
close to the object, the indicator stops
blinking and turns red, and the tone
sounds continuously. When the corner of the vehicle moves
closer to an object, the corner sonar indi-
cator
OAappears.The system indicators
OAwill appear when
the vehicle moves closer to an object.
LSD2428LSD2137
5-118Starting and driving
Page 349 of 476
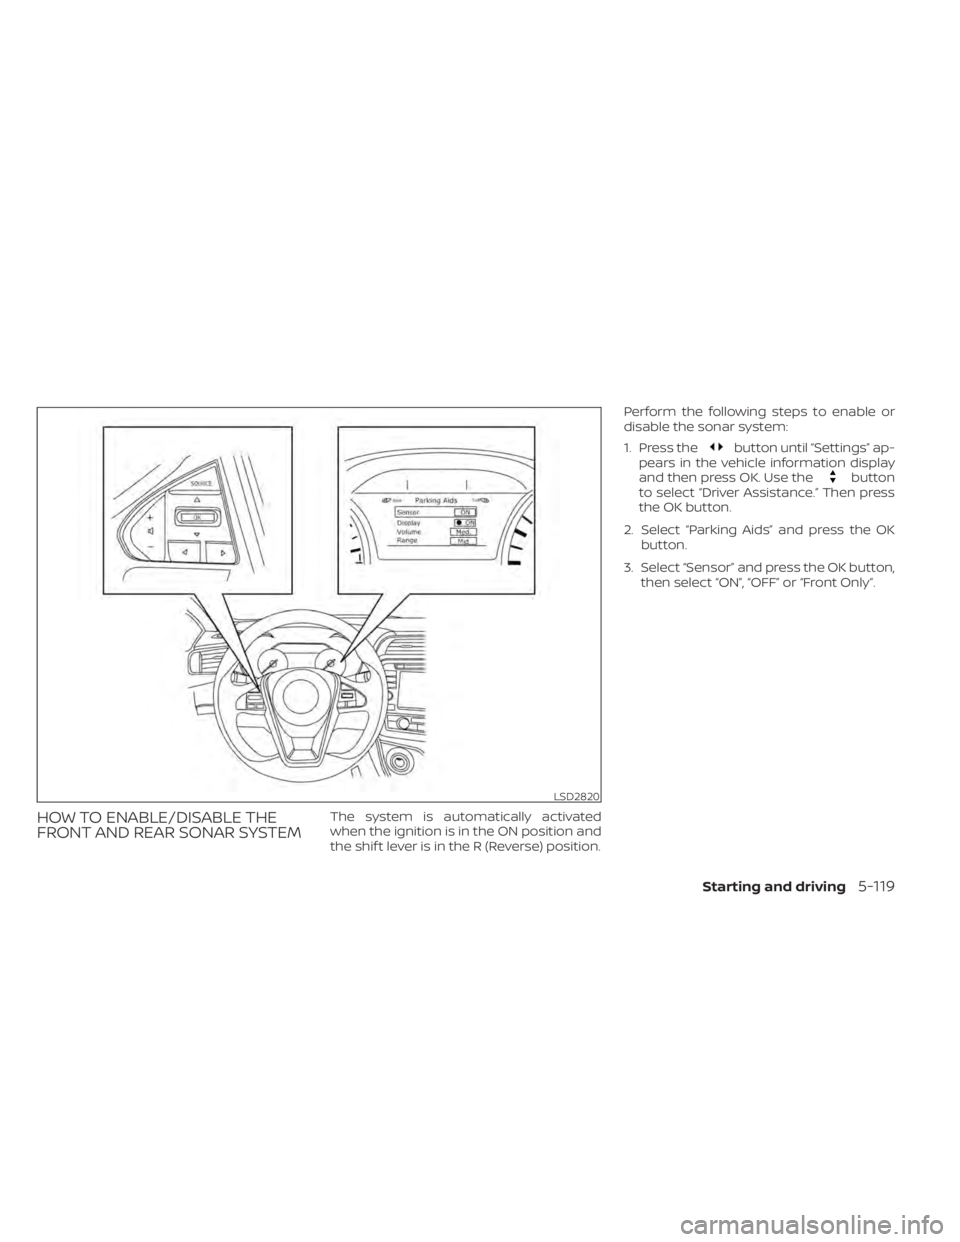
HOW TO ENABLE/DISABLE THE
FRONT AND REAR SONAR SYSTEMThe system is automatically activated
when the ignition is in the ON position and
the shif t lever is in the R (Reverse) position.Perform the following steps to enable or
disable the sonar system:
1. Press the
button until “Settings” ap-
pears in the vehicle information display
and then press OK. Use the
button
to select “Driver Assistance.” Then press
the OK button.
2. Select “Parking Aids” and press the OK button.
3. Select “Sensor” and press the OK button, then select “ON”, “OFF” or “Front Only”.
LSD2820
Starting and driving5-119
Page 355 of 476

TIRE PRESSURE MONITORING
SYSTEM (TPMS)
This vehicle is equipped with TPMS. It moni-
tors tire pressure of all tires except the
spare. When the low tire pressure warning
light is lit and the “Tire Pressure Low - Add
Air” warning appears in the vehicle infor-
mation display, one or more of your tires is
significantly under-inflated. If the vehicle is
being driven with low tire pressure, the
TPMS will activate and warn you of it by the
low tire pressure warning light. This system
will activate only when the vehicle is driven
at speeds above 16 mph (25 km/h). For ad-
ditional information, see “Warning lights, in-
dicator lights and audible reminders”
(P. 2-8) and “Tire Pressure Monitoring Sys-
tem (TPMS)” (P. 5-5).
WARNING
• Radio waves could adversely affect
electric medical equipment. Those
who use a pacemaker should contact
the electric medical equipment
manufacturer for the possible influ-
ences before use. •
If the low tire pressure warning light
illuminates while driving, avoid sud-
den steering maneuvers or abrupt
braking, reduce vehicle speed, pull
off the road to a safe location and
stop the vehicle as soon as possible.
Driving with under-inflated tires may
permanently damage the tires and
increase the likelihood of tire failure.
Serious vehicle damage could occur
and may lead to an accident and
could result in serious personal in-
jury. Check the tire pressure for all
four tires. Adjust the tire pressure to
the recommended COLD tire pres-
sure shown on the Tire and Loading
Information label to turn the low tire
pressure warning light OFF. If the
light still illuminates while driving af-
ter adjusting the tire pressure, a tire
may be flat or the TPMS may be mal-
functioning. If you have a flat tire, re-
place it with a spare tire as soon as
possible. If no tire is flat and all tires
are properly inflated, have the ve-
hicle checked. It is recommended
that you visit a NISSAN dealer for this
service. •
When using a wheel without the
TPMS such as the spare tire, the TPMS
will not function and the low tire
pressure warning light will flash for
approximately 1 minute. The light will
remain on af ter 1 minute. Have your
tires replaced and/or TPMS system
reset as soon as possible. It is recom-
mended that you visit a NISSAN
dealer for these services.
• Replacing tires with those not origi-
nally specified by NISSAN could af-
fect the proper operation of the
TPMS.
• Do not inject any tire liquid or aerosol
tire sealant into the tires, as this may
cause a malfunction of the tire pres-
sure sensors.
• If the light still comes on while driving
af ter adjusting the tire pressure, a
tire may be flat or the TPMS may be
malfunctioning. If you have a flat tire,
replace it with a spare tire as soon as
possible. If no tire is flat and all tires
are properly inflated, it is recom-
mended that you visit a NISSAN
dealer for this service.
FLAT TIRE
In case of emergency6-3
Page 368 of 476
In order to maintain the appearance of
your vehicle, it is important to take proper
care of it.
To protect the paint surfaces, wash your
vehicle as soon as you can:
• Af ter a rainfall to prevent possible dam-age from acid rain.
• Af ter driving on coastal roads.
• When contaminants such as soot, bird droppings, tree sap, metal particles or
bugs get on the paint surface.
• When dust or mud builds up on the surface.
Whenever possible, store or park your ve-
hicle inside a garage or in a covered area.
When it is necessary to park outside, park in
a shady area or protect the vehicle with a
body cover.
Be careful not to scratch the paint sur-
face when putting on or removing the
body cover.
WASHING
Wash dirt off with a wet sponge and plenty
of water. Clean the vehicle thoroughly us-
ing a mild soap, a special vehicle soap or
general purpose dishwashing liquid mixed
with clean, lukewarm (never hot) water.
CAUTION
• Do not concentrate water spray di-
rectly on the sonar sensors (if so
equipped) on the bumper as this will
result in damage to the sensors. Do
not use pressure washers capable of
spraying water over 1,200 psi (8,274
kPa) to wash your vehicle. Use of
high-pressure washers over 1,200 psi
(8,274 kPa) can result in damage to or
removal of paint or graphics. Avoid
using a high-pressure washer closer
than 12 inches (30 cm) to the vehicle.
Always use a wide-angle nozzle only,
keep the nozzle moving and do not
concentrate the water spray on any
one area.
• Do not use car washes that use acid
in the detergent. Some car washes,
especially brushless ones, use some
acid for cleaning. The acid may react
with some plastic vehicle compo-
nents, causing them to crack. This
could affect their appearance, and
also could cause them not to func-
tion properly. Always check with your
car wash to confirm that acid is not
used. •
Do not wash the vehicle with strong
household soap, strong chemical de-
tergents, gasoline or solvents.
• Do not wash the vehicle in direct sun-
light or while the vehicle body is hot,
as the surface may become
water-spotted.
• Avoid using tight-napped or rough
cloths, such as washing mitts. Care
must be taken when removing
caked-on dirt or other foreign sub-
stances so the paint surface is not
scratched or damaged.
Rinse the vehicle thoroughly with plenty of
clean water.
Inside edges, seams and folds on the
doors, hatches and hood are particularly
vulnerable to the effects of road salt. There-
fore, these areas must be cleaned regularly.
Take care that the drain holes in the lower
edge of the door are open. Spray water
under the body and in the wheel wells to
loosen the dirt and wash away road salt.
A damp chamois can be used to dry the
vehicle to avoid water spots.
CLEANING EXTERIOR
7-2Appearance and care
Page 371 of 476
Occasionally remove loose dust from the
interior trim, plastic parts and seats using a
vacuum cleaner or sof t bristled brush. Wipe
the vinyl and leather (if so equipped) sur-
faces with a clean, sof t cloth dampened in
mild soap solution, then wipe clean with a
dry, sof t cloth.
Regular care and cleaning is required in
order to maintain the appearance of the
leather (if so equipped).
Before using any fabric protector, read the
manufacturer's recommendations. Some
fabric protectors contain chemicals that
may stain or bleach the seat material.
Use a cloth dampened only with water to
clean the meter and gauge lens.
WARNING
Do not use water or acidic cleaners (hot
steam cleaners) on the seat. This can
damage the seat or occupant classifi-
cation sensor. This can also affect the
operation of the air bag system and re-
sult in serious personal injury.
CAUTION
• Never use benzine, thinner or any
similar material.
• Small dirt particles can be abrasive
and damaging to leather surfaces
and should be removed promptly. Do
not use saddle soap, car waxes, pol-
ishes, oils, cleaning fluids, solvents,
detergents or ammonia-based
cleaners as they may damage the
leather's natural finish.
• Never use fabric protectors unless
recommended by the manufacturer.
• Do not use glass or plastic cleaner on
meter or gauge lens covers. It may
damage the lens cover.
CLEANING INTERIOR
Appearance and care7-5