NISSAN NAVARA 2005 Repair Workshop Manual
Manufacturer: NISSAN, Model Year: 2005, Model line: NAVARA, Model: NISSAN NAVARA 2005Pages: 3171, PDF Size: 49.59 MB
Page 1411 of 3171
TURBO CHARGER
EM-29
C
D
E
F
G
H
I
J
K
L
MA
EM
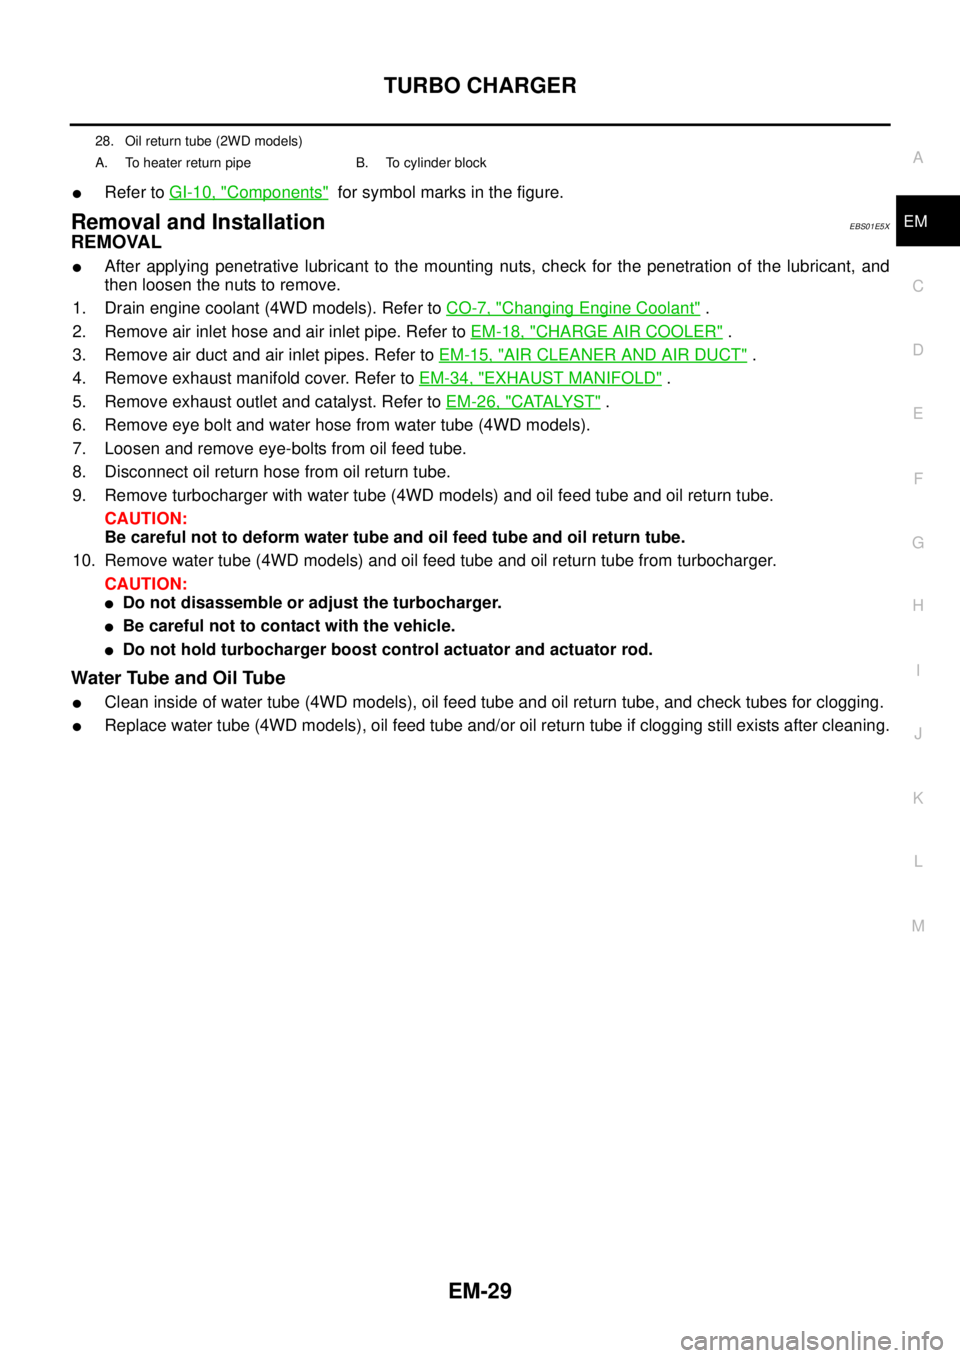
lRefer toGI-10, "Components"for symbol marks in the figure.
Removal and InstallationEBS01E5X
REMOVAL
lAfter applying penetrative lubricant to the mounting nuts, check for the penetration of the lubricant, and
then loosen the nuts to remove.
1. Drain engine coolant (4WD models). Refer toCO-7, "
Changing Engine Coolant".
2. Remove air inlet hose and air inlet pipe. Refer toEM-18, "
CHARGE AIR COOLER".
3. Remove air duct and air inlet pipes. Refer toEM-15, "
AIR CLEANER AND AIR DUCT".
4. Remove exhaust manifold cover. Refer toEM-34, "
EXHAUST MANIFOLD".
5. Remove exhaust outlet and catalyst. Refer toEM-26, "
CATALYST".
6. Remove eye bolt and water hose from water tube (4WD models).
7. Loosen and remove eye-bolts from oil feed tube.
8. Disconnect oil return hose from oil return tube.
9. Remove turbocharger with water tube (4WD models) and oil feed tube and oil return tube.
CAUTION:
Be careful not to deform water tube and oil feed tube and oil return tube.
10. Remove water tube (4WD models) and oil feed tube and oil return tube from turbocharger.
CAUTION:
lDo not disassemble or adjust the turbocharger.
lBe careful not to contact with the vehicle.
lDo not hold turbocharger boost control actuator and actuator rod.
Water Tube and Oil Tube
lClean inside of water tube (4WD models), oil feed tube and oil return tube, and check tubes for clogging.
lReplace water tube (4WD models), oil feed tube and/or oil return tube if clogging still exists after cleaning.
28. Oil return tube (2WD models)
A. To heater return pipe B. To cylinder block
Page 1412 of 3171
EM-30
TURBO CHARGER
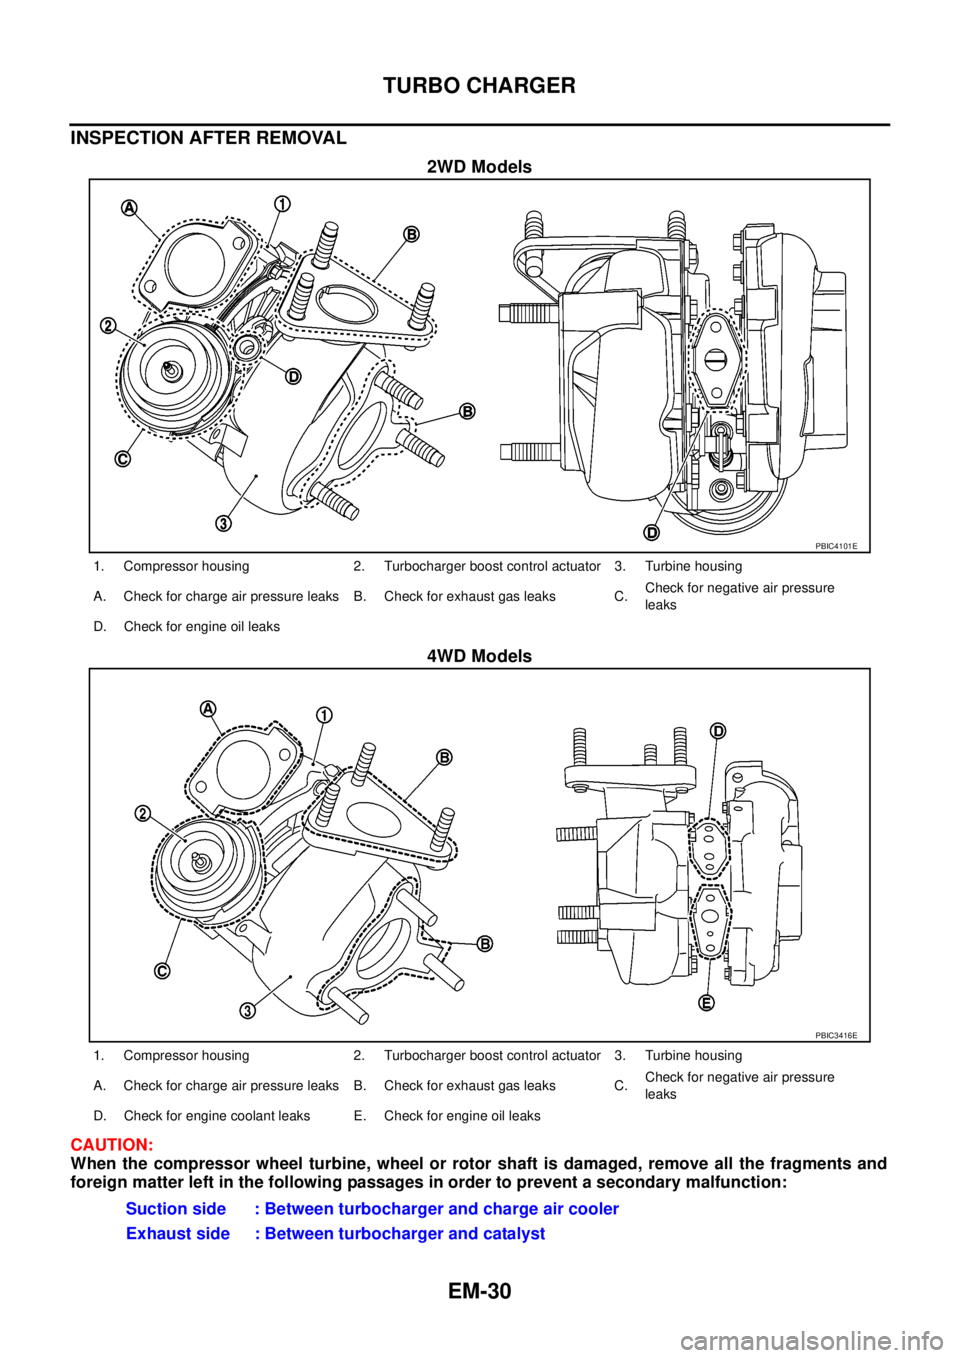
INSPECTION AFTER REMOVAL
2WD Models
4WD Models
CAUTION:
When the compressor wheel turbine, wheel or rotor shaft is damaged, remove all the fragments and
foreign matter left in the following passages in order to prevent a secondary malfunction:
PBIC4101E
1. Compressor housing 2. Turbocharger boost control actuator 3. Turbine housing
A. Check for charge air pressure leaks B. Check for exhaust gas leaks C.Check for negative air pressure
leaks
D. Check for engine oil leaks
PBIC3416E
1. Compressor housing 2. Turbocharger boost control actuator 3. Turbine housing
A. Check for charge air pressure leaks B. Check for exhaust gas leaks C.Check for negative air pressure
leaks
D. Check for engine coolant leaks E. Check for engine oil leaks
Suction side : Between turbocharger and charge air cooler
Exhaust side : Between turbocharger and catalyst
Page 1413 of 3171
TURBO CHARGER
EM-31
C
D
E
F
G
H
I
J
K
L
MA
EM
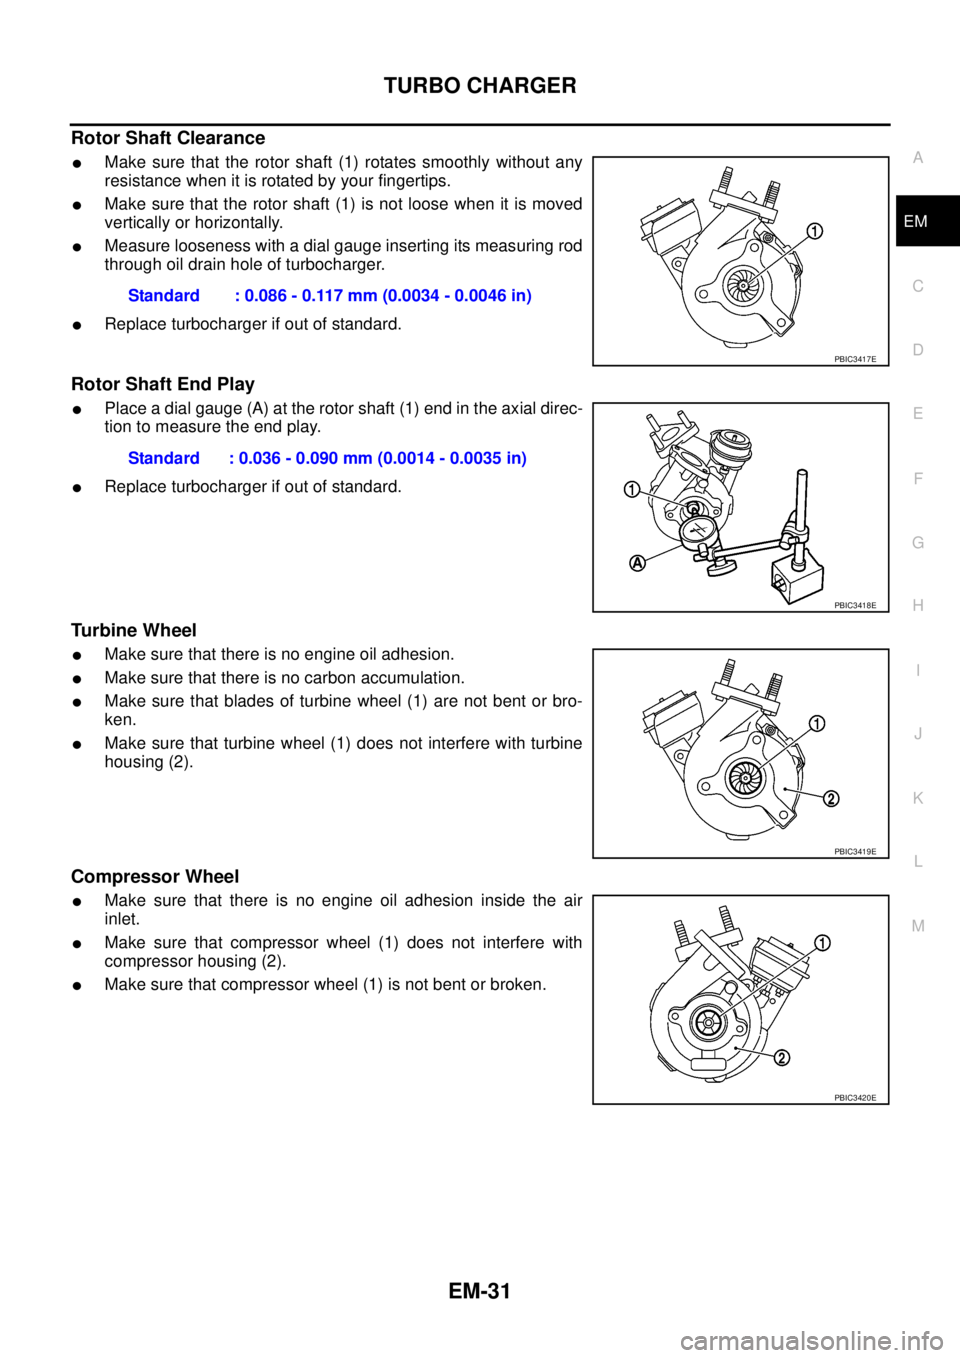
Rotor Shaft Clearance
lMake sure that the rotor shaft (1) rotates smoothly without any
resistance when it is rotated by your fingertips.
lMake sure that the rotor shaft (1) is not loose when it is moved
vertically or horizontally.
lMeasure looseness with a dial gauge inserting its measuring rod
through oil drain hole of turbocharger.
lReplace turbocharger if out of standard.
Rotor Shaft End Play
lPlace a dial gauge (A) at the rotor shaft (1) end in the axial direc-
tion to measure the end play.
lReplace turbocharger if out of standard.
Turbine Wheel
lMake sure that there is no engine oil adhesion.
lMake sure that there is no carbon accumulation.
lMake sure that blades of turbine wheel (1) are not bent or bro-
ken.
lMake sure that turbine wheel (1) does not interfere with turbine
housing (2).
Compressor Wheel
lMake sure that there is no engine oil adhesion inside the air
inlet.
lMake sure that compressor wheel (1) does not interfere with
compressor housing (2).
lMake sure that compressor wheel (1) is not bent or broken.Standard : 0.086 - 0.117 mm (0.0034 - 0.0046 in)
PBIC3417E
Standard : 0.036 - 0.090 mm (0.0014 - 0.0035 in)
PBIC3418E
PBIC3419E
PBIC3420E
Page 1414 of 3171
EM-32
TURBO CHARGER
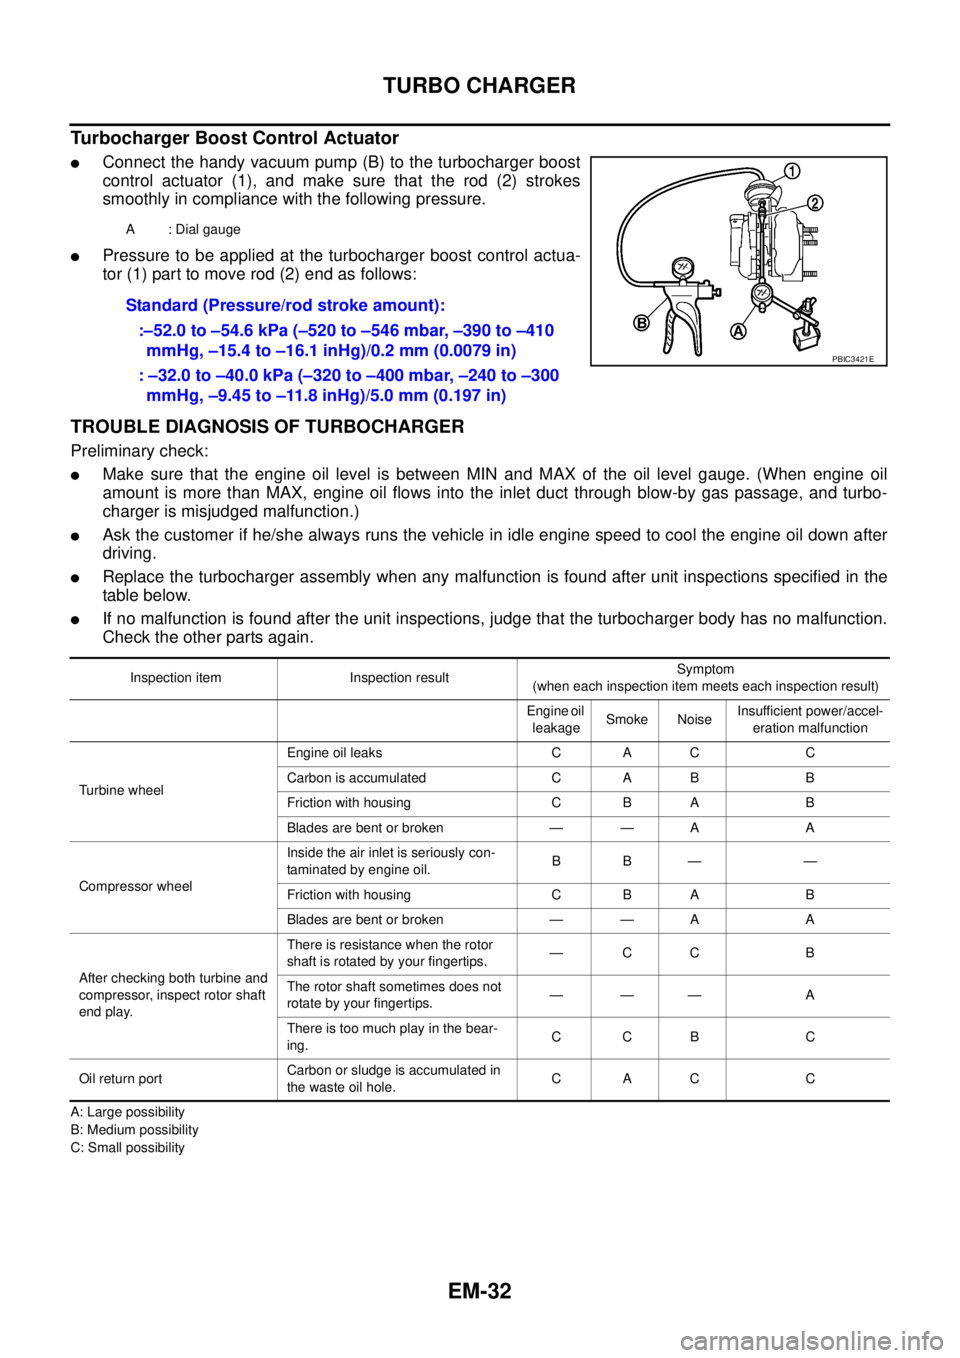
Turbocharger Boost Control Actuator
lConnect the handy vacuum pump (B) to the turbocharger boost
control actuator (1), and make sure that the rod (2) strokes
smoothly in compliance with the following pressure.
lPressure to be applied at the turbocharger boost control actua-
tor (1) part to move rod (2) end as follows:
TROUBLE DIAGNOSIS OF TURBOCHARGER
Preliminary check:
lMake sure that the engine oil level is between MIN and MAX of the oil level gauge. (When engine oil
amount is more than MAX, engine oil flows into the inlet duct through blow-by gas passage, and turbo-
charger is misjudged malfunction.)
lAsk the customer if he/she always runs the vehicle in idle engine speed to cool the engine oil down after
driving.
lReplace the turbocharger assembly when any malfunction is found after unit inspections specified in the
table below.
lIf no malfunction is found after the unit inspections, judge that the turbocharger body has no malfunction.
Check the other parts again.
A: Large possibility
B: Medium possibility
C: Small possibilityA : Dial gauge
Standard (Pressure/rod stroke amount):
:–52.0 to –54.6 kPa (–520 to –546 mbar, –390 to –410
mmHg, –15.4 to –16.1 inHg)/0.2 mm (0.0079 in)
: –32.0 to –40.0 kPa (–320 to –400 mbar, –240 to –300
mmHg, –9.45 to –11.8 inHg)/5.0 mm (0.197 in)
PBIC3421E
Inspection item Inspection resultSymptom
(when each inspection item meets each inspection result)
Engine oil
leakageSmoke NoiseInsufficient power/accel-
eration malfunction
Turbine wheelEngine oil leaks C A C C
Carbon is accumulated C A B B
Friction with housing C B A B
Blades are bent or broken — — A A
Compressor wheelInside the air inlet is seriously con-
taminated by engine oil.BB— —
Friction with housing C B A B
Blades are bent or broken — — A A
After checking both turbine and
compressor, inspect rotor shaft
end play.There is resistance when the rotor
shaft is rotated by your fingertips.—CC B
The rotor shaft sometimes does not
rotate by your fingertips.——— A
There is too much play in the bear-
ing.CCB C
Oil return portCarbon or sludge is accumulated in
the waste oil hole.CAC C
Page 1415 of 3171
TURBO CHARGER
EM-33
C
D
E
F
G
H
I
J
K
L
MA
EM
INSTALLATION
Note the following, and install in the reverse order of removal.
lWhen a stud bolt is pulled out, replace it with a new one and tighten it to the following torque.
: 25.5 N·m (2.6 kg-m, 19 ft-lb)
Page 1416 of 3171
EM-34
EXHAUST MANIFOLD
EXHAUST MANIFOLD
PFP:14004
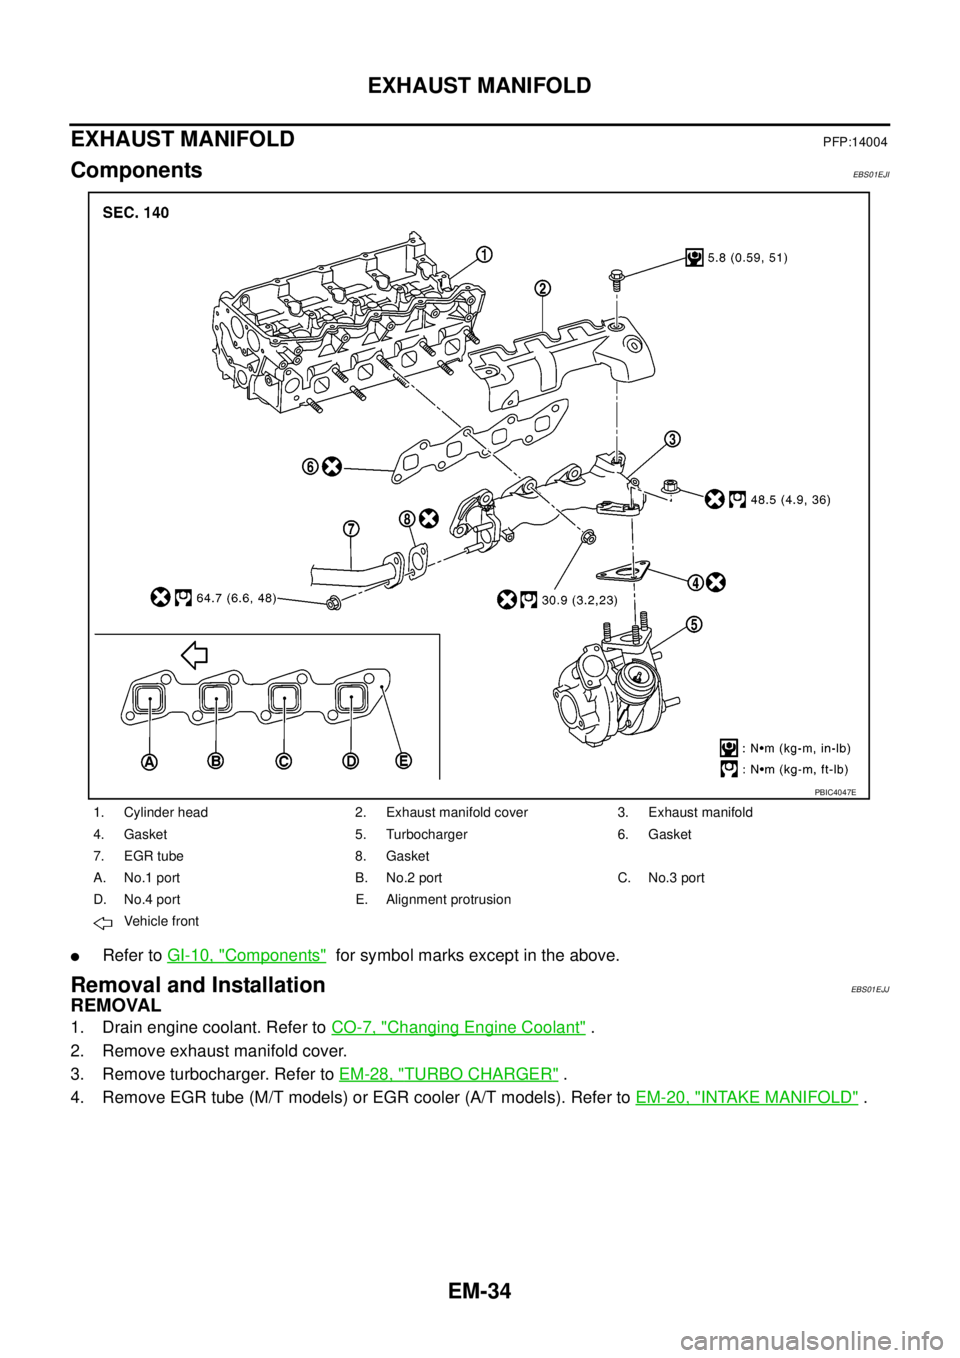
ComponentsEBS01EJI
lRefer toGI-10, "Components"for symbol marks except in the above.
Removal and InstallationEBS01EJJ
REMOVAL
1. Drain engine coolant. Refer toCO-7, "Changing Engine Coolant".
2. Remove exhaust manifold cover.
3. Remove turbocharger. Refer toEM-28, "
TURBO CHARGER".
4. Remove EGR tube (M/T models) or EGR cooler (A/T models). Refer toEM-20, "
INTAKE MANIFOLD".
1. Cylinder head 2. Exhaust manifold cover 3. Exhaust manifold
4. Gasket 5. Turbocharger 6. Gasket
7. EGR tube 8. Gasket
A. No.1 port B. No.2 port C. No.3 port
D. No.4 port E. Alignment protrusion
Vehicle front
PBIC4047E
Page 1417 of 3171
EXHAUST MANIFOLD
EM-35
C
D
E
F
G
H
I
J
K
L
MA
EM
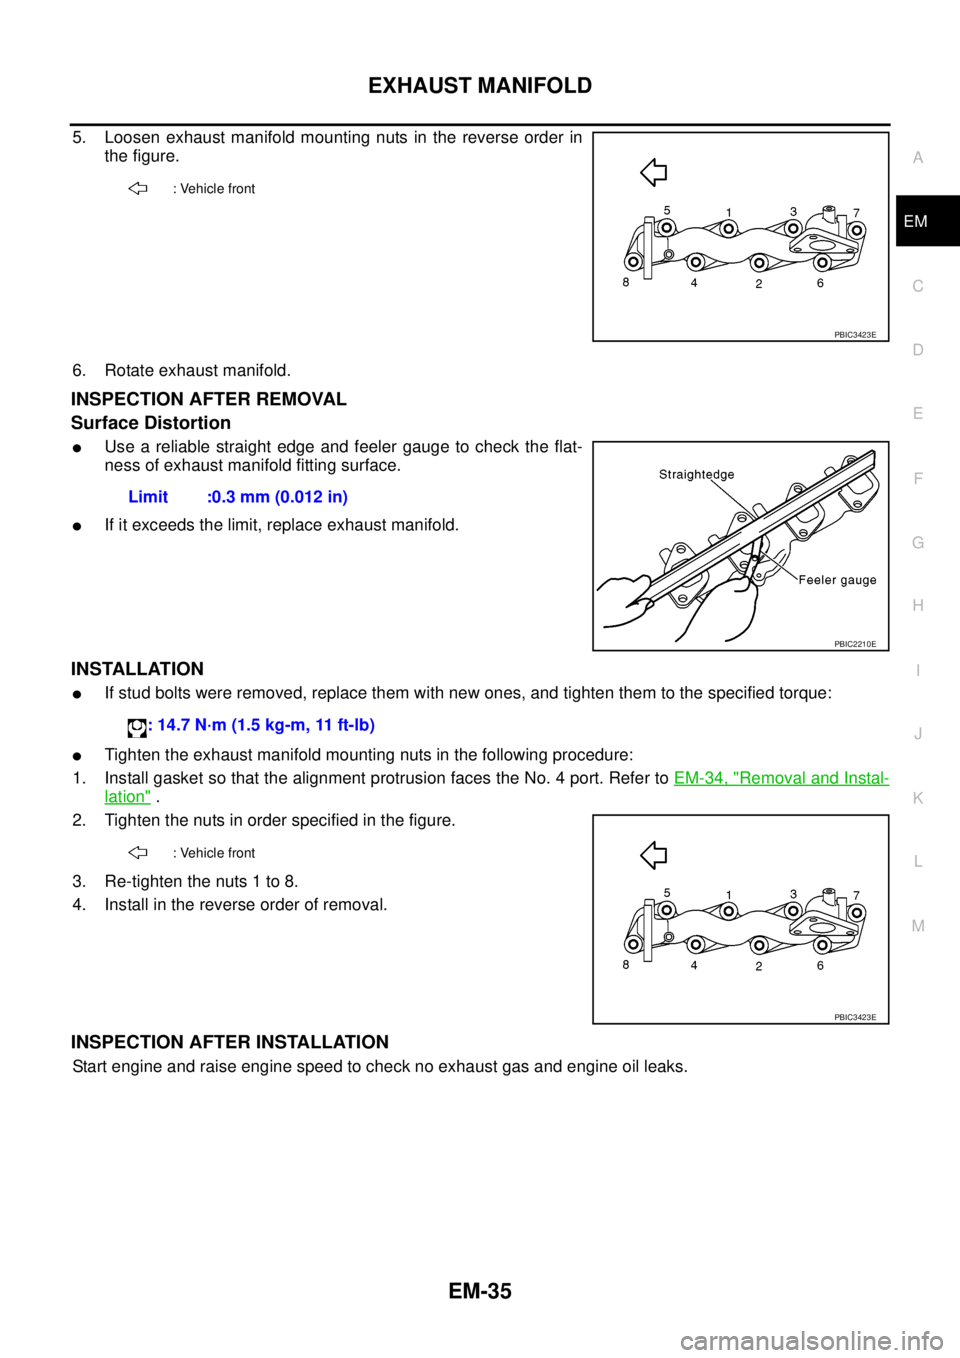
5. Loosen exhaust manifold mounting nuts in the reverse order in
the figure.
6. Rotate exhaust manifold.
INSPECTION AFTER REMOVAL
Surface Distortion
lUse a reliable straight edge and feeler gauge to check the flat-
ness of exhaust manifold fitting surface.
lIf it exceeds the limit, replace exhaust manifold.
INSTALLATION
lIf stud bolts were removed, replace them with new ones, and tighten them to the specified torque:
lTighten the exhaust manifold mounting nuts in the following procedure:
1. Install gasket so that the alignment protrusion faces the No. 4 port. Refer toEM-34, "
Removal and Instal-
lation".
2. Tighten the nuts in order specified in the figure.
3. Re-tighten the nuts 1 to 8.
4. Install in the reverse order of removal.
INSPECTION AFTER INSTALLATION
Start engine and raise engine speed to check no exhaust gas and engine oil leaks.
: Vehicle front
PBIC3423E
Limit :0.3 mm (0.012 in)
PBIC2210E
: 14.7 N·m (1.5 kg-m, 11 ft-lb)
: Vehicle front
PBIC3423E
Page 1418 of 3171
EM-36
OIL PAN AND OIL STRAINER
OIL PAN AND OIL STRAINER
P F P : 1111 0
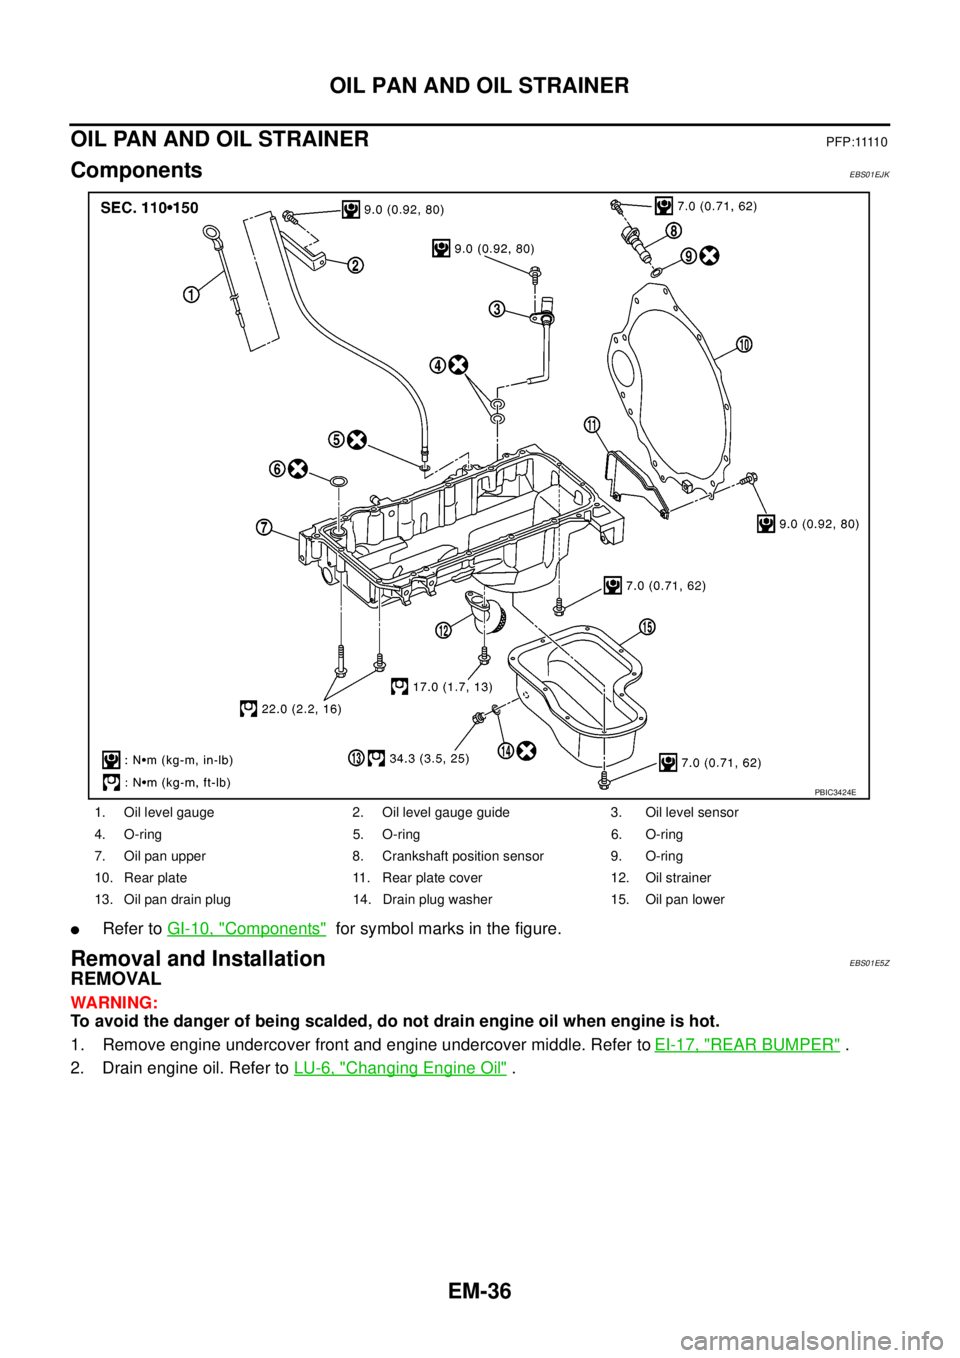
ComponentsEBS01EJK
lRefer toGI-10, "Components"for symbol marks in the figure.
Removal and InstallationEBS01E5Z
REMOVAL
WARNING:
To avoid the danger of being scalded, do not drain engine oil when engine is hot.
1. Remove engine undercover front and engine undercover middle. Refer toEI-17, "
REAR BUMPER".
2. Drain engine oil. Refer toLU-6, "
Changing Engine Oil".
1. Oil level gauge 2. Oil level gauge guide 3. Oil level sensor
4. O-ring 5. O-ring 6. O-ring
7. Oil pan upper 8. Crankshaft position sensor 9. O-ring
10. Rear plate 11. Rear plate cover 12. Oil strainer
13. Oil pan drain plug 14. Drain plug washer 15. Oil pan lower
PBIC3424E
Page 1419 of 3171
OIL PAN AND OIL STRAINER
EM-37
C
D
E
F
G
H
I
J
K
L
MA
EM
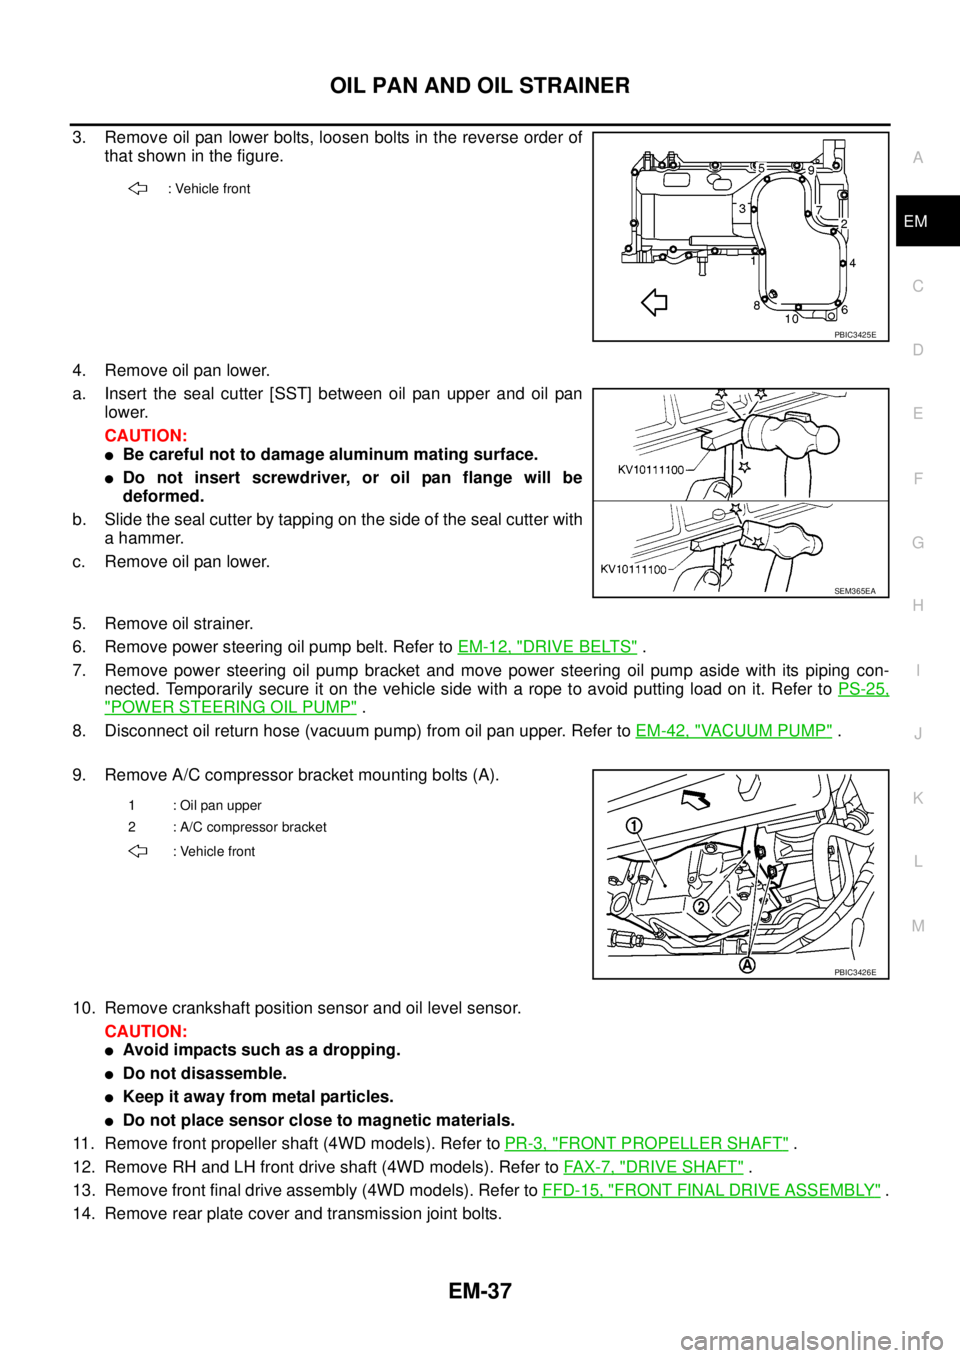
3. Remove oil pan lower bolts, loosen bolts in the reverse order of
that shown in the figure.
4. Remove oil pan lower.
a. Insert the seal cutter [SST] between oil pan upper and oil pan
lower.
CAUTION:
lBe careful not to damage aluminum mating surface.
lDo not insert screwdriver, or oil pan flange will be
deformed.
b. Slide the seal cutter by tapping on the side of the seal cutter with
a hammer.
c. Remove oil pan lower.
5. Remove oil strainer.
6. Remove power steering oil pump belt. Refer toEM-12, "
DRIVE BELTS".
7. Remove power steering oil pump bracket and move power steering oil pump aside with its piping con-
nected. Temporarily secure it on the vehicle side with a rope to avoid putting load on it. Refer toPS-25,
"POWER STEERING OIL PUMP".
8. Disconnect oil return hose (vacuum pump) from oil pan upper. Refer toEM-42, "
VACUUM PUMP".
9. Remove A/C compressor bracket mounting bolts (A).
10. Remove crankshaft position sensor and oil level sensor.
CAUTION:
lAvoid impacts such as a dropping.
lDo not disassemble.
lKeep it away from metal particles.
lDo not place sensor close to magnetic materials.
11. Remove front propeller shaft (4WD models). Refer toPR-3, "
FRONT PROPELLER SHAFT".
12. Remove RH and LH front drive shaft (4WD models). Refer toFAX-7, "
DRIVE SHAFT".
13. Remove front final drive assembly (4WD models). Refer toFFD-15, "
FRONT FINAL DRIVE ASSEMBLY".
14. Remove rear plate cover and transmission joint bolts.
: Vehicle front
PBIC3425E
SEM365EA
1 : Oil pan upper
2 : A/C compressor bracket
: Vehicle front
PBIC3426E
Page 1420 of 3171
![NISSAN NAVARA 2005 Repair Workshop Manual EM-38
OIL PAN AND OIL STRAINER
15. Loosen bolts in the reverse order of illustration to remove oil pan
upper.
16. Remove oil pan upper.
lInsert the seal cutter [SST] between oil pan upper and cylin-
d NISSAN NAVARA 2005 Repair Workshop Manual EM-38
OIL PAN AND OIL STRAINER
15. Loosen bolts in the reverse order of illustration to remove oil pan
upper.
16. Remove oil pan upper.
lInsert the seal cutter [SST] between oil pan upper and cylin-
d](/img/5/57362/w960_57362-1419.png)
EM-38
OIL PAN AND OIL STRAINER
15. Loosen bolts in the reverse order of illustration to remove oil pan
upper.
16. Remove oil pan upper.
lInsert the seal cutter [SST] between oil pan upper and cylin-
der block. Slide the seal cutter by tapping on the side of the
seal cutter with a hammer. Remove oil pan upper.
lBe careful not to damage aluminum mating surface.
lDo not insert screwdriver, or oil pan flange will be
deformed.
INSPECTION AFTER REMOVAL
Clean oil strainer if any object attached.
INSTALLATION
Note the following, and install in the reverse order of removal.
lInstall oil pan upper with the following procedure.
–Use the scraper (A) to remove old liquid gasket from mating sur-
face of oil pan upper (1).
•Also remove old liquid gasket from mating surface of cylin-
der block and rear chain case.
•Remove old liquid gasket from the bolt hole and thread.
–Apply a continuous bead of liquid gasket with the tube presser
[SST: WS39930000] to areas shown in the figure.
Use Genuine Liquid Gasket or equivalent.
CAUTION:
lAt the 2 bolt holes marked , liquid gasket should be
applied outside holes.
lBe sure liquid gasket is 3.5 to 4.5 mm (0.138 to 0.177 in)
or 4.5 to 5.5 mm (0.177 to 0.217 in) wide. (Be careful that
the diameter of the liquid gasket bead is different around
the front.)
lAttaching should be done within 5 minutes after coating.
–Install oil pan upper.
: Vehicle front
PBIC3431E
SEM365EA
PBIC3432E
: Vehicle front
PBIC3433E