NISSAN NAVARA 2005 Repair Workshop Manual
NAVARA 2005
NISSAN
NISSAN
https://www.carmanualsonline.info/img/5/57362/w960_57362-0.png
NISSAN NAVARA 2005 Repair Workshop Manual
Trending: air condition, alternator belt, octane, check engine, maintenance schedule, Conditioning, rear view mirror
Page 1371 of 3171
BODY SIDE TRIM
EI-33
C
D
E
F
G
H
J
K
L
MA
B
EI
BODY SIDE TRIMPFP:76913
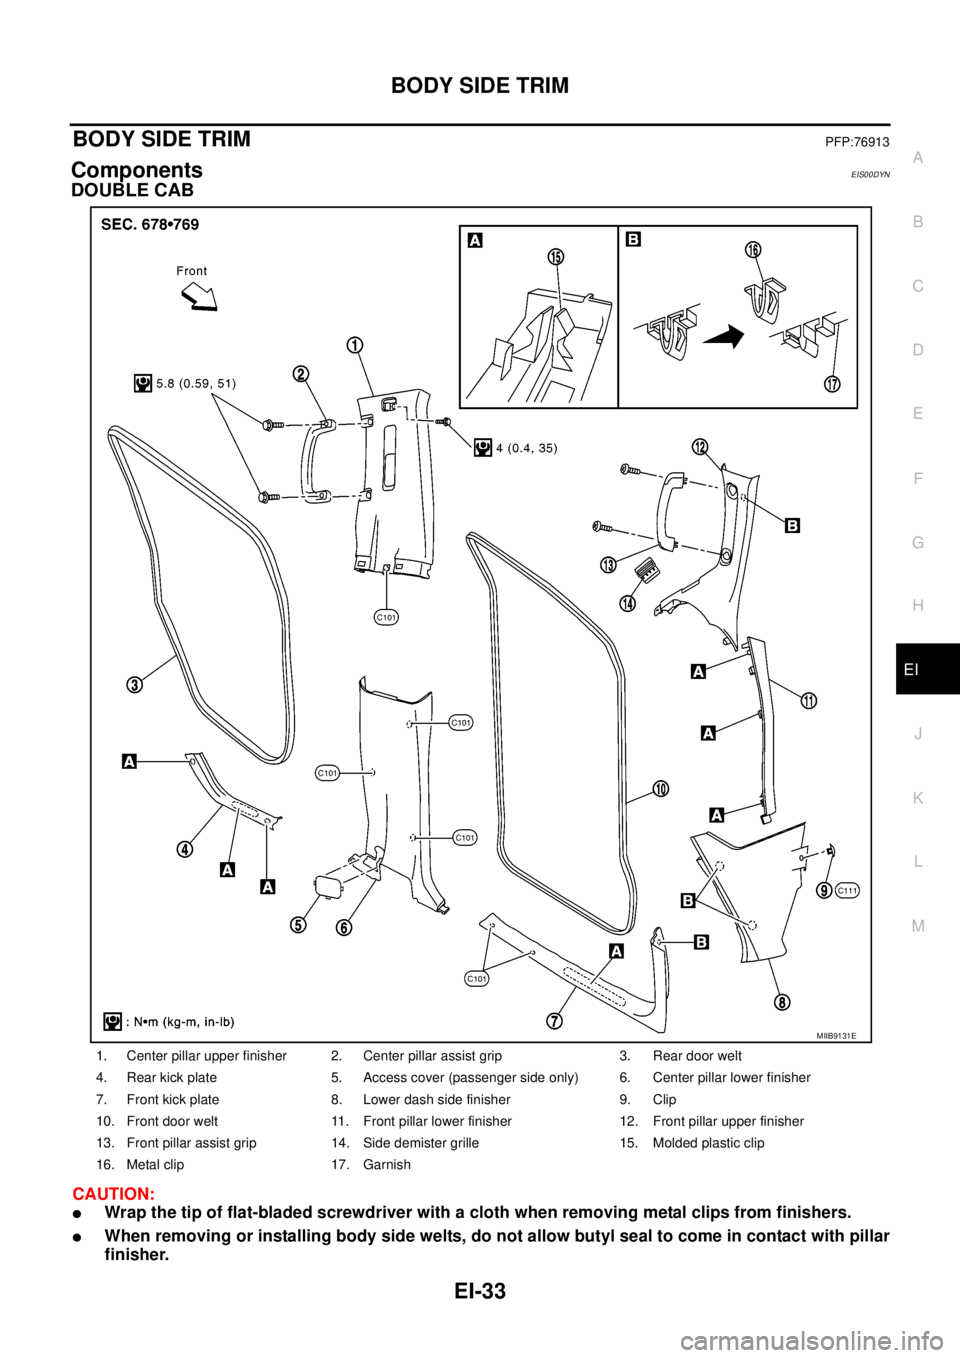
ComponentsEIS00DYN
DOUBLE CAB
CAUTION:
lWrap the tip of flat-bladed screwdriver with a cloth when removing metal clips from finishers.
lWhen removing or installing body side welts, do not allow butyl seal to come in contact with pillar
finisher.
1. Center pillar upper finisher 2. Center pillar assist grip 3. Rear door welt
4. Rear kick plate 5. Access cover (passenger side only) 6. Center pillar lower finisher
7. Front kick plate 8. Lower dash side finisher 9. Clip
10. Front door welt 11. Front pillar lower finisher 12. Front pillar upper finisher
13. Front pillar assist grip 14. Side demister grille 15. Molded plastic clip
16. Metal clip 17. Garnish
MIIB9131E
Page 1372 of 3171
EI-34
BODY SIDE TRIM
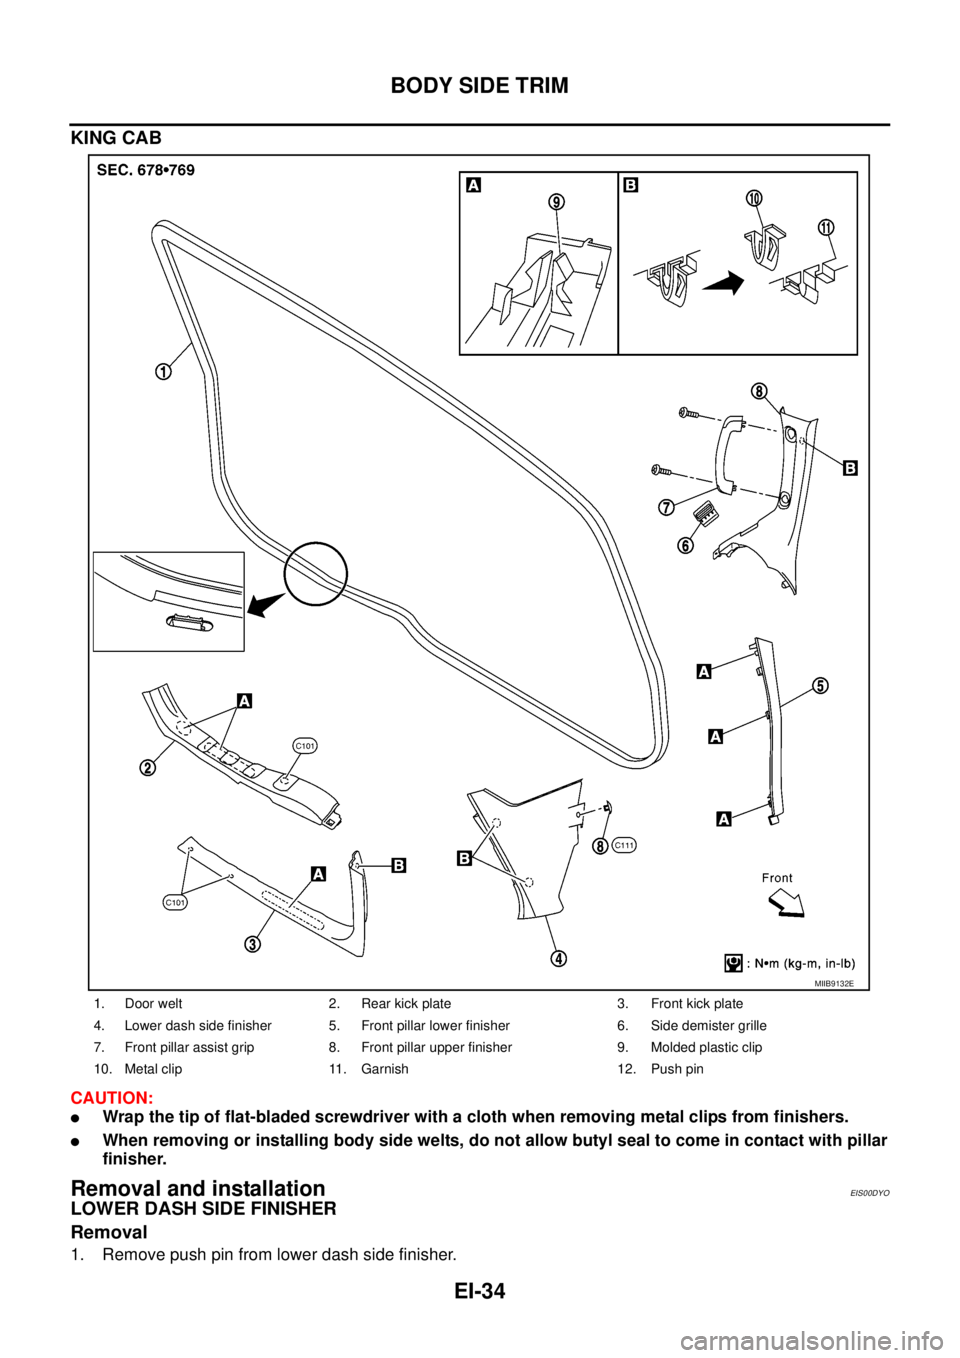
KING CAB
CAUTION:
lWrap the tip of flat-bladed screwdriver with a cloth when removing metal clips from finishers.
lWhen removing or installing body side welts, do not allow butyl seal to come in contact with pillar
finisher.
Removal and installationEIS00DYO
LOWER DASH SIDE FINISHER
Removal
1. Remove push pin from lower dash side finisher.
1. Door welt 2. Rear kick plate 3. Front kick plate
4. Lower dash side finisher 5. Front pillar lower finisher 6. Side demister grille
7. Front pillar assist grip 8. Front pillar upper finisher 9. Molded plastic clip
10. Metal clip 11. Garnish 12. Push pin
MIIB9132E
Page 1373 of 3171
BODY SIDE TRIM
EI-35
C
D
E
F
G
H
J
K
L
MA
B
EI
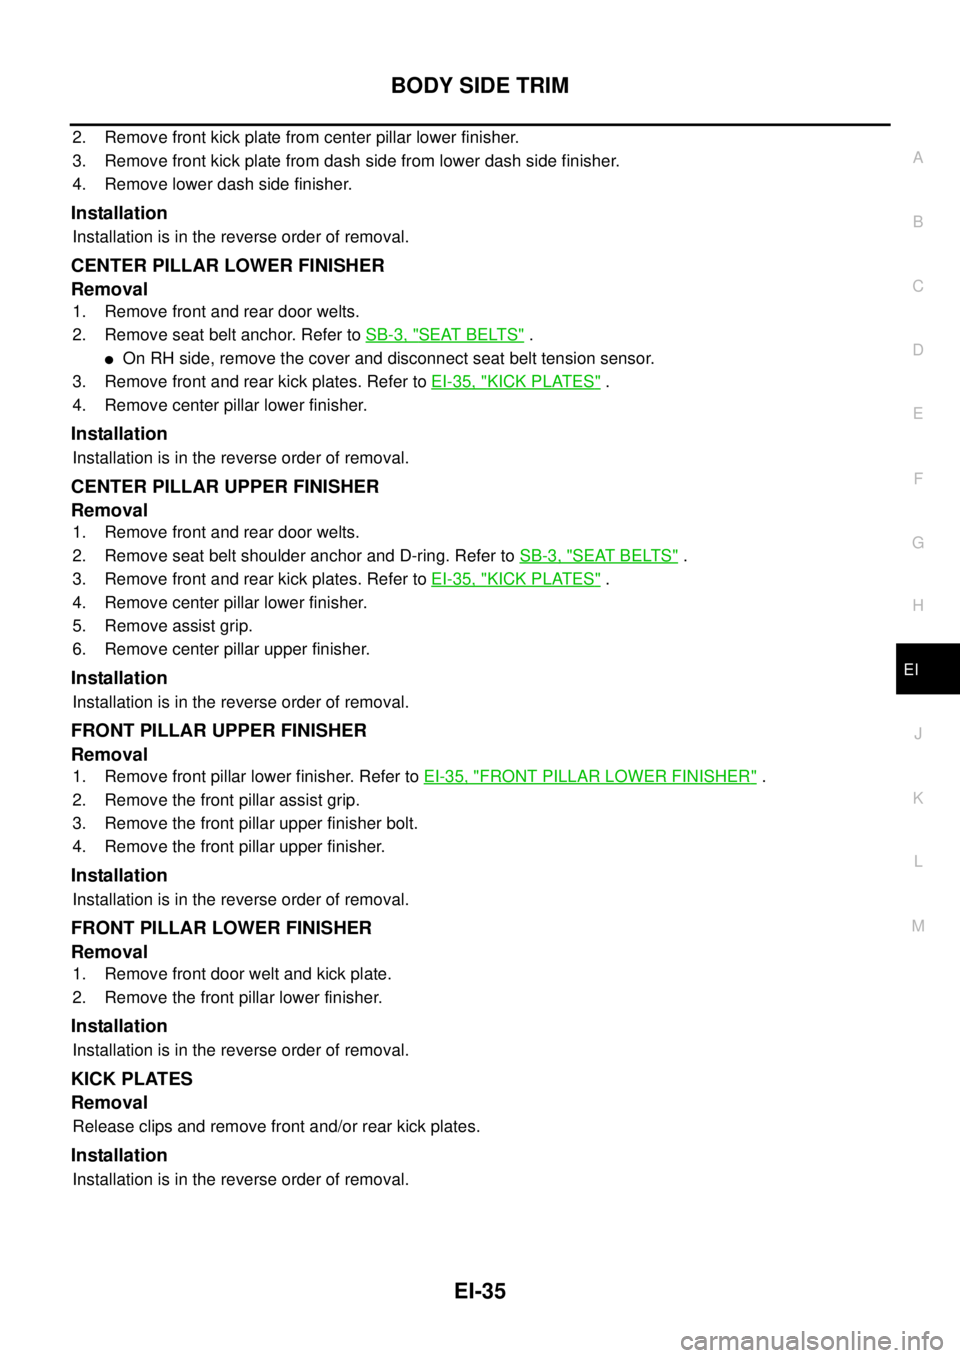
2. Remove front kick plate from center pillar lower finisher.
3. Remove front kick plate from dash side from lower dash side finisher.
4. Remove lower dash side finisher.
Installation
Installation is in the reverse order of removal.
CENTER PILLAR LOWER FINISHER
Removal
1. Remove front and rear door welts.
2. Remove seat belt anchor. Refer toSB-3, "
SEAT BELTS".
lOn RH side, remove the cover and disconnect seat belt tension sensor.
3. Remove front and rear kick plates. Refer toEI-35, "
KICK PLATES".
4. Remove center pillar lower finisher.
Installation
Installation is in the reverse order of removal.
CENTER PILLAR UPPER FINISHER
Removal
1. Remove front and rear door welts.
2. Remove seat belt shoulder anchor and D-ring. Refer toSB-3, "
SEAT BELTS".
3. Remove front and rear kick plates. Refer toEI-35, "
KICK PLATES".
4. Remove center pillar lower finisher.
5. Remove assist grip.
6. Remove center pillar upper finisher.
Installation
Installation is in the reverse order of removal.
FRONT PILLAR UPPER FINISHER
Removal
1. Remove front pillar lower finisher. Refer toEI-35, "FRONT PILLAR LOWER FINISHER".
2. Remove the front pillar assist grip.
3. Remove the front pillar upper finisher bolt.
4. Remove the front pillar upper finisher.
Installation
Installation is in the reverse order of removal.
FRONT PILLAR LOWER FINISHER
Removal
1. Remove front door welt and kick plate.
2. Remove the front pillar lower finisher.
Installation
Installation is in the reverse order of removal.
KICK PLATES
Removal
Release clips and remove front and/or rear kick plates.
Installation
Installation is in the reverse order of removal.
Page 1374 of 3171
EI-36
BODY SIDE TRIM
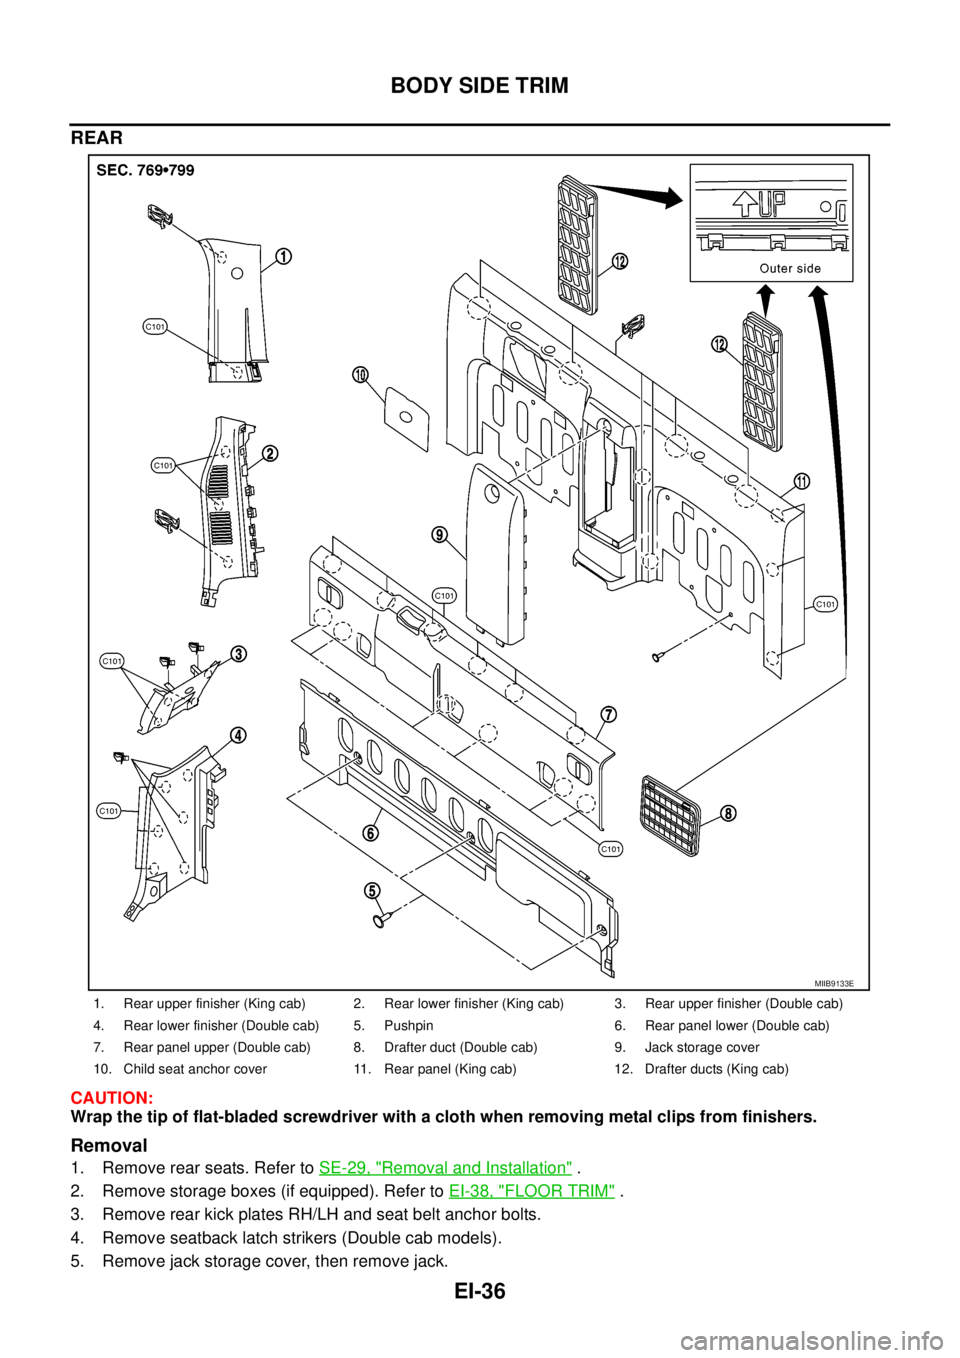
REAR
CAUTION:
Wrap the tip of flat-bladed screwdriver with a cloth when removing metal clips from finishers.
Removal
1. Remove rear seats. Refer toSE-29, "Removal and Installation".
2. Remove storage boxes (if equipped). Refer toEI-38, "
FLOOR TRIM".
3. Remove rear kick plates RH/LH and seat belt anchor bolts.
4. Remove seatback latch strikers (Double cab models).
5. Remove jack storage cover, then remove jack.
1. Rear upper finisher (King cab) 2. Rear lower finisher (King cab) 3. Rear upper finisher (Double cab)
4. Rear lower finisher (Double cab) 5. Pushpin 6. Rear panel lower (Double cab)
7. Rear panel upper (Double cab) 8. Drafter duct (Double cab) 9. Jack storage cover
10. Child seat anchor cover 11. Rear panel (King cab) 12. Drafter ducts (King cab)
MIIB9133E
Page 1375 of 3171
BODY SIDE TRIM
EI-37
C
D
E
F
G
H
J
K
L
MA
B
EI
6. Remove child seat anchor cover (if equipped) and rear panel(s).
7. Remove first rear lower, then rear upper finishers RH/LH.
8. Remove drafter duct(s).
Installation
Installation is in the reverse order of removal.
Page 1376 of 3171
EI-38
FLOOR TRIM
FLOOR TRIM
PFP:74902
Removal and InstallationEIS00DYP
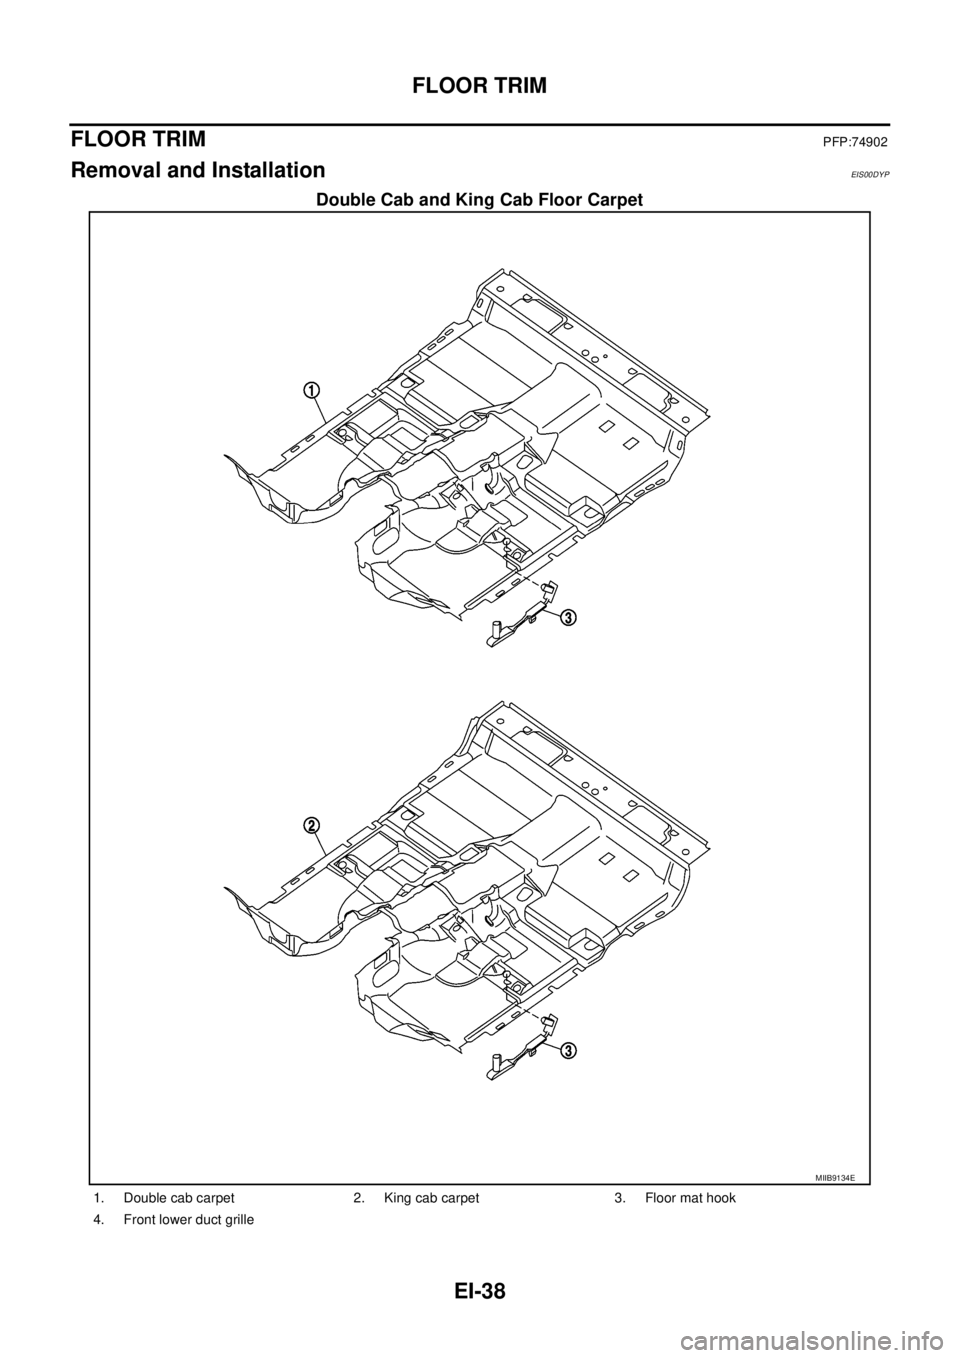
Double Cab and King Cab Floor Carpet
MIIB9134E
1. Double cab carpet 2. King cab carpet 3. Floor mat hook
4. Front lower duct grille
Page 1377 of 3171
FLOOR TRIM
EI-39
C
D
E
F
G
H
J
K
L
MA
B
EI
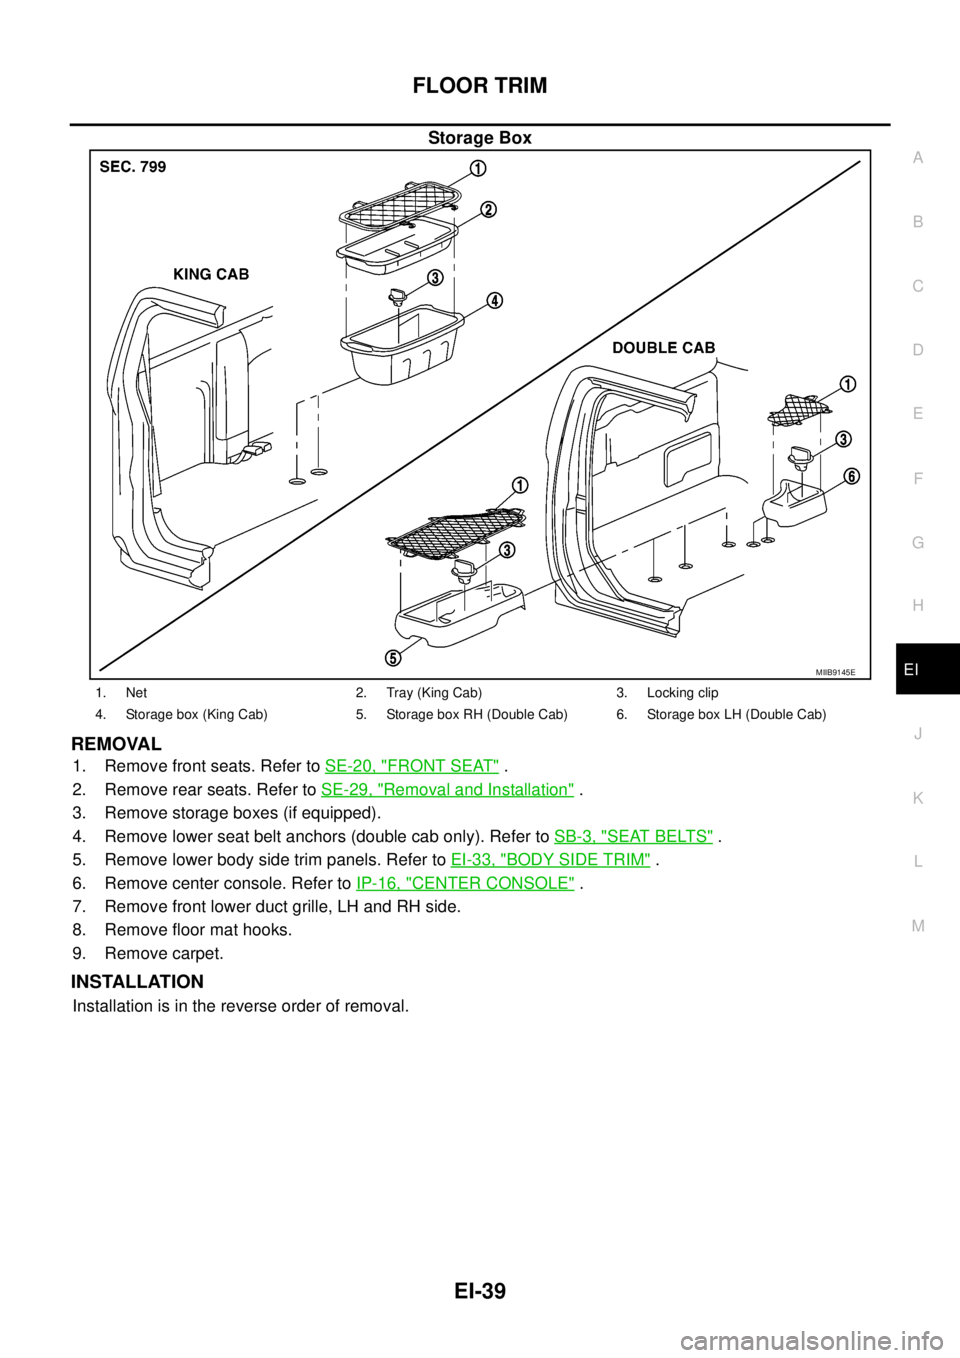
Storage Box
REMOVAL
1. Remove front seats. Refer toSE-20, "FRONT SEAT".
2. Remove rear seats. Refer toSE-29, "
Removal and Installation".
3. Remove storage boxes (if equipped).
4. Remove lower seat belt anchors (double cab only). Refer toSB-3, "
SEAT BELTS".
5. Remove lower body side trim panels. Refer toEI-33, "
BODY SIDE TRIM".
6. Remove center console. Refer toIP-16, "
CENTER CONSOLE".
7. Remove front lower duct grille, LH and RH side.
8. Remove floor mat hooks.
9. Remove carpet.
INSTALLATION
Installation is in the reverse order of removal.
MIIB9145E
1. Net 2. Tray (King Cab) 3. Locking clip
4. Storage box (King Cab) 5. Storage box RH (Double Cab) 6. Storage box LH (Double Cab)
Page 1378 of 3171
EI-40
HEADLINING
HEADLINING
PFP:73910
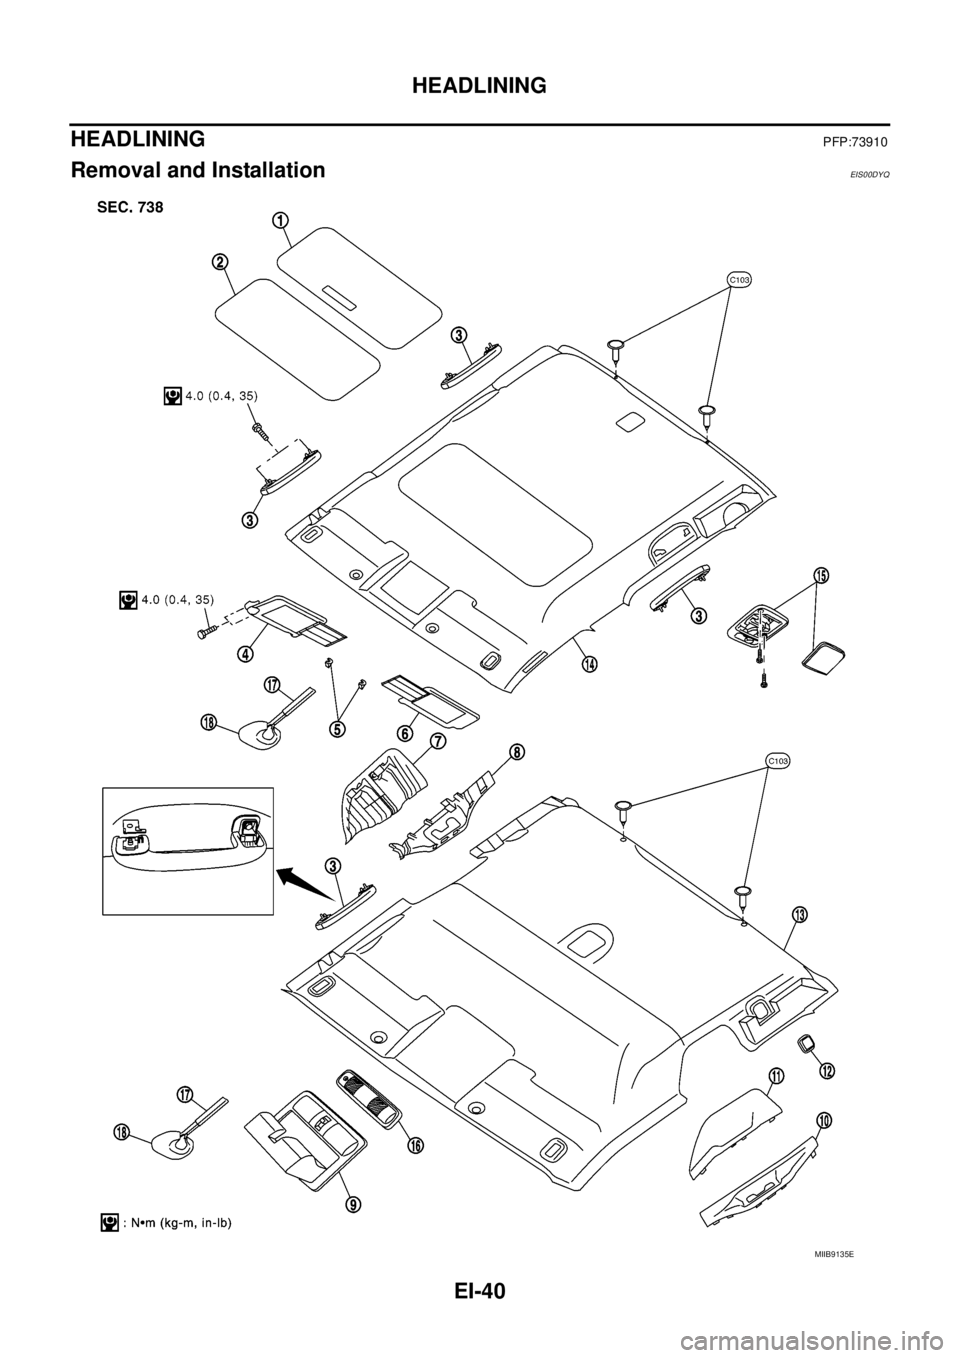
Removal and InstallationEIS00DYQ
MIIB9135E
Page 1379 of 3171
HEADLINING
EI-41
C
D
E
F
G
H
J
K
L
MA
B
EI
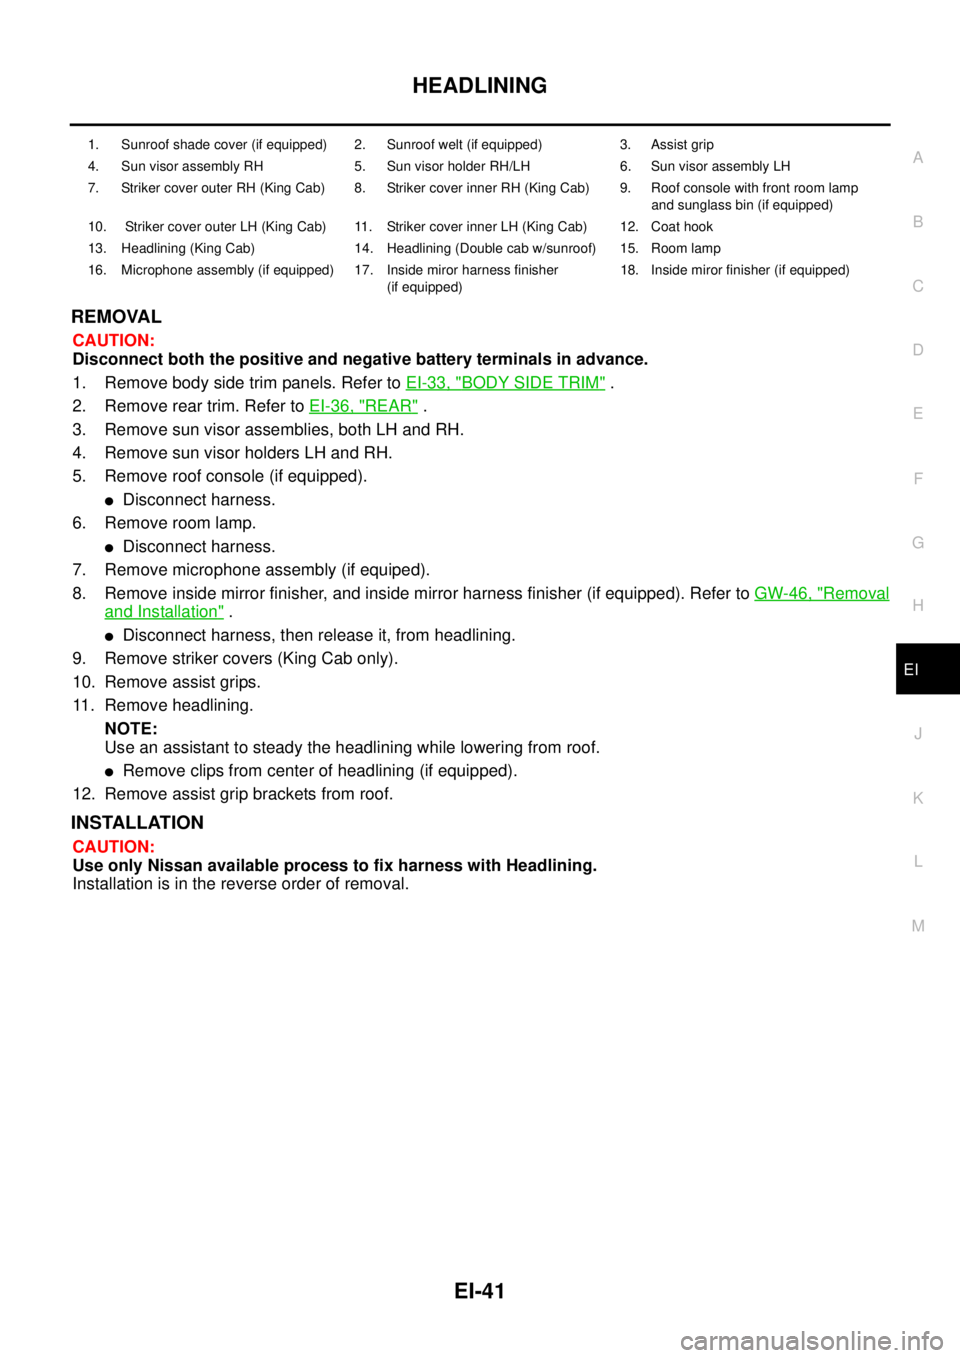
REMOVAL
CAUTION:
Disconnect both the positive and negative battery terminals in advance.
1. Remove body side trim panels. Refer toEI-33, "
BODY SIDE TRIM".
2. Remove rear trim. Refer toEI-36, "
REAR".
3. Remove sun visor assemblies, both LH and RH.
4. Remove sun visor holders LH and RH.
5. Remove roof console (if equipped).
lDisconnect harness.
6. Remove room lamp.
lDisconnect harness.
7. Remove microphone assembly (if equiped).
8. Remove inside mirror finisher, and inside mirror harness finisher (if equipped). Refer toGW-46, "
Removal
and Installation".
lDisconnect harness, then release it, from headlining.
9. Remove striker covers (King Cab only).
10. Remove assist grips.
11. Remove headlining.
NOTE:
Use an assistant to steady the headlining while lowering from roof.
lRemove clips from center of headlining (if equipped).
12. Remove assist grip brackets from roof.
INSTALLATION
CAUTION:
Use only Nissan available process to fix harness with Headlining.
Installation is in the reverse order of removal.
1. Sunroof shade cover (if equipped) 2. Sunroof welt (if equipped) 3. Assist grip
4. Sun visor assembly RH 5. Sun visor holder RH/LH 6. Sun visor assembly LH
7. Striker cover outer RH (King Cab) 8. Striker cover inner RH (King Cab) 9. Roof console with front room lamp
and sunglass bin (if equipped)
10. Striker cover outer LH (King Cab) 11. Striker cover inner LH (King Cab) 12. Coat hook
13. Headlining (King Cab) 14. Headlining (Double cab w/sunroof) 15. Room lamp
16. Microphone assembly (if equipped) 17. Inside miror harness finisher
(if equipped)18. Inside miror finisher (if equipped)
Page 1380 of 3171
EI-42
BED RAILS AND TRIM
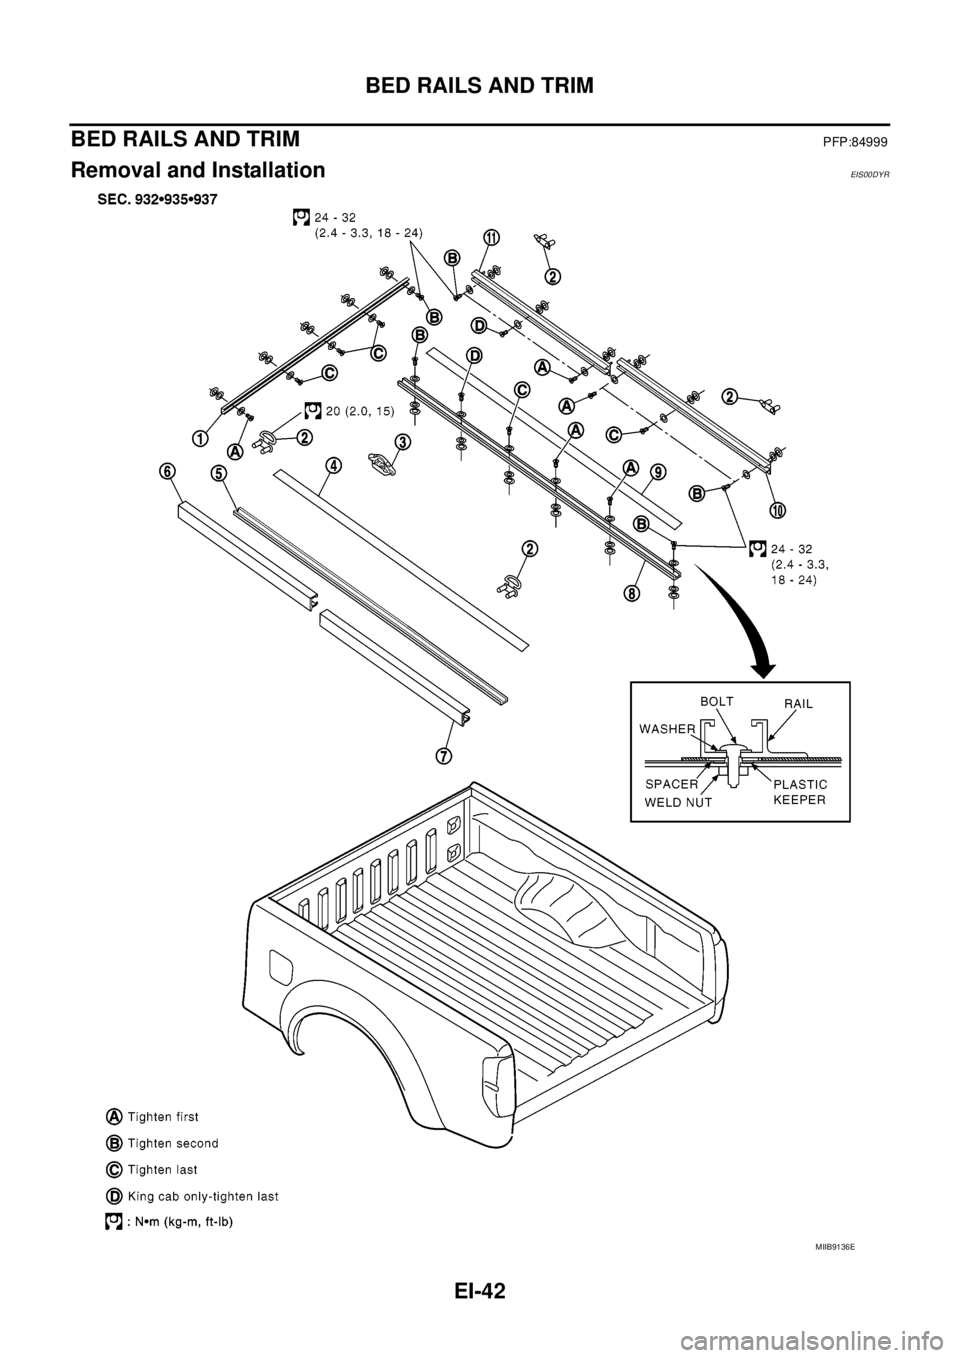
BED RAILS AND TRIM
PFP:84999
Removal and InstallationEIS00DYR
MIIB9136E
Trending: low oil pressure, open hood, lights, headlights, transmission fluid, bluetooth, engine oil
