NISSAN NAVARA 2005 Repair Workshop Manual
NAVARA 2005
NISSAN
NISSAN
https://www.carmanualsonline.info/img/5/57362/w960_57362-0.png
NISSAN NAVARA 2005 Repair Workshop Manual
Trending: hood release, Heater Core, Primary timing chain, warning lights, Timing chain, reset, transmission
Page 2891 of 3171
SE-20
FRONT SEAT
FRONT SEAT
PFP:87000
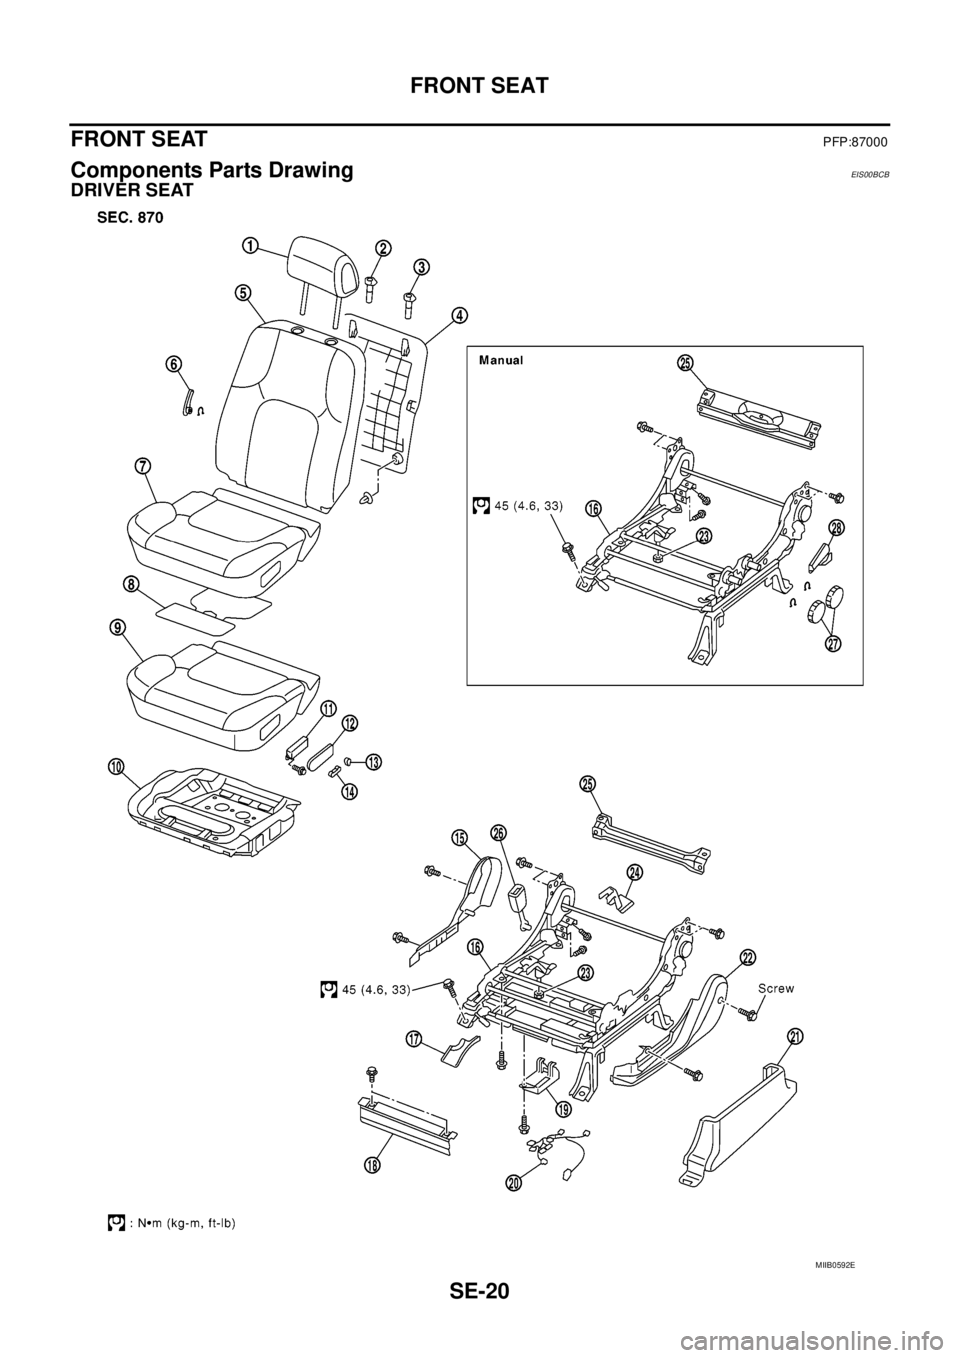
Components Parts DrawingEIS00BCB
DRIVER SEAT
MIIB0592E
Page 2892 of 3171
FRONT SEAT
SE-21
C
D
E
F
G
H
J
K
L
MA
B
SE
1. Headrest 2. Headrest holder (free) 3. Headrest holder (locked)
4. Seatback board 5. Seatback assembly 6. Lumbar support lever knob
7. Seat cushion trim 8. Seat cushion heater unit 9. Seat cushion pad
10. Seat cushion frame 11. Power seat switch 12. Power seat switch escutcheon
13. Reclining switch knob 14. Slide & lifter switch knob 15. Seat cushion inner finisher
16. Seat adjuster assembly 17. Front leg cover 18. Seat cushion front finisher
19. Seat control unit 20. Power seat harness 21. Seat slide cover
22. Seat cushion outer finisher 23. Gasket 24. Rear leg cover
25. Panel 26. Seat belt buckle 27. Lifter dial
28. Reclining lever knob
Page 2893 of 3171
SE-22
FRONT SEAT
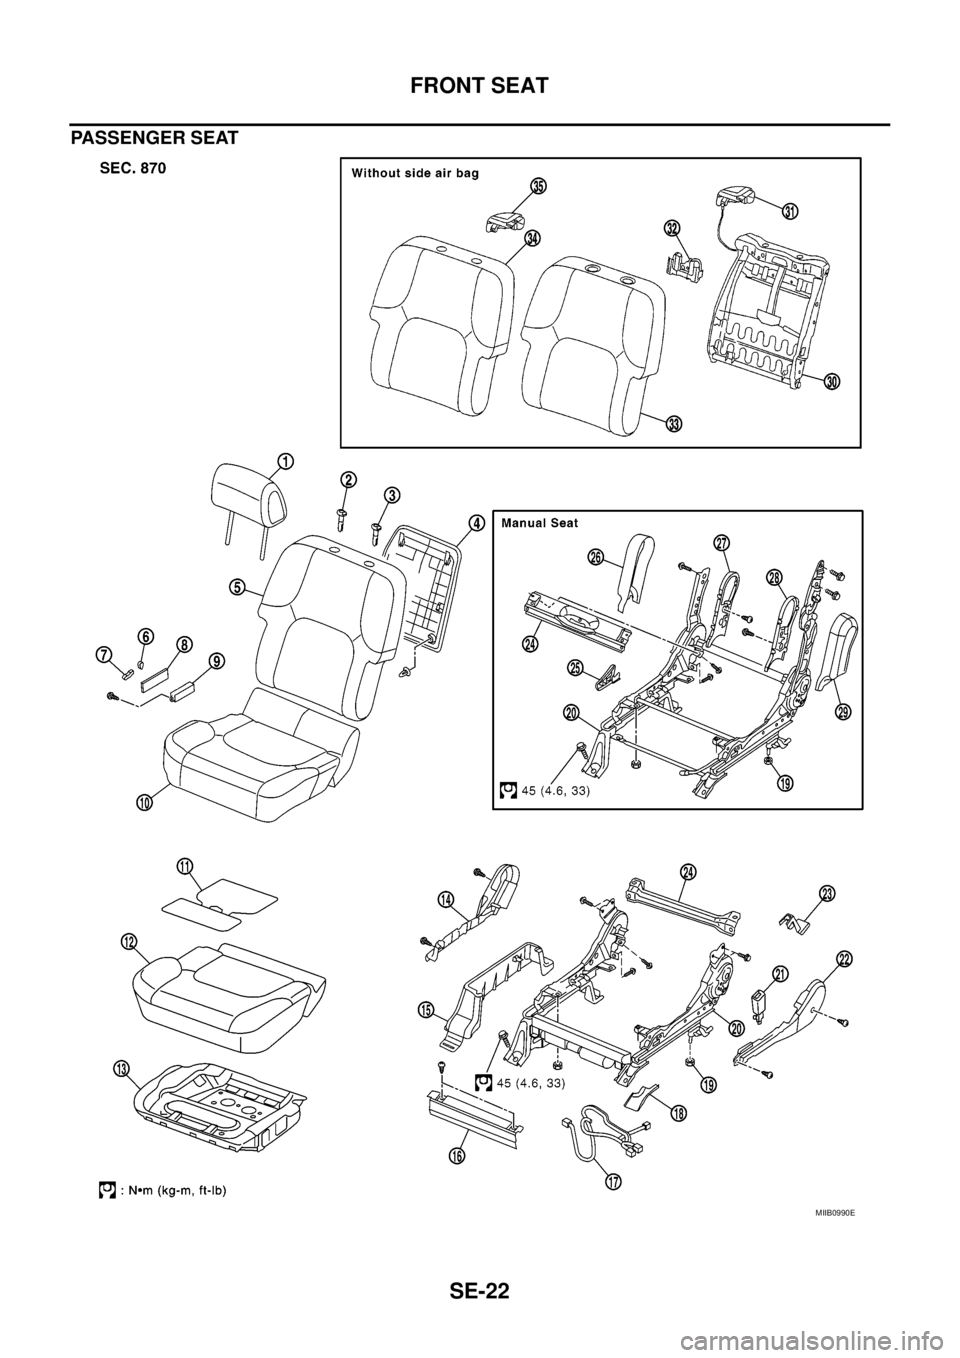
PASSENGER SEAT
MIIB0990E
Page 2894 of 3171
FRONT SEAT
SE-23
C
D
E
F
G
H
J
K
L
MA
B
SE
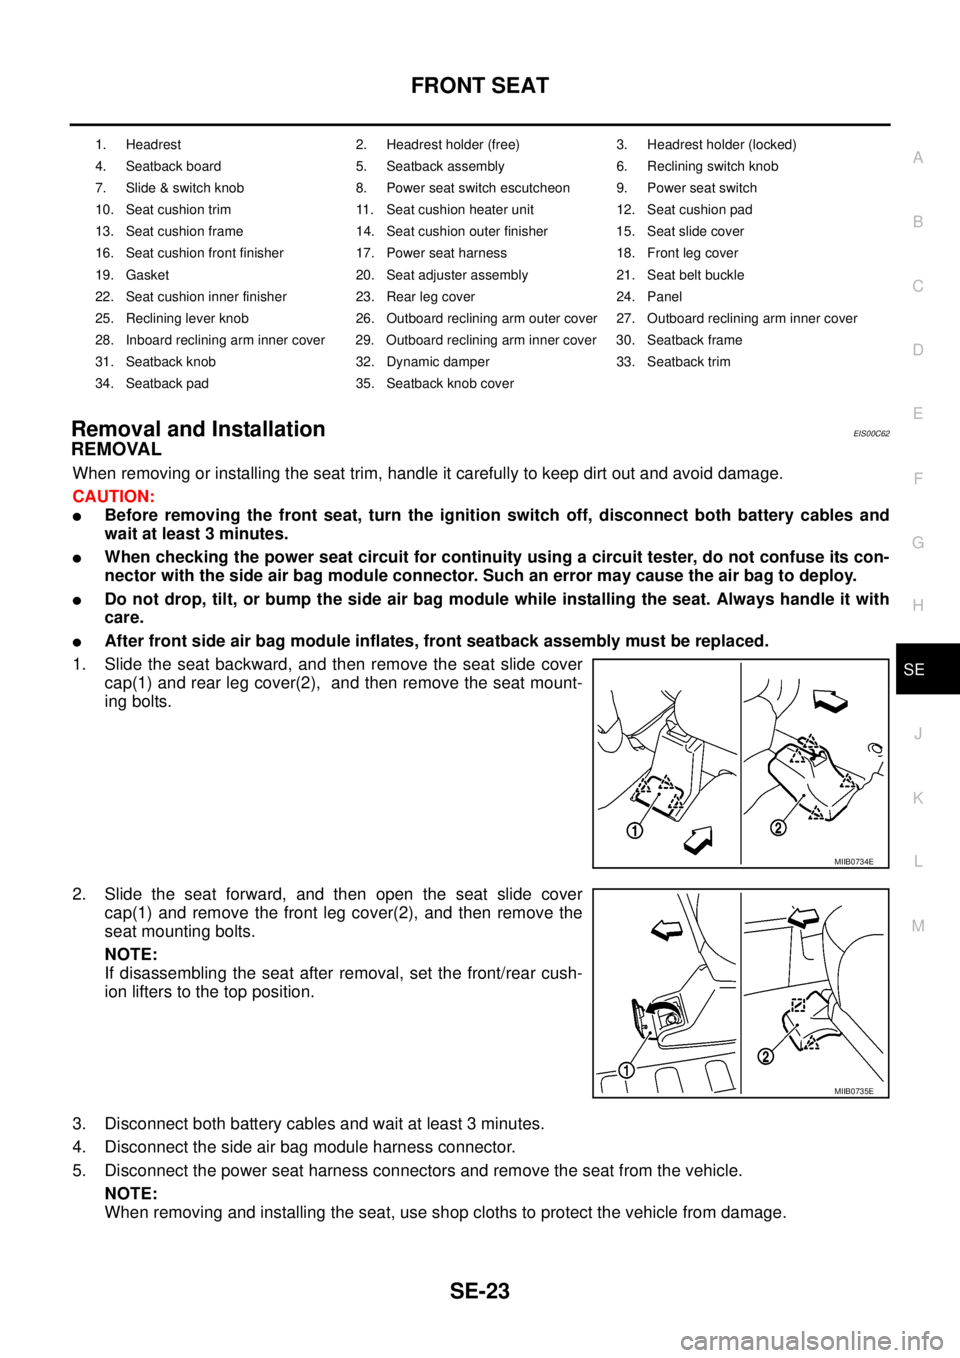
Removal and InstallationEIS00C62
REMOVAL
When removing or installing the seat trim, handle it carefully to keep dirt out and avoid damage.
CAUTION:
lBefore removing the front seat, turn the ignition switch off, disconnect both battery cables and
wait at least 3 minutes.
lWhen checking the power seat circuit for continuity using a circuit tester, do not confuse its con-
nector with the side air bag module connector. Such an error may cause the air bag to deploy.
lDo not drop, tilt, or bump the side air bag module while installing the seat. Always handle it with
care.
lAfter front side air bag module inflates, front seatback assembly must be replaced.
1. Slide the seat backward, and then remove the seat slide cover
cap(1) and rear leg cover(2), and then remove the seat mount-
ing bolts.
2. Slide the seat forward, and then open the seat slide cover
cap(1) and remove the front leg cover(2), and then remove the
seat mounting bolts.
NOTE:
If disassembling the seat after removal, set the front/rear cush-
ion lifters to the top position.
3. Disconnect both battery cables and wait at least 3 minutes.
4. Disconnect the side air bag module harness connector.
5. Disconnect the power seat harness connectors and remove the seat from the vehicle.
NOTE:
When removing and installing the seat, use shop cloths to protect the vehicle from damage.
1. Headrest 2. Headrest holder (free) 3. Headrest holder (locked)
4. Seatback board 5. Seatback assembly 6. Reclining switch knob
7. Slide & switch knob 8. Power seat switch escutcheon 9. Power seat switch
10. Seat cushion trim 11. Seat cushion heater unit 12. Seat cushion pad
13. Seat cushion frame 14. Seat cushion outer finisher 15. Seat slide cover
16. Seat cushion front finisher 17. Power seat harness 18. Front leg cover
19. Gasket 20. Seat adjuster assembly 21. Seat belt buckle
22. Seat cushion inner finisher 23. Rear leg cover 24. Panel
25. Reclining lever knob 26. Outboard reclining arm outer cover 27. Outboard reclining arm inner cover
28. Inboard reclining arm inner cover 29. Outboard reclining arm inner cover 30. Seatback frame
31. Seatback knob 32. Dynamic damper 33. Seatback trim
34. Seatback pad 35. Seatback knob cover
MIIB0734E
MIIB0735E
Page 2895 of 3171
SE-24
FRONT SEAT
INSTALLATION
Install is in the reverse order of removal.
Disassembly and AssemblyEIS00BCC
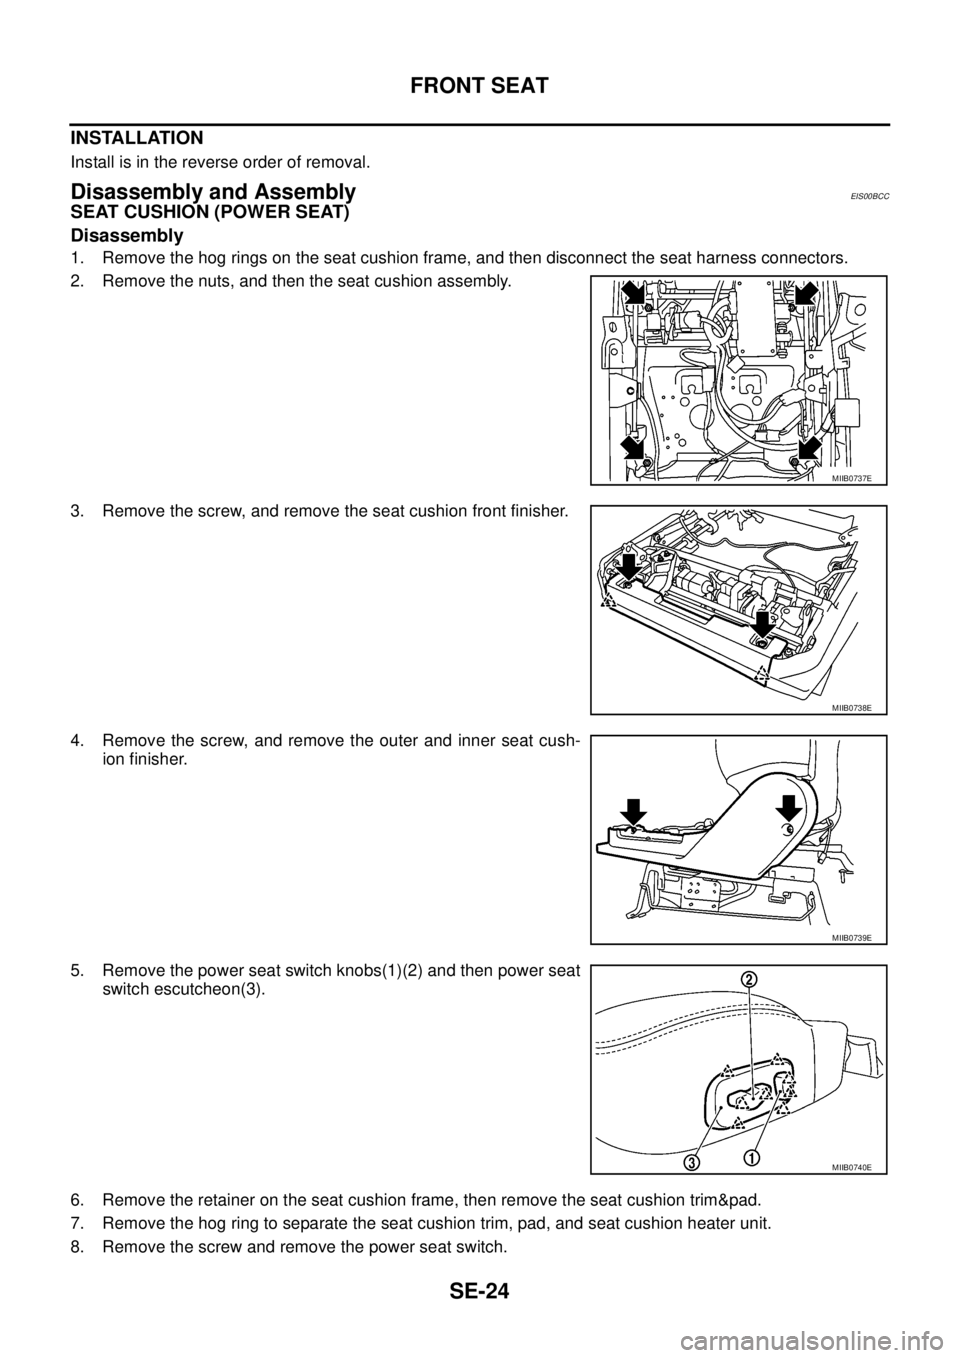
SEAT CUSHION (POWER SEAT)
Disassembly
1. Remove the hog rings on the seat cushion frame, and then disconnect the seat harness connectors.
2. Remove the nuts, and then the seat cushion assembly.
3. Remove the screw, and remove the seat cushion front finisher.
4. Remove the screw, and remove the outer and inner seat cush-
ion finisher.
5. Remove the power seat switch knobs(1)(2) and then power seat
switch escutcheon(3).
6. Remove the retainer on the seat cushion frame, then remove the seat cushion trim&pad.
7. Remove the hog ring to separate the seat cushion trim, pad, and seat cushion heater unit.
8. Remove the screw and remove the power seat switch.
MIIB0737E
MIIB0738E
MIIB0739E
MIIB0740E
Page 2896 of 3171
FRONT SEAT
SE-25
C
D
E
F
G
H
J
K
L
MA
B
SE
Assembly
Assemble in the reverse order of disassembly.
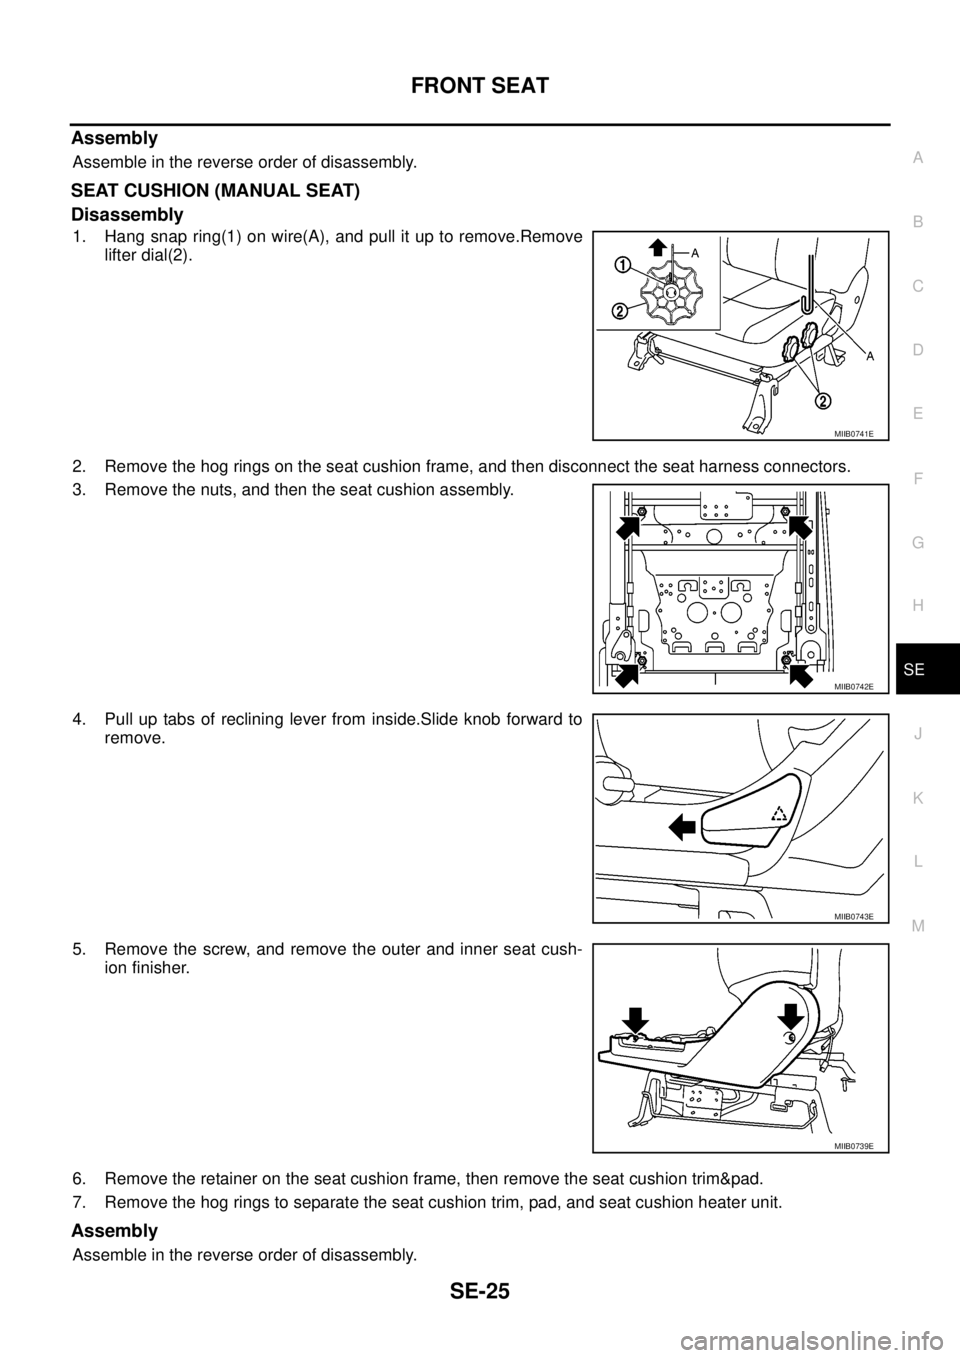
SEAT CUSHION (MANUAL SEAT)
Disassembly
1. Hang snap ring(1) on wire(A), and pull it up to remove.Remove
lifter dial(2).
2. Remove the hog rings on the seat cushion frame, and then disconnect the seat harness connectors.
3. Remove the nuts, and then the seat cushion assembly.
4. Pull up tabs of reclining lever from inside.Slide knob forward to
remove.
5. Remove the screw, and remove the outer and inner seat cush-
ion finisher.
6. Remove the retainer on the seat cushion frame, then remove the seat cushion trim&pad.
7. Remove the hog rings to separate the seat cushion trim, pad, and seat cushion heater unit.
Assembly
Assemble in the reverse order of disassembly.
MIIB0741E
MIIB0742E
MIIB0743E
MIIB0739E
Page 2897 of 3171
SE-26
FRONT SEAT
SEATBACK (POWER AND MANUAL SEAT)
Disassembly
WARNING:
Removal of front side air bag module should only be done to allow deployment of front side air bag
module prior to disposal of seatback assembly.
NOTE:
Only complete seatback assemblies can be replaced.
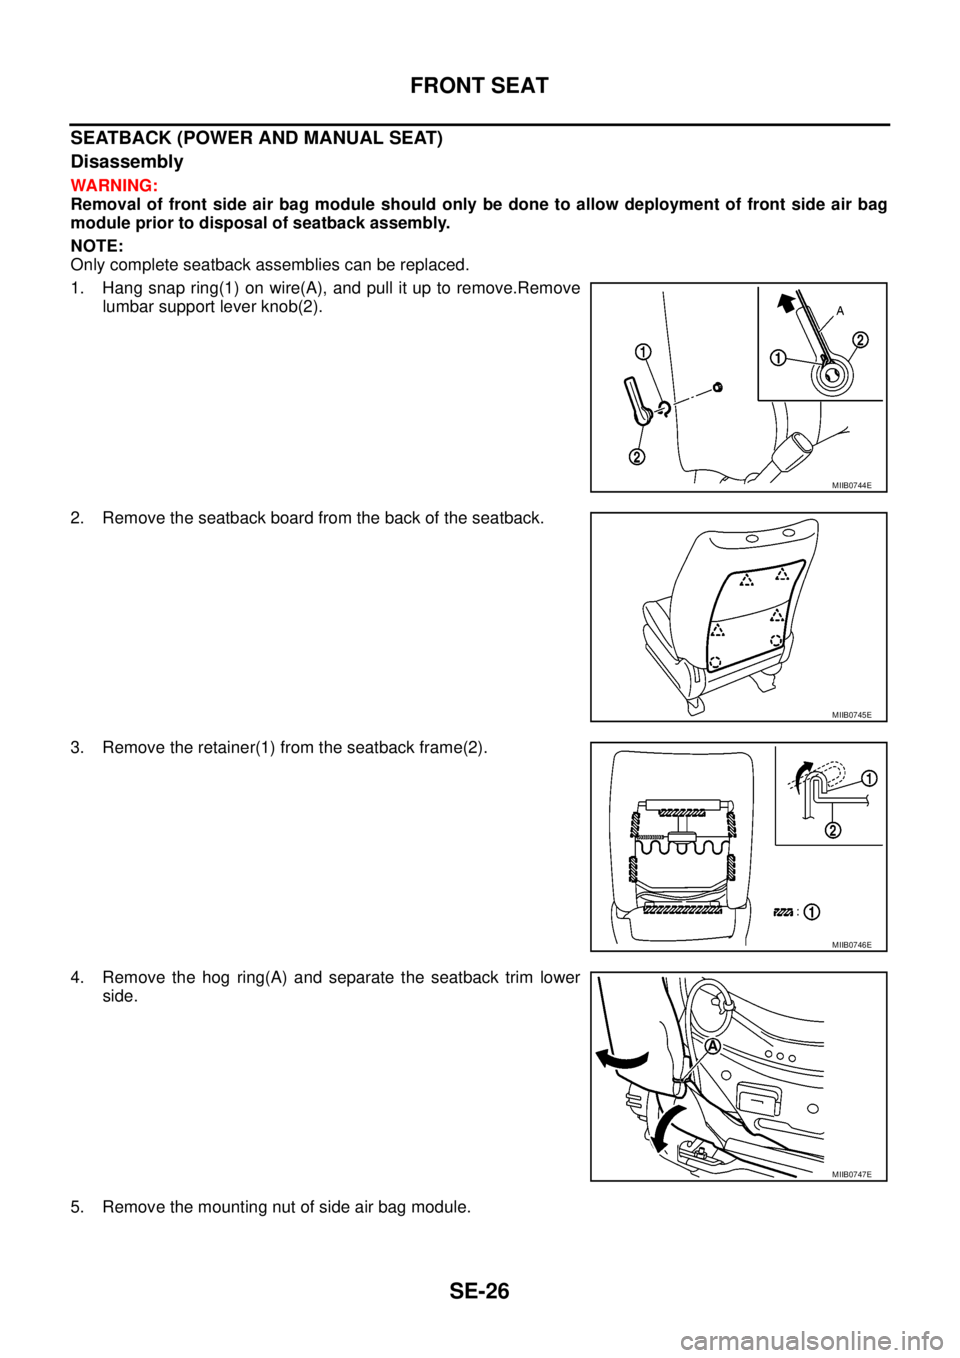
1. Hang snap ring(1) on wire(A), and pull it up to remove.Remove
lumbar support lever knob(2).
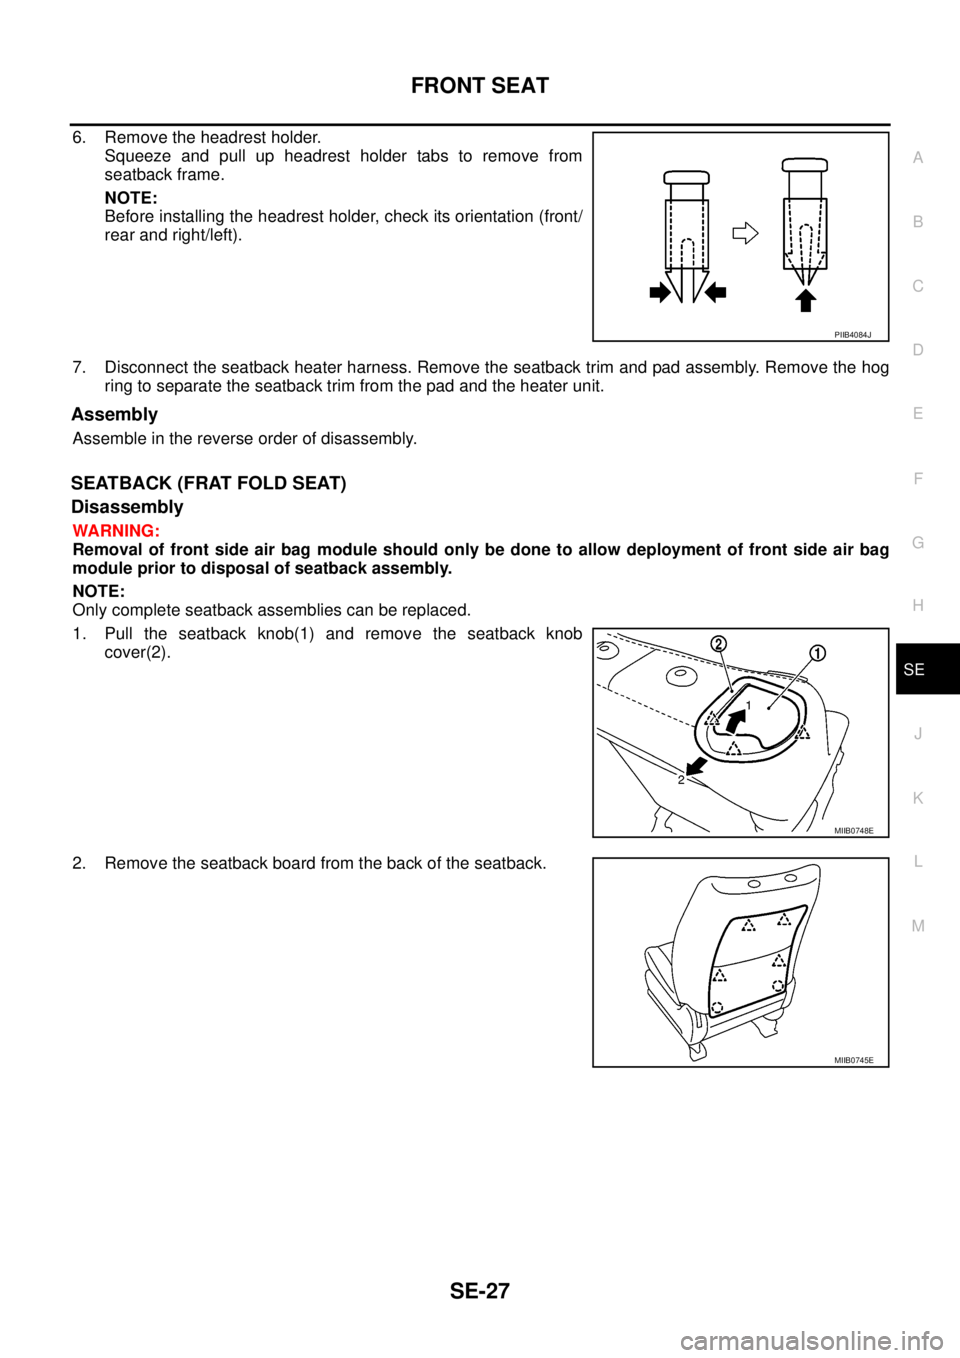
2. Remove the seatback board from the back of the seatback.
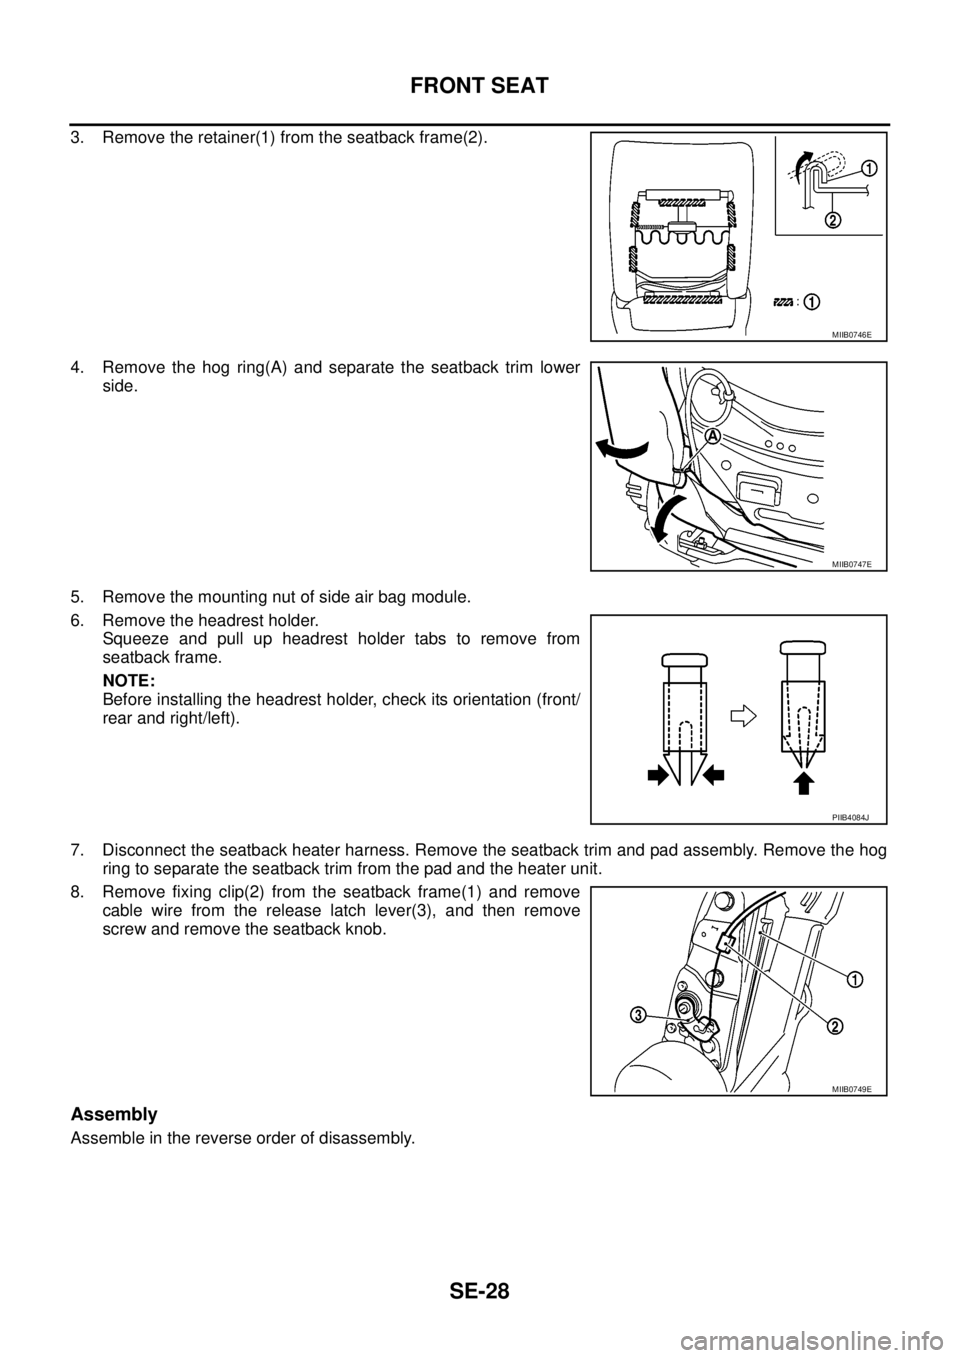
3. Remove the retainer(1) from the seatback frame(2).
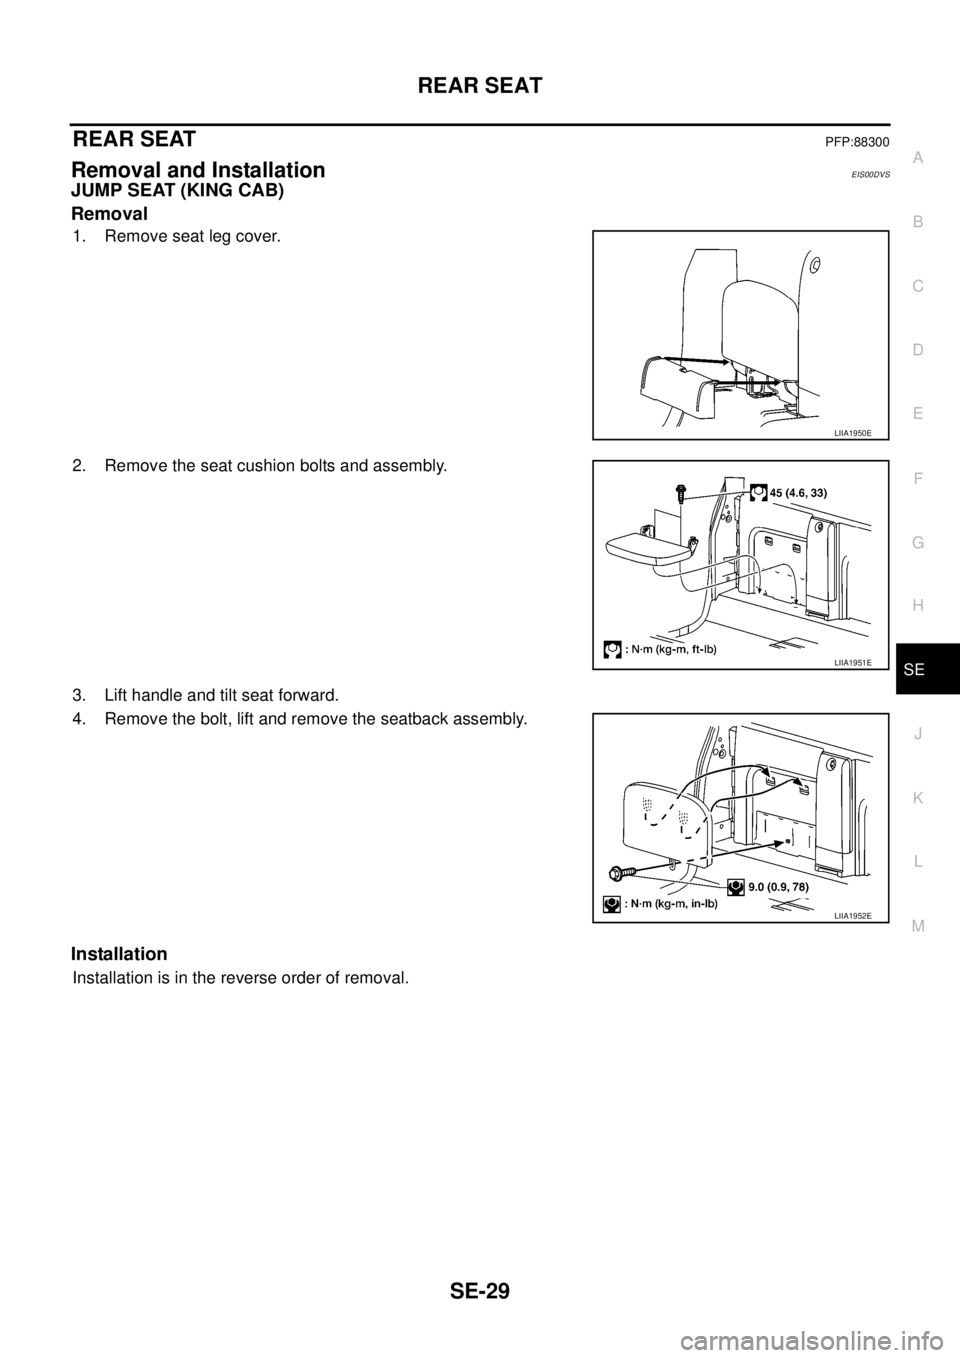
4. Remove the hog ring(A) and separate the seatback trim lower
side.
5. Remove the mounting nut of side air bag module.
MIIB0744E
MIIB0745E
MIIB0746E
MIIB0747E
Page 2898 of 3171
FRONT SEAT
SE-27
C
D
E
F
G
H
J
K
L
MA
B
SE
6. Remove the headrest holder.
Squeeze and pull up headrest holder tabs to remove from
seatback frame.
NOTE:
Before installing the headrest holder, check its orientation (front/
rear and right/left).
7. Disconnect the seatback heater harness. Remove the seatback trim and pad assembly. Remove the hog
ring to separate the seatback trim from the pad and the heater unit.
Assembly
Assemble in the reverse order of disassembly.
SEATBACK (FRAT FOLD SEAT)
Disassembly
WARNING:
Removal of front side air bag module should only be done to allow deployment of front side air bag
module prior to disposal of seatback assembly.
NOTE:
Only complete seatback assemblies can be replaced.
1. Pull the seatback knob(1) and remove the seatback knob
cover(2).
2. Remove the seatback board from the back of the seatback.
PIIB4084J
MIIB0748E
MIIB0745E
Page 2899 of 3171
SE-28
FRONT SEAT
3. Remove the retainer(1) from the seatback frame(2).
4. Remove the hog ring(A) and separate the seatback trim lower
side.
5. Remove the mounting nut of side air bag module.
6. Remove the headrest holder.
Squeeze and pull up headrest holder tabs to remove from
seatback frame.
NOTE:
Before installing the headrest holder, check its orientation (front/
rear and right/left).
7. Disconnect the seatback heater harness. Remove the seatback trim and pad assembly. Remove the hog
ring to separate the seatback trim from the pad and the heater unit.
8. Remove fixing clip(2) from the seatback frame(1) and remove
cablewirefromthereleaselatchlever(3),andthenremove
screw and remove the seatback knob.
Assembly
Assemble in the reverse order of disassembly.
MIIB0746E
MIIB0747E
PIIB4084J
MIIB0749E
Page 2900 of 3171
REAR SEAT
SE-29
C
D
E
F
G
H
J
K
L
MA
B
SE
REAR SEATPFP:88300
Removal and InstallationEIS00DVS
JUMP SEAT (KING CAB)
Removal
1. Remove seat leg cover.
2. Remove the seat cushion bolts and assembly.
3. Lift handle and tilt seat forward.
4. Remove the bolt, lift and remove the seatback assembly.
Installation
Installation is in the reverse order of removal.
LIIA1950E
LIIA1951E
LIIA1952E
Trending: run flat, tires, fuel, boot, automatic transmission, Coolant leak, jack points
