width NISSAN NOTE 2016 Service Owner's Manual
[x] Cancel search | Manufacturer: NISSAN, Model Year: 2016, Model line: NOTE, Model: NISSAN NOTE 2016Pages: 3641, PDF Size: 28.72 MB
Page 1907 of 3641

TIGHTENING TORQUE OF STANDARD BOLTSGI-19
< HOW TO USE THIS MANUAL >
C
DE
F
G H
I
J
K L
M B
GI
N
O PTIGHTENING TORQUE OF STANDARD BOLTS
DescriptionINFOID:0000000012433155
This vehicle has both new standard based on ISO* and prev ious standard bolts/nuts. There are some differ-
ences between these two types of bolts/ nuts; shape of the head, grade of strength, hexagonal width across
flats and the standard tightening torque.
• For guidance in discriminating, refer to GI-19, "
Tightening Torque Table (New Standard Included)".
• If the tightening torque is not described in the description or figure, refer to GI-19, "
Tightening Torque Table
(New Standard Included)".
*ISO: International Organization for Standardization
Tightening Torque Table (New Standard Included)INFOID:0000000012433156
CAUTION:
• The special parts are excluded.
• The bolts/nuts in these tables have a strength (discrimination) number/sym bol assigned to the head
or the like. As to the relation between the streng th grade in these tables and the strength (discrimi-
nation) number/symbol, refer to “DISCRIMINATION OF BOLTS AND NUTS”.
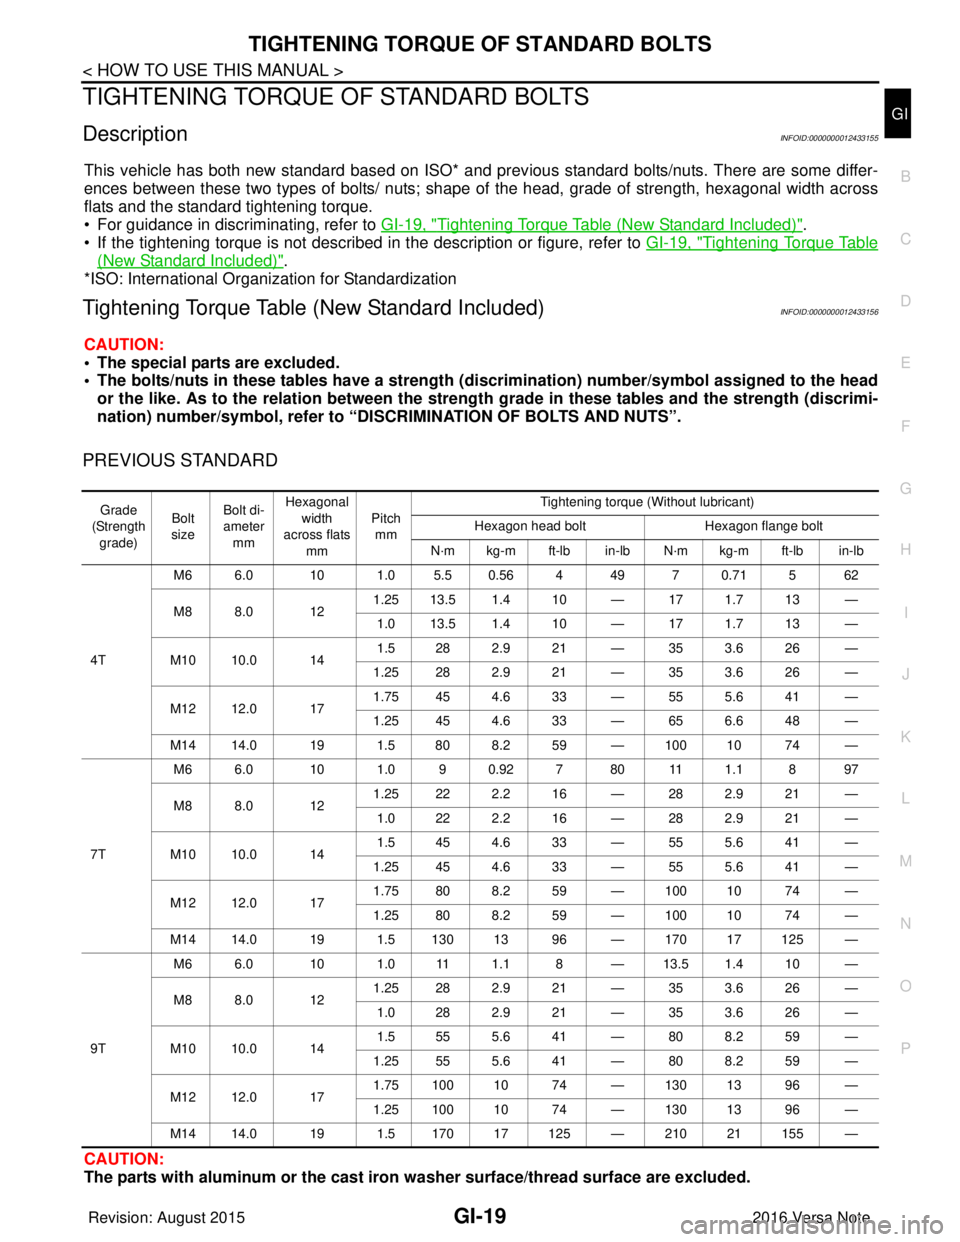
PREVIOUS STANDARD
CAUTION:
The parts with aluminum or the cast iron washer surface/thread surface are excluded.
Grade
(Strength
grade) Bolt
size Bolt di-
ameter
mm Hexagonal
width
across flats mm Pitch
mm Tightening torque (Without lubricant)
Hexagon head bolt Hexagon flange bolt
N·m kg-m ft-lb in-lb N·m kg-m ft-lb in-lb
4T M6 6.0 10 1.05.50.564 49 70.715 62
M8 8.0 12
1.25 13.5 1.4 10 — 17 1.7 13 —
1.0 13.5 1.4 10 — 17 1.7 13 —
M10 10.0 14 1.5282.921 — 353.626 —
1.25 28 2.9 21 — 35 3.6 26 —
M12 12.0 17 1.75 45 4.6 33 — 55 5.6 41 —
1.25 45 4.6 33 — 65 6.6 48 —
M14 14.0 19 1.5 80 8.2 59 — 100 10 74 —
7T M6 6.0 10 1.0 9 0.92 7 80 11 1.1 8 97
M8 8.0 12
1.25 22 2.2 16 — 28 2.9 21 —
1.0222.216 — 282.921 —
M10 10.0 14 1.5454.633 — 555.641 —
1.25 45 4.6 33 — 55 5.6 41 —
M12 12.0 17 1.75 80 8.2 59 — 100 10 74 —
1.25 80 8.2 59 — 100 10 74 —
M1414.0 19 1.513013 96 — 17017125 —
9T M6 6.0 10 1.0 11 1.1 8 — 13.5 1.4 10 —
M8 8.0 12
1.25 28 2.9 21 — 35 3.6 26 —
1.0282.921 — 353.626 —
M10 10.0 14 1.5555.641 — 808.259 —
1.25 55 5.6 41 — 80 8.2 59 —
M12 12.0 17 1.75 100 10 74 — 130 13 96 —
1.25 100 10 74 — 130 13 96 —
M14 14.0 19 1.5 170 17 125 — 210 21 155 —
Revision: August 2015 2016 Versa Note
cardiagn.com
Page 1908 of 3641

GI-20
< HOW TO USE THIS MANUAL >
TIGHTENING TORQUE OF STANDARD BOLTS
NEW STANDARD BASED ON ISO
CAUTION:
1. Use tightening torque with lubricant for the new standard bolts/nuts in principle. Friction coeffi-cient stabilizer is applied to the new standard bolts/nuts.
2. However, use tightening torque without lubricant for the foll owing cases. Friction coefficient stabi-
lizer is not applied to the following bolts/nuts.
- Grade 4.8, M6 size bolt, Co nical spring washer installed
- Paint removing nut (Size M6 an d M8) for fixing with weld bolt
Grade
(Strength grade) Bolt
size Bolt di-
ameter
mm Hexagonal
width
across flats
mm Pitch
mm Tightening torque
Hexagon head bolt Hexagon flange bolt
N·m kg-m ft-lb in-lb N·m kg-m ft-lb in-lb
4.8
(Without
lubricant) M6 6.0 10 1.0 5.5 0.56 4 49 7 0.71 5 62
M8 8.0 13
1.25 13.5 1.4 10 — 17 1.7 13 —
1.0 13.5 1.4 10 — 17 1.7 13 —
M10 10.0 16 1.5 282.921 — 353.626 —
1.25 28 2.9 21 — 35 3.6 26 —
M12 12.0 18 1.75 45 4.6 33 — 55 5.6 41 —
1.25 45 4.6 33 — 65 6.6 48 —
M14 14.0 21 1.5 80 8.2 59 — 100 10 74 —
4.8
(With lu-
bricant) M6 6.0 10 1.0 4 0.41 3 35 5.5 0.56 4 49
M8 8.0 13
1.25 11 1.1 8 — 13.5 1.4 10 —
1.0 11 1.1 8 — 13.5 1.4 10 —
M10 10.0 16 1.5 222.216 — 282.921 —
1.25 22 2.2 16 — 28 2.9 21 —
M12 12.0 18 1.75 35 3.6 26 — 45 4.6 33 —
1.25 35 3.6 26 — 45 4.6 33 —
M14 14.0 21 1.5 65 6.6 48 — 80 8.2 59 —
8.8
(With lu-
bricant) M6 6.0 10 1.0 8 0.82 6 71 10 1.0 7 89
M8 8.0 13
1.25 21 2.1 15 — 25 2.6 18 —
1.0 212.115 — 252.618 —
M10 10.0 16 1.5 404.130 — 505.137 —
1.25 40 4.1 30 — 50 5.1 37 —
M12 12.0 18 1.75 70 7.1 52 — 85 8.7 63 —
1.25 70 7.1 52 — 85 8.7 63 —
M14 14.0 21 1.5 120 12 89 — 140 14 103 —
10.9
(With lu-
bricant) M6 6.0 10 1.0 10 1.0 7 89 12 1.2 9 106
M8 8.0 13
1.25 27 2.8 20 — 32 3.3 24 —
1.0 272.820 — 323.324 —
M10 10.0 16 1.5 555.641 — 656.648 —
1.25 55 5.6 41 — 65 6.6 48 —
M12 12.0 18 1.75 95 9.7 70 — 110 11 81 —
1.25 95 9.7 70 — 110 11 81 —
M14 14.0 21 1.5 160 16 118 — 180 18 133 —
Revision: August 2015 2016 Versa Note
cardiagn.com
Page 1924 of 3641

GI-36
< VEHICLE INFORMATION >
IDENTIFICATION INFORMATION
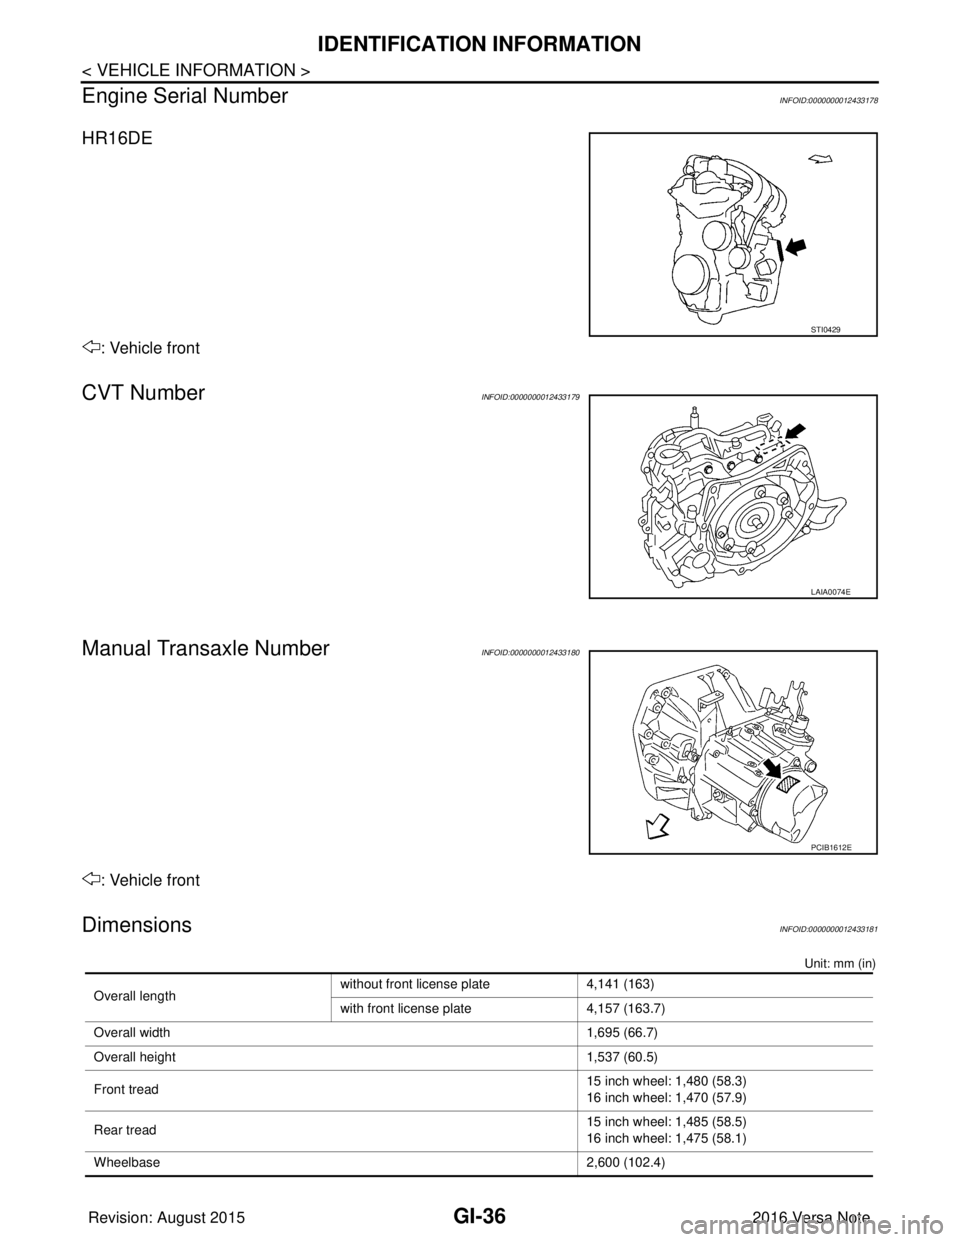
Engine Serial Number
INFOID:0000000012433178
HR16DE
: Vehicle front
CVT NumberINFOID:0000000012433179
Manual Transaxle NumberINFOID:0000000012433180
: Vehicle front
DimensionsINFOID:0000000012433181
Unit: mm (in)
STI0429
LAIA0074E
PCIB1612E
Overall length without front license plate 4,141 (163)
with front license plate
4,157 (163.7)
Overall width 1,695 (66.7)
Overall height 1,537 (60.5)
Front tread 15 inch wheel: 1,480 (58.3)
16 inch wheel: 1,470 (57.9)
Rear tread 15 inch wheel: 1,485 (58.5)
16 inch wheel: 1,475 (58.1)
Wheelbase 2,600 (102.4)
Revision: August 2015 2016 Versa Note
cardiagn.com
Page 3312 of 3641
![NISSAN NOTE 2016 Service Owners Manual STRUCTURE AND OPERATIONTM-71
< SYSTEM DESCRIPTION > [CVT: RE0F11A]
C
EF
G H
I
J
K L
M A
B
TM
N
O P
Mechanism
It is composed of a pair of pulleys (the groove width is changed freely in the axial direct NISSAN NOTE 2016 Service Owners Manual STRUCTURE AND OPERATIONTM-71
< SYSTEM DESCRIPTION > [CVT: RE0F11A]
C
EF
G H
I
J
K L
M A
B
TM
N
O P
Mechanism
It is composed of a pair of pulleys (the groove width is changed freely in the axial direct](/img/5/57363/w960_57363-3311.png)
STRUCTURE AND OPERATIONTM-71
< SYSTEM DESCRIPTION > [CVT: RE0F11A]
C
EF
G H
I
J
K L
M A
B
TM
N
O P
Mechanism
It is composed of a pair of pulleys (the groove width is changed freely in the axial direction) and the steel belt
(the steel plates are placed conti
nuously and the belt is guided with the multilayer steel rings on both sides).
The groove width changes according to wrapping radius of steel belt and pulley from low status to overdrive
status continuously with non-step. It is controlled with the oil pressures of primary pulley and secondary pulley.
Steel belt
It is composed of multiple steel plates (A) and two steel rings (B)
stacked to a several number. The feature of this steel belt transmits
power with compression of the steel plate in contrast with transmis-
sion of power in pulling with a rubber belt. Friction force is required
with the pulley slope to transmit power from the steel plate. The force
is generated with the following mechanism:
Oil pressure applies to the secondary pulley to nip the plate. ⇒The
plate is pushed and extended outward. ⇒The steel ring shows with-
stands. ⇒Pulling force is generated on the steel ring. ⇒ The plate of
the primary pulley is nipped between the pulley. ⇒Friction force is
generated between the steel belt and the pulley.
Therefore, responsibilities are divided by the steel plate that trans-
mits the power with compression and the steel ring that main tains necessary friction force. In this way, the
tension of the steel ring is distributed on the entire su rface and stress variation is limited, resulting in good
durability.
Pulley
The primary pulley (input shaft side) and the secondary pulley (output shaft side) have the shaft with slope
(fixed cone surface), movable sheave (movable cone surface that can move in the axial direction) and oil pres-
sure chamber at the back of the movable sheave.
Pulley gear shifting operation
• Pulley gear shifting operation The movable sheave slides on the shaft to change the groove width of the pulley. Input signals of engine
load (accelerator pedal opening), engine revolution and gear ratio (vehicle speed) change the operation
pressures of the primary pulley and the secondary pulle y, and controls the pulley groove width. Along with
change of the pulley groove width, the belt contact radi us is changed. This allows continuous and stepless
JSDIA1966ZZ
JSDIA1779GB
Revision: August 2015 2016 Versa Note
cardiagn.com
Page 3491 of 3641
![NISSAN NOTE 2016 Service Owners Manual TM-250
< REMOVAL AND INSTALLATION >[CVT: RE0F11A]
DIFFERENTIAL SIDE OIL SEAL
Since seal lips have a tolerance of
± 0.3 mm ( ± 0.012 in) at maximum due to manufacturing tolerances or
packing conditi NISSAN NOTE 2016 Service Owners Manual TM-250
< REMOVAL AND INSTALLATION >[CVT: RE0F11A]
DIFFERENTIAL SIDE OIL SEAL
Since seal lips have a tolerance of
± 0.3 mm ( ± 0.012 in) at maximum due to manufacturing tolerances or
packing conditi](/img/5/57363/w960_57363-3490.png)
TM-250
< REMOVAL AND INSTALLATION >[CVT: RE0F11A]
DIFFERENTIAL SIDE OIL SEAL
Since seal lips have a tolerance of
± 0.3 mm ( ± 0.012 in) at maximum due to manufacturing tolerances or
packing conditions, it is necessary to measure t he seal lip height beforehand to clarify the tolerance.
2. As an indicator of the parallelism and insertion depth, cut a masking tape (1) to specified width [add 1 mm (0.04 in) to the
value calculated from the tip of differential side oil seal lip] and
affix to the differential side oil seal.
3. Install the differential side oil seal using a suitable tool according to the guide of the masking tape (1).
CAUTION:
• If differential side oil seal is inserted deeper than the ref-erence value, use a new differe ntial side oil seal and per-
form the steps again.
• Apply ATF to the differential side oil seal lip and around
the oil seal.
NOTE:
A hub cap (Part No. 43234 1HA0A) can be used as substitute for drift. To use a hub cap, be sure to pre-
pare a new one specifically for patting seal.
4. Remove masking tape.
5. Adjust as instructed below to optimize the protrusion size and parallelism. CAUTION:
If differential side oil seal is inserted deeper th an the reference value, use a new differential side
oil seal and perform the steps again.
• Protrusion size (A) CAUTION:
Protrusion must fall within ± 0.5mm (0.020 in) of calculated
size.
• Parallelism at four diagonal points ( ) CAUTION:
The difference among four diagona l points must be within 0.3
mm (0.012 in).
NOTE:
If differential side oil seal is uneven while installing, tilt suitable tool.
6. Check that the protrusion size and parallelism are adequate.
Inspection and AdjustmentINFOID:0000000012431206
INSPECTION AFTER INSTALLATION
Check for CVT fluid leakage. Refer to TM-228, "Inspection".
ADJUSTMENT AFTER INSTALLATION
Adjust the CVT fluid level. Refer to TM-229, "Adjustment".
JSDIA4817ZZ
JSDIA4815ZZ
JSDIA4814ZZ
Revision: August 2015 2016 Versa Note
cardiagn.com