NISSAN PATROL 2006 Service Manual
PATROL 2006
NISSAN
NISSAN
https://www.carmanualsonline.info/img/5/57368/w960_57368-0.png
NISSAN PATROL 2006 Service Manual
Trending: fuse box, drain bolt, load capacity, instrument panel, limit switch, warning lights, trunk release
Page 111 of 1226
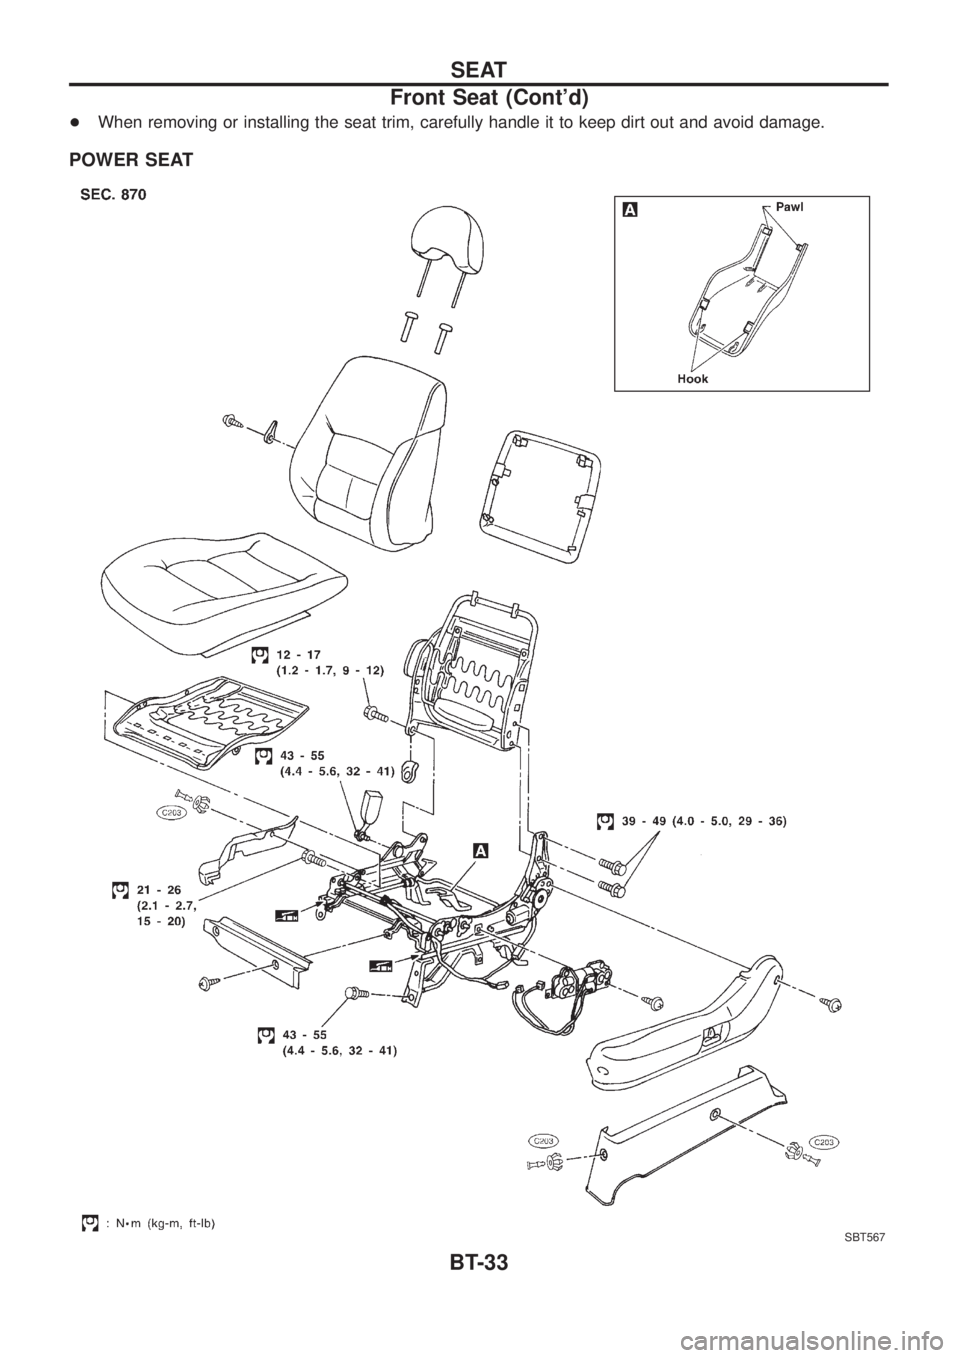
+When removing or installing the seat trim, carefully handle it to keep dirt out and avoid damage.
POWER SEAT
SBT567
SEAT
Front Seat (Cont'd)
BT-33
Page 112 of 1226
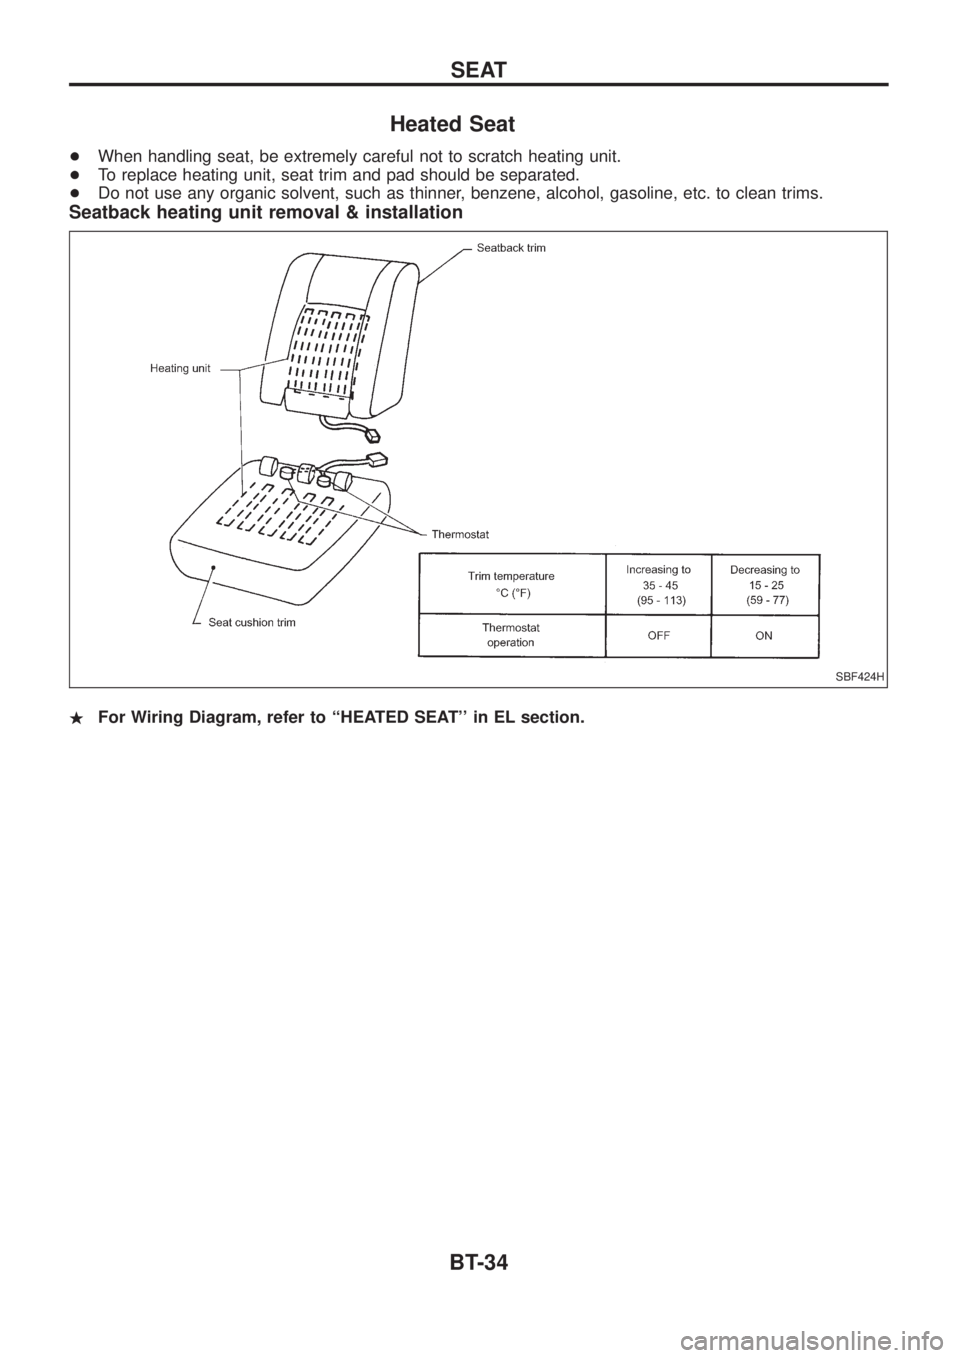
Heated Seat
+When handling seat, be extremely careful not to scratch heating unit.
+To replace heating unit, seat trim and pad should be separated.
+Do not use any organic solvent, such as thinner, benzene, alcohol, gasoline, etc. to clean trims.
Seatback heating unit removal & installation
.For Wiring Diagram, refer to ``HEATED SEAT'' in EL section.
SBF424H
SEAT
BT-34
Page 113 of 1226
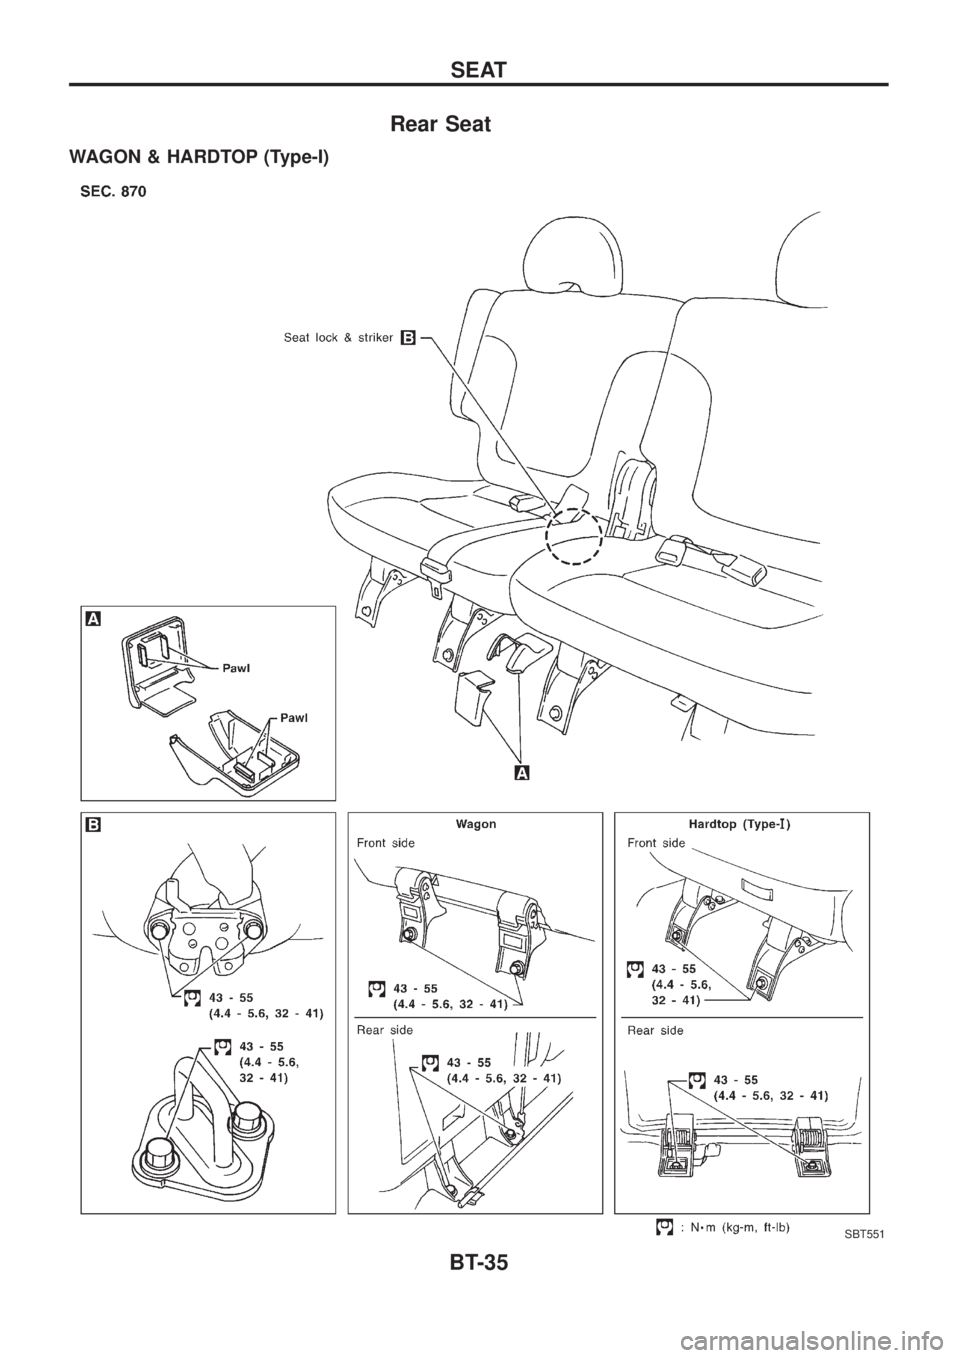
Rear Seat
WAGON & HARDTOP (Type-I)
SBT551
SEAT
BT-35
Page 114 of 1226
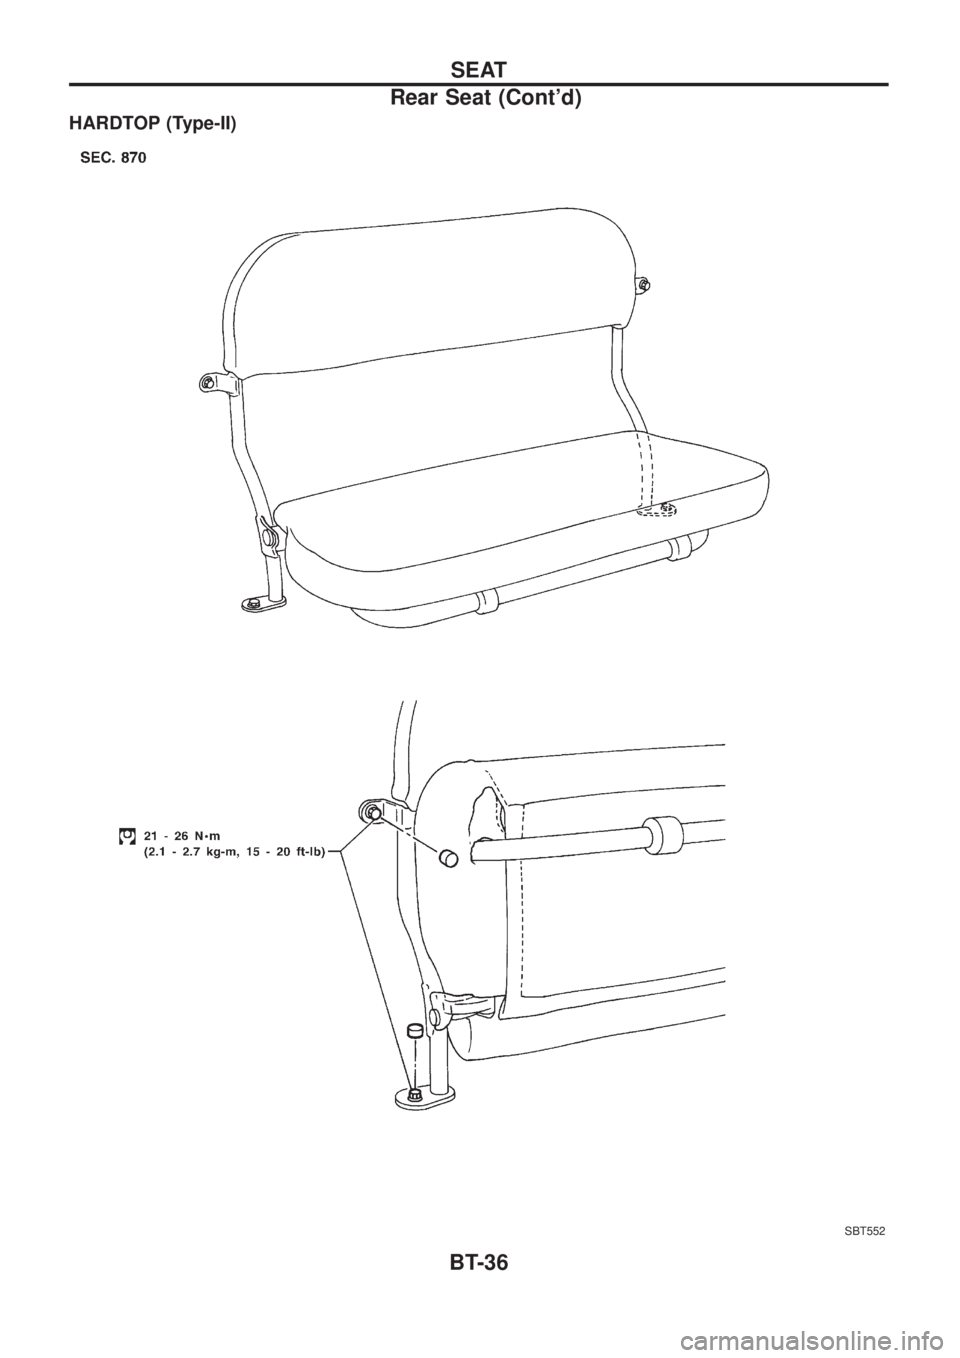
HARDTOP (Type-II)
SBT552
SEAT
Rear Seat (Cont'd)
BT-36
Page 115 of 1226
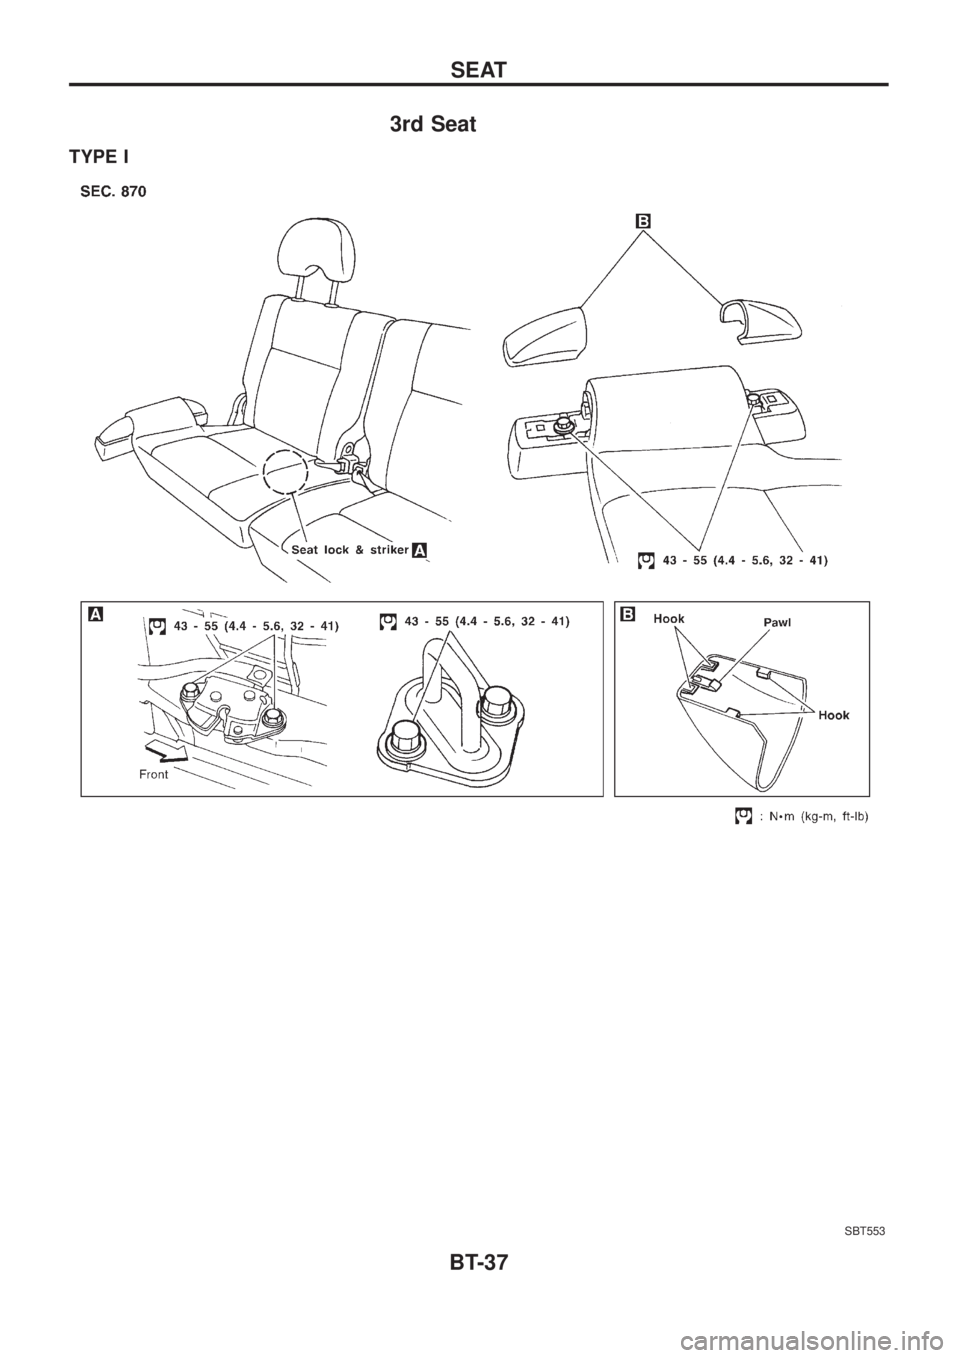
3rd Seat
TYPE I
SBT553
SEAT
BT-37
Page 116 of 1226
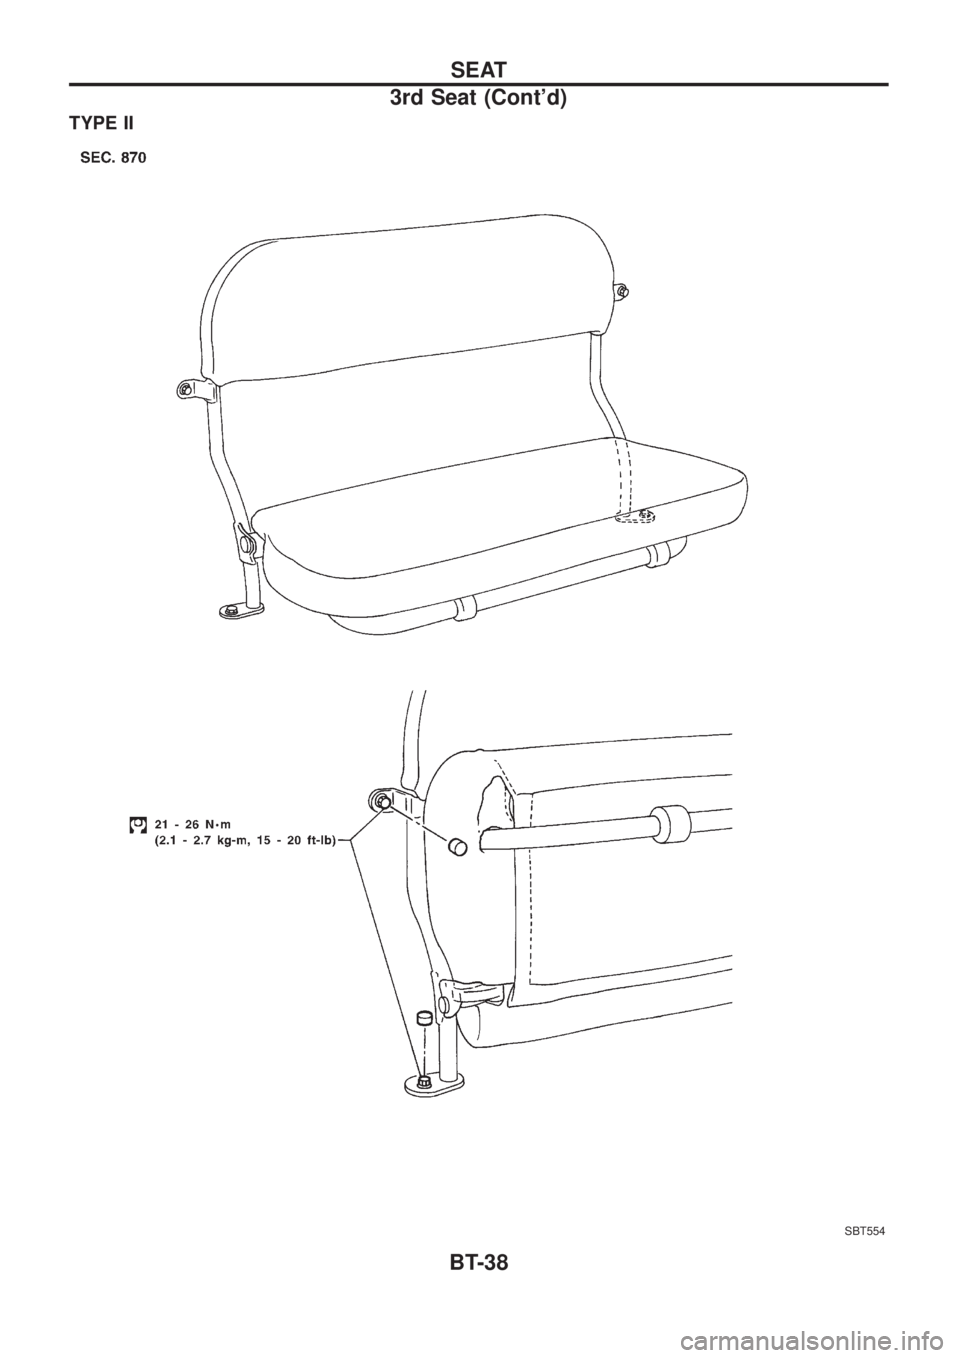
TYPE II
SBT554
SEAT
3rd Seat (Cont'd)
BT-38
Page 117 of 1226
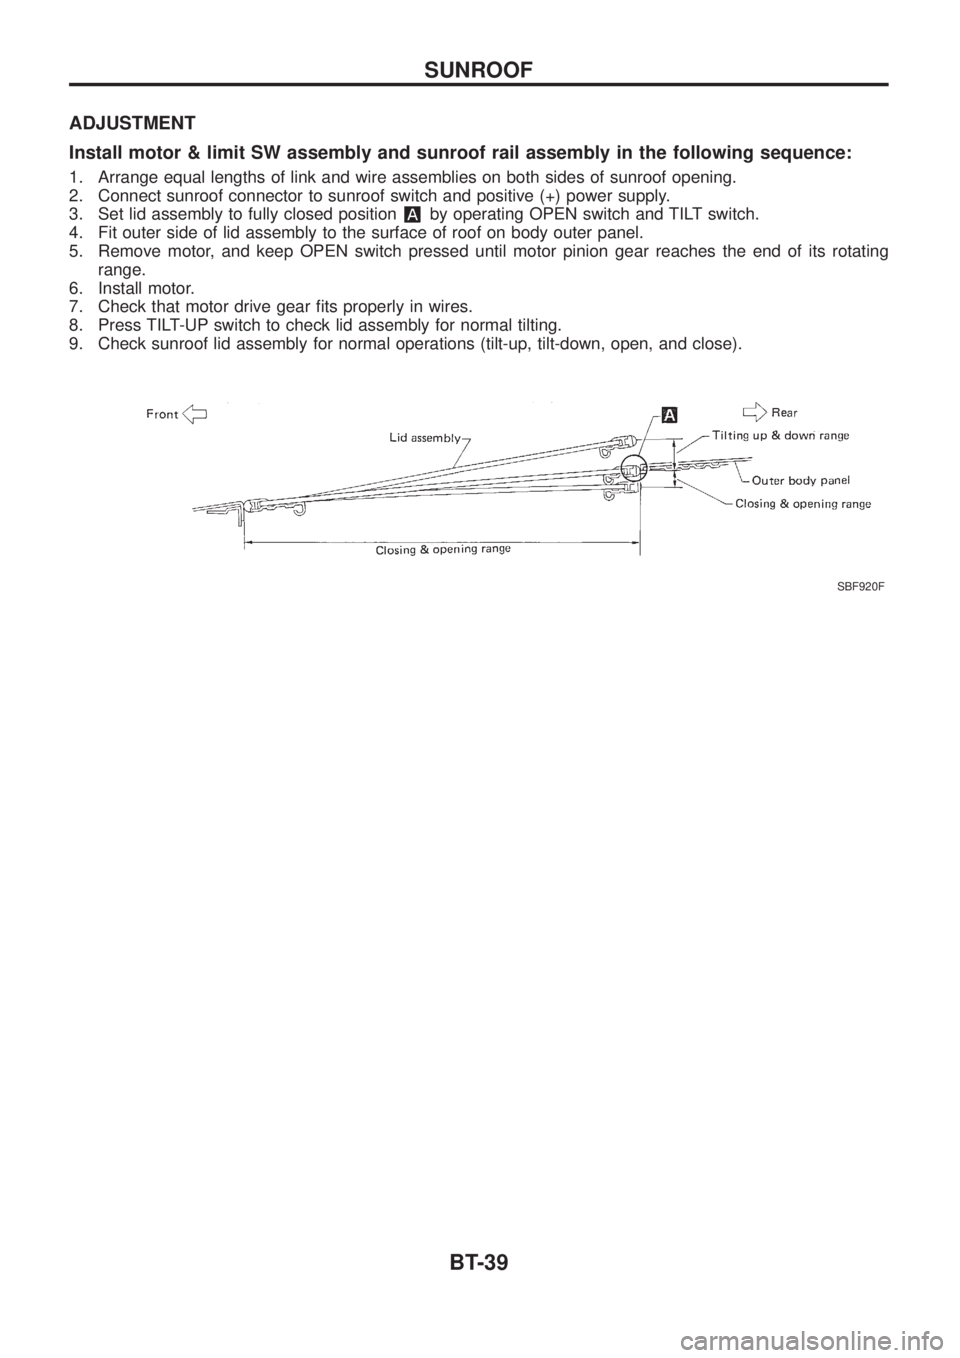
ADJUSTMENT
Install motor & limit SW assembly and sunroof rail assembly in the following sequence:
1. Arrange equal lengths of link and wire assemblies on both sides of sunroof opening.
2. Connect sunroof connector to sunroof switch and positive (+) power supply.
3. Set lid assembly to fully closed position
by operating OPEN switch and TILT switch.
4. Fit outer side of lid assembly to the surface of roof on body outer panel.
5. Remove motor, and keep OPEN switch pressed until motor pinion gear reaches the end of its rotating
range.
6. Install motor.
7. Check that motor drive gear ®ts properly in wires.
8. Press TILT-UP switch to check lid assembly for normal tilting.
9. Check sunroof lid assembly for normal operations (tilt-up, tilt-down, open, and close).
SBF920F
SUNROOF
BT-39
Page 118 of 1226
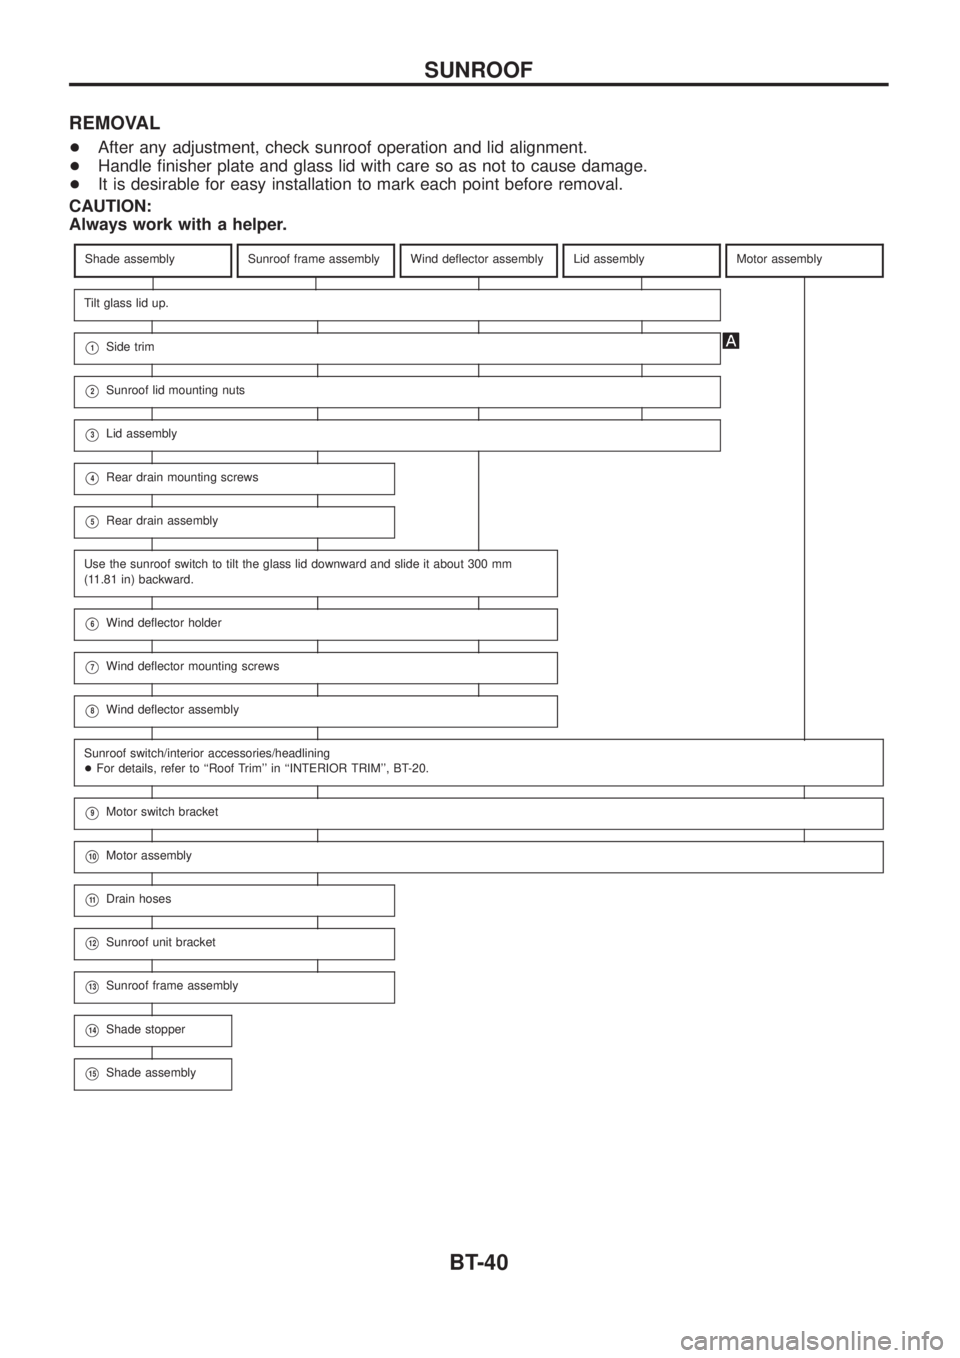
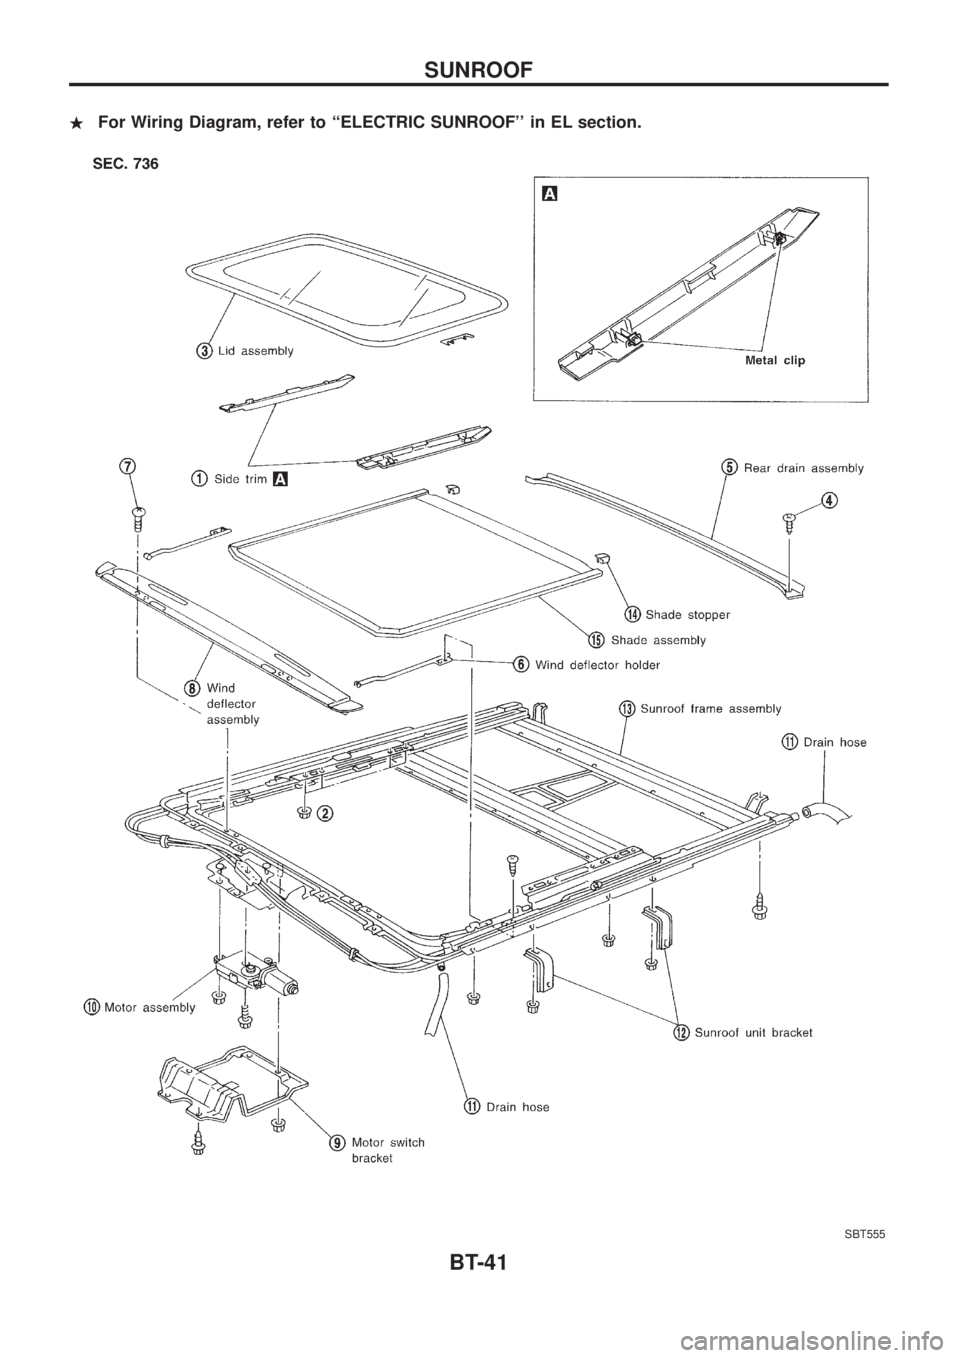
REMOVAL
+After any adjustment, check sunroof operation and lid alignment.
+Handle ®nisher plate and glass lid with care so as not to cause damage.
+It is desirable for easy installation to mark each point before removal.
CAUTION:
Always work with a helper.
Shade assemblySunroof frame assemblyWind de¯ector assemblyLid assemblyMotor assembly
Tilt glass lid up.
V1Side trim
V2Sunroof lid mounting nuts
V3Lid assembly
V4Rear drain mounting screws
V5Rear drain assembly
Use the sunroof switch to tilt the glass lid downward and slide it about 300 mm
(11.81 in) backward.
V6Wind de¯ector holder
V7Wind de¯ector mounting screws
V8Wind de¯ector assembly
Sunroof switch/interior accessories/headlining
+For details, refer to ``Roof Trim'' in ``INTERIOR TRIM'', BT-20.
V9Motor switch bracket
V10Motor assembly
V11Drain hoses
V12Sunroof unit bracket
V13Sunroof frame assembly
V14Shade stopper
V15Shade assembly
SUNROOF
BT-40
Page 119 of 1226
.For Wiring Diagram, refer to ``ELECTRIC SUNROOF'' in EL section.
SBT555
SUNROOF
BT-41
Page 120 of 1226
REMOVAL
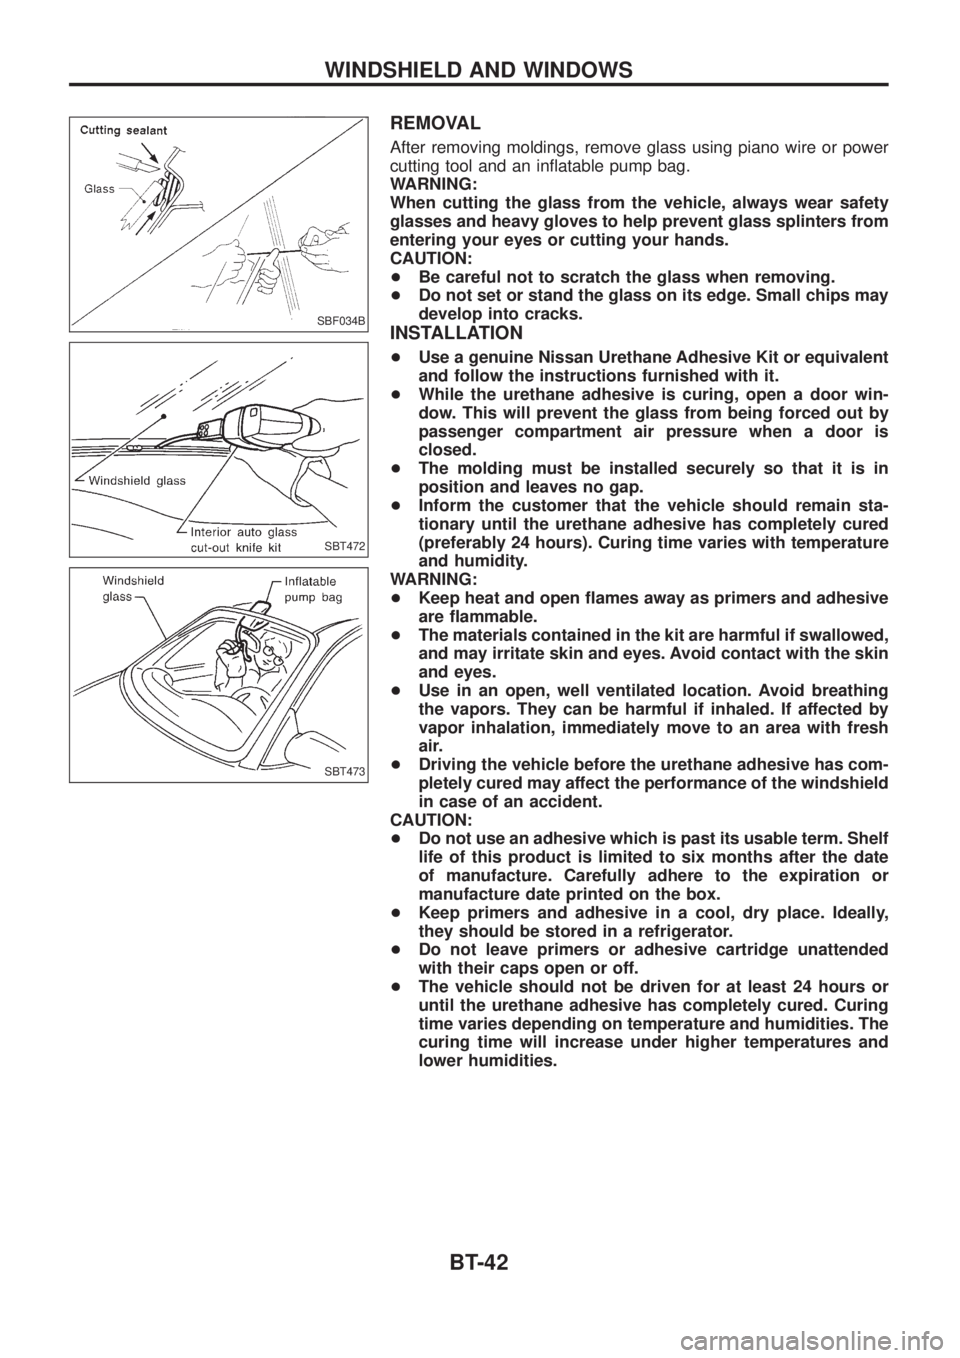
After removing moldings, remove glass using piano wire or power
cutting tool and an in¯atable pump bag.
WARNING:
When cutting the glass from the vehicle, always wear safety
glasses and heavy gloves to help prevent glass splinters from
entering your eyes or cutting your hands.
CAUTION:
+Be careful not to scratch the glass when removing.
+Do not set or stand the glass on its edge. Small chips may
develop into cracks.
INSTALLATION
+Use a genuine Nissan Urethane Adhesive Kit or equivalent
and follow the instructions furnished with it.
+While the urethane adhesive is curing, open a door win-
dow. This will prevent the glass from being forced out by
passenger compartment air pressure when a door is
closed.
+The molding must be installed securely so that it is in
position and leaves no gap.
+Inform the customer that the vehicle should remain sta-
tionary until the urethane adhesive has completely cured
(preferably 24 hours). Curing time varies with temperature
and humidity.
WARNING:
+Keep heat and open ¯ames away as primers and adhesive
are ¯ammable.
+The materials contained in the kit are harmful if swallowed,
and may irritate skin and eyes. Avoid contact with the skin
and eyes.
+Use in an open, well ventilated location. Avoid breathing
the vapors. They can be harmful if inhaled. If affected by
vapor inhalation, immediately move to an area with fresh
air.
+Driving the vehicle before the urethane adhesive has com-
pletely cured may affect the performance of the windshield
in case of an accident.
CAUTION:
+Do not use an adhesive which is past its usable term. Shelf
life of this product is limited to six months after the date
of manufacture. Carefully adhere to the expiration or
manufacture date printed on the box.
+Keep primers and adhesive in a cool, dry place. Ideally,
they should be stored in a refrigerator.
+Do not leave primers or adhesive cartridge unattended
with their caps open or off.
+The vehicle should not be driven for at least 24 hours or
until the urethane adhesive has completely cured. Curing
time varies depending on temperature and humidities. The
curing time will increase under higher temperatures and
lower humidities.
SBF034B
SBT472
SBT473
WINDSHIELD AND WINDOWS
BT-42
Trending: service indicator, coolant reservoir, low oil pressure, engine oil, bolt pattern, manual transmission, tire pressure
