charging NISSAN PICK-UP 1998 User Guide
[x] Cancel search | Manufacturer: NISSAN, Model Year: 1998, Model line: PICK-UP, Model: NISSAN PICK-UP 1998Pages: 1659, PDF Size: 53.39 MB
Page 415 of 1659
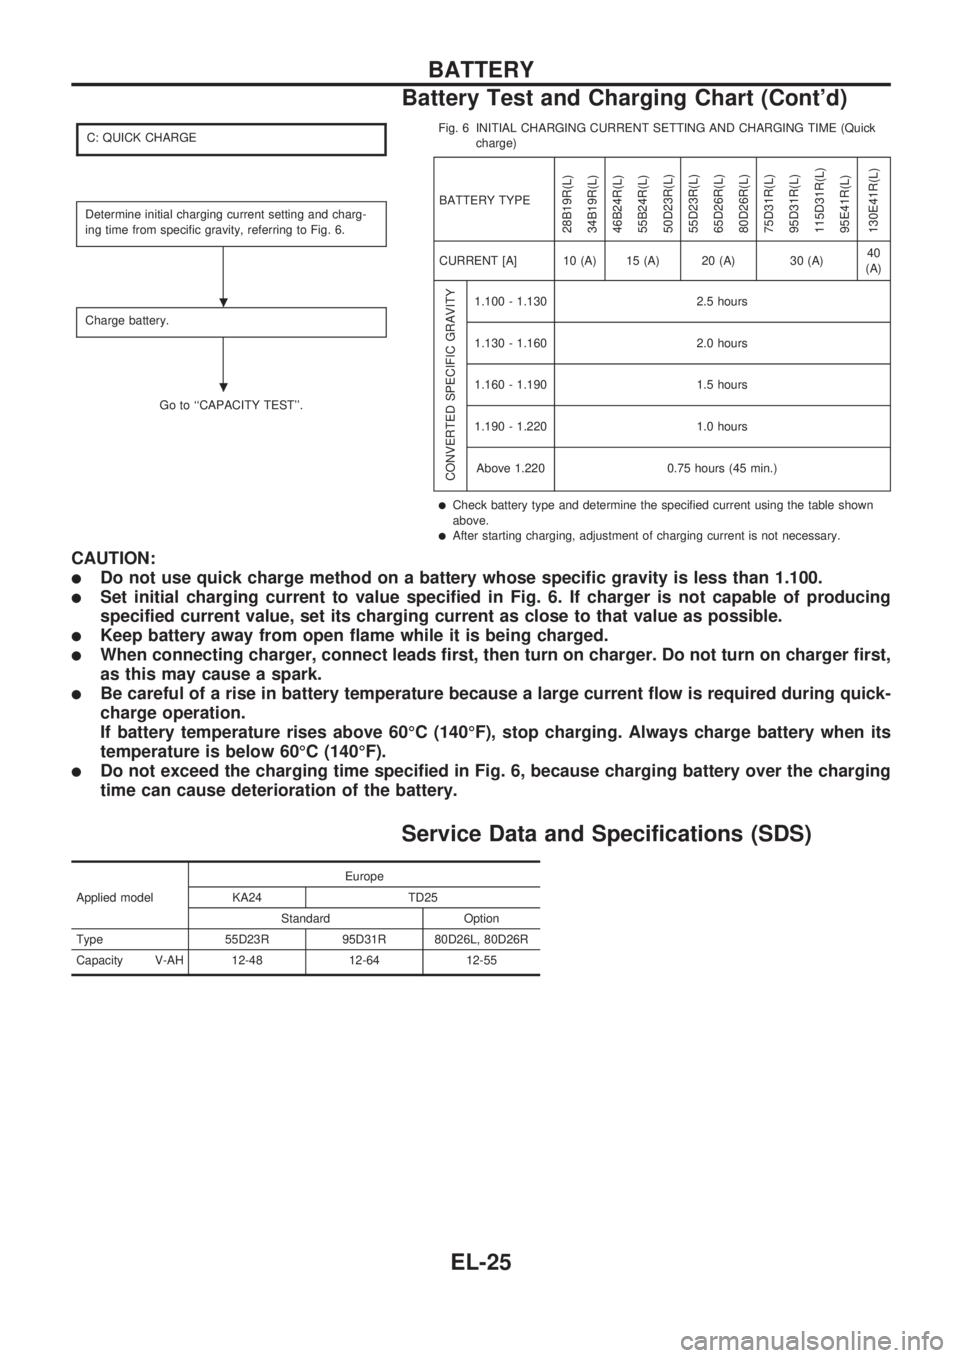
C: QUICK CHARGE
Determine initial charging current setting and charg-
ing time from specific gravity, referring to Fig. 6.
Charge battery.
Go to ``CAPACITY TEST''.Fig. 6 INITIAL CHARGING CURRENT SETTING AND CHARGING TIME (Quick
charge)
BATTERY TYPE
28B19R(L)
34B19R(L)
46B24R(L)
55B24R(L)
50D23R(L)
55D23R(L)
65D26R(L)
80D26R(L)
75D31R(L)
95D31R(L)
115D31R(L)
95E41R(L)
130E41R(L)
CURRENT [A] 10 (A) 15 (A) 20 (A) 30 (A)40
(A)
CONVERTED SPECIFIC GRAVITY
1.100 - 1.130 2.5 hours
1.130 - 1.160 2.0 hours
1.160 - 1.190 1.5 hours
1.190 - 1.220 1.0 hours
Above 1.220 0.75 hours (45 min.)
lCheck battery type and determine the specified current using the table shown
above.
lAfter starting charging, adjustment of charging current is not necessary.
CAUTION:
lDo not use quick charge method on a battery whose specific gravity is less than 1.100.
lSet initial charging current to value specified in Fig. 6. If charger is not capable of producing
specified current value, set its charging current as close to that value as possible.
lKeep battery away from open flame while it is being charged.
lWhen connecting charger, connect leads first, then turn on charger. Do not turn on charger first,
as this may cause a spark.
lBe careful of a rise in battery temperature because a large current flow is required during quick-
charge operation.
If battery temperature rises above 60ÉC (140ÉF), stop charging. Always charge battery when its
temperature is below 60ÉC (140ÉF).
lDo not exceed the charging time specified in Fig. 6, because charging battery over the charging
time can cause deterioration of the battery.
Service Data and Specifications (SDS)
Applied modelEurope
KA24 TD25
Standard Option
Type 55D23R 95D31R 80D26L, 80D26R
Capacity V-AH 12-48 12-64 12-55
.
.
BATTERY
Battery Test and Charging Chart (Cont'd)
EL-25
Page 417 of 1659
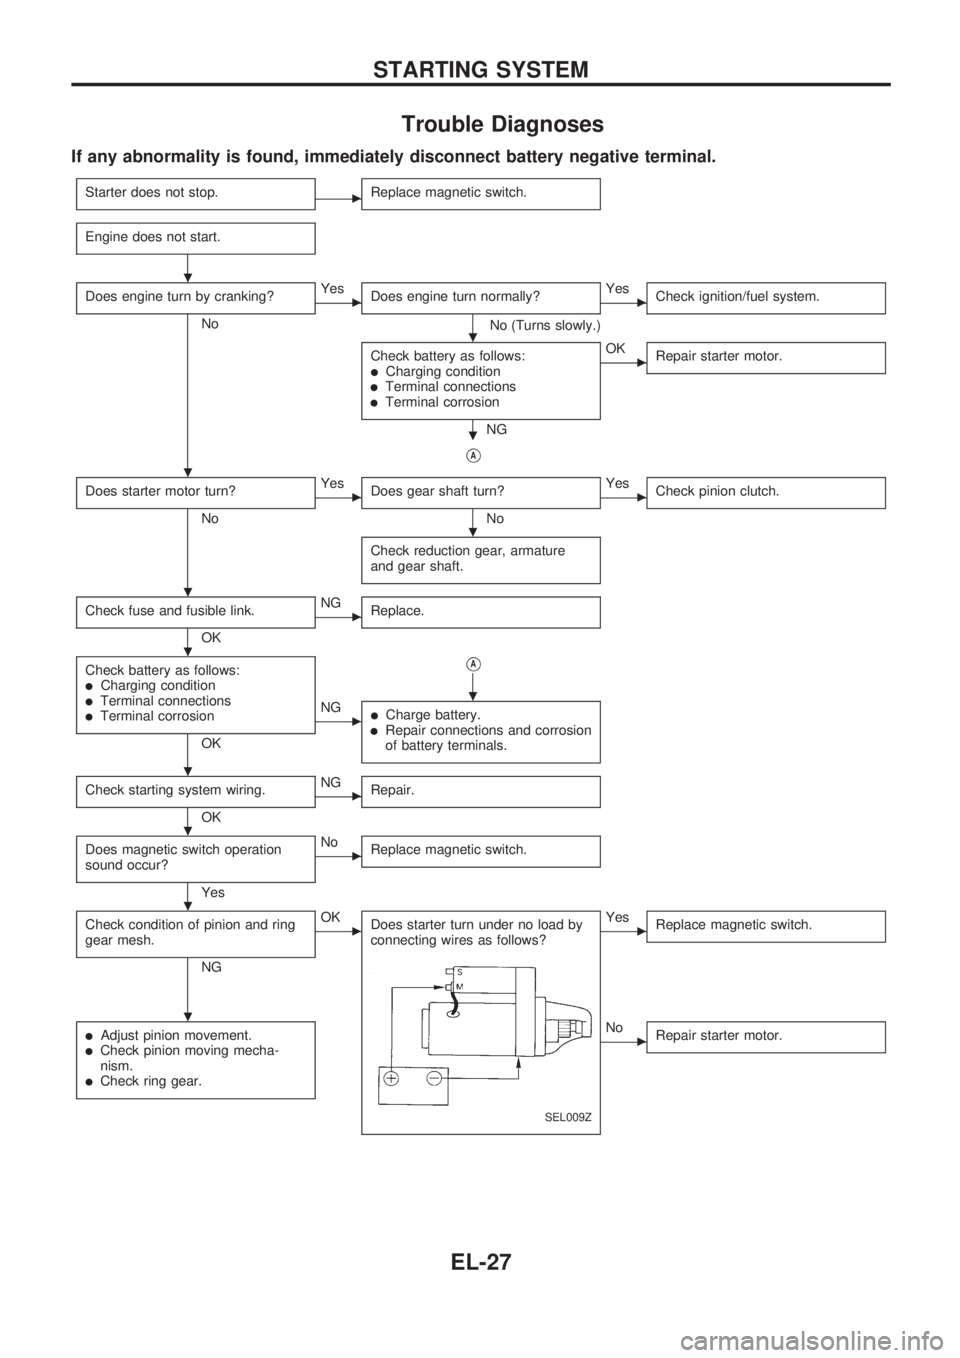
Trouble Diagnoses
If any abnormality is found, immediately disconnect battery negative terminal.
Starter does not stop.cReplace magnetic switch.
Engine does not start.
Does engine turn by cranking?
No
cYes
Does engine turn normally?
No (Turns slowly.)
cYes
Check ignition/fuel system.
Check battery as follows:lCharging conditionlTerminal connectionslTerminal corrosion
NG
cOK
Repair starter motor.
VA
Does starter motor turn?
No
cYes
Does gear shaft turn?
No
cYes
Check pinion clutch.
Check reduction gear, armature
and gear shaft.
Check fuse and fusible link.
OK
cNG
Replace.
Check battery as follows:lCharging conditionlTerminal connectionslTerminal corrosion
OK
VA
cNGlCharge battery.lRepair connections and corrosion
of battery terminals.
Check starting system wiring.
OK
cNG
Repair.
Does magnetic switch operation
sound occur?
Yes
cNo
Replace magnetic switch.
Check condition of pinion and ring
gear mesh.
NG
cOK
Does starter turn under no load by
connecting wires as follows?
SEL009Z
cYes
Replace magnetic switch.
lAdjust pinion movement.lCheck pinion moving mecha-
nism.
lCheck ring gear.
cNo
Repair starter motor.
.
.
.
.
.
.
.
.
.
.
.
.
STARTING SYSTEM
EL-27
Page 424 of 1659
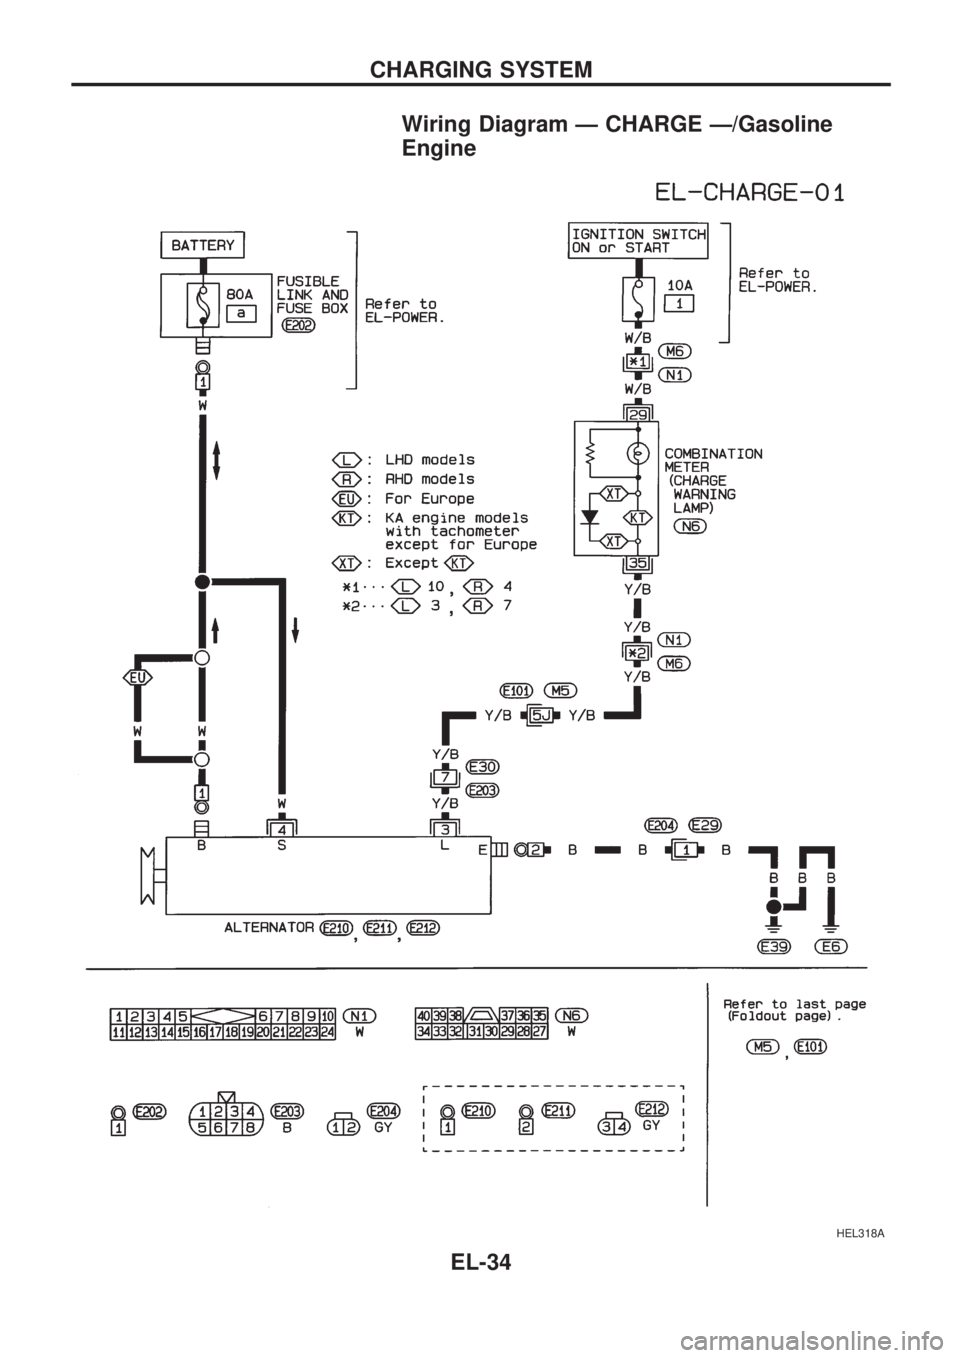
Wiring Diagram Ð CHARGE Ð/Gasoline
Engine
HEL318A
CHARGING SYSTEM
EL-34
Page 425 of 1659
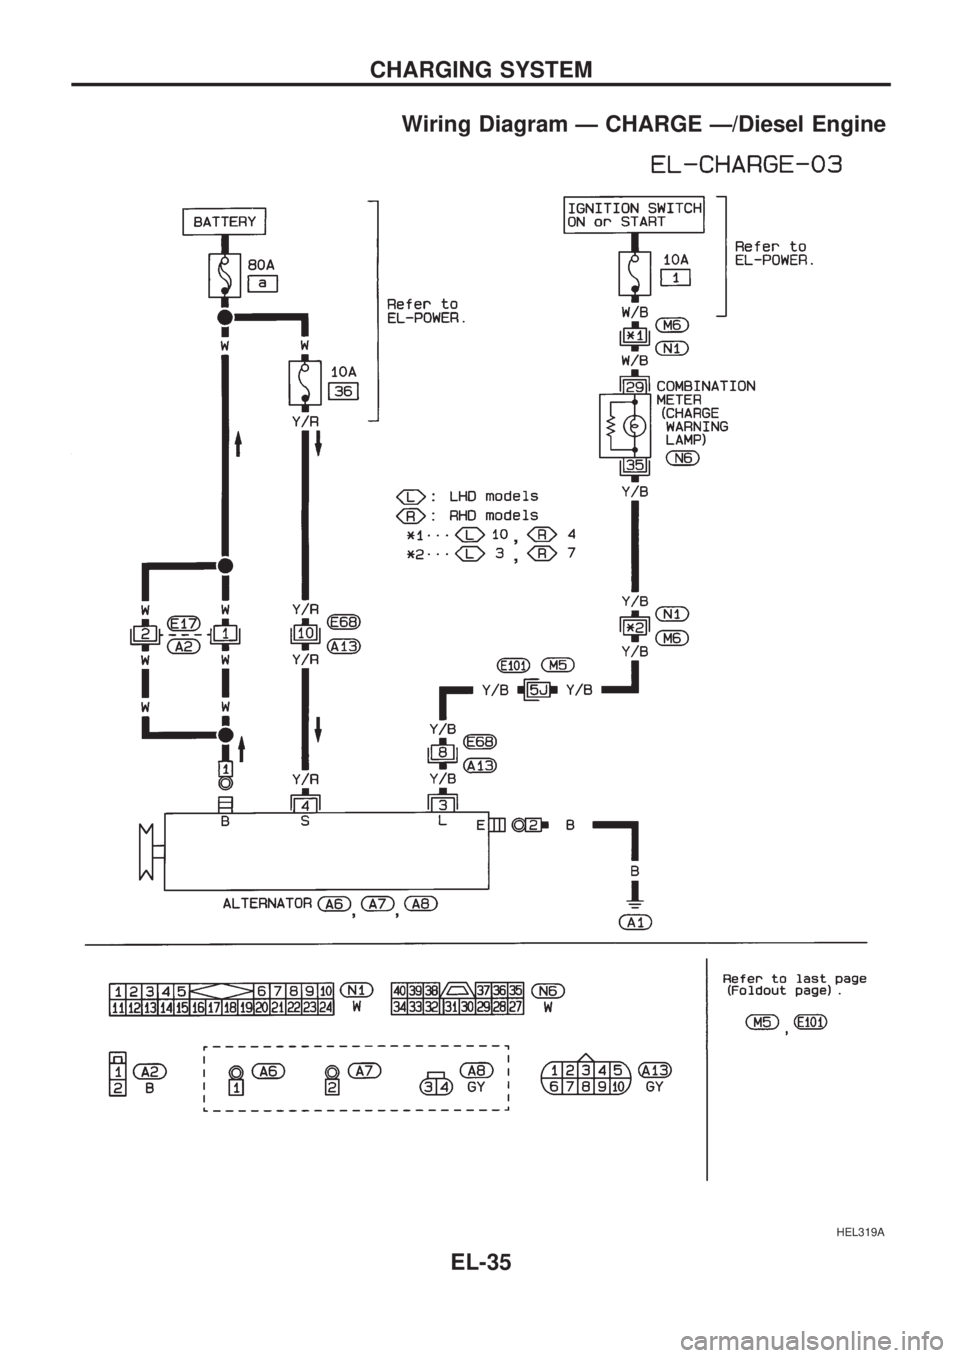
Wiring Diagram Ð CHARGE Ð/Diesel Engine
HEL319A
CHARGING SYSTEM
EL-35
Page 426 of 1659
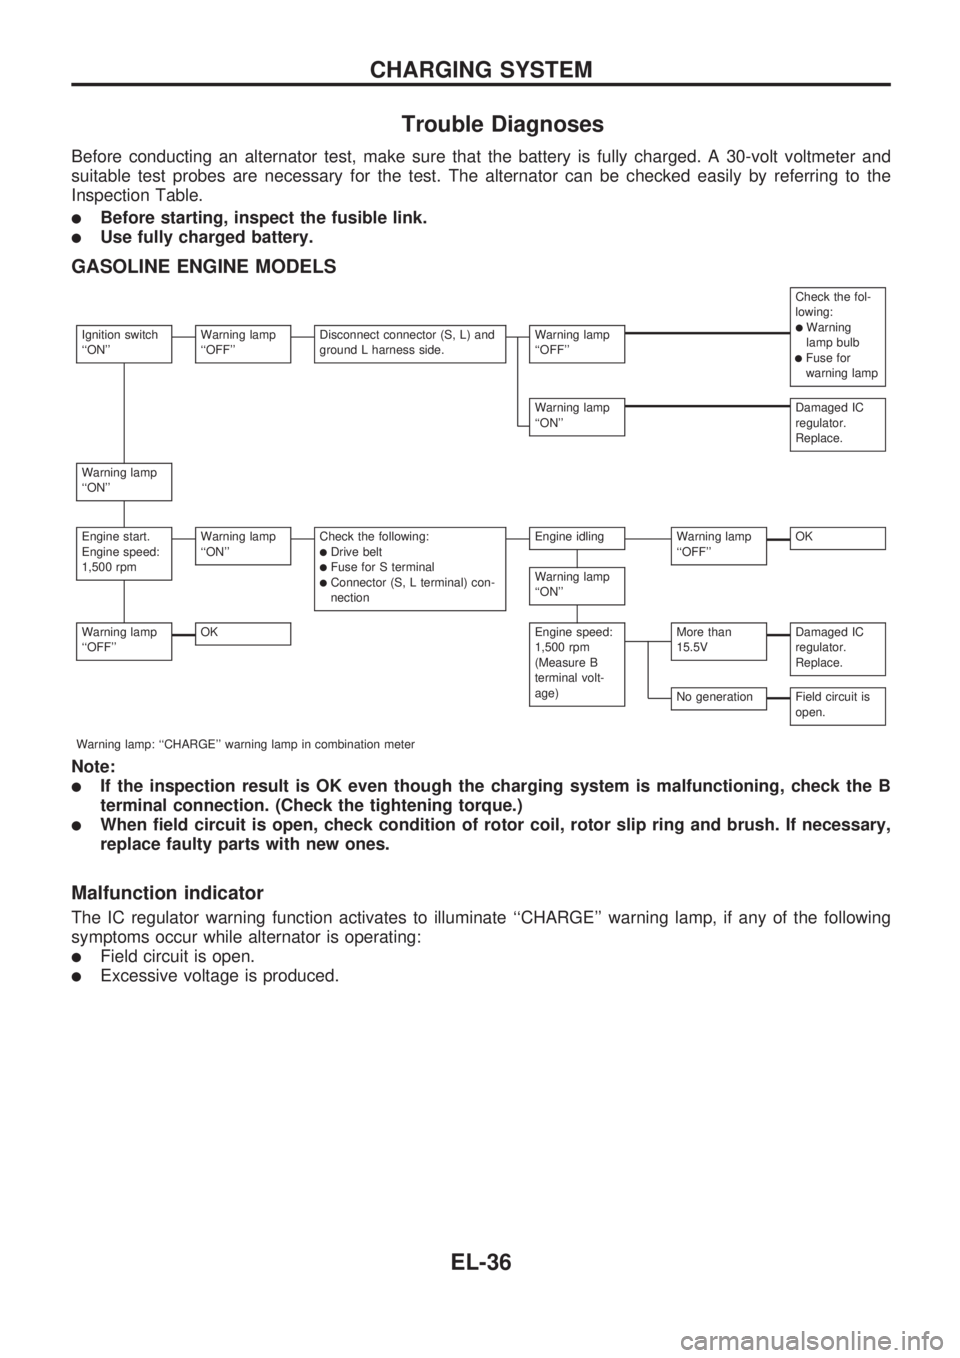
Trouble Diagnoses
Before conducting an alternator test, make sure that the battery is fully charged. A 30-volt voltmeter and
suitable test probes are necessary for the test. The alternator can be checked easily by referring to the
Inspection Table.
lBefore starting, inspect the fusible link.
lUse fully charged battery.
GASOLINE ENGINE MODELS
Check the fol-
lowing:
lWarning
lamp bulb
lFuse for
warning lamp
Ignition switch
``ON''Warning lamp
``OFF''Disconnect connector (S, L) and
ground L harness side.Warning lamp
``OFF''
Warning lamp
``ON''Damaged IC
regulator.
Replace.
Warning lamp
``ON''
Engine start.
Engine speed:
1,500 rpmWarning lamp
``ON''Check the following:lDrive beltlFuse for S terminallConnector (S, L terminal) con-
nection
Engine idlingWarning lamp
``OFF''OK
Warning lamp
``ON''
Warning lamp
``OFF''OKEngine speed:
1,500 rpm
(Measure B
terminal volt-
age)More than
15.5VDamaged IC
regulator.
Replace.
No generationField circuit is
open.
Warning lamp: ``CHARGE'' warning lamp in combination meter
Note:
lIf the inspection result is OK even though the charging system is malfunctioning, check the B
terminal connection. (Check the tightening torque.)
lWhen field circuit is open, check condition of rotor coil, rotor slip ring and brush. If necessary,
replace faulty parts with new ones.
Malfunction indicator
The IC regulator warning function activates to illuminate ``CHARGE'' warning lamp, if any of the following
symptoms occur while alternator is operating:
lField circuit is open.
lExcessive voltage is produced.
CHARGING SYSTEM
EL-36
Page 427 of 1659
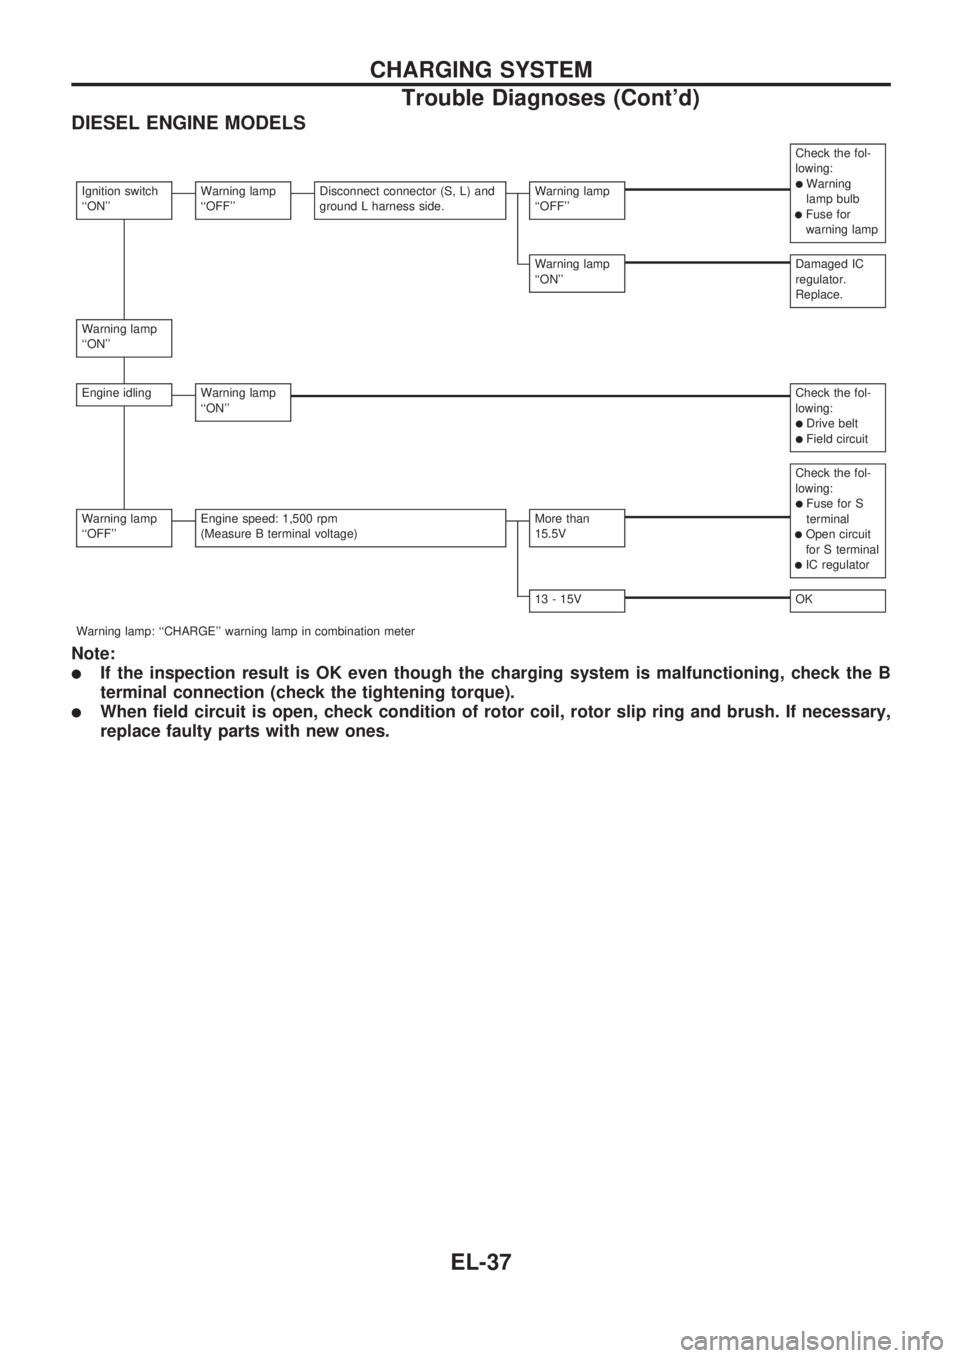
DIESEL ENGINE MODELS
Check the fol-
lowing:
lWarning
lamp bulb
lFuse for
warning lamp
Ignition switch
``ON''Warning lamp
``OFF''Disconnect connector (S, L) and
ground L harness side.Warning lamp
``OFF''
Warning lamp
``ON''Damaged IC
regulator.
Replace.
Warning lamp
``ON''
Engine idlingWarning lamp
``ON''Check the fol-
lowing:
lDrive beltlField circuit
Check the fol-
lowing:
lFuse for S
terminal
lOpen circuit
for S terminal
lIC regulator
Warning lamp
``OFF''Engine speed: 1,500 rpm
(Measure B terminal voltage)More than
15.5V
13 - 15VOK
Warning lamp: ``CHARGE'' warning lamp in combination meter
Note:
lIf the inspection result is OK even though the charging system is malfunctioning, check the B
terminal connection (check the tightening torque).
lWhen field circuit is open, check condition of rotor coil, rotor slip ring and brush. If necessary,
replace faulty parts with new ones.
CHARGING SYSTEM
Trouble Diagnoses (Cont'd)
EL-37
Page 428 of 1659
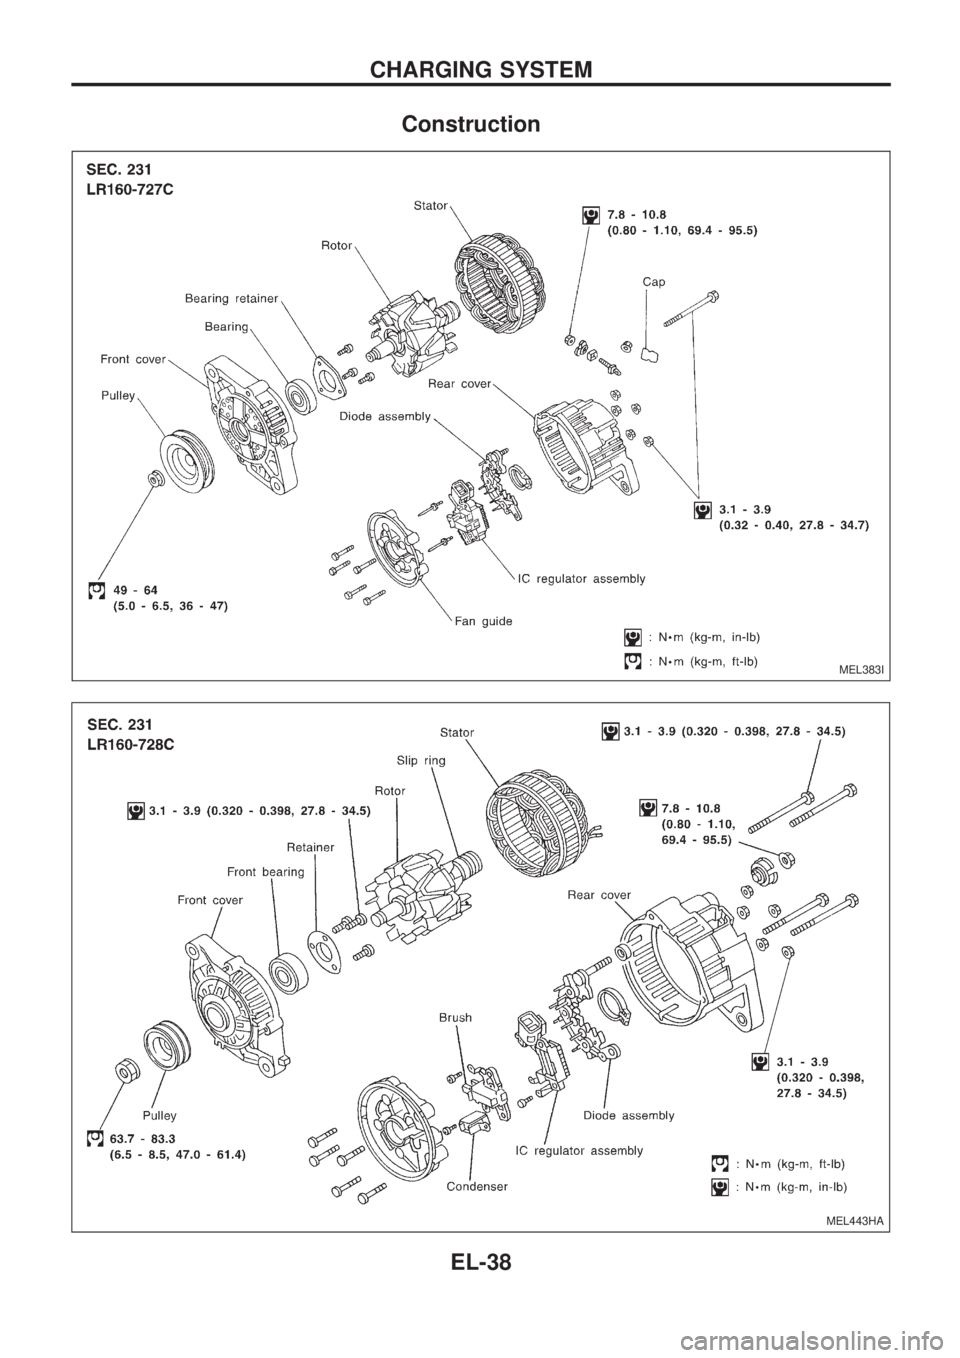
Construction
MEL383I
MEL443HA
CHARGING SYSTEM
EL-38
Page 429 of 1659
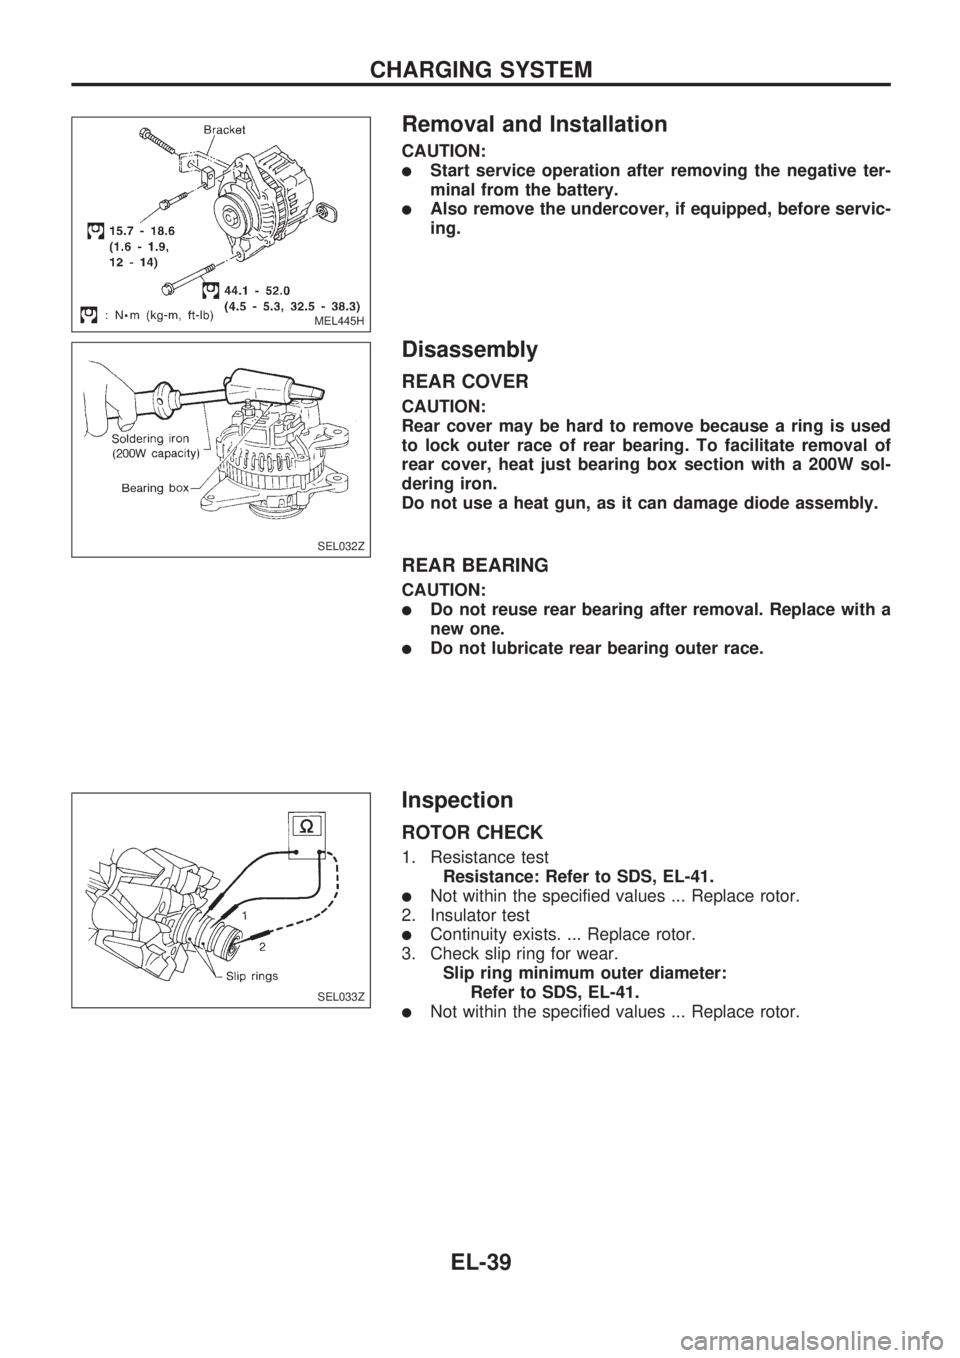
Removal and Installation
CAUTION:
lStart service operation after removing the negative ter-
minal from the battery.
lAlso remove the undercover, if equipped, before servic-
ing.
Disassembly
REAR COVER
CAUTION:
Rear cover may be hard to remove because a ring is used
to lock outer race of rear bearing. To facilitate removal of
rear cover, heat just bearing box section with a 200W sol-
dering iron.
Do not use a heat gun, as it can damage diode assembly.
REAR BEARING
CAUTION:
lDo not reuse rear bearing after removal. Replace with a
new one.
lDo not lubricate rear bearing outer race.
Inspection
ROTOR CHECK
1. Resistance test
Resistance: Refer to SDS, EL-41.
lNot within the specified values ... Replace rotor.
2. Insulator test
lContinuity exists. ... Replace rotor.
3. Check slip ring for wear.
Slip ring minimum outer diameter:
Refer to SDS, EL-41.
lNot within the specified values ... Replace rotor.
MEL445H
.
SEL032Z
SEL033Z
CHARGING SYSTEM
EL-39
Page 430 of 1659
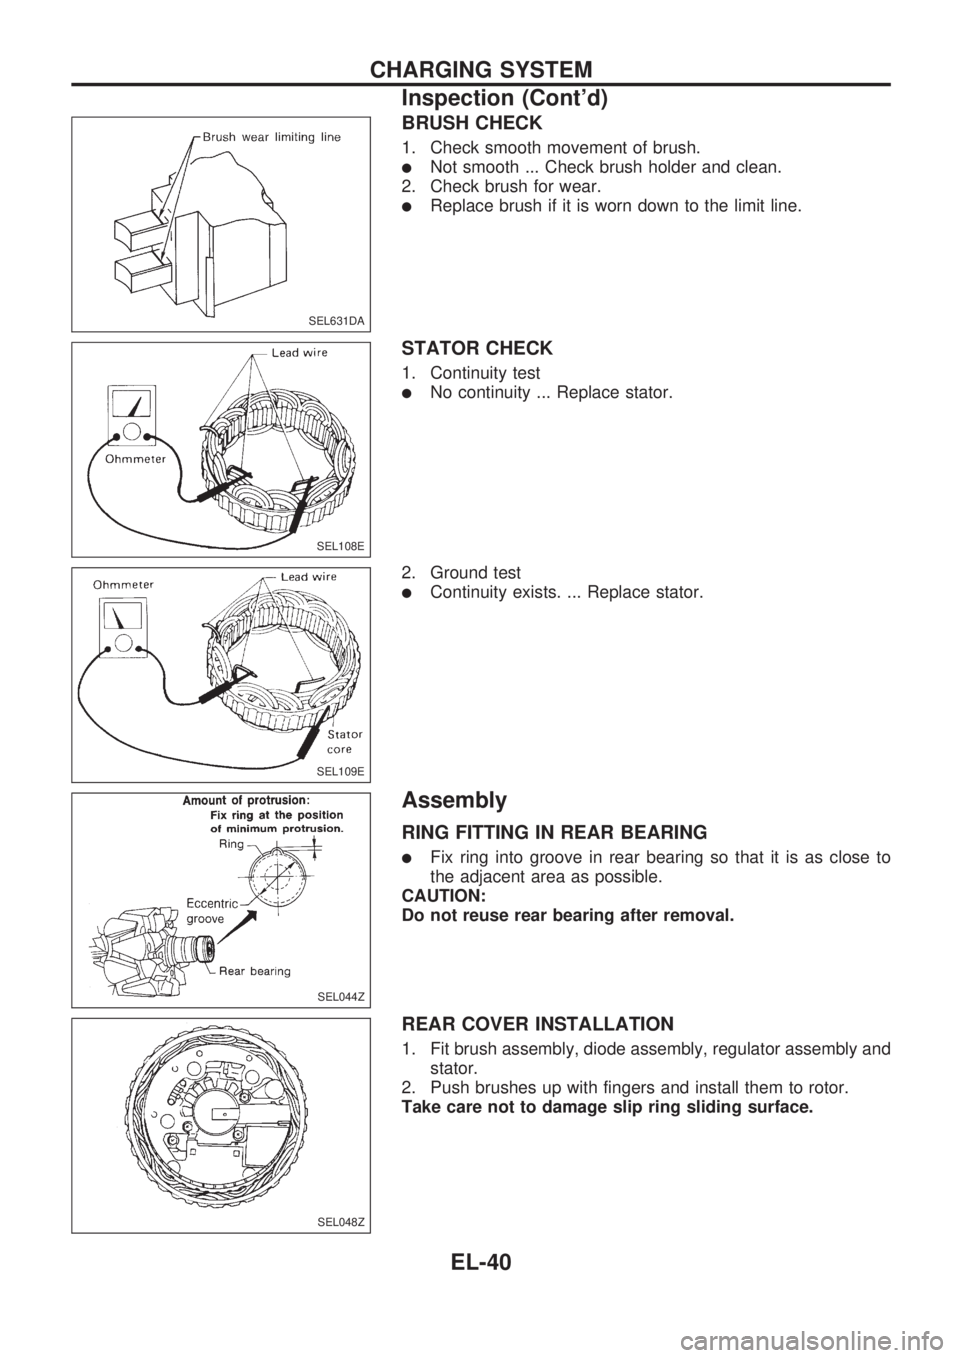
BRUSH CHECK
1. Check smooth movement of brush.
lNot smooth ... Check brush holder and clean.
2. Check brush for wear.
lReplace brush if it is worn down to the limit line.
STATOR CHECK
1. Continuity test
lNo continuity ... Replace stator.
2. Ground test
lContinuity exists. ... Replace stator.
Assembly
RING FITTING IN REAR BEARING
lFix ring into groove in rear bearing so that it is as close to
the adjacent area as possible.
CAUTION:
Do not reuse rear bearing after removal.
REAR COVER INSTALLATION
1. Fit brush assembly, diode assembly, regulator assembly and
stator.
2. Push brushes up with fingers and install them to rotor.
Take care not to damage slip ring sliding surface.
SEL631DA
SEL108E
SEL109E
SEL044Z
SEL048Z
CHARGING SYSTEM
Inspection (Cont'd)
EL-40
Page 431 of 1659
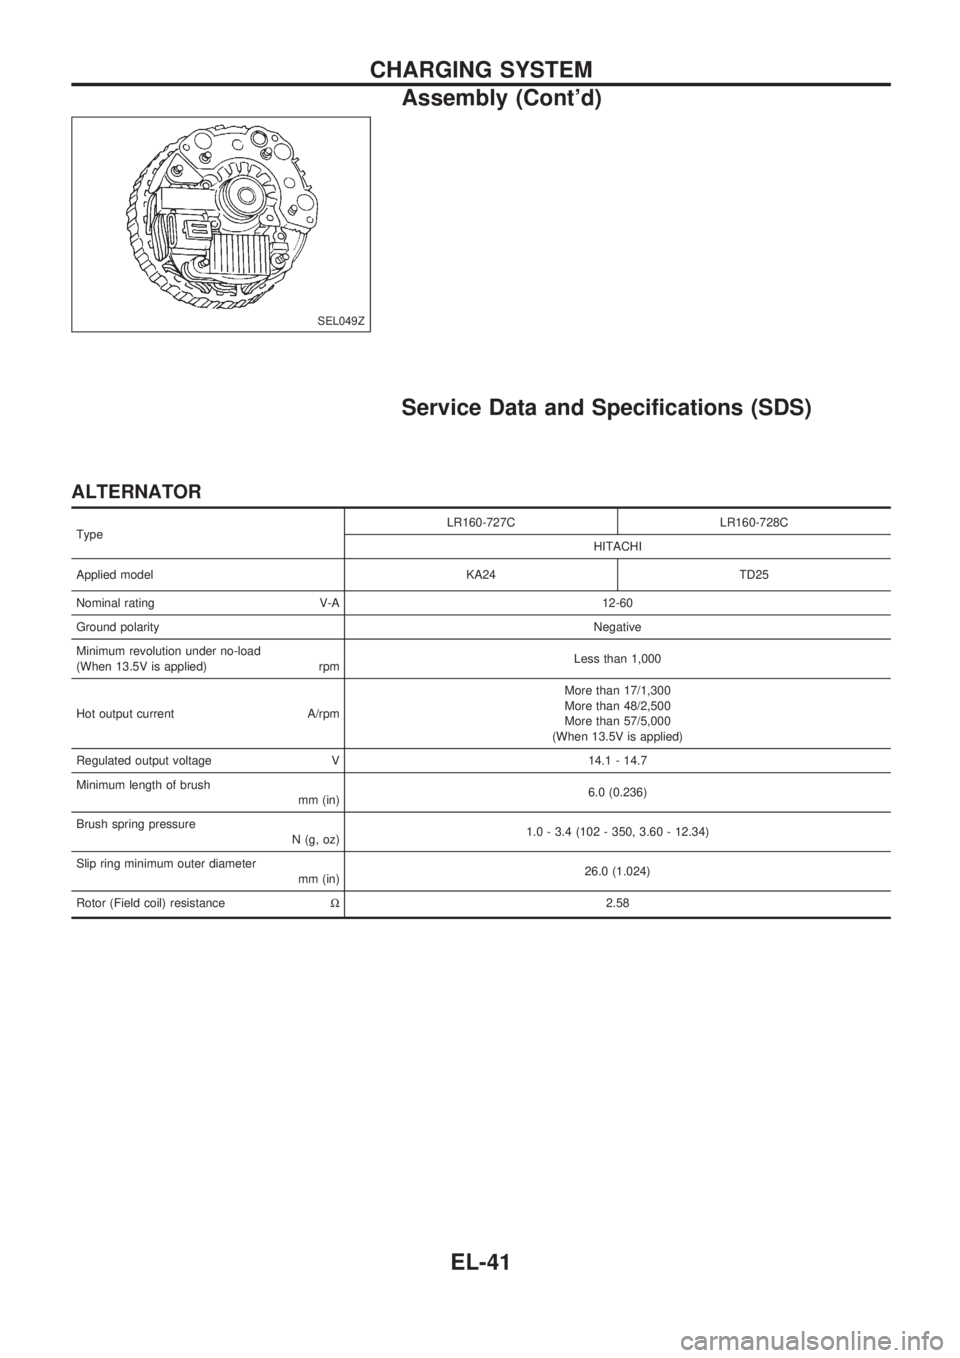
Service Data and Specifications (SDS)
ALTERNATOR
TypeLR160-727C LR160-728C
HITACHI
Applied model KA24 TD25
Nominal rating V-A 12-60
Ground polarityNegative
Minimum revolution under no-load
(When 13.5V is applied) rpmLess than 1,000
Hot output current A/rpmMore than 17/1,300
More than 48/2,500
More than 57/5,000
(When 13.5V is applied)
Regulated output voltage V 14.1 - 14.7
Minimum length of brush
mm (in)6.0 (0.236)
Brush spring pressure
N (g, oz)1.0 - 3.4 (102 - 350, 3.60 - 12.34)
Slip ring minimum outer diameter
mm (in)26.0 (1.024)
Rotor (Field coil) resistanceW2.58
SEL049Z
CHARGING SYSTEM
Assembly (Cont'd)
EL-41