NISSAN PICK-UP 2001 Repair Manual
Manufacturer: NISSAN, Model Year: 2001, Model line: PICK-UP, Model: NISSAN PICK-UP 2001Pages: 1306, PDF Size: 31.7 MB
Page 931 of 1306
3. Heat cylinder head to 110 to 120ÉC (230 to 248ÉF) by soak-
ing in heated oil.
4. Sufficiently cool valve seat with dry ice. Force fit valve seat
into cylinder head.
WARNING:
Do not touch cold valve seat with your bare hands.
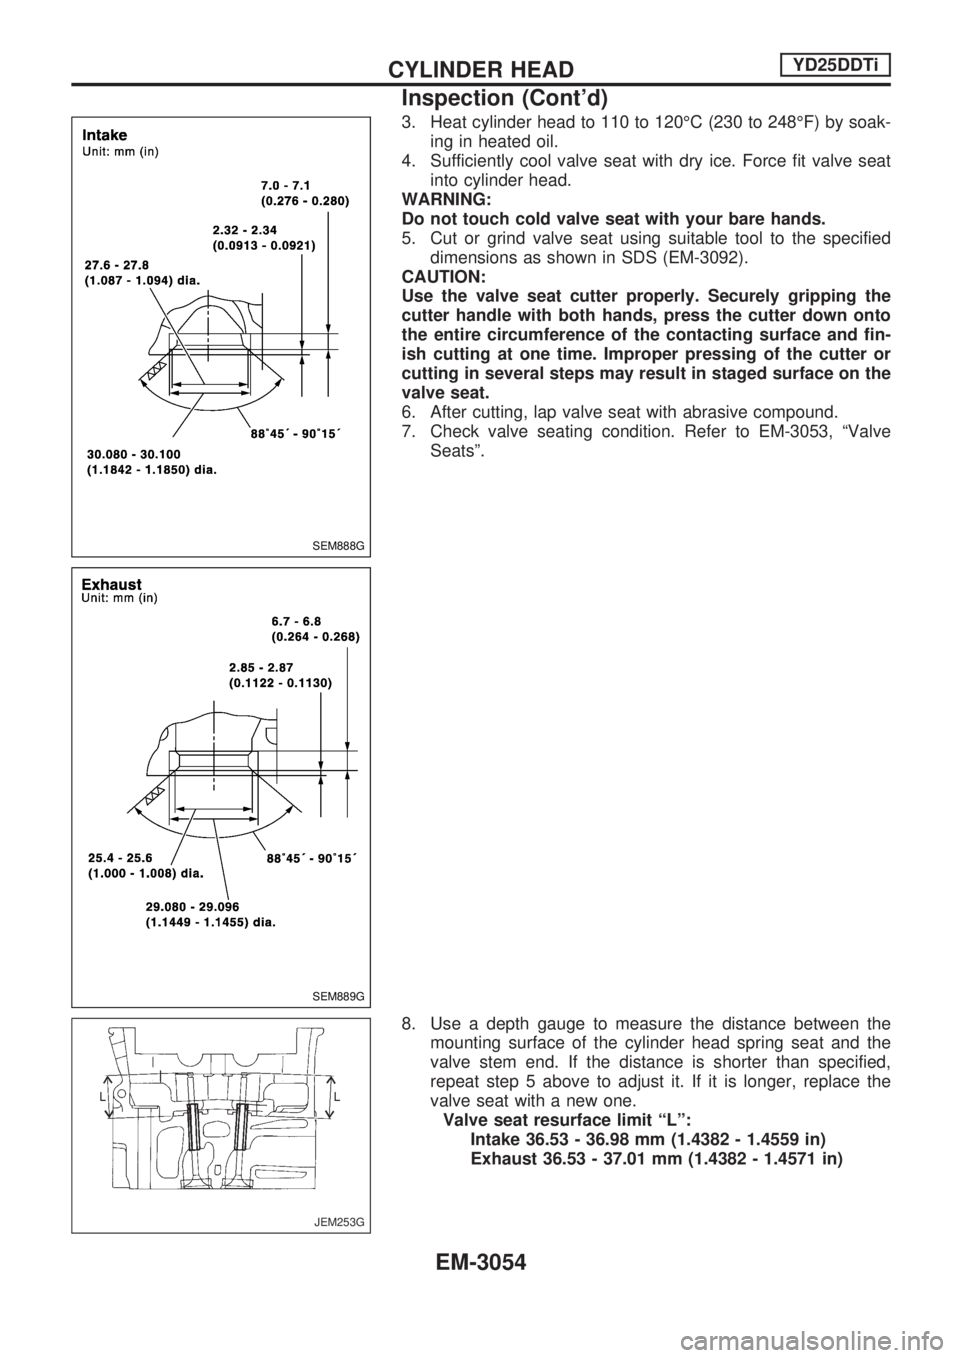
5. Cut or grind valve seat using suitable tool to the specified
dimensions as shown in SDS (EM-3092).
CAUTION:
Use the valve seat cutter properly. Securely gripping the
cutter handle with both hands, press the cutter down onto
the entire circumference of the contacting surface and fin-
ish cutting at one time. Improper pressing of the cutter or
cutting in several steps may result in staged surface on the
valve seat.
6. After cutting, lap valve seat with abrasive compound.
7. Check valve seating condition. Refer to EM-3053, ªValve
Seatsº.
8. Use a depth gauge to measure the distance between the
mounting surface of the cylinder head spring seat and the
valve stem end. If the distance is shorter than specified,
repeat step 5 above to adjust it. If it is longer, replace the
valve seat with a new one.
Valve seat resurface limit ªLº:
Intake 36.53 - 36.98 mm (1.4382 - 1.4559 in)
Exhaust 36.53 - 37.01 mm (1.4382 - 1.4571 in)
SEM888G
SEM889G
JEM253G
CYLINDER HEADYD25DDTi
Inspection (Cont'd)
EM-3054
Page 932 of 1306
VALVE DIMENSIONS
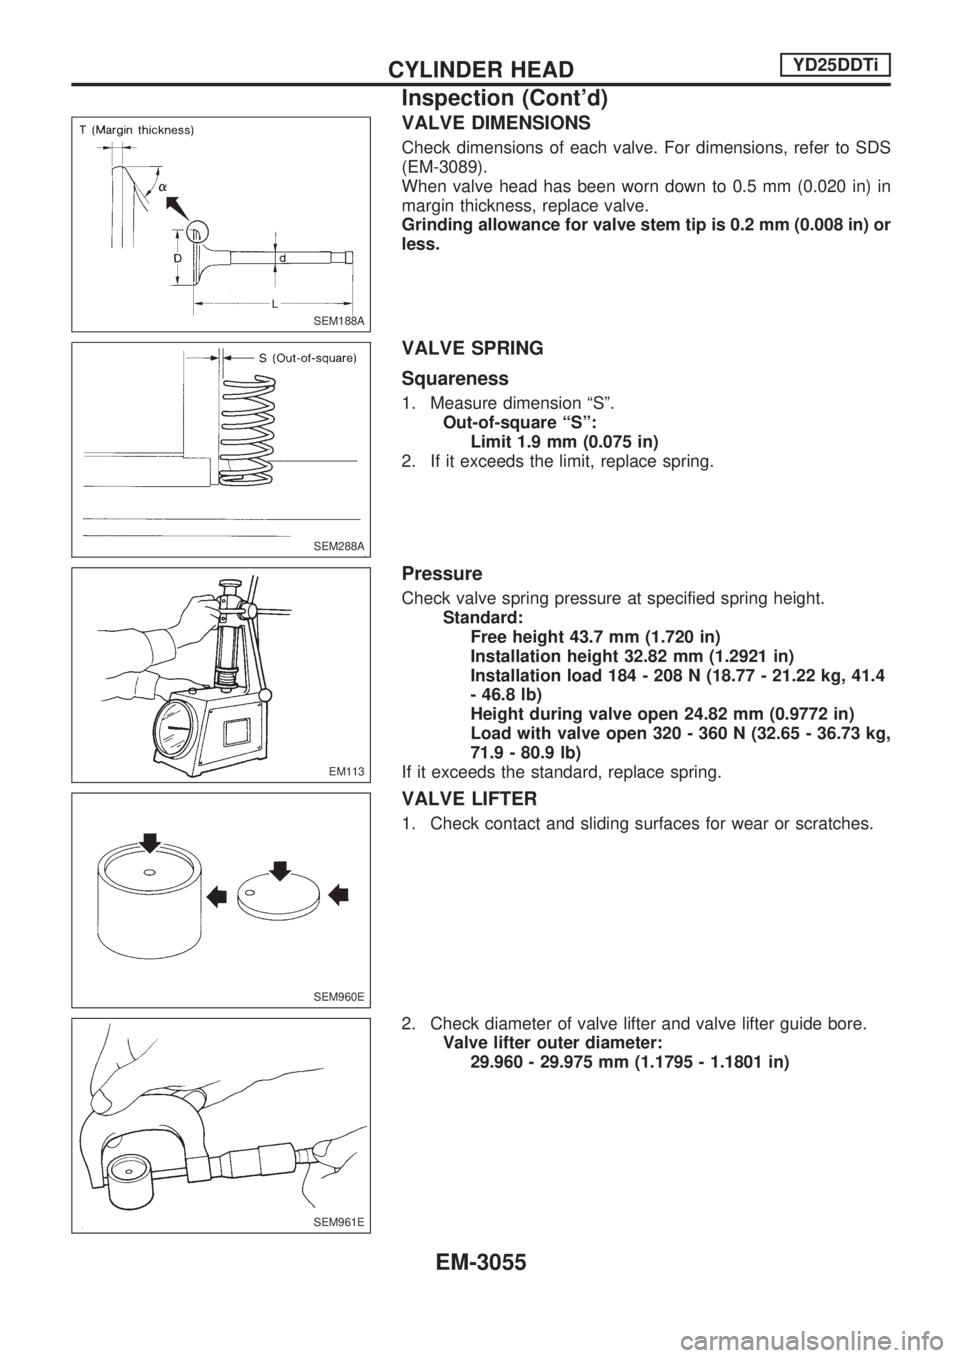
Check dimensions of each valve. For dimensions, refer to SDS
(EM-3089).
When valve head has been worn down to 0.5 mm (0.020 in) in
margin thickness, replace valve.
Grinding allowance for valve stem tip is 0.2 mm (0.008 in) or
less.
VALVE SPRING
Squareness
1. Measure dimension ªSº.
Out-of-square ªSº:
Limit 1.9 mm (0.075 in)
2. If it exceeds the limit, replace spring.
Pressure
Check valve spring pressure at specified spring height.
Standard:
Free height 43.7 mm (1.720 in)
Installation height 32.82 mm (1.2921 in)
Installation load 184 - 208 N (18.77 - 21.22 kg, 41.4
- 46.8 lb)
Height during valve open 24.82 mm (0.9772 in)
Load with valve open 320 - 360 N (32.65 - 36.73 kg,
71.9 - 80.9 lb)
If it exceeds the standard, replace spring.
VALVE LIFTER
1. Check contact and sliding surfaces for wear or scratches.
2. Check diameter of valve lifter and valve lifter guide bore.
Valve lifter outer diameter:
29.960 - 29.975 mm (1.1795 - 1.1801 in)
SEM188A
SEM288A
EM113
SEM960E
SEM961E
CYLINDER HEADYD25DDTi
Inspection (Cont'd)
EM-3055
Page 933 of 1306
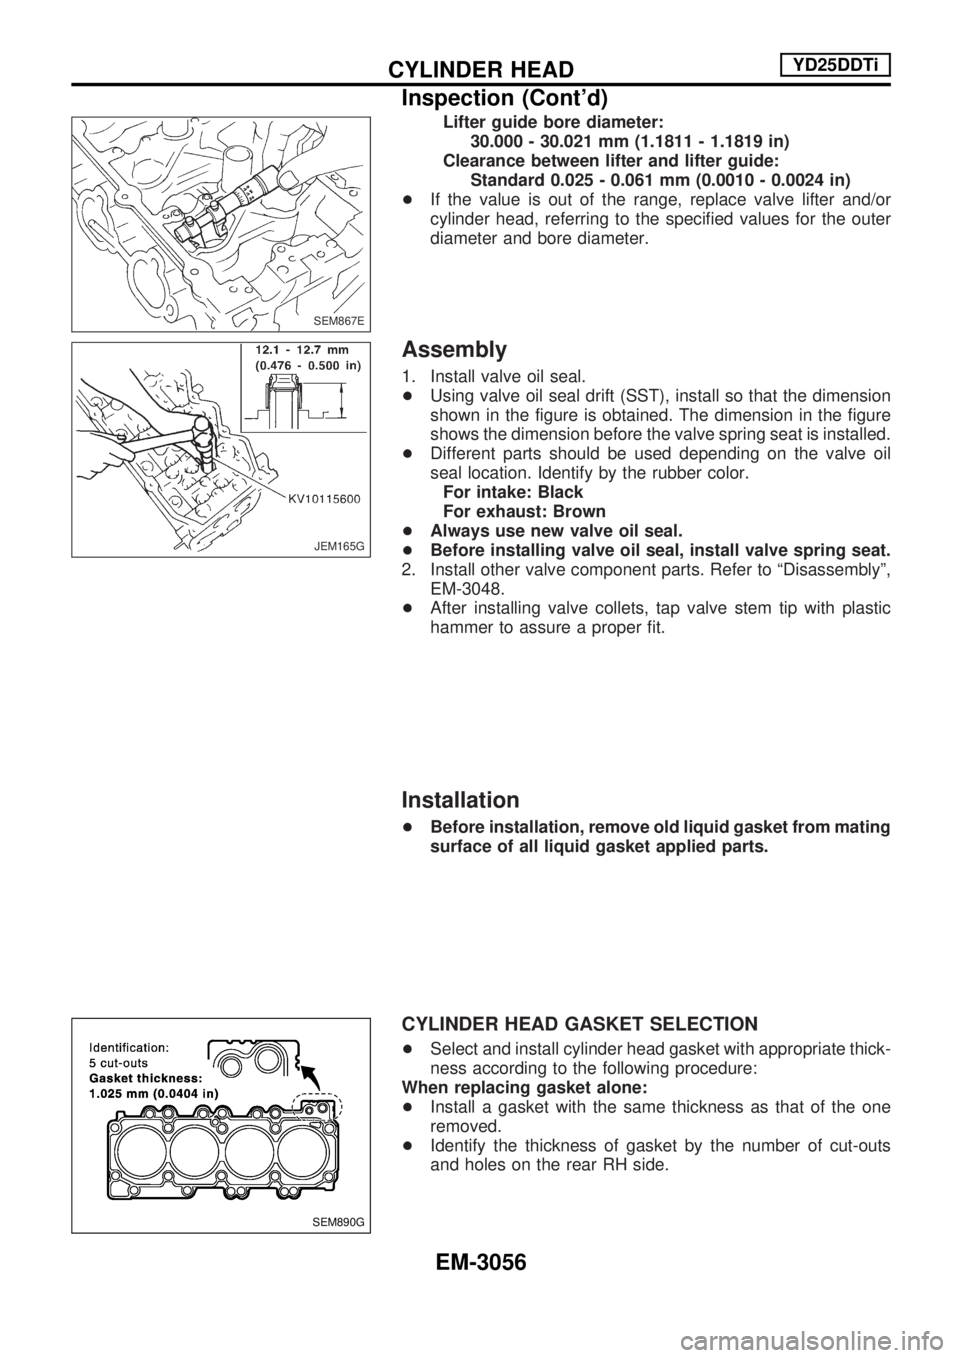
Lifter guide bore diameter:
30.000 - 30.021 mm (1.1811 - 1.1819 in)
Clearance between lifter and lifter guide:
Standard 0.025 - 0.061 mm (0.0010 - 0.0024 in)
+If the value is out of the range, replace valve lifter and/or
cylinder head, referring to the specified values for the outer
diameter and bore diameter.
Assembly
1. Install valve oil seal.
+Using valve oil seal drift (SST), install so that the dimension
shown in the figure is obtained. The dimension in the figure
shows the dimension before the valve spring seat is installed.
+Different parts should be used depending on the valve oil
seal location. Identify by the rubber color.
For intake: Black
For exhaust: Brown
+Always use new valve oil seal.
+Before installing valve oil seal, install valve spring seat.
2. Install other valve component parts. Refer to ªDisassemblyº,
EM-3048.
+After installing valve collets, tap valve stem tip with plastic
hammer to assure a proper fit.
Installation
+Before installation, remove old liquid gasket from mating
surface of all liquid gasket applied parts.
CYLINDER HEAD GASKET SELECTION
+Select and install cylinder head gasket with appropriate thick-
ness according to the following procedure:
When replacing gasket alone:
+Install a gasket with the same thickness as that of the one
removed.
+Identify the thickness of gasket by the number of cut-outs
and holes on the rear RH side.
SEM867E
JEM165G
SEM890G
CYLINDER HEADYD25DDTi
Inspection (Cont'd)
EM-3056
Page 934 of 1306
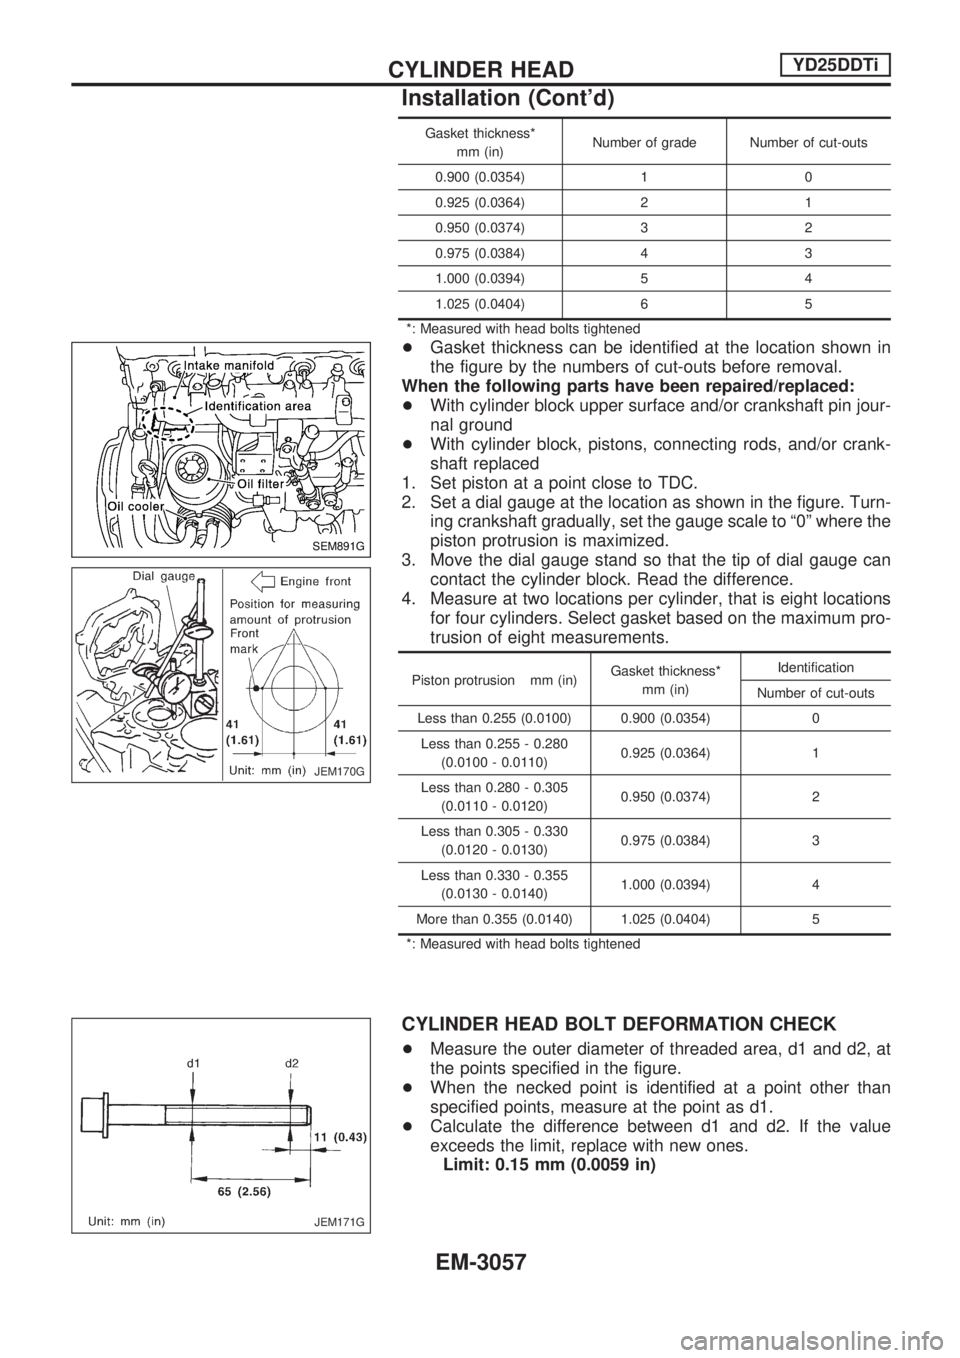
Gasket thickness*
mm (in)Number of grade Number of cut-outs
0.900 (0.0354) 1 0
0.925 (0.0364) 2 1
0.950 (0.0374) 3 2
0.975 (0.0384) 4 3
1.000 (0.0394) 5 4
1.025 (0.0404) 6 5
*: Measured with head bolts tightened
+Gasket thickness can be identified at the location shown in
the figure by the numbers of cut-outs before removal.
When the following parts have been repaired/replaced:
+With cylinder block upper surface and/or crankshaft pin jour-
nal ground
+With cylinder block, pistons, connecting rods, and/or crank-
shaft replaced
1. Set piston at a point close to TDC.
2. Set a dial gauge at the location as shown in the figure. Turn-
ing crankshaft gradually, set the gauge scale to ª0º where the
piston protrusion is maximized.
3. Move the dial gauge stand so that the tip of dial gauge can
contact the cylinder block. Read the difference.
4. Measure at two locations per cylinder, that is eight locations
for four cylinders. Select gasket based on the maximum pro-
trusion of eight measurements.
Piston protrusion mm (in)Gasket thickness*
mm (in)Identification
Number of cut-outs
Less than 0.255 (0.0100) 0.900 (0.0354) 0
Less than 0.255 - 0.280
(0.0100 - 0.0110)0.925 (0.0364) 1
Less than 0.280 - 0.305
(0.0110 - 0.0120)0.950 (0.0374) 2
Less than 0.305 - 0.330
(0.0120 - 0.0130)0.975 (0.0384) 3
Less than 0.330 - 0.355
(0.0130 - 0.0140)1.000 (0.0394) 4
More than 0.355 (0.0140) 1.025 (0.0404) 5
*: Measured with head bolts tightened
CYLINDER HEAD BOLT DEFORMATION CHECK
+Measure the outer diameter of threaded area, d1 and d2, at
the points specified in the figure.
+When the necked point is identified at a point other than
specified points, measure at the point as d1.
+Calculate the difference between d1 and d2. If the value
exceeds the limit, replace with new ones.
Limit: 0.15 mm (0.0059 in)
SEM891G
JEM170G
JEM171G
CYLINDER HEADYD25DDTi
Installation (Cont'd)
EM-3057
Page 935 of 1306
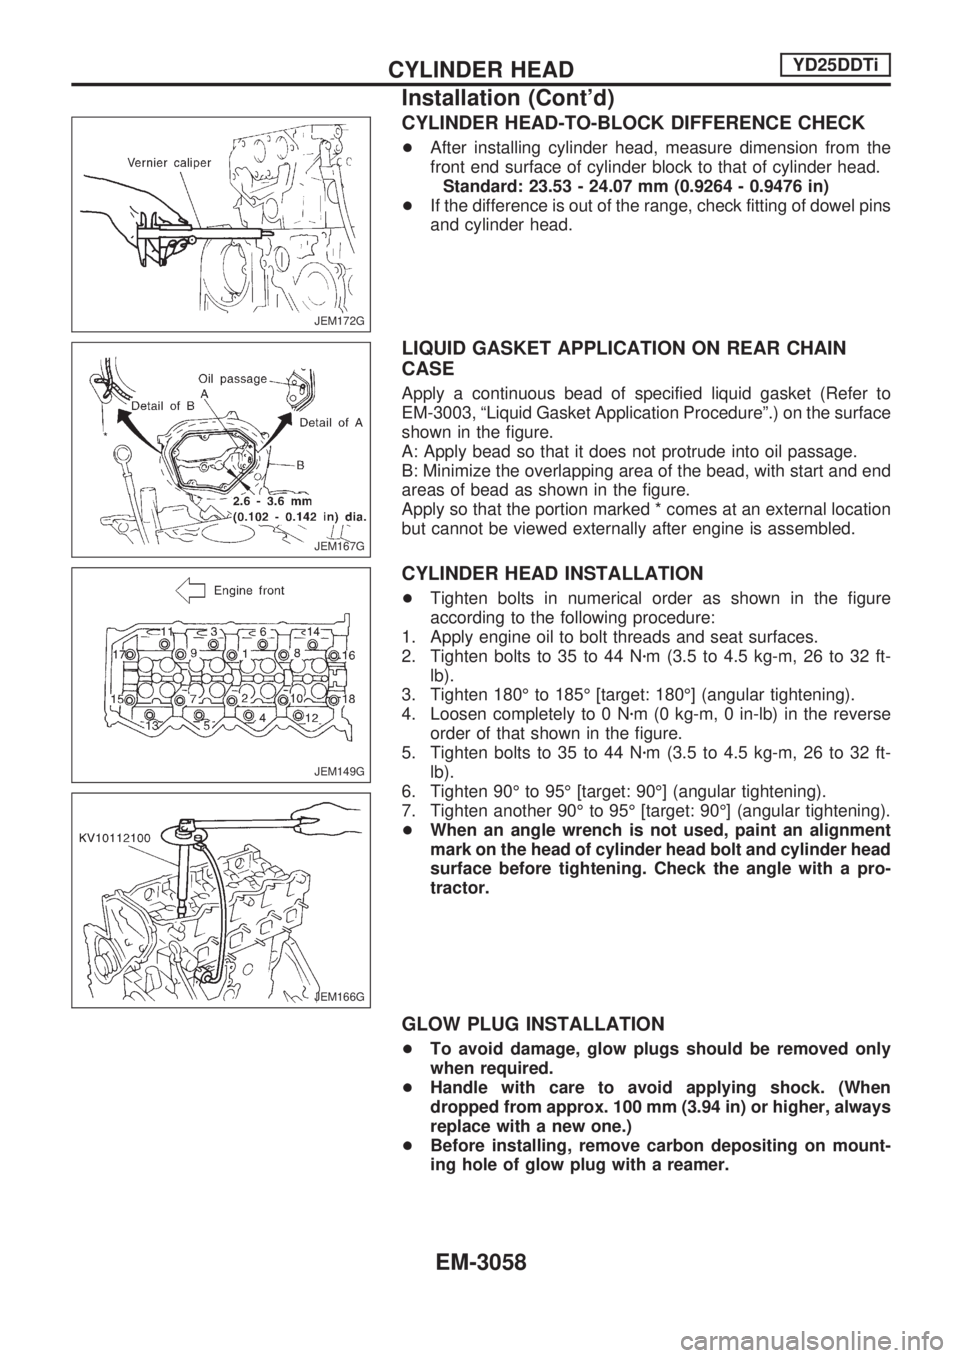
CYLINDER HEAD-TO-BLOCK DIFFERENCE CHECK
+After installing cylinder head, measure dimension from the
front end surface of cylinder block to that of cylinder head.
Standard: 23.53 - 24.07 mm (0.9264 - 0.9476 in)
+If the difference is out of the range, check fitting of dowel pins
and cylinder head.
LIQUID GASKET APPLICATION ON REAR CHAIN
CASE
Apply a continuous bead of specified liquid gasket (Refer to
EM-3003, ªLiquid Gasket Application Procedureº.) on the surface
shown in the figure.
A: Apply bead so that it does not protrude into oil passage.
B: Minimize the overlapping area of the bead, with start and end
areas of bead as shown in the figure.
Apply so that the portion marked * comes at an external location
but cannot be viewed externally after engine is assembled.
CYLINDER HEAD INSTALLATION
+Tighten bolts in numerical order as shown in the figure
according to the following procedure:
1. Apply engine oil to bolt threads and seat surfaces.
2. Tighten bolts to 35 to 44 Nzm (3.5 to 4.5 kg-m, 26 to 32 ft-
lb).
3. Tighten 180É to 185É [target: 180É] (angular tightening).
4. Loosen completely to 0 Nzm (0 kg-m, 0 in-lb) in the reverse
order of that shown in the figure.
5. Tighten bolts to 35 to 44 Nzm (3.5 to 4.5 kg-m, 26 to 32 ft-
lb).
6. Tighten 90É to 95É [target: 90É] (angular tightening).
7. Tighten another 90É to 95É [target: 90É] (angular tightening).
+When an angle wrench is not used, paint an alignment
mark on the head of cylinder head bolt and cylinder head
surface before tightening. Check the angle with a pro-
tractor.
GLOW PLUG INSTALLATION
+To avoid damage, glow plugs should be removed only
when required.
+Handle with care to avoid applying shock. (When
dropped from approx. 100 mm (3.94 in) or higher, always
replace with a new one.)
+Before installing, remove carbon depositing on mount-
ing hole of glow plug with a reamer.
JEM172G
JEM167G
JEM149G
JEM166G
CYLINDER HEADYD25DDTi
Installation (Cont'd)
EM-3058
Page 936 of 1306
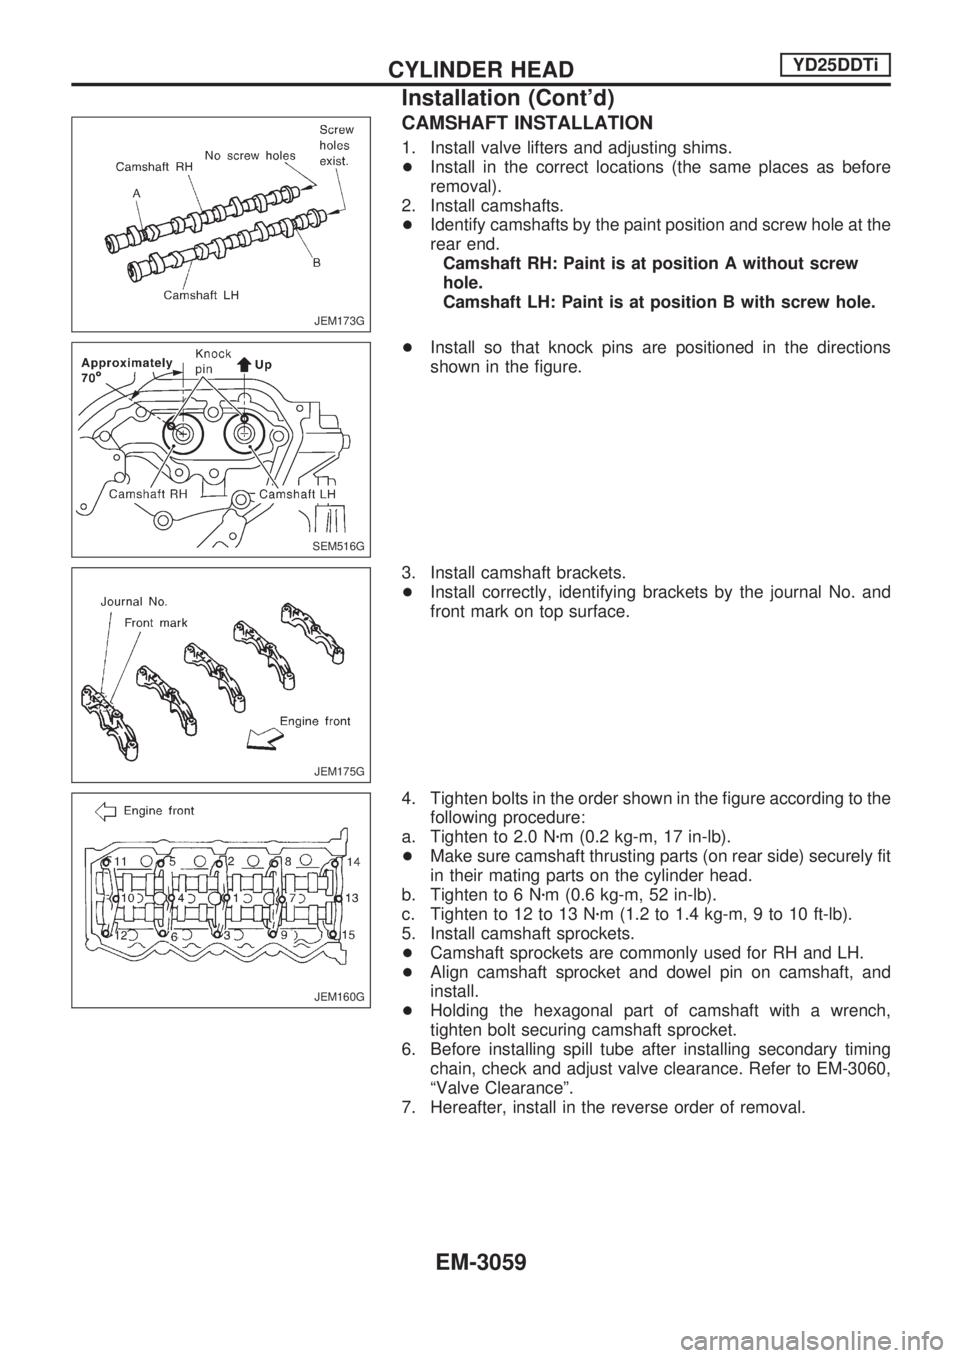
CAMSHAFT INSTALLATION
1. Install valve lifters and adjusting shims.
+Install in the correct locations (the same places as before
removal).
2. Install camshafts.
+Identify camshafts by the paint position and screw hole at the
rear end.
Camshaft RH: Paint is at position A without screw
hole.
Camshaft LH: Paint is at position B with screw hole.
+Install so that knock pins are positioned in the directions
shown in the figure.
3. Install camshaft brackets.
+Install correctly, identifying brackets by the journal No. and
front mark on top surface.
4. Tighten bolts in the order shown in the figure according to the
following procedure:
a. Tighten to 2.0 Nzm (0.2 kg-m, 17 in-lb).
+Make sure camshaft thrusting parts (on rear side) securely fit
in their mating parts on the cylinder head.
b. Tighten to 6 Nzm (0.6 kg-m, 52 in-lb).
c. Tighten to 12 to 13 Nzm (1.2 to 1.4 kg-m, 9 to 10 ft-lb).
5. Install camshaft sprockets.
+Camshaft sprockets are commonly used for RH and LH.
+Align camshaft sprocket and dowel pin on camshaft, and
install.
+Holding the hexagonal part of camshaft with a wrench,
tighten bolt securing camshaft sprocket.
6. Before installing spill tube after installing secondary timing
chain, check and adjust valve clearance. Refer to EM-3060,
ªValve Clearanceº.
7. Hereafter, install in the reverse order of removal.
JEM173G
SEM516G
JEM175G
JEM160G
CYLINDER HEADYD25DDTi
Installation (Cont'd)
EM-3059
Page 937 of 1306
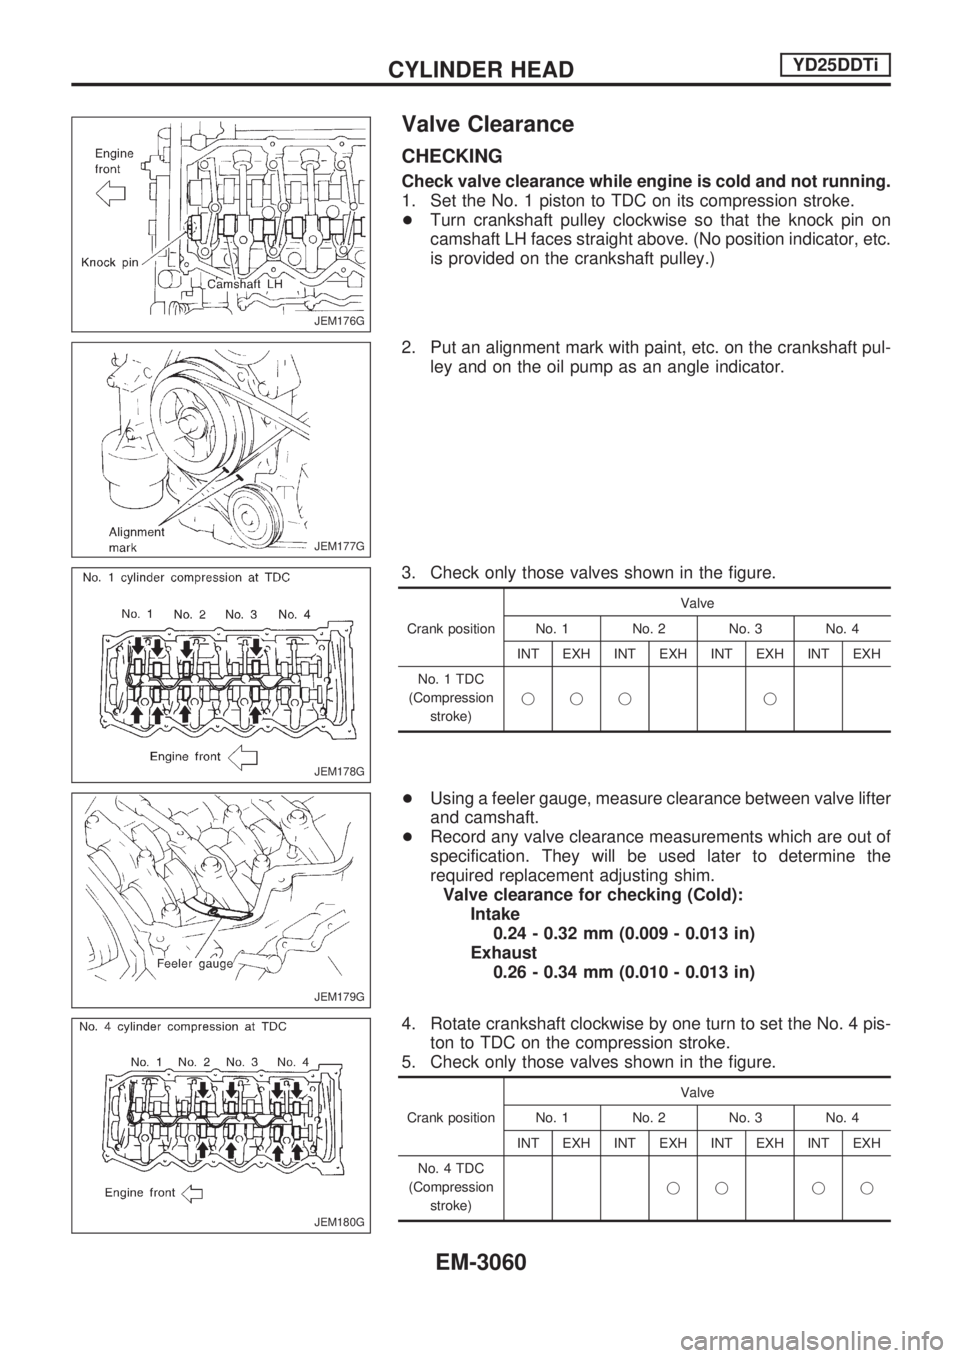
Valve Clearance
CHECKING
Check valve clearance while engine is cold and not running.
1. Set the No. 1 piston to TDC on its compression stroke.
+Turn crankshaft pulley clockwise so that the knock pin on
camshaft LH faces straight above. (No position indicator, etc.
is provided on the crankshaft pulley.)
2. Put an alignment mark with paint, etc. on the crankshaft pul-
ley and on the oil pump as an angle indicator.
3. Check only those valves shown in the figure.
Crank positionValve
No. 1 No. 2 No. 3 No. 4
INT EXH INT EXH INT EXH INT EXH
No. 1 TDC
(Compression
stroke)jjj j
+Using a feeler gauge, measure clearance between valve lifter
and camshaft.
+Record any valve clearance measurements which are out of
specification. They will be used later to determine the
required replacement adjusting shim.
Valve clearance for checking (Cold):
Intake
0.24 - 0.32 mm (0.009 - 0.013 in)
Exhaust
0.26 - 0.34 mm (0.010 - 0.013 in)
4. Rotate crankshaft clockwise by one turn to set the No. 4 pis-
ton to TDC on the compression stroke.
5. Check only those valves shown in the figure.
Crank positionValve
No. 1 No. 2 No. 3 No. 4
INT EXH INT EXH INT EXH INT EXH
No. 4 TDC
(Compression
stroke)jj jj
JEM176G
JEM177G
JEM178G
JEM179G
JEM180G
CYLINDER HEADYD25DDTi
EM-3060
Page 938 of 1306
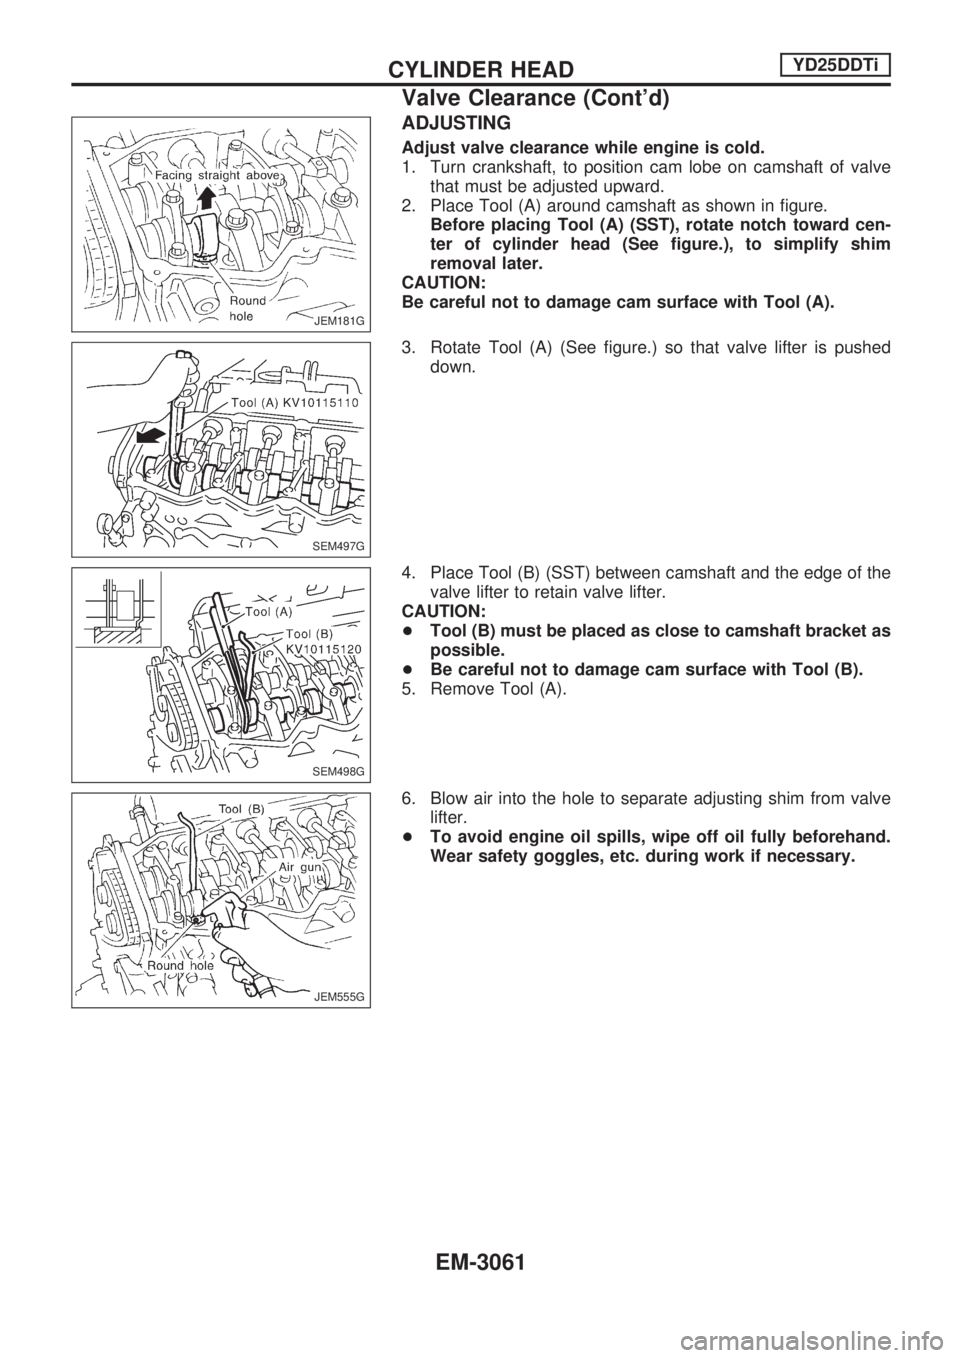
ADJUSTING
Adjust valve clearance while engine is cold.
1. Turn crankshaft, to position cam lobe on camshaft of valve
that must be adjusted upward.
2. Place Tool (A) around camshaft as shown in figure.
Before placing Tool (A) (SST), rotate notch toward cen-
ter of cylinder head (See figure.), to simplify shim
removal later.
CAUTION:
Be careful not to damage cam surface with Tool (A).
3. Rotate Tool (A) (See figure.) so that valve lifter is pushed
down.
4. Place Tool (B) (SST) between camshaft and the edge of the
valve lifter to retain valve lifter.
CAUTION:
+Tool (B) must be placed as close to camshaft bracket as
possible.
+Be careful not to damage cam surface with Tool (B).
5. Remove Tool (A).
6. Blow air into the hole to separate adjusting shim from valve
lifter.
+To avoid engine oil spills, wipe off oil fully beforehand.
Wear safety goggles, etc. during work if necessary.
JEM181G
SEM497G
SEM498G
JEM555G
CYLINDER HEADYD25DDTi
Valve Clearance (Cont'd)
EM-3061
Page 939 of 1306
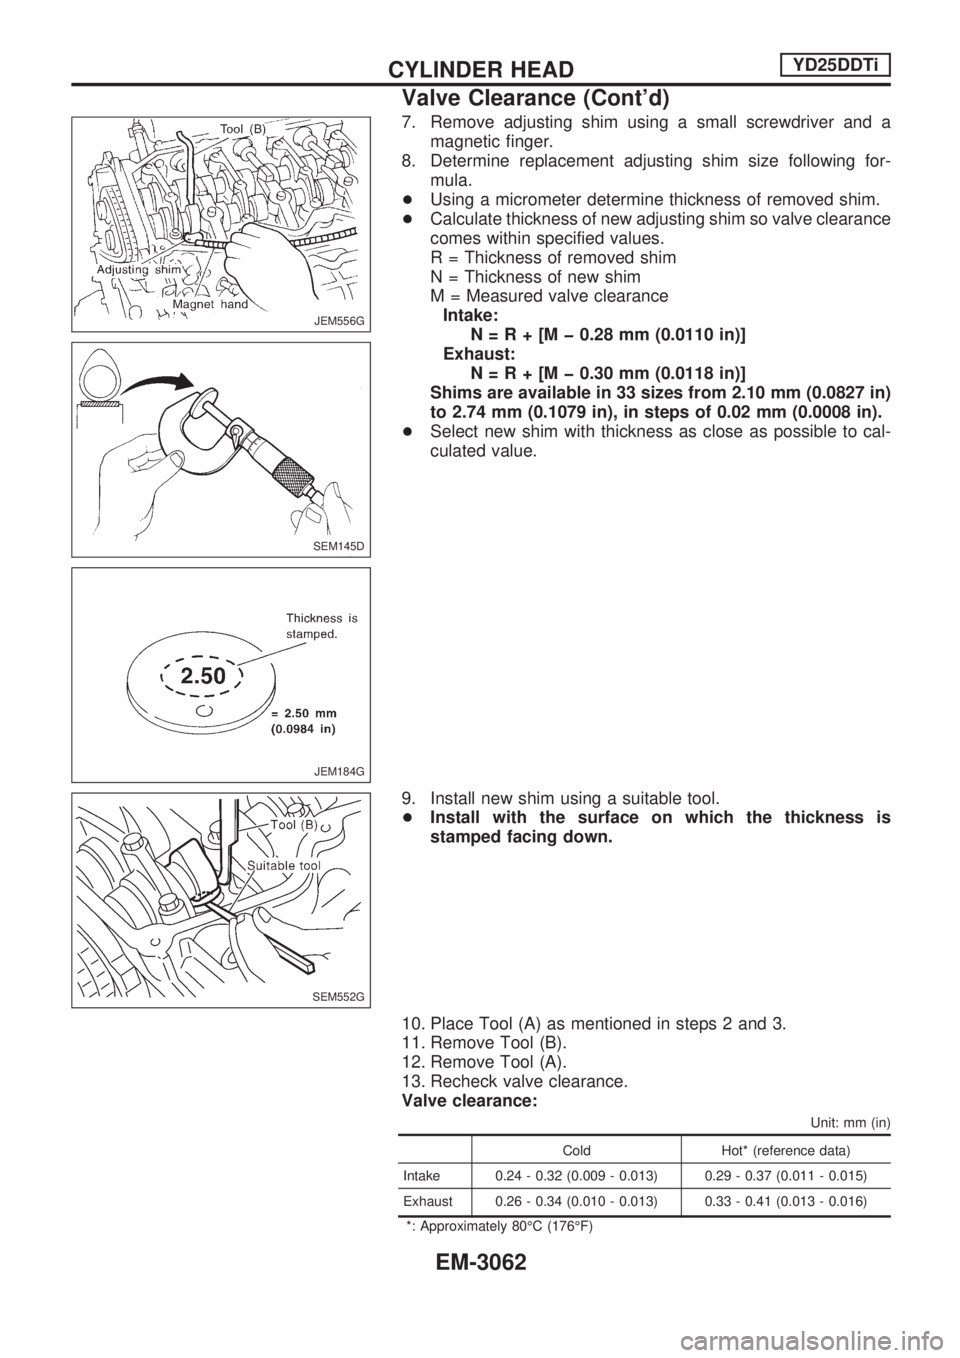
7. Remove adjusting shim using a small screwdriver and a
magnetic finger.
8. Determine replacement adjusting shim size following for-
mula.
+Using a micrometer determine thickness of removed shim.
+Calculate thickness of new adjusting shim so valve clearance
comes within specified values.
R = Thickness of removed shim
N = Thickness of new shim
M = Measured valve clearance
Intake:
N=R+[Mþ0.28 mm (0.0110 in)]
Exhaust:
N=R+[Mþ0.30 mm (0.0118 in)]
Shims are available in 33 sizes from 2.10 mm (0.0827 in)
to 2.74 mm (0.1079 in), in steps of 0.02 mm (0.0008 in).
+Select new shim with thickness as close as possible to cal-
culated value.
9. Install new shim using a suitable tool.
+Install with the surface on which the thickness is
stamped facing down.
10. Place Tool (A) as mentioned in steps 2 and 3.
11. Remove Tool (B).
12. Remove Tool (A).
13. Recheck valve clearance.
Valve clearance:
Unit: mm (in)
Cold Hot* (reference data)
Intake 0.24 - 0.32 (0.009 - 0.013) 0.29 - 0.37 (0.011 - 0.015)
Exhaust 0.26 - 0.34 (0.010 - 0.013) 0.33 - 0.41 (0.013 - 0.016)
*: Approximately 80ÉC (176ÉF)
JEM556G
SEM145D
JEM184G
SEM552G
CYLINDER HEADYD25DDTi
Valve Clearance (Cont'd)
EM-3062
Page 940 of 1306
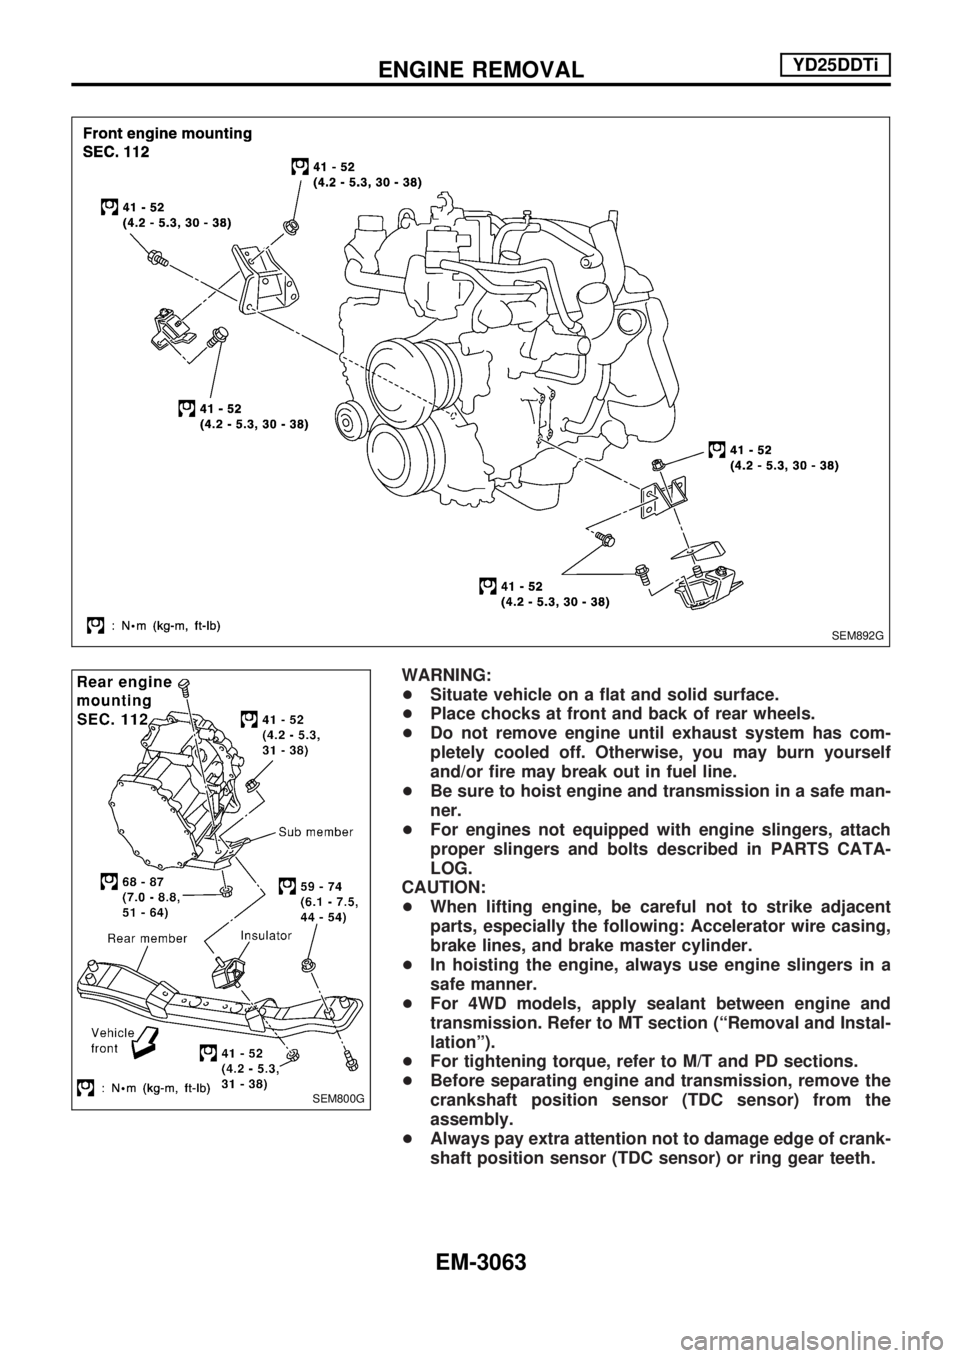
WARNING:
+Situate vehicle on a flat and solid surface.
+Place chocks at front and back of rear wheels.
+Do not remove engine until exhaust system has com-
pletely cooled off. Otherwise, you may burn yourself
and/or fire may break out in fuel line.
+Be sure to hoist engine and transmission in a safe man-
ner.
+For engines not equipped with engine slingers, attach
proper slingers and bolts described in PARTS CATA-
LOG.
CAUTION:
+When lifting engine, be careful not to strike adjacent
parts, especially the following: Accelerator wire casing,
brake lines, and brake master cylinder.
+In hoisting the engine, always use engine slingers in a
safe manner.
+For 4WD models, apply sealant between engine and
transmission. Refer to MT section (ªRemoval and Instal-
lationº).
+For tightening torque, refer to M/T and PD sections.
+Before separating engine and transmission, remove the
crankshaft position sensor (TDC sensor) from the
assembly.
+Always pay extra attention not to damage edge of crank-
shaft position sensor (TDC sensor) or ring gear teeth.
SEM892G
SEM800G
ENGINE REMOVALYD25DDTi
EM-3063