alternator NISSAN PULSAR 1987 Owner's Manual
[x] Cancel search | Manufacturer: NISSAN, Model Year: 1987, Model line: PULSAR, Model: NISSAN PULSAR 1987Pages: 238, PDF Size: 28.91 MB
Page 200 of 238

200 Electrical System
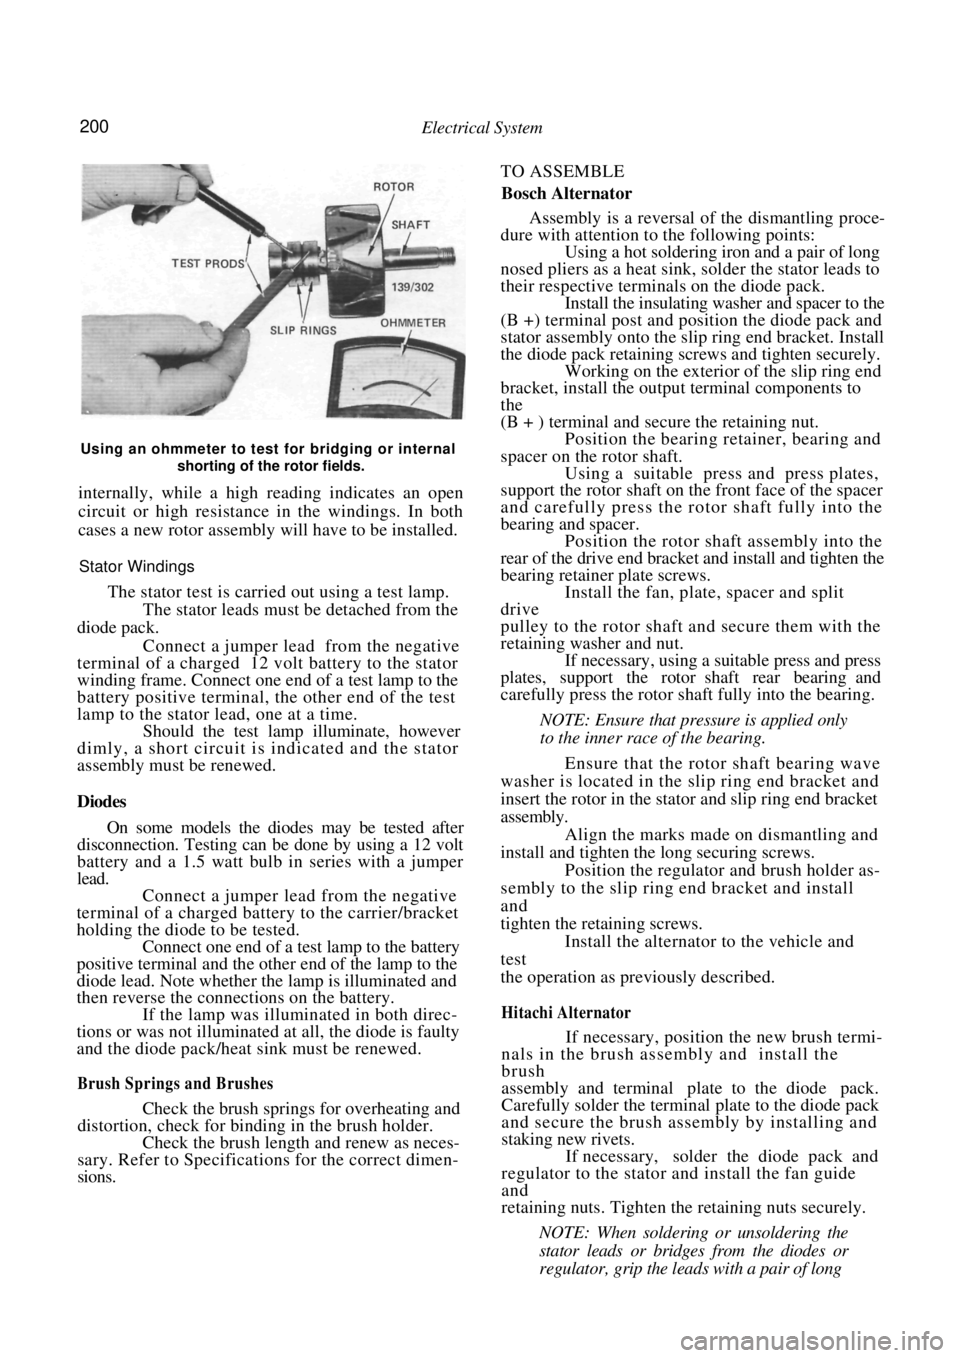
Using an ohmmeter to test for bridging or internal shorting of the rotor fields.
internally, while a high reading indicates an open
circuit or high resistance in the windings. In both
cases a new rotor assembly will have to be installed.
Stator Windings
The stator test is carried out using a test lamp.
The stator leads must be detached from the
diode pack.
Connect a jumper lead from the negative
terminal of a charged 12 volt battery to the stator
winding frame. Connect one en d of a test lamp to the
battery positive terminal, the other end of the test
lamp to the stator lead, one at a time. Should the test lamp illuminate, however
dimly, a short circuit is indicated and the stator
assembly must be renewed.
Diodes
On some models the diod es may be tested after
disconnection. Testing can be done by using a 12 volt
battery and a 1.5 watt bulb in series with a jumper
lead.
Connect a jumper lead from the negative
terminal of a charged battery to the carrier/bracket
holding the diode to be tested. Connect one end of a test lamp to the battery
positive terminal and the other end of the lamp to the
diode lead. Note whether the lamp is illuminated and
then reverse the connections on the battery. If the lamp was illuminated in both direc-
tions or was not illuminated at all, the diode is faulty
and the diode pack/heat sink must be renewed.
Brush Springs and Brushes
Check the brush spring s for overheating and
distortion, check for binding in the brush holder.
Check the brush length and renew as neces-
sary. Refer to Specifications for the correct dimen-
sions. TO ASSEMBLE
Bosch Alternator
Assembly is a reversal of the dismantling proce-
dure with attention to the following points:
Using a hot soldering iron and a pair of long
nosed pliers as a heat sink, solder the stator leads to
their respective terminals on the diode pack. Install the insulating washer and spacer to the
(B +) terminal post and position the diode pack and
stator assembly onto the slip ring end bracket. Install
the diode pack retaining screws and tighten securely. Working on the exterior of the slip ring end
bracket, install the output terminal components to
the
(B + ) terminal and secure the retaining nut.
Position the bearing retainer, bearing and
spacer on the rotor shaft. Using a suitable press and press plates,
support the rotor sh aft on the front face of the spacer
and carefully press the rotor shaft fully into the
bearing and spacer. Position the rotor shaft assembly into the
rear of the drive end bracket and install and tighten the
bearing retainer plate screws. Install the fan, plate, spacer and split
drive
pulley to the rotor shaft and secure them with the
retaining washer and nut. If necessary, using a suitable press and press
plates, support the rotor shaft rear bearing and
carefully press the rotor shaft fully into the bearing.
NOTE: Ensure that pressure is applied only
to the inner race of the bearing.
Ensure that the rotor shaft bearing wave
washer is located in the slip ring end bracket and
insert the rotor in the stator and slip ring end bracket
assembly. Align the marks made on dismantling and
install and tighten the long securing screws.
Position the regulator and brush holder as-
sembly to the slip ring end bracket and install
and
tighten the retaining screws. Install the alternator to the vehicle and
test
the operation as prev iously described.
Hitachi Alternator
If necessary, position the new brush termi-
nals in the brush assembly and install the
brush
assembly and terminal plate to the diode pack.
Carefully solder the terminal plate to the diode pack
and secure the brush assembly by installing and
staking new rivets.
If necessary, solder the diode pack and
regulator to the stator and install the fan guide
and
retaining nuts. Tighten the retaining nuts securely.
NOTE: When soldering or unsoldering the
stator leads or bridges from the diodes or
regulator, grip the leads with a pair of long
Page 201 of 238

Electrical System 201
nosed pliers. This will safeguard the diodes
by transferring any excess heat to the jaws of
the pliers.
Using a suitable drift, install the bearing into
the drive end bracket, install the retainer plate and
screws. Tighten the screws securely. Using a suitable press and press plates, install
the bearing to the slip ring end of the rotor shaft.
Ensure that pressure is ex erted only on the inner race
and that the stop ring groove is nearest to the sl i p
rings. Ensure that the rotor sh aft rear bearing stop
ring is positioned so that the protruding part of the
ring is located in the deepest part of the groove. Install the stator, diode pack and
regulator
assembly to the slip ring e nd bracket. Install the
retaining nuts and washers and tighten securely. Install the nut and insulator to the terminal
and tighten securely. Using a piece of wire, hold the brushes in a
retracted position. Hold the drive end bracket in a soft jawed
vice and install the rotor shaft assembly to the drive
end bracket. Install the pulley, retaining nut and washer to
the rotor shaft and tighten the retaining nut to the
specified torque. Apply a heated 200 watt soldering iron to the
slip ring end bracket at the bearing mounting boss for
3-4 minutes to heat the bracket and allow the
installation of the rotor shaft rear bearing. Aligning the marks made on dismantling and
ensuring that the rotor sh aft rear bearing retaining
ring protrusion is located in the deepest part of its
groove, install the rotor/stator assembly to the slip ring
end bracket.
Remove the brush retr acting wire from the
alternator, ensure that the alternator component
marks are aligned, install the retaining through bolts
and tighten them securely. Check the alternator rotor for smooth oper-
ation and install the al ternator to the vehicle
as
previously described.
Check the alternator operation on the vehicle
as previously described.
8. STARTER MOTOR
Special Equipment Required:
To Renew Brushes — Soldering iron
To Renew Armature Bearings — Bearing puller
DESCRIPTION
Two types of starter motors are installed to the
range of vehicles covere d by this manual, either
Hitachi or Bosch.
The starter motor is the induced pole type with
four brushes and four pole shoes with field coils.
A solenoid switch is attached to the starter drive
end bracket. The solenoid plunger is connected to
the overrunning clutch and drive pinion assembly
through a lever and pivot arrangement.
When the solenoid windings are energized, the
plunger acting on the lever and pivot engages the drive
pinion with the flywheel ri ng gear and at the same
time closes the switch supplying power from the
positive lead of the battery to the starter motor field
coils and armature to operate the motor.
As the engine fires, the over-running clutch of the
drive pinion assembly prevents high speed rotation of.
and possible damage to, the starter armature if the
solenoid windings are not immediately de-energized
by releasing the ignition key.
The starter solenoid switch windings are energized
by the ignition switch.
TO TEST ON VEHICLE
Should the starter motor fail to operate when the
ignition switch is turned to the Start position, check
the following points:
Check the battery condition and state of
charge. Refer to the Battery heading for the correct
procedure.
Clean the battery terminals, taking particular
care to remove the scale from the positive ( + )
terminal post and terminal. Check the earth connection for tightness and
cleanliness.
Switch on the headlamps and turn the igni-
tion switch to Start. If the lamps dim but the starter
motor does not operate, it could indicate that a short
circuit has developed in the starting system. Check that the engine is not seized or that the
starter motor drive pinion and ring gear are not
locked as these conditions would -give the same
indications as above.
(5) If the lamps do not dim and the starter
motor does not operate, this would indicate an open
circuit such as a broken or disconnected wire or a
switch not operating.
If the vehicle is equipped with an automatic
transaxle, turn the ignition switch to Start and move
the selector lever through all the gear selection range.
If the starter motor operates in any position other
than N or P, the neutral safety switch is faulty.
(6) Check all the external wiring to ensure that
the fault is not external. If the external circuit proves
satisfactory, indicating that the problem is in the
starter motor, the unit will have to be removed and
tested.
TO REMOVE AND INSTAL
Disconnect the negative battery terminal.
Disconnect the wiring from the starter motor
solenoid. Remove the starter motor mounting bolts,
Page 219 of 238

Electrical System 219
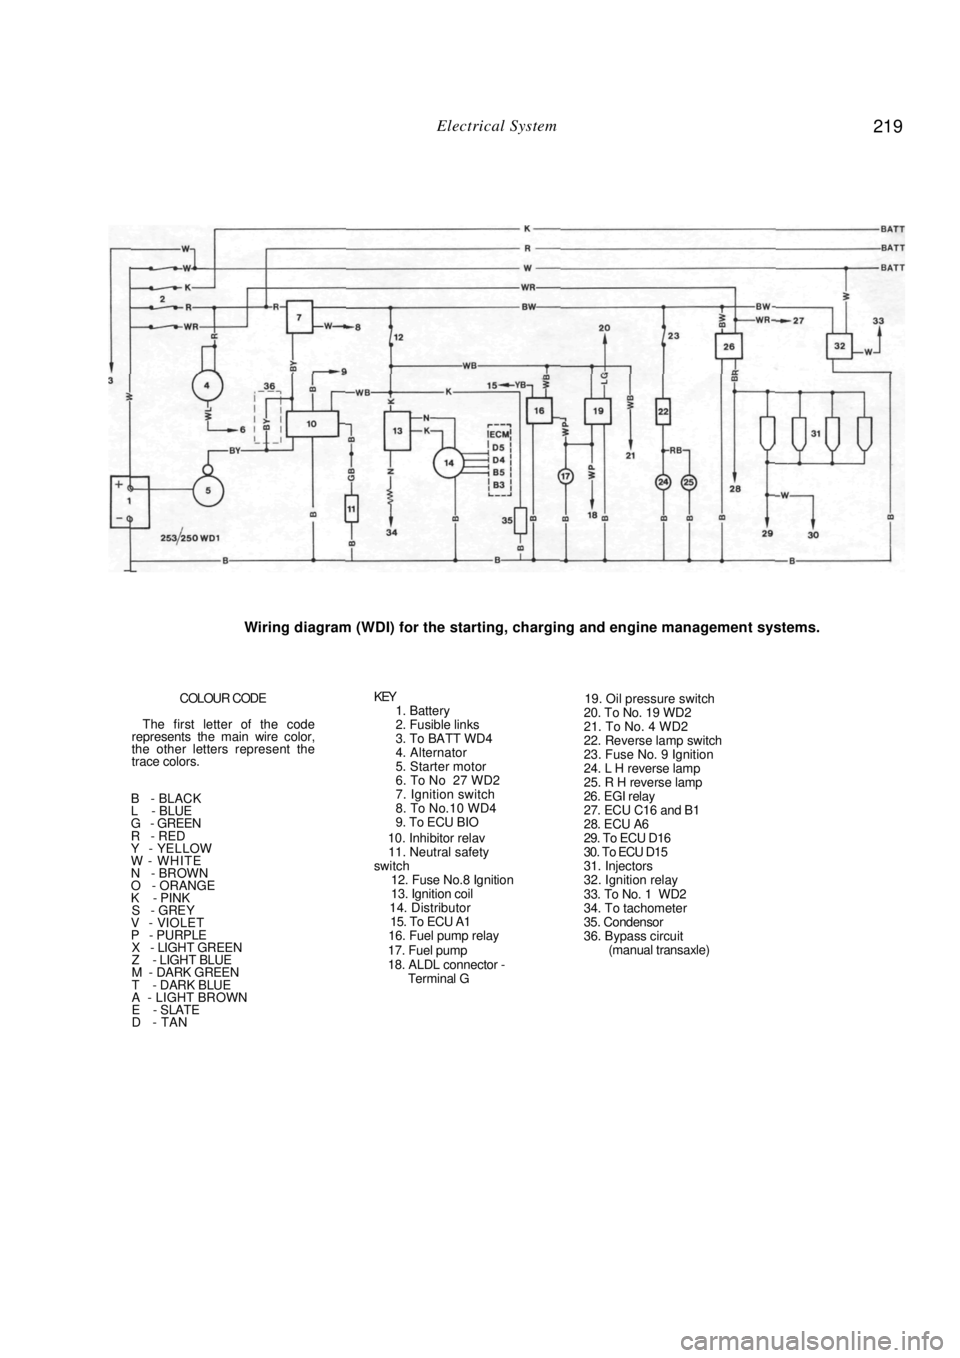
Wiring diagram (WDI) for the starting, charging and engine management systems.
COLOUR CODE
The first letter of the code
represents the main wire color,
the other letters represent the
trace colors.
B - BLACK
L - BLUE
G - GREEN
R - RED
Y - YELLOW
W - WHITE
N - BROWN
O - ORANGE
K - PINK
S - GREY V - VIOLET
P - PURPLE X - LIGHT GREEN
Z - LIGHT BLUE
M - DARK GREEN
T - DARK BLUE
A - LIGHT BROWN
E - SLATE
D - TAN
KEY 1. Battery
2. Fusible links
3. To BATT WD4
4. Alternator
5. Starter motor
6. To No 27 WD2
7. Ignition switch
8. To No.10 WD4
9. To ECU BIO
10. Inhibitor relav
11. Neutral safety
switch
12. Fuse No.8 Ignition
13. Ignition coil
14. Distributor
15. To ECU A1
16. Fuel pump relay
17. Fuel pump
18. ALDL connector - Terminal G
19. Oil pressure switch
20. To No. 19 WD2
21. To No. 4 WD2
22. Reverse lamp switch
23. Fuse No. 9 Ignition
24. L H reverse lamp
25. R H reverse lamp
26. EGI relay
27. ECU C16 and B1
28. ECU A6
29. To ECU D16
30. To ECU D15
31. Injectors
32. Ignition relay
33. To No. 1 WD2
34. To tachometer
35. Condensor
36. Bypass circuit (manual transaxle)