NISSAN TEANA 2003 Service Manual
TEANA 2003
NISSAN
NISSAN
https://www.carmanualsonline.info/img/5/57392/w960_57392-0.png
NISSAN TEANA 2003 Service Manual
Trending: m53, relay, M42, battery location, automatic transmission, LT-196, jack points
Page 3361 of 3502
FRONT SEAT
SE-105
C
D
E
F
G
H
J
K
L
MA
B
SE
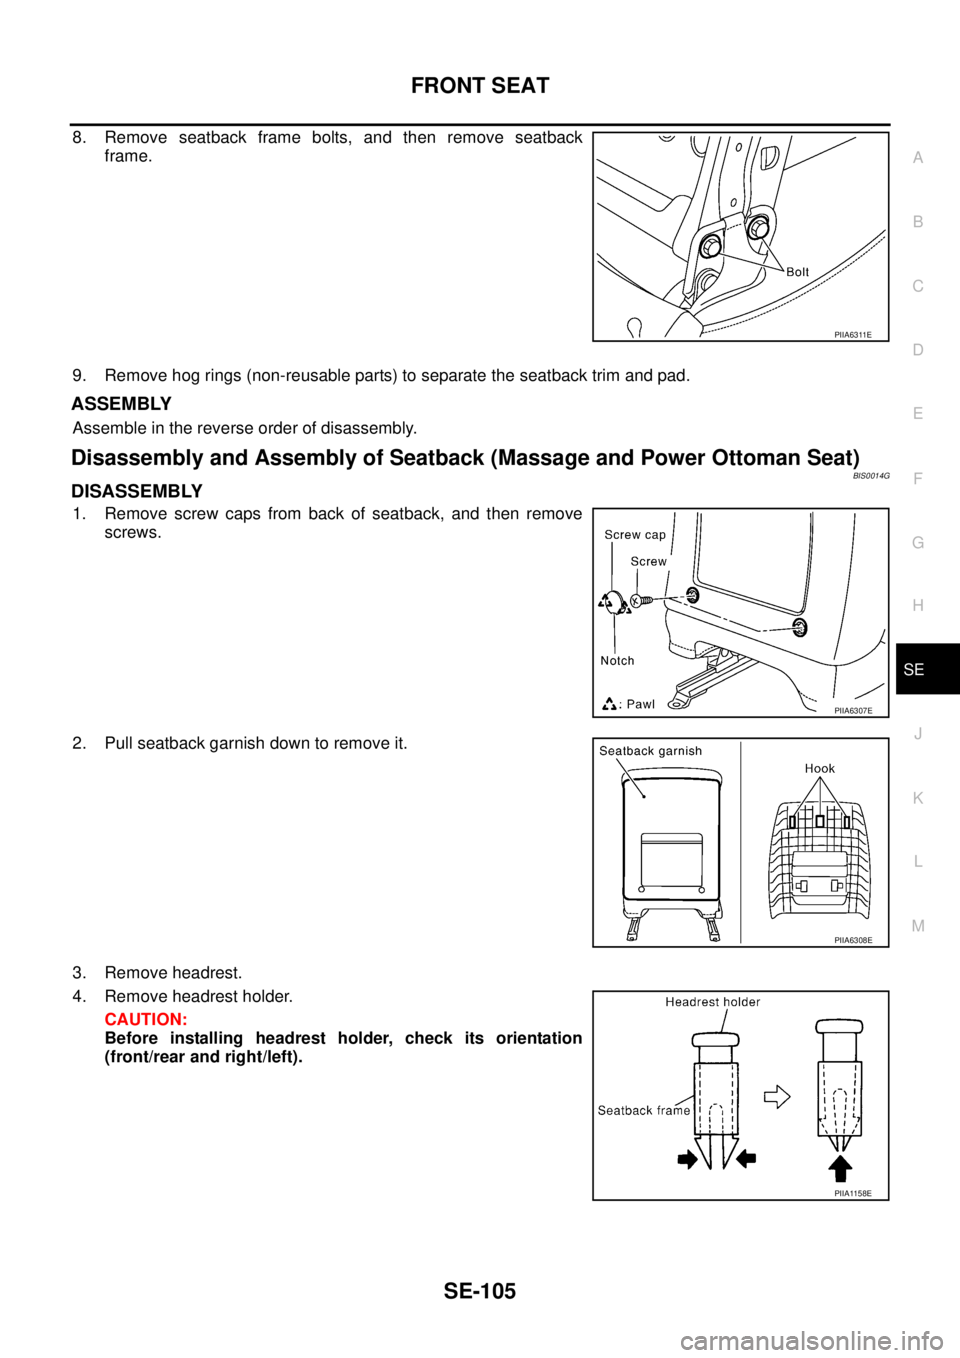
8. Remove seatback frame bolts, and then remove seatback
frame.
9. Remove hog rings (non-reusable parts) to separate the seatback trim and pad.
ASSEMBLY
Assemble in the reverse order of disassembly.
Disassembly and Assembly of Seatback (Massage and Power Ottoman Seat)BIS0014G
DISASSEMBLY
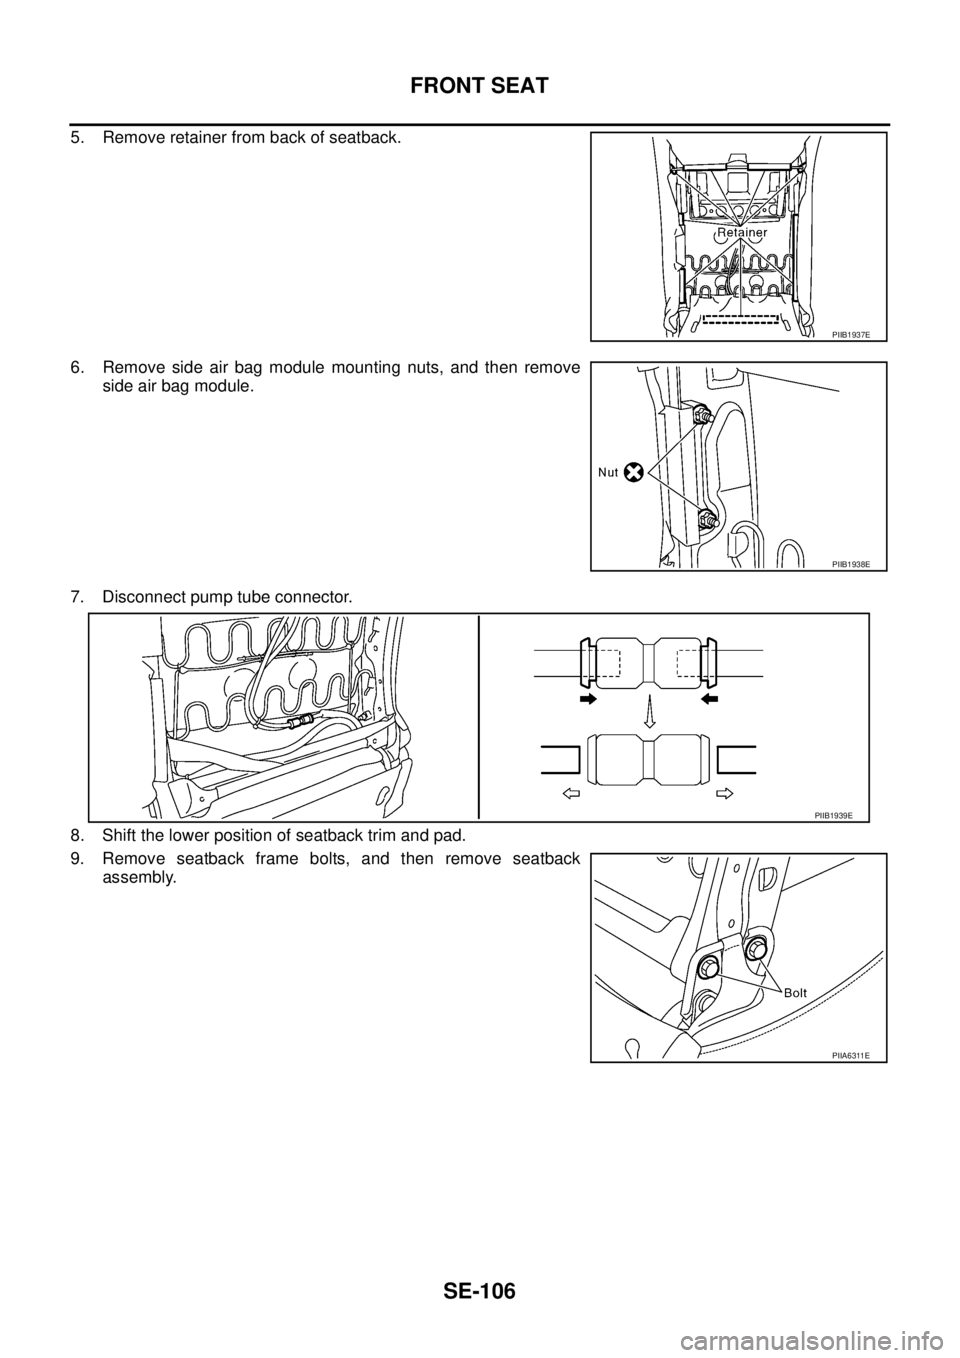
1. Remove screw caps from back of seatback, and then remove
screws.
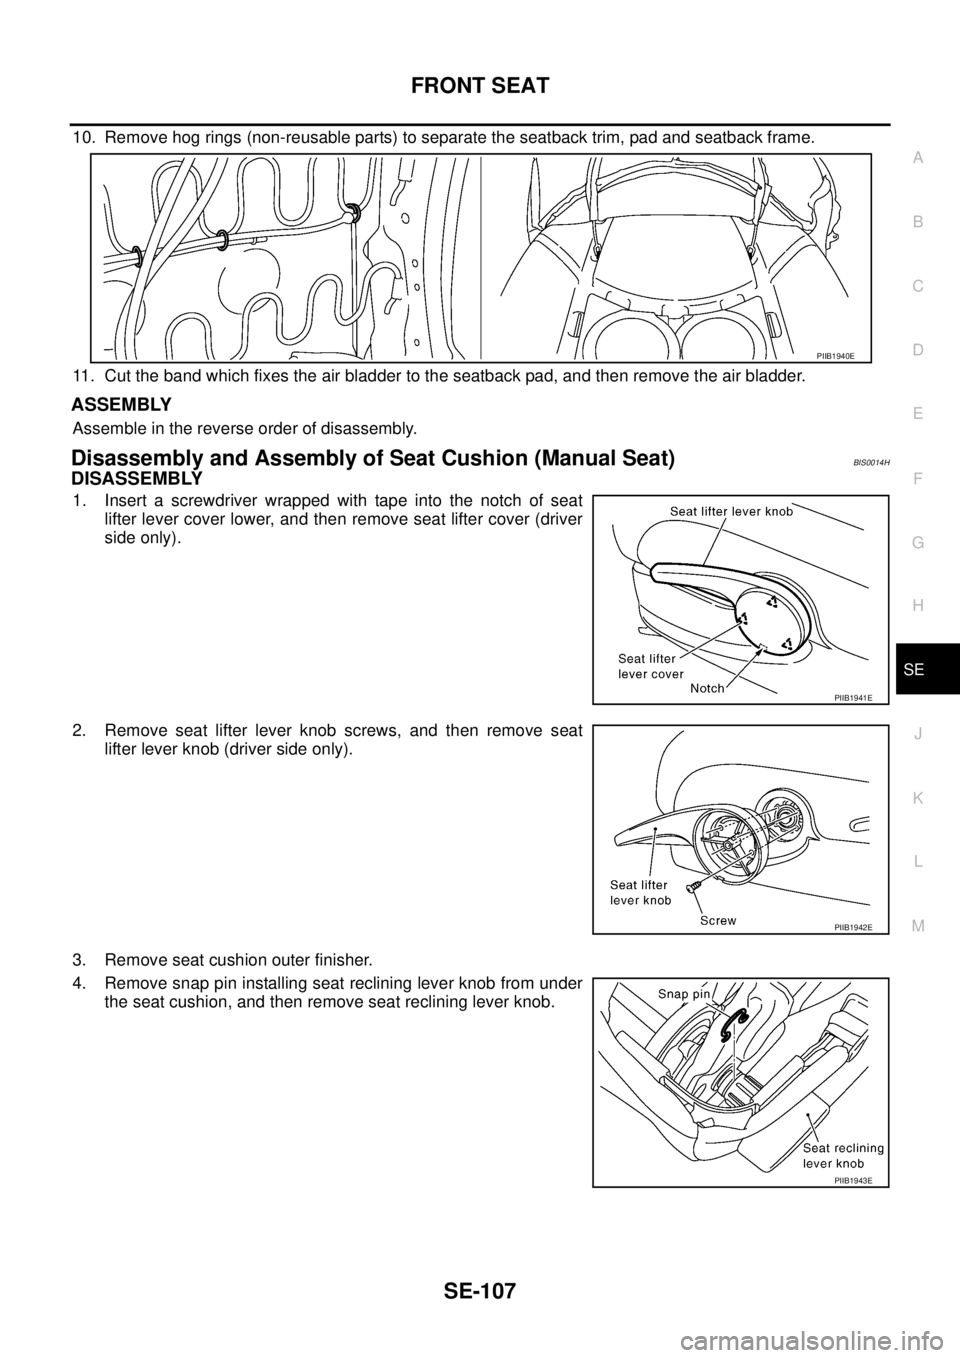
2. Pull seatback garnish down to remove it.
3. Remove headrest.
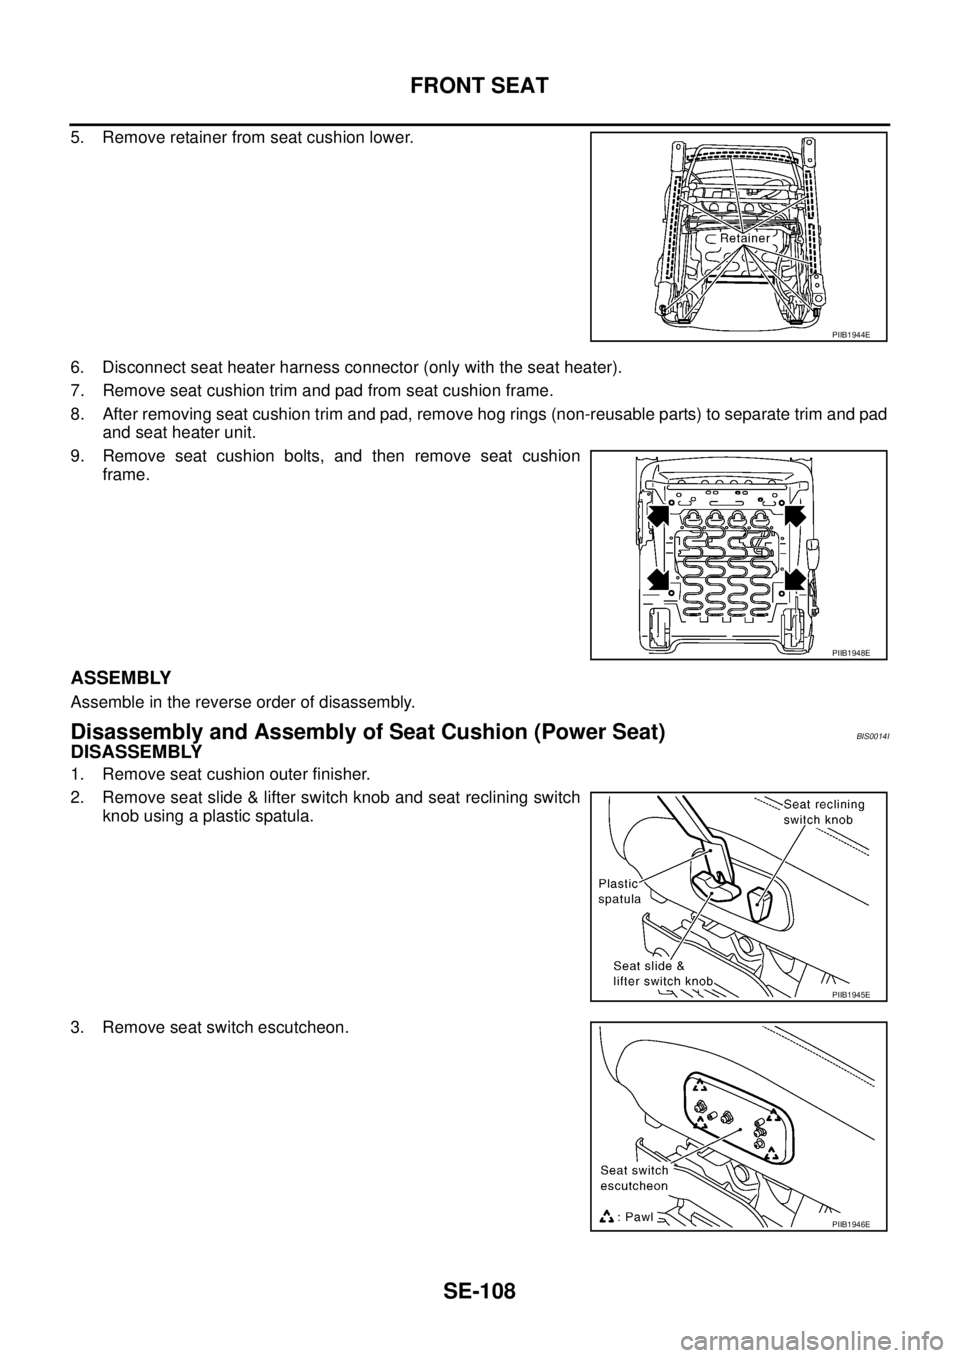
4. Remove headrest holder.
CAUTION:
Before installing headrest holder, check its orientation
(front/rear and right/left).
PIIA6311E
PIIA6307E
PIIA6308E
PIIA1158E
Page 3362 of 3502
SE-106
FRONT SEAT
5. Remove retainer from back of seatback.
6. Remove side air bag module mounting nuts, and then remove
side air bag module.
7. Disconnect pump tube connector.
8. Shift the lower position of seatback trim and pad.
9. Remove seatback frame bolts, and then remove seatback
assembly.
PIIB1937E
PIIB1938E
PIIB1939E
PIIA6311E
Page 3363 of 3502
FRONT SEAT
SE-107
C
D
E
F
G
H
J
K
L
MA
B
SE
10. Remove hog rings (non-reusable parts) to separate the seatback trim, pad and seatback frame.
11. Cut the band which fixes the air bladder to the seatback pad, and then remove the air bladder.
ASSEMBLY
Assemble in the reverse order of disassembly.
Disassembly and Assembly of Seat Cushion (Manual Seat)BIS0014H
DISASSEMBLY
1. Insert a screwdriver wrapped with tape into the notch of seat
lifter lever cover lower, and then remove seat lifter cover (driver
side only).
2. Remove seat lifter lever knob screws, and then remove seat
lifter lever knob (driver side only).
3. Remove seat cushion outer finisher.
4. Remove snap pin installing seat reclining lever knob from under
the seat cushion, and then remove seat reclining lever knob.
PIIB1940E
PIIB1941E
PIIB1942E
PIIB1943E
Page 3364 of 3502
SE-108
FRONT SEAT
5. Remove retainer from seat cushion lower.
6. Disconnect seat heater harness connector (only with the seat heater).
7. Remove seat cushion trim and pad from seat cushion frame.
8. After removing seat cushion trim and pad, remove hog rings (non-reusable parts) to separate trim and pad
and seat heater unit.
9. Remove seat cushion bolts, and then remove seat cushion
frame.
ASSEMBLY
Assemble in the reverse order of disassembly.
Disassembly and Assembly of Seat Cushion (Power Seat)BIS0014I
DISASSEMBLY
1. Remove seat cushion outer finisher.
2. Remove seat slide & lifter switch knob and seat reclining switch
knob using a plastic spatula.
3. Remove seat switch escutcheon.
PIIB1944E
PIIB1948E
PIIB1945E
PIIB1946E
Page 3365 of 3502
FRONT SEAT
SE-109
C
D
E
F
G
H
J
K
L
MA
B
SE
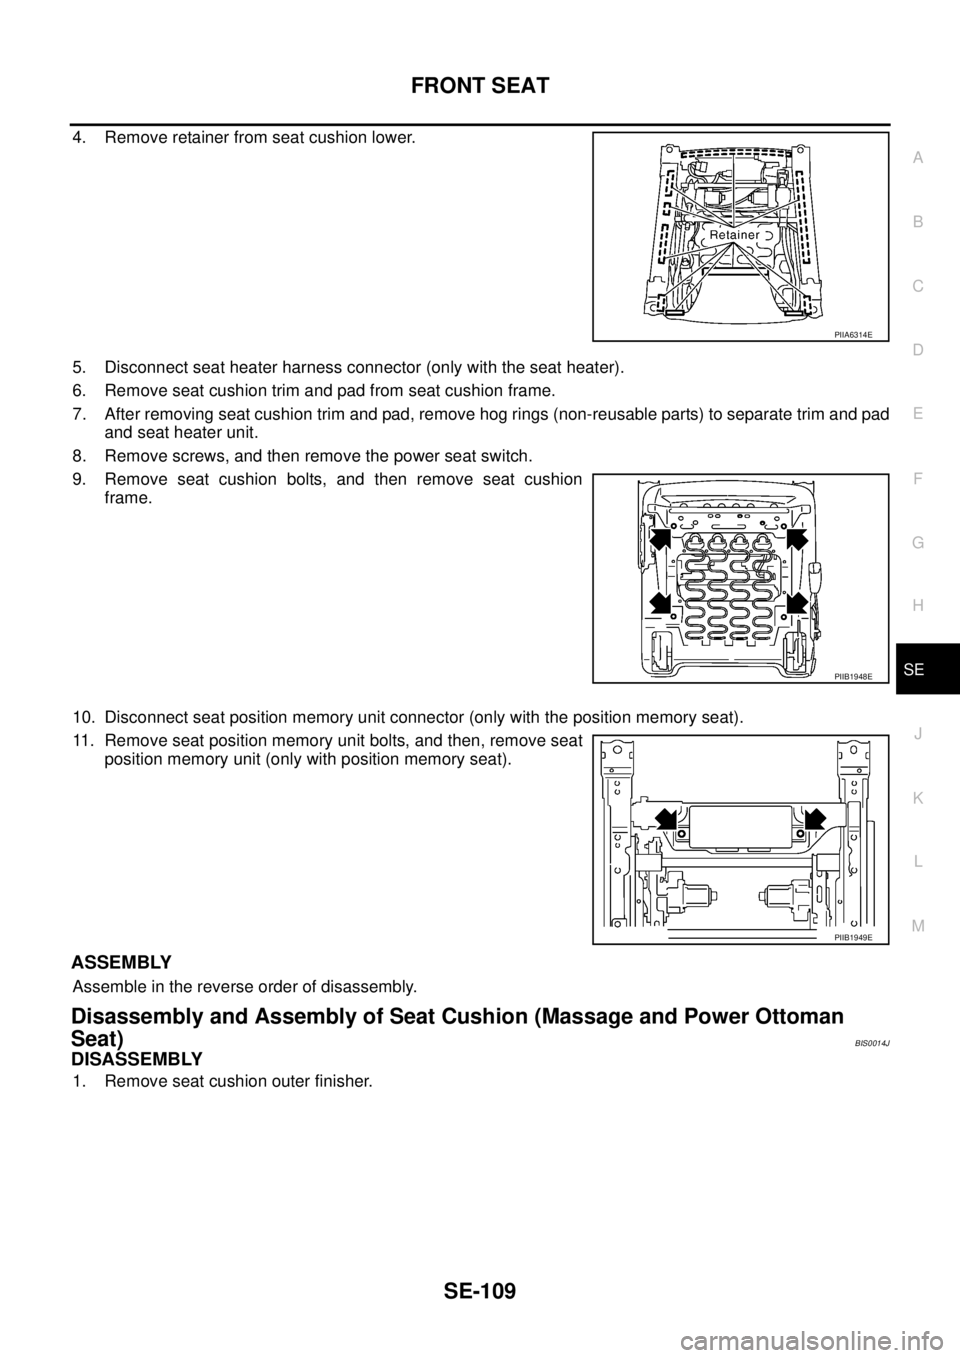
4. Remove retainer from seat cushion lower.
5. Disconnect seat heater harness connector (only with the seat heater).
6. Remove seat cushion trim and pad from seat cushion frame.
7. After removing seat cushion trim and pad, remove hog rings (non-reusable parts) to separate trim and pad
and seat heater unit.
8. Remove screws, and then remove the power seat switch.
9. Remove seat cushion bolts, and then remove seat cushion
frame.
10. Disconnect seat position memory unit connector (only with the position memory seat).
11. Remove seat position memory unit bolts, and then, remove seat
position memory unit (only with position memory seat).
ASSEMBLY
Assemble in the reverse order of disassembly.
Disassembly and Assembly of Seat Cushion (Massage and Power Ottoman
Seat)
BIS0014J
DISASSEMBLY
1. Remove seat cushion outer finisher.
PIIA6314E
PIIB1948E
PIIB1949E
Page 3366 of 3502
SE-110
FRONT SEAT
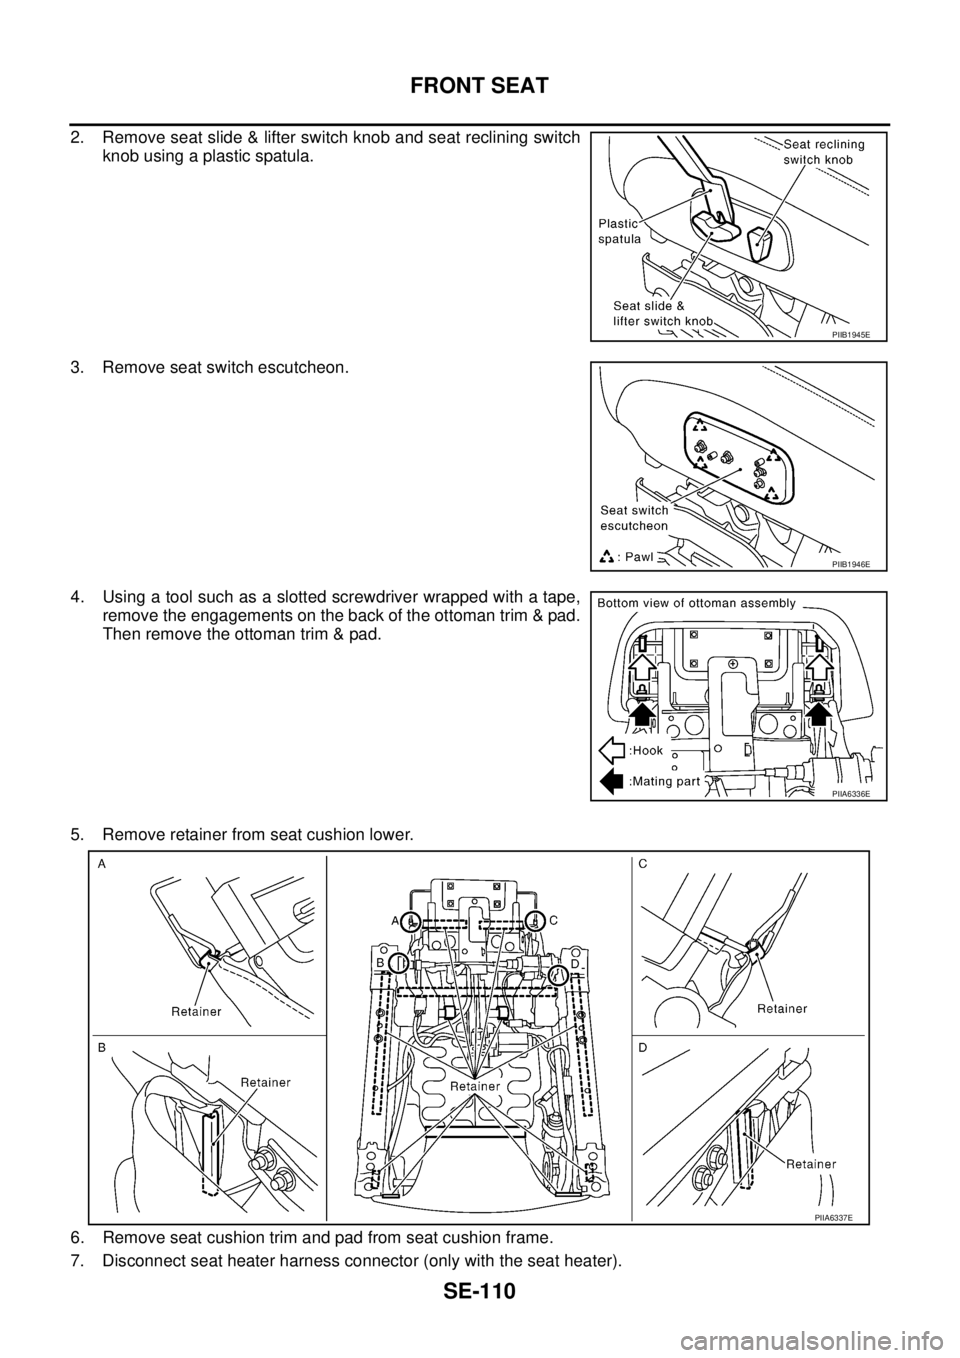
2. Remove seat slide & lifter switch knob and seat reclining switch
knob using a plastic spatula.
3. Remove seat switch escutcheon.
4. Using a tool such as a slotted screwdriver wrapped with a tape,
remove the engagements on the back of the ottoman trim & pad.
Then remove the ottoman trim & pad.
5. Remove retainer from seat cushion lower.
6. Remove seat cushion trim and pad from seat cushion frame.
7. Disconnect seat heater harness connector (only with the seat heater).
PIIB1945E
PIIB1946E
PIIA6336E
PIIA6337E
Page 3367 of 3502
FRONT SEAT
SE-111
C
D
E
F
G
H
J
K
L
MA
B
SE
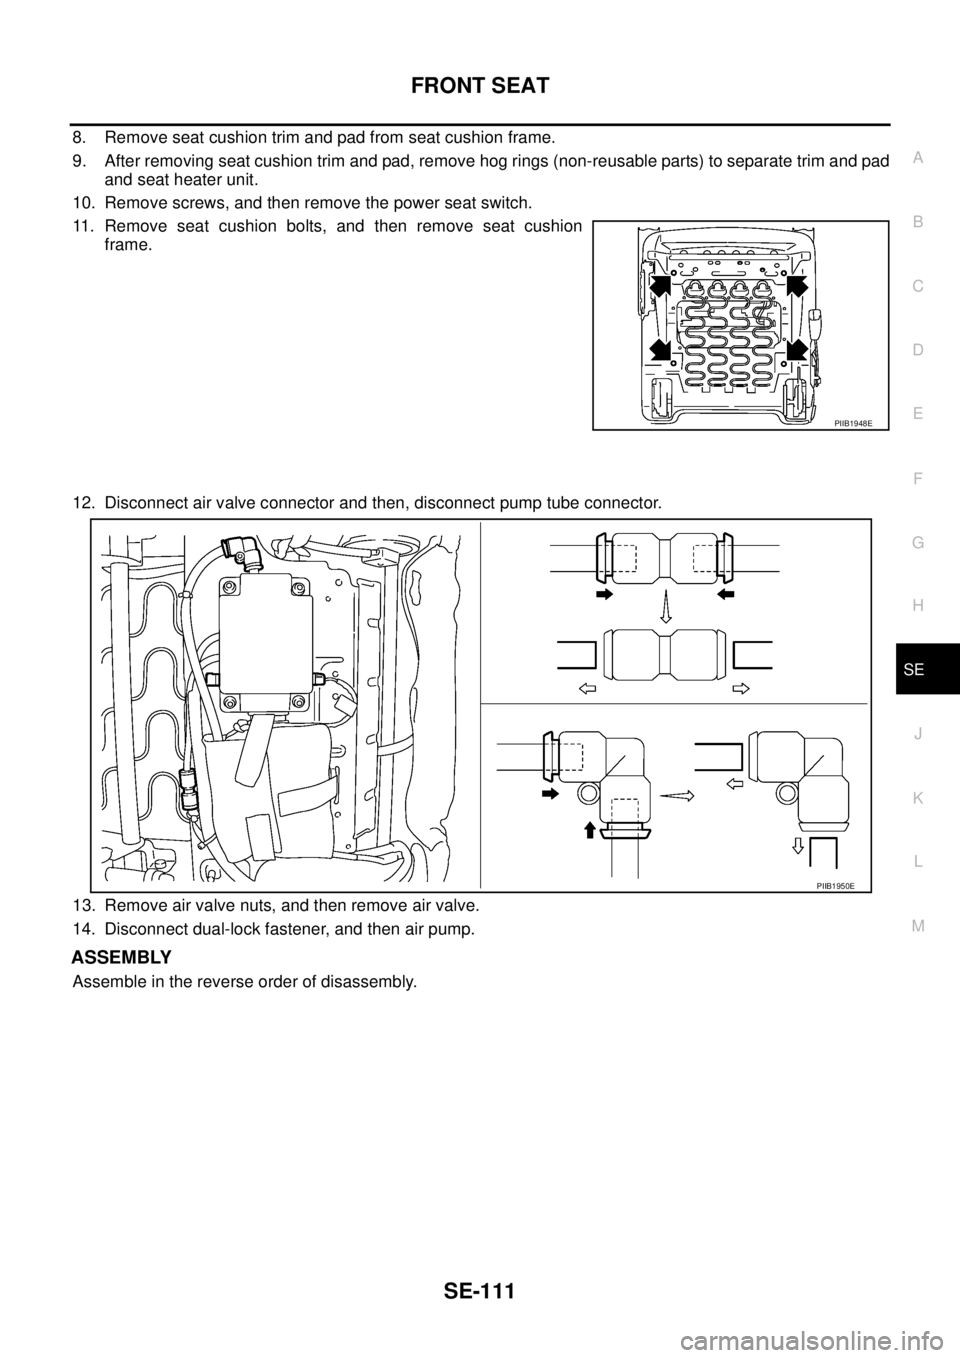
8. Remove seat cushion trim and pad from seat cushion frame.
9. After removing seat cushion trim and pad, remove hog rings (non-reusable parts) to separate trim and pad
and seat heater unit.
10. Remove screws, and then remove the power seat switch.
11. Remove seat cushion bolts, and then remove seat cushion
frame.
12. Disconnect air valve connector and then, disconnect pump tube connector.
13. Remove air valve nuts, and then remove air valve.
14. Disconnect dual-lock fastener, and then air pump.
ASSEMBLY
Assemble in the reverse order of disassembly.
PIIB1948E
PIIB1950E
Page 3368 of 3502
SE-112
REAR SEAT
REAR SEATPFP:88300
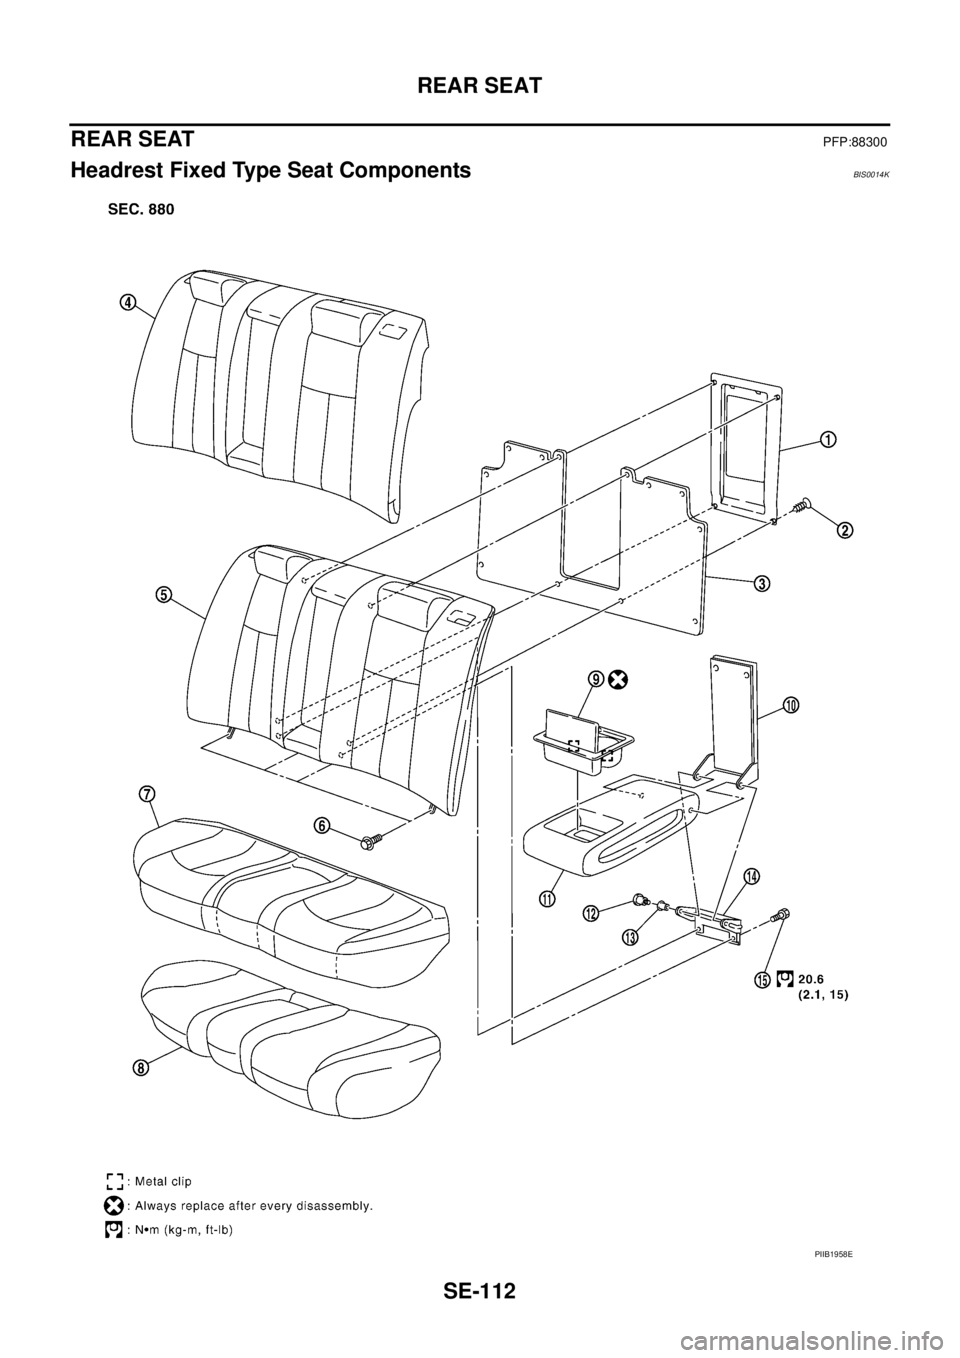
Headrest Fixed Type Seat ComponentsBIS0014K
PIIB1958E
Page 3369 of 3502
REAR SEAT
SE-113
C
D
E
F
G
H
J
K
L
MA
B
SE
1. Seatback screen 2. Screw 3. Seatback mat
4. Seatback trim 5. Seatback pad 6. Bolt
7. Seat cushion trim 8. Seat cushion pad 9. Cup holder
10. Armrest lid 11. Armrest 12. Armrest screw
13. Bush 14. Armrest bracket 15. Bolt
Page 3370 of 3502
SE-114
REAR SEAT
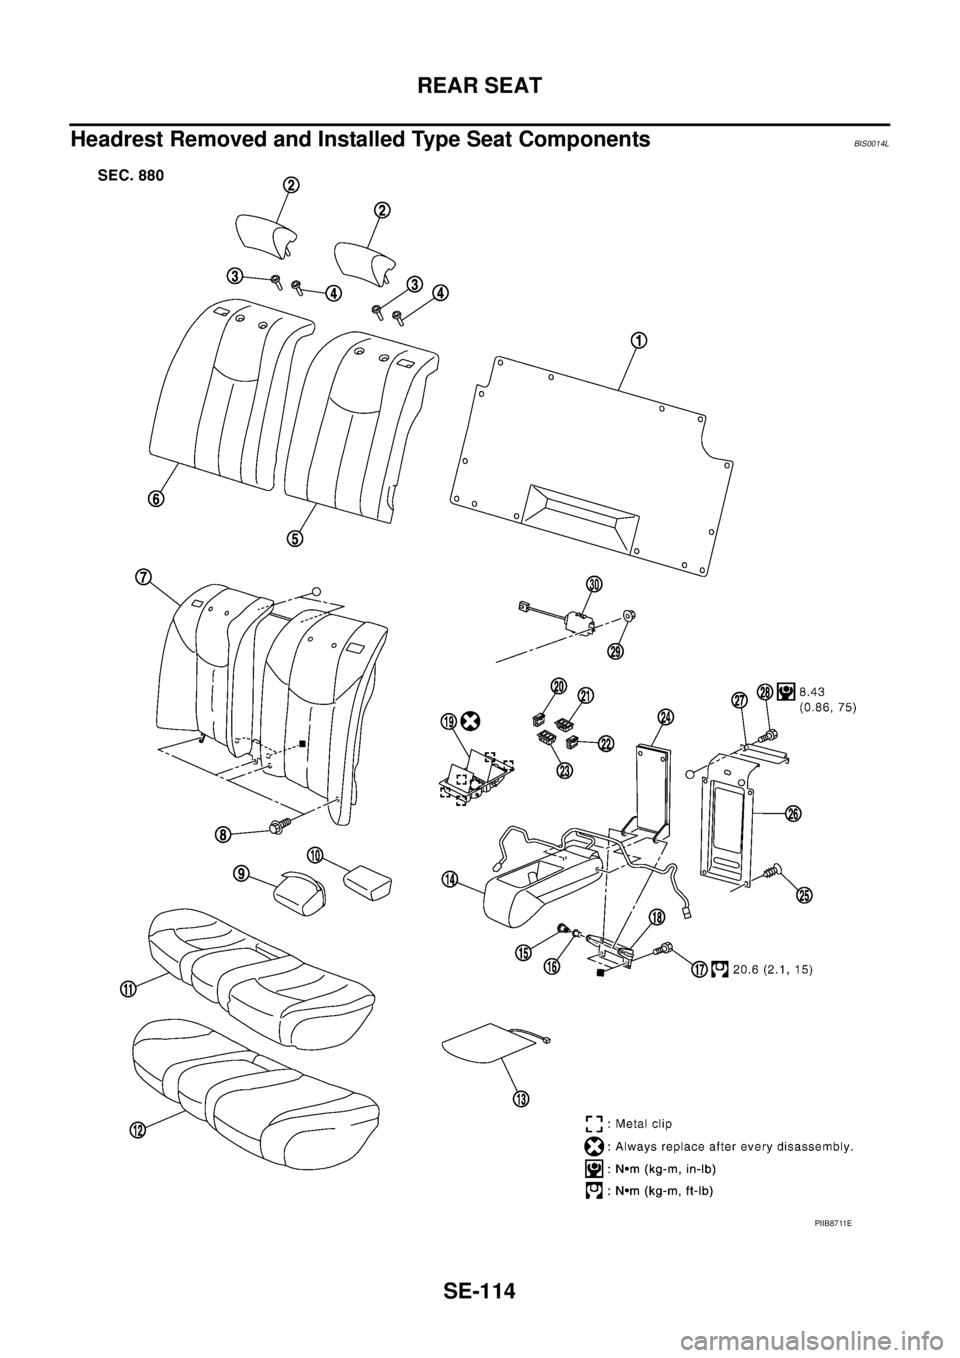
Headrest Removed and Installed Type Seat ComponentsBIS0014L
PIIB8711E
Trending: height, ABS, timing chain instal, brake pads, catalytic converter, wheel torque, accelerator
