wheel torque NISSAN TEANA 2008 User Guide
[x] Cancel search | Manufacturer: NISSAN, Model Year: 2008, Model line: TEANA, Model: NISSAN TEANA 2008Pages: 5121, PDF Size: 69.03 MB
Page 1141 of 5121
CO-18
< ON-VEHICLE REPAIR >
WATER PUMP
WATER PUMP
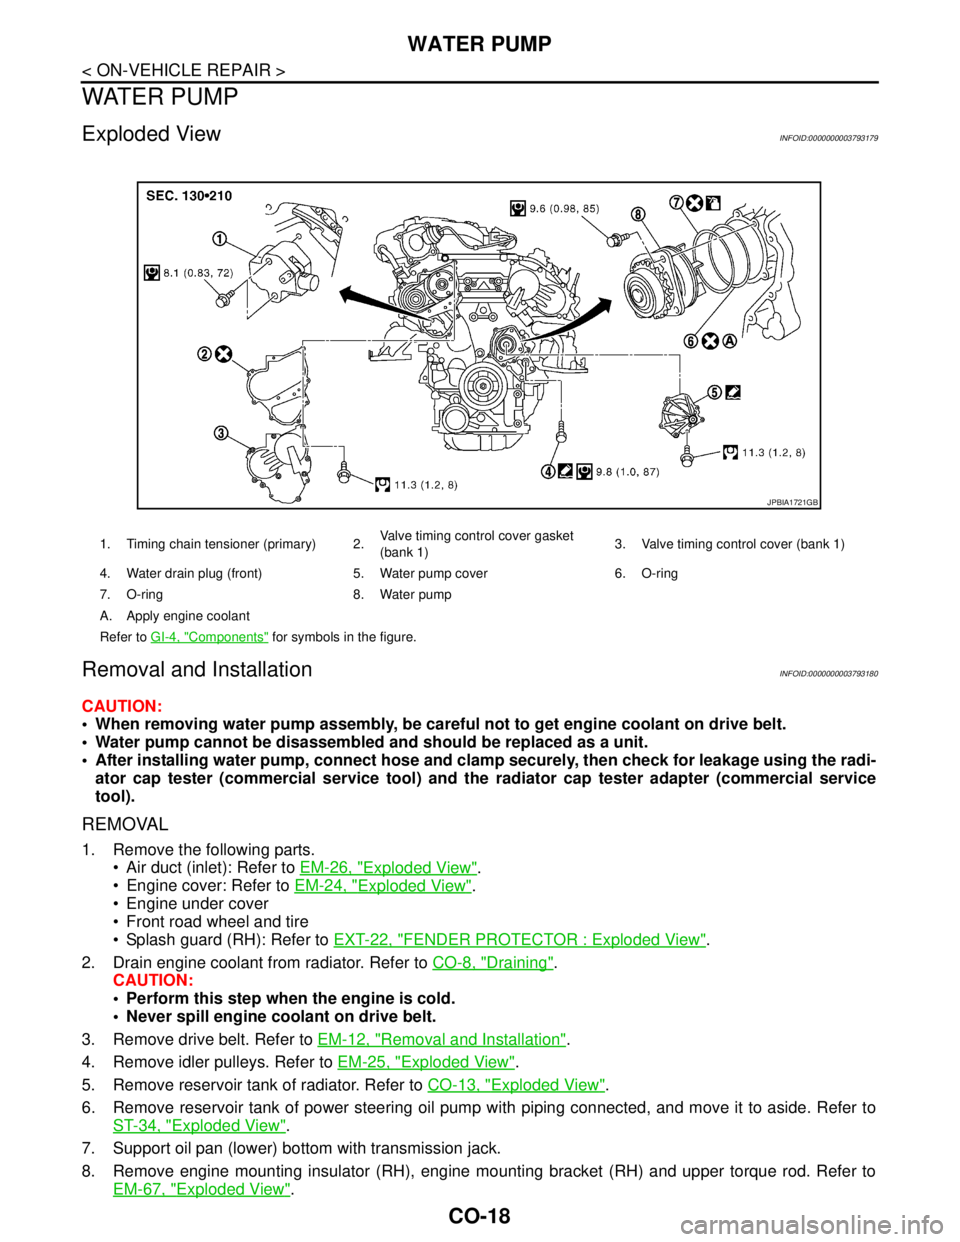
Exploded ViewINFOID:0000000003793179
Removal and InstallationINFOID:0000000003793180
CAUTION:
When removing water pump assembly, be careful not to get engine coolant on drive belt.
Water pump cannot be disassembled and should be replaced as a unit.
After installing water pump, connect hose and clamp securely, then check for leakage using the radi-
ator cap tester (commercial service tool) and the radiator cap tester adapter (commercial service
tool).
REMOVAL
1. Remove the following parts.
Air duct (inlet): Refer to EM-26, "
Exploded View".
Engine cover: Refer to EM-24, "
Exploded View".
Engine under cover
Front road wheel and tire
Splash guard (RH): Refer to EXT-22, "
FENDER PROTECTOR : Exploded View".
2. Drain engine coolant from radiator. Refer to CO-8, "
Draining".
CAUTION:
Perform this step when the engine is cold.
Never spill engine coolant on drive belt.
3. Remove drive belt. Refer to EM-12, "
Removal and Installation".
4. Remove idler pulleys. Refer to EM-25, "
Exploded View".
5. Remove reservoir tank of radiator. Refer to CO-13, "
Exploded View".
6. Remove reservoir tank of power steering oil pump with piping connected, and move it to aside. Refer to
ST-34, "
Exploded View".
7. Support oil pan (lower) bottom with transmission jack.
8. Remove engine mounting insulator (RH), engine mounting bracket (RH) and upper torque rod. Refer to
EM-67, "
Exploded View".
1. Timing chain tensioner (primary) 2.Valve timing control cover gasket
(bank 1)3. Valve timing control cover (bank 1)
4. Water drain plug (front) 5. Water pump cover 6. O-ring
7. O-ring 8. Water pump
A. Apply engine coolant
Refer to GI-4, "
Components" for symbols in the figure.
JPBIA1721GB
Page 1881 of 5121
EM-6
< PRECAUTION >
PRECAUTIONS
3. Disconnect both battery cables. The steering lock will remain released with both battery cables discon-
nected and the steering wheel can be turned.
4. Perform the necessary repair operation.
5. When the repair work is completed, re-connect both battery cables. With the brake pedal released, turn
the push-button ignition switch from ACC position to ON position, then to LOCK position. (The steering
wheel will lock when the push-button ignition switch is turned to LOCK position.)
6. Perform self-diagnosis check of all control units using CONSULT-III.
Precaution for Drain Engine Coolant and Engine OilINFOID:0000000003802227
Drain engine coolant and engine oil when the engine is cooled.
Precaution for Disconnecting Fuel PipingINFOID:0000000003802228
Before starting work, check no fire or spark producing items are in the work area.
Release fuel pressure before disconnecting and disassembly.
After disconnecting pipes, plug openings to stop fuel leakage.
Precaution for Removal and DisassemblyINFOID:0000000003802229
When instructed to use SST, use the specified tools. Always be careful to work safely, avoid forceful or unin-
structed operations.
Exercise maximum care to avoid damage to mating or sliding surfaces.
Dowel pins are used for several parts alignment. When replacing and reassembling parts with dowel pins,
check that dowel pins are installed in the original position.
Cover openings of engine system with a tape or the equivalent, if necessary, to seal out foreign materials.
Mark and arrange disassembly parts in an organized way for easy troubleshooting and reassembly.
When loosening nuts and bolts, as a basic rule, start with the one furthest outside, then the one diagonally
opposite, and so on. If the order of loosening is specified, do exactly as specified. Power tools may be used
in the step.
Precaution for Inspection, Repair and ReplacementINFOID:0000000003802230
Before repairing or replacing, thoroughly inspect parts. Inspect new replacement parts in the same way, and
replace if necessary.
Precaution for Assembly and InstallationINFOID:0000000003802231
Use torque wrench to tighten bolts or nuts to specification.
When tightening nuts and bolts, as a basic rule, equally tighten in several different steps starting with the
ones in center, then ones on inside and outside diagonally in this order. If the order of tightening is specified,
do exactly as specified.
Replace with new gasket, packing, oil seal or O-ring.
Dowel pins are used for several parts alignment. When replacing and reassembling parts with dowel pins,
check that dowel pins are installed in the original position.
Thoroughly wash, clean, and air-blow each part. Carefully check engine oil or engine coolant passages for
any restriction and blockage.
Avoid damaging sliding or mating surfaces. Completely remove foreign materials such as cloth lint or dust.
Before assembly, oil sliding surfaces well.
Release air within route when refilling after draining engine coolant.
After repairing, start the engine and increase engine speed to check engine coolant, fuel, engine oil, and
exhaust gases for leakage.
Precaution for Angle TighteningINFOID:0000000003802232
Use the angle wrench [SST: KV10112100 (BT8653-A)] for the final tightening of the following engine parts:
- Cylinder head bolts
- Main bearing cap bolts
- Connecting rod cap bolts
- Crankshaft pulley bolt (No the angle wrench is required as bolt flange is provided with notches for angle
tightening)
Never use a torque value for final tightening.
The torque value for these parts are for a preliminary step.
Page 1944 of 5121
ENGINE ASSEMBLY
EM-69
< REMOVAL AND INSTALLATION >
C
D
E
F
G
H
I
J
K
L
MA
EM
N
P O
10. Remove starter motor. Refer to STR-15, "VQ25DE : Exploded View" (VQ25DE) or STR-20, "VQ35DE :
Exploded View" (VQ35DE).
Vehicle Underbody
1. Remove front drive shafts (RH and LH). Refer to FAX-16, "Exploded View".
2. Remove exhaust front tube. Refer to EX-5, "
Exploded View".
3. Remove heat insulator.
4. Disconnect steering lower joint at power steering gear assembly side, and release steering lower shaft.
Refer to ST-16, "
Exploded View".
5. Disconnect front stabilizer connecting rod. Refer to FSU-14, "
Exploded View".
6. Remove strut assembly and steering knuckle fixing nuts and bolts. Refer to FSU-9, "
Exploded View" and
FA X - 8 , "
Exploded View".
7. Remove front wheel sensor (RH and LH) for ABS from steering knuckle. Refer to BRC-57, "
FRONT
WHEEL SENSOR : Exploded View".
8. Remove front brake caliper assembly with piping connected, and temporarily secure it to aside for vehicle
side. Refer to BR-34, "
BRAKE CALIPER ASSEMBLY : Exploded View".
9. Disconnect power steering piping at a point between vehicle and engine. Refer to ST-34, "
Exploded
View".
Install plug to avoid leakage of power steering fluid.
10. Remove rear plate cover from oil pan (upper). Then remove bolts fixing drive plate to torque converter.
Refer to EM-38, "
Exploded View" and TM-332, "Removal and Installation" (VQ25DE) or TM-168,
"Removal and Installation" (VQ35DE).
11. Remove transaxle joint bolts which pierce at oil pan (upper) lower rear side. Refer to EM-38, "
Exploded
View".
12. Remove crankshaft position sensor (POS). Refer to EM-38, "
Exploded View".
CAUTION:
Handle carefully to avoid dropping and shocks.
Never disassemble.
Never allow metal powder to adhere to magnetic part at sensor tip.
Never place sensors in a location where they are exposed to magnetism.
Removal
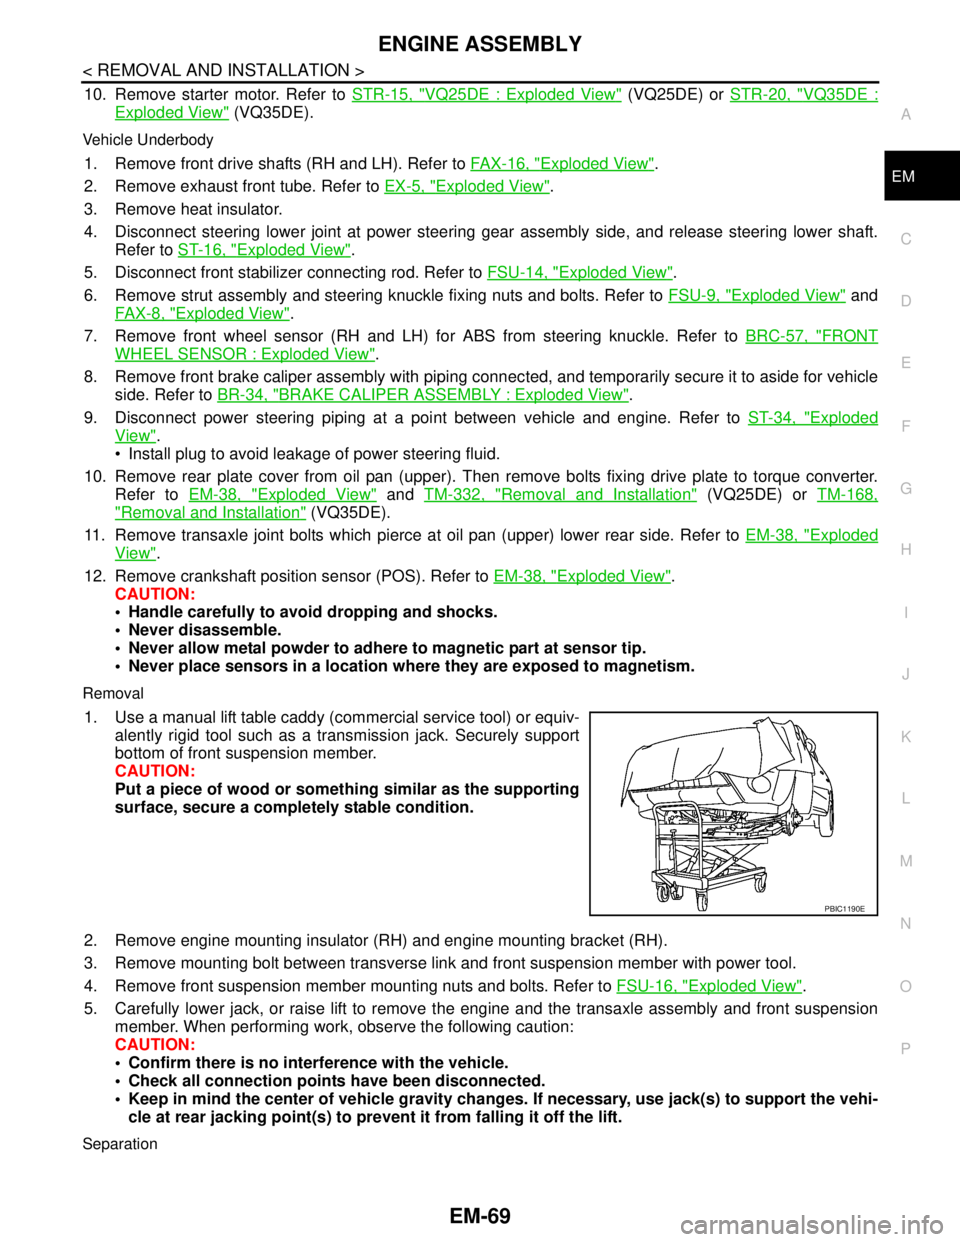
1. Use a manual lift table caddy (commercial service tool) or equiv-
alently rigid tool such as a transmission jack. Securely support
bottom of front suspension member.
CAUTION:
Put a piece of wood or something similar as the supporting
surface, secure a completely stable condition.
2. Remove engine mounting insulator (RH) and engine mounting bracket (RH).
3. Remove mounting bolt between transverse link and front suspension member with power tool.
4. Remove front suspension member mounting nuts and bolts. Refer to FSU-16, "
Exploded View".
5. Carefully lower jack, or raise lift to remove the engine and the transaxle assembly and front suspension
member. When performing work, observe the following caution:
CAUTION:
Confirm there is no interference with the vehicle.
Check all connection points have been disconnected.
Keep in mind the center of vehicle gravity changes. If necessary, use jack(s) to support the vehi-
cle at rear jacking point(s) to prevent it from falling it off the lift.
Separation
PBIC1190E
Page 2437 of 5121
FRONT WHEEL HUB AND KNUCKLE
FAX-9
< ON-VEHICLE REPAIR >
C
E
F
G
H
I
J
K
L
MA
B
FA X
N
O
P
11. Temporarily tighten strut assembly and steering knuckle.
12. Remove wheel hub and bearing assembly, and then remove splash guard.
13. Remove steering outer socket from steering knuckle. Refer to ST-18, "
Exploded View".
14. Remove steering knuckle from transverse link and strut assembly.
INSTALLATION
Note the following, and install in the reverse order of the removal.
Install removed wheel hub and bearing assembly and steering knuckle and perform the final tightening of
each part under unladen conditions on the level surface.
Never reuse cotter pin.
InspectionINFOID:0000000003811078
INSPECTION AFTER REMOVAL
Check components for deformation, cracks, and other damage. Replace if necessary.
Ball Joint Inspection
Check boots of transverse link and steering outer socket ball joint for breakage, axial play, and torque. Refer to
FSU-12, "
Inspection" and ST-26, "Inspection".
INSPECTION AFTER INSTALLATION
1. Check wheel sensor harness for proper connection. Refer to BRC-57, "FRONT WHEEL SENSOR :
Exploded View" (without VDC), BRC-151, "FRONT WHEEL SENSOR : Exploded View". (with VDC).
2. Check the wheel alignment. Refer to FSU-7, "
Wheel Alignment Inspection".
3. Adjust neutral position of steering angle sensor (with VDC). Refer to BRC-66, "
ADJUSTMENT OF
STEERING ANGLE SENSOR NEUTRAL POSITION : Special Repair Requirement".
Page 2442 of 5121
FAX-14
< ON-VEHICLE REPAIR >
FRONT DRIVE SHAFT BOOT
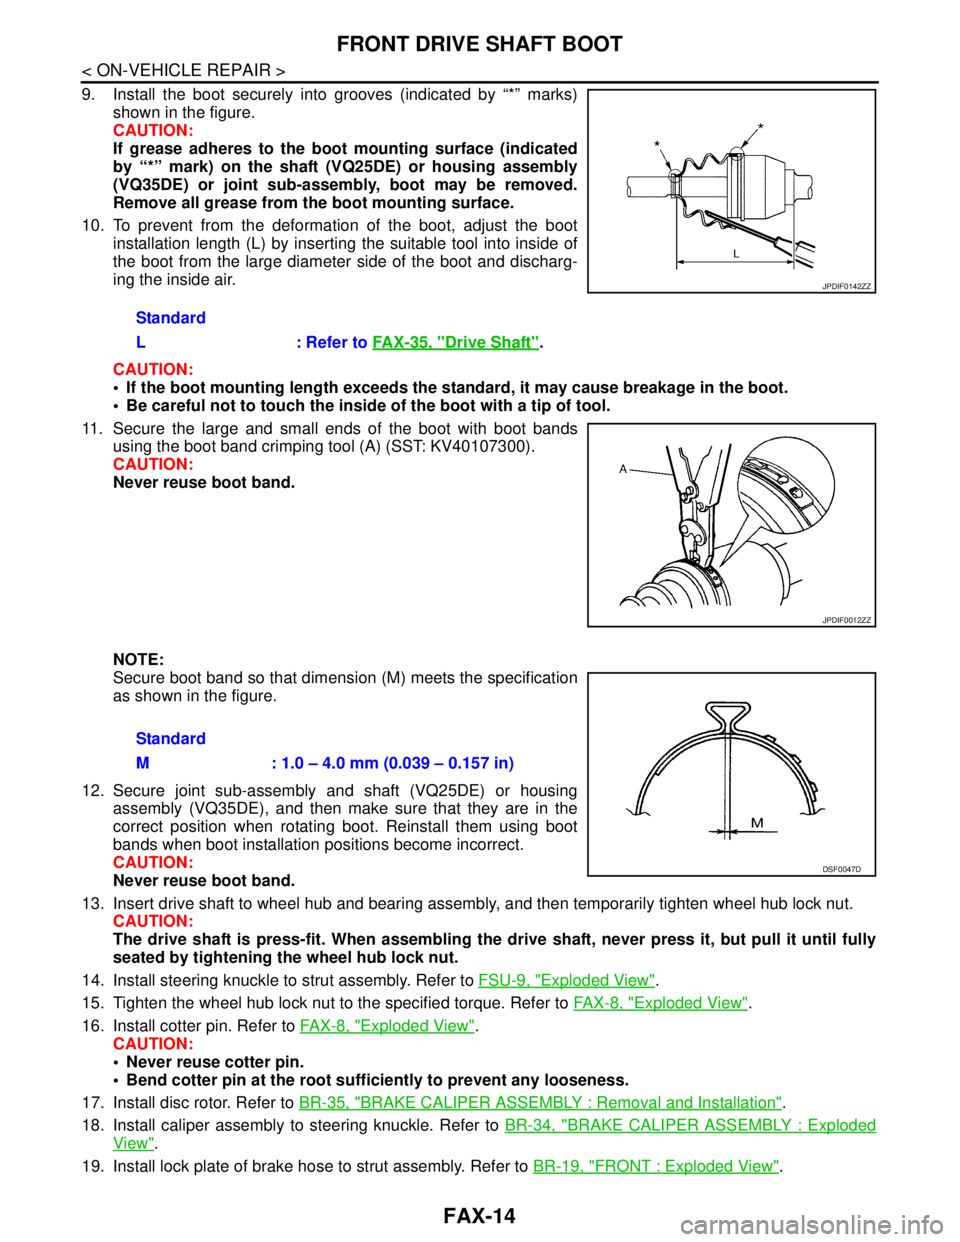
9. Install the boot securely into grooves (indicated by “*” marks)
shown in the figure.
CAUTION:
If grease adheres to the boot mounting surface (indicated
by “*” mark) on the shaft (VQ25DE) or housing assembly
(VQ35DE) or joint sub-assembly, boot may be removed.
Remove all grease from the boot mounting surface.
10. To prevent from the deformation of the boot, adjust the boot
installation length (L) by inserting the suitable tool into inside of
the boot from the large diameter side of the boot and discharg-
ing the inside air.
CAUTION:
If the boot mounting length exceeds the standard, it may cause breakage in the boot.
Be careful not to touch the inside of the boot with a tip of tool.
11. Secure the large and small ends of the boot with boot bands
using the boot band crimping tool (A) (SST: KV40107300).
CAUTION:
Never reuse boot band.
NOTE:
Secure boot band so that dimension (M) meets the specification
as shown in the figure.
12. Secure joint sub-assembly and shaft (VQ25DE) or housing
assembly (VQ35DE), and then make sure that they are in the
correct position when rotating boot. Reinstall them using boot
bands when boot installation positions become incorrect.
CAUTION:
Never reuse boot band.
13. Insert drive shaft to wheel hub and bearing assembly, and then temporarily tighten wheel hub lock nut.
CAUTION:
The drive shaft is press-fit. When assembling the drive shaft, never press it, but pull it until fully
seated by tightening the wheel hub lock nut.
14. Install steering knuckle to strut assembly. Refer to FSU-9, "
Exploded View".
15. Tighten the wheel hub lock nut to the specified torque. Refer to FA X - 8 , "
Exploded View".
16. Install cotter pin. Refer to FA X - 8 , "
Exploded View".
CAUTION:
Never reuse cotter pin.
Bend cotter pin at the root sufficiently to prevent any looseness.
17. Install disc rotor. Refer to BR-35, "
BRAKE CALIPER ASSEMBLY : Removal and Installation".
18. Install caliper assembly to steering knuckle. Refer to BR-34, "
BRAKE CALIPER ASSEMBLY : Exploded
View".
19. Install lock plate of brake hose to strut assembly. Refer to BR-19, "
FRONT : Exploded View". Standard
L : Refer to FAX-35, "
Drive Shaft".
JPDIF0142ZZ
JPDIF0012ZZ
Standard
M : 1.0 – 4.0 mm (0.039 – 0.157 in)
DSF0047D
Page 2448 of 5121
FAX-20
< ON-VEHICLE REPAIR >
FRONT DRIVE SHAFT
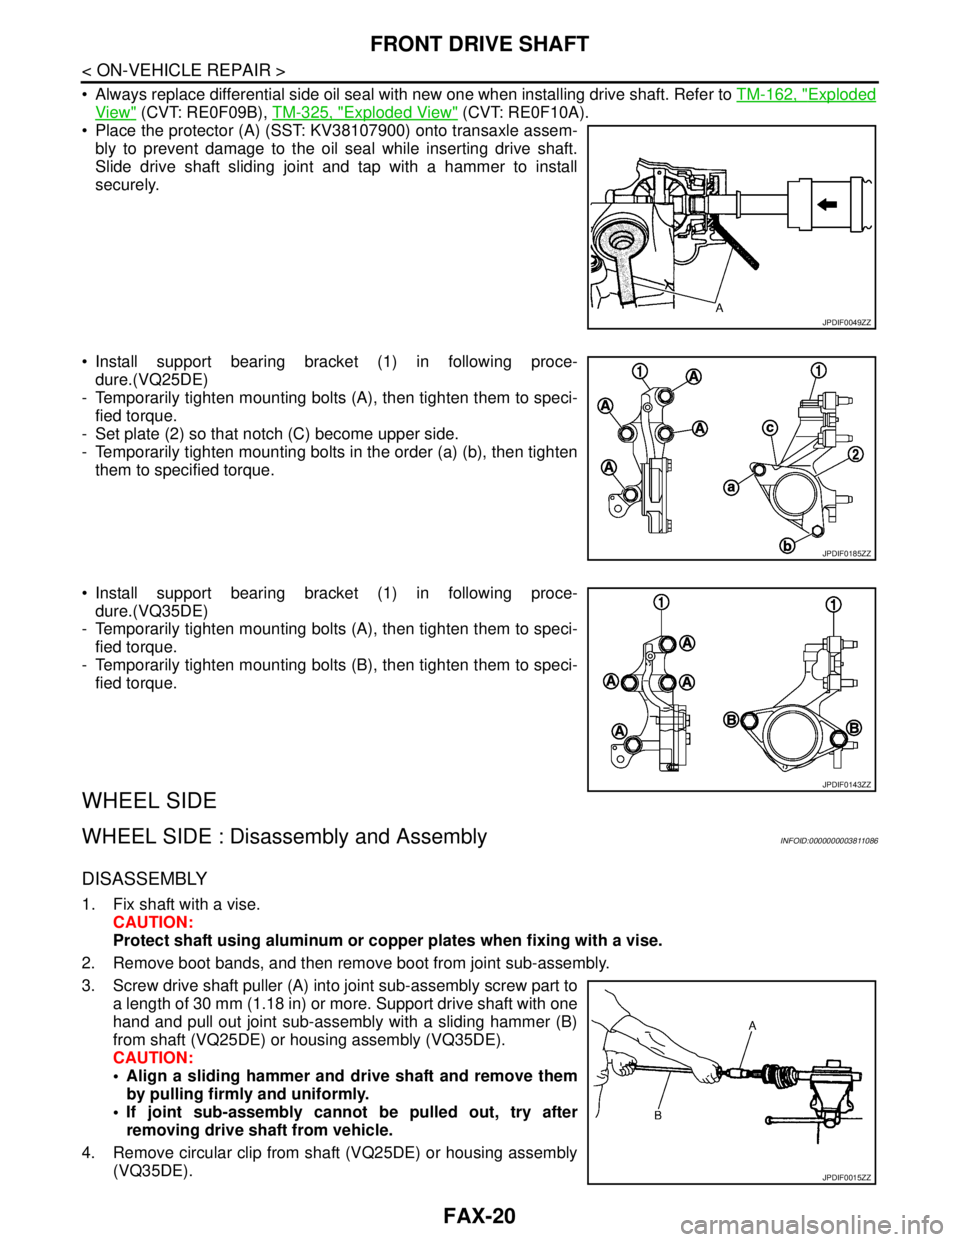
Always replace differential side oil seal with new one when installing drive shaft. Refer to TM-162, "Exploded
View" (CVT: RE0F09B), TM-325, "Exploded View" (CVT: RE0F10A).
Place the protector (A) (SST: KV38107900) onto transaxle assem-
bly to prevent damage to the oil seal while inserting drive shaft.
Slide drive shaft sliding joint and tap with a hammer to install
securely.
Install support bearing bracket (1) in following proce-
dure.(VQ25DE)
- Temporarily tighten mounting bolts (A), then tighten them to speci-
fied torque.
- Set plate (2) so that notch (C) become upper side.
- Temporarily tighten mounting bolts in the order (a) (b), then tighten
them to specified torque.
Install support bearing bracket (1) in following proce-
dure.(VQ35DE)
- Temporarily tighten mounting bolts (A), then tighten them to speci-
fied torque.
- Temporarily tighten mounting bolts (B), then tighten them to speci-
fied torque.
WHEEL SIDE
WHEEL SIDE : Disassembly and AssemblyINFOID:0000000003811086
DISASSEMBLY
1. Fix shaft with a vise.
CAUTION:
Protect shaft using aluminum or copper plates when fixing with a vise.
2. Remove boot bands, and then remove boot from joint sub-assembly.
3. Screw drive shaft puller (A) into joint sub-assembly screw part to
a length of 30 mm (1.18 in) or more. Support drive shaft with one
hand and pull out joint sub-assembly with a sliding hammer (B)
from shaft (VQ25DE) or housing assembly (VQ35DE).
CAUTION:
Align a sliding hammer and drive shaft and remove them
by pulling firmly and uniformly.
If joint sub-assembly cannot be pulled out, try after
removing drive shaft from vehicle.
4. Remove circular clip from shaft (VQ25DE) or housing assembly
(VQ35DE).
JPDIF0049ZZ
JPDIF0185ZZ
JPDIF0143ZZ
JPDIF0015ZZ
Page 2479 of 5121
PREPARATION
FSU-5
< PREPARATION >
C
D
F
G
H
I
J
K
L
MA
B
FSU
N
O
P
PREPARATION
PREPARATION
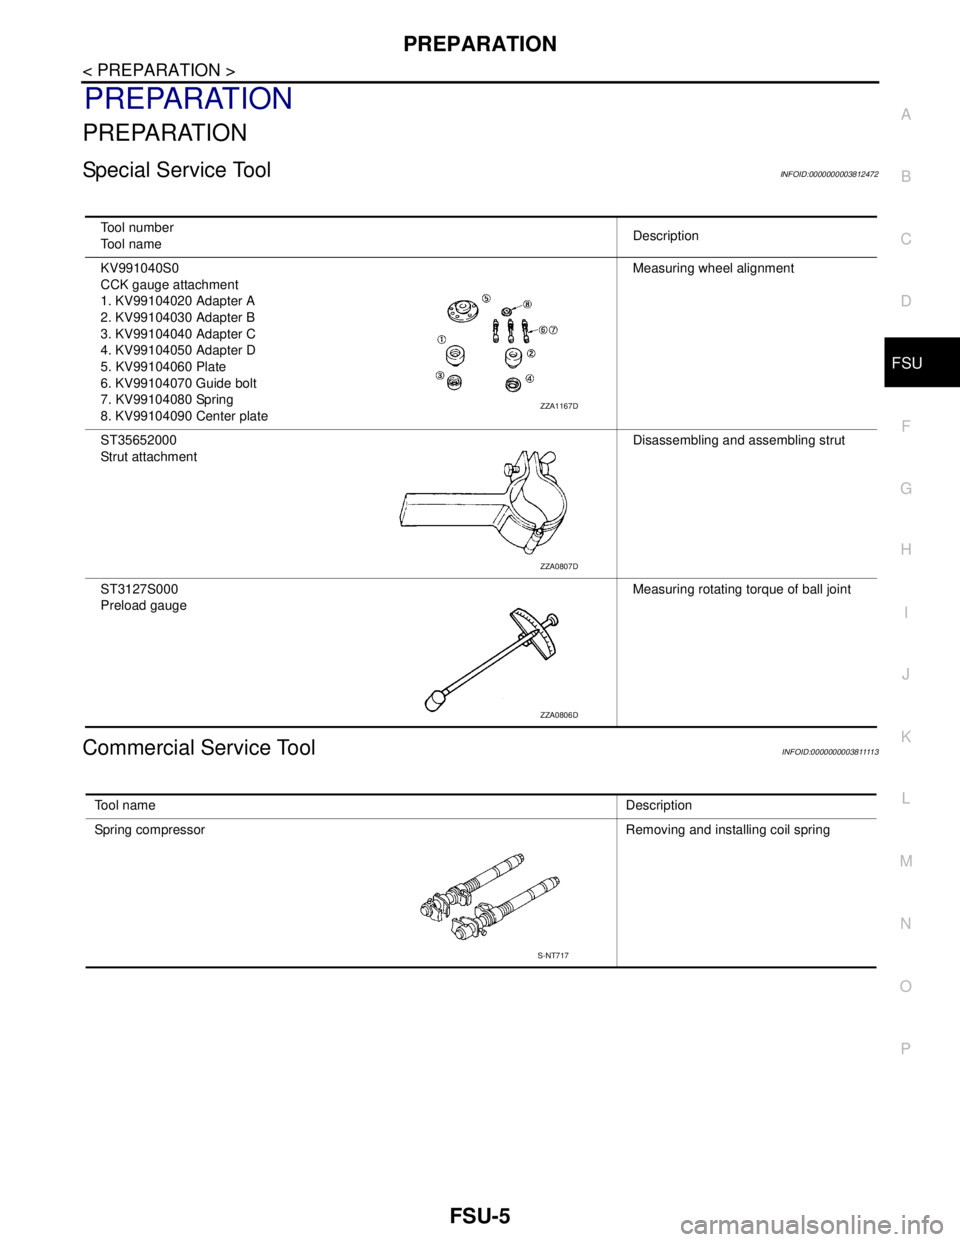
Special Service ToolINFOID:0000000003812472
Commercial Service ToolINFOID:000000000381111 3
Tool number
Tool nameDescription
KV991040S0
CCK gauge attachment
1. KV99104020 Adapter A
2. KV99104030 Adapter B
3. KV99104040 Adapter C
4. KV99104050 Adapter D
5. KV99104060 Plate
6. KV99104070 Guide bolt
7. KV99104080 Spring
8. KV99104090 Center plateMeasuring wheel alignment
ST35652000
Strut attachmentDisassembling and assembling strut
ST3127S000
Preload gaugeMeasuring rotating torque of ball joint
ZZA1167D
ZZA0807D
ZZA0806D
Tool nameDescription
Spring compressor Removing and installing coil spring
S-NT717
Page 2485 of 5121
FRONT COIL SPRING AND STRUT
FSU-11
< ON-VEHICLE REPAIR >
C
D
F
G
H
I
J
K
L
MA
B
FSU
N
O
P
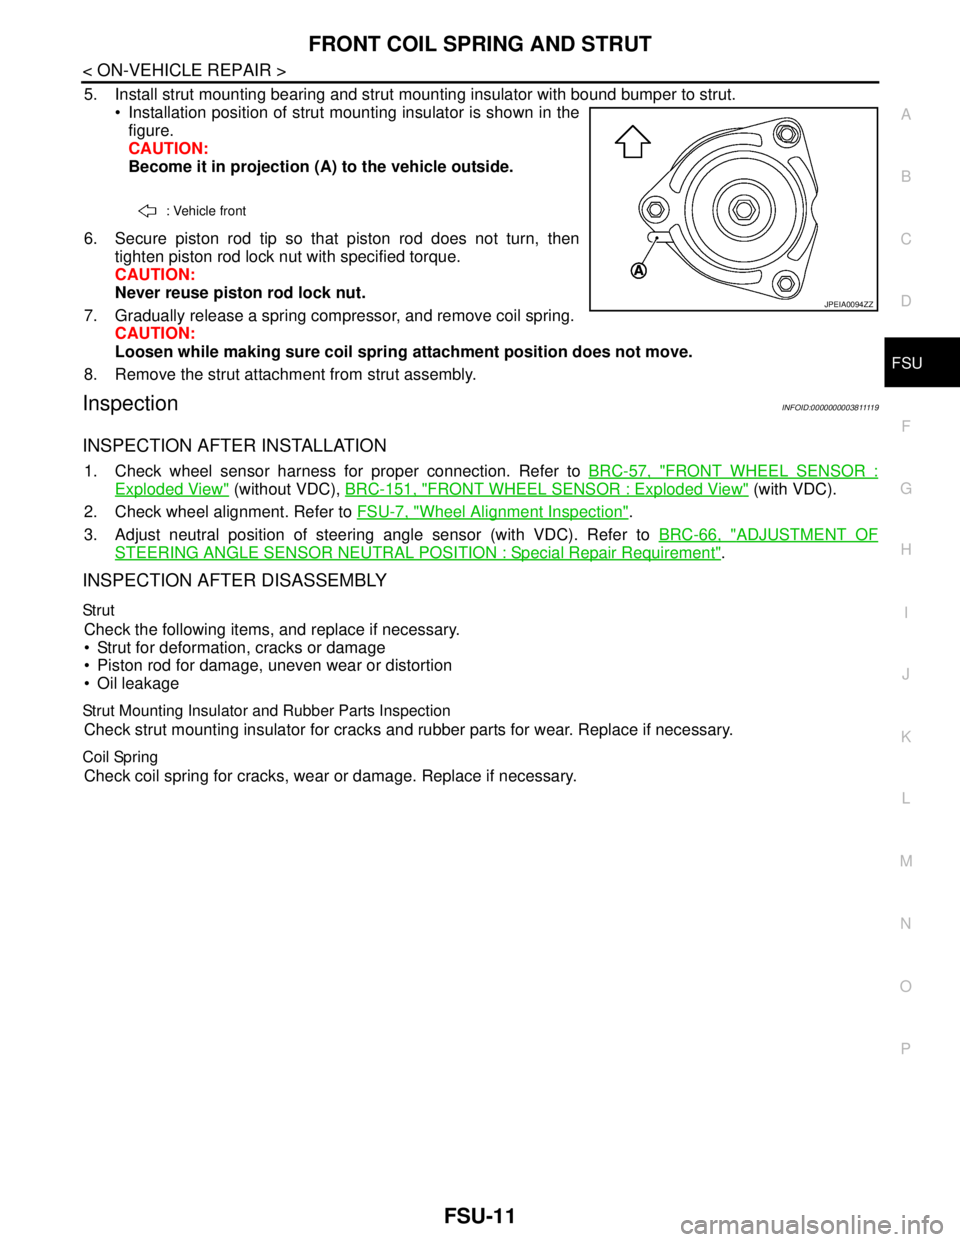
5. Install strut mounting bearing and strut mounting insulator with bound bumper to strut.
Installation position of strut mounting insulator is shown in the
figure.
CAUTION:
Become it in projection (A) to the vehicle outside.
6. Secure piston rod tip so that piston rod does not turn, then
tighten piston rod lock nut with specified torque.
CAUTION:
Never reuse piston rod lock nut.
7. Gradually release a spring compressor, and remove coil spring.
CAUTION:
Loosen while making sure coil spring attachment position does not move.
8. Remove the strut attachment from strut assembly.
InspectionINFOID:000000000381111 9
INSPECTION AFTER INSTALLATION
1. Check wheel sensor harness for proper connection. Refer to BRC-57, "FRONT WHEEL SENSOR :
Exploded View" (without VDC), BRC-151, "FRONT WHEEL SENSOR : Exploded View" (with VDC).
2. Check wheel alignment. Refer to FSU-7, "
Wheel Alignment Inspection".
3. Adjust neutral position of steering angle sensor (with VDC). Refer to BRC-66, "
ADJUSTMENT OF
STEERING ANGLE SENSOR NEUTRAL POSITION : Special Repair Requirement".
INSPECTION AFTER DISASSEMBLY
Str ut
Check the following items, and replace if necessary.
Strut for deformation, cracks or damage
Piston rod for damage, uneven wear or distortion
Oil leakage
Strut Mounting Insulator and Rubber Parts Inspection
Check strut mounting insulator for cracks and rubber parts for wear. Replace if necessary.
Coil Spring
Check coil spring for cracks, wear or damage. Replace if necessary.
: Vehicle front
JPEIA0094ZZ
Page 2486 of 5121
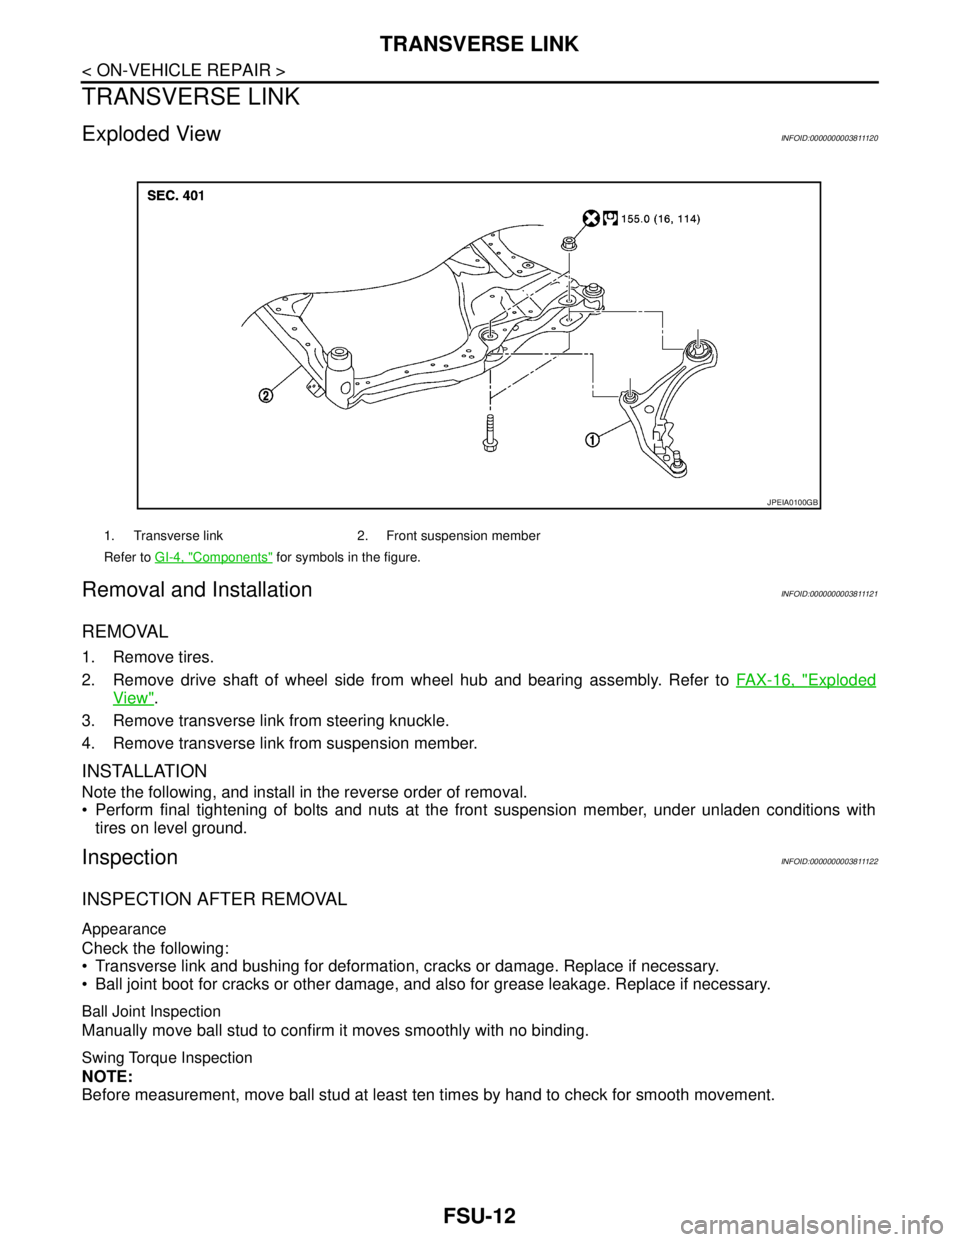
FSU-12
< ON-VEHICLE REPAIR >
TRANSVERSE LINK
TRANSVERSE LINK
Exploded ViewINFOID:0000000003811120
Removal and InstallationINFOID:0000000003811121
REMOVAL
1. Remove tires.
2. Remove drive shaft of wheel side from wheel hub and bearing assembly. Refer to FAX-16, "
Exploded
View".
3. Remove transverse link from steering knuckle.
4. Remove transverse link from suspension member.
INSTALLATION
Note the following, and install in the reverse order of removal.
Perform final tightening of bolts and nuts at the front suspension member, under unladen conditions with
tires on level ground.
InspectionINFOID:0000000003811122
INSPECTION AFTER REMOVAL
Appearance
Check the following:
Transverse link and bushing for deformation, cracks or damage. Replace if necessary.
Ball joint boot for cracks or other damage, and also for grease leakage. Replace if necessary.
Ball Joint Inspection
Manually move ball stud to confirm it moves smoothly with no binding.
Swing Torque Inspection
NOTE:
Before measurement, move ball stud at least ten times by hand to check for smooth movement.
1. Transverse link 2. Front suspension member
Refer to GI-4, "
Components" for symbols in the figure.
JPEIA0100GB
Page 2487 of 5121

TRANSVERSE LINK
FSU-13
< ON-VEHICLE REPAIR >
C
D
F
G
H
I
J
K
L
MA
B
FSU
N
O
P
Hook a spring balance (A) at cotter pin mounting hole. Confirm
spring balance measurement value is within specifications when
ball stud begins moving.
- If swing torque exceeds standard value, replace transverse link
assembly.
Rotating Torque Inspection
Attach mounting nut to boll stud. Check that rotating torque is
within specifications with a preload gauge (A) (SST: ST3127S000).
- If rotating torque exceeds standard range, replace transverse link
assembly.
Axial End Play Inspection
Move tip of ball stud in axial direction to check for looseness.
- If axial end play exceeds the standard value, replace transverse link assembly.
INSPECTION AFTER INSTALLATION
1. Check wheel sensor harness for proper connection. Refer to BRC-57, "FRONT WHEEL SENSOR :
Exploded View" (without VDC), BRC-151, "FRONT WHEEL SENSOR : Exploded View" (with VDC).
2. Check wheel alignment. Refer to FSU-7, "
Wheel Alignment Inspection".
3. Adjust neutral position of steering angle sensor (with VDC). Refer to BRC-66, "
ADJUSTMENT OF
STEERING ANGLE SENSOR NEUTRAL POSITION : Special Repair Requirement". Standard
Swing torque :Refer to FSU-18, "
Ball Joint".
Spring balance
measurement:Refer to FSU-18, "
Ball Joint".
JPEIA0005ZZ
Standard
Rotating torque : Refer to FSU-18, "
Ball Joint".
PDIA1258E
Standard
Axial end play :Refer to FSU-18, "
Ball Joint".