Trans NISSAN TEANA 2008 Service Manual
[x] Cancel search | Manufacturer: NISSAN, Model Year: 2008, Model line: TEANA, Model: NISSAN TEANA 2008Pages: 5121, PDF Size: 69.03 MB
Page 2448 of 5121
FAX-20
< ON-VEHICLE REPAIR >
FRONT DRIVE SHAFT
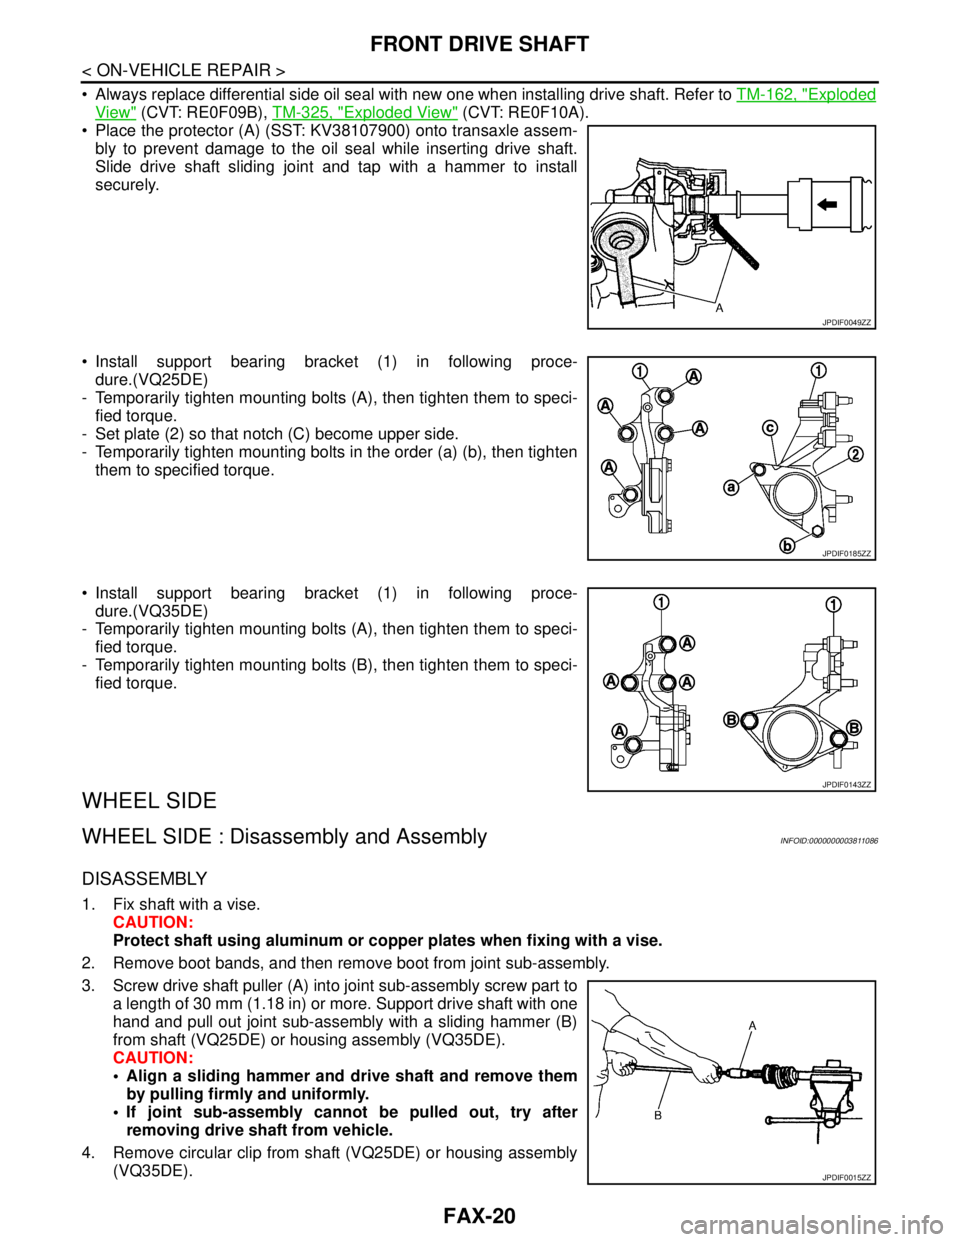
Always replace differential side oil seal with new one when installing drive shaft. Refer to TM-162, "Exploded
View" (CVT: RE0F09B), TM-325, "Exploded View" (CVT: RE0F10A).
Place the protector (A) (SST: KV38107900) onto transaxle assem-
bly to prevent damage to the oil seal while inserting drive shaft.
Slide drive shaft sliding joint and tap with a hammer to install
securely.
Install support bearing bracket (1) in following proce-
dure.(VQ25DE)
- Temporarily tighten mounting bolts (A), then tighten them to speci-
fied torque.
- Set plate (2) so that notch (C) become upper side.
- Temporarily tighten mounting bolts in the order (a) (b), then tighten
them to specified torque.
Install support bearing bracket (1) in following proce-
dure.(VQ35DE)
- Temporarily tighten mounting bolts (A), then tighten them to speci-
fied torque.
- Temporarily tighten mounting bolts (B), then tighten them to speci-
fied torque.
WHEEL SIDE
WHEEL SIDE : Disassembly and AssemblyINFOID:0000000003811086
DISASSEMBLY
1. Fix shaft with a vise.
CAUTION:
Protect shaft using aluminum or copper plates when fixing with a vise.
2. Remove boot bands, and then remove boot from joint sub-assembly.
3. Screw drive shaft puller (A) into joint sub-assembly screw part to
a length of 30 mm (1.18 in) or more. Support drive shaft with one
hand and pull out joint sub-assembly with a sliding hammer (B)
from shaft (VQ25DE) or housing assembly (VQ35DE).
CAUTION:
Align a sliding hammer and drive shaft and remove them
by pulling firmly and uniformly.
If joint sub-assembly cannot be pulled out, try after
removing drive shaft from vehicle.
4. Remove circular clip from shaft (VQ25DE) or housing assembly
(VQ35DE).
JPDIF0049ZZ
JPDIF0185ZZ
JPDIF0143ZZ
JPDIF0015ZZ
Page 2450 of 5121
FAX-22
< ON-VEHICLE REPAIR >
FRONT DRIVE SHAFT
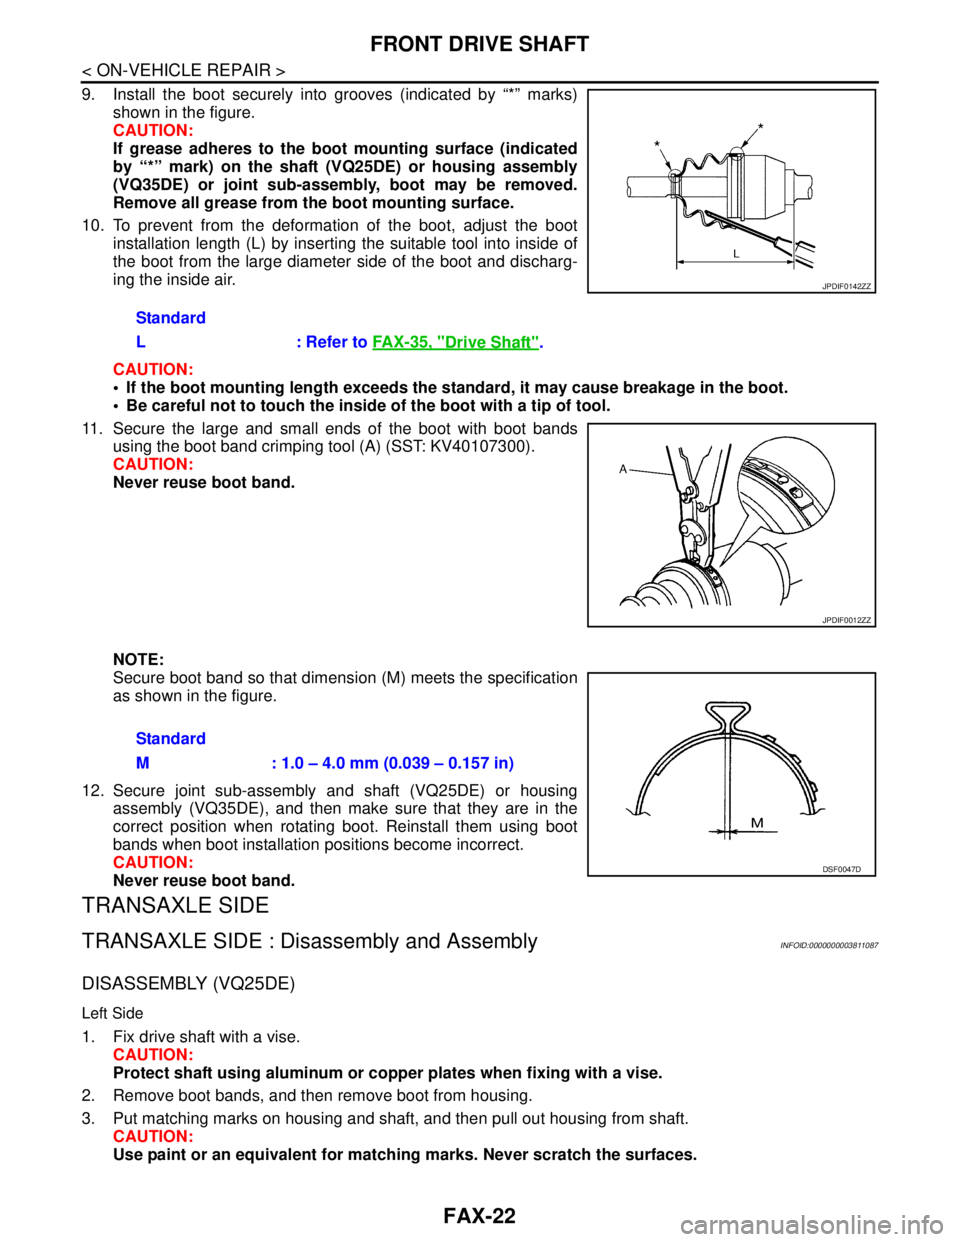
9. Install the boot securely into grooves (indicated by “*” marks)
shown in the figure.
CAUTION:
If grease adheres to the boot mounting surface (indicated
by “*” mark) on the shaft (VQ25DE) or housing assembly
(VQ35DE) or joint sub-assembly, boot may be removed.
Remove all grease from the boot mounting surface.
10. To prevent from the deformation of the boot, adjust the boot
installation length (L) by inserting the suitable tool into inside of
the boot from the large diameter side of the boot and discharg-
ing the inside air.
CAUTION:
If the boot mounting length exceeds the standard, it may cause breakage in the boot.
Be careful not to touch the inside of the boot with a tip of tool.
11. Secure the large and small ends of the boot with boot bands
using the boot band crimping tool (A) (SST: KV40107300).
CAUTION:
Never reuse boot band.
NOTE:
Secure boot band so that dimension (M) meets the specification
as shown in the figure.
12. Secure joint sub-assembly and shaft (VQ25DE) or housing
assembly (VQ35DE), and then make sure that they are in the
correct position when rotating boot. Reinstall them using boot
bands when boot installation positions become incorrect.
CAUTION:
Never reuse boot band.
TRANSAXLE SIDE
TRANSAXLE SIDE : Disassembly and AssemblyINFOID:0000000003811087
DISASSEMBLY (VQ25DE)
Left Side
1. Fix drive shaft with a vise.
CAUTION:
Protect shaft using aluminum or copper plates when fixing with a vise.
2. Remove boot bands, and then remove boot from housing.
3. Put matching marks on housing and shaft, and then pull out housing from shaft.
CAUTION:
Use paint or an equivalent for matching marks. Never scratch the surfaces. Standard
L : Refer to FAX-35, "
Drive Shaft".
JPDIF0142ZZ
JPDIF0012ZZ
Standard
M : 1.0 – 4.0 mm (0.039 – 0.157 in)
DSF0047D
Page 2452 of 5121
FAX-24
< ON-VEHICLE REPAIR >
FRONT DRIVE SHAFT
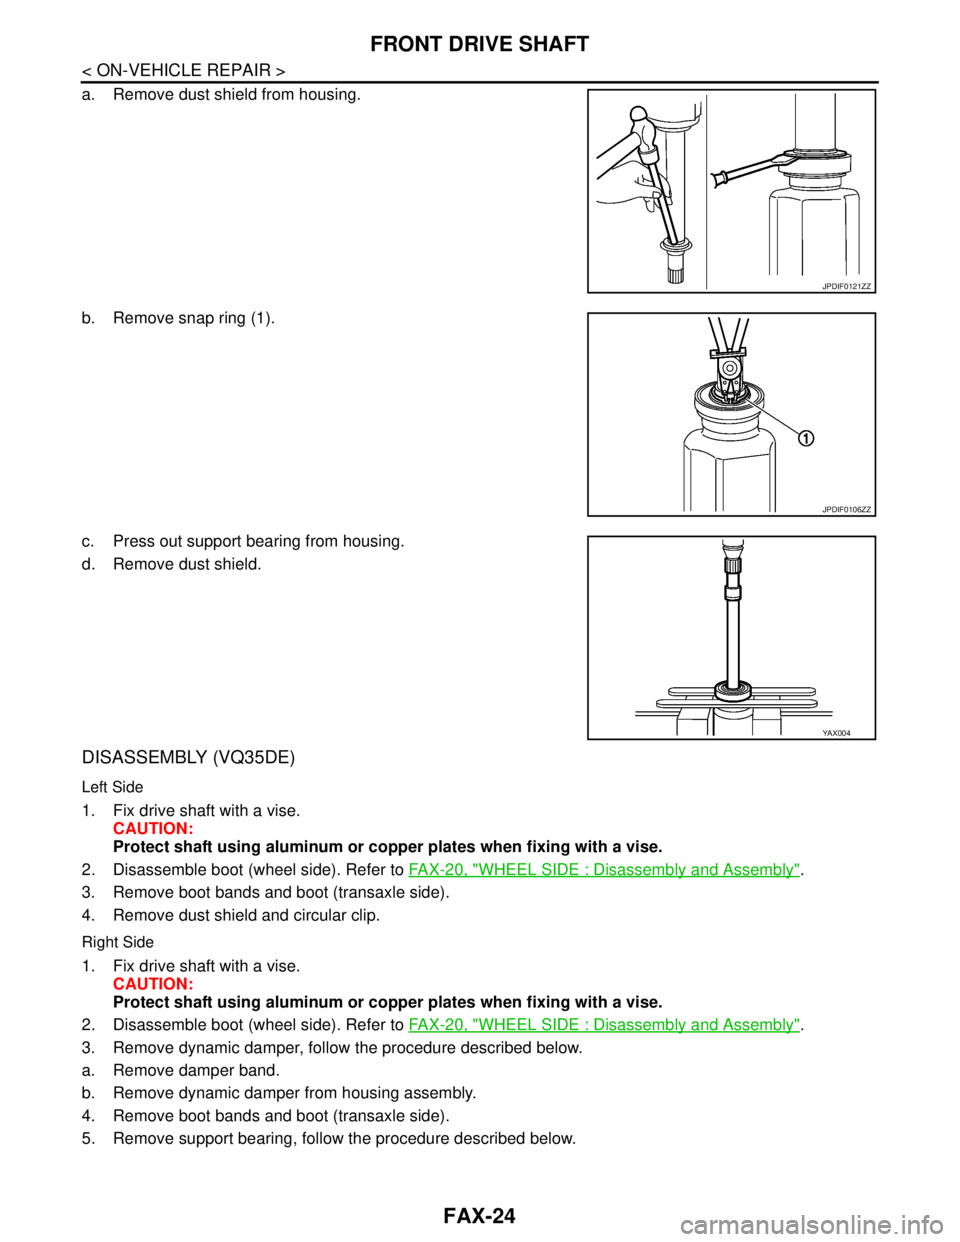
a. Remove dust shield from housing.
b. Remove snap ring (1).
c. Press out support bearing from housing.
d. Remove dust shield.
DISASSEMBLY (VQ35DE)
Left Side
1. Fix drive shaft with a vise.
CAUTION:
Protect shaft using aluminum or copper plates when fixing with a vise.
2. Disassemble boot (wheel side). Refer to FAX-20, "
WHEEL SIDE : Disassembly and Assembly".
3. Remove boot bands and boot (transaxle side).
4. Remove dust shield and circular clip.
Right Side
1. Fix drive shaft with a vise.
CAUTION:
Protect shaft using aluminum or copper plates when fixing with a vise.
2. Disassemble boot (wheel side). Refer to FAX-20, "
WHEEL SIDE : Disassembly and Assembly".
3. Remove dynamic damper, follow the procedure described below.
a. Remove damper band.
b. Remove dynamic damper from housing assembly.
4. Remove boot bands and boot (transaxle side).
5. Remove support bearing, follow the procedure described below.
JPDIF0121ZZ
JPDIF0106ZZ
YA X 0 0 4
Page 2462 of 5121
FAX-34
< ON-VEHICLE REPAIR >
FRONT DRIVE SHAFT
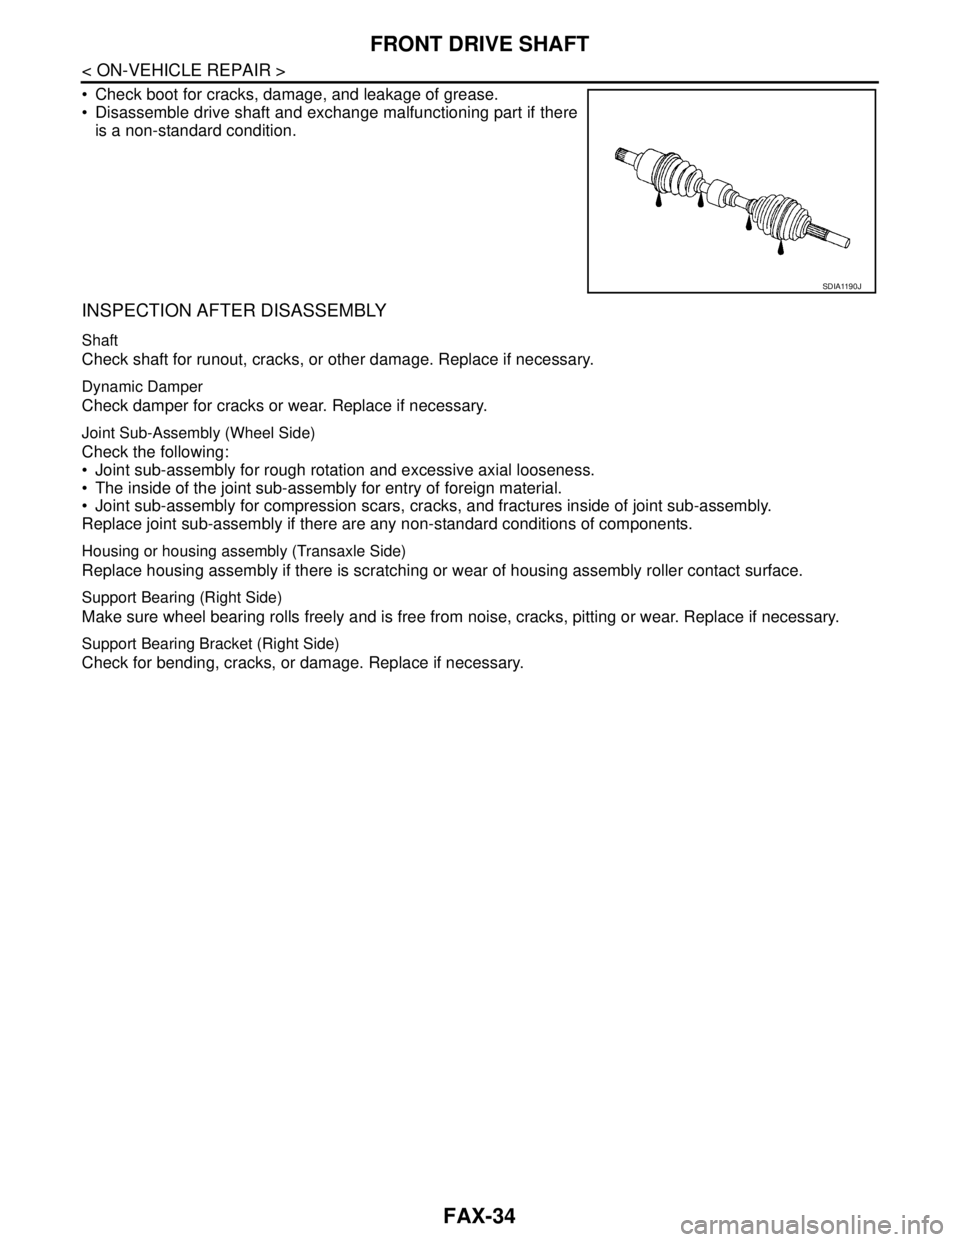
Check boot for cracks, damage, and leakage of grease.
Disassemble drive shaft and exchange malfunctioning part if there
is a non-standard condition.
INSPECTION AFTER DISASSEMBLY
Shaft
Check shaft for runout, cracks, or other damage. Replace if necessary.
Dynamic Damper
Check damper for cracks or wear. Replace if necessary.
Joint Sub-Assembly (Wheel Side)
Check the following:
Joint sub-assembly for rough rotation and excessive axial looseness.
The inside of the joint sub-assembly for entry of foreign material.
Joint sub-assembly for compression scars, cracks, and fractures inside of joint sub-assembly.
Replace joint sub-assembly if there are any non-standard conditions of components.
Housing or housing assembly (Transaxle Side)
Replace housing assembly if there is scratching or wear of housing assembly roller contact surface.
Support Bearing (Right Side)
Make sure wheel bearing rolls freely and is free from noise, cracks, pitting or wear. Replace if necessary.
Support Bearing Bracket (Right Side)
Check for bending, cracks, or damage. Replace if necessary.
SDIA1190J
Page 2463 of 5121
SERVICE DATA AND SPECIFICATIONS (SDS)
FAX-35
< SERVICE DATA AND SPECIFICATIONS (SDS)
C
E
F
G
H
I
J
K
L
MA
B
FA X
N
O
P
SERVICE DATA AND SPECIFICATIONS (SDS)
SERVICE DATA AND SPECIFICATIONS (SDS)
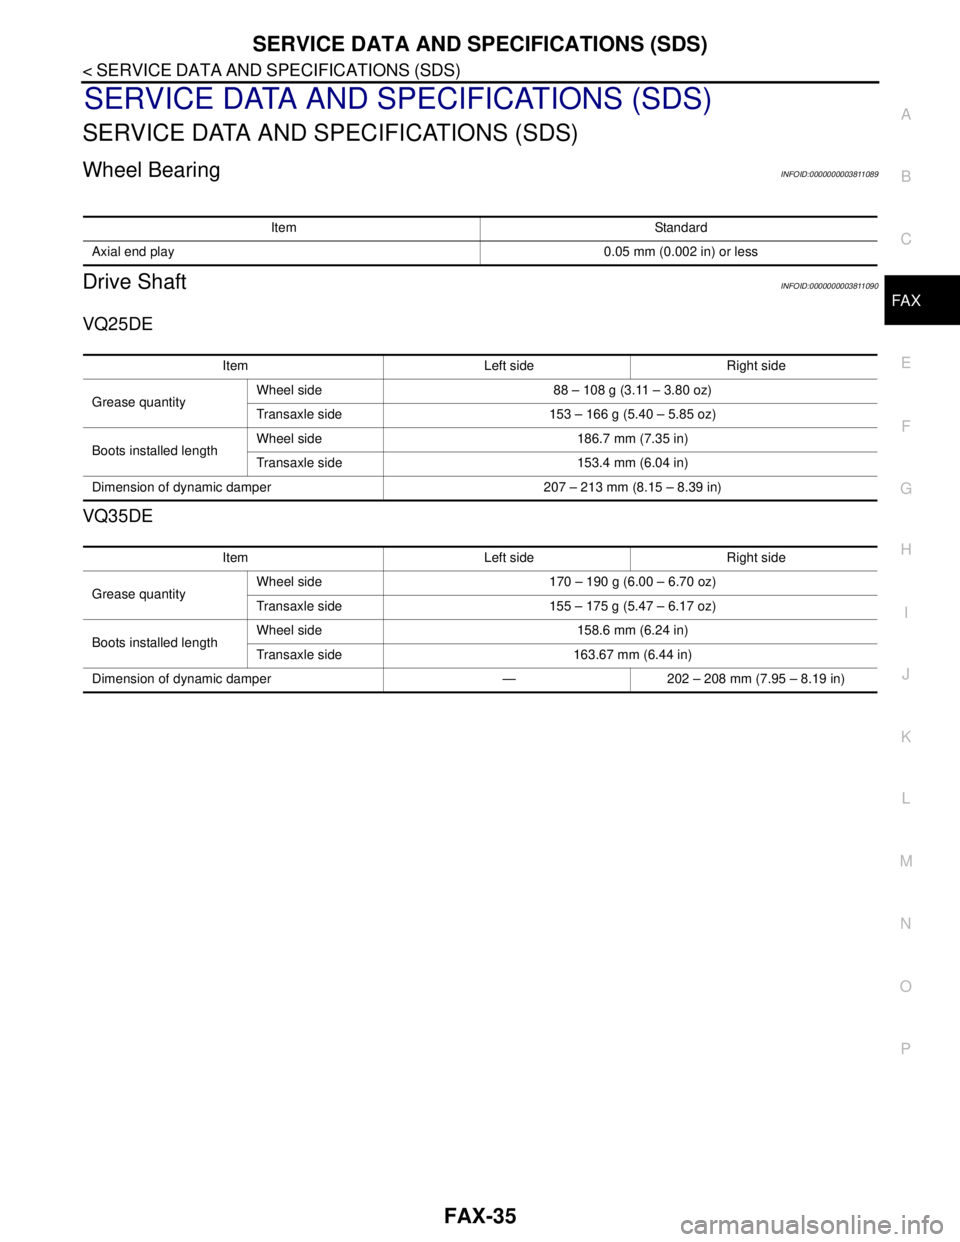
Wheel BearingINFOID:0000000003811089
Drive ShaftINFOID:0000000003811090
VQ25DE
VQ35DE
Item Standard
Axial end play0.05 mm (0.002 in) or less
Item Left side Right side
Grease quantityWheel side 88 – 108 g (3.11 – 3.80 oz)
Transaxle side 153 – 166 g (5.40 – 5.85 oz)
Boots installed lengthWheel side 186.7 mm (7.35 in)
Transaxle side 153.4 mm (6.04 in)
Dimension of dynamic damper 207 – 213 mm (8.15 – 8.39 in)
Item Left side Right side
Grease quantityWheel side 170 – 190 g (6.00 – 6.70 oz)
Transaxle side 155 – 175 g (5.47 – 6.17 oz)
Boots installed lengthWheel side 158.6 mm (6.24 in)
Transaxle side 163.67 mm (6.44 in)
Dimension of dynamic damper — 202 – 208 mm (7.95 – 8.19 in)
Page 2473 of 5121
FL-10
< ON-VEHICLE REPAIR >
FUEL TANK
4. Remove rear parking brake cables. Refer to PB-5, "Exploded View".
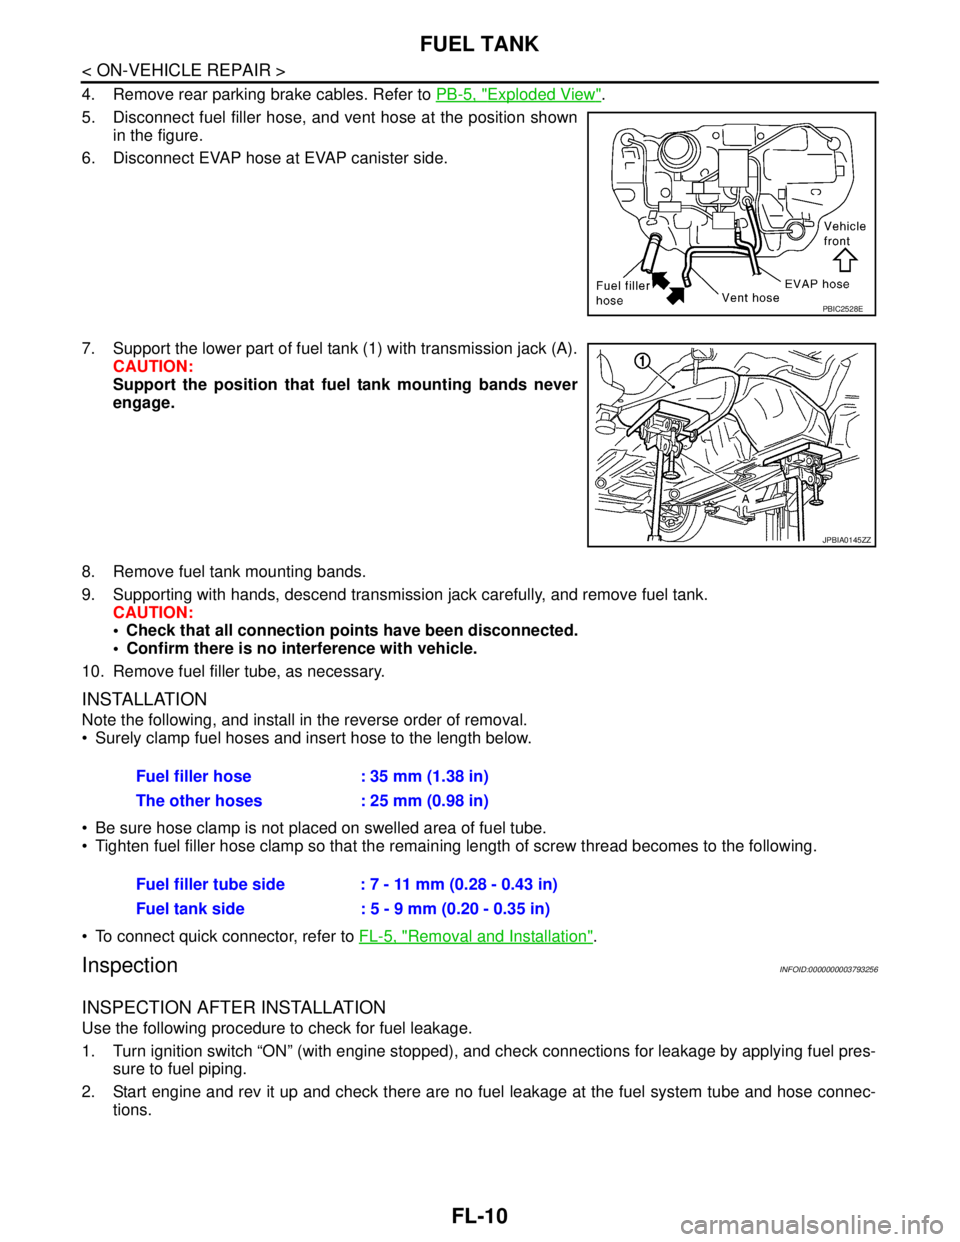
5. Disconnect fuel filler hose, and vent hose at the position shown
in the figure.
6. Disconnect EVAP hose at EVAP canister side.
7. Support the lower part of fuel tank (1) with transmission jack (A).
CAUTION:
Support the position that fuel tank mounting bands never
engage.
8. Remove fuel tank mounting bands.
9. Supporting with hands, descend transmission jack carefully, and remove fuel tank.
CAUTION:
Check that all connection points have been disconnected.
Confirm there is no interference with vehicle.
10. Remove fuel filler tube, as necessary.
INSTALLATION
Note the following, and install in the reverse order of removal.
Surely clamp fuel hoses and insert hose to the length below.
Be sure hose clamp is not placed on swelled area of fuel tube.
Tighten fuel filler hose clamp so that the remaining length of screw thread becomes to the following.
To connect quick connector, refer to FL-5, "
Removal and Installation".
InspectionINFOID:0000000003793256
INSPECTION AFTER INSTALLATION
Use the following procedure to check for fuel leakage.
1. Turn ignition switch “ON” (with engine stopped), and check connections for leakage by applying fuel pres-
sure to fuel piping.
2. Start engine and rev it up and check there are no fuel leakage at the fuel system tube and hose connec-
tions.
PBIC2528E
JPBIA0145ZZ
Fuel filler hose : 35 mm (1.38 in)
The other hoses : 25 mm (0.98 in)
Fuel filler tube side : 7 - 11 mm (0.28 - 0.43 in)
Fuel tank side : 5 - 9 mm (0.20 - 0.35 in)
Page 2475 of 5121
FSU-1
SUSPENSION
C
DF
G H
I
J
K L
M
SECTION FSU
A
B
FSU
N
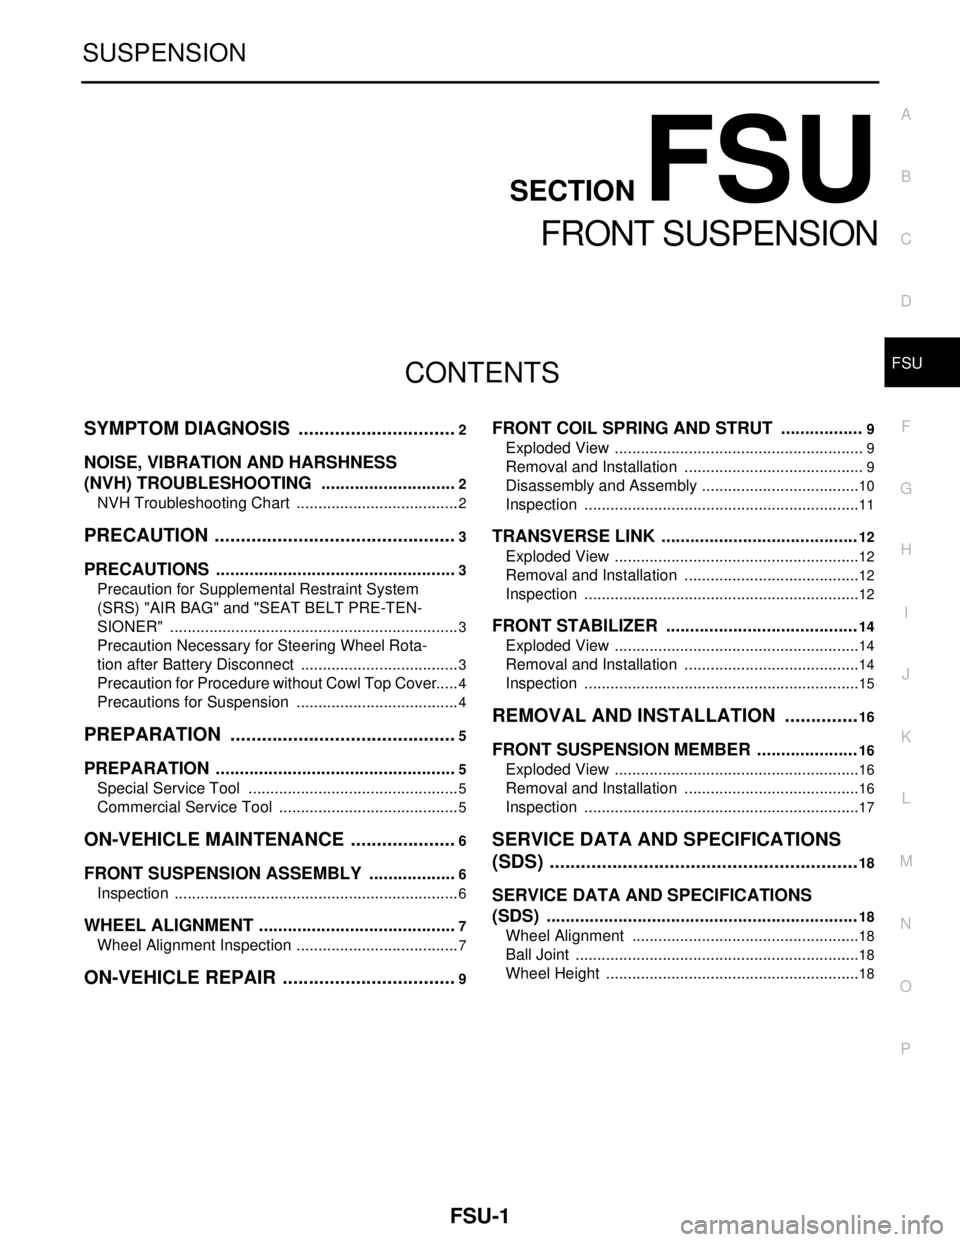
O PCONTENTS
FRONT SUSPENSION
SYMPTOM DIAGNOSIS ..... ..........................2
NOISE, VIBRATION AND HARSHNESS
(NVH) TROUBLESHOOTING ........................ .....
2
NVH Troubleshooting Chart ................................ ......2
PRECAUTION ...............................................3
PRECAUTIONS .............................................. .....3
Precaution for Supplemental Restraint System
(SRS) "AIR BAG" and "SEAT BELT PRE-TEN-
SIONER" ............................................................. ......
3
Precaution Necessary for Steering Wheel Rota-
tion after Battery Disconnect .....................................
3
Precaution for Procedure without Cowl Top Cover ......4
Precautions for Suspension ......................................4
PREPARATION ............................................5
PREPARATION .............................................. .....5
Special Service Tool ........................................... ......5
Commercial Service Tool ..........................................5
ON-VEHICLE MAINTENANCE .....................6
FRONT SUSPENSION ASSEMBLY .............. .....6
Inspection ............................................................ ......6
WHEEL ALIGNMENT ..........................................7
Wheel Alignment Inspection ................................ ......7
ON-VEHICLE REPAIR ..................................9
FRONT COIL SPRING AND STRUT .................9
Exploded View ..................................................... .....9
Removal and Installation ..........................................9
Disassembly and Assembly .....................................10
Inspection ................................................................11
TRANSVERSE LINK .........................................12
Exploded View ..................................................... ....12
Removal and Installation .........................................12
Inspection ................................................................12
FRONT STABILIZER ........................................14
Exploded View .........................................................14
Removal and Installation .........................................14
Inspection ................................................................15
REMOVAL AND INSTALLATION ...............16
FRONT SUSPENSION MEMBER .....................16
Exploded View ..................................................... ....16
Removal and Installation .........................................16
Inspection ................................................................17
SERVICE DATA AND SPECIFICATIONS
(SDS) ............... .............................................
18
SERVICE DATA AND SPECIFICATIONS
(SDS) .................................................................
18
Wheel Alignment ................................................. ....18
Ball Joint ..................................................................18
Wheel Height ...........................................................18
Page 2480 of 5121
FSU-6
< ON-VEHICLE MAINTENANCE >
FRONT SUSPENSION ASSEMBLY
ON-VEHICLE MAINTENANCE
FRONT SUSPENSION ASSEMBLY
InspectionINFOID:0000000003811114
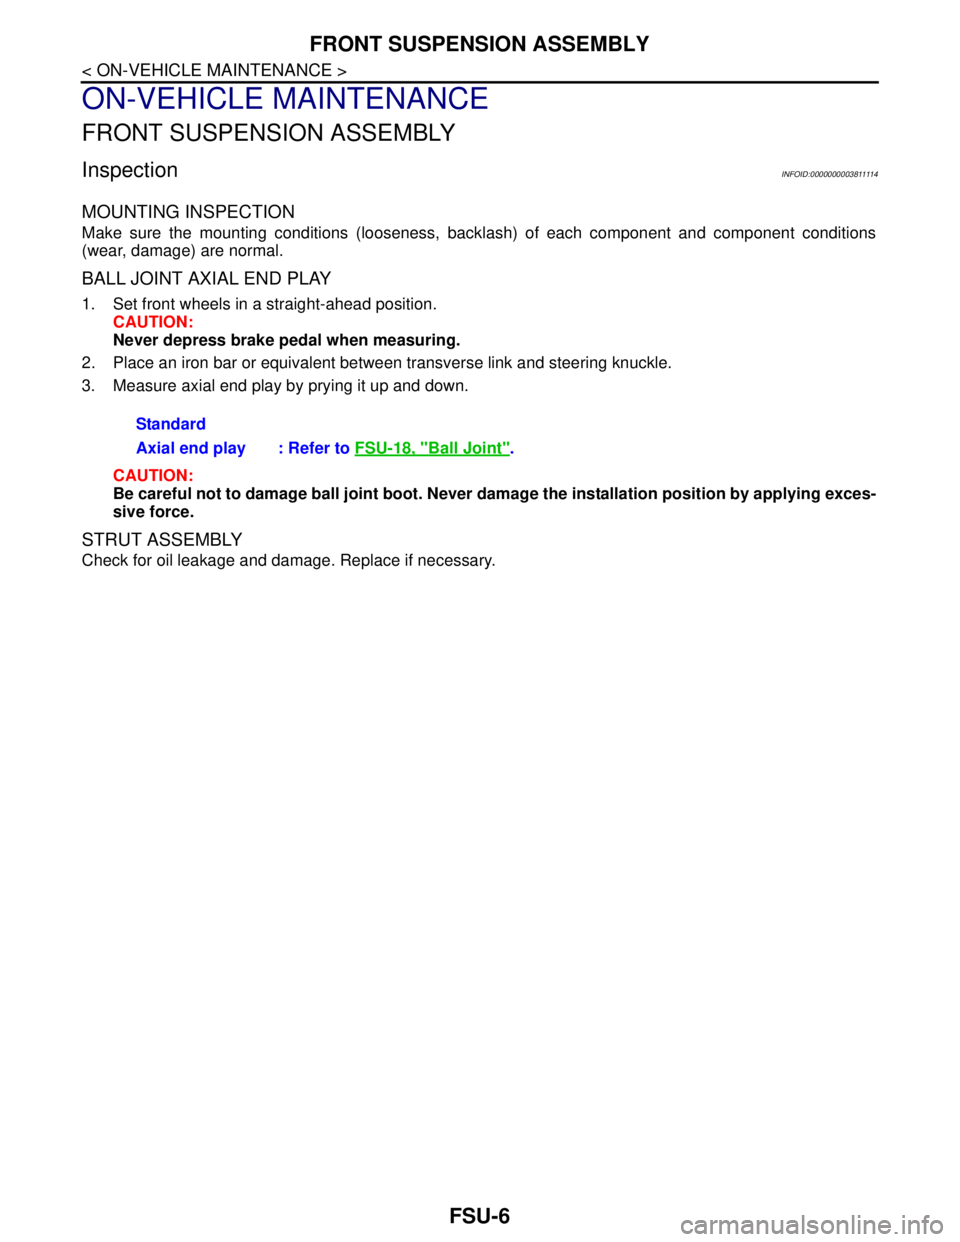
MOUNTING INSPECTION
Make sure the mounting conditions (looseness, backlash) of each component and component conditions
(wear, damage) are normal.
BALL JOINT AXIAL END PLAY
1. Set front wheels in a straight-ahead position.
CAUTION:
Never depress brake pedal when measuring.
2. Place an iron bar or equivalent between transverse link and steering knuckle.
3. Measure axial end play by prying it up and down.
CAUTION:
Be careful not to damage ball joint boot. Never damage the installation position by applying exces-
sive force.
STRUT ASSEMBLY
Check for oil leakage and damage. Replace if necessary.Standard
Axial end play : Refer to FSU-18, "
Ball Joint".
Page 2481 of 5121
WHEEL ALIGNMENT
FSU-7
< ON-VEHICLE MAINTENANCE >
C
D
F
G
H
I
J
K
L
MA
B
FSU
N
O
P
WHEEL ALIGNMENT
Wheel Alignment InspectionINFOID:0000000003812473
INSPECTION
Description
CAUTION:
Camber, caster, kingpin inclination angles cannot be adjusted.
If camber, caster, or kingpin inclination angle exceeds the standard value, check front suspension
parts for wear and damage. Replace suspect parts if a malfunction is detected.
Kingpin inclination angle is reference value, no inspection is required.
Measure wheel alignment under unladen conditions.
NOTE:
“Unladen conditions” means that fuel, engine coolant, and lubricant are full. Spare tire, jack, hand tools and
mats are in designated positions.
Preliminary Check
Check the following:
Tires for improper air pressure and wear
Road wheels for runout: Refer to WT-2, "
Inspection".
Wheel bearing axial end play: Refer to FA X - 6 , "
Inspection".
Transverse link ball joint axial end play: Refer to FSU-11, "
Inspection".
Strut operation.
Each mounting part of axle and suspension for looseness and deformation
Each of suspension member and transverse link for cracks, deformation and other damage
Vehicle height (posture)
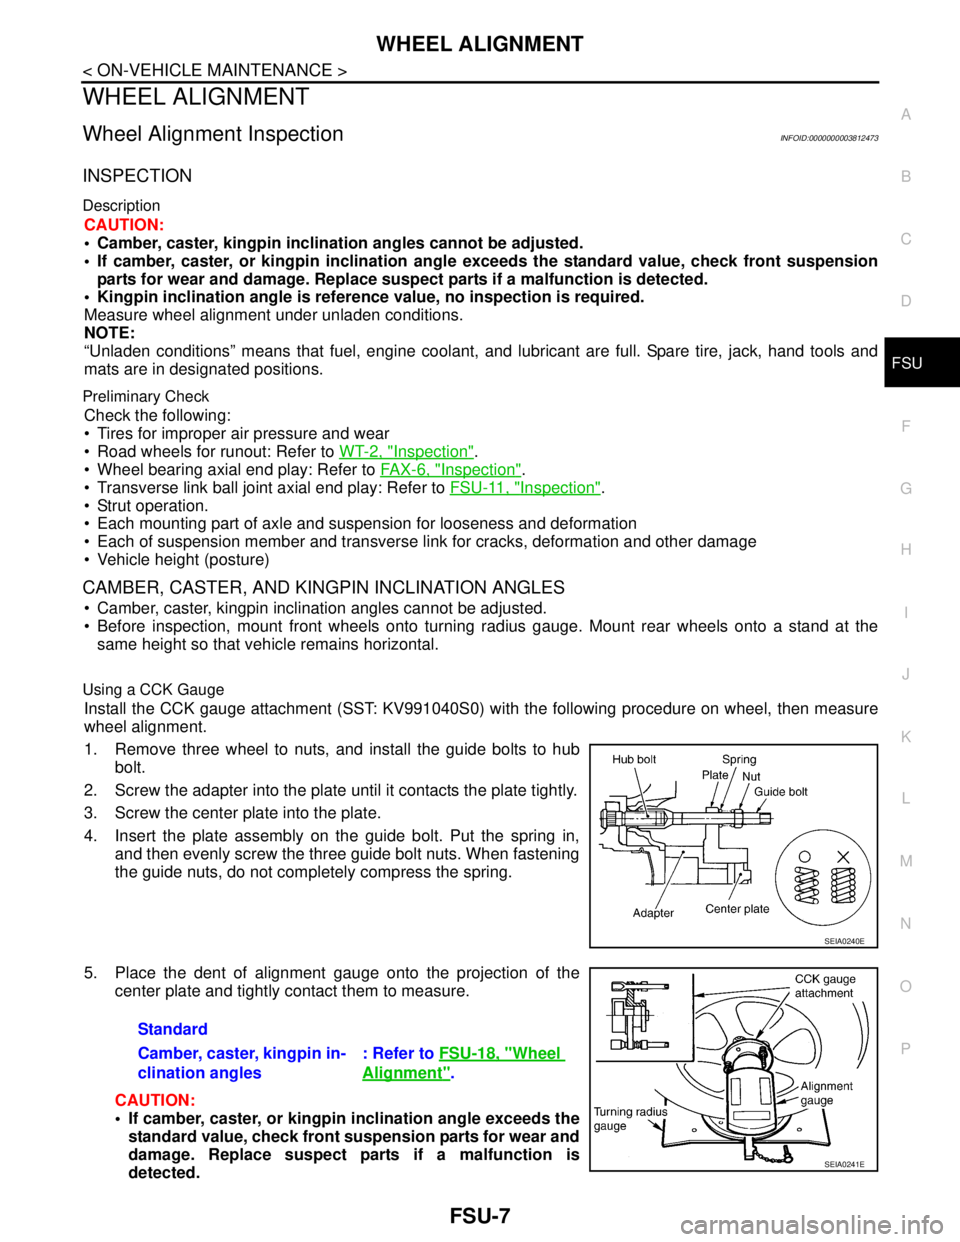
CAMBER, CASTER, AND KINGPIN INCLINATION ANGLES
Camber, caster, kingpin inclination angles cannot be adjusted.
Before inspection, mount front wheels onto turning radius gauge. Mount rear wheels onto a stand at the
same height so that vehicle remains horizontal.
Using a CCK Gauge
Install the CCK gauge attachment (SST: KV991040S0) with the following procedure on wheel, then measure
wheel alignment.
1. Remove three wheel to nuts, and install the guide bolts to hub
bolt.
2. Screw the adapter into the plate until it contacts the plate tightly.
3. Screw the center plate into the plate.
4. Insert the plate assembly on the guide bolt. Put the spring in,
and then evenly screw the three guide bolt nuts. When fastening
the guide nuts, do not completely compress the spring.
5. Place the dent of alignment gauge onto the projection of the
center plate and tightly contact them to measure.
CAUTION:
If camber, caster, or kingpin inclination angle exceeds the
standard value, check front suspension parts for wear and
damage. Replace suspect parts if a malfunction is
detected.
SEIA0240E
Standard
Camber, caster, kingpin in-
clination angles: Refer to FSU-18, "
Wheel
Alignment".
SEIA0241E
Page 2486 of 5121
FSU-12
< ON-VEHICLE REPAIR >
TRANSVERSE LINK
TRANSVERSE LINK
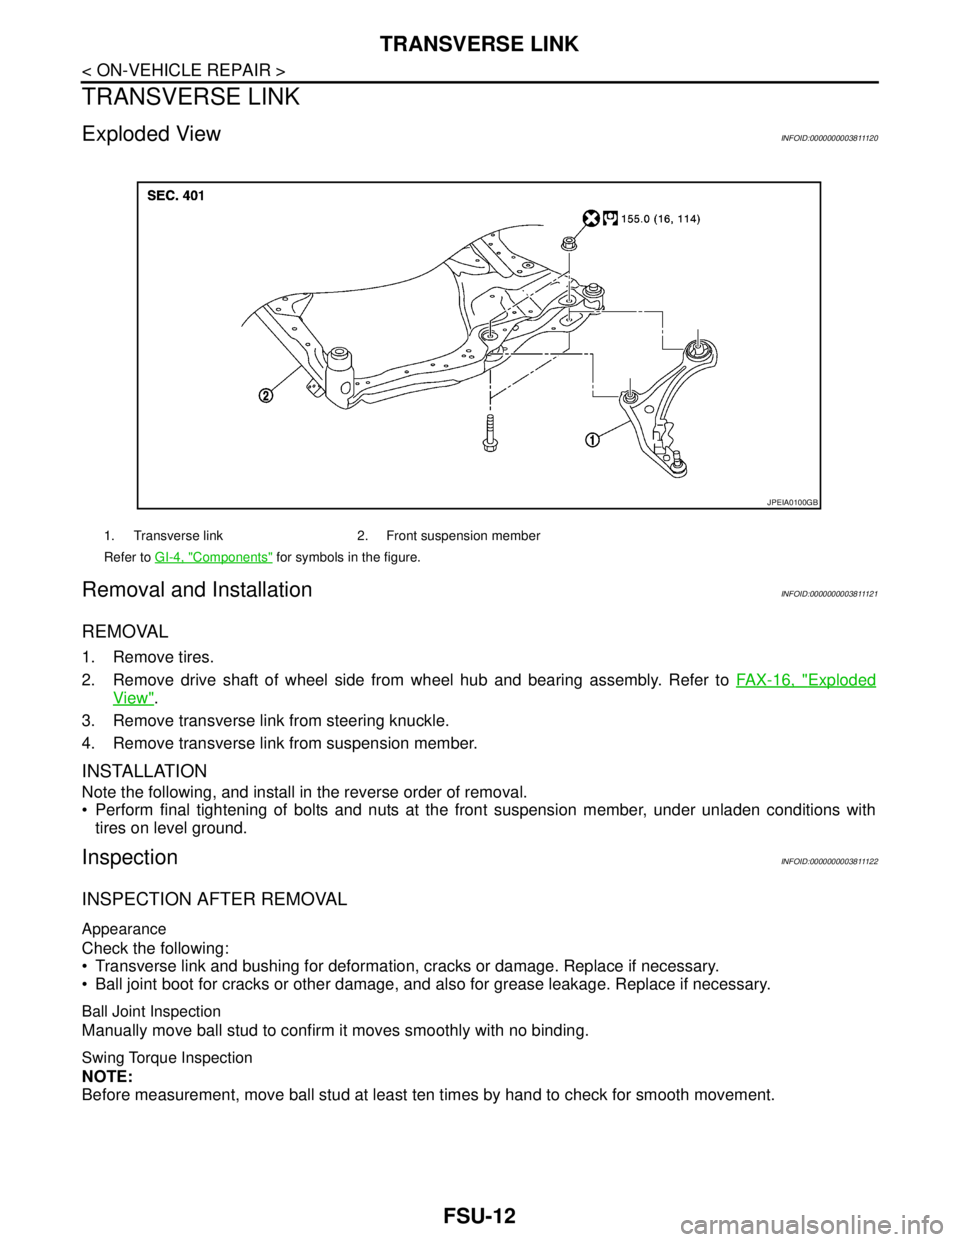
Exploded ViewINFOID:0000000003811120
Removal and InstallationINFOID:0000000003811121
REMOVAL
1. Remove tires.
2. Remove drive shaft of wheel side from wheel hub and bearing assembly. Refer to FAX-16, "
Exploded
View".
3. Remove transverse link from steering knuckle.
4. Remove transverse link from suspension member.
INSTALLATION
Note the following, and install in the reverse order of removal.
Perform final tightening of bolts and nuts at the front suspension member, under unladen conditions with
tires on level ground.
InspectionINFOID:0000000003811122
INSPECTION AFTER REMOVAL
Appearance
Check the following:
Transverse link and bushing for deformation, cracks or damage. Replace if necessary.
Ball joint boot for cracks or other damage, and also for grease leakage. Replace if necessary.
Ball Joint Inspection
Manually move ball stud to confirm it moves smoothly with no binding.
Swing Torque Inspection
NOTE:
Before measurement, move ball stud at least ten times by hand to check for smooth movement.
1. Transverse link 2. Front suspension member
Refer to GI-4, "
Components" for symbols in the figure.
JPEIA0100GB