maintenance NISSAN TEANA 2008 Owner's Manual
[x] Cancel search | Manufacturer: NISSAN, Model Year: 2008, Model line: TEANA, Model: NISSAN TEANA 2008Pages: 5121, PDF Size: 69.03 MB
Page 911 of 5121
REAR DISC BRAKE
BR-15
< ON-VEHICLE MAINTENANCE >
C
D
E
G
H
I
J
K
L
MA
B
BR
N
O
P
REAR DISC BRAKE
BRAKE PAD
BRAKE PAD : Inspection and AdjustmentINFOID:0000000003811181
INSPECTION
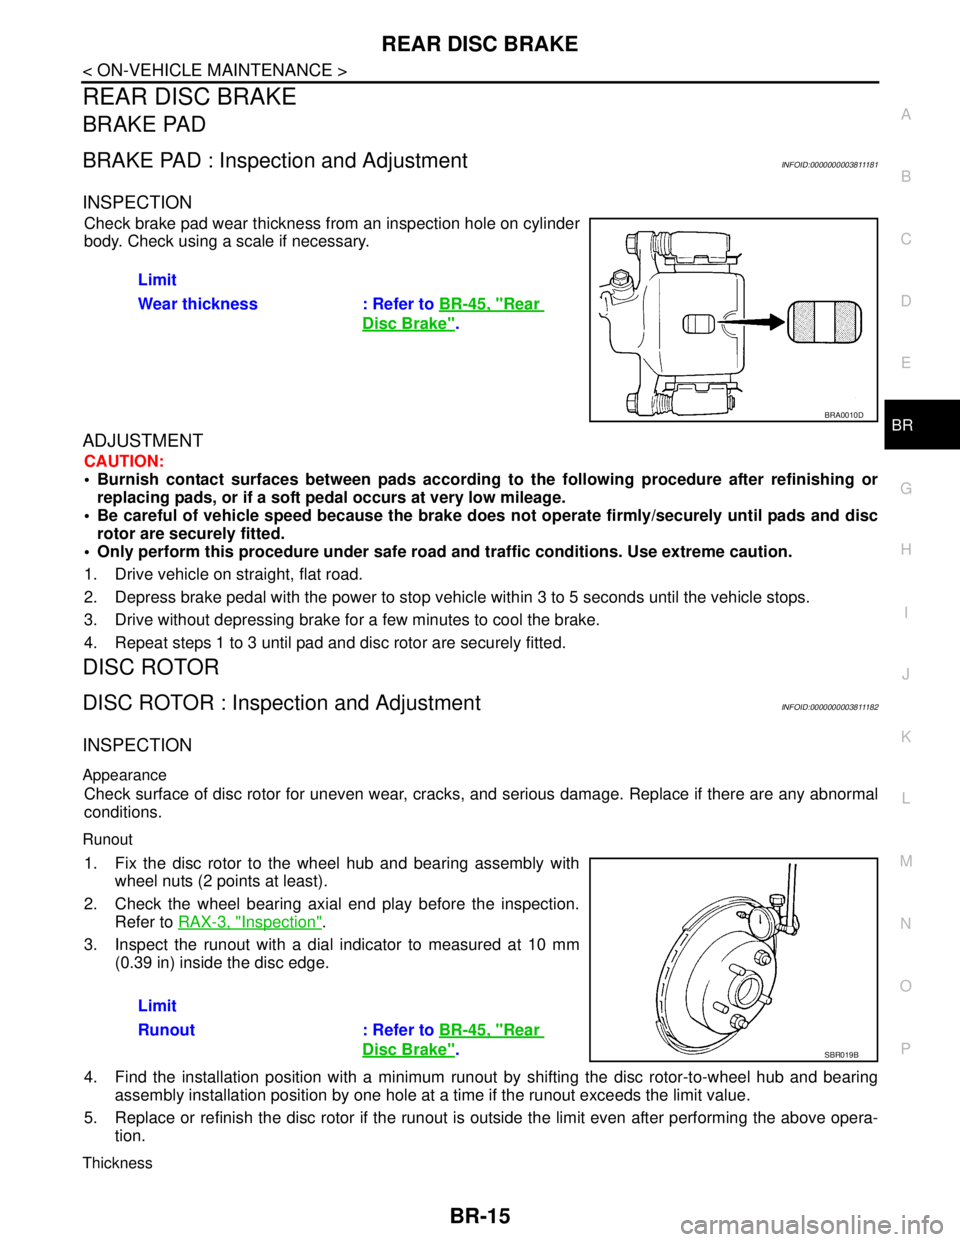
Check brake pad wear thickness from an inspection hole on cylinder
body. Check using a scale if necessary.
ADJUSTMENT
CAUTION:
Burnish contact surfaces between pads according to the following procedure after refinishing or
replacing pads, or if a soft pedal occurs at very low mileage.
Be careful of vehicle speed because the brake does not operate firmly/securely until pads and disc
rotor are securely fitted.
Only perform this procedure under safe road and traffic conditions. Use extreme caution.
1. Drive vehicle on straight, flat road.
2. Depress brake pedal with the power to stop vehicle within 3 to 5 seconds until the vehicle stops.
3. Drive without depressing brake for a few minutes to cool the brake.
4. Repeat steps 1 to 3 until pad and disc rotor are securely fitted.
DISC ROTOR
DISC ROTOR : Inspection and AdjustmentINFOID:0000000003811182
INSPECTION
Appearance
Check surface of disc rotor for uneven wear, cracks, and serious damage. Replace if there are any abnormal
conditions.
Runout
1. Fix the disc rotor to the wheel hub and bearing assembly with
wheel nuts (2 points at least).
2. Check the wheel bearing axial end play before the inspection.
Refer to RAX-3, "
Inspection".
3. Inspect the runout with a dial indicator to measured at 10 mm
(0.39 in) inside the disc edge.
4. Find the installation position with a minimum runout by shifting the disc rotor-to-wheel hub and bearing
assembly installation position by one hole at a time if the runout exceeds the limit value.
5. Replace or refinish the disc rotor if the runout is outside the limit even after performing the above opera-
tion.
Thickness
Limit
Wear thickness : Refer to BR-45, "
Rear
Disc Brake".
BRA0010D
Limit
Runout : Refer to BR-45, "
Rear
Disc Brake".SBR019B
Page 912 of 5121
BR-16
< ON-VEHICLE MAINTENANCE >
REAR DISC BRAKE
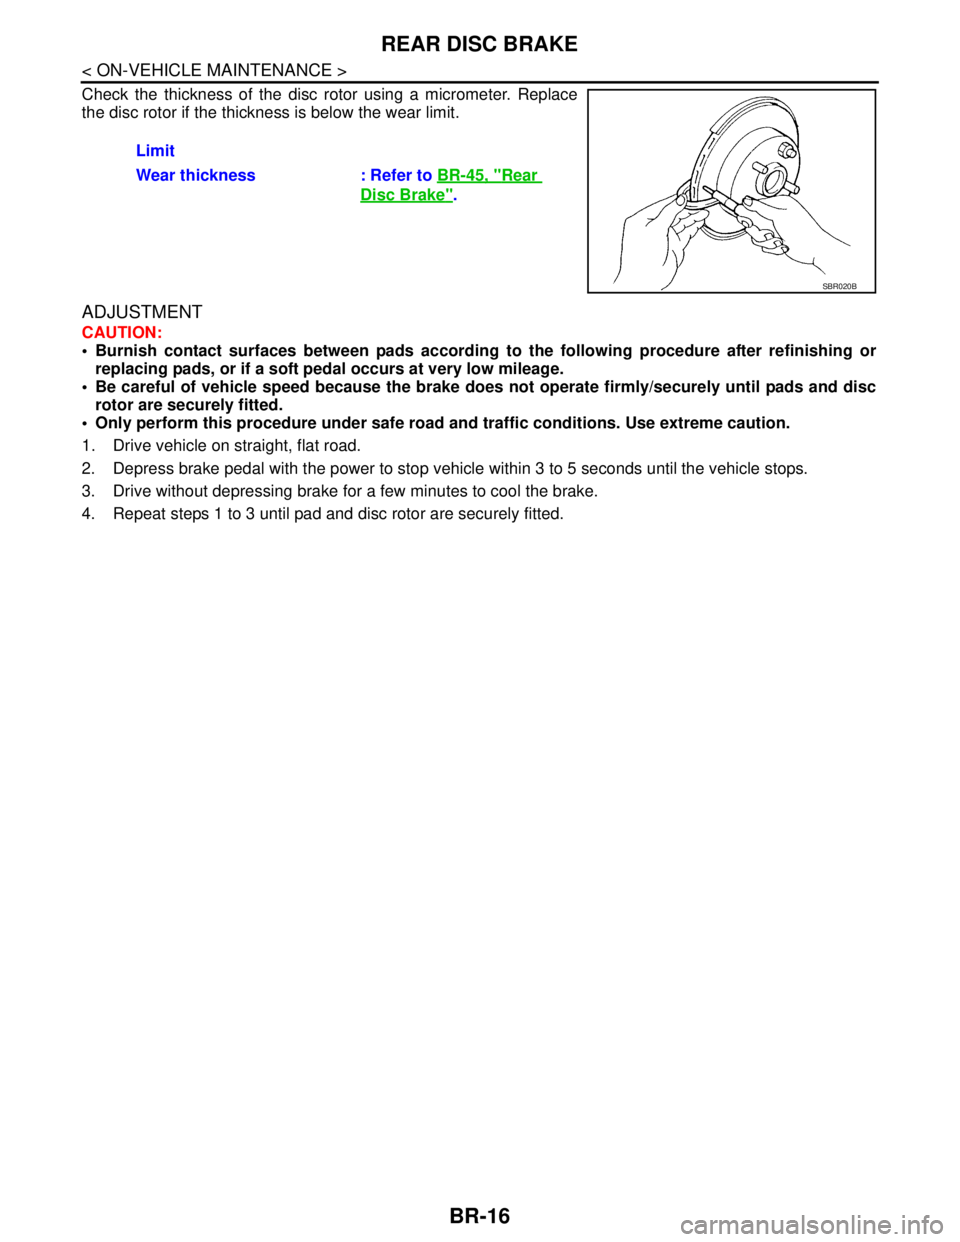
Check the thickness of the disc rotor using a micrometer. Replace
the disc rotor if the thickness is below the wear limit.
ADJUSTMENT
CAUTION:
Burnish contact surfaces between pads according to the following procedure after refinishing or
replacing pads, or if a soft pedal occurs at very low mileage.
Be careful of vehicle speed because the brake does not operate firmly/securely until pads and disc
rotor are securely fitted.
Only perform this procedure under safe road and traffic conditions. Use extreme caution.
1. Drive vehicle on straight, flat road.
2. Depress brake pedal with the power to stop vehicle within 3 to 5 seconds until the vehicle stops.
3. Drive without depressing brake for a few minutes to cool the brake.
4. Repeat steps 1 to 3 until pad and disc rotor are securely fitted.Limit
Wear thickness : Refer to BR-45, "
Rear
Disc Brake".
SBR020B
Page 996 of 5121

PRECAUTIONS
BRC-55
< PRECAUTION >[ABS]
C
D
E
G
H
I
J
K
L
MA
B
BRC
N
O
P
PRECAUTION
PRECAUTIONS
Precaution for Supplemental Restraint System (SRS) "AIR BAG" and "SEAT BELT
PRE-TENSIONER"
INFOID:0000000003893848
The Supplemental Restraint System such as “AIR BAG” and “SEAT BELT PRE-TENSIONER”, used along
with a front seat belt, helps to reduce the risk or severity of injury to the driver and front passenger for certain
types of collision. Information necessary to service the system safely is included in the “SRS AIRBAG” and
“SEAT BELT” of this Service Manual.
WARNING:
To avoid rendering the SRS inoperative, which could increase the risk of personal injury or death in
the event of a collision which would result in air bag inflation, all maintenance must be performed by
an authorized NISSAN/INFINITI dealer.
Improper maintenance, including incorrect removal and installation of the SRS, can lead to personal
injury caused by unintentional activation of the system. For removal of Spiral Cable and Air Bag
Module, see the “SRS AIRBAG”.
Never use electrical test equipment on any circuit related to the SRS unless instructed to in this Ser-
vice Manual. SRS wiring harnesses can be identified by yellow and/or orange harnesses or harness
connectors.
Precaution for Procedure without Cowl Top CoverINFOID:0000000003928740
When performing the procedure after removing cowl top cover, cover
the lower end of windshield with urethane, etc.
Precaution for Brake SystemINFOID:0000000003766860
WARNING:
Clean brake pads and shoes with a waste cloth, then wipe with a dust collector.
Only use “DOT 3” or “DOT 4” brake fluid. Refer to MA-11, "
Fluids and Lubricants".
Never reuse drained brake fluid.
Never spill or splash brake fluid on painted surfaces. Brake fluid may seriously damage paint. Wipe it off
immediately and wash with water if it gets on a painted surface.
Never use mineral oils such as gasoline or light oil. They may damage rubber parts and cause improper
operation.
Always loosen the brake tube flare nut with a flare nut wrench.
Tighten the brake tube flare nut to the specified torque with a flare
nut torque wrench (A).
Always conform the specified tightening torque when installing the
brake pipes.
Brake system is an important safety part. If a brake fluid leak is
detected, always disassemble the affected part. If a malfunction is
detected, replace part with a new one.
Turn the ignition switch OFF and disconnect the ABS actuator and
electric unit (control unit) connector or the battery negative terminal
before performing the work.
PIIB3706J
JPFIA0061ZZ
Page 1090 of 5121

PRECAUTIONS
BRC-149
< PRECAUTION >[VDC/TCS/ABS]
C
D
E
G
H
I
J
K
L
MA
B
BRC
N
O
P
PRECAUTION
PRECAUTIONS
Precaution for Supplemental Restraint System (SRS) "AIR BAG" and "SEAT BELT
PRE-TENSIONER"
INFOID:0000000003893849
The Supplemental Restraint System such as “AIR BAG” and “SEAT BELT PRE-TENSIONER”, used along
with a front seat belt, helps to reduce the risk or severity of injury to the driver and front passenger for certain
types of collision. Information necessary to service the system safely is included in the “SRS AIRBAG” and
“SEAT BELT” of this Service Manual.
WARNING:
To avoid rendering the SRS inoperative, which could increase the risk of personal injury or death in
the event of a collision which would result in air bag inflation, all maintenance must be performed by
an authorized NISSAN/INFINITI dealer.
Improper maintenance, including incorrect removal and installation of the SRS, can lead to personal
injury caused by unintentional activation of the system. For removal of Spiral Cable and Air Bag
Module, see the “SRS AIRBAG”.
Never use electrical test equipment on any circuit related to the SRS unless instructed to in this Ser-
vice Manual. SRS wiring harnesses can be identified by yellow and/or orange harnesses or harness
connectors.
Precaution for Procedure without Cowl Top CoverINFOID:0000000003928809
When performing the procedure after removing cowl top cover, cover
the lower end of windshield with urethane, etc.
Precaution for Brake SystemINFOID:0000000003767031
WARNING:
Clean brake pads and shoes with a waste cloth, then wipe with a dust collector.
Only use “DOT 3” or “DOT 4” brake fluid. Refer to MA-11, "
Fluids and Lubricants".
Never reuse drained brake fluid.
Never spill or splash brake fluid on painted surfaces. Brake fluid may seriously damage paint. Wipe it off
immediately and wash with water if it gets on a painted surface.
Never use mineral oils such as gasoline or light oil. They may damage rubber parts and cause improper
operation.
Always loosen the brake tube flare nut with a flare nut wrench.
Tighten the brake tube flare nut to the specified torque with a flare
nut torque wrench (A).
Always conform the specified tightening torque when installing the
brake pipes.
Brake system is an important safety part. If a brake fluid leak is
detected, always disassemble the affected part. If a malfunction is
detected, replace part with a new one.
Turn the ignition switch OFF and disconnect the ABS actuator and
electric unit (control unit) connector or the battery negative terminal
before performing the work.
PIIB3706J
JPFIA0061ZZ
Page 1099 of 5121
CHG
CHG-1
ELECTRICAL & POWER CONTROL
C
DE
F
G H
I
J
K L
B
SECTION CHG
A
O P
N
CONTENTS
CHARGING SYSTEM
BASIC INSPECTION .......
.............................2
DIAGNOSIS AND REPAIR WORKFLOW ..... .....2
Work Flow ........................................................... ......2
FUNCTION DIAGNOSIS ...............................5
CHARGING SYSTEM ..................................... .....5
System Diagram .................................................. ......5
System Description ...................................................5
Component Parts Location ........................................5
Component Description ............................................5
POWER GENERATION VOLTAGE VARI-
ABLE CONTROL SYSTEM ............................ .....
7
System Diagram .................................................. ......7
System Description ...................................................7
Component Parts Location ........................................7
Component Description .............................................8
COMPONENT DIAGNOSIS ..........................9
B TERMINAL CIRCUIT .................................. .....9
Description .......................................................... ......9
Diagnosis Procedure .................................................9
L TERMINAL CIRCUIT (OPEN) .........................10
Description .......................................................... ....10
Diagnosis Procedure ...............................................10
L TERMINAL CIRCUIT (SHORT) .......................12
Description .......................................................... ....12
Diagnosis Procedure ...............................................12
S TERMINAL CIRCUIT ......................................13
Description .......................................................... ....13
Diagnosis Procedure ...............................................13
CHARGING SYSTEM ..................................... ....14
Wiring Diagram - CHARGING SYSTEM - ........... ....14
SYMPTOM DIAGNOSIS ..............................17
CHARGING SYSTEM .......................................17
Symptom Table ................................................... ....17
PRECAUTION ..............................................18
PRECAUTIONS .................................................18
Precaution for Supplemental Restraint System
(SRS) "AIR BAG" and "SEAT BELT PRE-TEN-
SIONER" ............................................................. ....
18
PREPARATION ...........................................19
PREPARATION .................................................19
Special Service Tools .......................................... ....19
ON-VEHICLE MAINTENANCE ....................20
CHARGING SYSTEM PRELIMINARY IN-
SPECTION ....... ................................ .................
20
Inspection Procedure ........................................... ....20
ON-VEHICLE REPAIR .................................21
ALTERNATOR . ................................ .................21
Exploded View ..................................................... ....21
Removal and Installation .........................................22
Disassembly and Assembly .....................................23
Inspection ................................................................24
SERVICE DATA AND SPECIFICATIONS
(SDS) ............... .............................................
25
SERVICE DATA AND SPECIFICATIONS
(SDS) .................................................................
25
Alternator ............................................................. ....25
Page 1116 of 5121
CHG-18
< PRECAUTION >
PRECAUTIONS
PRECAUTION
PRECAUTIONS
Precaution for Supplemental Restraint System (SRS) "AIR BAG" and "SEAT BELT
PRE-TENSIONER"
INFOID:0000000003860531
The Supplemental Restraint System such as “AIR BAG” and “SEAT BELT PRE-TENSIONER”, used along
with a front seat belt, helps to reduce the risk or severity of injury to the driver and front passenger for certain
types of collision. Information necessary to service the system safely is included in the “SRS AIRBAG” and
“SEAT BELT” of this Service Manual.
WARNING:
• To avoid rendering the SRS inoperative, which could increase the risk of personal injury or death in
the event of a collision which would result in air bag inflation, all maintenance must be performed by
an authorized NISSAN/INFINITI dealer.
Improper maintenance, including incorrect removal and installation of the SRS, can lead to personal
injury caused by unintentional activation of the system. For removal of Spiral Cable and Air Bag
Module, see the “SRS AIRBAG”.
Never use electrical test equipment on any circuit related to the SRS unless instructed to in this Ser-
vice Manual. SRS wiring harnesses can be identified by yellow and/or orange harnesses or harness
connectors.
Page 1118 of 5121
CHG-20
< ON-VEHICLE MAINTENANCE >
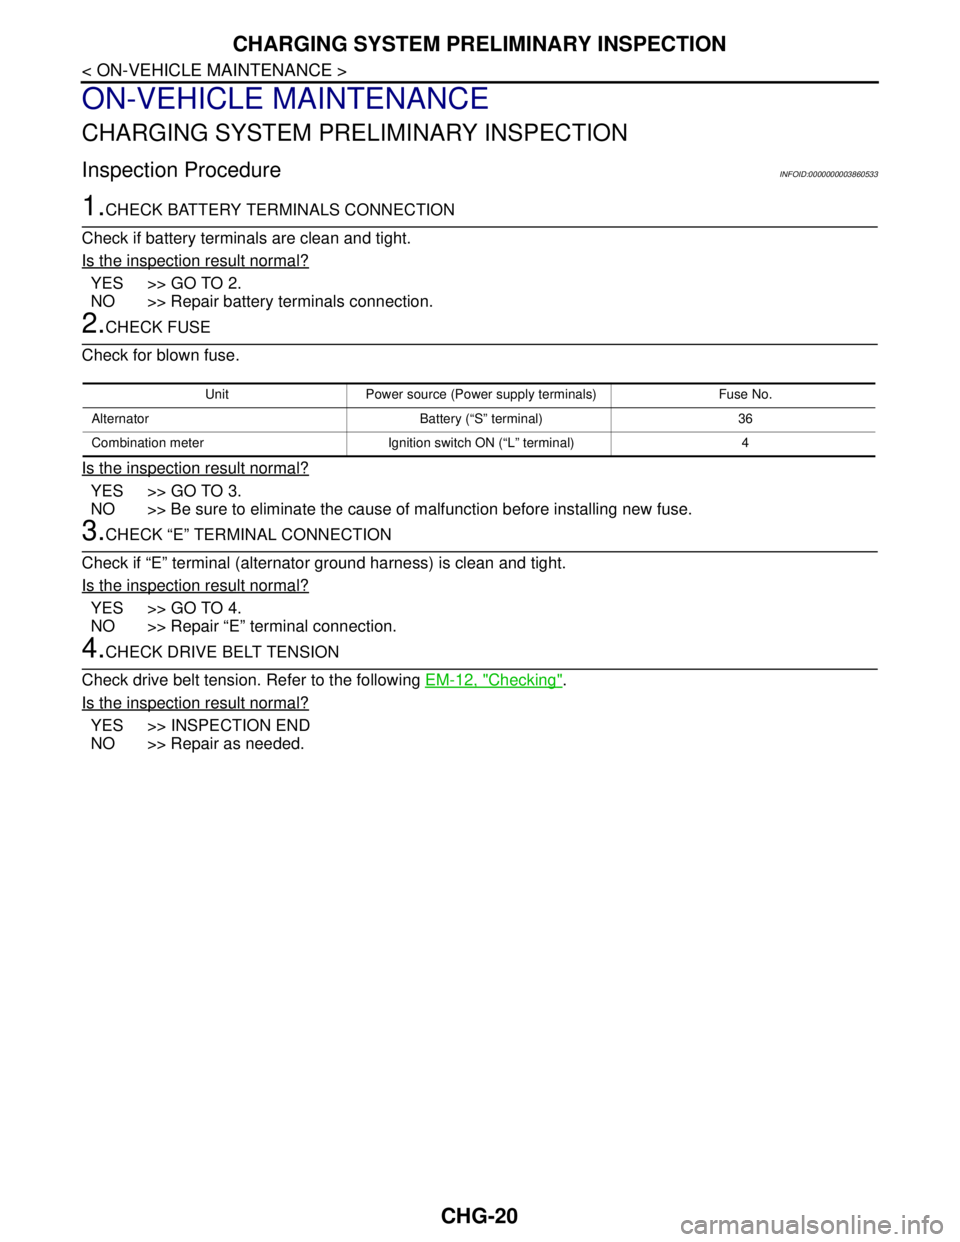
CHARGING SYSTEM PRELIMINARY INSPECTION
ON-VEHICLE MAINTENANCE
CHARGING SYSTEM PRELIMINARY INSPECTION
Inspection ProcedureINFOID:0000000003860533
1.CHECK BATTERY TERMINALS CONNECTION
Check if battery terminals are clean and tight.
Is the inspection result normal?
YES >> GO TO 2.
NO >> Repair battery terminals connection.
2.CHECK FUSE
Check for blown fuse.
Is the inspection result normal?
YES >> GO TO 3.
NO >> Be sure to eliminate the cause of malfunction before installing new fuse.
3.CHECK “E” TERMINAL CONNECTION
Check if “E” terminal (alternator ground harness) is clean and tight.
Is the inspection result normal?
YES >> GO TO 4.
NO >> Repair “E” terminal connection.
4.CHECK DRIVE BELT TENSION
Check drive belt tension. Refer to the following EM-12, "
Checking".
Is the inspection result normal?
YES >> INSPECTION END
NO >> Repair as needed.
Unit Power source (Power supply terminals) Fuse No.
Alternator Battery (“S” terminal) 36
Combination meter Ignition switch ON (“L” terminal) 4
Page 1124 of 5121
CO-1
ENGINE
C
DE
F
G H
I
J
K L
M
SECTION CO
A
CO
N
O P
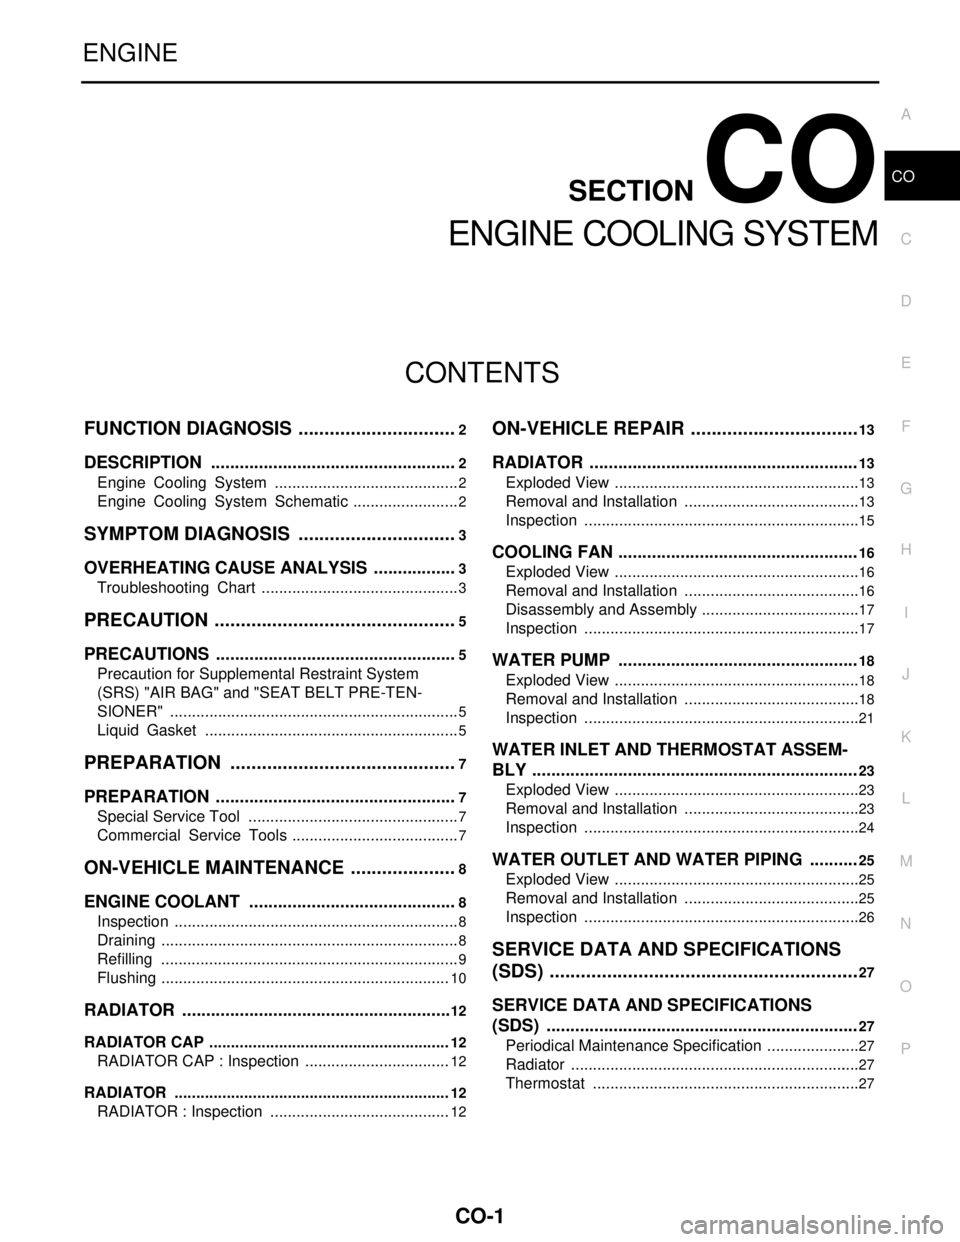
CONTENTS
ENGINE COOLING SYSTEM
FUNCTION DIAGNOSIS .. .............................2
DESCRIPTION ............................................... .....2
Engine Cooling System ..................................... ......2
Engine Cooling System Schematic .........................2
SYMPTOM DIAGNOSIS ...............................3
OVERHEATING CAUSE ANALYSIS ............. .....3
Troubleshooting Chart ........................................ ......3
PRECAUTION ...............................................5
PRECAUTIONS .............................................. .....5
Precaution for Supplemental Restraint System
(SRS) "AIR BAG" and "SEAT BELT PRE-TEN-
SIONER" ............................................................. ......
5
Liquid Gasket ...........................................................5
PREPARATION ............................................7
PREPARATION .............................................. .....7
Special Service Tool ........................................... ......7
Commercial Service Tools .......................................7
ON-VEHICLE MAINTENANCE .....................8
ENGINE COOLANT ....................................... .....8
Inspection ............................................................ ......8
Draining .....................................................................8
Refilling .....................................................................9
Flushing ...................................................................10
RADIATOR .........................................................12
RADIATOR CAP .................................................... ....12
RADIATOR CAP : Inspection ..................................12
RADIATOR ............................................................ ....12
RADIATOR : Inspection ..........................................12
ON-VEHICLE REPAIR .................................13
RADIATOR ....... ................................ .................13
Exploded View ..................................................... ....13
Removal and Installation .........................................13
Inspection ................................................................15
COOLING FAN ..................................................16
Exploded View .........................................................16
Removal and Installation .........................................16
Disassembly and Assembly .....................................17
Inspection ................................................................17
WATER PUMP ..................................................18
Exploded View .........................................................18
Removal and Installation .........................................18
Inspection ................................................................21
WATER INLET AND THERMOSTAT ASSEM-
BLY ....................................................................
23
Exploded View .........................................................23
Removal and Installation .........................................23
Inspection ................................................................24
WATER OUTLET AND WATER PIPING ..........25
Exploded View .........................................................25
Removal and Installation .........................................25
Inspection ................................................................26
SERVICE DATA AND SPECIFICATIONS
(SDS) ............... .............................................
27
SERVICE DATA AND SPECIFICATIONS
(SDS) .................................................................
27
Periodical Maintenance Specification .................. ....27
Radiator ...................................................................27
Thermostat ..............................................................27
Page 1128 of 5121
PRECAUTIONS
CO-5
< PRECAUTION >
C
D
E
F
G
H
I
J
K
L
MA
CO
N
P O
PRECAUTION
PRECAUTIONS
Precaution for Supplemental Restraint System (SRS) "AIR BAG" and "SEAT BELT
PRE-TENSIONER"
INFOID:0000000003801896
The Supplemental Restraint System such as “AIR BAG” and “SEAT BELT PRE-TENSIONER”, used along
with a front seat belt, helps to reduce the risk or severity of injury to the driver and front passenger for certain
types of collision. This system includes seat belt switch inputs and dual stage front air bag modules. The SRS
system uses the seat belt switches to determine the front air bag deployment, and may only deploy one front
air bag, depending on the severity of a collision and whether the front occupants are belted or unbelted.
Information necessary to service the system safely is included in the “SRS AIRBAG” and “SEAT BELT” of this
Service Manual.
WARNING:
• To avoid rendering the SRS inoperative, which could increase the risk of personal injury or death in
the event of a collision which would result in air bag inflation, all maintenance must be performed by
an authorized NISSAN/INFINITI dealer.
Improper maintenance, including incorrect removal and installation of the SRS, can lead to personal
injury caused by unintentional activation of the system. For removal of Spiral Cable and Air Bag
Module, see the “SRS AIRBAG”.
Do not use electrical test equipment on any circuit related to the SRS unless instructed to in this
Service Manual. SRS wiring harnesses can be identified by yellow and/or orange harnesses or har-
ness connectors.
Liquid GasketINFOID:0000000003793163
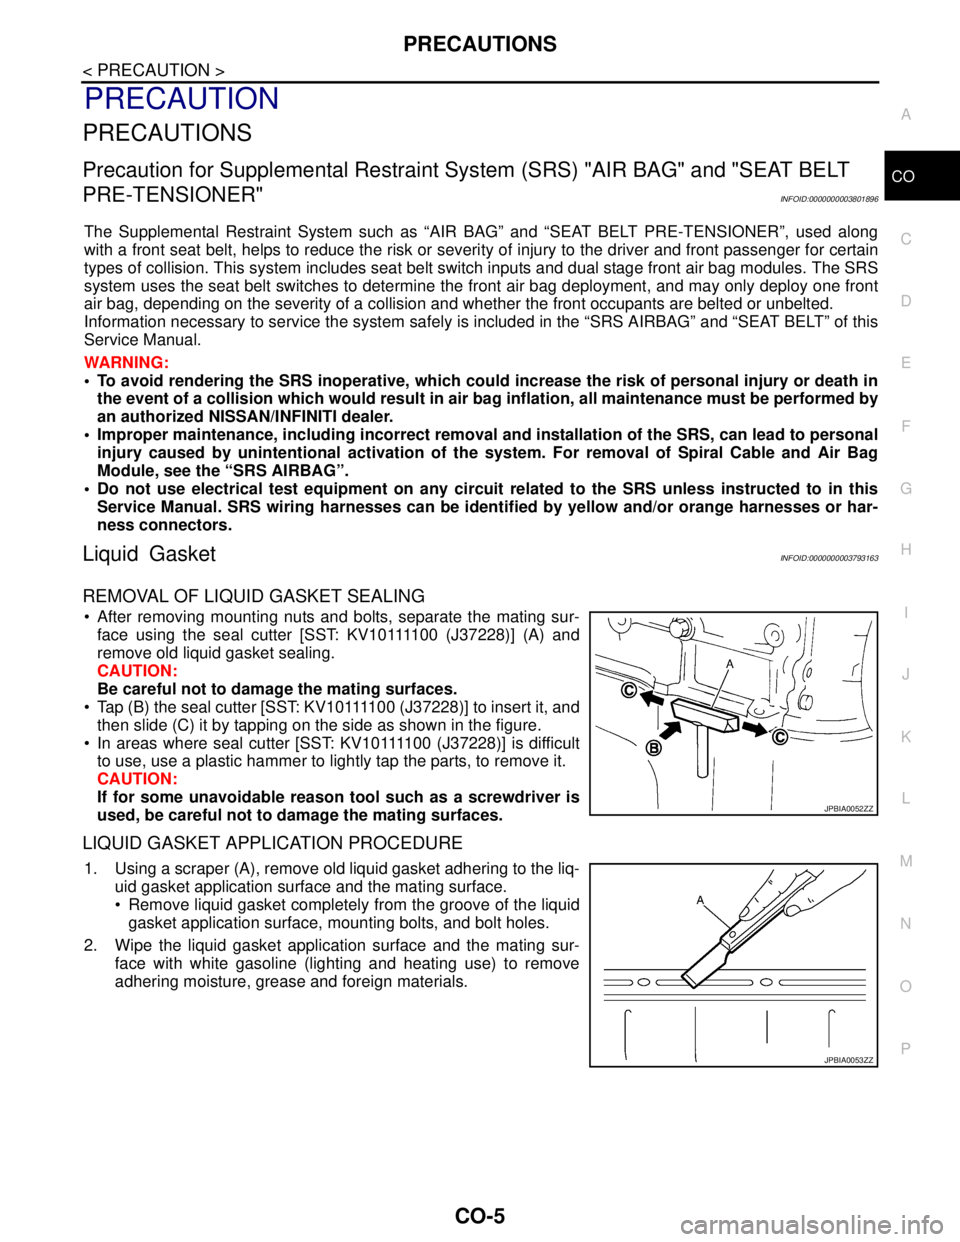
REMOVAL OF LIQUID GASKET SEALING
After removing mounting nuts and bolts, separate the mating sur-
f a c e u s i n g t h e s e a l c u t t e r [ S S T: K V 1 0 1111 0 0 ( J37228)] (A) and
remove old liquid gasket sealing.
CAUTION:
Be careful not to damage the mating surfaces.
Tap (B) the seal cutter [SST: KV10111100 (J37228)] to insert it, and
then slide (C) it by tapping on the side as shown in the figure.
In areas where seal cutter [SST: KV10111100 (J37228)] is difficult
to use, use a plastic hammer to lightly tap the parts, to remove it.
CAUTION:
If for some unavoidable reason tool such as a screwdriver is
used, be careful not to damage the mating surfaces.
LIQUID GASKET APPLICATION PROCEDURE
1. Using a scraper (A), remove old liquid gasket adhering to the liq-
uid gasket application surface and the mating surface.
Remove liquid gasket completely from the groove of the liquid
gasket application surface, mounting bolts, and bolt holes.
2. Wipe the liquid gasket application surface and the mating sur-
face with white gasoline (lighting and heating use) to remove
adhering moisture, grease and foreign materials.
JPBIA0052ZZ
JPBIA0053ZZ
Page 1131 of 5121
CO-8
< ON-VEHICLE MAINTENANCE >
ENGINE COOLANT
ON-VEHICLE MAINTENANCE
ENGINE COOLANT
InspectionINFOID:0000000003793166
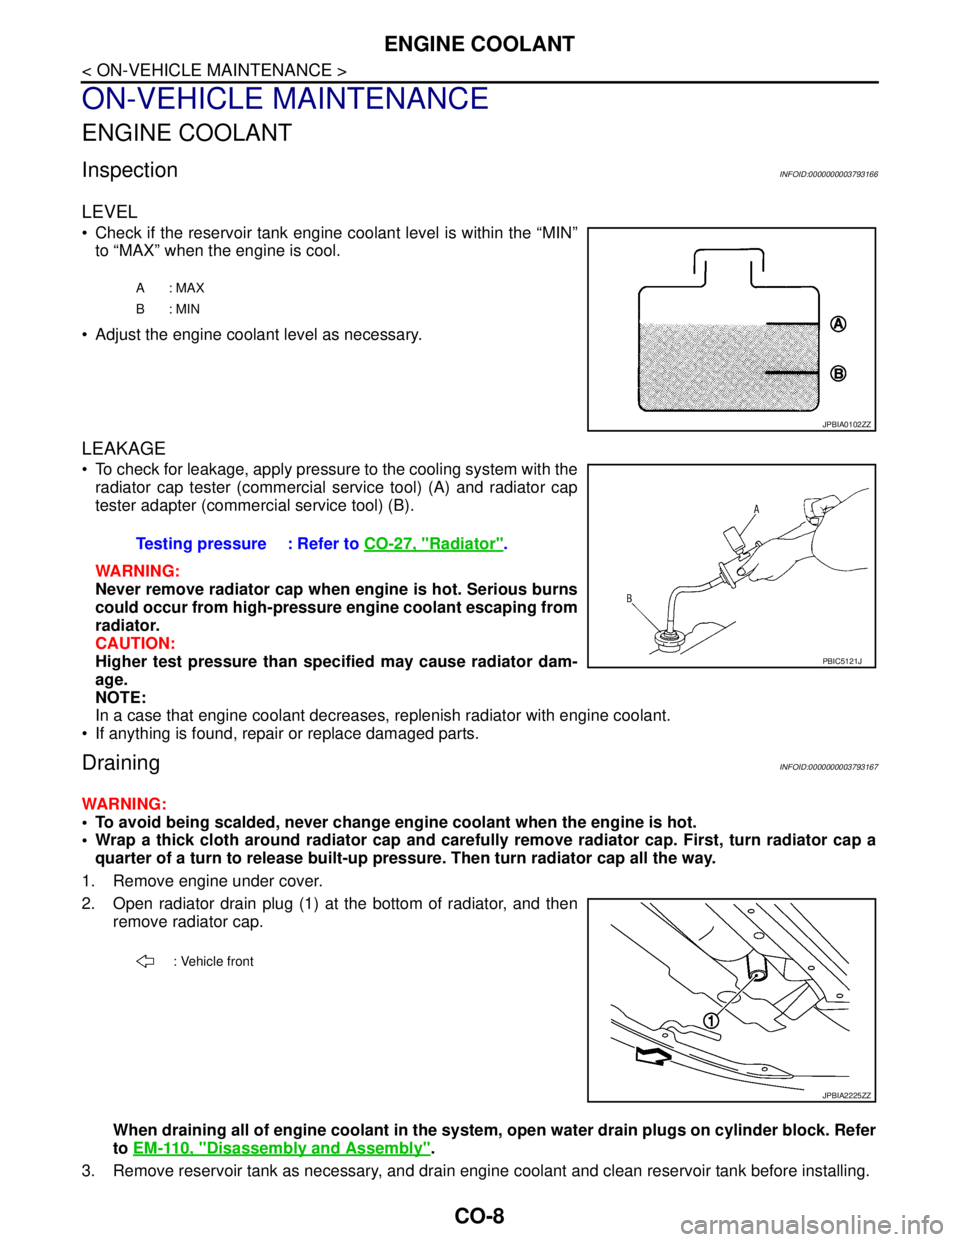
LEVEL
Check if the reservoir tank engine coolant level is within the “MIN”
to “MAX” when the engine is cool.
Adjust the engine coolant level as necessary.
LEAKAGE
To check for leakage, apply pressure to the cooling system with the
radiator cap tester (commercial service tool) (A) and radiator cap
tester adapter (commercial service tool) (B).
WARNING:
Never remove radiator cap when engine is hot. Serious burns
could occur from high-pressure engine coolant escaping from
radiator.
CAUTION:
Higher test pressure than specified may cause radiator dam-
age.
NOTE:
In a case that engine coolant decreases, replenish radiator with engine coolant.
If anything is found, repair or replace damaged parts.
DrainingINFOID:0000000003793167
WARNING:
To avoid being scalded, never change engine coolant when the engine is hot.
Wrap a thick cloth around radiator cap and carefully remove radiator cap. First, turn radiator cap a
quarter of a turn to release built-up pressure. Then turn radiator cap all the way.
1. Remove engine under cover.
2. Open radiator drain plug (1) at the bottom of radiator, and then
remove radiator cap.
When draining all of engine coolant in the system, open water drain plugs on cylinder block. Refer
to EM-110, "
Disassembly and Assembly".
3. Remove reservoir tank as necessary, and drain engine coolant and clean reservoir tank before installing.
A: MAX
B: MIN
JPBIA0102ZZ
Testing pressure : Refer to CO-27, "Radiator".
PBIC5121J
: Vehicle front
JPBIA2225ZZ