Ioni NISSAN TEANA 2008 Service Manual
[x] Cancel search | Manufacturer: NISSAN, Model Year: 2008, Model line: TEANA, Model: NISSAN TEANA 2008Pages: 5121, PDF Size: 69.03 MB
Page 1 of 5121
MODEL J32 SERIES
© 2008 NISSAN INTERNATIONAL SA
Allrightsreserved.NopartofthisElectronicServiceManualmaybereproducedorstoredinaretrievalsystem,ortransmittedinanyform,or by any means, electronic, mechanical, photocopying, recording or otherwise, without the prior written permission of Nissan InternationalSA, Switzerland.
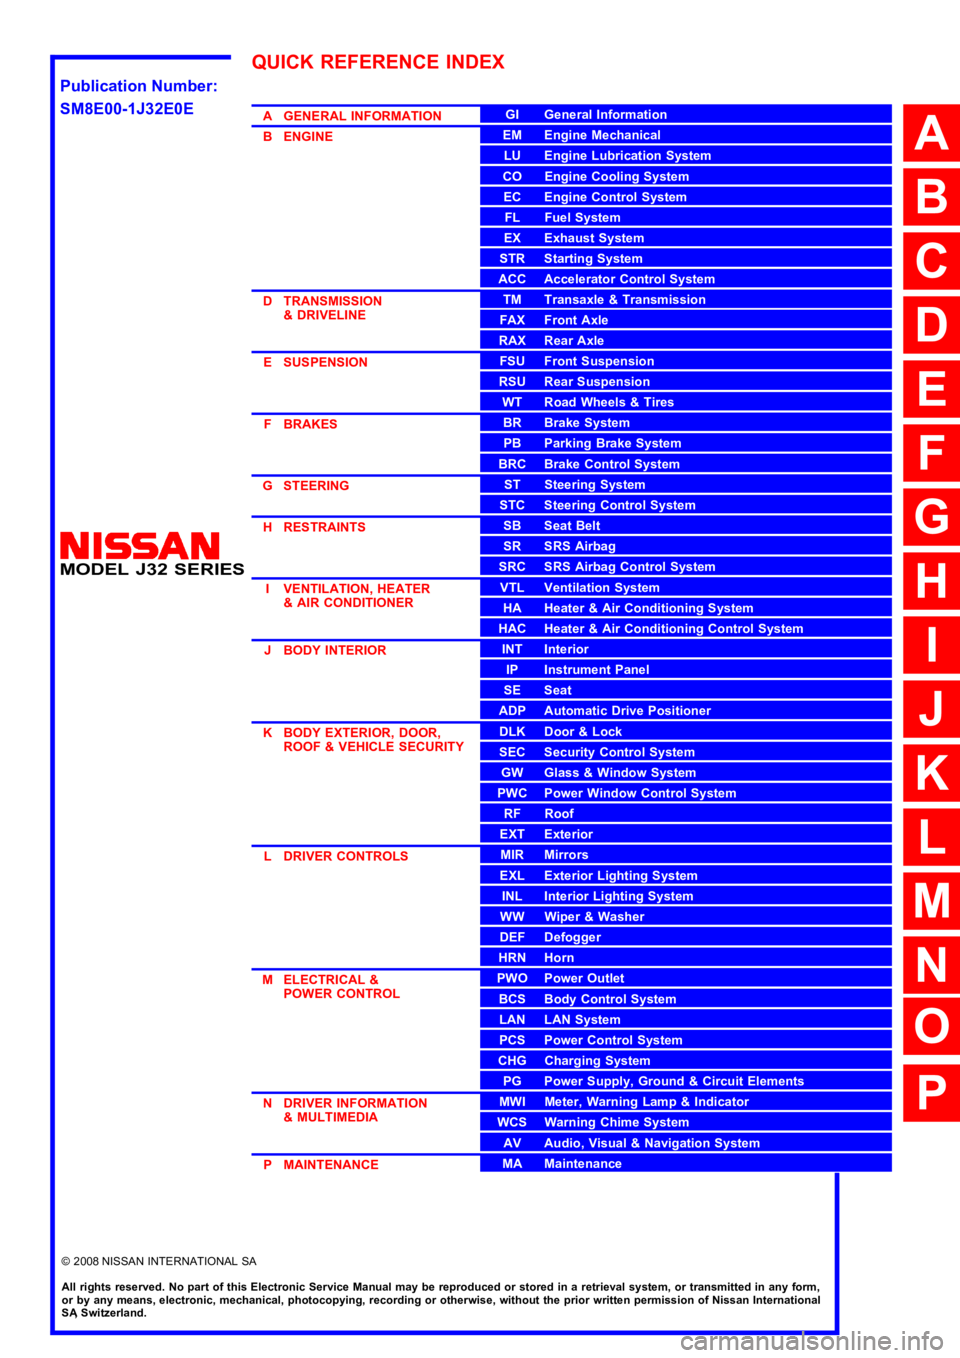
AGENERALINFORMATION
BENGINE
DTRANSMISSION&DRIVELINE
ESUSPENSION
FBRAKES
GSTEERING
HRESTRAINTS
IVENTILATION,HEATER&AIRCONDITIONER
JBODYINTERIOR
KBODYEXTERIOR,DOOR,ROOF&VEHICLESECURITY
LDRIVERCONTROLS
MELECTRICAL&POWERCONTROL
NDRIVERINFORMATION&MULTIMEDIA
PMAINTENANCE
GIGeneralInformation
EMEngineMechanical
LUEngineLubricationSystem
COEngineCoolingSystem
ECEngineControlSystem
FLFuelSystem
EXExhaustSystem
STRStartingSystem
ACCAcceleratorControlSystem
TMTransaxle &Transmission
FAXFrontAxle
RAXRearAxle
FSUFrontSuspension
RSURearSuspension
WTRoadWheels &Tires
BRBrakeSystem
PBParkingBrakeSystem
BRCBrakeControlSystem
STSteeringSystem
STCSteeringControlSystem
SBSeatBelt
SRSRSAirbag
SRCSRSAirbagControlSystem
VTLVentilationSystem
HAHeater &AirConditioningSystem
HACHeater &AirConditioningControlSystem
INTInterior
IPInstrumentPanel
SESeat
ADPAutomaticDrivePositioner
DLKDoor &Lock
SECSecurityControlSystem
GWGlass &WindowSystem
PWCPowerWindowControlSystem
RFRoof
EXTExterior
MIRMirrors
EXLExteriorLightingSystem
INLInteriorLightingSystem
WWWiper &Washer
DEFDefogger
HRNHorn
PWOPowerOutlet
BCSBodyControlSystem
LANLANSystem
PCSPowerControlSystem
CHGChargingSystem
PGPowerSupply,Ground&CircuitElements
MWIMeter,WarningLamp&Indicator
WCSWarningChimeSystem
AVAudio,Visual&NavigationSystem
MAMaintenance
QUICKREFERENCEINDEX
A
B
C
D
E
F
G
H
I
J
K
L
M
N
O
P
M
Publication Number:
SM8E00-1J32E0E
Page 2 of 5121

FOREWORD
This manual contains maintenance and repair procedures for the NISSAN
TEANA,modelJ32 series.
In order to assure your safety and the efficient functioning of the vehicle,
this manual should be read thoroughly. It is especially important that the
PRECAUTIONS in the GI section be completely understood before starting
any repair task.
All information in this manual is based on the latest product information
at the time of publication. The right is reserved to make changes in speci-
fications and methods at any time without notice.
IMPORTANT SAFETY NOTICE
The proper performance of service is essential for both the safety of the
technician and the efficient functioning of the vehicle.
The service methods in this Service Manual are described in such a man-
ner that the service may be performed safely and accurately.
Service varies with the procedures used, the skills of the technician and the
tools and parts available. Accordingly, anyone using service procedures,
tools or parts which are not specifically recommended by NISSAN must
first be completely satisfied that neither personal safety nor the vehicle's
safety will be jeopardized by the service method selected.
NISSANINTERNATIONAL SA
Service Engineering SectionParis, France
Page 5 of 5121
ACCELERATOR CONTROL SYSTEM
ACC-3
< ON-VEHICLE REPAIR >
C
D
E
F
G
H
I
J
K
L
MA
ACC
N
P O
ON-VEHICLE REPAIR
ACCELERATOR CONTROL SYSTEM
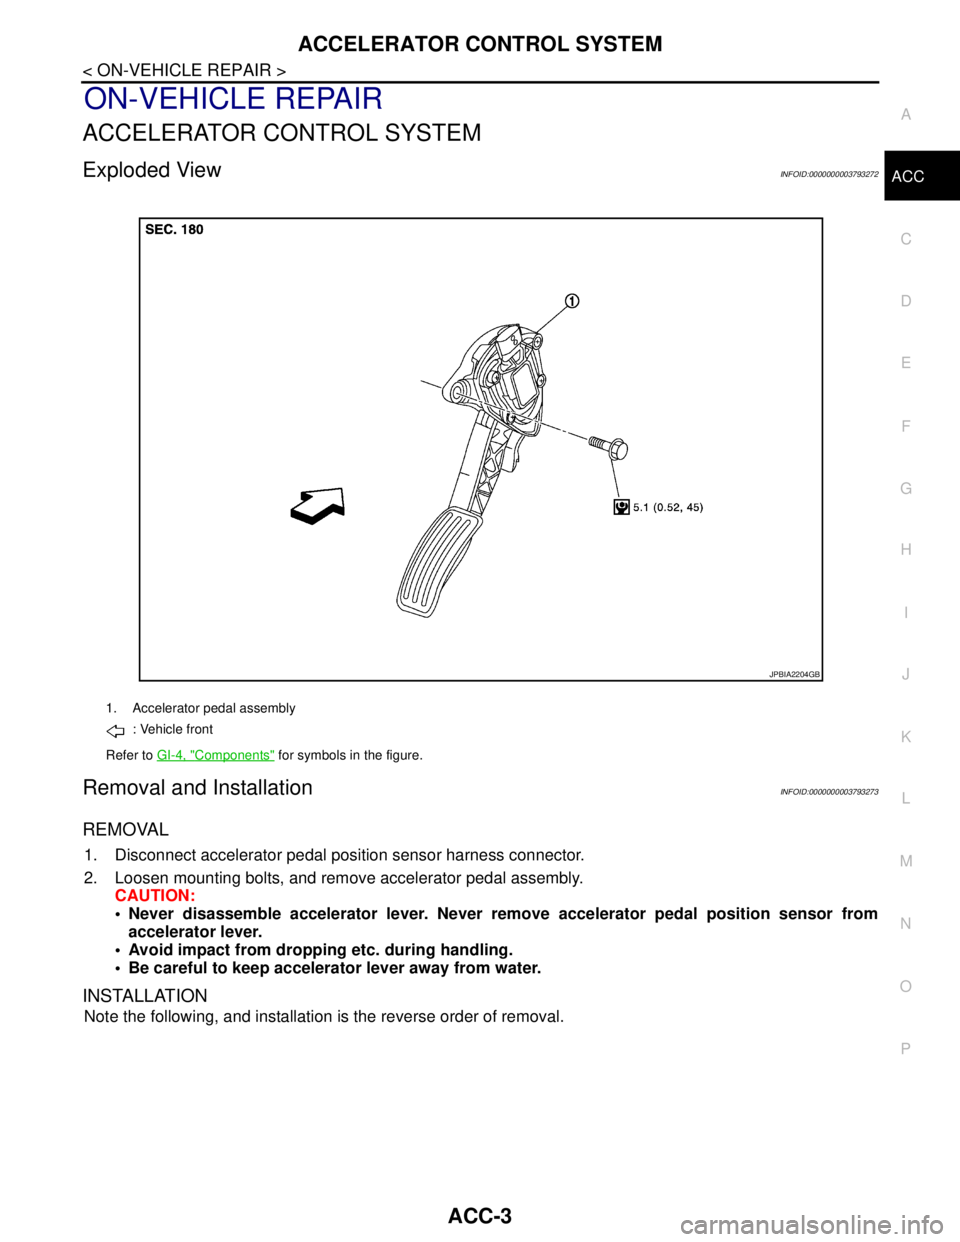
Exploded ViewINFOID:0000000003793272
Removal and InstallationINFOID:0000000003793273
REMOVAL
1. Disconnect accelerator pedal position sensor harness connector.
2. Loosen mounting bolts, and remove accelerator pedal assembly.
CAUTION:
Never disassemble accelerator lever. Never remove accelerator pedal position sensor from
accelerator lever.
Avoid impact from dropping etc. during handling.
Be careful to keep accelerator lever away from water.
INSTALLATION
Note the following, and installation is the reverse order of removal.
1. Accelerator pedal assembly
: Vehicle front
Refer to GI-4, "
Components" for symbols in the figure.
JPBIA2204GB
Page 6 of 5121
ACC-4
< ON-VEHICLE REPAIR >
ACCELERATOR CONTROL SYSTEM
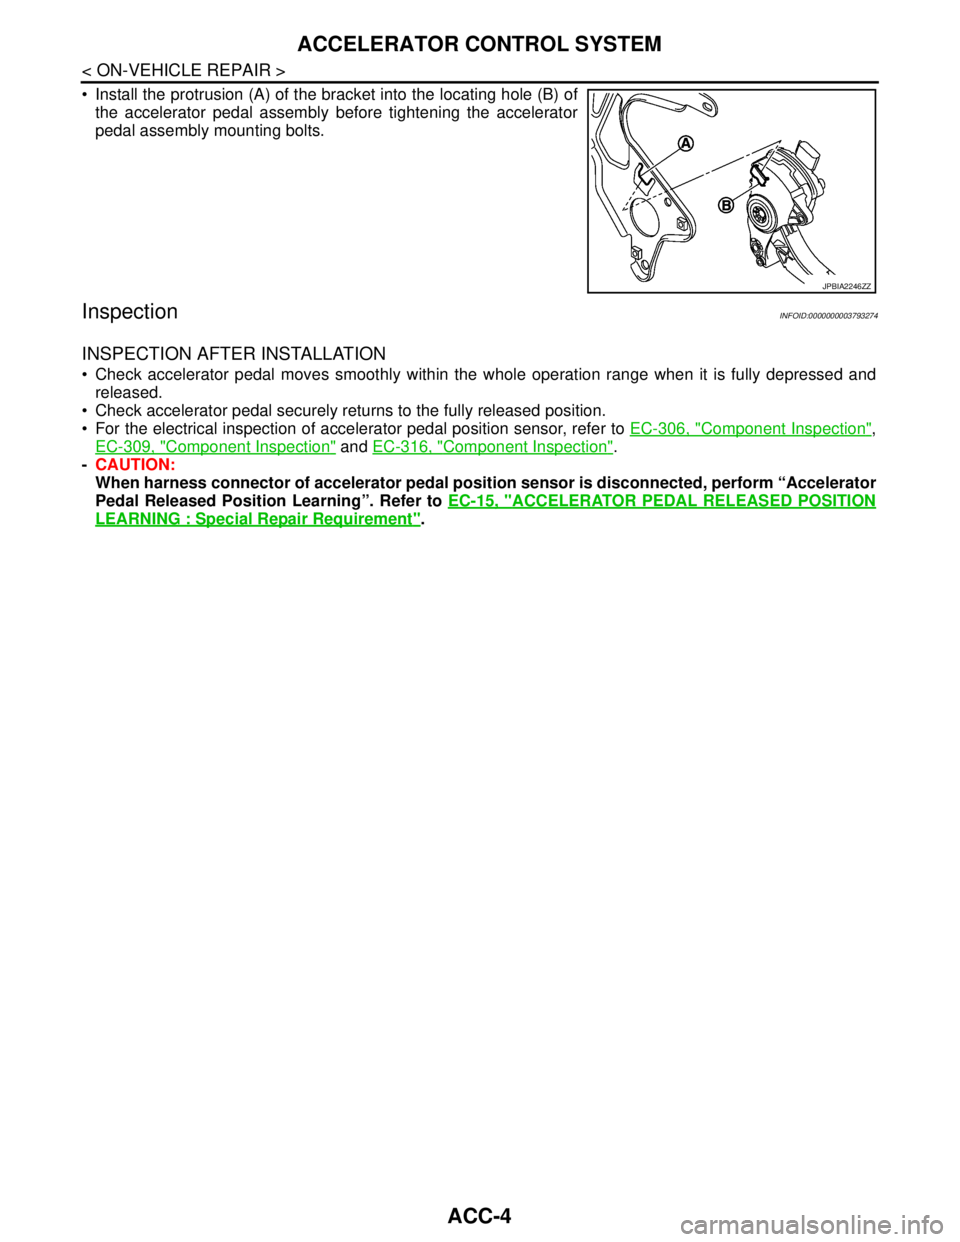
Install the protrusion (A) of the bracket into the locating hole (B) of
the accelerator pedal assembly before tightening the accelerator
pedal assembly mounting bolts.
InspectionINFOID:0000000003793274
INSPECTION AFTER INSTALLATION
Check accelerator pedal moves smoothly within the whole operation range when it is fully depressed and
released.
Check accelerator pedal securely returns to the fully released position.
For the electrical inspection of accelerator pedal position sensor, refer to EC-306, "
Component Inspection",
EC-309, "
Component Inspection" and EC-316, "Component Inspection".
-CAUTION:
When harness connector of accelerator pedal position sensor is disconnected, perform “Accelerator
Pedal Released Position Learning”. Refer to EC-15, "
ACCELERATOR PEDAL RELEASED POSITION
LEARNING : Special Repair Requirement".
JPBIA2246ZZ
Page 11 of 5121
DIAGNOSIS AND REPAIR WORKFLOW
ADP-5
< BASIC INSPECTION >
C
D
E
F
G
H
I
K
L
MA
B
ADP
N
O
P
1.GET INFORMATION FOR SYMPTOM
Get detailed information from the customer about the symptom (the condition and the environment when the
incident/malfunction occurs).
>> GO TO 2.
2.CHECK DTC WITH AUTOMATIC DRIVE POSITIONER SYSTEM
Check “Self Diagnostic Result” with CONSULT-III. Refer to ADP-124, "
DTCIndex"
Are any symptoms described and any DTC displayed?
Symptom is described, DTC is detected.>>GO TO 3.
Symptom is not described, DTC is detected.>>GO TO 6.
Symptom is described, DTC is not detected.>>GO TO 4.
3.CONFIRM THE SYMPTOM
Try to confirm the symptom described by the customer.
>> GO TO 6.
4.CONFIRM THE SYMPTOM
Try to confirm the symptom described by the customer.
>> GO TO 5.
5.CHECK NORMAL OPERATING CONDITION
Check normal operating condition. Refer to ADP-134, "
Description".
Is the incident a normal operation?
YES >> GO TO 10.
NO >> GO TO 7.
6.PERFORM DTC CONFIRMATION PROCEDURE
Perform the confirmation procedure for the detected DTC.
Is the DTC displayed?
YES >> GO TO 8.
NO >> Check intermittent incident. Refer to GI-35, "
Intermittent Incident".
7.PERFORM COMPONENT FUNCTION CHECK
Perform the component function check for the isolated malfunctioning point.
>> GO TO 8.
8.DETECT MALFUNCTIONING PART BY DIAGNOSTIC PROCEDURE
Isolate the malfunctioning point by performing the diagnosis procedure relevant to the symptom during the
component diagnosis.
>> GO TO 9.
9.REPARE OR REPLACE
Repair or replace the malfunctioning part.
>> GO TO 10.
10.FINAL CHECK
Perform the DTC confirmation procedure (if DTC is detected) or component function check (if no DTC is
detected) again. Check that the malfunction is repaired.
Are all malfunctions repaired?
Page 14 of 5121

ADP-8
< BASIC INSPECTION >
INSPECTION AND ADJUSTMENT
quirement
INFOID:0000000003759061
1.SYSTEM INITIALIZATION
Perform system initialization. Refer to ADP-8, "
SYSTEM INITIALIZATION : Description".
>> GO TO 2.
2.SYSTEM SETTING
Perform system setting. Refer to ADP-9, "
SYSTEM SETTING : Description".
>> GO TO 3.
3.MEMORY STORAGE
Perform memory storage. Refer to ADP-8, "
MEMORY STORING : Description".
>> END
SYSTEM INITIALIZATION
SYSTEM INITIALIZATION : DescriptionINFOID:0000000003759062
Always perform the initialization when the battery terminal is disconnected or the driver seat control unit is
replaced.
The entry/exit assist function will not operate normally unless initialization is performed.
SYSTEM INITIALIZATION : Special Repair RequirementINFOID:0000000003759063
INITIALIZATION PROCEDURE
1. CHOOSE METHOD
There are two initialization methods.
Which method do you use?
With door switch>>GO TO 2.
With vehicle speed>>GO TO 4.
2. STEP A-1
Turn ignition switch from the ACC to the OFF position.
>> GO TO 3.
3. STEP A-2
Driver door switch is ON (open) → OFF (close) → ON (open).
>> END
4. STEP B-1
Drive the vehicle at more than 25 km/h (16 MPH).
>> END
MEMORY STORING
MEMORY STORING : DescriptionINFOID:0000000003759064
Always perform memory storage when the battery terminal is disconnected or the driver seat control unit is
replaced. The memory function and Intelligent Key interlock function will not operate normally unless memory
storage is performed.
Page 15 of 5121

INSPECTION AND ADJUSTMENT
ADP-9
< BASIC INSPECTION >
C
D
E
F
G
H
I
K
L
MA
B
ADP
N
O
P
MEMORY STORING : Special Repair RequirementINFOID:0000000003759065
Memory Storage Procedure
Two positions for the driver seat can be stored for memory operation by the following procedure.
1.STEP 1
Shift selector lever to the P position.
>> GO TO 2.
2.STEP 2
Turn ignition switch ON.
>> GO TO 3.
3.STEP 3
Adjust driver seat position manually.
>> GO TO 4.
4.STEP 4
1. Push set switch.
NOTE:
Memory indicator for which driver seat position is already retained in memory is illuminated for 5 sec-
onds.
Memory indicator for which driver seat position is not retained in memory is illuminated for 0.5 seconds.
2. Push the memory switch (1 or 2) for at least 1 second within 5 seconds after pushing the set switch.
NOTE:
When entering driver seat positions into blank memory, memory indicator turns ON for 5 seconds.
When changing driver seat positions, memory indicator turns OFF for 0.5 seconds, then turns ON for 5
seconds.
NOTE:
If memory is stored in the same memory switch, the previous memory will be deleted.
Do you need to link Intelligent Keys?
YES >> GO TO 5.
NO >> END
5.STEP 6
Push the Intelligent Key unlock button within 5 seconds after pushing memory switch (while the memory indi-
cator is ON).
>> GO TO 6.
6.STEP 7
Confirm the operation of each part with memory operation and Intelligent Key interlock operation.
>> END
SYSTEM SETTING
SYSTEM SETTING : DescriptionINFOID:0000000003759066
The settings of the automatic driving positioner system can be changed, using CONSULT-III, the display unit
in the center of the instrument panel and the set switch. Always check the settings before and after discon-
necting the battery terminal or replacing driver seat control unit.
Setting Change
Page 18 of 5121
ADP-12
< FUNCTION DIAGNOSIS >
AUTOMATIC DRIVE POSITIONER SYSTEM
FUNCTION DIAGNOSIS
AUTOMATIC DRIVE POSITIONER SYSTEM
AUTOMATIC DRIVE POSITIONER SYSTEM
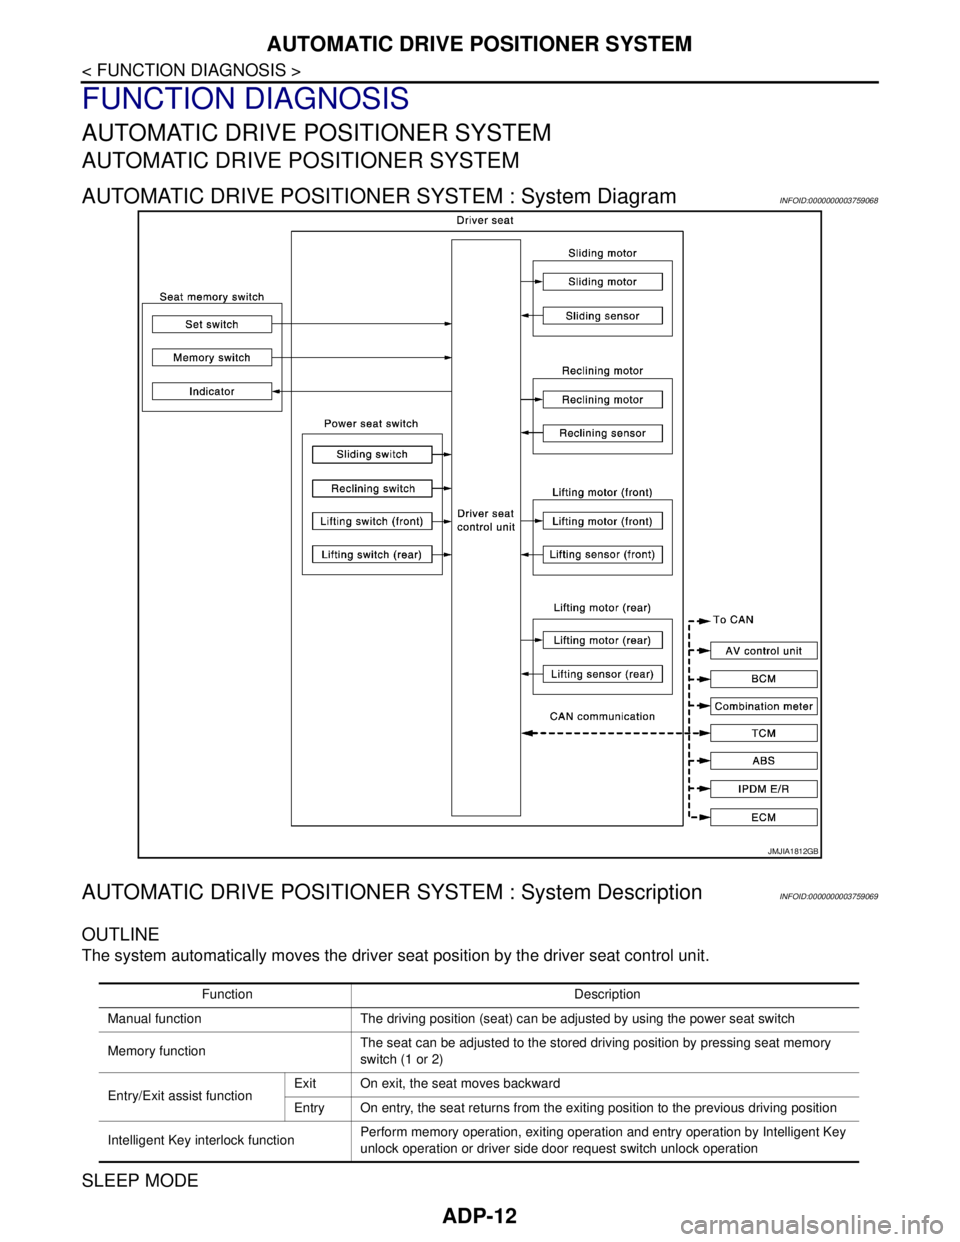
AUTOMATIC DRIVE POSITIONER SYSTEM : System DiagramINFOID:0000000003759068
AUTOMATIC DRIVE POSITIONER SYSTEM : System DescriptionINFOID:0000000003759069
OUTLINE
The system automatically moves the driver seat position by the driver seat control unit.
SLEEP MODE
JMJIA1812GB
Function Description
Manual function The driving position (seat) can be adjusted by using the power seat switch
Memory functionThe seat can be adjusted to the stored driving position by pressing seat memory
switch (1 or 2)
Entry/Exit assist functionExit On exit, the seat moves backward
Entry On entry, the seat returns from the exiting position to the previous driving position
Intelligent Key interlock functionPerform memory operation, exiting operation and entry operation by Intelligent Key
unlock operation or driver side door request switch unlock operation
Page 21 of 5121

AUTOMATIC DRIVE POSITIONER SYSTEM
ADP-15
< FUNCTION DIAGNOSIS >
C
D
E
F
G
H
I
K
L
MA
B
ADP
N
O
P
AUTOMATIC DRIVE POSITIONER SYSTEM : Component DescriptionINFOID:0000000003759071
CONTROL UNITS
INPUT PARTS
Switches
Sensors
OUTPUT PARTS
10. Lifting motor (rear) (driver side) B456 11. Power seat switch (driver side) B459
(sliding, lifting switch)12. Power seat switch (driver side) B459
(reclining switch)
13. TCM (transmission control module)
F2314. Control device (detention switch)
M5715. ABS actuator and electric unit (con-
trol unit) E36
A. Behind the combination meter B. View with seat cushion and seatback
pad removedC. Back side of the seat cushion
D. Engine room (LH) E. View with the center console assem-
bly removedF. Engine room (RH)
Item Function
Driver seat control unit Main unit of automatic drive positioner system
Connected to the CAN
BCMTransmits the following status to the driver seat control unit via CAN communication
Driver door: OPEN/CLOSE
Ignition switch position: ACC/ON
Door lock: UNLOCK (with Intelligent Key or driver side door request switch oper-
ation)
Key ID
Key switch: Insert/Pull out Intelligent Key
Starter: CRANKING/OTHER
Steering lock unit status: Lock/Unlock
Handle position
Combination meter / ABS actuator and
electric unit (control unit)Transmits the vehicle speed signal to the driver seat control unit via CAN commu-
nication
AV control unit The setting change of auto drive positioner system can be performed on the display
TCMTransmits the shift position signal (P range) to the driver seat control unit via CAN
communication
Item Function
Key slot The key switch is installed to detect the key inserted/removed status
Front door switch (driver side) Detects front door (driver side) open/close status
Control device (detention switch) Detects the P range position of selector lever
Set switch The registration and system setting can be performed with its operation
Memory switch 1/2 The registration and operation can be performed with its operation
Power seat switchThe following switches are installed
Reclining switch
Lifting switch (front)
Lifting switch (rear)
Sliding switch
Item Function
Lifting sensor (front) Detects the up/down position of seat lifting (front)
Lifting sensor (rear) Detects the up/down position of seat lifting (rear)
Reclining sensor Detects the tilt of seatback
Sliding sensor Detects the front/rear position of seat
Page 22 of 5121

ADP-16
< FUNCTION DIAGNOSIS >
AUTOMATIC DRIVE POSITIONER SYSTEM
MANUAL FUNCTION
MANUAL FUNCTION : System DiagramINFOID:0000000003759072
MANUAL FUNCTION : System DescriptionINFOID:0000000003759073
OUTLINE
The driving position (seat) can be adjusted manually with power seat switch.
DETAIL FLOW
Seat
Item Function
Lifting motor (front) Moves the seat lifting (front) upward/downward
Lifting motor (rear) Moves the seat lifting (rear) upward/downward
Reclining motor Tilts and raises up the seatback
Sliding motor Slides the seat frontward/rearward
Memory indicator Illuminates or blinks according to the registration/operation status
JMJIA1813GB
Order Input Output Control unit condition
1Power seat switch
(sliding, lifting, reclin-
ing)—The power seat switch signal is inputted to the driver seat control
unit when the power seat switch is operated
2—Motors
(sliding, lifting, reclin-
ing)The driver seat control unit outputs signals to each motor accord-
ing to the power seat switch input signal