Heater NISSAN TEANA 2014 Service Manual
[x] Cancel search | Manufacturer: NISSAN, Model Year: 2014, Model line: TEANA, Model: NISSAN TEANA 2014Pages: 4801, PDF Size: 51.2 MB
Page 3790 of 4801
FRONT SEATSE-41
< UNIT DISASSEMBLY AND ASSEMBLY >
C
D E
F
G H
I
K L
M A
B
SE
N
O P
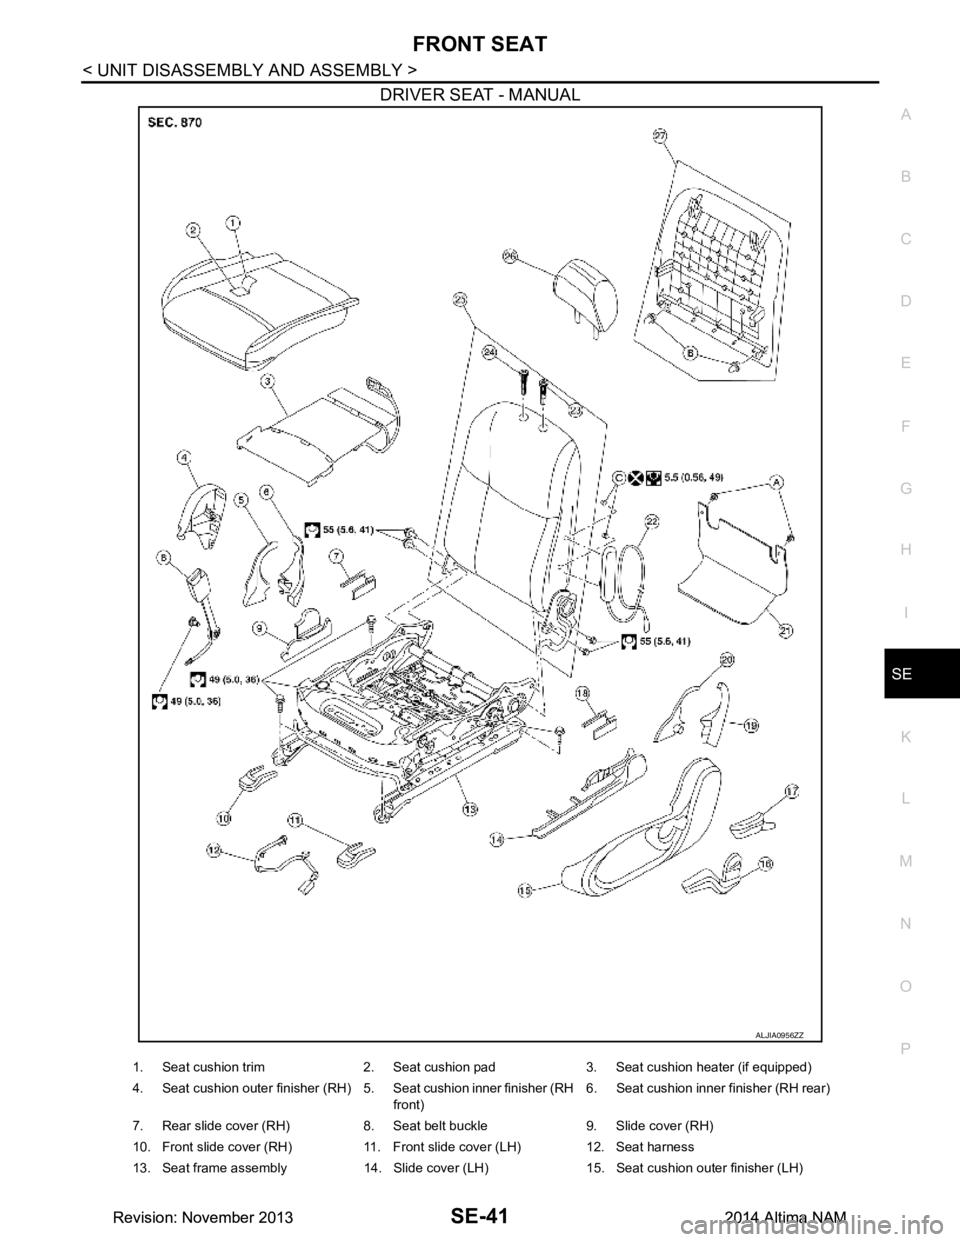
DRIVER SEAT - MANUAL
ALJIA0956ZZ
1. Seat cushion trim 2. Seat cushion pad 3. Seat cushion heater (if equipped)
4. Seat cushion outer finisher (RH) 5. Seat cushion inner finisher (RH front)6. Seat cushion inner finisher (RH rear)
7. Rear slide cover (RH) 8. Seat belt buckle 9. Slide cover (RH)
10. Front slide cover (RH) 11. Front slide cover (LH) 12. Seat harness
13. Seat frame assembly 14. Slide cover (LH) 15. Seat cushion outer finisher (LH)
Revision: November 20132014 Altima NAMRevision: November 20132014 Altima NAM
Page 3792 of 4801
FRONT SEATSE-43
< UNIT DISASSEMBLY AND ASSEMBLY >
C
D E
F
G H
I
K L
M A
B
SE
N
O P
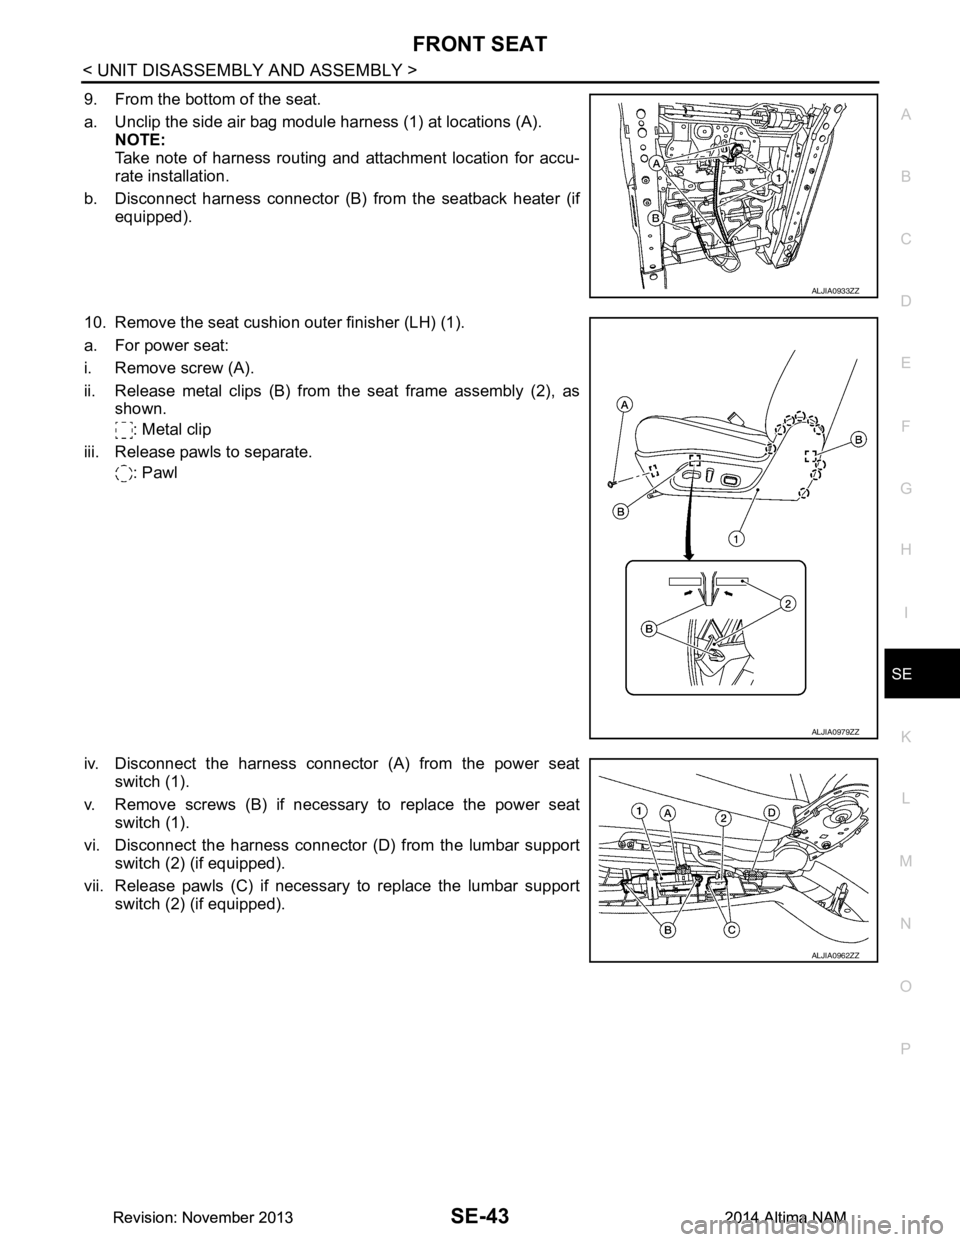
9. From the bottom of the seat.
a. Unclip the side air bag module harness (1) at locations (A). NOTE:
Take note of harness routing and attachment location for accu-
rate installation.
b. Disconnect harness connector (B) from the seatback heater (if
equipped).
10. Remove the seat cushion outer finisher (LH) (1).
a. For power seat:
i. Remove screw (A).
ii. Release metal clips (B) from the seat frame assembly (2), as shown.
: Metal clip
iii. Release pawls to separate. : Pawl
iv. Disconnect the harness connector (A) from the power seat switch (1).
v. Remove screws (B) if necessa ry to replace the power seat
switch (1).
vi. Disconnect the harness connector (D) from the lumbar support switch (2) (if equipped).
vii. Release pawls (C) if necessary to replace the lumbar support switch (2) (if equipped).
ALJIA0933ZZ
ALJIA0979ZZ
ALJIA0962ZZ
Revision: November 20132014 Altima NAMRevision: November 20132014 Altima NAM
Page 3796 of 4801
FRONT SEATSE-47
< UNIT DISASSEMBLY AND ASSEMBLY >
C
D E
F
G H
I
K L
M A
B
SE
N
O P
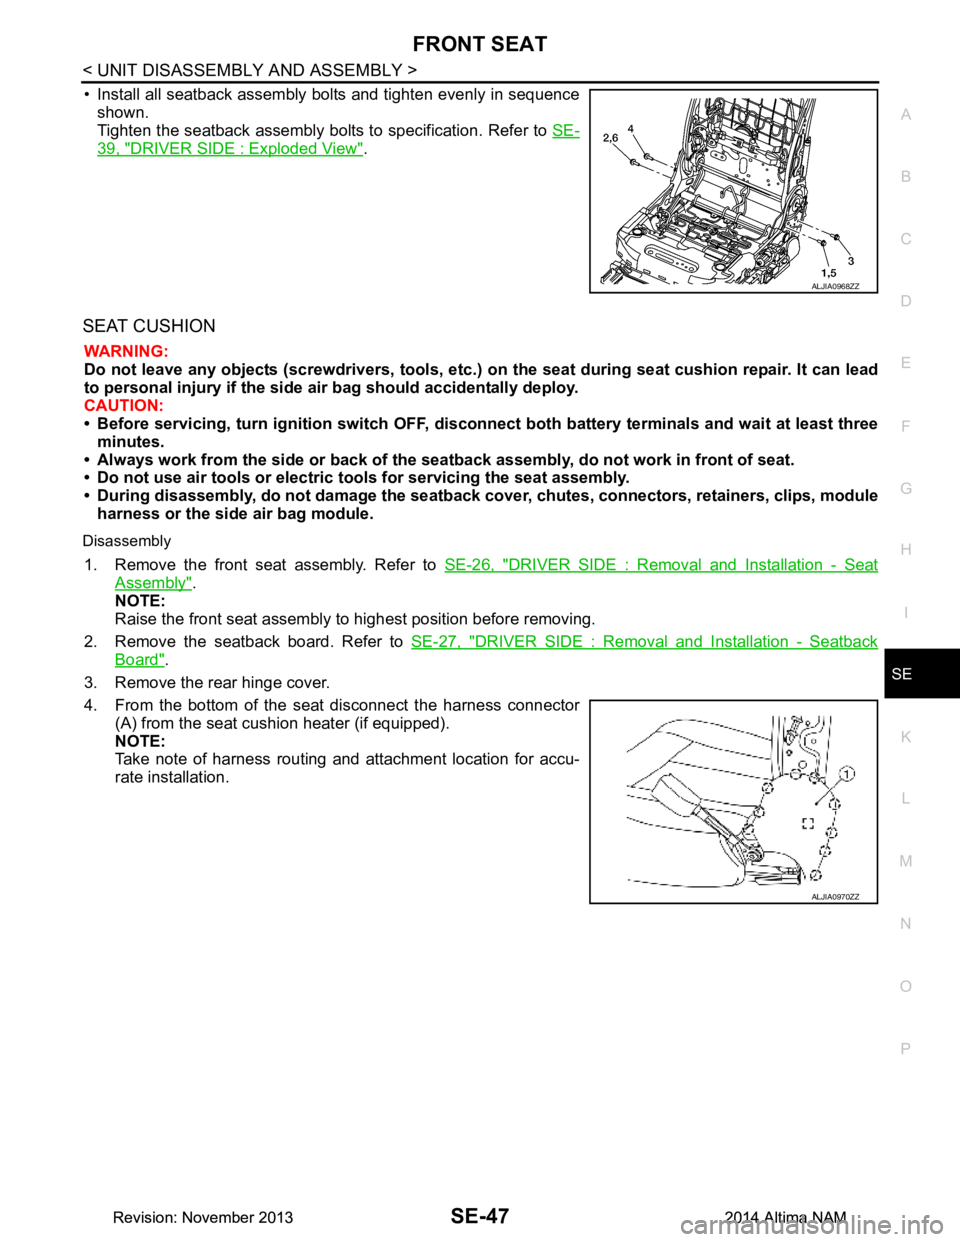
• Install all seatback assembly bolts and tighten evenly in sequence shown.
Tighten the seatback assembly bolts to specification. Refer to SE-
39, "DRIVER SIDE : Exploded View".
SEAT CUSHION
WARNING:
Do not leave any objects (screwdrivers, tools, etc. ) on the seat during seat cushion repair. It can lead
to personal injury if the side air bag should accidentally deploy.
CAUTION:
• Before servicing, turn ignition swit ch OFF, disconnect both battery terminals and wait at least three
minutes.
• Always work from the side or back of the seat back assembly, do not work in front of seat.
• Do not use air tools or electric tools for servicing the seat assembly.
• During disassembly, do not damage the seatback cover , chutes, connectors, retainers, clips, module
harness or the side air bag module.
Disassembly
1. Remove the front seat assembly. Refer to SE-26, "DRIVER SIDE : Removal and Installation - Seat
Assembly".
NOTE:
Raise the front seat assembly to highest position before removing.
2. Remove the seatback board. Refer to SE-27, "DRIVER SIDE : Removal and Installation - Seatback
Board".
3. Remove the rear hinge cover.
4. From the bottom of the seat disconnect the harness connector (A) from the seat cushion heater (if equipped).
NOTE:
Take note of harness routing and attachment location for accu-
rate installation.
ALJIA0968ZZ
ALJIA0970ZZ
Revision: November 20132014 Altima NAMRevision: November 20132014 Altima NAM
Page 3798 of 4801
FRONT SEATSE-49
< UNIT DISASSEMBLY AND ASSEMBLY >
C
D E
F
G H
I
K L
M A
B
SE
N
O P
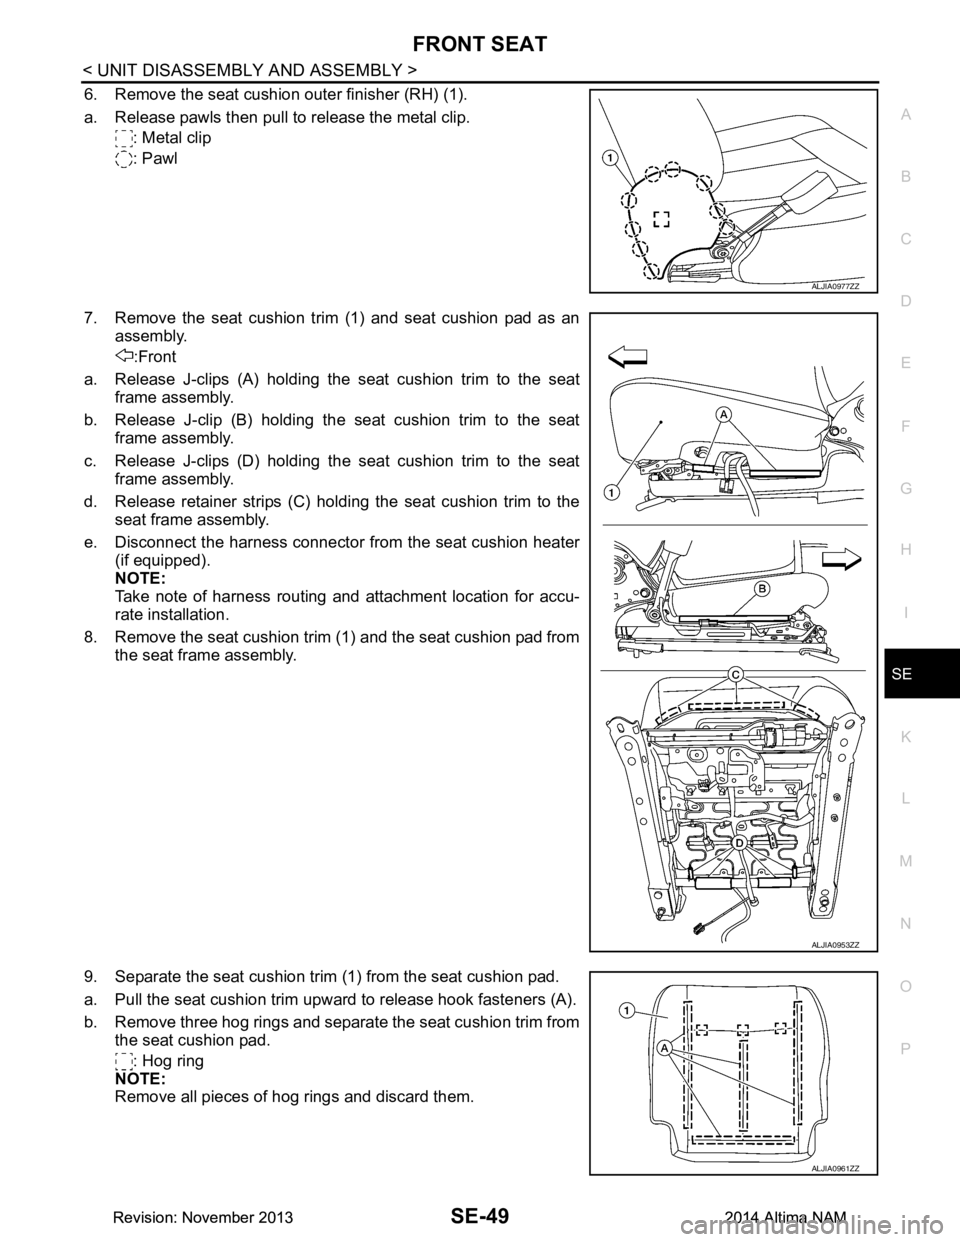
6. Remove the seat cushion outer finisher (RH) (1).
a. Release pawls then pull to release the metal clip. : Metal clip
: Pawl
7. Remove the seat cushion trim (1) and seat cushion pad as an assembly.
:Front
a. Release J-clips (A) holding the seat cushion trim to the seat frame assembly.
b. Release J-clip (B) holding the seat cushion trim to the seat frame assembly.
c. Release J-clips (D) holding the seat cushion trim to the seat frame assembly.
d. Release retainer strips (C) holding the seat cushion trim to the seat frame assembly.
e. Disconnect the harness connector from the seat cushion heater (if equipped).
NOTE:
Take note of harness routing and attachment location for accu-
rate installation.
8. Remove the seat cushion trim (1) and the seat cushion pad from the seat frame assembly.
9. Separate the seat cushion trim (1) from the seat cushion pad.
a. Pull the seat cushion trim upward to release hook fasteners (A).
b. Remove three hog rings and separate the seat cushion trim from the seat cushion pad.
: Hog ring
NOTE:
Remove all pieces of hog rings and discard them.
ALJIA0977ZZ
ALJIA0953ZZ
ALJIA0961ZZ
Revision: November 20132014 Altima NAMRevision: November 20132014 Altima NAM
Page 3800 of 4801
FRONT SEATSE-51
< UNIT DISASSEMBLY AND ASSEMBLY >
C
D E
F
G H
I
K L
M A
B
SE
N
O P
1. Remove the front seat assembly. Refer to SE-26, "DRIVER SIDE : Removal and Installation - Seat
Assembly".
2. Remove the seatback board. Refer to SE-27, "DRIVER SIDE : Removal and Installation - Seatback
Board".
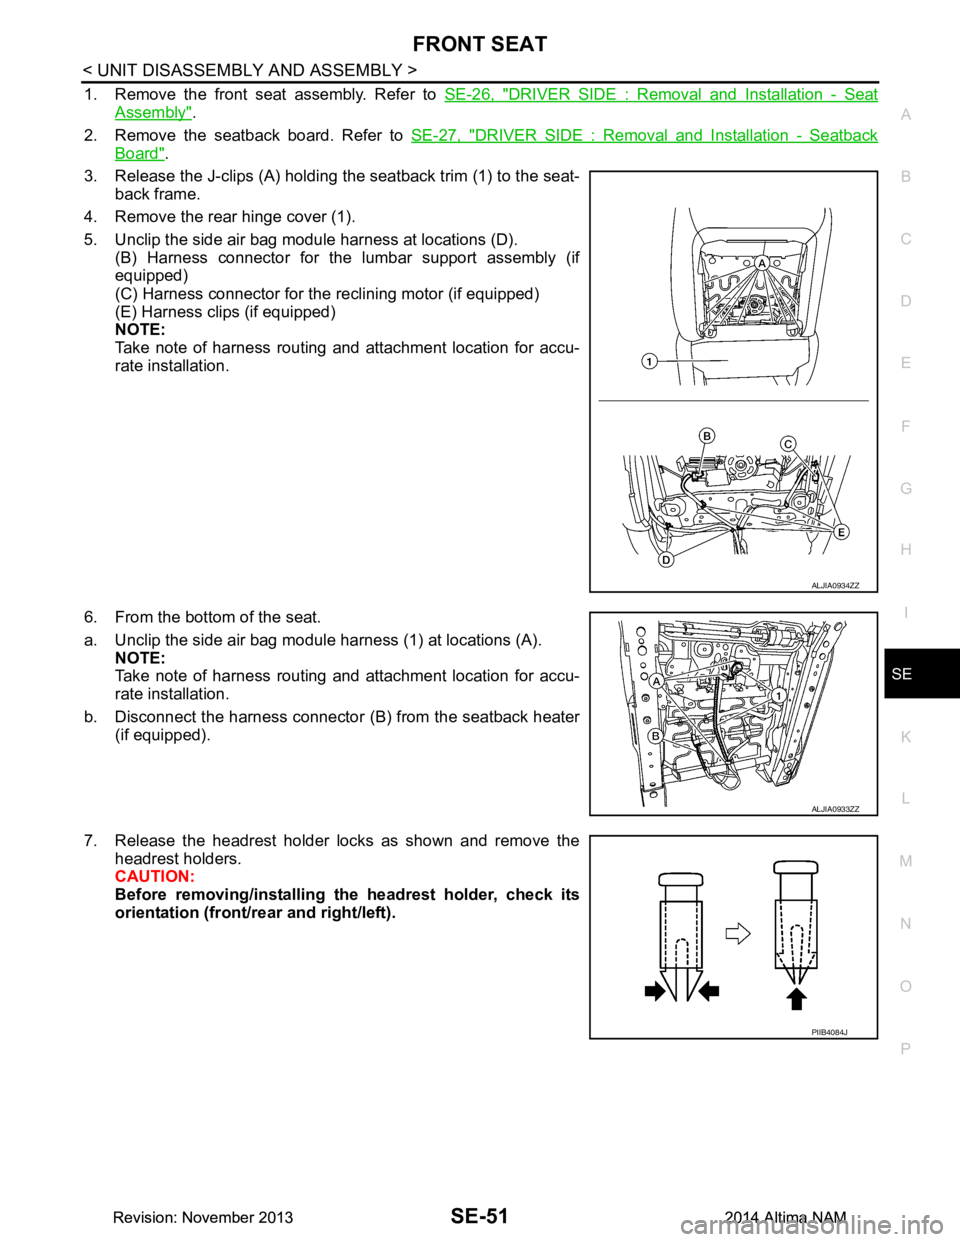
3. Release the J-clips (A) holding the seatback trim (1) to the seat- back frame.
4. Remove the rear hinge cover (1).
5. Unclip the side air bag module harness at locations (D). (B) Harness connector for the lumbar support assembly (if
equipped)
(C) Harness connector for the reclining motor (if equipped)
(E) Harness clips (if equipped)
NOTE:
Take note of harness routing and attachment location for accu-
rate installation.
6. From the bottom of the seat.
a. Unclip the side air bag module harness (1) at locations (A). NOTE:
Take note of harness routing and attachment location for accu-
rate installation.
b. Disconnect the harness connector (B) from the seatback heater
(if equipped).
7. Release the headrest holder locks as shown and remove the headrest holders.
CAUTION:
Before removing/installing th e headrest holder, check its
orientation (front/rear and right/left).
ALJIA0934ZZ
ALJIA0933ZZ
PIIB4084J
Revision: November 20132014 Altima NAMRevision: November 20132014 Altima NAM
Page 3803 of 4801
SE-54
< UNIT DISASSEMBLY AND ASSEMBLY >
FRONT SEAT
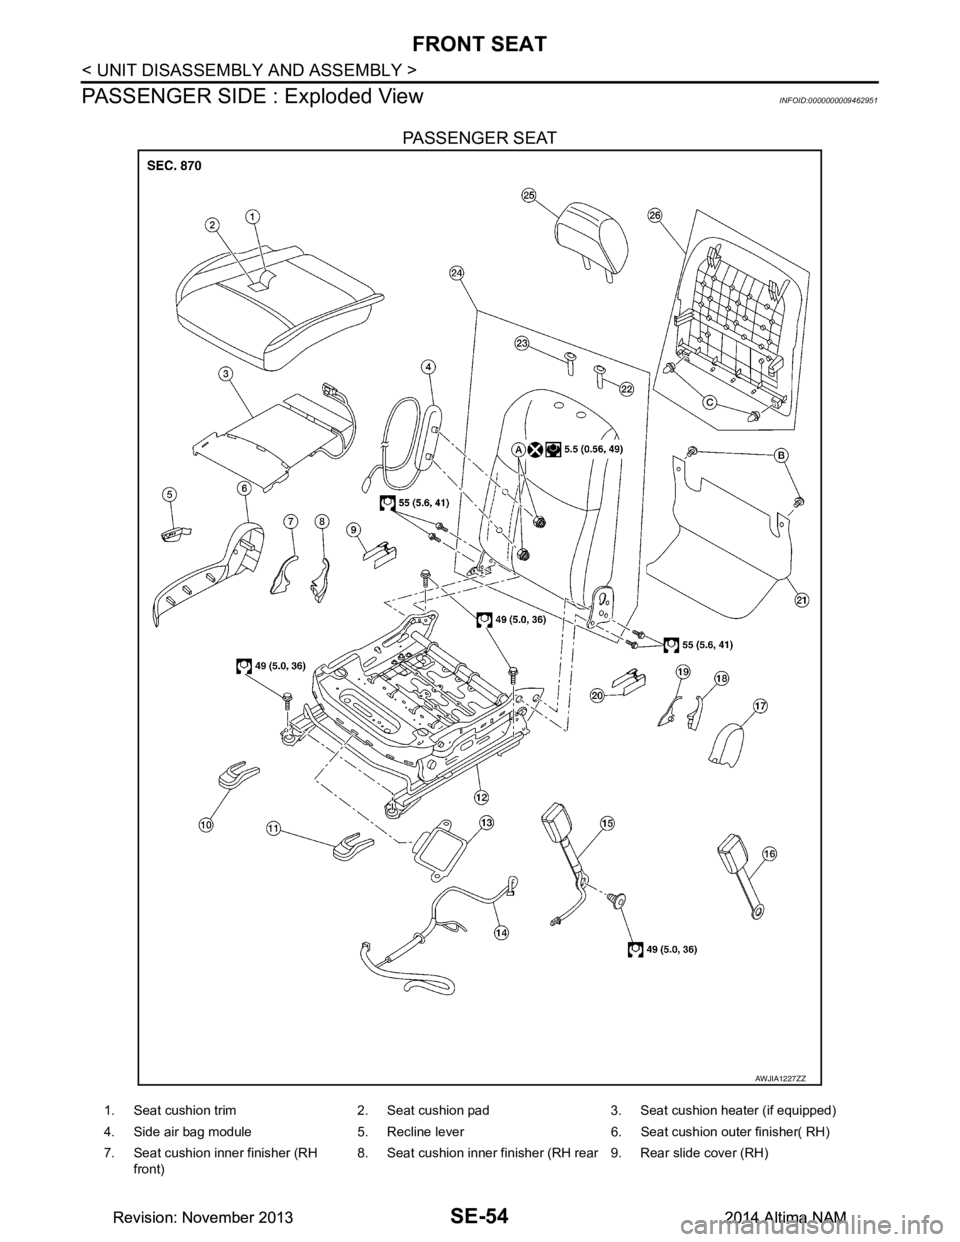
PASSENGER SIDE : Exploded View
INFOID:0000000009462951
PASSENGER SEAT
AWJIA1227ZZ
1. Seat cushion trim 2. Seat cushion pad 3. Seat cushion heater (if equipped)
4. Side air bag module 5. Recline lever 6. Seat cushion outer finisher( RH)
7. Seat cushion inner finisher (RH front) 8. Seat cushion inner finisher (RH rear 9. Rear slide cover (RH)
Revision: November 20132014 Altima NAMRevision: November 20132014 Altima NAM
Page 3805 of 4801
SE-56
< UNIT DISASSEMBLY AND ASSEMBLY >
FRONT SEAT
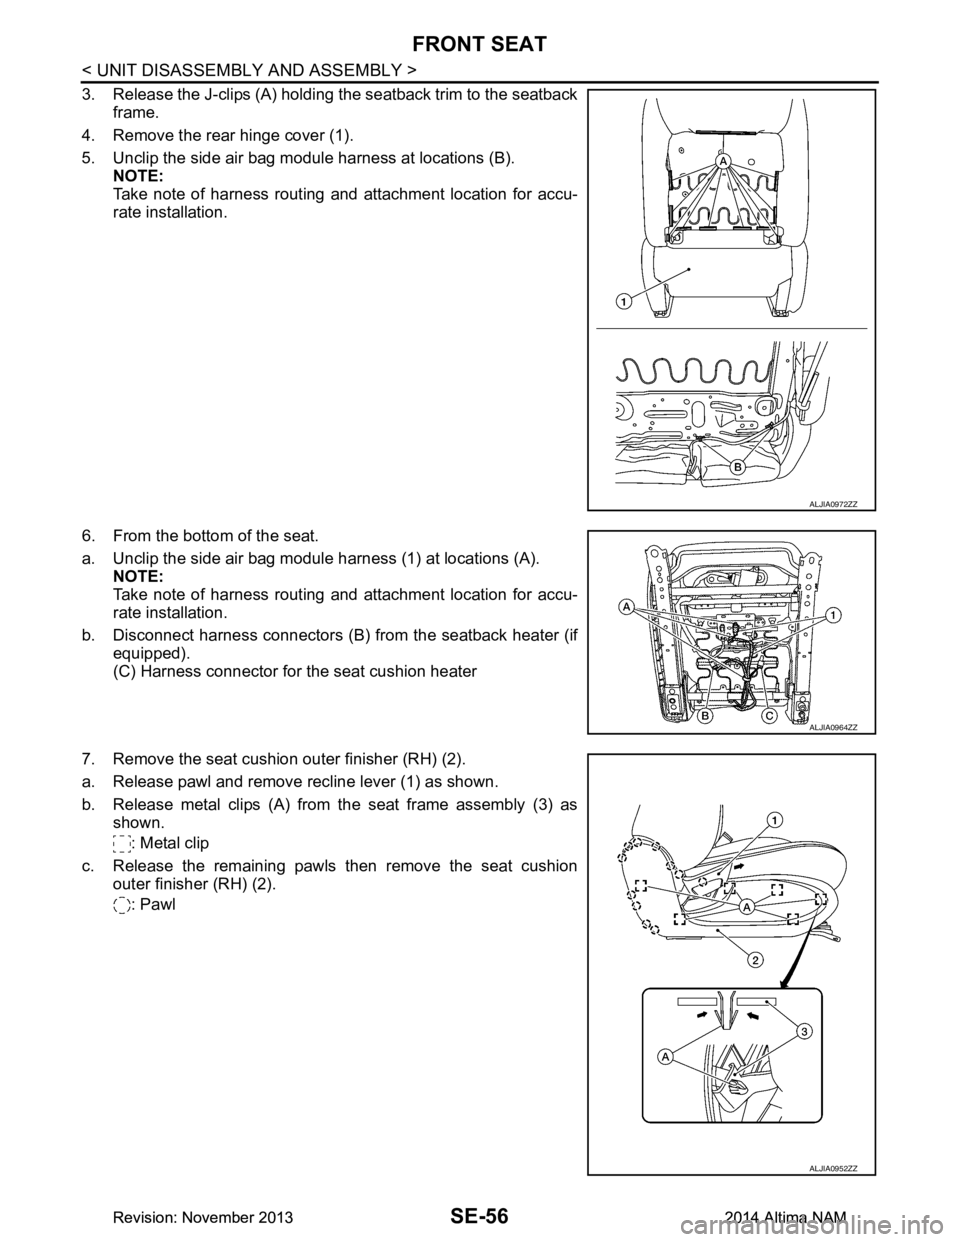
3. Release the J-clips (A) holding the seatback trim to the seatbackframe.
4. Remove the rear hinge cover (1).
5. Unclip the side air bag module harness at locations (B). NOTE:
Take note of harness routing and attachment location for accu-
rate installation.
6. From the bottom of the seat.
a. Unclip the side air bag module harness (1) at locations (A). NOTE:
Take note of harness routing and attachment location for accu-
rate installation.
b. Disconnect harness connectors (B) from the seatback heater (if
equipped).
(C) Harness connector for the seat cushion heater
7. Remove the seat cushion outer finisher (RH) (2).
a. Release pawl and remove recline lever (1) as shown.
b. Release metal clips (A) from the seat frame assembly (3) as shown.
: Metal clip
c. Release the remaining pawls then remove the seat cushion outer finisher (RH) (2).
: Pawl
ALJIA0972ZZ
ALJIA0964ZZ
ALJIA0952ZZ
Revision: November 20132014 Altima NAMRevision: November 20132014 Altima NAM
Page 3809 of 4801
SE-60
< UNIT DISASSEMBLY AND ASSEMBLY >
FRONT SEAT
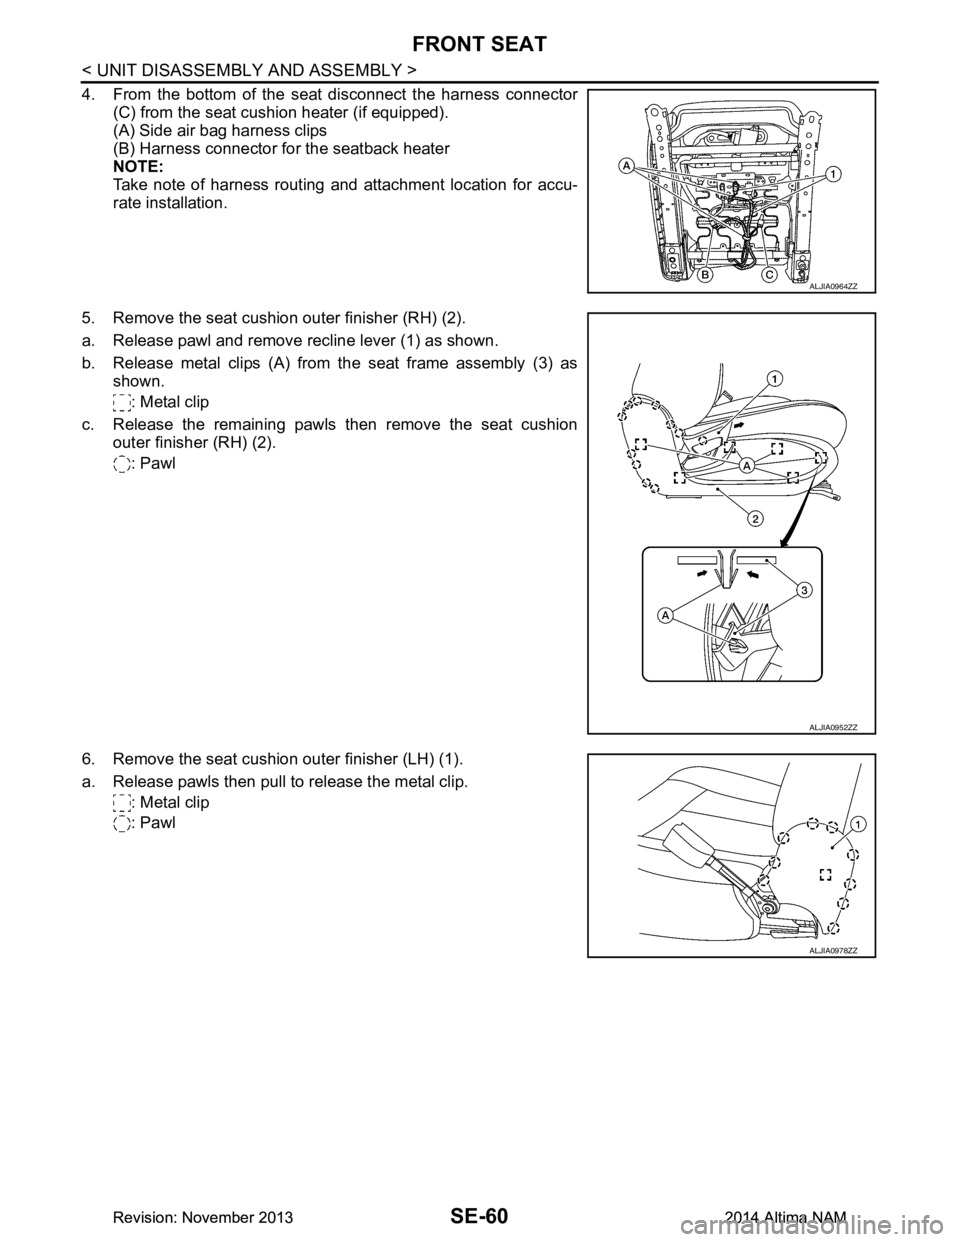
4. From the bottom of the seat disconnect the harness connector(C) from the seat cushion heater (if equipped).
(A) Side air bag harness clips
(B) Harness connector for the seatback heater
NOTE:
Take note of harness routing and attachment location for accu-
rate installation.
5. Remove the seat cushion outer finisher (RH) (2).
a. Release pawl and remove recline lever (1) as shown.
b. Release metal clips (A) from the seat frame assembly (3) as shown.
: Metal clip
c. Release the remaining pawls then remove the seat cushion outer finisher (RH) (2).
: Pawl
6. Remove the seat cushion outer finisher (LH) (1).
a. Release pawls then pull to release the metal clip. : Metal clip
: Pawl
ALJIA0964ZZ
ALJIA0952ZZ
ALJIA0978ZZ
Revision: November 20132014 Altima NAMRevision: November 20132014 Altima NAM
Page 3810 of 4801
FRONT SEATSE-61
< UNIT DISASSEMBLY AND ASSEMBLY >
C
D E
F
G H
I
K L
M A
B
SE
N
O P
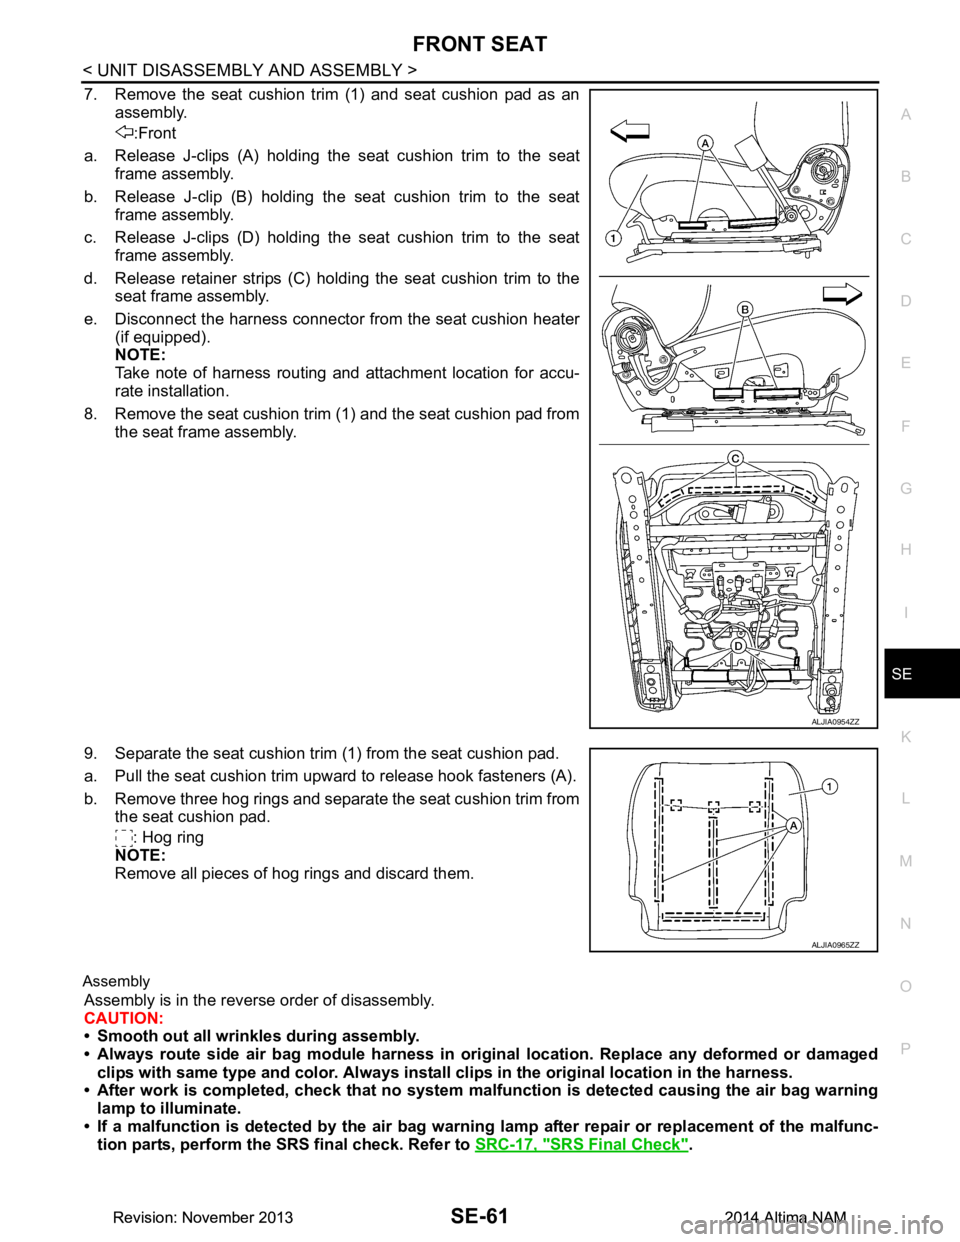
7. Remove the seat cushion trim (1) and seat cushion pad as an assembly.
:Front
a. Release J-clips (A) holding the seat cushion trim to the seat frame assembly.
b. Release J-clip (B) holding the seat cushion trim to the seat frame assembly.
c. Release J-clips (D) holding the seat cushion trim to the seat frame assembly.
d. Release retainer strips (C) holding the seat cushion trim to the seat frame assembly.
e. Disconnect the harness connector from the seat cushion heater (if equipped).
NOTE:
Take note of harness routing and attachment location for accu-
rate installation.
8. Remove the seat cushion trim (1) and the seat cushion pad from the seat frame assembly.
9. Separate the seat cushion trim (1) from the seat cushion pad.
a. Pull the seat cushion trim upward to release hook fasteners (A).
b. Remove three hog rings and separate the seat cushion trim from the seat cushion pad.
: Hog ring
NOTE:
Remove all pieces of hog rings and discard them.
Assembly
Assembly is in the reverse order of disassembly.
CAUTION:
• Smooth out all wrinkles during assembly.
• Always route side air bag module harness in origin al location. Replace any deformed or damaged
clips with same type and color. Always install cl ips in the original location in the harness.
• After work is completed, check that no system ma lfunction is detected causing the air bag warning
lamp to illuminate.
• If a malfunction is detected by the air bag warni ng lamp after repair or replacement of the malfunc-
tion parts, perform the SRS final check. Refer to SRC-17, "SRS Final Check"
.
ALJIA0954ZZ
ALJIA0965ZZ
Revision: November 20132014 Altima NAMRevision: November 20132014 Altima NAM
Page 3812 of 4801
FRONT SEATSE-63
< UNIT DISASSEMBLY AND ASSEMBLY >
C
D E
F
G H
I
K L
M A
B
SE
N
O P
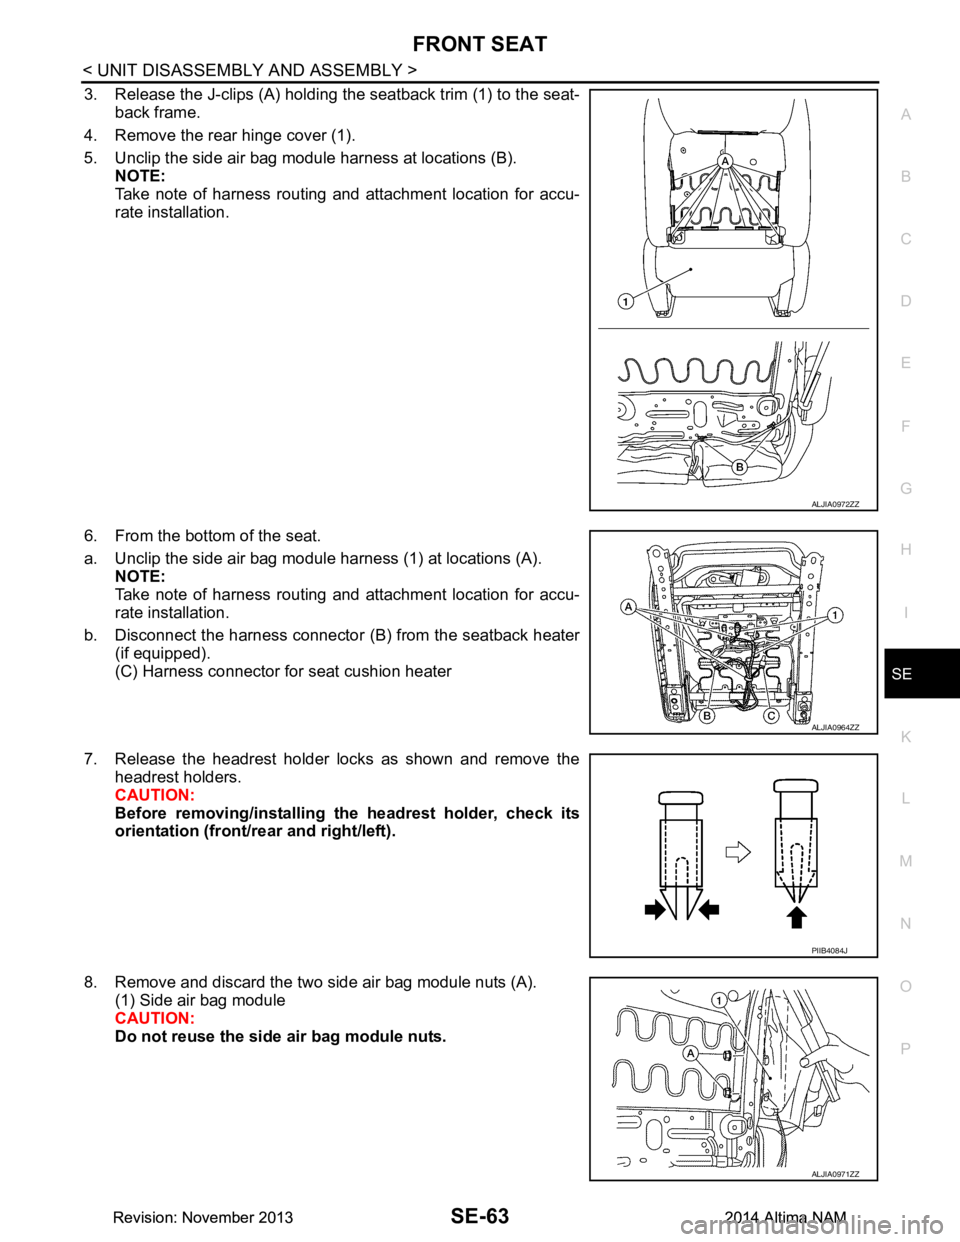
3. Release the J-clips (A) holding the seatback trim (1) to the seat- back frame.
4. Remove the rear hinge cover (1).
5. Unclip the side air bag module harness at locations (B). NOTE:
Take note of harness routing and attachment location for accu-
rate installation.
6. From the bottom of the seat.
a. Unclip the side air bag module harness (1) at locations (A). NOTE:
Take note of harness routing and attachment location for accu-
rate installation.
b. Disconnect the harness connector (B) from the seatback heater
(if equipped).
(C) Harness connector for seat cushion heater
7. Release the headrest holder locks as shown and remove the headrest holders.
CAUTION:
Before removing/installing th e headrest holder, check its
orientation (front/rear and right/left).
8. Remove and discard the two side air bag module nuts (A). (1) Side air bag module
CAUTION:
Do not reuse the side air bag module nuts.
ALJIA0972ZZ
ALJIA0964ZZ
PIIB4084J
ALJIA0971ZZ
Revision: November 20132014 Altima NAMRevision: November 20132014 Altima NAM