Heater NISSAN TEANA 2014 Owners Manual
[x] Cancel search | Manufacturer: NISSAN, Model Year: 2014, Model line: TEANA, Model: NISSAN TEANA 2014Pages: 4801, PDF Size: 51.2 MB
Page 3207 of 4801
ENGINE MAINTENANCE (VQ35DE)MA-23
< PERIODIC MAINTENANCE >
C
D E
F
G H
I
J
K L
M B
MA
N
O A
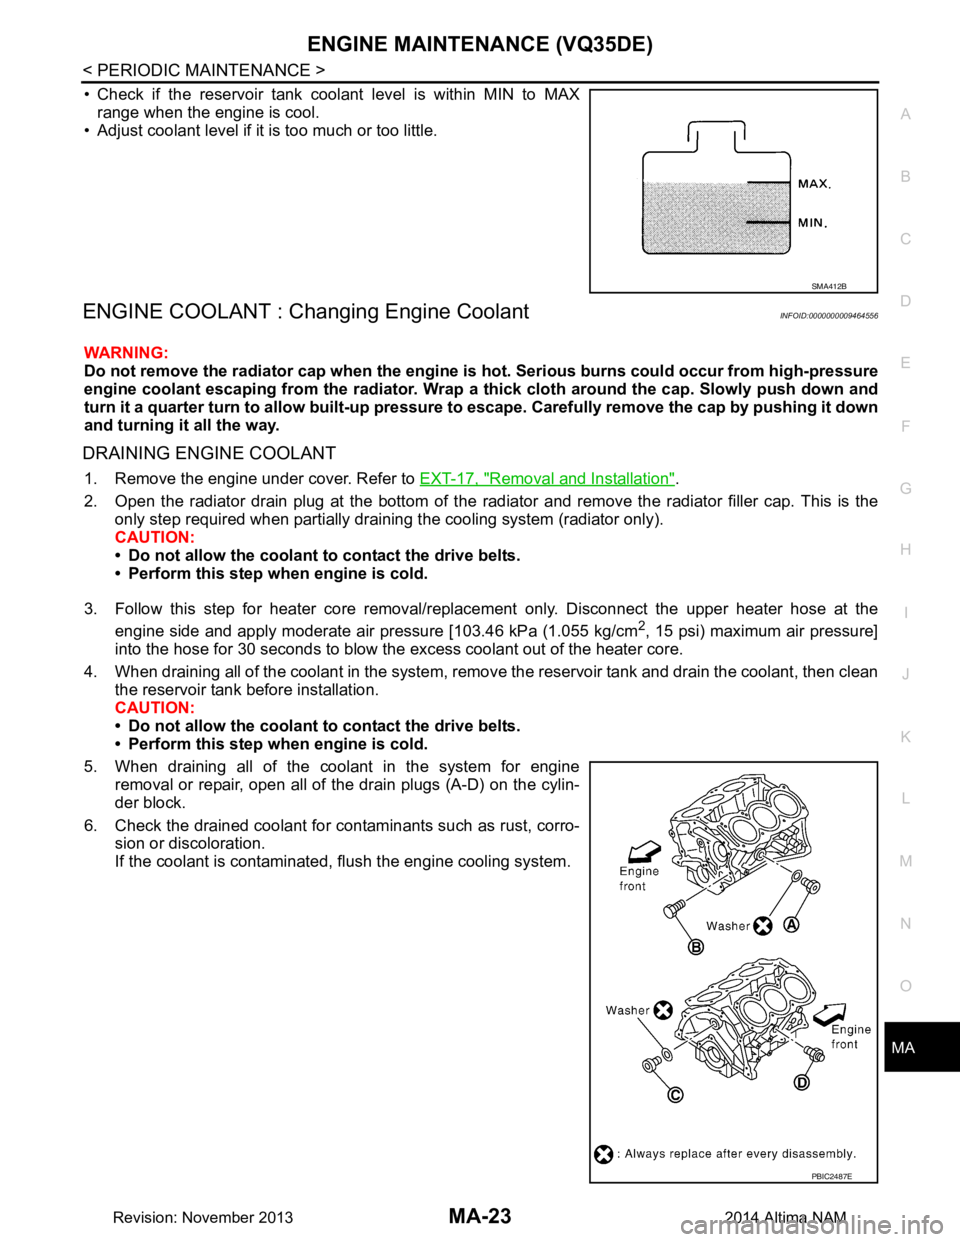
• Check if the reservoir tank coolant level is within MIN to MAX
range when the engine is cool.
• Adjust coolant level if it is too much or too little.
ENGINE COOLANT : Chang ing Engine CoolantINFOID:0000000009464556
WARNING:
Do not remove the radiator cap when the engine is hot. Serious burns could occur from high-pressure
engine coolant escaping from the radiator. Wrap a thick cloth around the cap. Slowly push down and
turn it a quarter turn to allow built-up pressure to escape. Carefully remove the cap by pushing it down
and turning it all the way.
DRAINING ENGINE COOLANT
1. Remove the engine under cover. Refer to EXT-17, "Removal and Installation".
2. Open the radiator drain plug at the bottom of the radiat or and remove the radiator filler cap. This is the
only step required when partially draining the cooling system (radiator only).
CAUTION:
• Do not allow the coolant to contact the drive belts.
• Perform this step when engine is cold.
3. Follow this step for heater core removal/repl acement only. Disconnect the upper heater hose at the
engine side and apply moderate air pressure [103.46 kPa (1.055 kg/cm
2, 15 psi) maximum air pressure]
into the hose for 30 seconds to blow the excess coolant out of the heater core.
4. When draining all of the coolant in the system, remo ve the reservoir tank and drain the coolant, then clean
the reservoir tank before installation.
CAUTION:
• Do not allow the coolant to contact the drive belts.
• Perform this step when engine is cold.
5. When draining all of the coolant in the system for engine removal or repair, open all of the drain plugs (A-D) on the cylin-
der block.
6. Check the drained coolant for contaminants such as rust, corro- sion or discoloration.
If the coolant is contaminated, flush the engine cooling system.
SMA412B
PBIC2487E
Revision: November 20132014 Altima NAM
Page 3208 of 4801
MA-24
< PERIODIC MAINTENANCE >
ENGINE MAINTENANCE (VQ35DE)
REFILLING ENGINE COOLANT
1. Install the radiator drain plug. If the cooling system was drained completely, install the reservoir tank and
the cylinder block drain plugs.
• The radiator must be complete ly empty of coolant and water.
• Apply sealant to the threads of the cylinder block drain plug. Use Genuine High Performance
Thread Sealant or equivalent. Refer to GI-21, "Recommended Chemical Products and Sealants"
.
CAUTION:
Do not reuse copp er sealing washers.
2. If disconnected, reattach the upper radiator hose at the engine side.
3. Set the vehicle heater controls to the full HOT and heat er ON position. Turn the vehicle ignition ON with
the engine OFF as necessary to activate the heater mode.
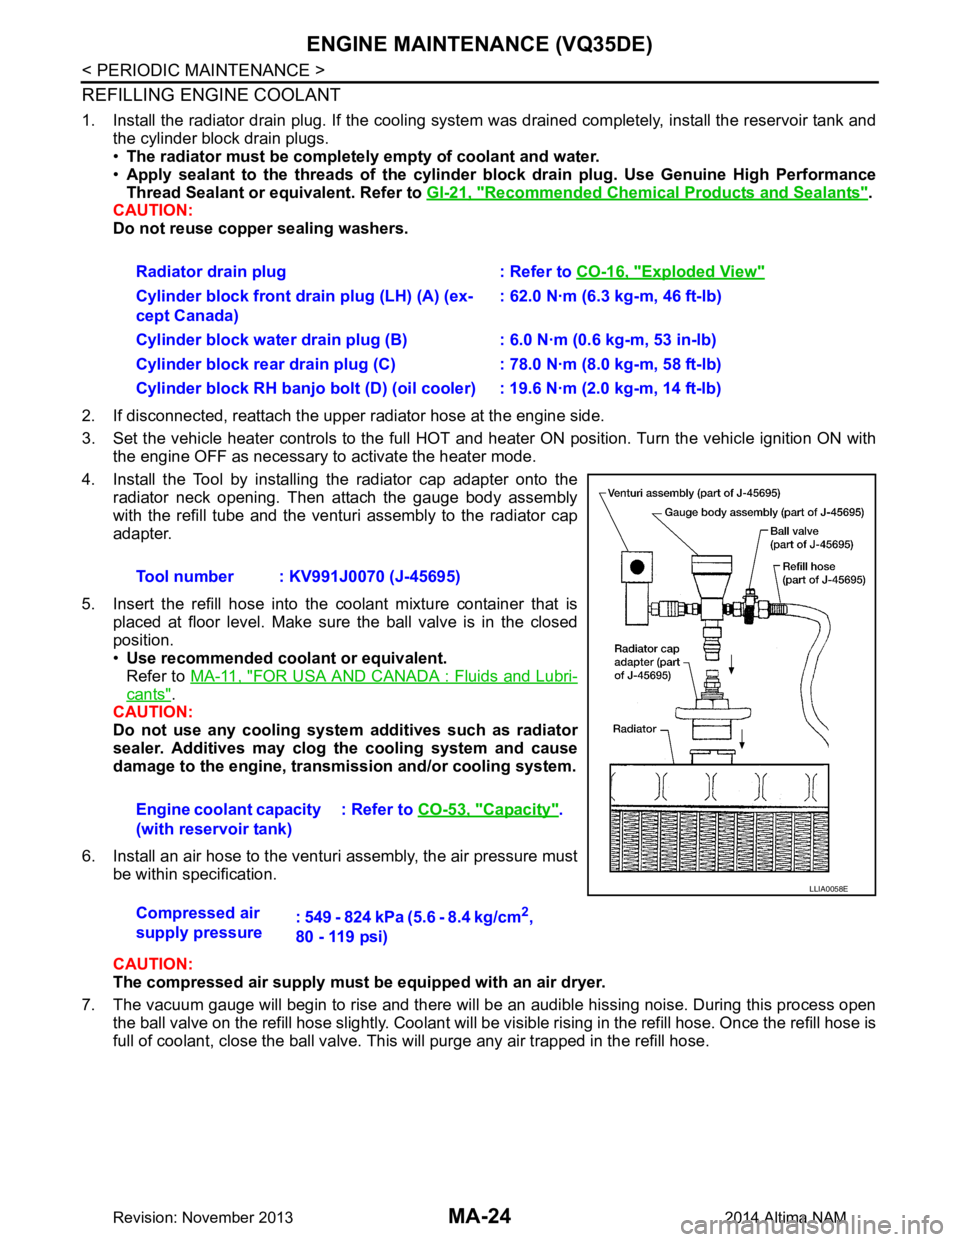
4. Install the Tool by installing the radiator cap adapter onto the radiator neck opening. Then attach the gauge body assembly
with the refill tube and the venturi assembly to the radiator cap
adapter.
5. Insert the refill hose into the coolant mixture container that is placed at floor level. Make sure the ball valve is in the closed
position.
• Use recommended coolant or equivalent.
Refer to MA-11, "FOR USA AND CANADA : Fluids and Lubri-
cants".
CAUTION:
Do not use any cooling system additives such as radiator
sealer. Additives may clog th e cooling system and cause
damage to the engine, transm ission and/or cooling system.
6. Install an air hose to the venturi assembly, the air pressure must be within specification.
CAUTION:
The compressed air supply must be equipped with an air dryer.
7. The vacuum gauge will begin to rise and there will be an audible hissing noise. During this process open the ball valve on the refill hose slightly. Coolant will be vi sible rising in the refill hose. Once the refill hose is
full of coolant, close the ball valve. This will purge any air trapped in the refill hose. Radiator drain plug : Refer to
CO-16, "Exploded View"
Cylinder block front drain plug (LH) (A) (ex-
cept Canada) : 62.0 N·m (6.3 kg-m, 46 ft-lb)
Cylinder block water drain plug (B) : 6.0 N·m (0.6 kg-m, 53 in-lb)
Cylinder block rear drain plug (C) : 78.0 N·m (8.0 kg-m, 58 ft-lb)
Cylinder block RH banjo bolt (D) (oil cooler) : 19.6 N·m (2.0 kg-m, 14 ft-lb)
Tool number : KV991J0070 (J-45695)
Engine coolant capacity
(with reservoir tank) : Refer to
CO-53, "Capacity"
.
Compressed air
supply pressure : 549 - 824 kPa (5.6 - 8.4 kg/cm
2,
80 - 119 psi)
LLIA0058E
Revision: November 20132014 Altima NAM
Page 3439 of 4801
PG
INSPECTION AND ADJUSTMENTPG-7
< BASIC INSPECTION >
C
D E
F
G H
I
J
K L
B
A
O P
N
INSPECTION AND ADJUSTMENT
ADDITIONAL SERVICE WHEN REMOVI
NG BATTERY NEGATIVE TERMINAL
ADDITIONAL SERVICE WHEN REMOVING BATTERY NEGATIVE TERMINAL : Spe-
cial Repair Requirement
INFOID:0000000009460434
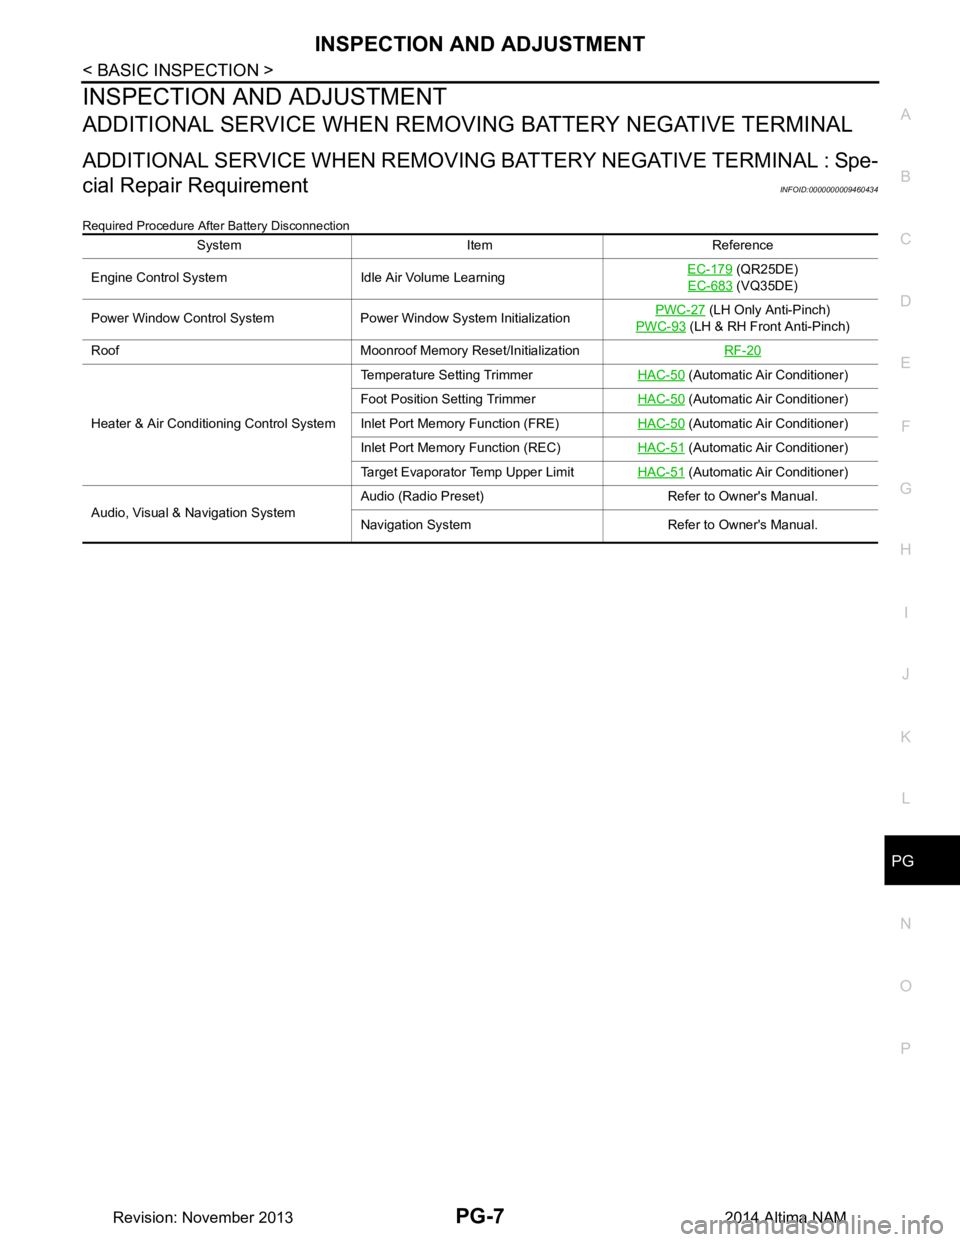
Required Procedure After Battery Disconnection
System Item Reference
Engine Control System Idle Air Volume Learning EC-179
(QR25DE)
EC-683
(VQ35DE)
Power Window Control System Power Window System Initialization PWC-27
(LH Only Anti-Pinch)
PWC-93
(LH & RH Front Anti-Pinch)
Roof Moonroof Memory Reset/Initialization RF-20
Heater & Air Conditioning Control SystemTemperature Setting Trimmer
HAC-50
(Automatic Air Conditioner)
Foot Position Setting Trimmer HAC-50
(Automatic Air Conditioner)
Inlet Port Memory Function (FRE) HAC-50
(Automatic Air Conditioner)
Inlet Port Memory Function (REC) HAC-51
(Automatic Air Conditioner)
Target Evaporator Temp Upper Limit HAC-51
(Automatic Air Conditioner)
Audio, Visual & Navigation System Audio (Radio Preset) Refer to Owner's Manual.
Navigation System Refer to Owner's Manual.
Revision: November 20132014 Altima NAM
Page 3485 of 4801

PG
HARNESSPG-53
< DTC/CIRCUIT DIAGNOSIS >
C
D E
F
G H
I
J
K L
B
A
O P
N
E2 B8 W/4 : Front door switch LH C5 B46 GR/2 : Rear bumper antenna
G3 B9 Y/22 : Air bag diagnosis sensor unit E4 B47 W/2 : Rear speaker RH (Without BOSE audio
system)
G1 B10 W/12 : To E29 C2 B52 W/1 : Condenser
F2 B11 Y/2 : Front LH side air bag module B2 B53 B/1 : Rear window defogger
F2 B12 W/6 : To B201 D3 B54 B/1 : Rear window defogger
G1 B13 W/6 : Fuse block (J/B) D3 B58 — : Body ground
E2 B14 Y/2 : Front LH seat belt pre-tensioner D3 B61 Y/2 : Rear side air bag satellite sensor LH
E2 B15 Y/2 : Front side air bag satellite sensor LH G3 B65 W/4 : Joint connector-B04
B3 B16 W/12 : Rear view camera washer control unit E3 B66 O/2 : Front LH seat belt pre-tensioner
B4 B17 W/2 : Rear view camera air pump motor Chassis harness
D2 B18 W/4 : Rear door switch LH D4 C1 B/4 : To B43
C2 B19 — : Body ground C4 C2 B/2 : Rear wheel sensor LH
F2 B21 W/4 : Joint connector-B06 D5 C3 B/2 : Rear wheel sensor RH
B2 B22 L/12 : Joint connector-B07 Front seat LH harness
C 3 B 2 5 W / 2 : Rear speaker LH (Without BOSE audio
system) F 3 B 2 0 1 W / 6 : T o B 1 2
C 4 B 2 8 W / 3 : Trunk lamp switch and trunk release
solenoid F3 B202 W/2 : Seat belt buckle switch LH
D3 B29 GR/2 : Rear parcel shelf antenna E2 B203 W/10 : Power seat switch
A3 B30 W/6 : Rear combination lamp LH E2 B205 BR/4 : Lumbar support switch
C4 B32 BR/2 : License plate lamp RH F3 B206 GR/5 : Sliding motor
C4 B33 GR/2 : Trunk opener request switch E3 B207 W/6 : Reclining motor
B3 B34 BR/2 : License plate lamp LH F2 B208 W/6 : Front lifting motor
B4 B35 W/8 : Rear view camera F3 B209 W/6 : Rear lifting motor
C3 B36 W/2 : Trunk room lamp E3 B210 W/3 : Seat cushion heater LH
C 3 B 3 7 B / 2 : High-mounted stop lamp (Without rear
spoiler) D2 B211 W/2 : Seat back heater LH
E1 B38 Y/2 : LH side curtain air bag module G3 B212 B/2 : Lumbar support motor
D4 B39 B/2 : EVAP canister vent control valve
Revision: November 20132014 Altima NAM
Page 3487 of 4801

PG
HARNESSPG-55
< DTC/CIRCUIT DIAGNOSIS >
C
D E
F
G H
I
J
K L
B
A
O P
N
E2 B107 — : Body ground Front seat RH harness
E2 B108 W/4 : Front door switch RH D2 B301 W/4 : To B106
E3 B109 BR/23 : BOSE speaker amp. C3 B3 02 W/4 : Seat belt buckle switch RH
E4 B110 BR/14 : BOSE speaker amp. D3 B304 W/3 : Seat cushion heater RH
C2 B111 W/4 : Joint connector-B02 D3 B305 W/6 : To B128
D2 B112 Y/2 : Front RH side air bag module D2 B308 W/4 : To B326
C3 B113 Y/22 : Air bag diagnosis sensor unit D2 B310 W/2 : Seat back heater RH
E2 B115 Y/2 : Front RH seat belt pre-tensioner ODS sub-harness
F3 B116 W/4 : Rear door switch RH C2 B326 W/4 : To B308
F2 B117 — : Body ground D3 B327 B/20 : Occupant classification system control
unit
E2 B118 Y/2 : Front side air bag satellite sensor RH C3 B328 P/3 : Occupant classification system sensor FL
E1 B119 Y/2 : RH side curtain air bag module C3 B329 P/3 : Occupant classification system sensor RL
D 4 B 1 2 0 W / 2 : Rear speaker LH (With BOSE audio
system)
Revision: November 20132014 Altima NAM
Page 3773 of 4801

SE-24
< REMOVAL AND INSTALLATION >
FRONT SEAT
1. Seat cushion trim 2. Seat cushion pad 3. Seat cushion heater (if equipped)
4. Seat cushion outer finisher (RH) 5. Seat cushion inner finisher (RH front)6. Seat cushion inner finisher (RH rear)
7. Rear slide cover (RH) 8. Seat belt buckle 9. Slide cover (RH)
10. Front slide cover (RH) 11. Front slide cover (LH)12. Seat harness
13. Seat cushion outer finisher (LH) 14. Seat slide knob 15. Seat recline knob
16. Lumbar support switch (if equipped) 17. Power seat switch 18. Slide cover (LH)
19. Seat frame assembly 20. Rear slide cover (LH) 21. Seat cushion inner finisher (LH rear)
22. Seat cushion inner finisher (LH front) 23. Rear hinge cover 24. Side air bag module
25. Headrest holder (locked) 26. Headrest holder (free) 27. Seatback assembly
28. Lumbar support assembly (if equipped) 29. Headrest 30. Seatback board
A. Rear hinge cover clips B. Seatback board clips C. Side air bag module nuts
Revision: November 20132014 Altima NAMRevision: November 20132014 Altima NAM
Page 3774 of 4801

FRONT SEATSE-25
< REMOVAL AND INSTALLATION >
C
D E
F
G H
I
K L
M A
B
SE
N
O P
DRIVER SEAT - MANUAL
ALJIA0956ZZ
1. Seat cushion trim 2. Seat cushion pad 3. Seat cushion heater (if equipped)
4. Seat cushion outer finisher (RH) 5. Seat cushion inner finisher (RH front)6. Seat cushion inner finisher (RH rear)
7. Rear slide cover (RH) 8. Seat belt buckle 9. Slide cover (RH)
10. Front slide cover (RH) 11. Front slide cover (LH) 12. Seat harness
13. Seat frame assembly 14. Slide cover (LH) 15. Seat cushion outer finisher (LH)
Revision: November 20132014 Altima NAMRevision: November 20132014 Altima NAM
Page 3778 of 4801

FRONT SEATSE-29
< REMOVAL AND INSTALLATION >
C
D E
F
G H
I
K L
M A
B
SE
N
O P
PASSENGER SIDE : Exploded ViewINFOID:0000000009462937
PASSENGER SEAT
AWJIA1227ZZ
1. Seat cushion trim 2. Seat cushion pad 3. Seat cushion heater (if equipped)
4. Side air bag module 5. Recline lever 6. Seat cushion outer finisher (RH)
7. Seat cushion inner finisher (RH front) 8. Seat cushion inner finisher
(RH rear) 9. Rear slide cover (RH)
Revision: November 20132014 Altima NAMRevision: November 20132014 Altima NAM
Page 3781 of 4801
SE-32
< REMOVAL AND INSTALLATION >
FRONT SEAT
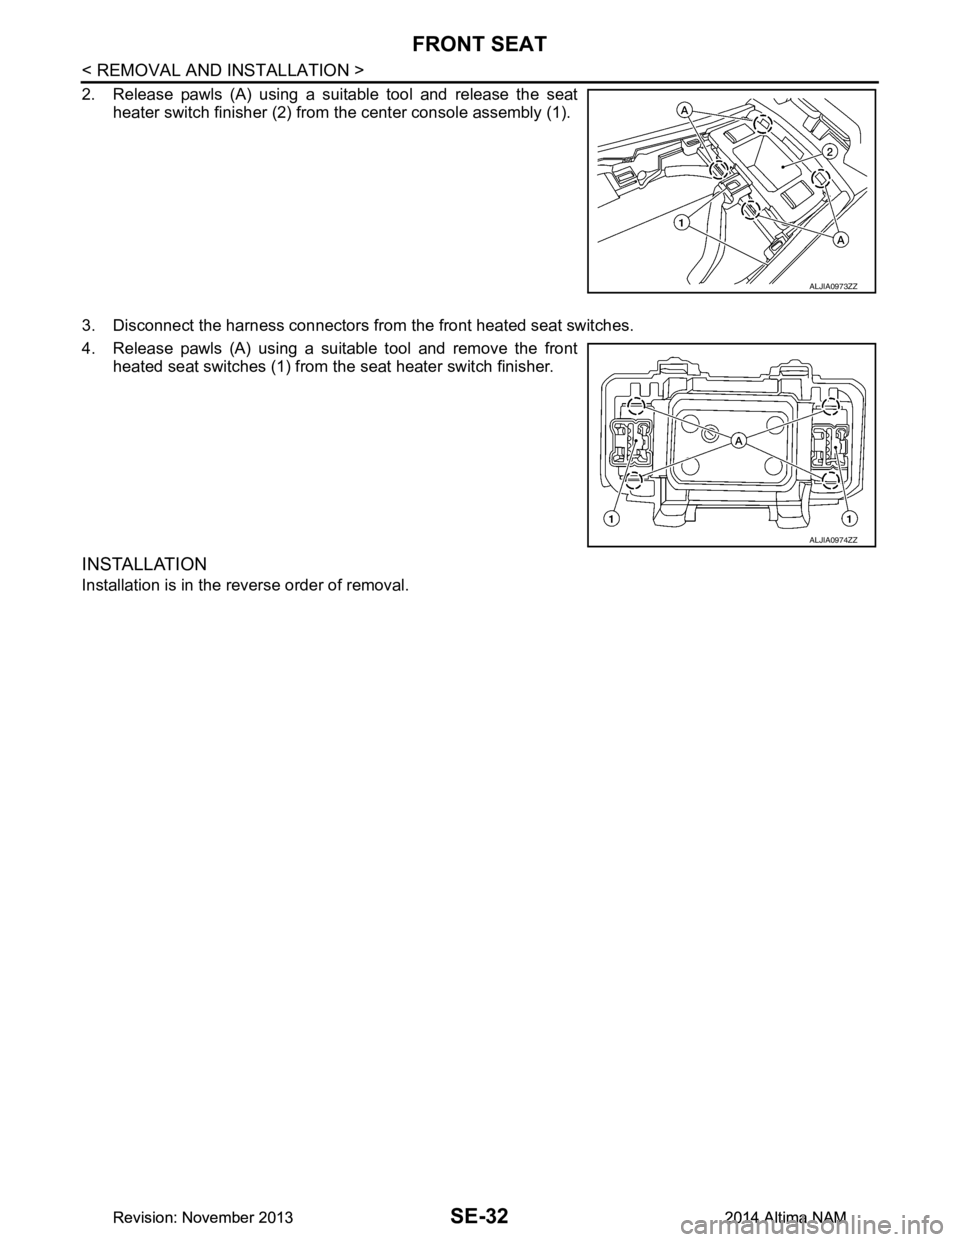
2. Release pawls (A) using a suitable tool and release the seatheater switch finisher (2) from the center console assembly (1).
3. Disconnect the harness connectors from the front heated seat switches.
4. Release pawls (A) using a suitable tool and remove the front heated seat switches (1) from t he seat heater switch finisher.
INSTALLATION
Installation is in the reverse order of removal.
ALJIA0973ZZ
ALJIA0974ZZ
Revision: November 20132014 Altima NAMRevision: November 20132014 Altima NAM
Page 3789 of 4801

SE-40
< UNIT DISASSEMBLY AND ASSEMBLY >
FRONT SEAT
1. Seat cushion trim 2. Seat cushion pad 3. Seat cushion heater (if equipped)
4. Seat cushion outer finisher (RH) 5. Seat cushion inner finisher (RH front)6. Seat cushion inner finisher (RH rear)
7. Rear slide cover (RH) 8. Seat belt buckle 9. Slide cover (RH)
10. Front slide cover (RH) 11. Front slide cover (LH) 12. Seat harness
13. Seat cushion outer finisher (LH) 14. Seat slide knob 15. Seat recline knob
16. Lumbar support switch (if equipped) 17. Power seat switch 18. Slide cover (LH)
19. Seat frame assembly 20. Rear slide cover (LH) 21. Seat cushion inner finisher (LH rear)
22. Seat cushion inner finisher (LH front) 23. Rear hinge cover 24. Side air bag module
25. Headrest holder (locked) 26. Headrest holder (free) 27. Seatback assembly
28. Lumbar support assembly (if equipped) 29. Headrest 30. Seatback board
A. Rear hinge cover clips B. Seatback board clips C. Side air bag module nuts
Revision: November 20132014 Altima NAMRevision: November 20132014 Altima NAM