NISSAN TERRANO 2002 Service Repair Manual
Manufacturer: NISSAN, Model Year: 2002, Model line: TERRANO, Model: NISSAN TERRANO 2002Pages: 1767, PDF Size: 41.51 MB
Page 1591 of 1767
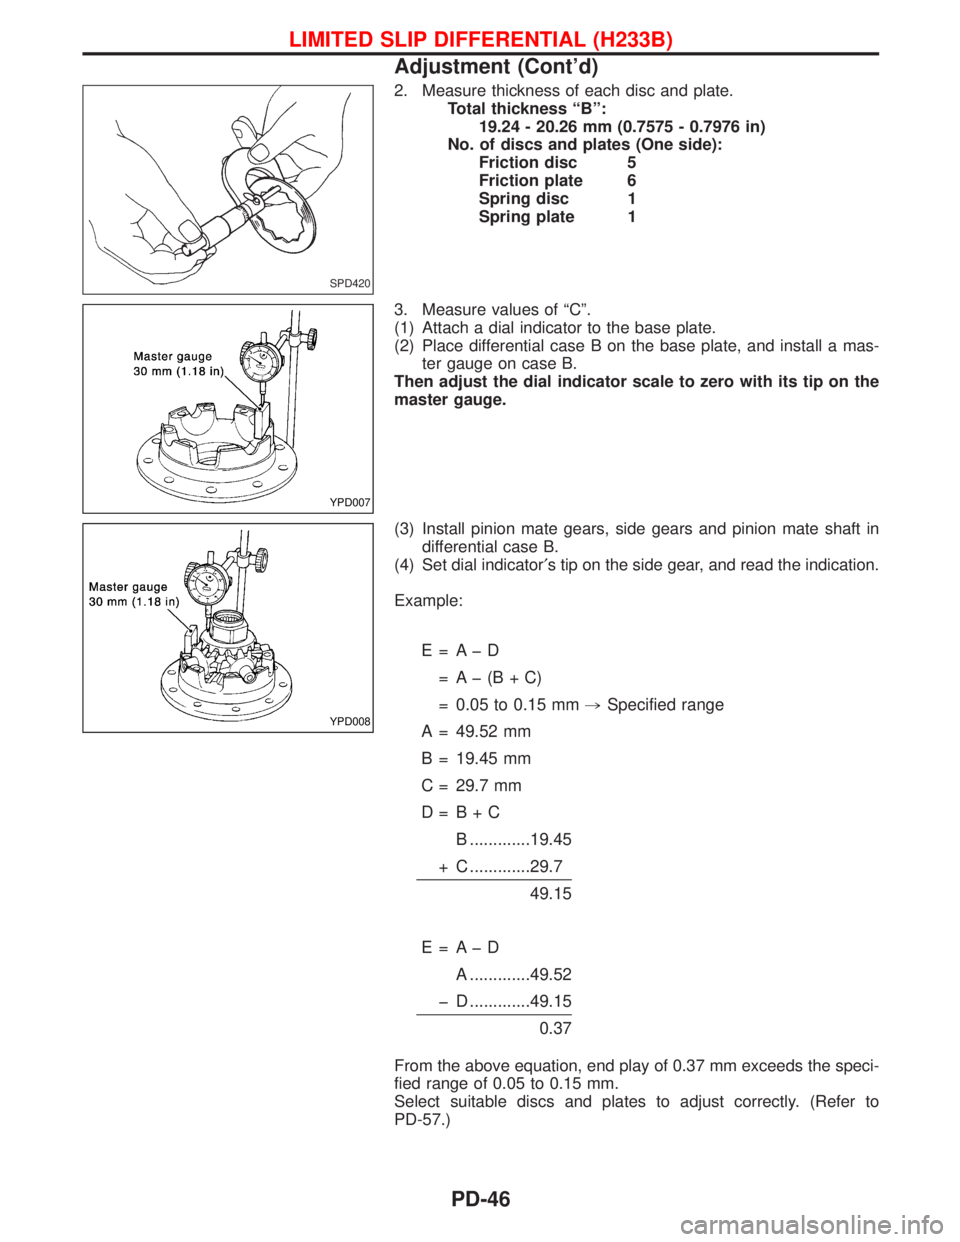
2. Measure thickness of each disc and plate.
Total thickness ªBº:
19.24 - 20.26 mm (0.7575 - 0.7976 in)
No. of discs and plates (One side):
Friction disc 5
Friction plate 6
Spring disc 1
Spring plate 1
3. Measure values of ªCº.
(1) Attach a dial indicator to the base plate.
(2) Place differential case B on the base plate, and install a mas-
ter gauge on case B.
Then adjust the dial indicator scale to zero with its tip on the
master gauge.
(3) Install pinion mate gears, side gears and pinion mate shaft in
differential case B.
(4) Set dial indicator¢s tip on the side gear, and read the indication.
Example:
E= AþD
= Aþ(B+C)
= 0.05 to 0.15 mm,Specified range
A = 49.52 mm
B = 19.45 mm
C = 29.7 mm
D= B+C
B .............19.45
+ C .............29.7
49.15
E= AþD
A .............49.52
þ D .............49.15
0.37
From the above equation, end play of 0.37 mm exceeds the speci-
fied range of 0.05 to 0.15 mm.
Select suitable discs and plates to adjust correctly. (Refer to
PD-57.)
SPD420
YPD007
YPD008
LIMITED SLIP DIFFERENTIAL (H233B)
Adjustment (Cont'd)
PD-46
Page 1592 of 1767
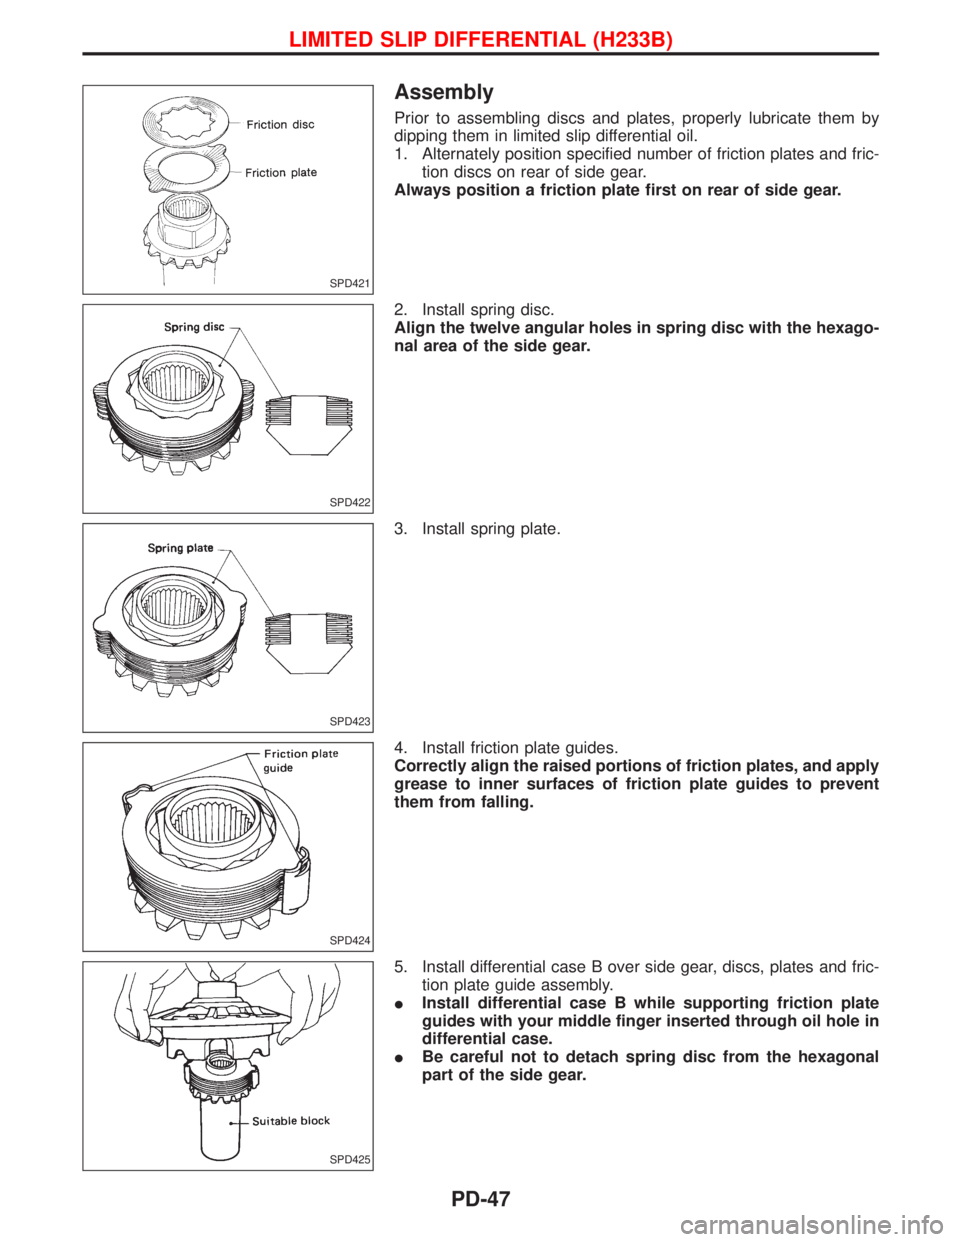
Assembly
Prior to assembling discs and plates, properly lubricate them by
dipping them in limited slip differential oil.
1. Alternately position specified number of friction plates and fric-
tion discs on rear of side gear.
Always position a friction plate first on rear of side gear.
2. Install spring disc.
Align the twelve angular holes in spring disc with the hexago-
nal area of the side gear.
3. Install spring plate.
4. Install friction plate guides.
Correctly align the raised portions of friction plates, and apply
grease to inner surfaces of friction plate guides to prevent
them from falling.
5. Install differential case B over side gear, discs, plates and fric-
tion plate guide assembly.
IInstall differential case B while supporting friction plate
guides with your middle finger inserted through oil hole in
differential case.
IBe careful not to detach spring disc from the hexagonal
part of the side gear.
SPD421
SPD422
SPD423
SPD424
SPD425
LIMITED SLIP DIFFERENTIAL (H233B)
PD-47
Page 1593 of 1767
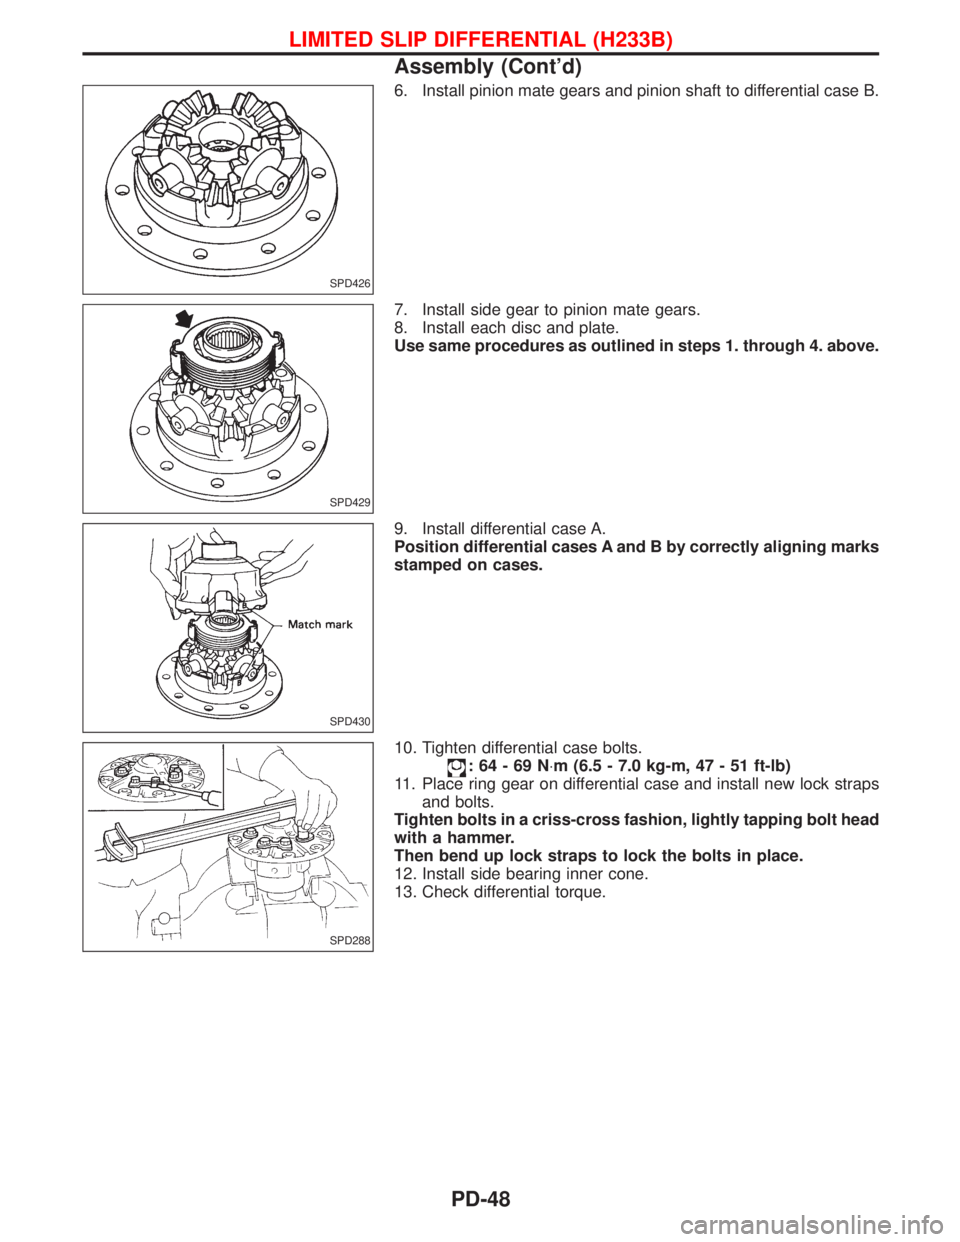
6. Install pinion mate gears and pinion shaft to differential case B.
7. Install side gear to pinion mate gears.
8. Install each disc and plate.
Use same procedures as outlined in steps 1. through 4. above.
9. Install differential case A.
Position differential cases A and B by correctly aligning marks
stamped on cases.
10. Tighten differential case bolts.
:64-69N×m (6.5 - 7.0 kg-m, 47 - 51 ft-lb)
11. Place ring gear on differential case and install new lock straps
and bolts.
Tighten bolts in a criss-cross fashion, lightly tapping bolt head
with a hammer.
Then bend up lock straps to lock the bolts in place.
12. Install side bearing inner cone.
13. Check differential torque.
SPD426
SPD429
SPD430
SPD288
LIMITED SLIP DIFFERENTIAL (H233B)
Assembly (Cont'd)
PD-48
Page 1594 of 1767
To avoid confusion while calculating bearing shims, it is absolutely
necessary to stay with the metric system. If you measure anything
in inches, the results MUST be converted to the metric system.
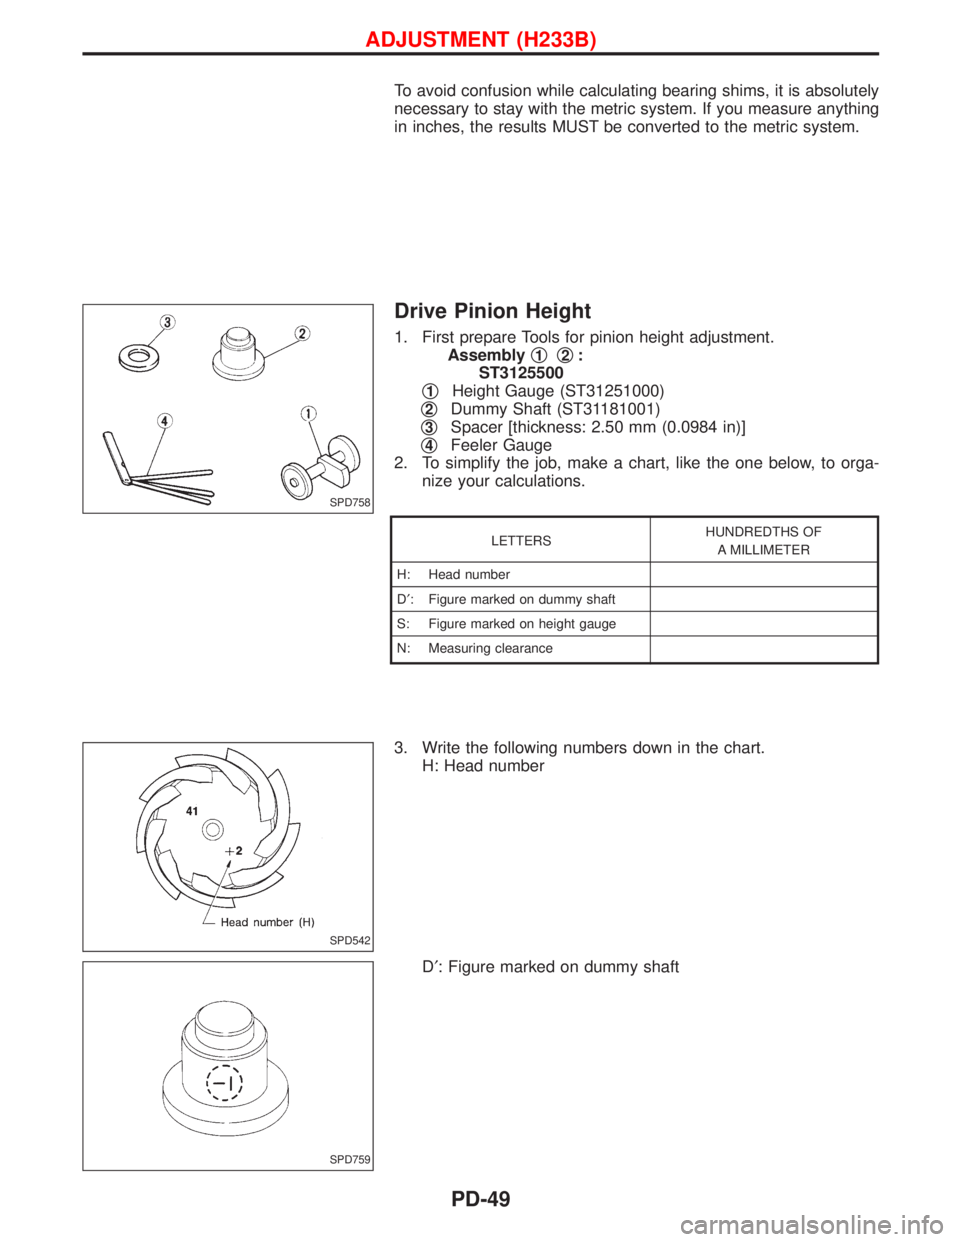
Drive Pinion Height
1. First prepare Tools for pinion height adjustment.
Assemblyq
1q2:
ST3125500
q
1Height Gauge (ST31251000)
q
2Dummy Shaft (ST31181001)
q
3Spacer [thickness: 2.50 mm (0.0984 in)]
q
4Feeler Gauge
2. To simplify the job, make a chart, like the one below, to orga-
nize your calculations.
LETTERSHUNDREDTHS OF
A MILLIMETER
H: Head number
D¢: Figure marked on dummy shaft
S: Figure marked on height gauge
N: Measuring clearance
3. Write the following numbers down in the chart.
H: Head number
D¢: Figure marked on dummy shaft
SPD758
SPD542
SPD759
ADJUSTMENT (H233B)
PD-49
Page 1595 of 1767
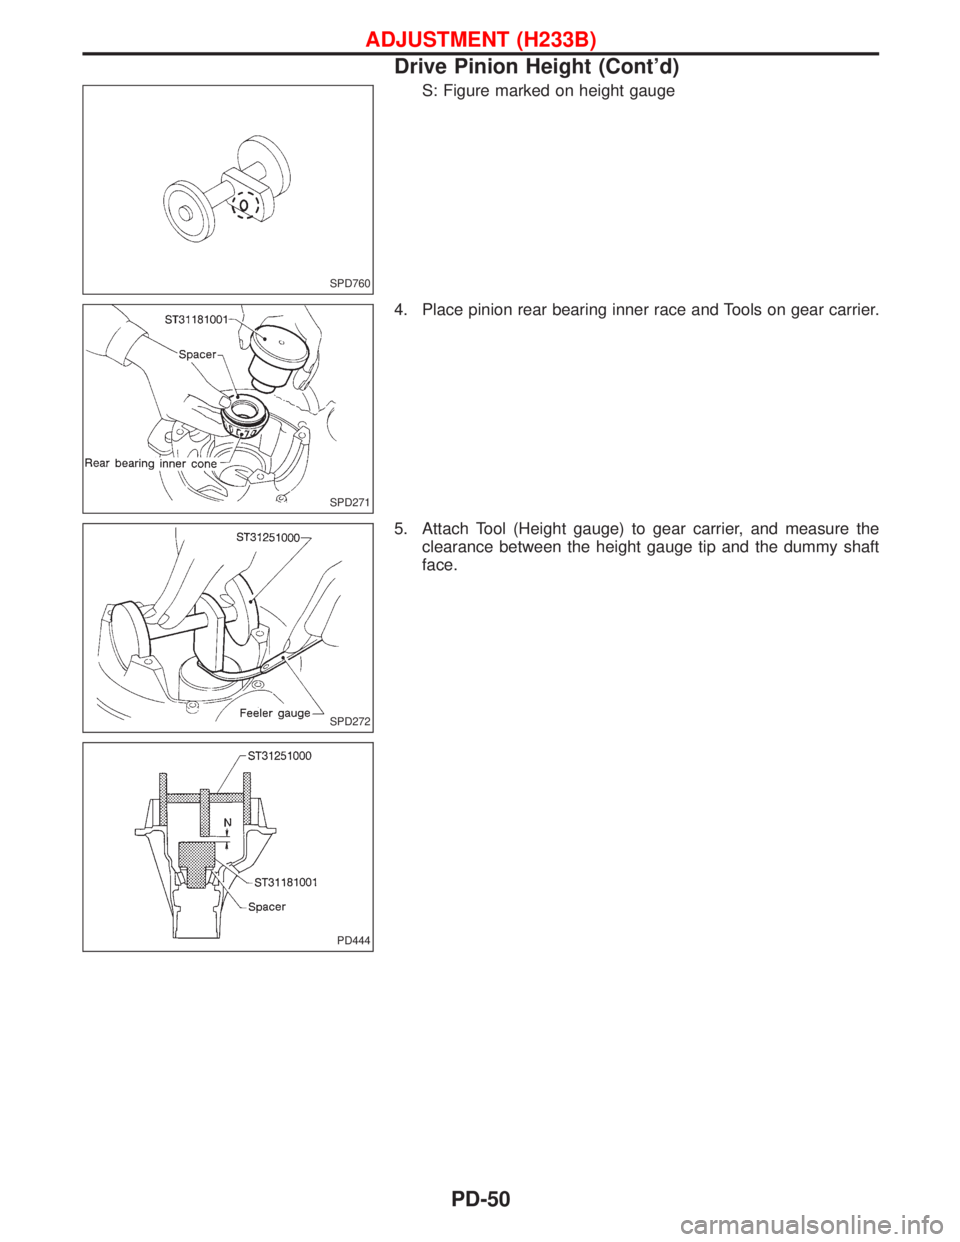
S: Figure marked on height gauge
4. Place pinion rear bearing inner race and Tools on gear carrier.
5. Attach Tool (Height gauge) to gear carrier, and measure the
clearance between the height gauge tip and the dummy shaft
face.
SPD760
SPD271
SPD272
PD444
ADJUSTMENT (H233B)
Drive Pinion Height (Cont'd)
PD-50
Page 1596 of 1767
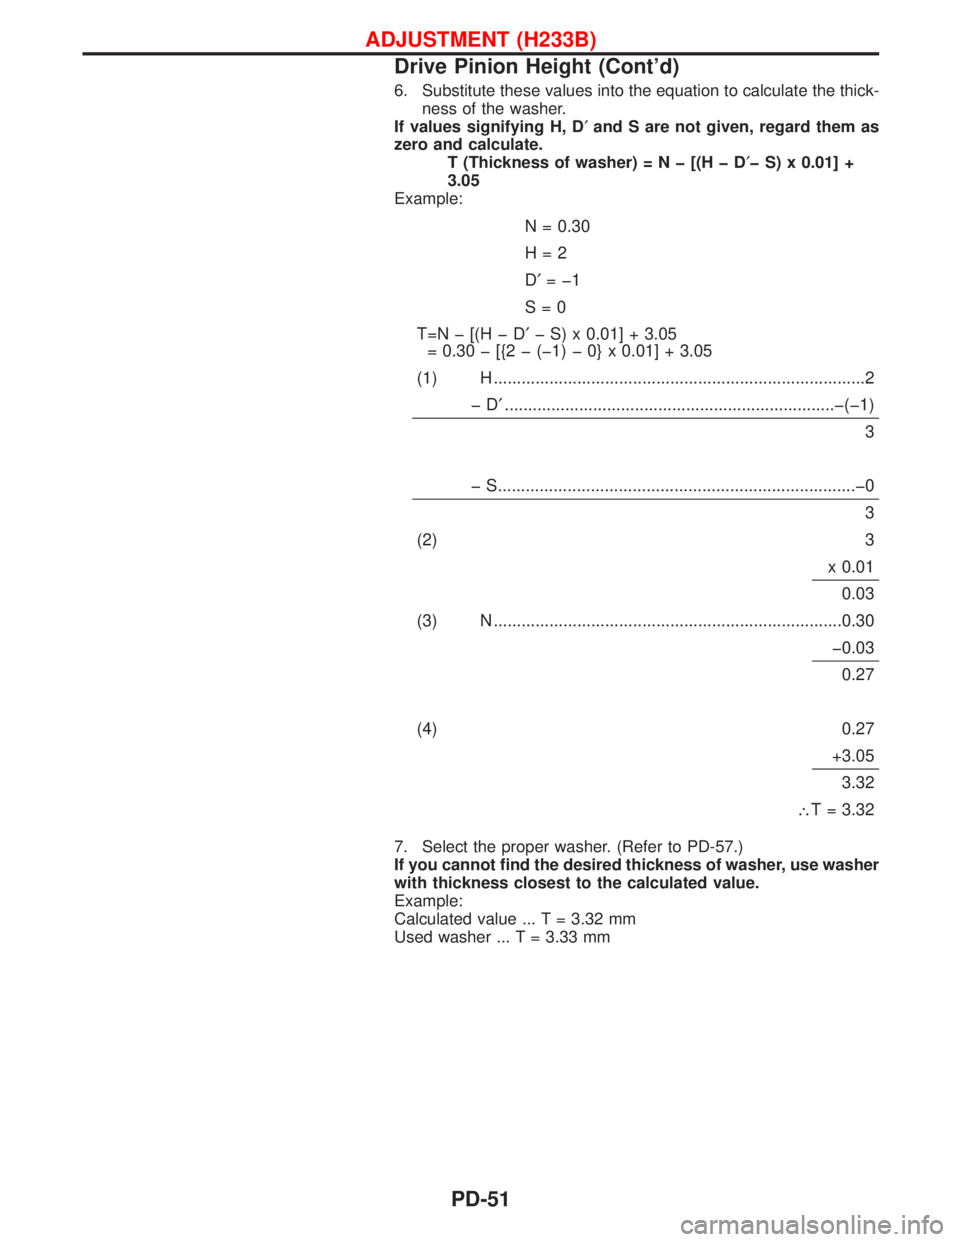
6. Substitute these values into the equation to calculate the thick-
ness of the washer.
If values signifying H, D¢and S are not given, regard them as
zero and calculate.
T (Thickness of washer)=Nþ[(HþD¢þ S) x 0.01] +
3.05
Example:
N = 0.30
H=2
D¢=þ1
S=0
T=Nþ[(HþD¢þ S) x 0.01] + 3.05
= 0.30 þ [{2 þ (þ1) þ 0} x 0.01] + 3.05
(1) H ................................................................................2
þD¢.......................................................................þ(þ1)
3
þ S.............................................................................þ0
3
(2) 3
x 0.01
0.03
(3) N ...........................................................................0.30
þ0.03
0.27
(4) 0.27
+3.05
3.32
\T = 3.32
7. Select the proper washer. (Refer to PD-57.)
If you cannot find the desired thickness of washer, use washer
with thickness closest to the calculated value.
Example:
Calculated value ... T = 3.32 mm
Used washer ... T = 3.33 mm
ADJUSTMENT (H233B)
Drive Pinion Height (Cont'd)
PD-51
Page 1597 of 1767
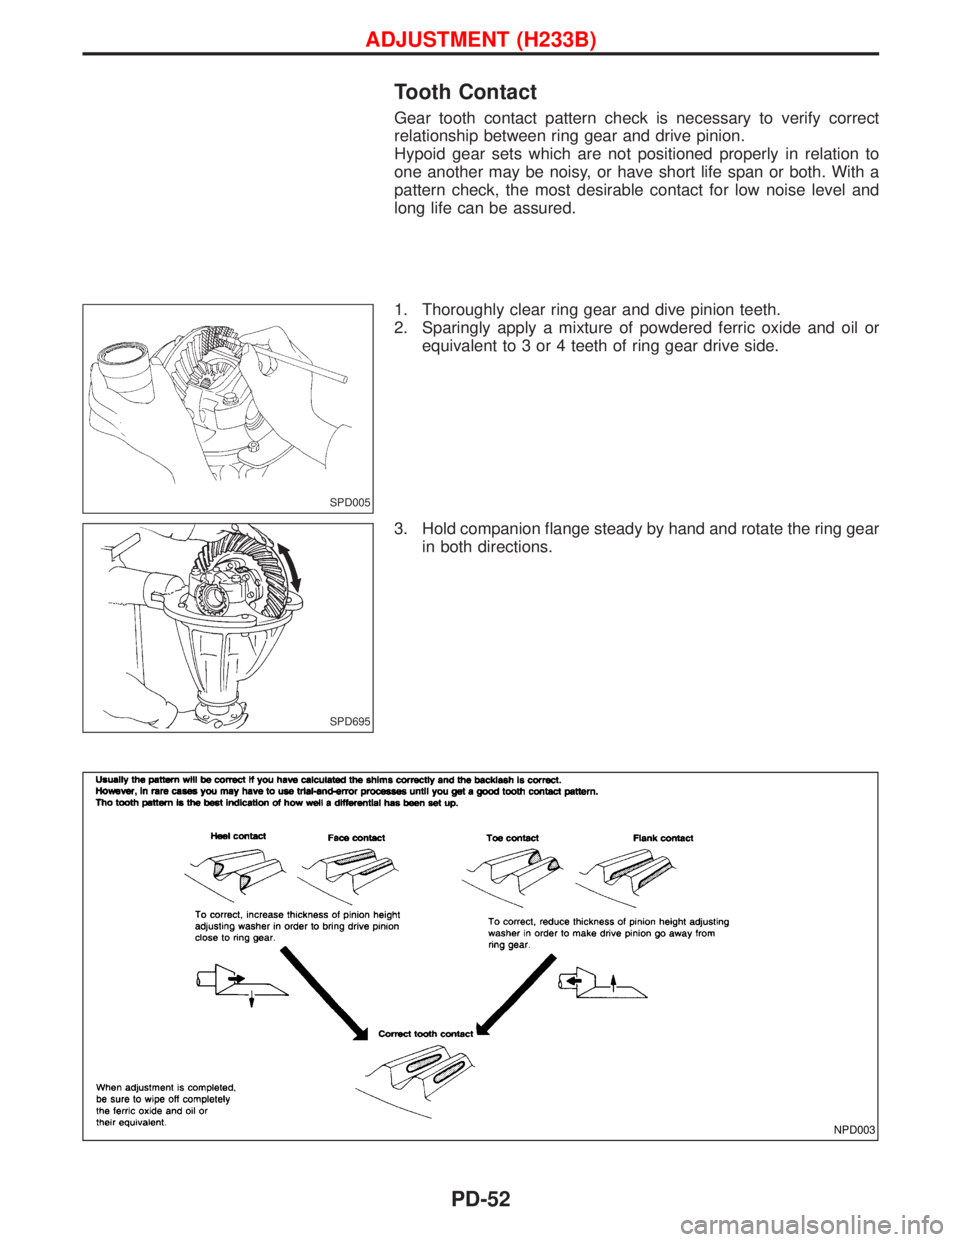
Tooth Contact
Gear tooth contact pattern check is necessary to verify correct
relationship between ring gear and drive pinion.
Hypoid gear sets which are not positioned properly in relation to
one another may be noisy, or have short life span or both. With a
pattern check, the most desirable contact for low noise level and
long life can be assured.
1. Thoroughly clear ring gear and dive pinion teeth.
2. Sparingly apply a mixture of powdered ferric oxide and oil or
equivalent to 3 or 4 teeth of ring gear drive side.
3. Hold companion flange steady by hand and rotate the ring gear
in both directions.
SPD005
SPD695
NPD003
ADJUSTMENT (H233B)
PD-52
Page 1598 of 1767
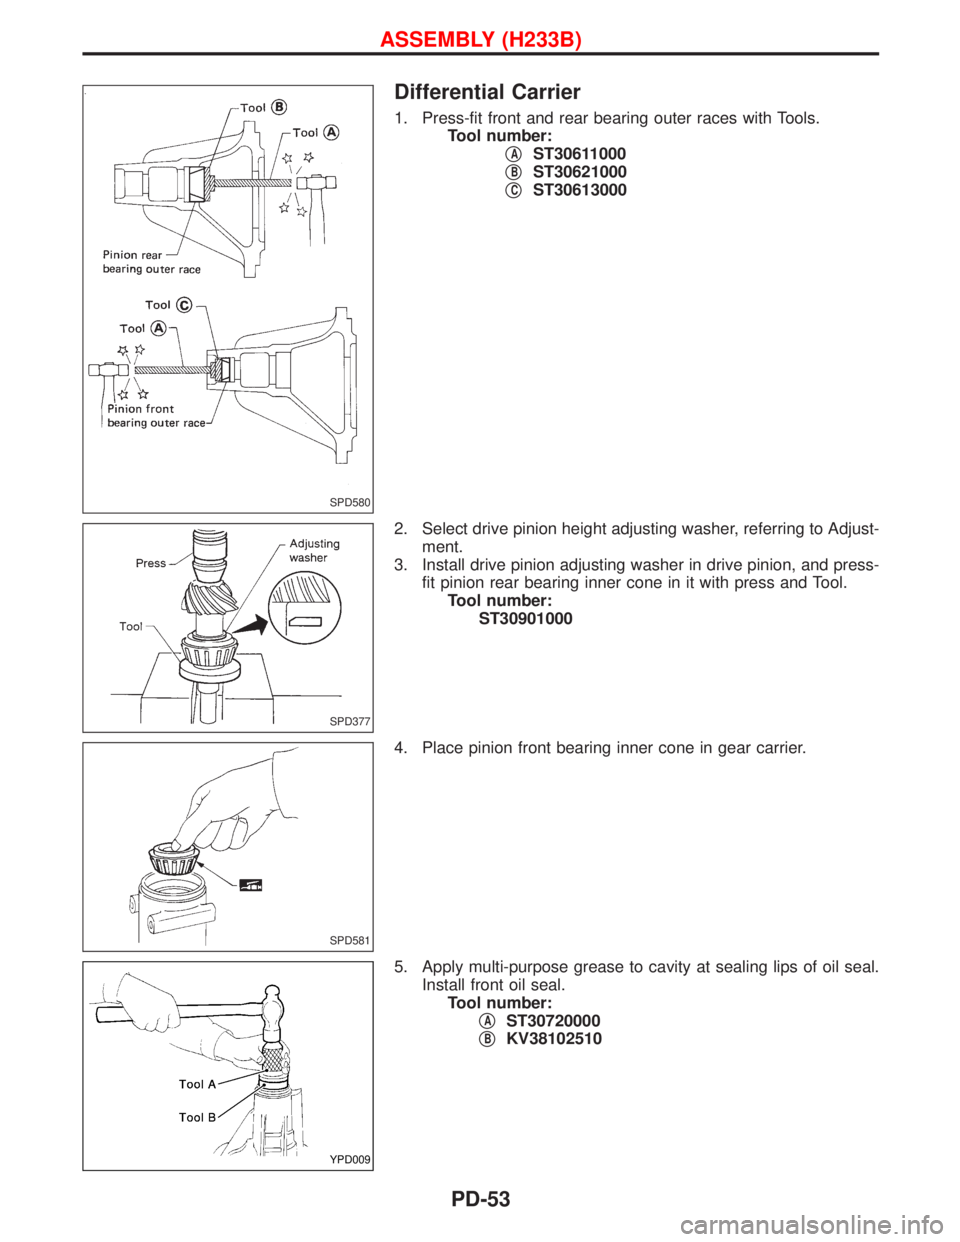
Differential Carrier
1. Press-fit front and rear bearing outer races with Tools.
Tool number:
q
AST30611000
q
BST30621000
q
CST30613000
2. Select drive pinion height adjusting washer, referring to Adjust-
ment.
3. Install drive pinion adjusting washer in drive pinion, and press-
fit pinion rear bearing inner cone in it with press and Tool.
Tool number:
ST30901000
4. Place pinion front bearing inner cone in gear carrier.
5. Apply multi-purpose grease to cavity at sealing lips of oil seal.
Install front oil seal.
Tool number:
q
AST30720000
q
BKV38102510
SPD580
SPD377
SPD581
YPD009
ASSEMBLY (H233B)
PD-53
Page 1599 of 1767
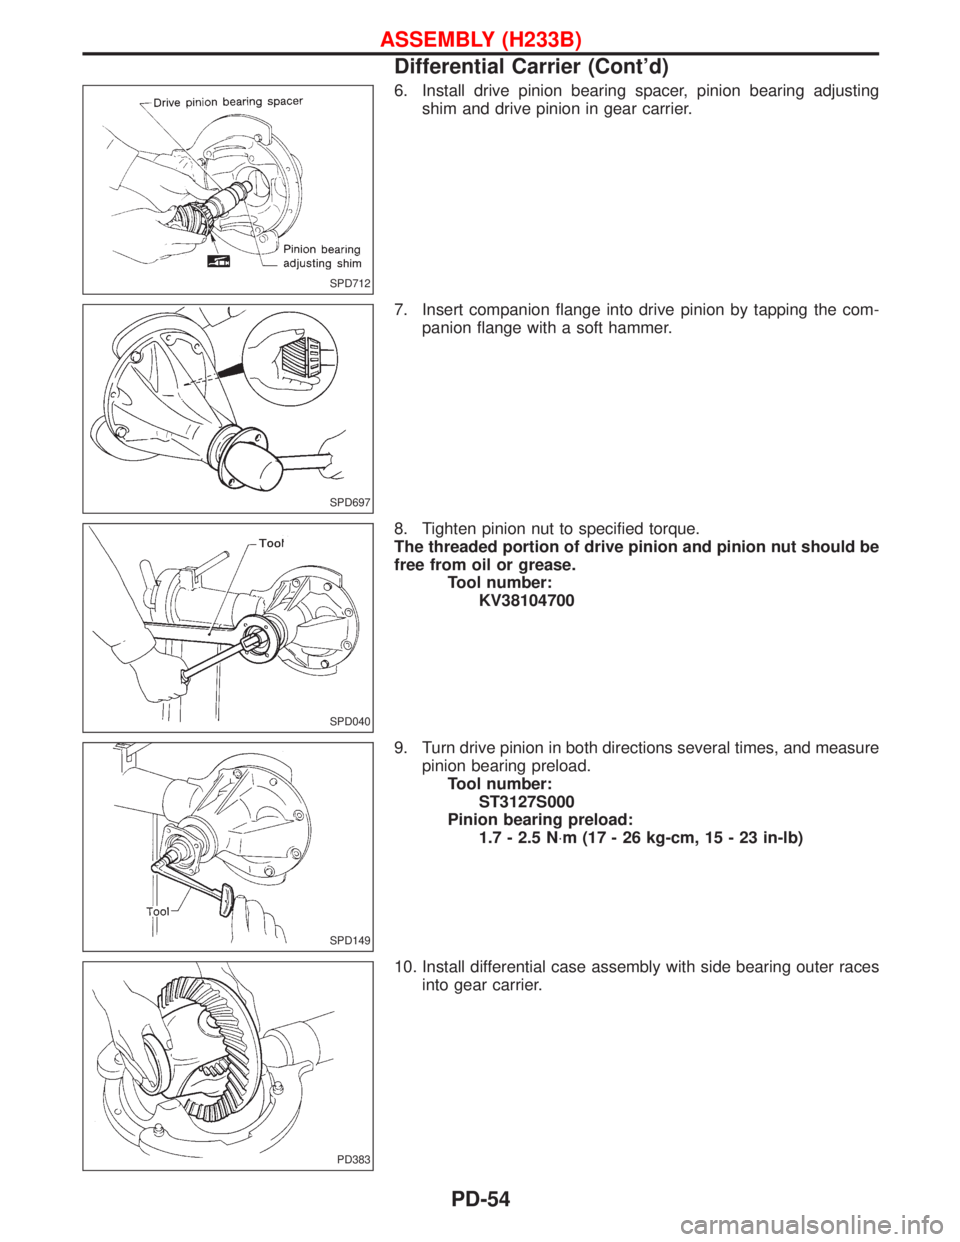
6. Install drive pinion bearing spacer, pinion bearing adjusting
shim and drive pinion in gear carrier.
7. Insert companion flange into drive pinion by tapping the com-
panion flange with a soft hammer.
8. Tighten pinion nut to specified torque.
The threaded portion of drive pinion and pinion nut should be
free from oil or grease.
Tool number:
KV38104700
9. Turn drive pinion in both directions several times, and measure
pinion bearing preload.
Tool number:
ST3127S000
Pinion bearing preload:
1.7 - 2.5 N×m (17 - 26 kg-cm, 15 - 23 in-lb)
10. Install differential case assembly with side bearing outer races
into gear carrier.
SPD712
SPD697
SPD040
SPD149
PD383
ASSEMBLY (H233B)
Differential Carrier (Cont'd)
PD-54
Page 1600 of 1767
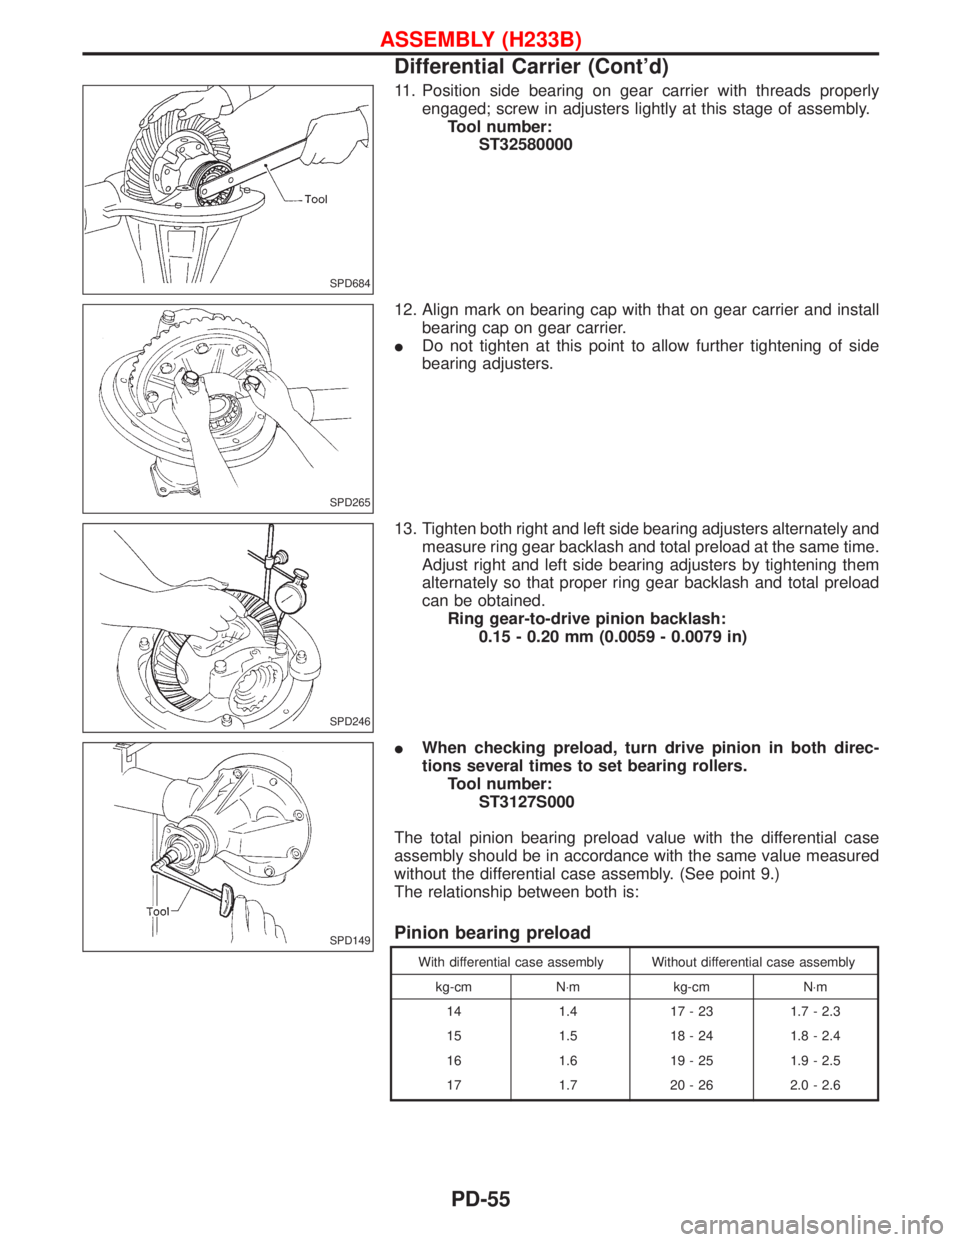
11. Position side bearing on gear carrier with threads properly
engaged; screw in adjusters lightly at this stage of assembly.
Tool number:
ST32580000
12. Align mark on bearing cap with that on gear carrier and install
bearing cap on gear carrier.
IDo not tighten at this point to allow further tightening of side
bearing adjusters.
13. Tighten both right and left side bearing adjusters alternately and
measure ring gear backlash and total preload at the same time.
Adjust right and left side bearing adjusters by tightening them
alternately so that proper ring gear backlash and total preload
can be obtained.
Ring gear-to-drive pinion backlash:
0.15 - 0.20 mm (0.0059 - 0.0079 in)
IWhen checking preload, turn drive pinion in both direc-
tions several times to set bearing rollers.
Tool number:
ST3127S000
The total pinion bearing preload value with the differential case
assembly should be in accordance with the same value measured
without the differential case assembly. (See point 9.)
The relationship between both is:
Pinion bearing preload
With differential case assembly Without differential case assembly
kg-cm N×m kg-cm N×m
14 1.4 17 - 23 1.7 - 2.3
15 1.5 18 - 24 1.8 - 2.4
16 1.6 19 - 25 1.9 - 2.5
17 1.7 20 - 26 2.0 - 2.6
SPD684
SPD265
SPD246
SPD149
ASSEMBLY (H233B)
Differential Carrier (Cont'd)
PD-55