NISSAN TIIDA 2009 Service Repair Manual
Manufacturer: NISSAN, Model Year: 2009, Model line: TIIDA, Model: NISSAN TIIDA 2009Pages: 4331, PDF Size: 58.04 MB
Page 4291 of 4331
WT-26< SERVICE INFORMATION >
REMOVAL AND INSTALLATION
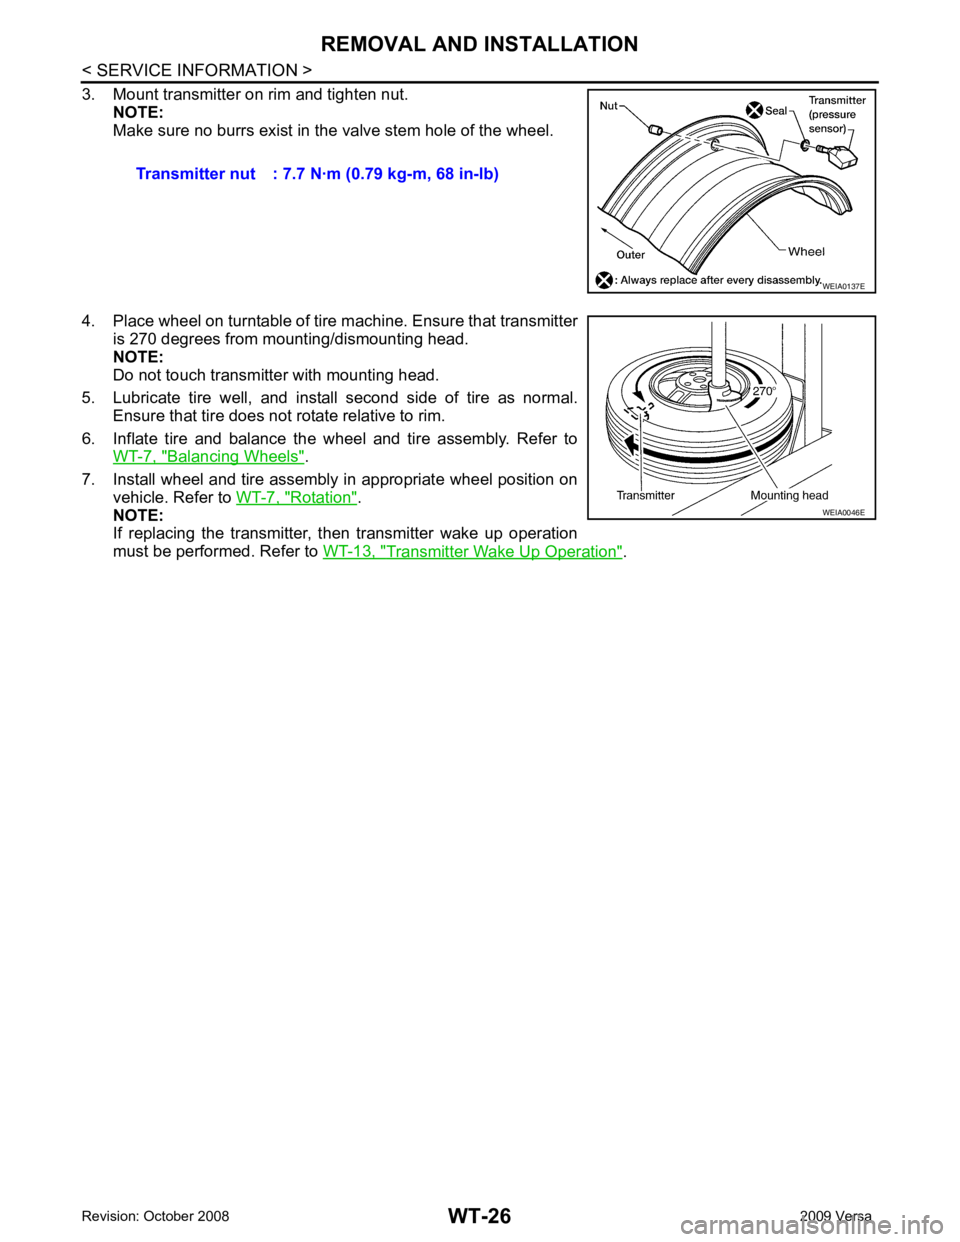
3. Mount transmitter on rim and tighten nut. NOTE:
Make sure no burrs exist in the valve stem hole of the wheel.
4. Place wheel on turntable of tire machine. Ensure that transmitter is 270 degrees from mounting/dismounting head.
NOTE:
Do not touch transmitter with mounting head.
5. Lubricate tire well, and install second side of tire as normal. Ensure that tire does not rotate relative to rim.
6. Inflate tire and balance the wheel and tire assembly. Refer to WT-7, " Balancing Wheels " .
7. Install wheel and tire assembly in appropriate wheel position on vehicle. Refer to WT-7, " Rotation " .
NOTE:
If replacing the transmitter, then transmitter wake up operation
must be performed. Refer to WT-13, " Transmitter Wake Up Operation " .
Transmitter nut : 7.7 N·m (0.79 kg-m, 68 in-lb) WEIA0137E
WEIA0046E
Page 4292 of 4331

WT
N
O P
SERVICE DATA AND SPECIFICATIONS (SDS)
Road Wheel INFOID:0000000004307342
Tire INFOID:0000000004307343
Unit: kPa (kg/cm 2
, psi)
Standard item
Allowable
Aluminum Steel
Maximum radial runout limit Lateral deflection Less than 0.3 mm (0.012 in) Less than 0.5 mm (0.020 in)
Radial deflection Less than 0.3 mm (0.012 in) Less than 0.8 mm (0.031 in)
Maximum allowable unbalance Dynamic
(At rim flange) Less than 5 g (0.18 oz) (one side)
Static
(At rim flange) Less than 10 g (0.35 oz)Tire size/speed rating
Cold tire pressure
Conventional tire Spare tire
Front wheel Rear wheel
P185/65R14 230 (2.3, 33) 230 (2.3, 33) —
P185/65R15 230 (2.3, 33) 230 (2.3, 33) —
T125/70D15 — — 420 (4.2, 60)
Page 4293 of 4331

WW
N
O P
CONTENTS
WIPER, WASHER & HORN
SERVICE INFORMATION .. ..........................2
PRECAUTION ................................................ .....2
Precaution for Supplemental Restraint System
(SRS) "AIR BAG" and "SEAT BELT PRE-TEN-
SIONER" ............................................................. ......
2
Precaution for Procedure without Cowl Top Cover ......2
FRONT WIPER AND WASHER SYSTEM ..... .....3
Component Parts and Harness Connector Loca-
tion ...................................................................... ......
3
System Description ............................................. ......3
CAN Communication System Description ........... ......5
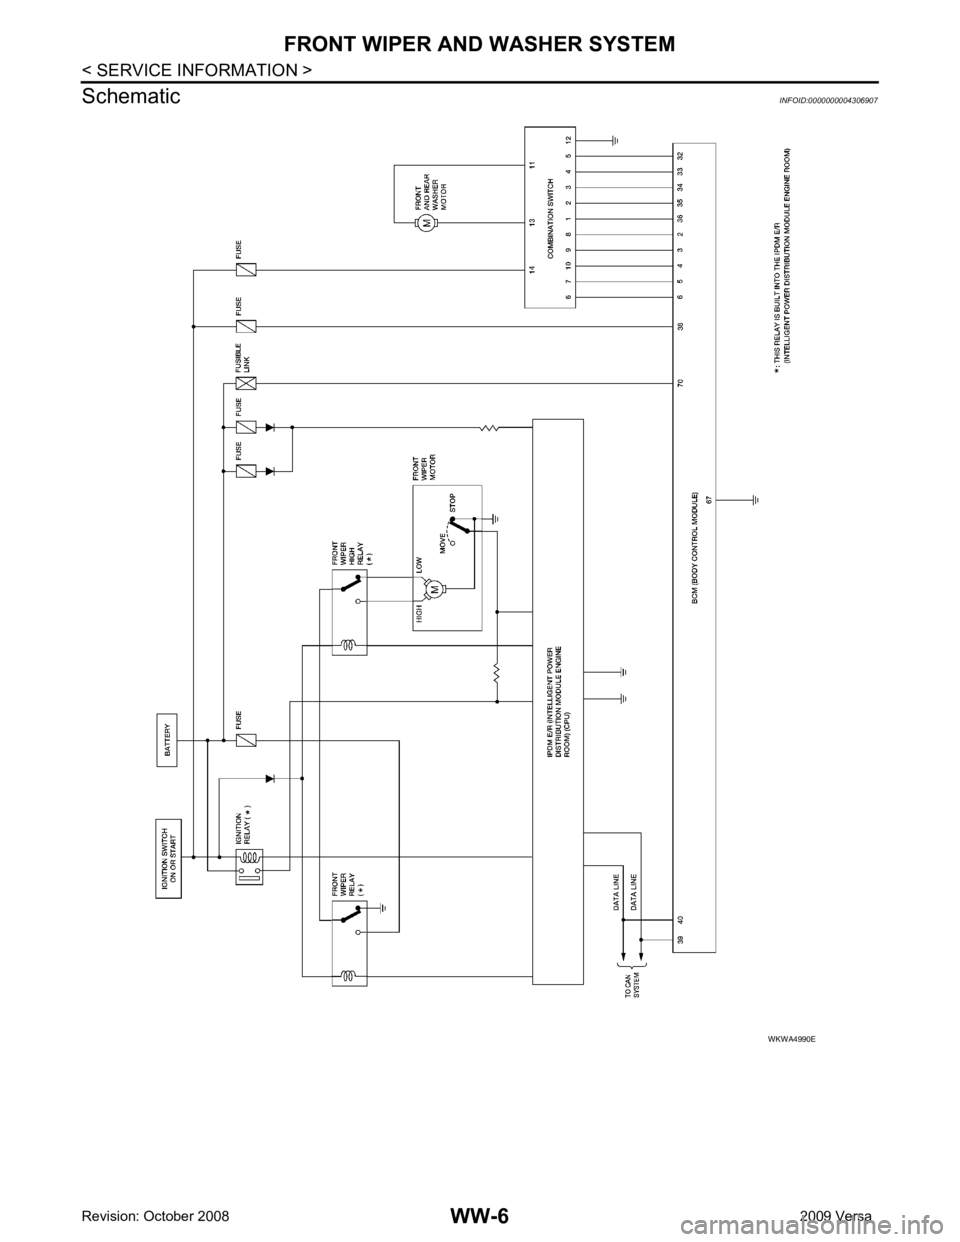
Schematic ........................................................... ......6
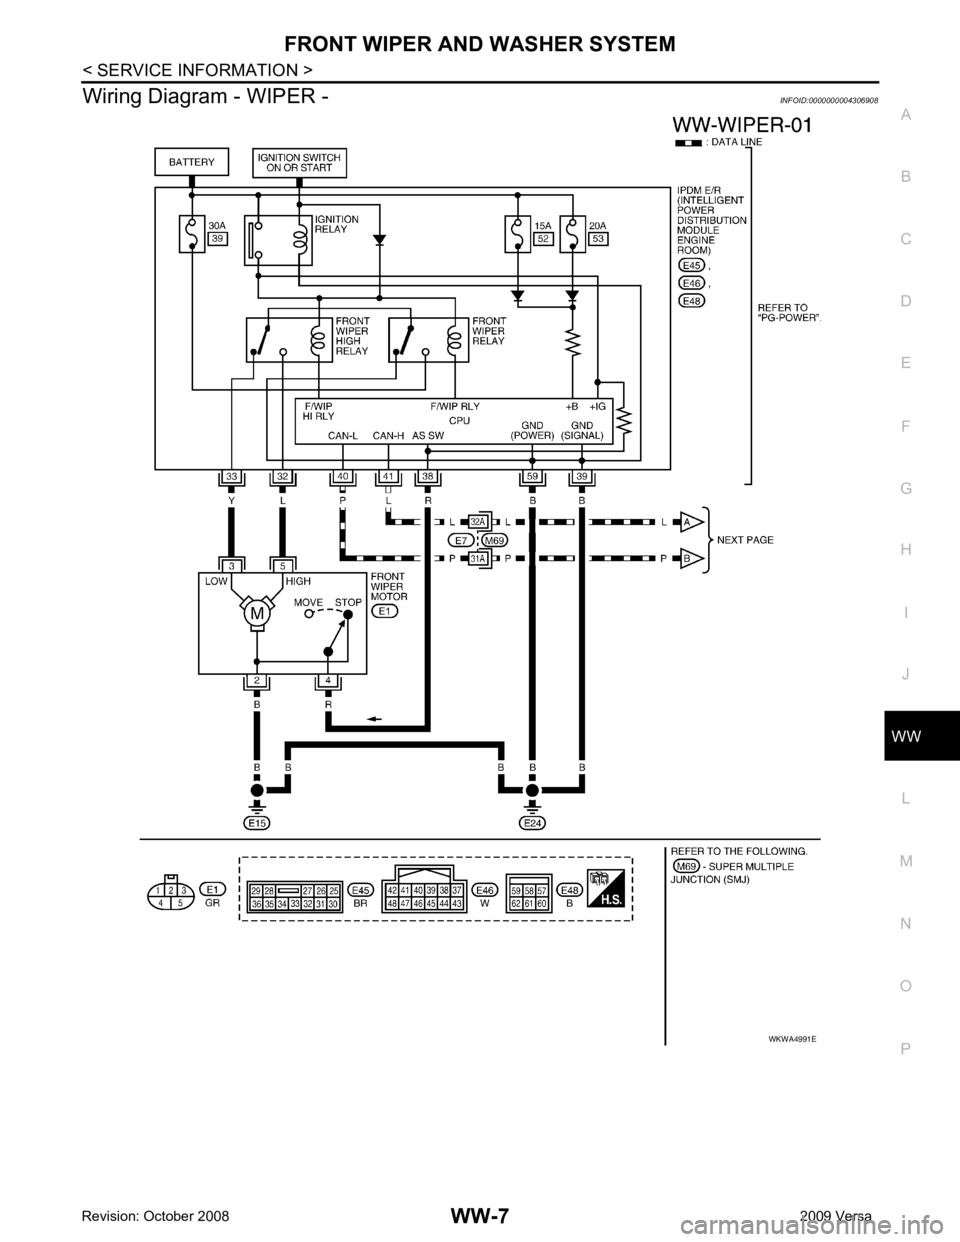
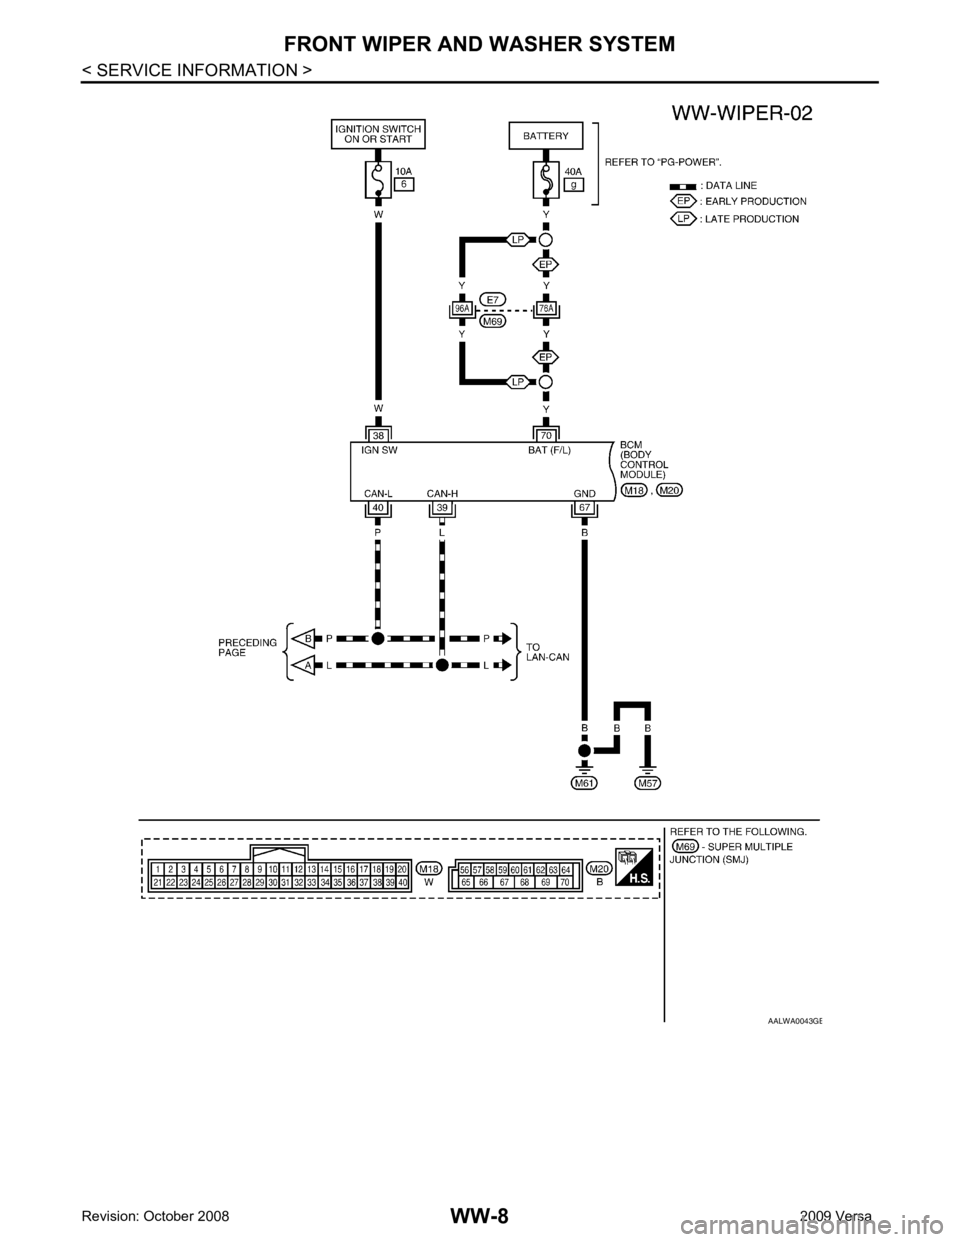
Wiring Diagram - WIPER - .................................. ......7
Terminal and Reference Value for BCM ............. ....10
Terminal and Reference Value for IPDM E/R ..... ....10
How to Proceed with Trouble Diagnosis ............. ....10
Preliminary Check ............................................... ....10
CONSULT-III Function (BCM) ............................. ....10
CONSULT-III Function (IPDM E/R) ..................... ....11
Front Wiper Does Not Operate ........................... ....12
Front Wiper Does Not Return to Stop Position (Af-
ter Front Wiper Operate for 10 Seconds, They
Stop for 20 Seconds, and After Repeating the Op-
eration Five Times, They Become Inoperative) .. ....
14
Only Front Wiper Low Does Not Operate ........... ....15
Only Front Wiper High Does Not Operate ........... ....16
Only Front Wiper Intermittent Does Not Operate .... 17
Front Wiper Intermittent Operation Switch Posi-
tion Cannot Be Adjusted ..................................... ....
18
Wiper Does Not Wipe When Front Washer Oper-
ates ..................................................................... ....
18
Front Wiper Does Not Stop ................................. ....18
Removal and Installation of Front Wiper Arms .... ....18
Adjustment of Wiper Arm Stop Location ............. ....19 Removal and Installation of Front Wiper Drive As-
sembly ................................................................. ....
20
Removal and Installation of Front Washer Nozzle ....20
Inspection for Washer No zzle ..................................21
Washer Nozzle Adjustment ................................. ....22
Washer Tube Layout ........................................... ....22
Removal and Installation of Front Wiper and
Washer Switch ..................................................... ....
23
Inspection of Front Wiper and Washer Switch Cir-
cuit ....................................................................... ....
23
Removal and Installation of Washer Tank ...............23
Removal and Installation of Front Washer Motor .... 24
REAR WIPER AND WASHER SYSTEM .......... 25
Component Parts and Harness Connector Loca-
tion ....................................................................... ....
25
System Description .............................................. ....25
Wiring Diagram - WIP/R - .................................... ....27
Terminal and Reference Value for BCM ..................29
How to Proceed with Trou ble Diagnosis ..................29
Preliminary Check ............................................... ....29
CONSULT-III Function (B CM) .................................29
Rear Wiper Does Not Operate ............................ ....29
Rear Wiper Stop Position Is Incorrect ................. ....30
Only Rear Wiper Does Not Operate .................... ....32
Only Rear Wiper Intermittent Does Not Operate . ....32
Wiper Does Not Wipe When Rear Washer Oper-
ates ...................................................................... ....
32
Removal and Installation ..................................... ....32
Washer Nozzle Adjustment ................................. ....35
POWER SOCKET ............................................. 36
Wiring Diagram - P/SCKT - ................................. ....36
Removal and Installation ..................................... ....36
HORN ................................................................ 38
Wiring Diagram - HORN - .................................... ....38
Removal and Installation ..................................... ....38
Page 4294 of 4331
WW-2< SERVICE INFORMATION >
PRECAUTION
SERVICE INFORMATION
PRECAUTION
Precaution for Supplemental Restraint Syst em (SRS) "AIR BAG" and "SEAT BELT
PRE-TENSIONER" INFOID:0000000004306902
The Supplemental Restraint System such as “A IR BAG” and “SEAT BELT PRE-TENSIONER”, used along
with a front seat belt, helps to reduce the risk or severi ty of injury to the driver and front passenger for certain
types of collision. This system includes seat belt switch inputs and dual stage front air bag modules. The SRS
system uses the seat belt switches to determine the front air bag deployment, and may only deploy one front
air bag, depending on the severity of a collision and w hether the front occupants are belted or unbelted.
Information necessary to service the system safely is included in the SRS and SB section of this Service Man-
ual.
WARNING:
• To avoid rendering the SRS inopera tive, which could increase the risk of personal injury or death in
the event of a collision which would result in air bag inflation, all maintenance must be performed by
an authorized NISS AN/INFINITI dealer.
• Improper maintenance, including in correct removal and installation of the SRS, can lead to personal
injury caused by unintent ional activation of the system. For re moval of Spiral Cable and Air Bag
Module, see the SRS section.
• Do not use electrical test equipmen t on any circuit related to the SRS unless instructed to in this
Service Manual. SRS wiring harn esses can be identified by yellow and/or orange harnesses or har-
ness connectors.
Precaution for Procedure without Cowl Top Cover INFOID:0000000004306903
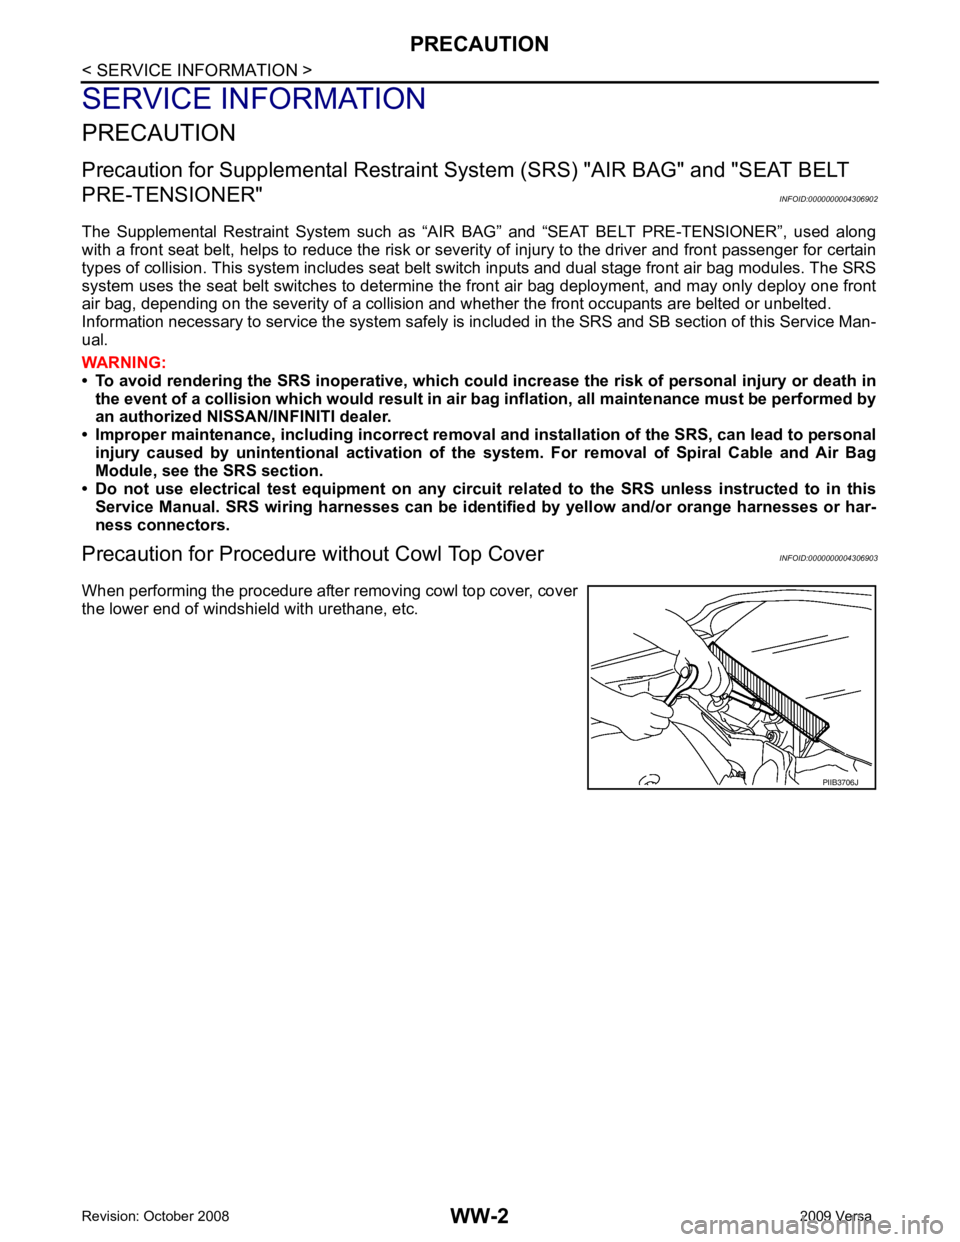
When performing the procedure after removing cowl top cover, cover
the lower end of windshield with urethane, etc. PIIB3706J
Page 4295 of 4331
WW
N
O P
FRONT WIPER AND WASHER SYSTEM
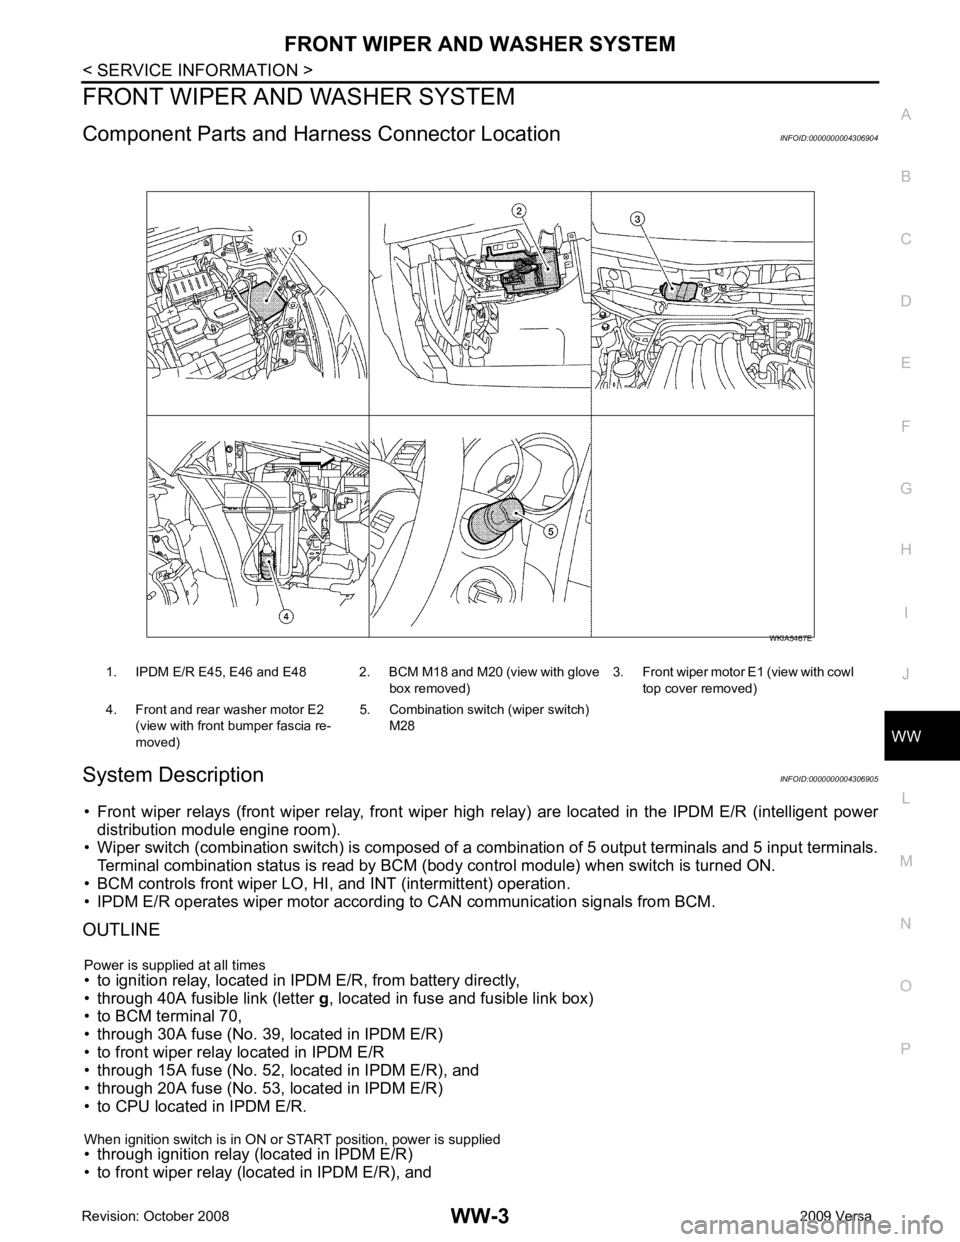
Component Parts and Har ness Connector Location INFOID:0000000004306904
System Description INFOID:0000000004306905
• Front wiper relays (front wiper relay, front wiper hi gh relay) are located in the IPDM E/R (intelligent power
distribution module engine room).
• Wiper switch (combination switch) is composed of a combination of 5 output terminals and 5 input terminals.
Terminal combination status is read by BCM (body control module) when switch is turned ON.
• BCM controls front wiper LO, HI, and INT (intermittent) operation.
• IPDM E/R operates wiper motor accordi ng to CAN communication signals from BCM.
OUTLINE
Power is supplied at all times
• to ignition relay, located in IPDM E/R, from battery directly,
• through 40A fusible link (letter g, located in fuse and fusible link box)
• to BCM terminal 70,
• through 30A fuse (No. 39, located in IPDM E/R)
• to front wiper relay located in IPDM E/R
• through 15A fuse (No. 52, located in IPDM E/R), and
• through 20A fuse (No. 53, located in IPDM E/R)
• to CPU located in IPDM E/R.
When ignition switch is in ON or START position, power is supplied
• through ignition relay (located in IPDM E/R)
• to front wiper relay (located in IPDM E/R), and 1. IPDM E/R E45, E46 and E48 2. BCM M18 and M20 (view with glove
box removed)3. Front wiper motor E1
(view with cowl
top cover removed)
4. Front and rear washer motor E2 (view with front bumper fascia re-
moved) 5. Combination switch (wiper switch)
M28
Page 4296 of 4331

Page 4297 of 4331
WW
N
O P
AUTO STOP OPERATION
With wiper switch turned OFF, wiper motor will cont inue to operate until wiper arms reach windshield base.
When the wiper arms are not located at base of wi ndshield with wiper switch OFF, ground is supplied
• from IPDM E/R terminal 33
• to front wiper motor terminal 3, in order to continue wiper motor operation at low speed.
When the wiper arms reach base of windshield, fr ont wiper motor terminals 4 and 2 are connected, and
ground is supplied
• to IPDM E/R terminal 38
• through front wiper motor terminals 4 and 2, and
• through grounds E15 and E24.
Then the IPDM E/R sends auto stop operation signal to BCM with CAN communication line.
When the BCM receives auto-stop operation signal, BCM sends wiper stop signal to IPDM E/R with CAN com-
munication line.
IPDM E/R stops wiper motor. Wiper motor wi ll then stop wiper arms at the STOP position.
WASHER OPERATION When the wiper switch is in front wiper washer positi on, BCM detect front wiper washer signal by BCM combi-
nation switch reading function. Refer to BCS-3, " System Description " .
Combination switch power is supplied
• through combination switch terminal 14
• to washer motor terminal 1.
Ground is supplied
• to front washer motor terminal 2
• through combination switch terminal 11, and
• through combination switch terminal 12
• through grounds M57 and M61.
With ground supplied, front washer motor is operated.
When the BCM detects that front washer motor has operated for 0.4 seconds or longer, BCM operates front
wiper motor for low speed.
When the BCM detects washer switch is OFF, low speed operation cycles approximately 2 times and stops.
MIST OPERATION When the wiper switch is turned to the mist positi on, wiper low speed operation cycles once and then stops.
For additional information about wiper operation under th is condition, refer to "LOW SPEED WIPER OPERA-
TION" .
If switch is held in mist posit ion, low speed operation continues.
FAIL-SAFE FUNCTION If an abnormality occurs in CAN communications, IPDM E/ R holds the condition just before fail-safe status is
initiated until ignition switch is turned OFF. (If wipers we re operating in LO just before the initiation of fail-safe
status, they continue to operate in LO until ignition switch is turned OFF.)
COMBINATION SWITCH READING FUNCTION Refer to BCS-3, " System Description " .
CAN Communication System Description INFOID:0000000004306906
Refer to LAN-8, " System Description " .
Page 4298 of 4331
Page 4299 of 4331
WW
N
O P
Wiring Diagram - WIPER -
INFOID:0000000004306908
Page 4300 of 4331
B