NISSAN TIIDA 2009 Service Repair Manual
TIIDA 2009
NISSAN
NISSAN
https://www.carmanualsonline.info/img/5/57398/w960_57398-0.png
NISSAN TIIDA 2009 Service Repair Manual
Trending: Battery type, transmission oil, weight, brake fluid, oil capacity, Tools location, p2135
Page 4321 of 4331
WW
N
O P
Terminal and Reference Value for BCM
INFOID:0000000004306937
Refer to BCS-11, " Terminal and Reference Value for BCM " .
How to Proceed with Trouble Diagnosis INFOID:0000000004306938
1. Confirm the symptoms and customer complaint.
2. Understand operation description and function description. Refer to WW-25, " System Description " .
3. Perform the Preliminary Check. Refer to WW-29, " Preliminary Check " .
4. Check symptom and repair or replace the cause of malfunction.
5. Does the rear wiper operate normally? If YES: GO TO 6. If NO: GO TO 4.
6. Inspection End.
Preliminary Check INFOID:0000000004306939
CHECK POWER SUPPLY AND GROUND CIRCUIT FOR BCM Refer to BCS-15, " BCM Power Supply and Ground Circuit Inspection " .
CONSULT-III Function (BCM) INFOID:0000000004306940
Refer to WW-10, " CONSULT-III Function (BCM) " .
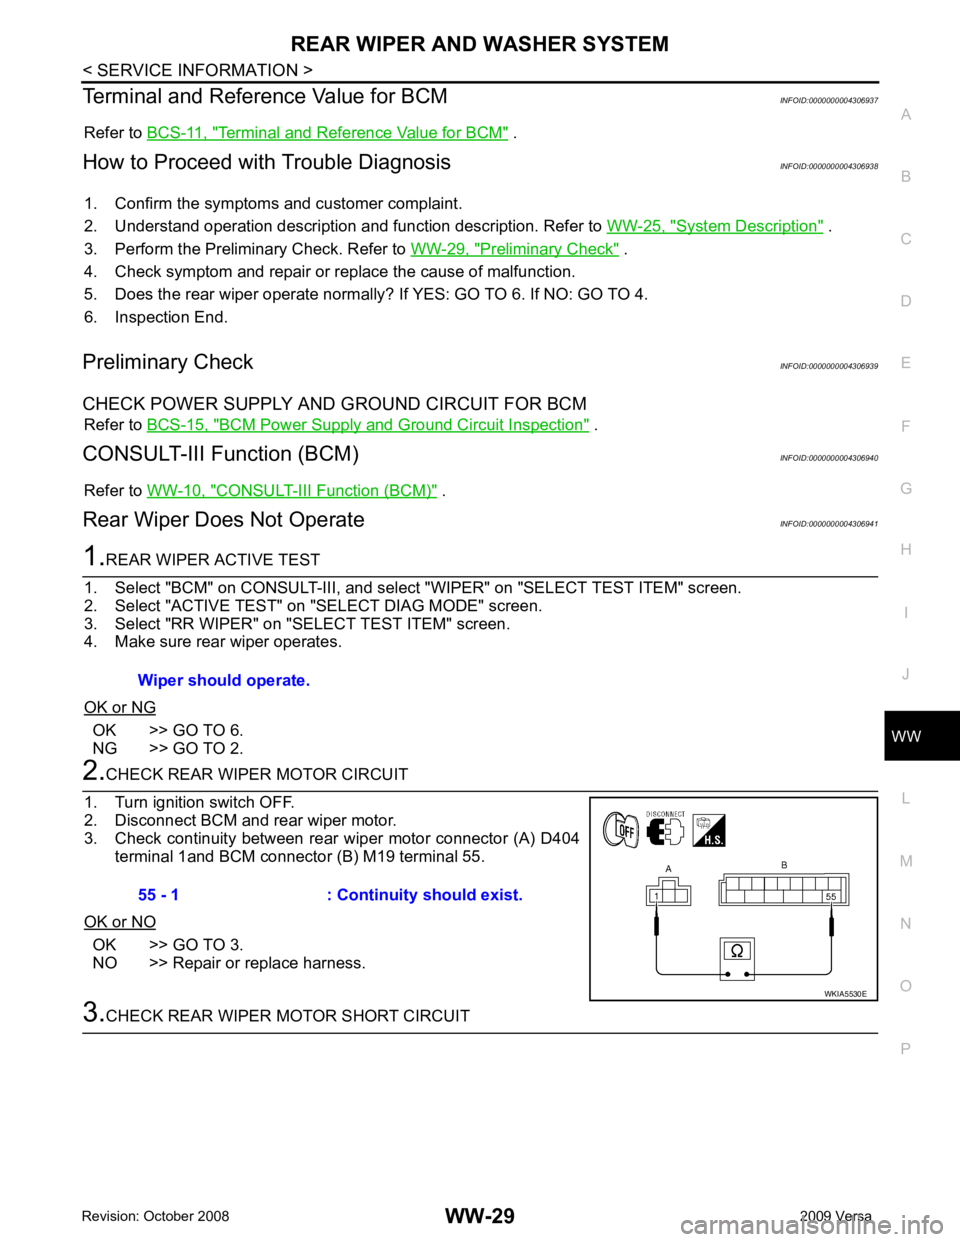
Rear Wiper Does Not Operate INFOID:0000000004306941OK >> GO TO 6.
NG >> GO TO 2. OK >> GO TO 3.
NO >> Repair or replace harness.
Page 4322 of 4331
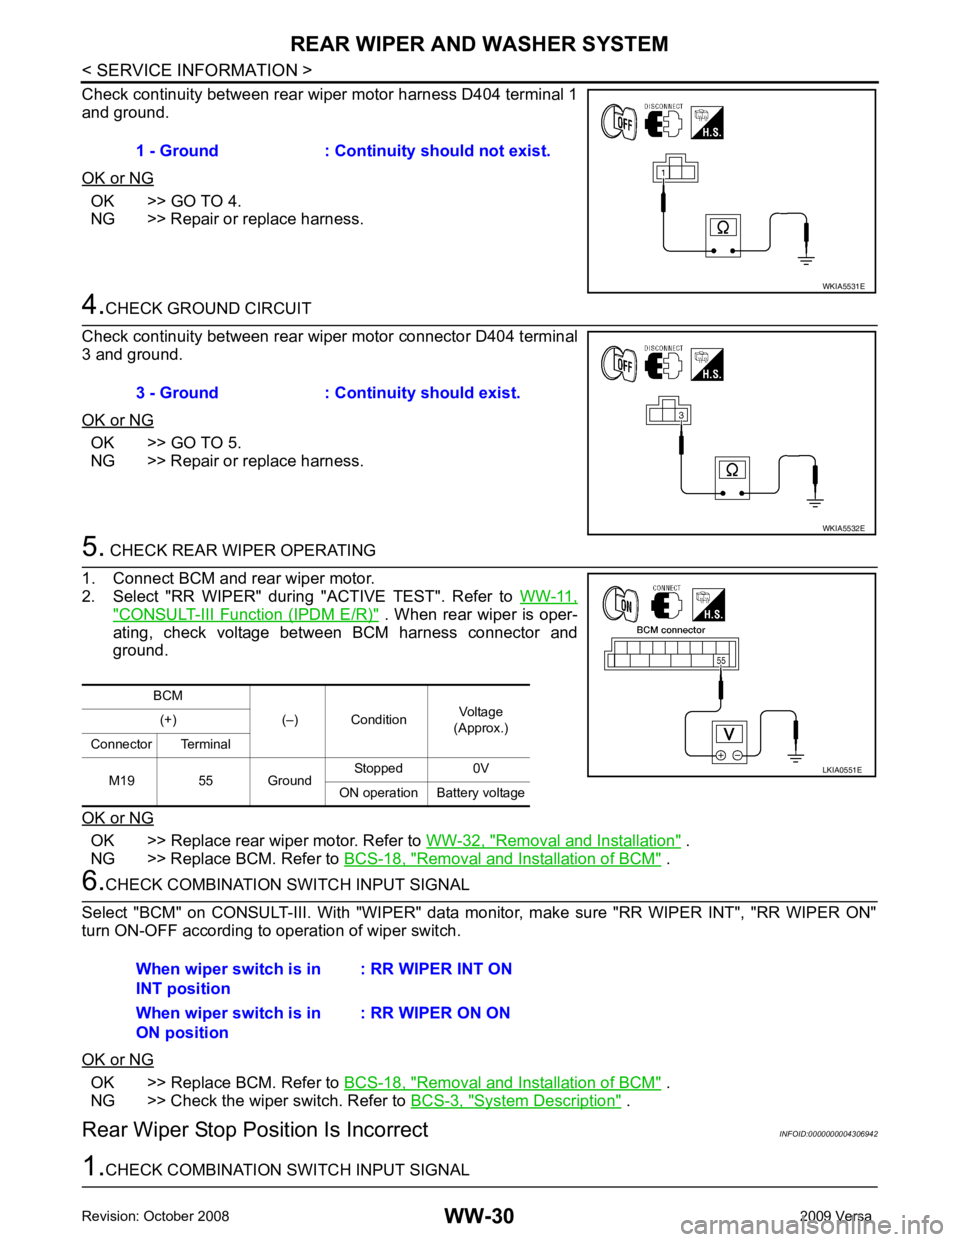
OK >> GO TO 4.
NG >> Repair or replace harness. OK >> GO TO 5.
NG >> Repair or replace harness. " CONSULT-III Function (IPDM E/R) " . When rear wiper is oper-
ating, check voltage between BCM harness connector and
ground.
OK or NG OK >> Replace rear wiper motor. Refer to
WW-32, " Removal and Installation " .
NG >> Replace BCM. Refer to BCS-18, " Removal and Installation of BCM " .
OK >> Replace BCM. Refer to
BCS-18, " Removal and Installation of BCM " .
NG >> Check the wiper switch. Refer to BCS-3, " System Description " .
Rear Wiper Stop Position Is Incorrect INFOID:0000000004306942
Page 4323 of 4331
WW
N
O P
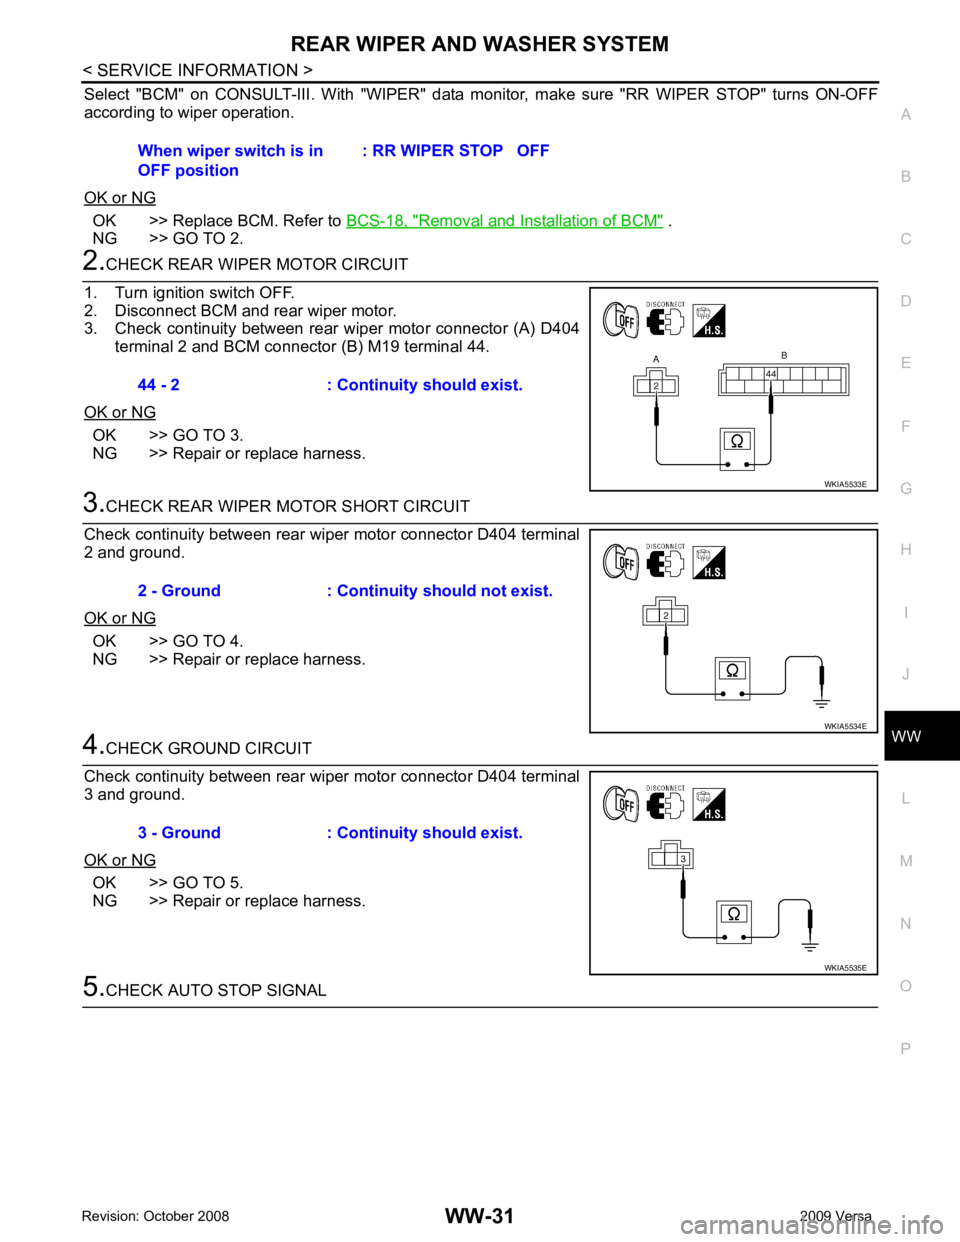
Select "BCM" on CONSULT-III. With "WIPER" data m
onitor, make sure "RR WIPER STOP" turns ON-OFF
according to wiper operation.
OK or NG OK >> Replace BCM. Refer to
BCS-18, " Removal and Installation of BCM " .
NG >> GO TO 2. OK >> GO TO 3.
NG >> Repair or replace harness. OK >> GO TO 4.
NG >> Repair or replace harness. OK >> GO TO 5.
NG >> Repair or replace harness.
Page 4324 of 4331
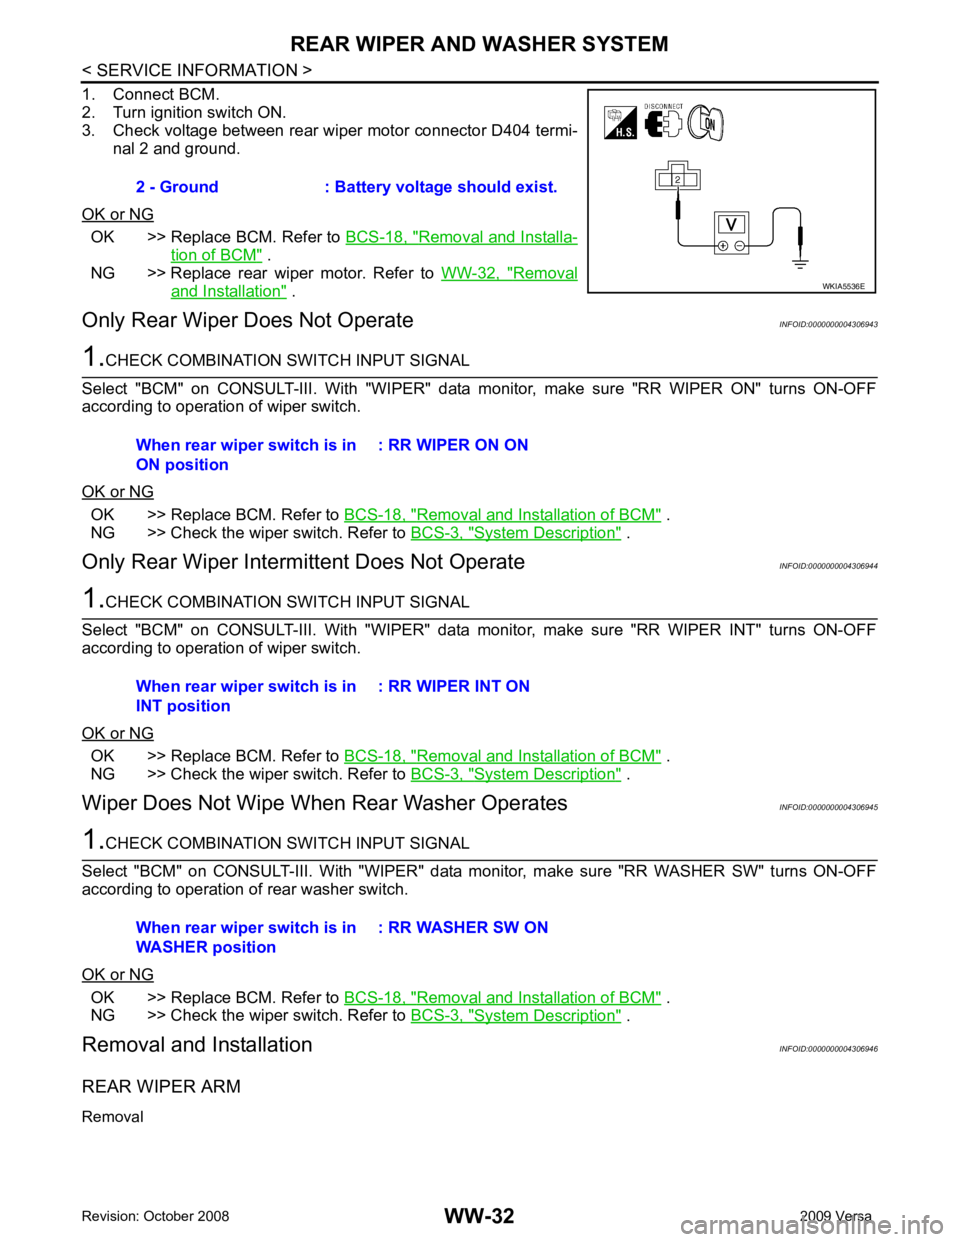
OK >> Replace BCM. Refer to
BCS-18, " Removal and Installa-
tion of BCM " .
NG >> Replace rear wiper motor. Refer to WW-32, " Removal
and Installation " .
Only Rear Wiper Does Not Operate INFOID:0000000004306943OK >> Replace BCM. Refer to
BCS-18, " Removal and Installation of BCM " .
NG >> Check the wiper switch. Refer to BCS-3, " System Description " .
Only Rear Wiper Intermi ttent Does Not Operate INFOID:0000000004306944OK >> Replace BCM. Refer to
BCS-18, " Removal and Installation of BCM " .
NG >> Check the wiper switch. Refer to BCS-3, " System Description " .
Wiper Does Not Wipe When Rear Washer Operates INFOID:0000000004306945OK >> Replace BCM. Refer to
BCS-18, " Removal and Installation of BCM " .
NG >> Check the wiper switch. Refer to BCS-3, " System Description " .
Removal and Installation INFOID:0000000004306946
REAR WIPER ARM
Removal 2 - Ground : Battery voltage should exist.
Page 4325 of 4331
WW
N
O P
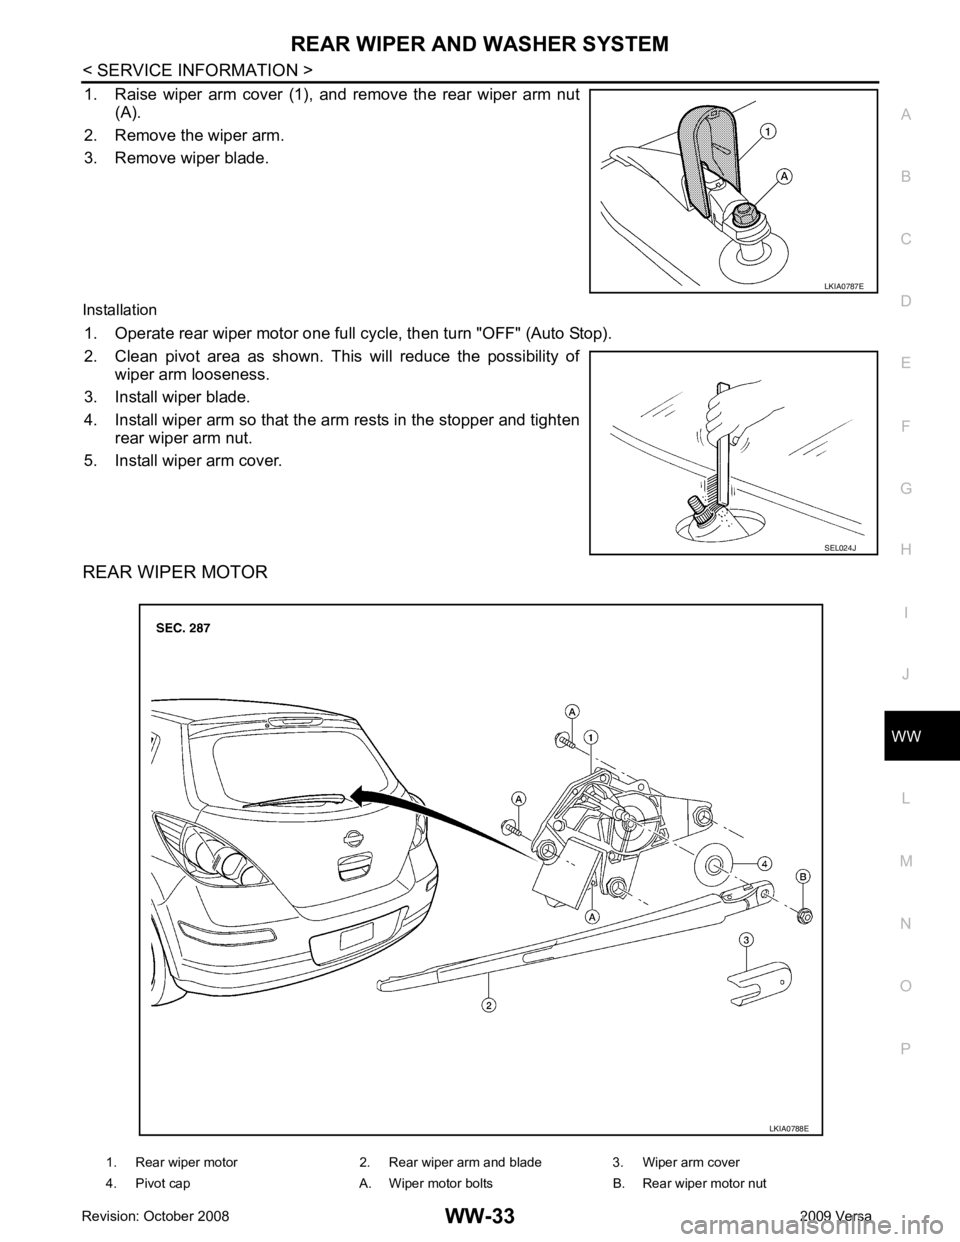
1. Raise wiper arm cover (1), and remove the rear wiper arm nut
(A).
2. Remove the wiper arm.
3. Remove wiper blade.
Installation 1. Operate rear wiper motor one full c ycle, then turn "OFF" (Auto Stop).
2. Clean pivot area as shown. This will reduce the possibility of wiper arm looseness.
3. Install wiper blade.
4. Install wiper arm so that the arm rests in the stopper and tighten rear wiper arm nut.
5. Install wiper arm cover.
REAR WIPER MOTOR SEL024J
Page 4326 of 4331
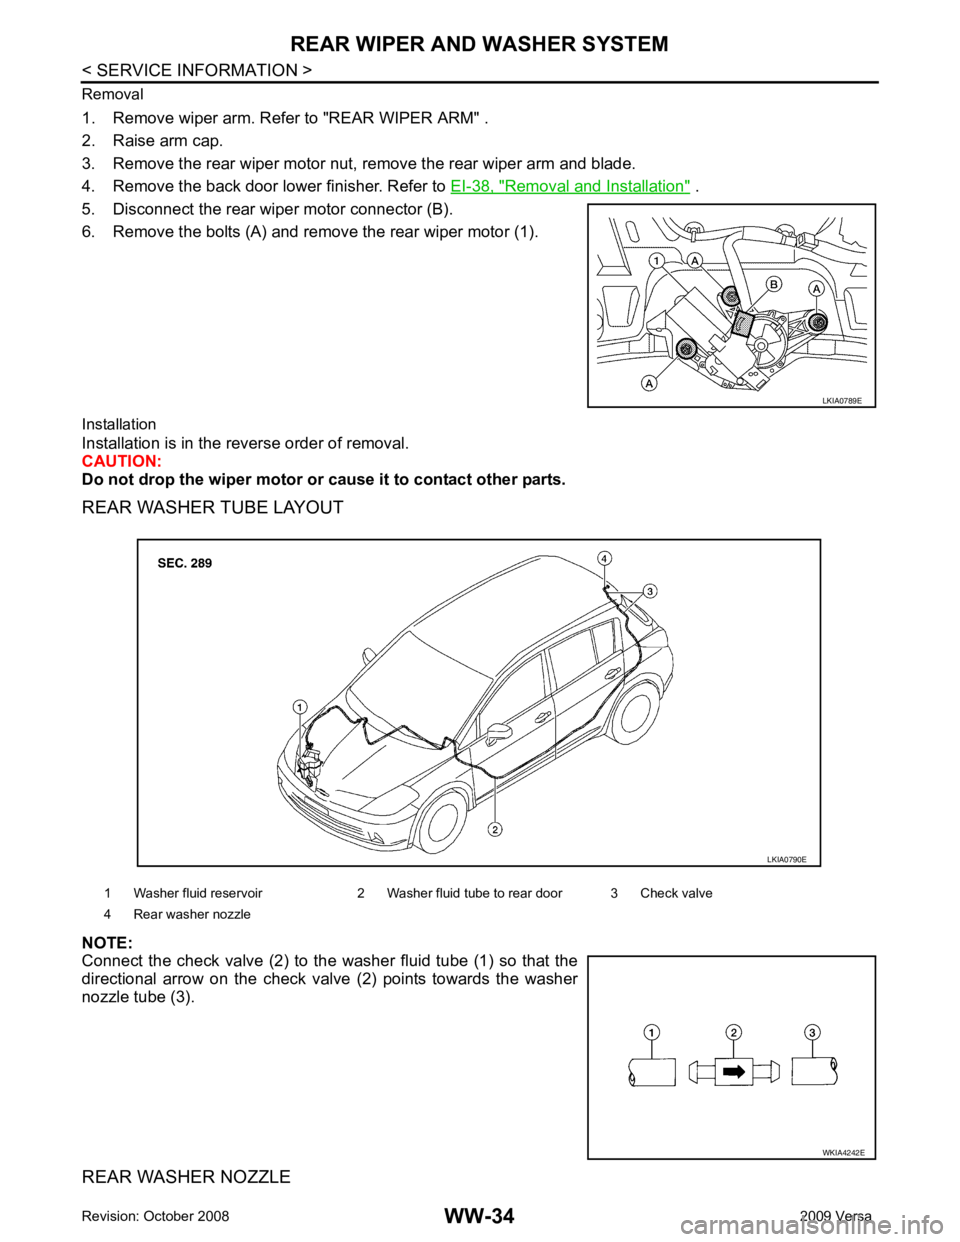
Removal and Installation " .
5. Disconnect the rear wiper motor connector (B).
6. Remove the bolts (A) and remove the rear wiper motor (1).
Installation
Installation is in the reverse order of removal.
CAUTION:
Do not drop the wiper motor or cause it to contact other parts.
REAR WASHER TUBE LAYOUT
NOTE:
Connect the check valve (2) to the washer fluid tube (1) so that the
directional arrow on the check valve (2) points towards the washer
nozzle tube (3).
REAR WASHER NOZZLE WKIA4242E
Page 4327 of 4331
WW
N
O P
Removal
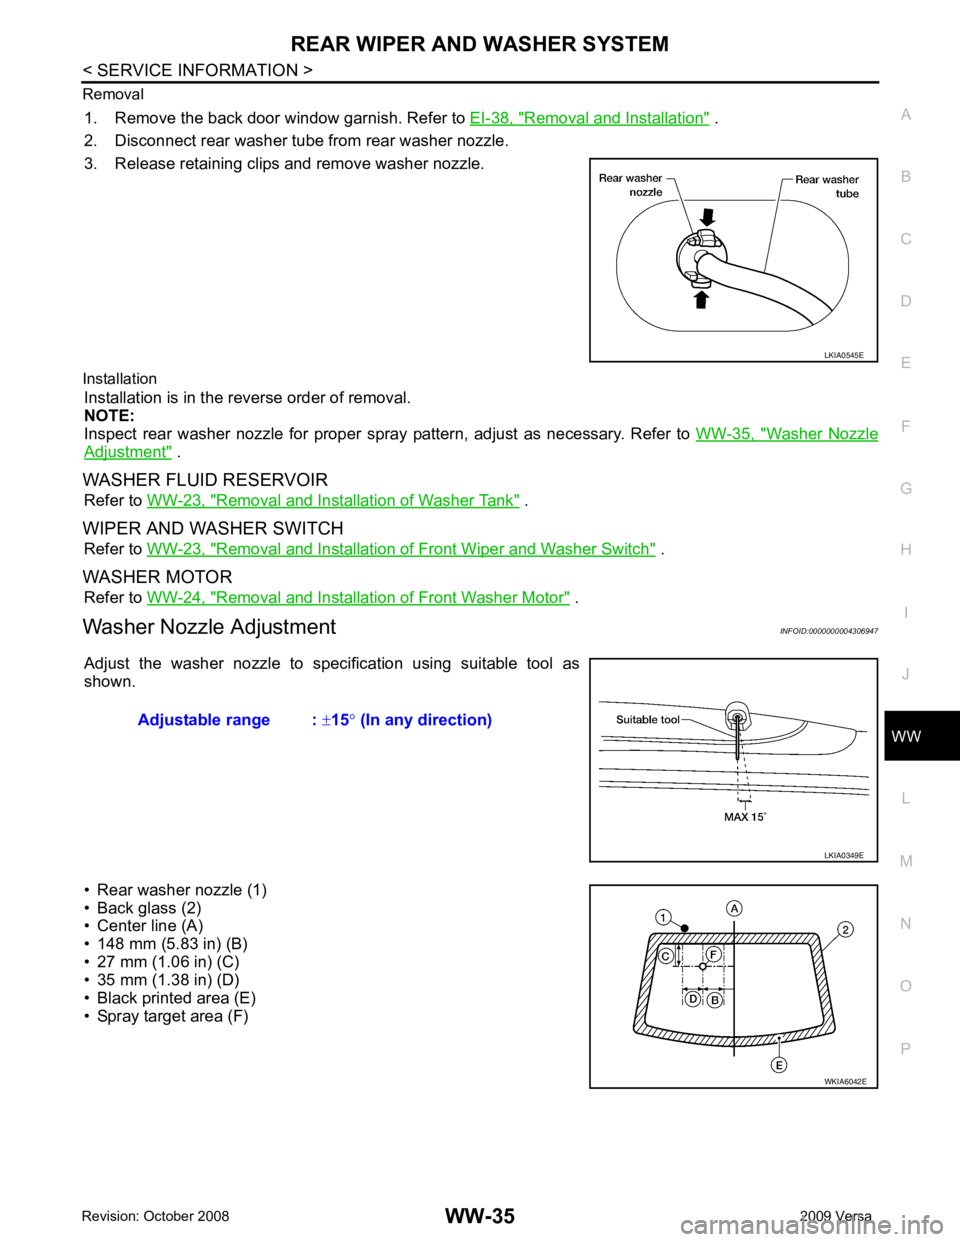
1. Remove the back door window garnish. Refer to EI-38, " Removal and Installation " .
2. Disconnect rear washer tube from rear washer nozzle.
3. Release retaining clips and remove washer nozzle.
Installation Installation is in the reverse order of removal.
NOTE:
Inspect rear washer nozzle for proper spray pattern, adjust as necessary. Refer to WW-35, " Washer Nozzle
Adjustment " .
WASHER FLUID RESERVOIR Refer to WW-23, " Removal and Installation of Washer Tank " .
WIPER AND WASHER SWITCH Refer to WW-23, " Removal and Installation of Front Wiper and Washer Switch " .
WASHER MOTOR Refer to WW-24, " Removal and Installation of Front Washer Motor " .
Washer Nozzle Adjustment INFOID:0000000004306947
Adjust the washer nozzle to specification using suitable tool as
shown.
• Rear washer nozzle (1)
• Back glass (2)
• Center line (A)
• 148 mm (5.83 in) (B)
• 27 mm (1.06 in) (C)
• 35 mm (1.38 in) (D)
• Black printed area (E)
• Spray target area (F) WKIA6042E
Page 4328 of 4331
Page 4329 of 4331
WW
N
O P
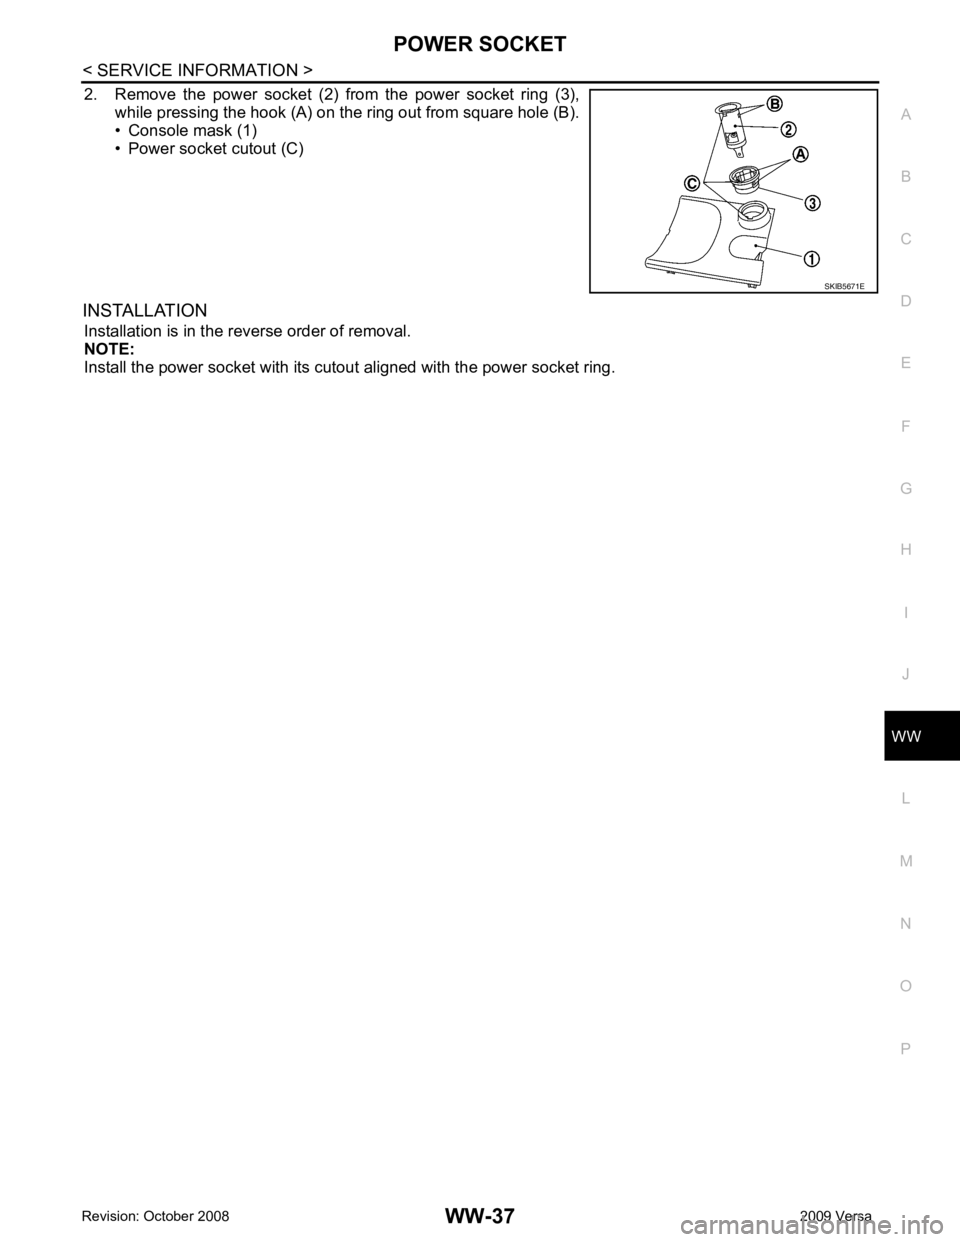
2. Remove the power socket (2) from the power socket ring (3),
while pressing the hook (A) on the ring out from square hole (B).
• Console mask (1)
• Power socket cutout (C)
INSTALLATION Installation is in the reverse order of removal.
NOTE:
Install the power socket with its cutout aligned with the power socket ring.
Page 4330 of 4331
Removal and Installation " . B
Trending: child lock, warning lights, Electric motor, radiator, octane, Luggage room Light, exterior
