front axle NISSAN TIIDA 2011 Service Owner's Manual
[x] Cancel search | Manufacturer: NISSAN, Model Year: 2011, Model line: TIIDA, Model: NISSAN TIIDA 2011Pages: 3787, PDF Size: 78.35 MB
Page 2432 of 3787
EM-42
< ON-VEHICLE REPAIR >[HR16DE]
OIL PAN (UPPER) AND OIL STRAINER
OIL PAN (UPPER) AND OIL STRAINER
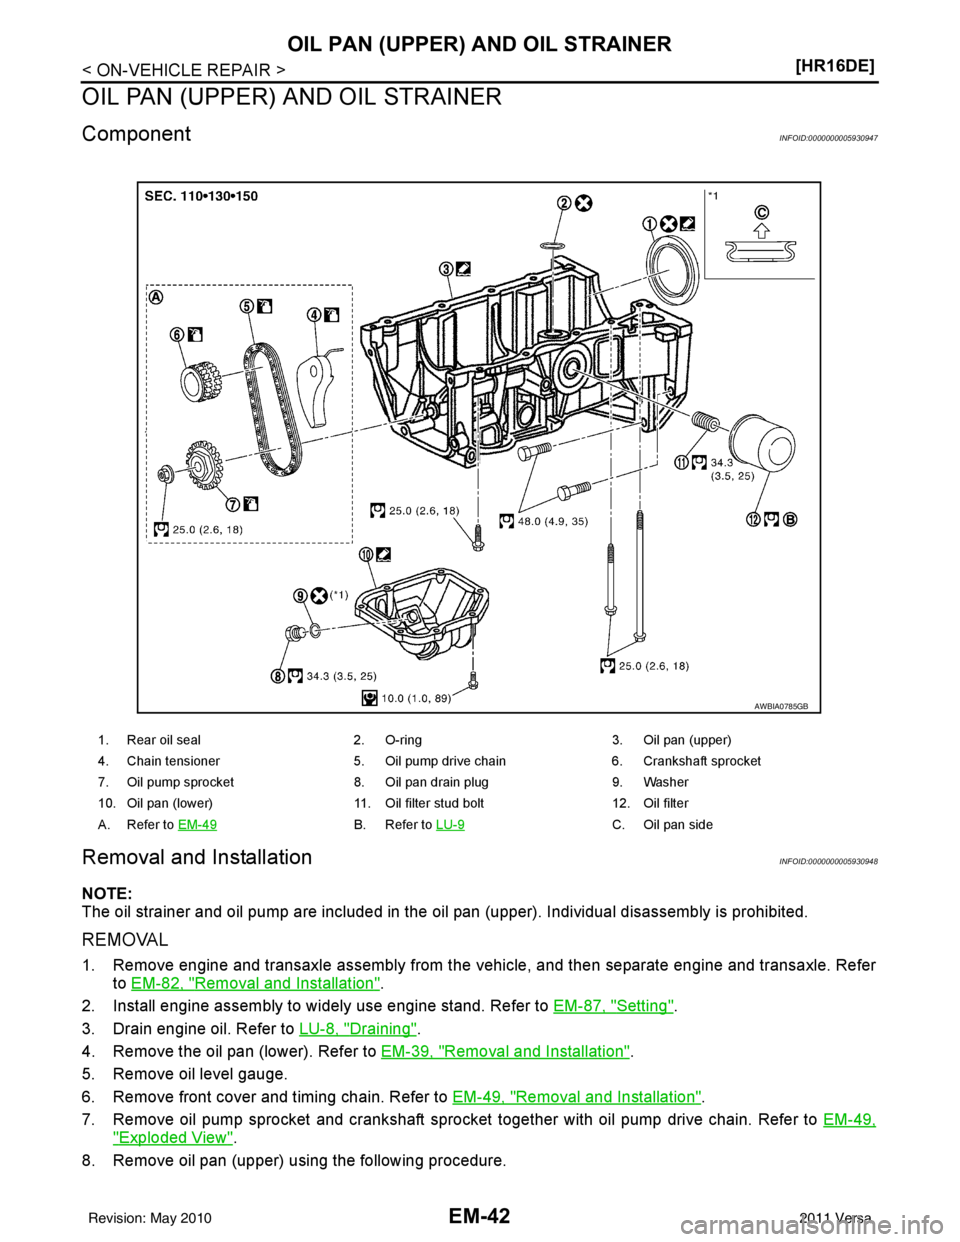
ComponentINFOID:0000000005930947
Removal and InstallationINFOID:0000000005930948
NOTE:
The oil strainer and oil pump are included in the oil pan (upper). Individual disassembly is prohibited.
REMOVAL
1. Remove engine and transaxle assembly from the vehicle, and then separate engine and transaxle. Refer
to EM-82, "
Removal and Installation".
2. Install engine assembly to widely use engine stand. Refer to EM-87, "
Setting".
3. Drain engine oil. Refer to LU-8, "
Draining".
4. Remove the oil pan (lower). Refer to EM-39, "
Removal and Installation".
5. Remove oil level gauge.
6. Remove front cover and timing chain. Refer to EM-49, "
Removal and Installation".
7. Remove oil pump sprocket and crankshaft sprocket together with oil pump drive chain. Refer to EM-49,
"Exploded View".
8. Remove oil pan (upper) using the following procedure.
1. Rear oil seal 2. O-ring 3. Oil pan (upper)
4. Chain tensioner 5. Oil pump drive chain 6. Crankshaft sprocket
7. Oil pump sprocket 8. Oil pan drain plug 9. Washer
10. Oil pan (lower) 11. Oil filter stud bolt 12. Oil filter
A. Refer to EM-49
B. Refer to LU-9C. Oil pan side
AWBIA0785GB
Revision: May 2010 2011 Versa
Page 2435 of 3787
OIL PAN (UPPER) AND OIL STRAINEREM-45
< ON-VEHICLE REPAIR > [HR16DE]
C
D
E
F
G H
I
J
K L
M A
EM
NP
O
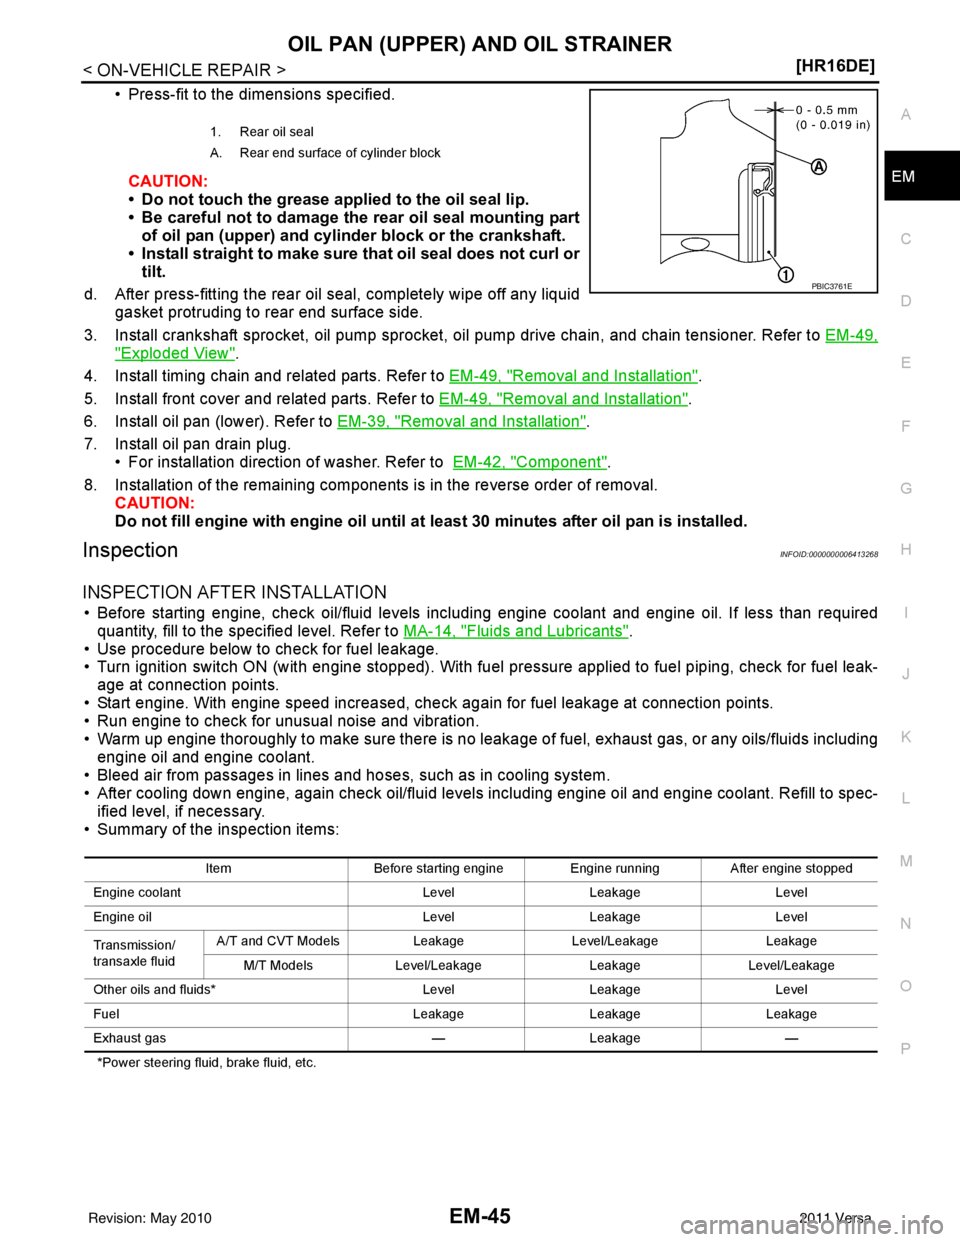
• Press-fit to the dimensions specified.
CAUTION:
• Do not touch the grease applied to the oil seal lip.
• Be careful not to damage the rear oil seal mounting partof oil pan (upper) and cylinder block or the crankshaft.
• Install straight to make sure that oil seal does not curl or tilt.
d. After press-fitting the rear oil seal, completely wipe off any liquid gasket protruding to rear end surface side.
3. Install crankshaft sprocket, oil pump sprocket, oi l pump drive chain, and chain tensioner. Refer to EM-49,
"Exploded View".
4. Install timing chain and related parts. Refer to EM-49, "
Removal and Installation".
5. Install front cover and related parts. Refer to EM-49, "
Removal and Installation".
6. Install oil pan (lower). Refer to EM-39, "
Removal and Installation".
7. Install oil pan drain plug. • For installation direction of washer. Refer to EM-42, "
Component".
8. Installation of the remaining components is in the reverse order of removal. CAUTION:
Do not fill engine with engi ne oil until at least 30 minutes after oil pan is installed.
InspectionINFOID:0000000006413268
INSPECTION AFTER INSTALLATION
• Before starting engine, check oil/fluid levels incl uding engine coolant and engine oil. If less than required
quantity, fill to the specified level. Refer to MA-14, "
Fluids and Lubricants".
• Use procedure below to check for fuel leakage.
• Turn ignition switch ON (with engine stopped). With fuel pressure applied to fuel piping, check for fuel leak-
age at connection points.
• Start engine. With engine speed increased, check again for fuel leakage at connection points.
• Run engine to check for unusual noise and vibration.
• Warm up engine thoroughly to make sure there is no leak age of fuel, exhaust gas, or any oils/fluids including
engine oil and engine coolant.
• Bleed air from passages in lines and hoses, such as in cooling system.
• After cooling down engine, again check oil/fluid levels including engine oil and engine coolant. Refill to spec- ified level, if necessary.
• Summary of the inspection items:
*Power steering fluid, brake fluid, etc. 1. Rear oil seal
A. Rear end surface of cylinder block
PBIC3761E
Item
Before starting engine Engine runningAfter engine stopped
Engine coolant LevelLeakage Level
Engine oil LevelLeakage Level
Transmission/
transaxle fluid A/T and CVT Models
LeakageLevel/Leakage Leakage
M/T Models Level/Leakage LeakageLevel/Leakage
Other oils and fluids* LevelLeakage Level
Fuel LeakageLeakageLeakage
Exhaust gas —Leakage —
Revision: May 2010 2011 Versa
Page 2461 of 3787
OIL SEALEM-71
< ON-VEHICLE REPAIR > [HR16DE]
C
D
E
F
G H
I
J
K L
M A
EM
NP
O
FRONT OIL SEAL : Removal and InstallationINFOID:0000000005930958
REMOVAL
1. Remove the following parts:
• Front wheel and tire (RH). Refer to WT-7, "
Adjustment".
• Front fender protector (RH): Refer to EI-26, "
Removal and Installation".
• Drive belt: Refer to EM-14, "
Removal and Installation".
• Crankshaft pulley: Refer to EM-49, "
Exploded View".
2. Remove front oil seal using a suitable tool. CAUTION:
Be careful not to damage fron t timing chain case and crankshaft.
INSTALLATION
1. Apply new engine oil to both oil seal lip and dust seal lip of new front oil seal.
2. Install front oil seal.
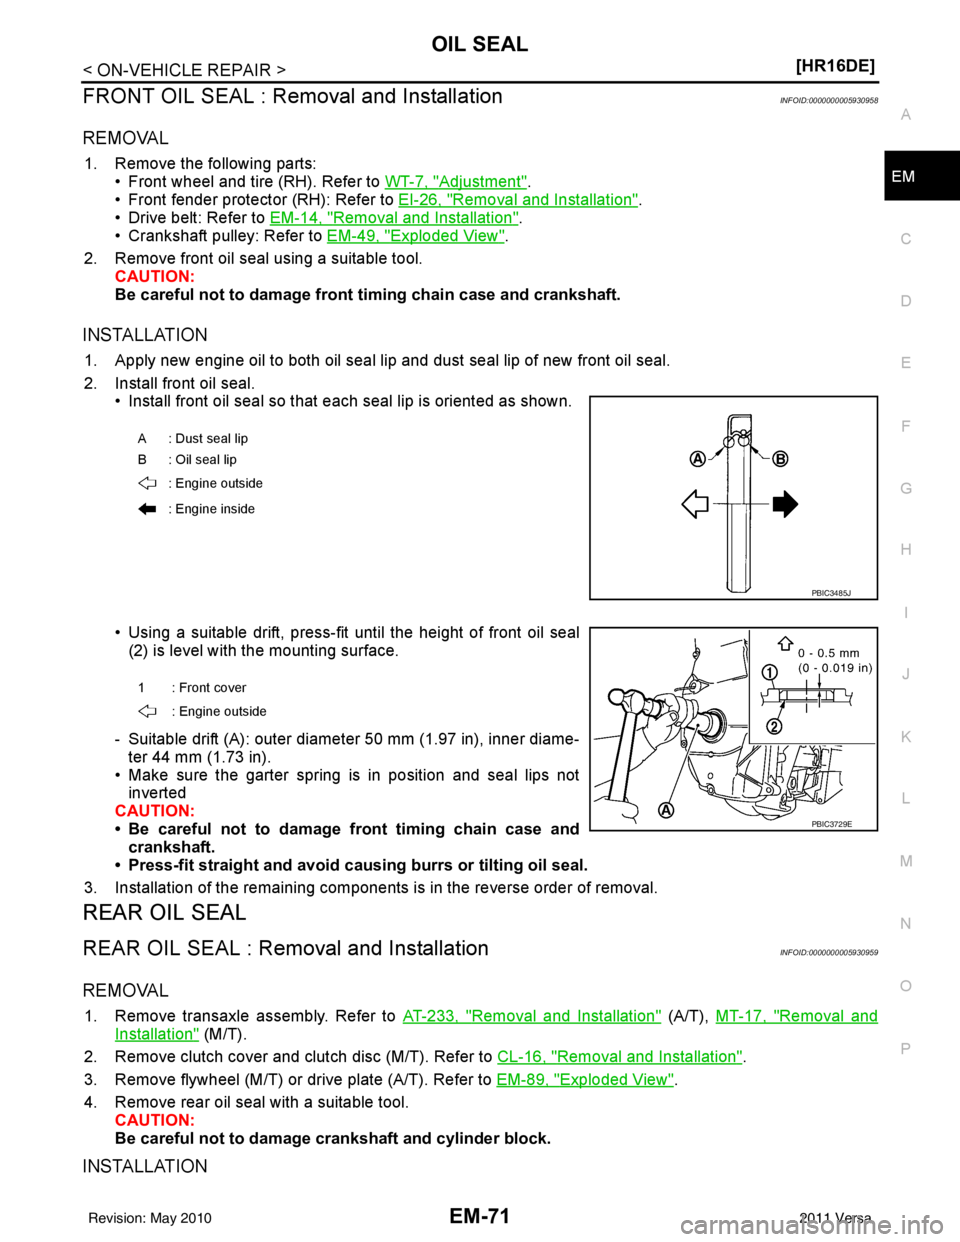
• Install front oil seal so that each seal lip is oriented as shown.
• Using a suitable drift, press-fit until the height of front oil seal
(2) is level with the mounting surface.
- Suitable drift (A): outer diameter 50 mm (1.97 in), inner diame- ter 44 mm (1.73 in).
• Make sure the garter spring is in position and seal lips not inverted
CAUTION:
• Be careful not to damage front timing chain case and
crankshaft.
• Press-fit straight and avoid cau sing burrs or tilting oil seal.
3. Installation of the remaining components is in the reverse order of removal.
REAR OIL SEAL
REAR OIL SEAL : Removal and InstallationINFOID:0000000005930959
REMOVAL
1. Remove transaxle assembly. Refer to AT-233, "Removal and Installation" (A/T), MT-17, "Removal and
Installation" (M/T).
2. Remove clutch cover and clutch disc (M/T). Refer to CL-16, "
Removal and Installation".
3. Remove flywheel (M/T) or drive plate (A/T). Refer to EM-89, "
Exploded View".
4. Remove rear oil seal with a suitable tool. CAUTION:
Be careful not to damage crankshaft and cylinder block.
INSTALLATION
A : Dust seal lip
B : Oil seal lip
: Engine outside
: Engine inside
PBIC3485J
1: Front cover : Engine outside
PBIC3729E
Revision: May 2010 2011 Versa
Page 2473 of 3787
ENGINE ASSEMBLYEM-83
< REMOVAL AND INSTALLATION > [HR16DE]
C
D
E
F
G H
I
J
K L
M A
EM
NP
O
• If items or work required are not covered by the engine section, follow the procedures in the applica-
ble sections.
• Always use the support poin t specified for lifting.
• Use either 2-pole lift type or separate type lift as best you can. If board-on type is used for unavoid-
able reasons, support at the rear axle jacking point with a transmission jack or similar tool before
starting work, in preparation for the backward shif t of center of gravity.
• For supporting points fo r lifting and jacking point at rear axle, refer to GI-38, "
Garage Jack and
Safety Stand and 2-Pole Lift".
REMOVAL
Outline
Remove the engine and the transaxle assembly from t he vehicle downward. Separate the engine and the tran-
saxle.
Preparation
1. Remove the hood assembly. Refer to BL-14, "Removal and Installation".
2. Remove the cowl top cover and cowl top extension assembly. Refer to EI-24, "
Removal and Installation".
3. Release fuel pressure. Refer to EC-499, "
Inspection".
4. Drain engine coolant from radiator. Refer to CO-11, "
Changing Engine Coolant".
CAUTION:
• Perform this step when the engine is cold.
• Never spill engine coolant on drive belt.
5. Remove the following parts. • Engine under cover. Refer to EI-15, "
Removal and Installation".
• Front road wheels and tires. Refer to WT-7, "
Adjustment".
• Front fender protector (RH and LH). Refer to EI-26, "
Removal and Installation".
• Battery and battery tray. Refer to SC-7, "
Removal and Installation".
• Drive belt. Refer to EM-14, "
Removal and Installation".
• Air duct and air cleaner case assembly. Refer to EM-25, "
Exploded View".
• Radiator hose (upper and lower). Refer to CO-16, "
Component".
• Disconnect cooling fan controller wiring harness.
• Remove coolant reservoir tank.
• Remove fan shroud and cooling fan assembly. Refer to CO-18, "
Component (Models with A/C)" or CO-
18, "Component (Models without A/C)".
Engine Room LH
1. Disconnect all connections of engine harness around the engine mounting insulator (LH), and then tem-
porarily secure the engine harness into the engine side.
CAUTION:
Protect connectors using a resin bag against foreign materials.
2. Remove ground cable at transaxle side.
3. Disconnect fuel feed hose at engine side. Refer to EM-33, "
Exploded View".
4. Disconnect EVAP purge hose and brake booster vacuum hose.
5. Disconnect heater hoses, and install plugs them to prevent engine coolant from draining. Refer to CO-16,
"Component".
6. Disconnect control linkage from transaxle. Refer to AT-213, "
A/T Shift Selector Removal and Installation"
(A/T), MT-14, "Exploded View" (M/T).
7. Disconnect the clutch tube at tr ansmission side (if equipped). Refer to CL-15, "
Removal and Installation".
Engine Room RH
1. Remove ground cable between front cover and vehicle.
2. Remove generator and generator br acket (A/C models). Refer to SC-25, "
Removal and Installation".
3. Remove A/C compressor with piping connected from t he engine. Temporarily secure it on the vehicle side
with a rope to avoid putting load on it (if equipped). Refer to MTC-78, "
Removal and Installation of Com-
pressor - HR16DE".
Vehicle Underbody
1. Remove front wheel sensor (LH and RH) for ABS from steering knuckle (if equipped). Refer to BRC-33,
"Removal and Installation" (ABS) or BRC-86, "Removal and Installation" (VDC/TCS/ABS).
Revision: May 2010 2011 Versa
Page 2474 of 3787
EM-84
< REMOVAL AND INSTALLATION >[HR16DE]
ENGINE ASSEMBLY
2. Remove brake caliper assembly with piping connected fr
om steering knuckle. Temporarily secure it on the
vehicle side with a rope to avoid load on it. Refer to BR-25, "
Component".
3. Remove drive shafts (LH and RH) from steering knuckle. Refer to FA X - 9 , "
Removal and Installation (Left
Side)" and FAX-10, "Removal and Installation (Right Side)".
4. Remove exhaust front tube. Refer to EX-5, "
Component".
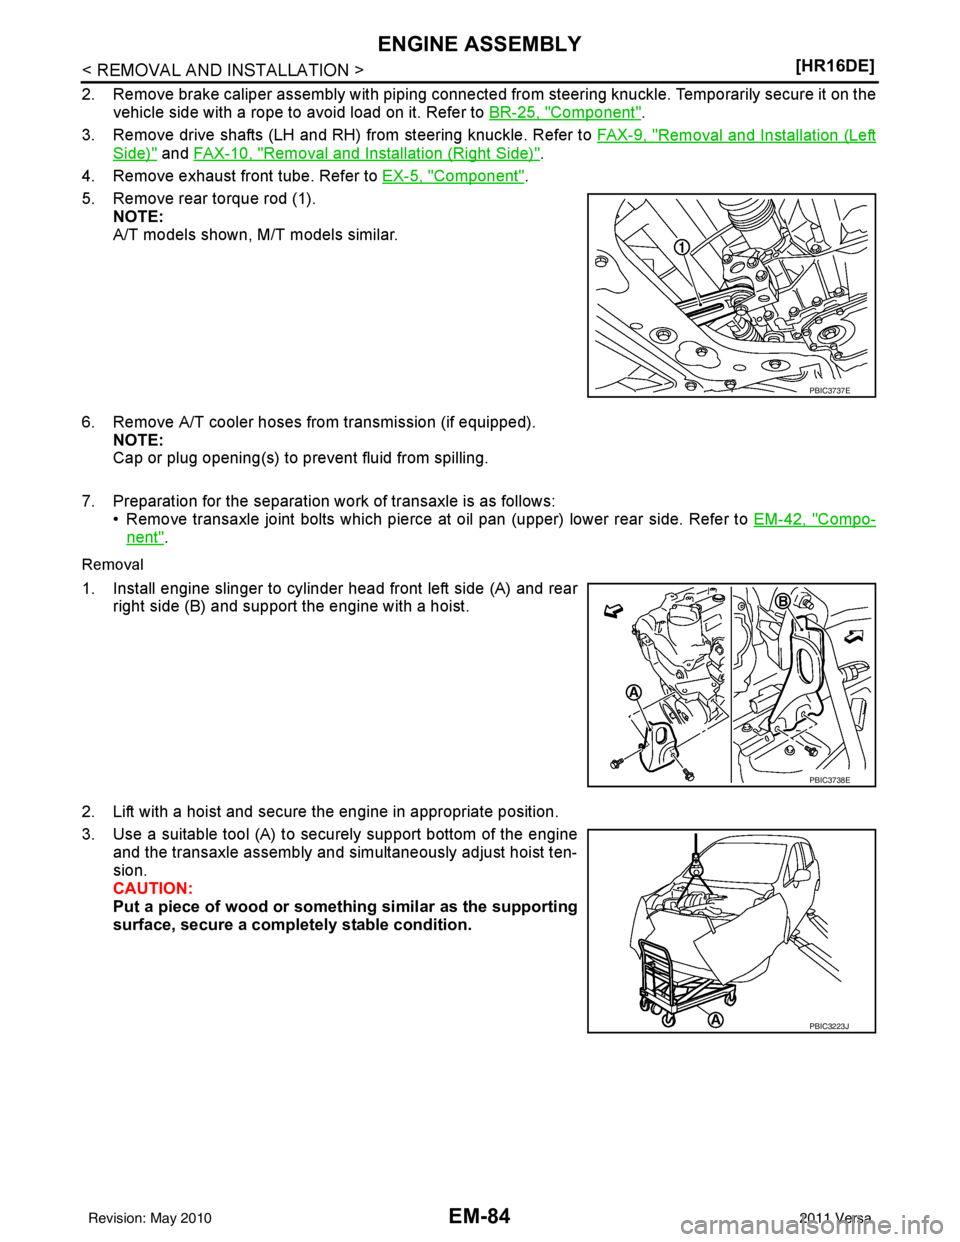
5. Remove rear torque rod (1). NOTE:
A/T models shown, M/T models similar.
6. Remove A/T cooler hoses from transmission (if equipped). NOTE:
Cap or plug opening(s) to prevent fluid from spilling.
7. Preparation for the separation work of transaxle is as follows: • Remove transaxle joint bolts which pierce at oil pan (upper) lower rear side. Refer to EM-42, "
Compo-
nent".
Removal
1. Install engine slinger to cylinder head front left side (A) and rear
right side (B) and support the engine with a hoist.
2. Lift with a hoist and secure the engine in appropriate position.
3. Use a suitable tool (A) to securely support bottom of the engine and the transaxle assembly and simultaneously adjust hoist ten-
sion.
CAUTION:
Put a piece of wood or something similar as the supporting
surface, secure a completely stable condition.
PBIC3737E
PBIC3738E
PBIC3223J
Revision: May 2010 2011 Versa
Page 2475 of 3787
ENGINE ASSEMBLYEM-85
< REMOVAL AND INSTALLATION > [HR16DE]
C
D
E
F
G H
I
J
K L
M A
EM
NP
O
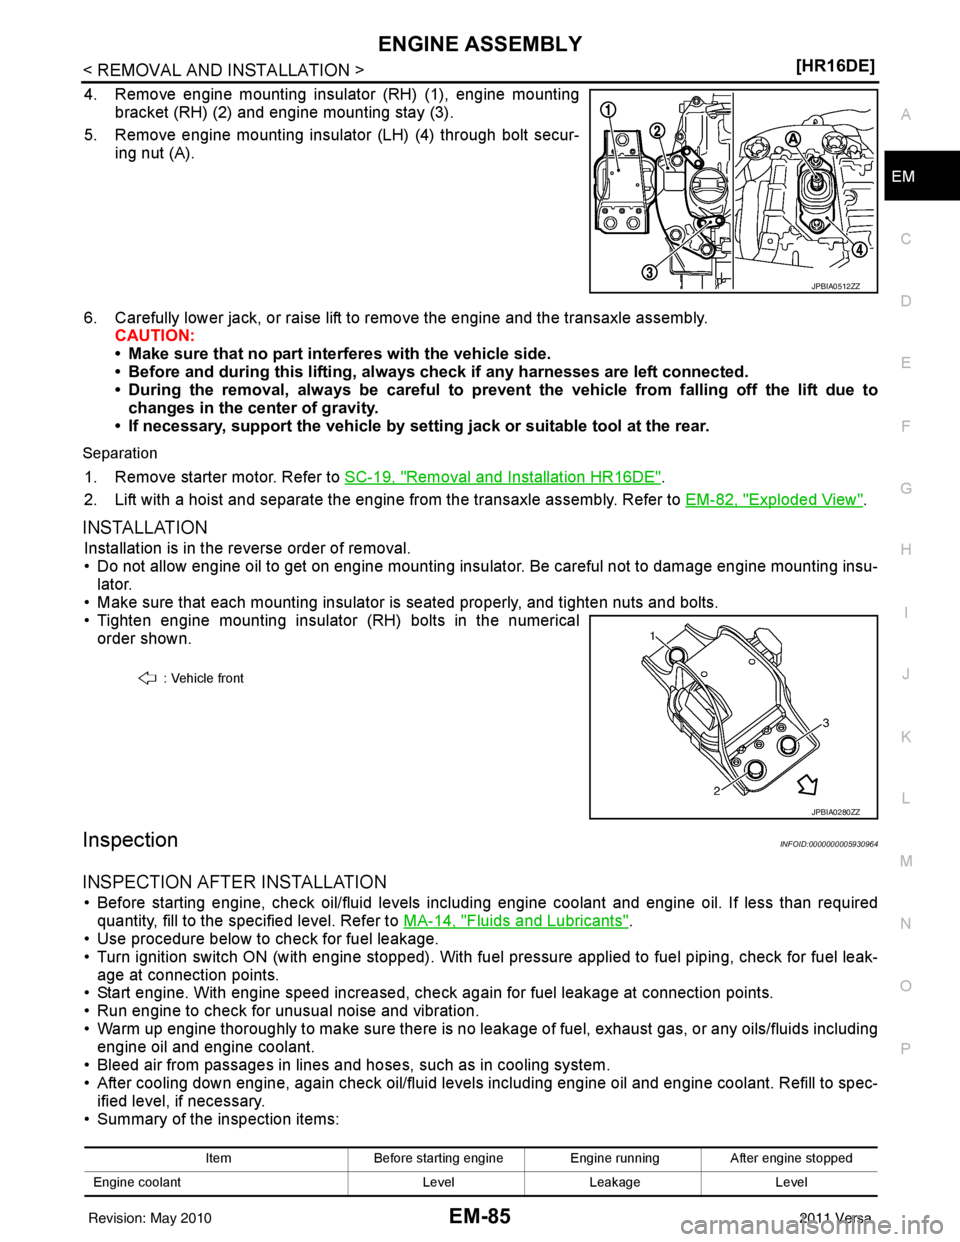
4. Remove engine mounting insulator (RH) (1), engine mounting
bracket (RH) (2) and engine mounting stay (3).
5. Remove engine mounting insulator (LH) (4) through bolt secur- ing nut (A).
6. Carefully lower jack, or raise lift to remove the engine and the transaxle assembly. CAUTION:
• Make sure that no part interferes with the vehicle side.
• Before and during this lifting, alw ays check if any harnesses are left connected.
• During the removal, always be careful to prevent the vehicle from falling off the lift due to
changes in the center of gravity.
• If necessary, support the vehicle by setting jack or suitable tool at the rear.
Separation
1. Remove starter motor. Refer to SC-19, "Removal and Installation HR16DE".
2. Lift with a hoist and separate the engine from the transaxle assembly. Refer to EM-82, "
Exploded View".
INSTALLATION
Installation is in the reverse order of removal.
• Do not allow engine oil to get on engine mounting insulator. Be careful not to damage engine mounting insu-
lator.
• Make sure that each mounting insulator is seated properly, and tighten nuts and bolts.
• Tighten engine mounting insulator (RH) bolts in the numerical
order shown.
InspectionINFOID:0000000005930964
INSPECTION AFTER INSTALLATION
• Before starting engine, check oil/fluid levels incl uding engine coolant and engine oil. If less than required
quantity, fill to the specified level. Refer to MA-14, "
Fluids and Lubricants".
• Use procedure below to check for fuel leakage.
• Turn ignition switch ON (with engine stopped). With fuel pressure applied to fuel piping, check for fuel leak-
age at connection points.
• Start engine. With engine speed increased, check again for fuel leakage at connection points.
• Run engine to check for unusual noise and vibration.
• Warm up engine thoroughly to make sure there is no leak age of fuel, exhaust gas, or any oils/fluids including
engine oil and engine coolant.
• Bleed air from passages in lines and hoses, such as in cooling system.
• After cooling down engine, again check oil/fluid levels including engine oil and engine coolant. Refill to spec- ified level, if necessary.
• Summary of the inspection items:
JPBIA0512ZZ
: Vehicle front
JPBIA0280ZZ
Item Before starting engine Engine runningAfter engine stopped
Engine coolant LevelLeakage Level
Revision: May 2010 2011 Versa
Page 2477 of 3787
ENGINE STAND SETTINGEM-87
< DISASSEMBLY AND ASSEMBLY > [HR16DE]
C
D
E
F
G H
I
J
K L
M A
EM
NP
O
DISASSEMBLY AND ASSEMBLY
ENGINE STAND SETTING
SettingINFOID:0000000005930965
NOTE:
Explained here is how to disassemble with engine stand supporting transmission surface. When using differ-
ent type of engine stand, note with difference in steps and etc.
1. Remove the engine and the transaxle assembly from
the vehicle, and separate the transaxle from the
engine. Refer to EM-82, "
Exploded View".
2. Remove clutch cover and clutch disc (if equipped). Refer to CL-16, "
Removal and Installation".
3. Remove flywheel or driveplate. • Secure flywheel or driveplate with Tool, and remove bolts.
CAUTION:
• Never disassemble flywheel.
• Never place flywheel or driveplate with signal plate facing down.
• When handling signal plate, take car e not to damage or scratch it.
• Handle signal plate in a manner that prevents it from becoming magnetized.
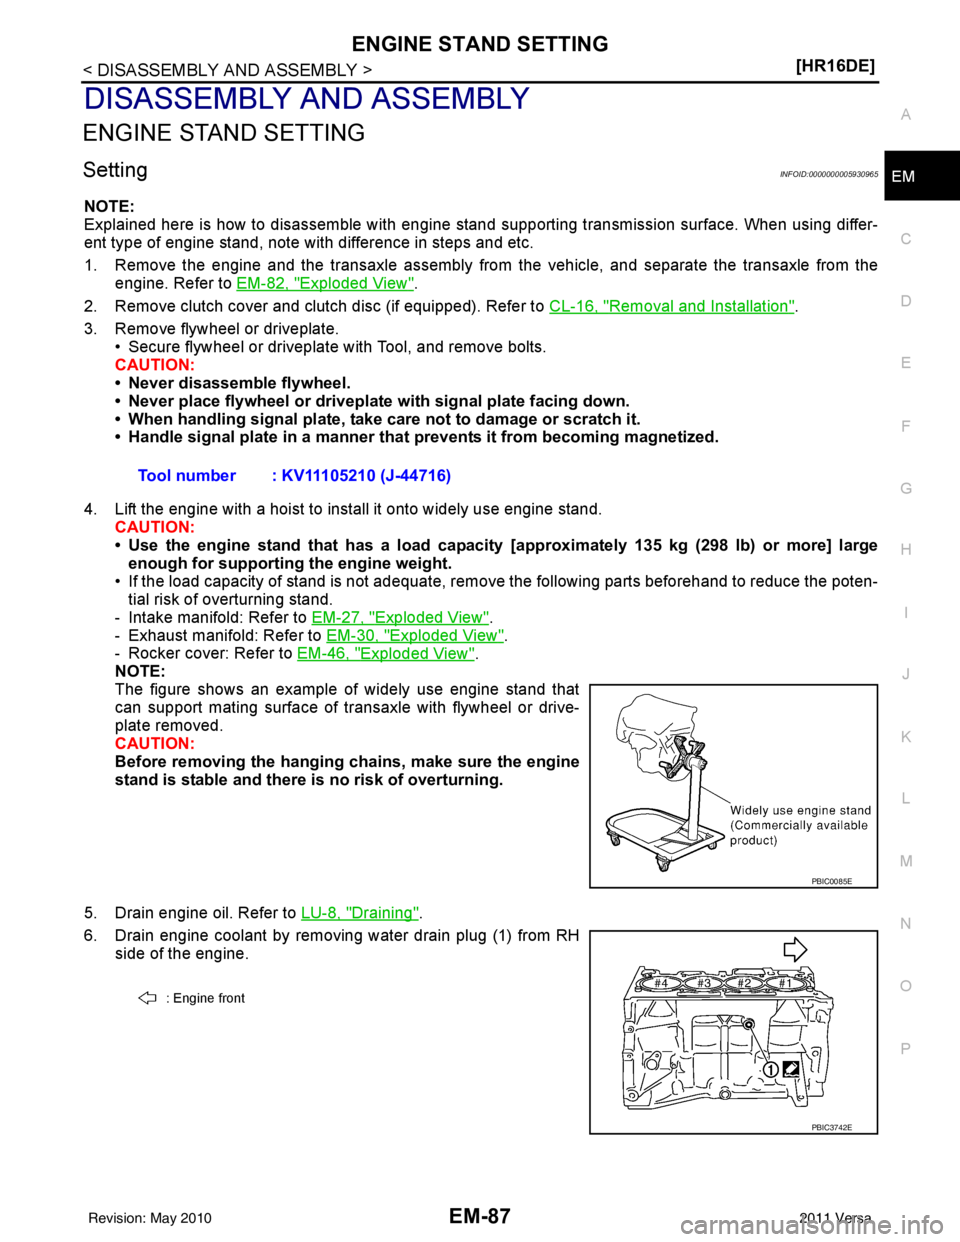
4. Lift the engine with a hoist to install it onto widely use engine stand. CAUTION:
• Use the engine stand that has a load capacity [approximately 135 kg (298 lb) or more] large
enough for supporting the engine weight.
• If the load capacity of stand is not adequate, remove the following parts beforehand to reduce the poten-
tial risk of overturning stand.
- Intake manifold: Refer to EM-27, "
Exploded View".
- Exhaust manifold: Refer to EM-30, "
Exploded View".
- Rocker cover: Refer to EM-46, "
Exploded View".
NOTE:
The figure shows an example of widely use engine stand that
can support mating surface of transaxle with flywheel or drive-
plate removed.
CAUTION:
Before removing the hanging chains, make sure the engine
stand is stable and there is no risk of overturning.
5. Drain engine oil. Refer to LU-8, "
Draining".
6. Drain engine coolant by removing water drain plug (1) from RH side of the engine. Tool number : KV11105210 (J-44716)
PBIC0085E
: Engine front
PBIC3742E
Revision: May 2010
2011 Versa
Page 2588 of 3787
EM-198
< SERVICE INFORMATION >[MR18DE]
ENGINE ASSEMBLY
• Use either 2-pole lift type or separate type lift as
best you can. If board-on type is used for unavoid-
able reasons, support at the rear axle jacking point with a transmission jack or similar tool before
starting work, in preparation for the backward shift of center of gravity.
• For supporting points for lifting and jacking point at rear axle, refer to GI-38, "
Garage Jack and
Safety Stand and 2-Pole Lift".
REMOVAL
Remove the engine and the transaxle assembly from t he vehicle downward. Separate the engine and the tran-
saxle.
1. Remove engine under cover. Refer to EI-15, "
Removal and Installation".
2. Drain engine coolant from radiator. Refer to CO-36, "
Changing Engine Coolant".
CAUTION:
• Perform this step when the engine is cold.
• Do not spill engine coolant on drive belt.
3. Drain clutch fluid (M/T models). Refer to CL-9, "
Air Bleeding Procedure".
4. Remove front fender protector (RH and LH). Refer to EI-26
.
5. Remove exhaust front tube. Refer to EX-10
.
6. Remove drive shafts (LH and RH) from steering knuckle. Refer to FA X - 9
.
7. Remove transaxle joint bolts which pierce at oil pan (upper) lower rear side. Refer to AT-233
(A/T models),
CVT-180, "
Removal and Installation" (CVT models) or MT-61, "Removal and Installation" (M/T models).
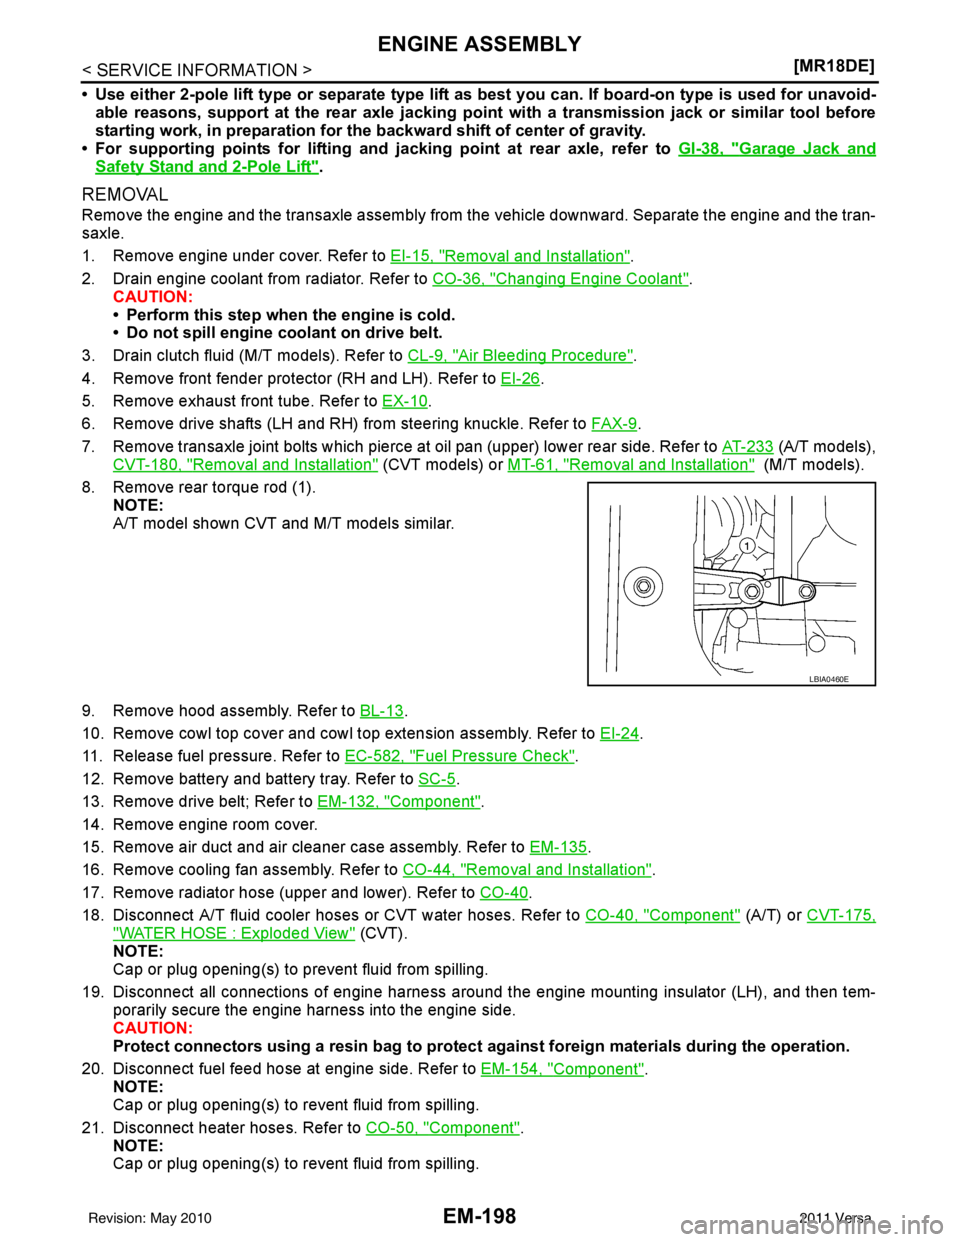
8. Remove rear torque rod (1). NOTE:
A/T model shown CVT and M/T models similar.
9. Remove hood assembly. Refer to BL-13
.
10. Remove cowl top cover and cowl top extension assembly. Refer to EI-24
.
11. Release fuel pressure. Refer to EC-582, "
Fuel Pressure Check".
12. Remove battery and battery tray. Refer to SC-5
.
13. Remove drive belt; Refer to EM-132, "
Component".
14. Remove engine room cover.
15. Remove air duct and air cleaner case assembly. Refer to EM-135
.
16. Remove cooling fan assembly. Refer to CO-44, "
Removal and Installation".
17. Remove radiator hose (upper and lower). Refer to CO-40
.
18. Disconnect A/T fluid cooler hoses or CVT water hoses. Refer to CO-40, "
Component" (A/T) or CVT-175,
"WATER HOSE : Exploded View" (CVT).
NOTE:
Cap or plug opening(s) to prevent fluid from spilling.
19. Disconnect all connections of engine harness around the engine mounting insulator (LH), and then tem- porarily secure the engine harness into the engine side.
CAUTION:
Protect connectors using a resin bag to protect against foreign materials during the operation.
20. Disconnect fuel feed hose at engine side. Refer to EM-154, "
Component".
NOTE:
Cap or plug opening(s) to revent fluid from spilling.
21. Disconnect heater hoses. Refer to CO-50, "
Component".
NOTE:
Cap or plug opening(s) to revent fluid from spilling.
LBIA0460E
Revision: May 2010 2011 Versa
Page 2589 of 3787
ENGINE ASSEMBLYEM-199
< SERVICE INFORMATION > [MR18DE]
C
D
E
F
G H
I
J
K L
M A
EM
NP
O
22. Disconnect control cable from transaxle. Refer to
CVT-180, "Removal and Installation" (CVT models), AT-
213 (A/T models) or MT-61, "Removal and Installation" (M/T models).
23. Remove ground cable at transaxle side.
24. Remove ground cable between front cover and vehicle.
25. Remove generator. Refer to SC-21
.
26. Remove A/C compressor with piping connected from t he engine. Temporarily secure it on the vehicle side
with a rope to avoid putting load on it. Refer to MTC-80, "
Removal and Installation of Compressor -
MR18DE".
27. Remove the intake manifold to prevent the hanging chain from interfering. Refer to EM-137, "
Compo-
nent".
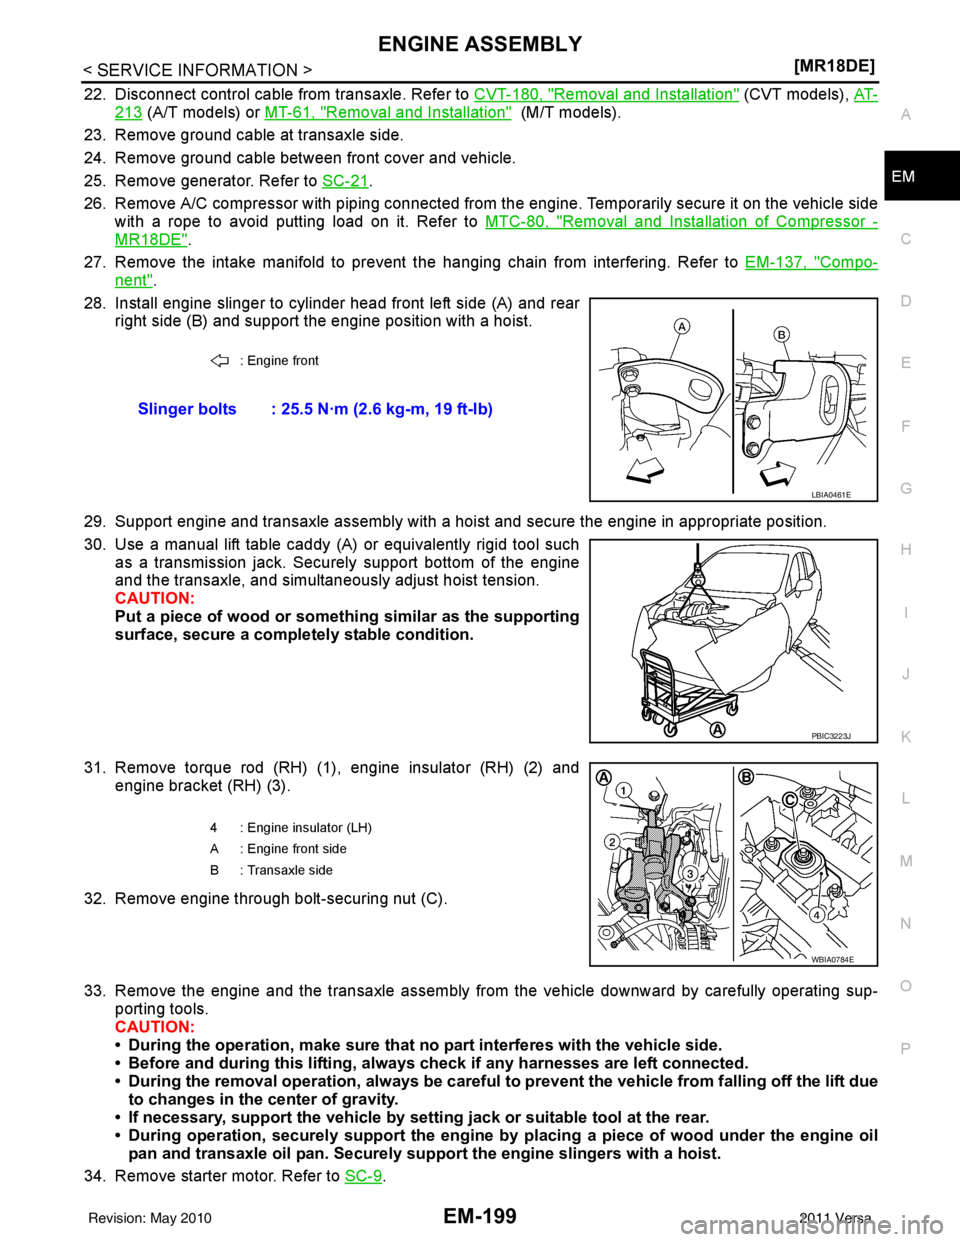
28. Install engine slinger to cylinder head front left side (A) and rear right side (B) and support the engine position with a hoist.
29. Support engine and transaxle assembly with a hoist and secure the engine in appropriate position.
30. Use a manual lift table caddy (A) or equivalently rigid tool such as a transmission jack. Securely support bottom of the engine
and the transaxle, and simultaneously adjust hoist tension.
CAUTION:
Put a piece of wood or someth ing similar as the supporting
surface, secure a completely stable condition.
31. Remove torque rod (RH) (1), engine insulator (RH) (2) and engine bracket (RH) (3).
32. Remove engine through bolt-securing nut (C).
33. Remove the engine and the transaxle assembly from the vehicle downward by carefully operating sup- porting tools.
CAUTION:
• During the operation, make sure that no part interferes with the vehicle side.
• Before and during this lifting, alw ays check if any harnesses are left connected.
• During the removal operation, alw ays be careful to prevent the vehicle from falling off the lift due
to changes in the center of gravity.
• If necessary, support the vehicle by setting jack or suitable tool at the rear.
• During operation, securely suppor t the engine by placing a piece of wood under the engine oil
pan and transaxle oil pan. Securely sup port the engine slingers with a hoist.
34. Remove starter motor. Refer to SC-9
.
: Engine front
Slinger bolts : 25.5 N·m (2.6 kg-m, 19 ft-lb)
LBIA0461E
PBIC3223J
4 : Engine insulator (LH)
A : Engine front side
B : Transaxle side
WBIA0784E
Revision: May 2010 2011 Versa
Page 2590 of 3787
EM-200
< SERVICE INFORMATION >[MR18DE]
ENGINE ASSEMBLY
35. Separate the engine and the transaxle and mount the engine on a suitable engine stand. Refer to
AT-233
(A/T models), CVT-180, "Removal and Installation" (CVT models) or MT-61, "Removal and Installation"
(M/T models).
INSTALLATION
Installation is in the reverse order of removal.
Note the following during installation:
• When installation directions are specified, install parts according to the directions. Refer to EM-197, "
Com-
ponent".
• Do not allow engine oil to get on engine mounting insulator. Be careful not to damage engine mounting insu-
lator.
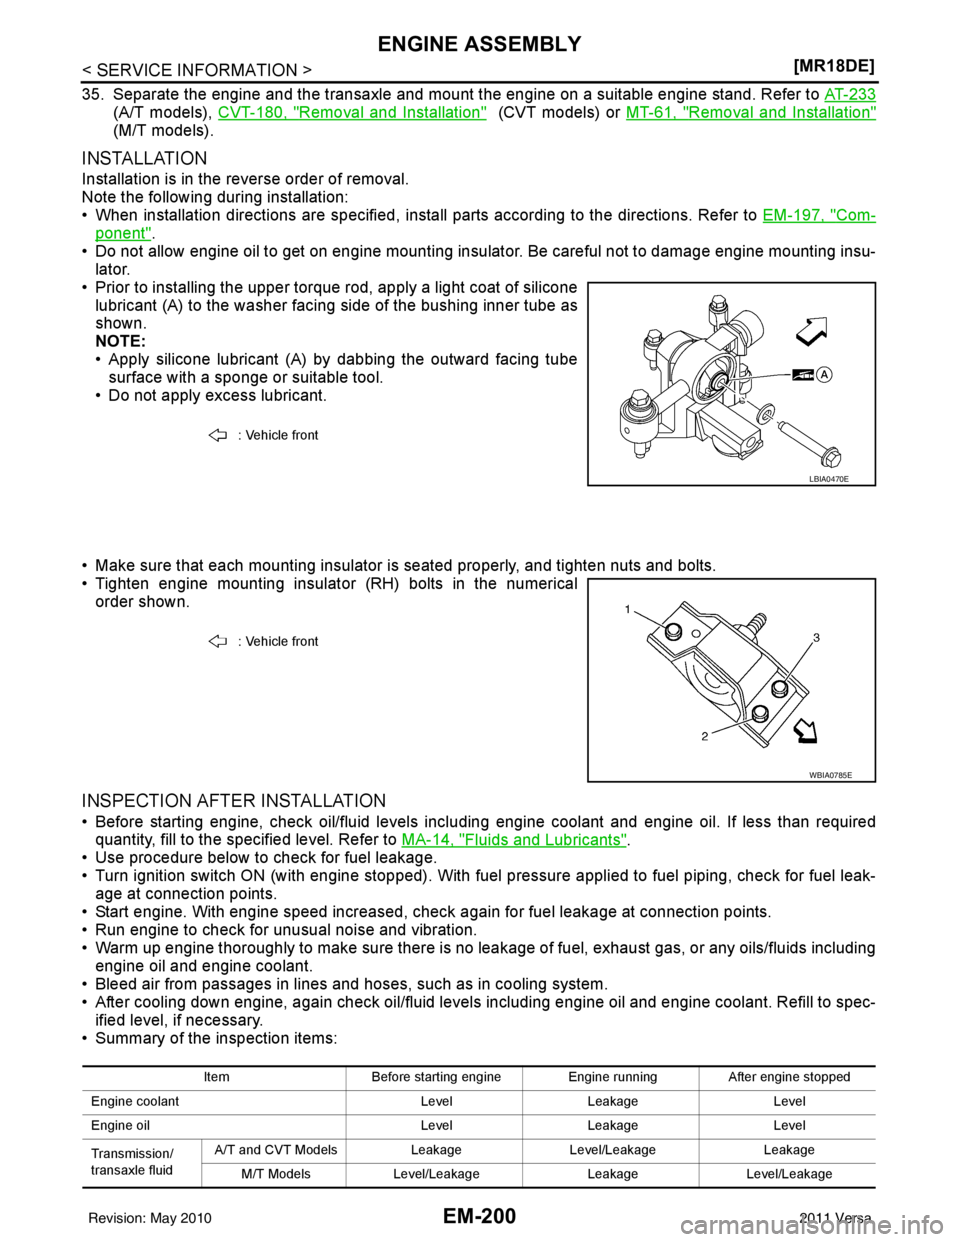
• Prior to installing the upper torque rod, apply a light coat of silicone lubricant (A) to the washer facing side of the bushing inner tube as
shown.
NOTE:
• Apply silicone lubricant (A) by dabbing the outward facing tubesurface with a sponge or suitable tool.
• Do not apply excess lubricant.
• Make sure that each mounting insulator is seated properly, and tighten nuts and bolts.
• Tighten engine mounting insulator (RH) bolts in the numerical order shown.
INSPECTION AFTER INSTALLATION
• Before starting engine, check oil/fluid levels incl uding engine coolant and engine oil. If less than required
quantity, fill to the specified level. Refer to MA-14, "
Fluids and Lubricants".
• Use procedure below to check for fuel leakage.
• Turn ignition switch ON (with engine stopped). With fuel pressure applied to fuel piping, check for fuel leak- age at connection points.
• Start engine. With engine speed increased, che ck again for fuel leakage at connection points.
• Run engine to check for unusual noise and vibration.
• Warm up engine thoroughly to make sure there is no leakage of fuel, exhaust gas, or any oils/fluids including
engine oil and engine coolant.
• Bleed air from passages in lines and hoses, such as in cooling system.
• After cooling down engine, again check oil/fluid levels including engine oil and engine coolant. Refill to spec- ified level, if necessary.
• Summary of the inspection items:
: Vehicle front
LBIA0470E
: Vehicle front
WBIA0785E
Item Before starting engine Engine runningAfter engine stopped
Engine coolant LevelLeakage Level
Engine oil LevelLeakage Level
Transmission/
transaxle fluid A/T and CVT Models
LeakageLevel/Leakage Leakage
M/T Models Level/Leakage LeakageLevel/Leakage
Revision: May 2010 2011 Versa