buttons NISSAN TITAN 2008 1.G Owner's Manual
[x] Cancel search | Manufacturer: NISSAN, Model Year: 2008, Model line: TITAN, Model: NISSAN TITAN 2008 1.GPages: 408, PDF Size: 5.58 MB
Page 217 of 408

1. SEEK/TRACK button
2. CAT FOLDER button
3. Display
4. SCAN RPT button
5. DISP button6. H/M button (clock set buttons)
7. PRESET A·B·C button
8. CD·DVD button
9. RADIO button*
10. AUX button11. REAR ON·OFF button
12.
speaker control button
13. LOAD button
14. CD insert slot
15.
CD eject button
16. POWER/VOLUME control knob
17. Station and CD select (1 - 6) buttons
18. Tuning and AUDIO control knob
(BASS, MID, TREBLE, FADE and BAL-
ANCE)
*No satellite radio reception is available
and “NO SAT” is displayed when the
RADIO button is pressed to access
satellite radio stations unless optional
satellite receiver and antenna are in-
stalled and an XMTsatellite radio ser-
vice subscription is active. Satellite ra-
dio is not available in Alaska, Hawaii
and Guam.
Type D
WHA0867
Display screen, heater, air conditioner, audio and phone systems4-51
ZREVIEW COPYÐ2008 Titan(tzw)
Owners ManualÐUSA_English(nna)
03/06/07Ðtbrooks
X
Page 221 of 408

1. Choose preset bank A, B or C using the
PRESET A·B·C select button.
2. Select the desired FM, AM or SAT station
band.
3. Tune to the desired station using manual,
SEEK or SCAN tuning. Press and hold any
of the desired station memory buttons (1 –
6) until a beep sound is heard.
4. The channel indicator will then come on and
the sound will resume. Programming is now
complete.
5. Other buttons can be set in the same man-
ner.
If the battery cable is disconnected, or if the fuse
opens, the radio memory will be canceled. In that
case, reset the desired stations.
Radio data system (RDS):
RDS stands for Radio Data System, and is a data
information service transmitted by some radio
stations on the FM band (not AM band) . Cur-
rently, most RDS stations are in large cities, but
many stations are now considering broadcasting
RDS data.
RDS can display:
cStation call sign, such as “WHFR 98.3”.
cStation name, such as “The Groove”.cMusic or programming type such as “Clas-
sical”, “Country”, or “Rock”.
cArtist and song information.
If the station broadcasts RDS information, the
RDS icon is displayed.
Compact disc (CD) changer operation
Turn the ignition key to the ACC or ON position
and press thebutton, then press one of
the CD insert (1–6) slots. Insert the compact disc
into the slot with the label side facing up. The
compact disc will be guided automatically into
the slot and start playing.
If the radio is already operating, it will automati-
cally turn off and the compact disc will play.
If the system has been turned off while the com-
pact disc was playing, pressing the
VOL/ON·OFF control knob will start the compact
disc.
button:
To insert a CD in the CD changer, press
the
button for less than 1.5 seconds. Se-
lect the loading slot by pressing the CD insert
select button (1 – 6) , then insert the CD.
To insert 6 CDs to the CD changer, press and
hold the
button for more than 1.5 seconds.The slot numbers (1 – 6) will illuminate on the
display when CDs are loaded into the changer.
CD button (Type B and C only):
When the CD button is pressed with the system
off and the compact disc loaded, the system will
turn on and the compact disc will start to play.
When the CD button is pressed with the com-
pact disc loaded with the radio playing, the radio
will automatically be turned off and the compact
disc will start to play.
CD·DVD button (Type A and D only):
Press the CD·DVD button to toggle the radio
between CD and DVD modes.
When the CD·DVD button is pressed with the
system off and the compact disc loaded, the
system will turn on and the compact disc will start
to play.
When the CD·DVD button is pressed with the
compact disc loaded with the radio playing, the
radio will automatically be turned off and the
compact disc will start to play.
For more information on the DVD system see
“Playing a digital video disc (DVD)” later in this
section.
Display screen, heater, air conditioner, audio and phone systems4-55
ZREVIEW COPYÐ2008 Titan(tzw)
Owners ManualÐUSA_English(nna)
03/06/07Ðtbrooks
X
Page 222 of 408

SEEK/TRACK button:
When the
button is pressed while a com-
pact disc is playing, the track being played re-
turns to its beginning. Press several times to skip
back through tracks. The compact disc will go
back the number of times the button is pressed.
When the
button is pressed while the
compact disc is playing, the next track will start to
play from its beginning. Press several times to
skip through tracks. The compact disc will ad-
vance the number of times the button is pressed.
(When the last track on the compact disc is
skipped through, the first track will be played.)
TUNE/FOLDER·CAT but-
ton:
CD:
cWhile playing a CD, press and hold the
TUNE/FOLDER·CAT button
orto fast forward or rewind a track on a CD.
MP3 CD:
cWhile playing an MP3 CD, press the
TUNE/FOLDER·CAT button
orto scan backward or forward through avail-
able folders.
cPress and hold the TUNE/FOLDER·CAT
button
orto fast forward or re-
wind a track on an MP3 CD.CD select buttons:
To play another CD that has been loaded, press a
CD select button (1 – 6) .
SCAN/RPT button (Type A, B and D only):
When the SCAN/RPT play button is pressed
while the compact disc is played, the play pattern
can be changed as follows:
ALL DISC RPT!1 DISC RPT!1 TRACK RPT
!ALL DISC RDM!1 DISC RDM!ALL DISC
RPT
ALL DISC RPT: All discs loaded will be repeated.
1 DISC RPT: The disc that is currently playing will
be repeated.
1 TRACK RPT: The track that is currently playing
will be repeated
ALL DISC RDM: Tracks from all discs will be
played randomly
1 DISC RDM: Tracks from the disc that is cur-
rently playing will be played randomly
RPT RDM button (Type C only):
When the RPT RDM play button is pressed while
the compact disc is played, the play pattern can
be changed as follows:
ALL DISC RPT!1 DISC RPT!1 TRACK RPT
!ALL DISC RDM!1 DISC RDM!ALL DISC
RPTALL DISC RPT: All discs loaded will be repeated.
1 DISC RPT: The disc that is currently playing will
be repeated.
1 TRACK RPT: The track that is currently playing
will be repeated
ALL DISC RDM: Tracks from all discs will be
played randomly
1 DISC RDM: Tracks from the disc that is cur-
rently playing will be played randomly
REAR ON·OFF (if so equipped):
Pressing the REAR ON·OFF button for less than
1.5 seconds turns the rear seat audio controller
on. REAR CONT ON will display. Pressing it
again will turn the rear seat audio controller off.
REAR CONT OFF will display. If the vehicle is not
equipped with a rear seat audio controller, the
display will show “REAR AV N/A”.
(SPEAKER CONTROL) button
(Type A and D only):
Press the
button to turn the rear speakers
off and headphones on. Press thebutton
again to turn rear seat speakers back on and
headphones off.
4-56Display screen, heater, air conditioner, audio and phone systems
ZREVIEW COPYÐ2008 Titan(tzw)
Owners ManualÐUSA_English(nna)
03/06/07Ðtbrooks
X
Page 233 of 408

If media is in PAUSE mode, activation of the
NAVIGATION KEYS (Up, Down and Right) will
perform the following functions: next
chapter/track, previous chapter/track and slow
forward, and the display will show
,and a forward arrow symbol respectively in the
upper left corner of the display for 4 seconds.
(Faceplate feature only)
If media is in activated MENU mode, the NAVI-
GATION KEYS will be used to navigate Up,
Down, Left, and Right within the menu.
If display control menu is on, the NAVIGATION
KEYS will be used to navigate Up, Down, Left,
and Right within the menu.
ENTER:
In MENU mode, press the ENTER button to se-
lect MENU items.
In the display menu, press the ENTER button to
select items for modification, as per the on-
screen instructions.
MENU:
If the media is in PLAY mode and the MENU
button is pressed, the DVD menu will appear on
the screen. Use Navigation Keys to navigate
within the menu, and use ENTER to select the
item.Press the MENU button again to return to PLAY
mode.
TITLE (Remote control only):
Press TITLE button to return the DVD media to
the “title” of the DVD.
Press TITLE button again to return to the previous
stop point and play.
BACK (Remote control only):
Press the BACK button to exit the current active
menu and return to the previous menu.
SUBTITLE (Remote control only):
Press the SUBTITLE button to call up subtitle
selection menu.
Repeatedly press the SUBTITLE button to cycle
through each available subtitle.
AUDIO (Remote control only):
Press the AUDIO button to call up audio menu.
Repeatedly press the AUDIO button to cycle
through each available audio track.
ANGLE (Remote control only):
Press the ANGLE button to call up camera angle
menu.
Repeatedly press the ANGLE button to cycle
through each available angle.CLEAR (Remote control only):
Press the CLEAR button to clear all numeric
inputs, if actuated prior to expiration of the
3-second timer.
NUMERIC KEYPAD (0–9 &¸10) (Remote
control only):
Press the NUMERIC KEYPAD to directly access
disc chapters, titles or tracks by inputting their
numeric value.
The “¸10” button input numbers greater than or
equal to 10, allowing up three digits to be input
for selecting chapter/title/track number.
The subsequent actuation of numeric buttons will
continuously shift the previously input number to
the “left”.
The chapter/title/track number will be automati-
cally selected (if valid, based on media content) if
3 seconds expire without any keypad inputs.
The operator can cancel the input
chapter/title/track number by actuating the
CLEAR control prior to the expiration of the
3-second timer.
These functions can be used only for the DVD
discs which correspond to them.
Display screen, heater, air conditioner, audio and phone systems4-67
ZREVIEW COPYÐ2008 Titan(tzw)
Owners ManualÐUSA_English(nna)
03/06/07Ðtbrooks
X
Page 241 of 408

– NOT “One eight hundred six six two sixty
two hundred, and
– NOT “One eight oh oh six six two sixty two
hundred.
cNumbers can be spoken in small groups.
The system will prompt you to continue en-
tering digits, if desired.
Example: 1-800-662-6200
– “One eight oh oh”
The system repeats the numbers and
prompts you to enter more.
– “six six two”
The system repeats the numbers and
prompts you to enter more.
– “six two oh oh”
c
You can say “Star” for * and “Pound” for # at
any time in any position of the phone number.
Example: 1-555-1212 *123
– “One five five five one two one two star
one two three”
NOTE:
For best results, say phone numbers as
single digits.
CONTROL BUTTONS
The control buttons for the BluetoothTHands-
Free Phone System are located on the steering
wheel.
PHONE/SEND
Press the
button to initiate a VR
session or answer an incoming call.
You can also use the
button to
skip through system feedback and to
enter commands during a call. See “List
of voice commands” and “During a call”
later in this section for more information.
PHONE/END
Press the
button to cancel a VR
session or end a call.
GETTING STARTED
The following procedures will help you get
started using the BluetoothTHands-Free Phone
System with NISSAN Voice Recognition. For ad-
ditional command options, refer to “List of voice
commands” later in this section.
Choosing a language
You can interact with the BluetoothTHands-Free
Phone System using English, Spanish or French.
To change the language, perform the following.
1. Press and hold the
button for more
than 5 seconds.
2. The system announces: “Press the
PHONE/SEND (
) button for the
hands-free phone system to enter the
speaker adaptation mode or press the
PHONE/END (
) button to select a dif-
ferent language.”
3. Press the
button.
For information on speaker adaptation, see
“Speaker adaptation (SA) mode” later in this
section.
WHA0879
Display screen, heater, air conditioner, audio and phone systems4-75
ZREVIEW COPYÐ2008 Titan(tzw)
Owners ManualÐUSA_English(nna)
03/06/07Ðtbrooks
X
Page 267 of 408
R (Reverse):
CAUTION
Use this position only when the vehicle is
completely stopped.
Use this position to back up. Make sure the
vehicle is completely stopped before selecting
the R (Reverse) position.The brake pedal
must be depressed to move the selector
lever from P (Park) , N (Neutral) or any drive
position to R (Reverse) .
N (Neutral):
Neither forward nor reverse gear is engaged. The
engine can be started in this position. You may
shift to N (Neutral) and restart a stalled engine
while the vehicle is moving.
D (Drive):
Use this position for all normal forward driving.
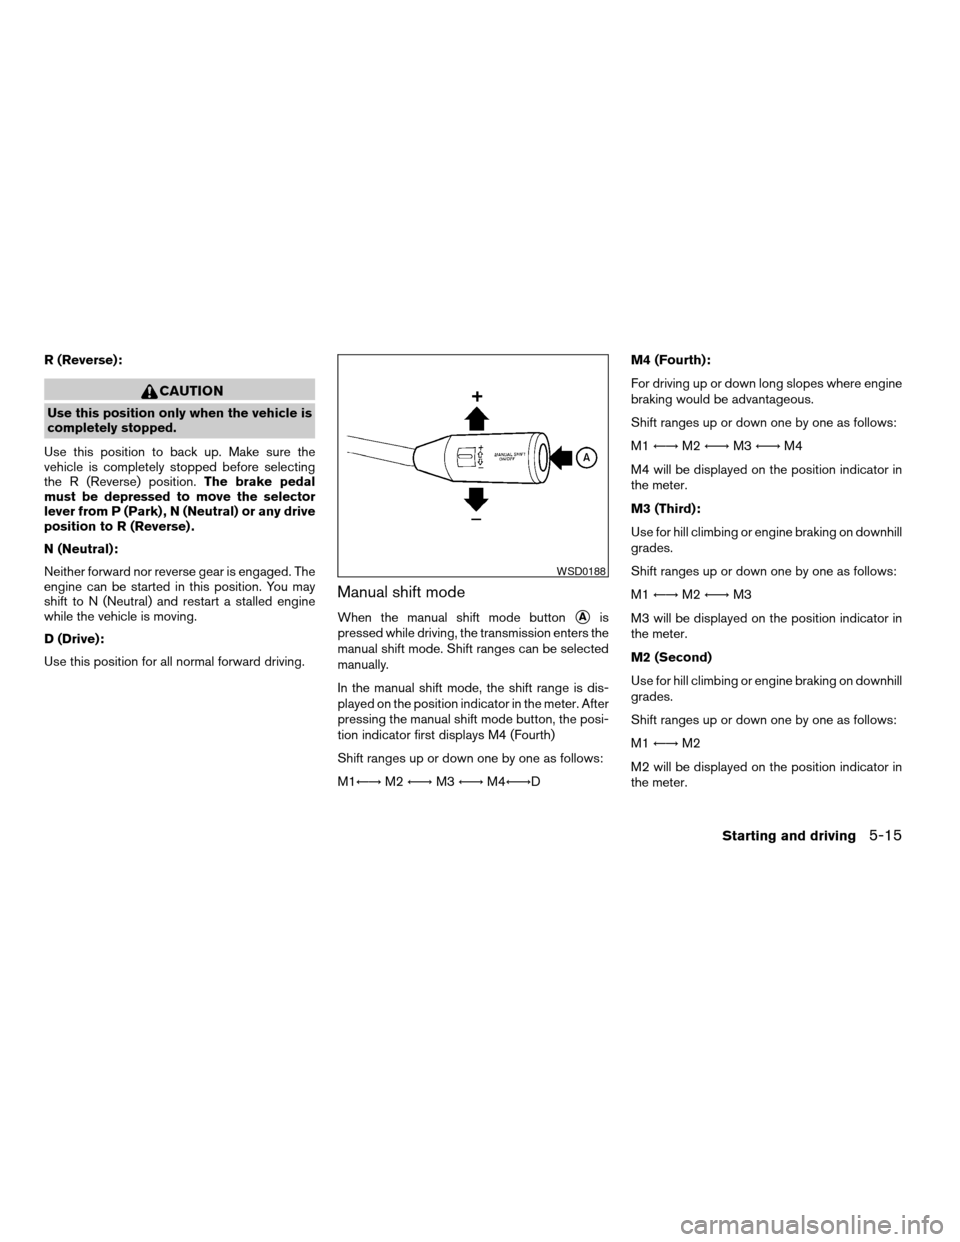
Manual shift mode
When the manual shift mode buttonsAis
pressed while driving, the transmission enters the
manual shift mode. Shift ranges can be selected
manually.
In the manual shift mode, the shift range is dis-
played on the position indicator in the meter. After
pressing the manual shift mode button, the posi-
tion indicator first displays M4 (Fourth)
Shift ranges up or down one by one as follows:
M1Ã!M2Ã!M3Ã!M4Ã!DM4 (Fourth):
For driving up or down long slopes where engine
braking would be advantageous.
Shift ranges up or down one by one as follows:
M1Ã!M2Ã!M3Ã!M4
M4 will be displayed on the position indicator in
the meter.
M3 (Third):
Use for hill climbing or engine braking on downhill
grades.
Shift ranges up or down one by one as follows:
M1Ã!M2Ã!M3
M3 will be displayed on the position indicator in
the meter.
M2 (Second)
Use for hill climbing or engine braking on downhill
grades.
Shift ranges up or down one by one as follows:
M1Ã!M2
M2 will be displayed on the position indicator in
the meter.
WSD0188
Starting and driving5-15
ZREVIEW COPYÐ2008 Titan(tzw)
Owners ManualÐUSA_English(nna)
03/06/07Ðtbrooks
X
Page 398 of 408
C
Capacities and recommended
fuel/lubricants...................9-2
Car phone or CB radio.............4-71
Cargo light switch...............2-36
Cargo (See vehicle loading information) . . .9-13
CD care and cleaning.............4-57
CD changer (See audio system)........4-55
CD player (See audio system).........4-46
Child restraint with top tether strap......1-26
Child restraints.......1-15, 1-16, 1-23, 1-25
Precautions on child
restraints............1-23, 1-31, 1-40
Top tether strap anchor point locations . .1-27
Child safety rear door lock............3-6
Chimes, audible reminders...........2-20
Cigarette lighter.................2-41
Cleaning exterior and interior..........7-2
Clock...................4-45, 4-52
(models with navigation system)......4-11
Clock set....................4-11
C.M.V.S.S. certification label..........9-11
Cold weather driving..............5-33
Compact disc (CD) player...........4-46
Compass display.................2-9
Control panel buttons..............4-2
Brightness/contrast button.........4-12
Back button..................4-3
Enter button..................4-2
Setting button................4-7
Startup screen................4-3
Trip button..................4-3
Controls
Audio controls (steering wheel)......4-58Heater and air conditioner controls. . . .4-13,
4-20, 4-27, 4-35
Rear audio controls.............4-60
Coolant
Capacities and recommended
fuel/lubricants.................9-2
Changing engine coolant..........8-8
Checking engine coolant level........8-7
Engine coolant temperature gauge.....2-6
Corrosion protection...............7-5
Cruise control..................5-18
Cup holders...................2-47
Curtain side-impact and rollover air bag . . .1-57
D
Daytime running light system
(Canada only)..................2-33
Defroster switch
Rear window and outside mirror defroster
switch....................2-30
Digital video disc DVD.............4-61
Dimensions and weights.............9-9
Dimmer switch for instrument panel......2-34
Display controls (see control panel buttons) . .4-2
Distance to empty................4-4
Door locks....................3-3
Drive belt....................8-15
Drive positioner, Automatic...........3-21
Driving
Cold weather driving............5-33
Driving with automatic
transmission.............5-11, 5-12
Precautions when starting and driving . . .5-2E
Economy - fuel.................5-20
Electronic locking rear differential (E-Lock)
system......................5-26
Electronic locking rear differential (E-Lock)
system switch..................2-37
Emission control information label.......9-11
Emission control system warranty.......9-42
Engine
Before starting the engine.........5-10
Block heater.................5-34
Capacities and recommended
fuel/lubricants.................9-2
Changing engine coolant..........8-8
Changing engine oil.............8-9
Changing engine oil filter..........8-10
Checking engine coolant level........8-7
Checking engine oil level..........8-8
Engine compartment check locations. . . .8-6
Engine coolant temperature gauge.....2-6
Engine cooling system............8-7
Engine oil...................8-8
Engine oil and oil filter recommendation . .9-6
Engine oil viscosity..............9-7
Engine serial number............9-11
Engine specifications.............9-8
Starting the engine.............5-10
Engine oil pressure gauge............2-7
Engine oil pressure low/engine coolant
temperature high warning light.........2-15
English/metric setting..............4-10
Enter button....................4-2
Event data recorders..............9-44
Exhaust gas (Carbon monoxide)........5-2
10-2
ZREVIEW COPYÐ2008 Titan(tzw)
Owners ManualÐUSA_English(nna)
03/06/07Ðtbrooks
X