NISSAN X-TRAIL 2001 Service Repair Manual
Manufacturer: NISSAN, Model Year: 2001, Model line: X-TRAIL, Model: NISSAN X-TRAIL 2001Pages: 3833, PDF Size: 39.49 MB
Page 2771 of 3833

REAR DISC BRAKE
BR-31
C
D
E
G
H
I
J
K
L
MA
B
BR
4. Fix piston boot with retaining ring.
CAUTION:
●Be sure boot is securely engaged in groove on cylinder
body.
●Do not reuse retaining ring.
5. Connect sliding pins and sliding pin boots to torque member.
6. Connect torque member to axle assembly and tighten mounting
bolts to specified torque.
CAUTION:
Wipe oil and grease on axle assembly washer seats and torque
member mounting surface. Install torque member to axle
assembly.
7. Connect pads, pad retainers, shims, and shim covers to torque member and assemble cylinder body.
8. Tighten sliding pin bolts to the specified torque.
9. Connect brake hose to caliper assembly and tighten union bolts to the specified torque.
CAUTION:
Do not reuse union bolt copper washer.
10. After installing caliper assembly, refill with new brake fluid and bleed air. Refer to BR-10, "
Bleeding Brake
System"
SFIA0158E
Page 2772 of 3833

BR-32
SERVICE DATA AND SPECIFICATIONS (SDS)
SERVICE DATA AND SPECIFICATIONS (SDS)
PFP:00030
General SpecificationsEFS000CQ
Unit: mm (in)
Brake PedalEFS000CR
Check ValveEFS000CS
Brake BoosterEFS000CT
Vacuum type
Front Disc BrakeEFS000CU
Front brakeBrake model AD31VD
Cylinder bore diameter 44.4 × 2 (1.748 × 0.08)
Pad
Length x width x thickness132.0 × 52.5 × 11.0
(5.20 × 2.067 × 0.433)
Rotor outer diameter x thickness 280 × 28 (11.02 × 1.10)
Rear brakeBrake model AD9VA
Cylinder bore diameter 34.9 (1.374)
Pad
Length x width x thickness83.0 × 33.0 × 8.5
(3.268 × 1.299 × 0.335)
Rotor outer diameter x thickness 292 × 16 (11.50 × 0.63)
Master cylinder Cylinder bore diameter 25.4 (1)
Control valve Valve model Electronic control type
Brake boosterBooster model C215T
Diaphragm diameterPrimary 230 (9.06)
Secondary 205 (8.07)
Recommended brake fluid DOT 3 or DOT 4
Free play (at pedal top surface) 3 - 11 mm (0.12 - 0.43 in)
Looseness at clevis pin 1 - 3 mm (0.04 - 0.12 in)
Brake pedal height (from dash panel top surface)M/T model 156 - 166 mm (6.14 - 6.54 in)
A/T model 164 - 174 mm (6.46 - 6.85 in)
Depressed pedal height under force of 490 N (50 kg,110.6 lb)
(from dash panel top surface)M/T model 80 mm (3.15 in) or more
A/T model 85 mm (3.35 in) or more
Clearance between threaded end of stop lamp switch and pedal stopper 0.74 - 1.96 mm (0.0291 - 0.0772 in)
Vacuum leakage [at vacuum of 66.7 kPa (-500 mmHg, -19.69
inHg)]Within 1.3 kPa (10 mmHg, 0.39 inHg) of vacuum for 15 sec-
onds
Vacuum leakage [at vacuum of -66.7 kPa (-500 mmHg, -19.69
inHg)]Within 3.3 kPa (25 mmHg, 0.98 inHg) of vacuum for 15 sec-
onds
Input rod installation standard dimension 125 mm (4.92 in)
Brake typeAD31VD
Brake padStandard thickness (new) 11 mm (0.43 in)
Repair limit thickness 2.0 mm (0.07 in)
Disc rotorStandard thickness (new) 28 mm (1.10 in)
Repair limit thickness 26 mm (1.02 in)
Runout limit 0.04 mm (0.0016 in)
Page 2773 of 3833

SERVICE DATA AND SPECIFICATIONS (SDS)
BR-33
C
D
E
G
H
I
J
K
L
MA
B
BR
Rear Disc BrakeEFS000CV
Brake typeAD9VA
Brake padStandard thickness (new) 8.5 mm (0.335 in)
Repair limit thickness 2.0 mm (0.079 in)
Disc rotorStandard thickness (new) 16 mm (0.63 in)
Repair limit thickness 14 mm (0.55 in)
Runout limit 0.07 mm (0.0028 in)
Page 2774 of 3833

BR-34
SERVICE DATA AND SPECIFICATIONS (SDS)
Page 2775 of 3833

PB-1
PARKING BRAKE SYSTEM
F BRAKES
CONTENTS
C
D
E
G
H
I
J
K
L
M
SECTION
A
B
PB
PARKING BRAKE SYSTEM
NOISE, VIBRATION, AND HARSHNESS (NVH)
TROUBLESHOOTING ................................................ 2
NVH Troubleshooting Chart ..................................... 2
PARKING BRAKE CONTROL ................................... 3
Components ............................................................. 3
Removal and Installation .......................................... 3
Inspection ................................................................. 3
Adjustment ............................................................... 4PARKING BRAKE SHOE ........................................... 5
Components ............................................................. 5
Removal and Installation .......................................... 5
REMOVAL ............................................................. 5
INSPECTION ........................................................ 7
INSTALLATION ..................................................... 7
SERVICE DATA AND SPECIFICATIONS (SDS) ...... 10
Parking Brake ......................................................... 10
Page 2776 of 3833

PB-2
NOISE, VIBRATION, AND HARSHNESS (NVH) TROUBLESHOOTING
NOISE, VIBRATION, AND HARSHNESS (NVH) TROUBLESHOOTING
PFP:00003
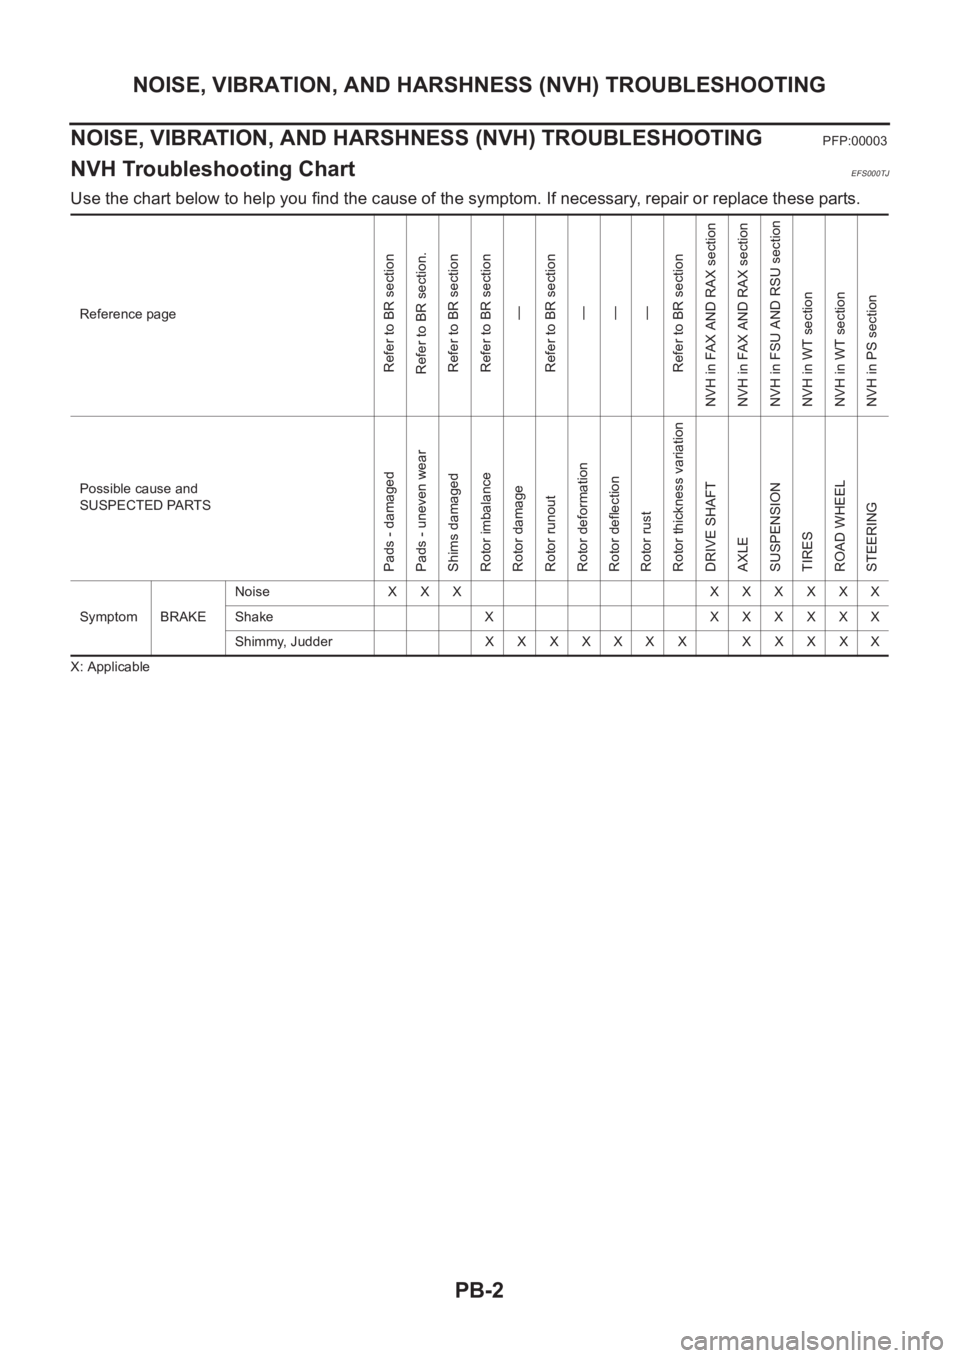
NVH Troubleshooting ChartEFS000TJ
Use the chart below to help you find the cause of the symptom. If necessary, repair or replace these parts.
X: ApplicableReference page
Refer to BR section
Refer to BR section.
Refer to BR section
Refer to BR section
—
Refer to BR section
—
—
—
Refer to BR section
NVH in FAX AND RAX section
NVH in FAX AND RAX section
NVH in FSU AND RSU section
NVH in WT section
NVH in WT section
NVH in PS section
Possible cause and
SUSPECTED PARTS
Pads - damaged
Pads - uneven wear
Shims damaged
Rotor imbalance
Rotor damage
Rotor runout
Rotor deformation
Rotor deflection
Rotor rust
Rotor thickness variation
DRIVE SHAFT
AXLE
SUSPENSION
TIRES
ROAD WHEEL
STEERING
Symptom BRAKENoise XXX XXXXXX
Shake X XXXXXX
Shimmy, JudderXXXXXXX XXXXX
Page 2777 of 3833

PARKING BRAKE CONTROL
PB-3
C
D
E
G
H
I
J
K
L
MA
B
PB
PARKING BRAKE CONTROLPFP:36010
Components EFS0017I
Removal and InstallationEFS0017J
1. Remove center console.
2. Disconnect warning lamp switch connector.
3. Remove cable mounting bolt. Loosen cable and remove self-
locking nut.
4. Remove cable from toggle lever of disc brake.
InspectionEFS0017L
●Operate parking brake lever with a force of 196 N (20 kg, 44 lb). Check stroke is within specified number
of notches. (Check it by hearing clicks of ratchet.)
●Check parking lever assembly for bend, damage and cracks, and replace if necessary.
●Check cables and equalizer for wear and damage. If a malfunction is detected, replace applicable part.
●Check parking brake warning lamp switch. If a malfunction is detected, replace applicable part.
●Check each part for deformation, or damage by contact with other parts. If a malfunction is detected,
replace applicable part.
1. Control lever assembly 2. Cap 3. Parking brake warning lamp switch
4. Screw 5. Self-locking nut 6. Front cable
7. RH rear cable 8. LH rear cable
SFIA0050E
SFIA0200E
Lever stroke : 6 - 7 notches
Page 2778 of 3833

PB-4
PARKING BRAKE CONTROL
Adjustment
EFS0017M
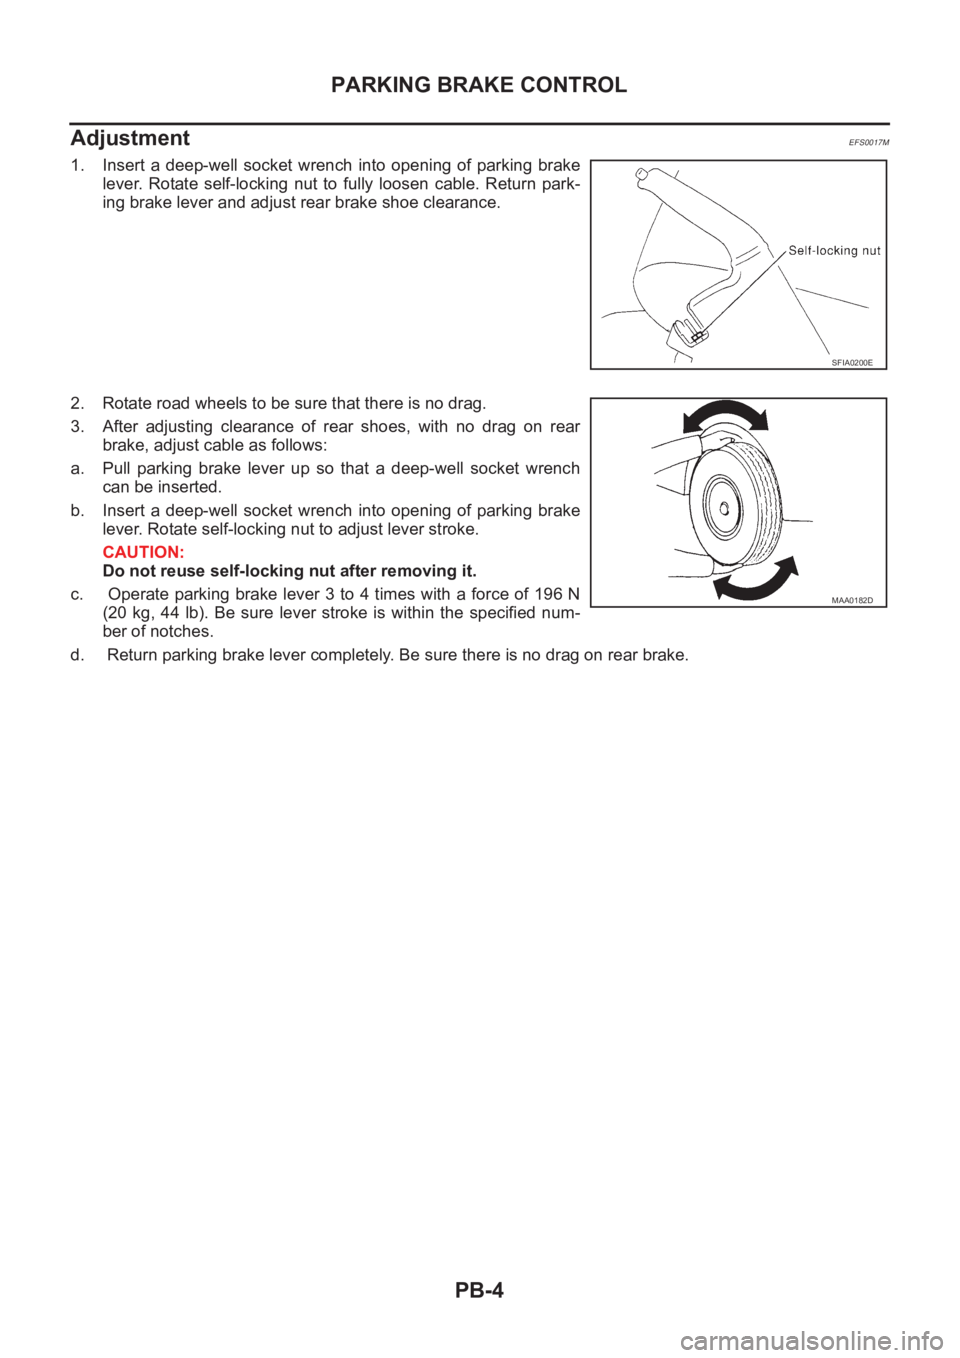
1. Insert a deep-well socket wrench into opening of parking brake
lever. Rotate self-locking nut to fully loosen cable. Return park-
ing brake lever and adjust rear brake shoe clearance.
2. Rotate road wheels to be sure that there is no drag.
3. After adjusting clearance of rear shoes, with no drag on rear
brake, adjust cable as follows:
a. Pull parking brake lever up so that a deep-well socket wrench
can be inserted.
b. Insert a deep-well socket wrench into opening of parking brake
lever. Rotate self-locking nut to adjust lever stroke.
CAUTION:
Do not reuse self-locking nut after removing it.
c. Operate parking brake lever 3 to 4 times with a force of 196 N
(20 kg, 44 lb). Be sure lever stroke is within the specified num-
ber of notches.
d. Return parking brake lever completely. Be sure there is no drag on rear brake.
SFIA0200E
MAA0182D
Page 2779 of 3833

PARKING BRAKE SHOE
PB-5
C
D
E
G
H
I
J
K
L
MA
B
PB
PARKING BRAKE SHOEPFP:44060
ComponentsEFS0017K
Removal and InstallationEFS0017N
REMOVAL
CAUTION:
Clean dust on brake disc and back plate with a vacuum dust
collector.
1. Remove wheel. With parking brake pedal completely returned,
loosen self-locking adjusting nut and slacken cable.
2. Remove rear disc brake caliper.
1. Parking cable 2. Back plate 3. Anchor block
4. Brake shoe 5. Return spring 6. Return spring
7. Spring 8. Retainer 9. Shoe hold pin
10. Adjust assembly LH 11. Adjuster assembly RH 12. E-ring
13. Toggle lever 14. Pin 15. Pin
16. Toggle lever
SFIA0199E
SFIA0200E
Page 2780 of 3833

PB-6
PARKING BRAKE SHOE
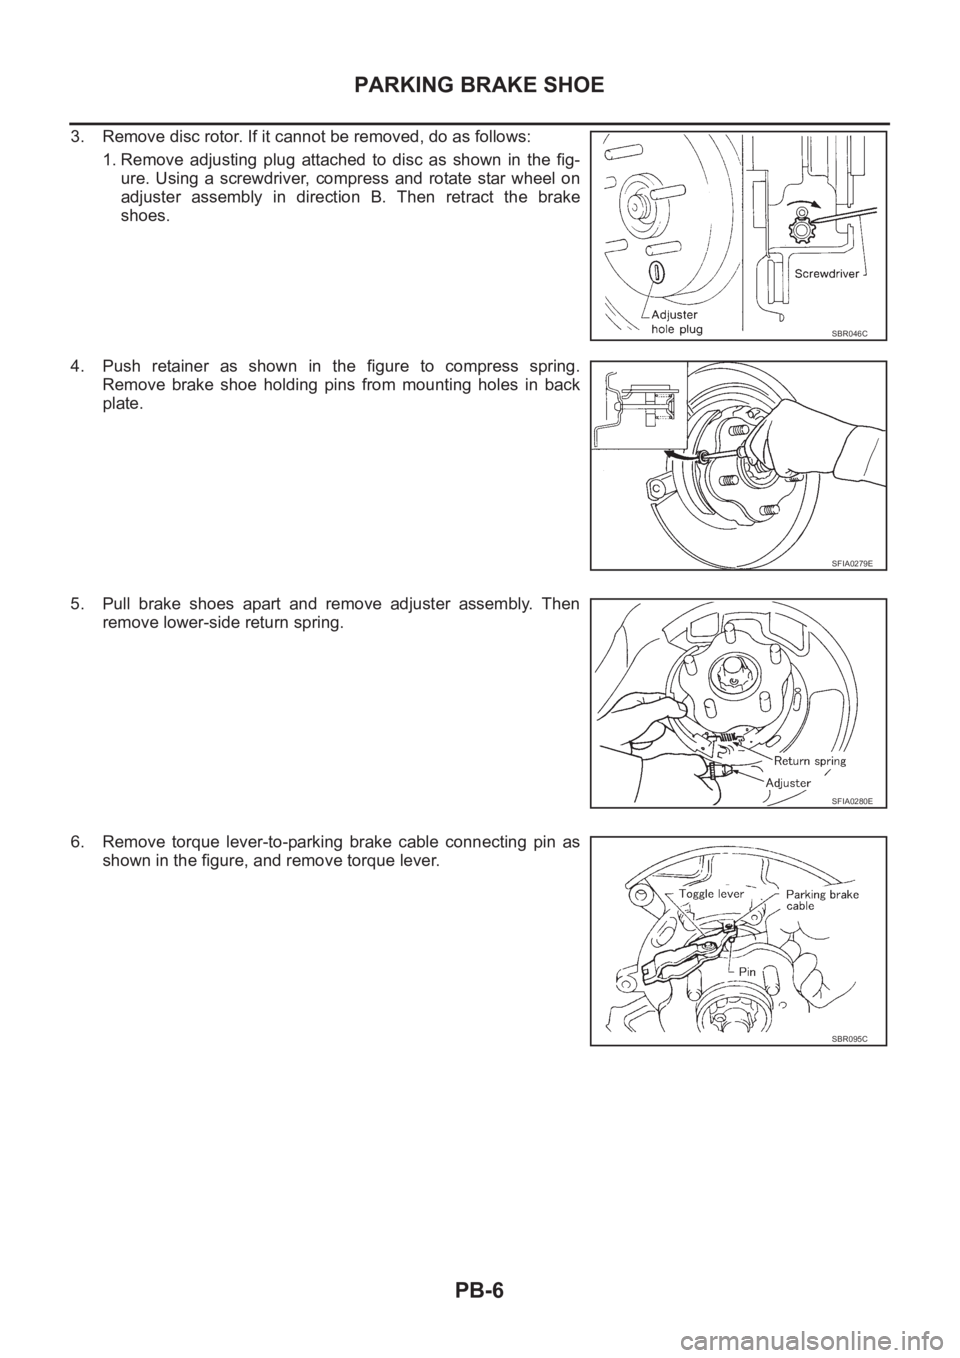
3. Remove disc rotor. If it cannot be removed, do as follows:
1. Remove adjusting plug attached to disc as shown in the fig-
ure. Using a screwdriver, compress and rotate star wheel on
adjuster assembly in direction B. Then retract the brake
shoes.
4. Push retainer as shown in the figure to compress spring.
Remove brake shoe holding pins from mounting holes in back
plate.
5. Pull brake shoes apart and remove adjuster assembly. Then
remove lower-side return spring.
6. Remove torque lever-to-parking brake cable connecting pin as
shown in the figure, and remove torque lever.
SBR046C
SFIA0279E
SFIA0280E
SBR095C