dimensions NISSAN X-TRAIL 2003 Electronic Owner's Guide
[x] Cancel search | Manufacturer: NISSAN, Model Year: 2003, Model line: X-TRAIL, Model: NISSAN X-TRAIL 2003Pages: 3066, PDF Size: 51.47 MB
Page 2255 of 3066

GI-2
MANUAL TRANSAXLE NUMBER ....................... 46
Dimensions ............................................................. 46
Wheels & Tires ....................................................... 46TERMINOLOGY ........................................................47
SAE J1930 Terminology List ...................................47
Page 2299 of 3066

GI-46
IDENTIFICATION INFORMATION
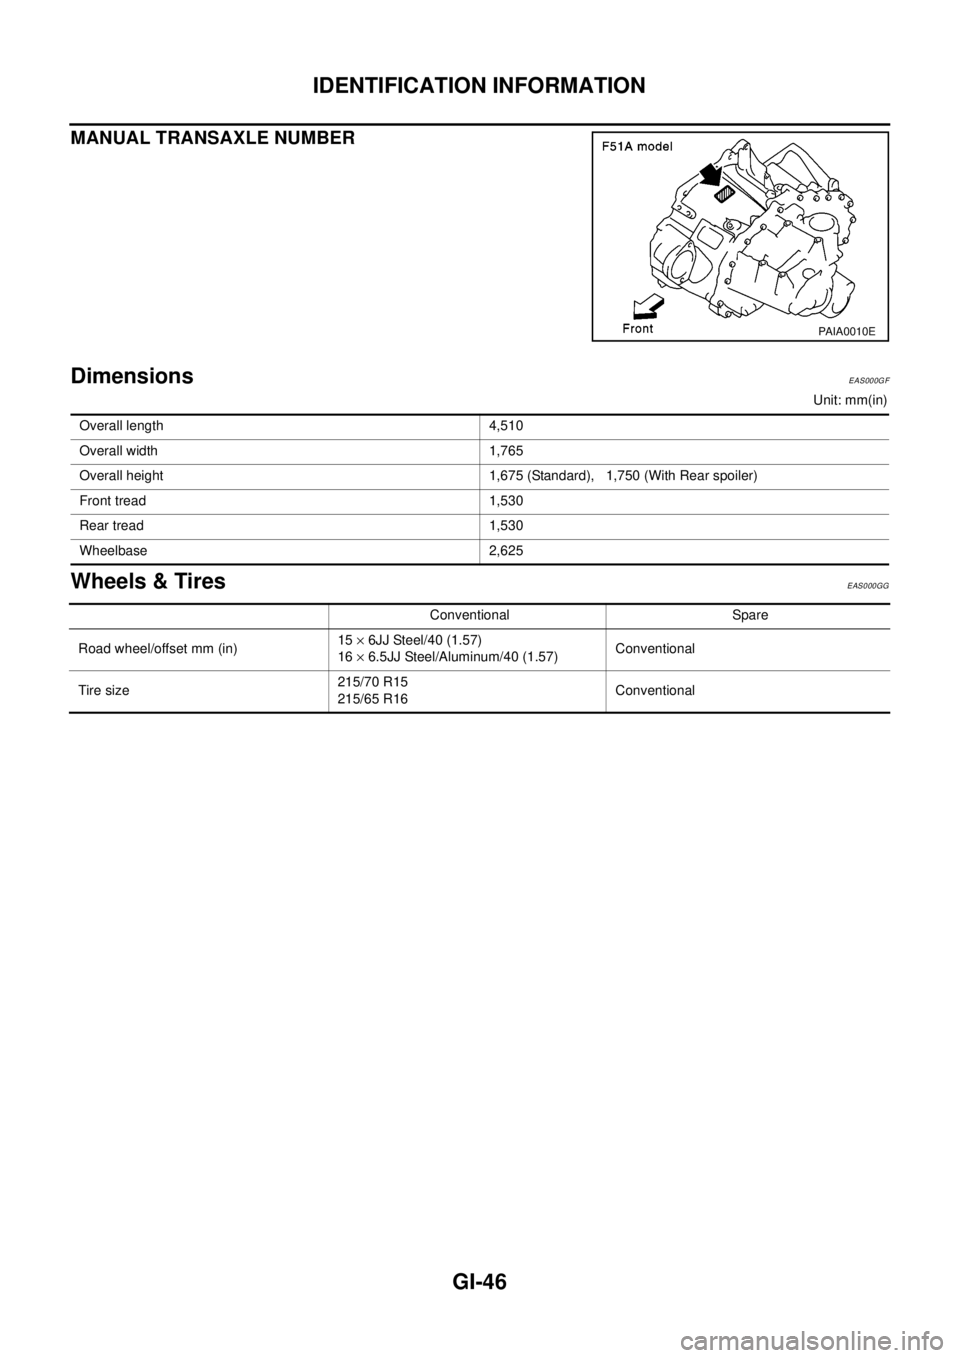
MANUAL TRANSAXLE NUMBER
DimensionsEAS000GF
Unit: mm(in)
Wheels & TiresEAS000GG
PAIA0010E
Overall length 4,510
Overall width 1,765
Overall height 1,675 (Standard), 1,750 (With Rear spoiler)
Front tread 1,530
Rear tread 1,530
Wheelbase 2,625
Conventional Spare
Road wheel/offset mm (in)15´6JJ Steel/40 (1.57)
16´6.5JJ Steel/Aluminum/40 (1.57)Conventional
Tire size215/70 R15
215/65 R16Conventional
Page 2469 of 3066
![NISSAN X-TRAIL 2003 Electronic Owners Guide PRECAUTIONS
LU-3
[QR20DE]
C
D
E
F
G
H
I
J
K
L
MA
LU
[QR20DE]PRECAUTIONSPFP:00001
Precautions For Liquid GasketEBS009SQ
REMOVAL OF LIQUID GASKET SEALING
lAfter removing the mounting bolts and nuts, dis NISSAN X-TRAIL 2003 Electronic Owners Guide PRECAUTIONS
LU-3
[QR20DE]
C
D
E
F
G
H
I
J
K
L
MA
LU
[QR20DE]PRECAUTIONSPFP:00001
Precautions For Liquid GasketEBS009SQ
REMOVAL OF LIQUID GASKET SEALING
lAfter removing the mounting bolts and nuts, dis](/img/5/57402/w960_57402-2468.png)
PRECAUTIONS
LU-3
[QR20DE]
C
D
E
F
G
H
I
J
K
L
MA
LU
[QR20DE]PRECAUTIONSPFP:00001
Precautions For Liquid GasketEBS009SQ
REMOVAL OF LIQUID GASKET SEALING
lAfter removing the mounting bolts and nuts, disconnect and
remove the liquid gasket sealing using a seal cutter.
CAUTION:
Be careful not to damage the mating surfaces.
lIn areas where the cutter is difficult to use, use a plastic hammer
to lightly tap the areas where the liquid gasket is applied.
CAUTION:
If for some unavoidable reason a tool such as a flat-bladed
screwdriver is used, be careful not to damage the mating sur-
faces.
LIQUID GASKET APPLICATION PROCEDURE
1. Using a scraper, remove the old liquid gasket adhering to the
gasket application surface and the mating surface.
lRemove the liquid gasket completely from the groove of the gas-
ket application surface, mounting bolts, and bolt holes.
2. Wipe the gasket application surface and the mating surface with
white gasoline (lighting and heating use) to remove adhering
moisture, grease and foreign materials.
3. Attach the liquid gasket to the tube presser.
Use Genuine Liquid Gasket or equivalent.
4. Apply the gasket without breaks to the specified location with the
specified dimensions.
lIf there is a groove for the liquid gasket application, apply the
gasket to the groove.
lAs for the bolt holes, normally apply the gasket inside the holes.
Occasionally, it should be applied outside the holes. Make sure
to read the text of service manual.
lWithin five minutes of gasket application, install the mating com-
ponent.
lIf the liquid gasket protrudes, wipe it off immediately.
lDo not retighten after the installation.
lAfter 30 minutes or more have passed from the installation, fill
the engine oil and coolant.
CAUTION:
If there are specific instructions in the service manual, observe
them.
PBIC0275E
PBIC0003E
EMA0622D
SEM164F
Page 2481 of 3066
![NISSAN X-TRAIL 2003 Electronic Owners Guide PRECAUTIONS
LU-15
[YD22DDTi]
C
D
E
F
G
H
I
J
K
L
MA
LU
[YD22DDTi]PRECAUTIONSPFP:00001
Precautions For Liquid GasketEBS00B00
REMOVAL OF LIQUID GASKET SEALING
lAfter removing the mounting bolts and nuts NISSAN X-TRAIL 2003 Electronic Owners Guide PRECAUTIONS
LU-15
[YD22DDTi]
C
D
E
F
G
H
I
J
K
L
MA
LU
[YD22DDTi]PRECAUTIONSPFP:00001
Precautions For Liquid GasketEBS00B00
REMOVAL OF LIQUID GASKET SEALING
lAfter removing the mounting bolts and nuts](/img/5/57402/w960_57402-2480.png)
PRECAUTIONS
LU-15
[YD22DDTi]
C
D
E
F
G
H
I
J
K
L
MA
LU
[YD22DDTi]PRECAUTIONSPFP:00001
Precautions For Liquid GasketEBS00B00
REMOVAL OF LIQUID GASKET SEALING
lAfter removing the mounting bolts and nuts, disconnect and
remove the liquid gasket sealing using a seal cutter.
CAUTION:
Be careful not to damage the mating surfaces.
lIn areas where the cutter is difficult to use, use a plastic hammer
to lightly tap the areas where the liquid gasket is applied.
CAUTION:
If for some unavoidable reason a tool such as a flat-bladed
screwdriver is used, be careful not to damage the mating sur-
faces.
LIQUID GASKET APPLICATION PROCEDURE
1. Using a scraper, remove the old liquid gasket adhering to the
gasket application surface and the mating surface.
lRemove the liquid gasket completely from the groove of the gas-
ket application surface, mounting bolts, and bolt holes.
2. Wipe the gasket application surface and the mating surface with
white gasoline (lighting and heating use) to remove adhering
moisture, grease and foreign materials.
3. Attach the liquid gasket to the tube presser.
Use Genuine Liquid Gasket or equivalent.
4. Apply the gasket without breaks to the specified location with the
specified dimensions.
lIf there is a groove for the liquid gasket application, apply the
gasket to the groove.
lAs for the bolt holes, normally apply the gasket inside the holes.
Occasionally, it should be applied outside the holes. Make sure
to read the text of service manual.
lWithin five minutes of gasket application, install the mating com-
ponent.
lIf the liquid gasket protrudes, wipe it off immediately.
lDo not retighten after the installation.
lAfter 30 minutes or more have passed from the installation, fill
the engine oil and coolant.
CAUTION:
If there are specific instructions in the service manual, observe
them.
PBIC0275E
PBIC0003E
EMA0622D
SEM159F
Page 2994 of 3066

TF-24
TRANSFER ASSEMBLY
CAUTION:
If a malfunction is detected on the drive gear or drive pinion gear, replace the drive gear and drive pin-
ion gear as a set.
Bearings
lCheck for seizure, peeling, wear, corrosion, sticking/abnormal noise/roughness in hand turning, and other
damage.
CAUTION:
When replacing the bearing, always replace the inner race and outer race as a pair.
Washers and shims
lCheck for seizure, damage, and abnormal wear.
Oil seals
lDiscard old oil seals; replace with new ones.
lIf wear, deterioration of adherence (sealing force of lips), or damage is detected on the lips, replace them.
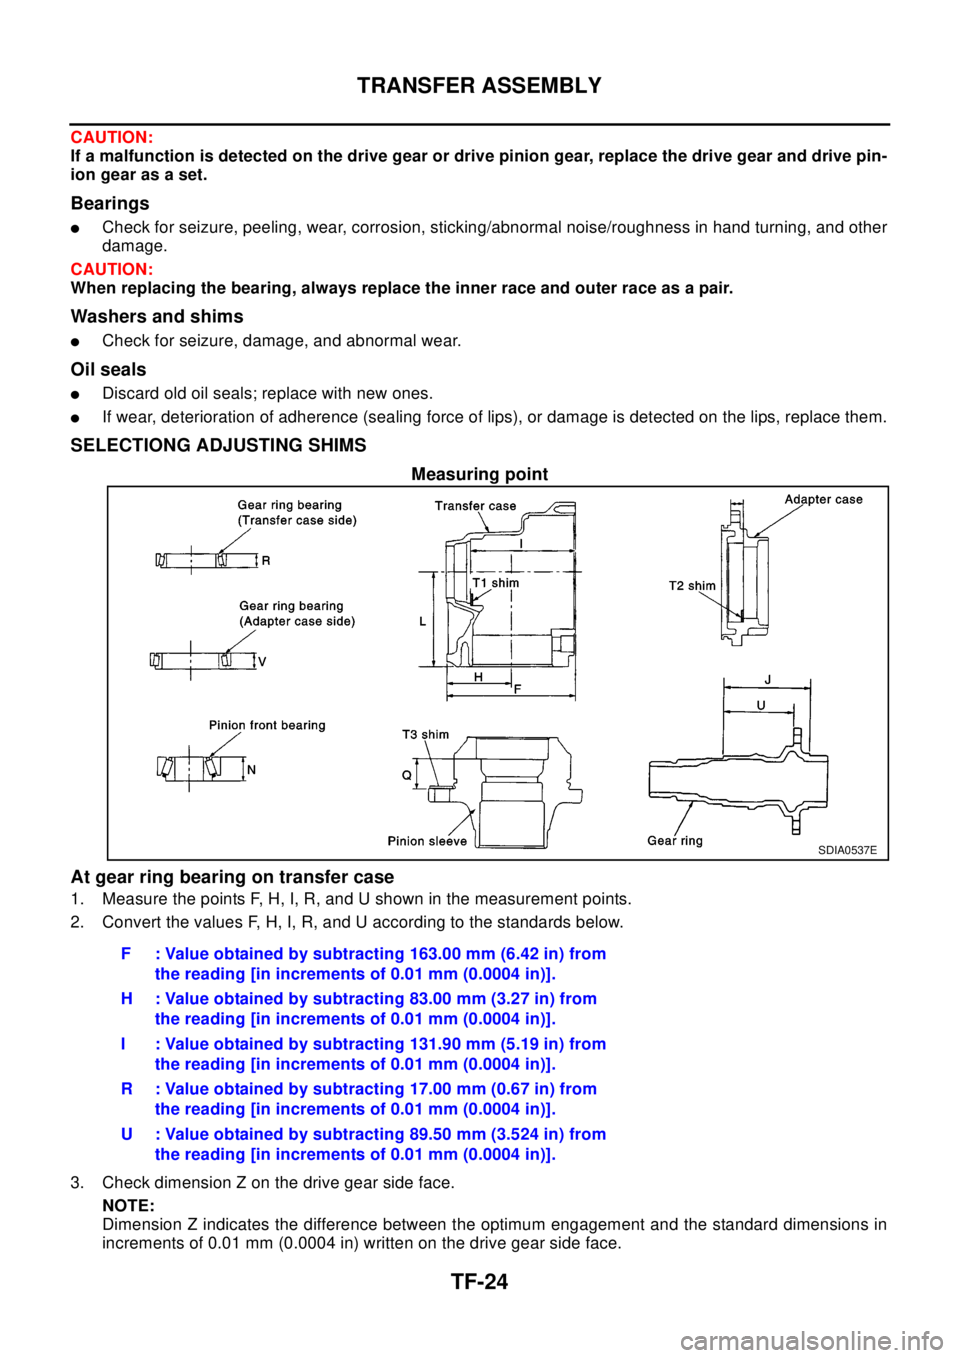
SELECTIONG ADJUSTING SHIMS
Measuring point
At gear ring bearing on transfer case
1. Measure the points F, H, I, R, and U shown in the measurement points.
2. Convert the values F, H, I, R, and U according to the standards below.
3. Check dimension Z on the drive gear side face.
NOTE:
Dimension Z indicates the difference between the optimum engagement and the standard dimensions in
increments of 0.01 mm (0.0004 in) written on the drive gear side face.
SDIA0537E
F : Value obtained by subtracting 163.00 mm (6.42 in) from
the reading [in increments of 0.01 mm (0.0004 in)].
H : Value obtained by subtracting 83.00 mm (3.27 in) from
the reading [in increments of 0.01 mm (0.0004 in)].
I : Value obtained by subtracting 131.90 mm (5.19 in) from
the reading [in increments of 0.01 mm (0.0004 in)].
R : Value obtained by subtracting 17.00 mm (0.67 in) from
the reading [in increments of 0.01 mm (0.0004 in)].
U : Value obtained by subtracting 89.50 mm (3.524 in) from
the reading [in increments of 0.01 mm (0.0004 in)].
Page 2995 of 3066

TRANSFER ASSEMBLY
TF-25
C
E
F
G
H
I
J
K
L
MA
B
TF
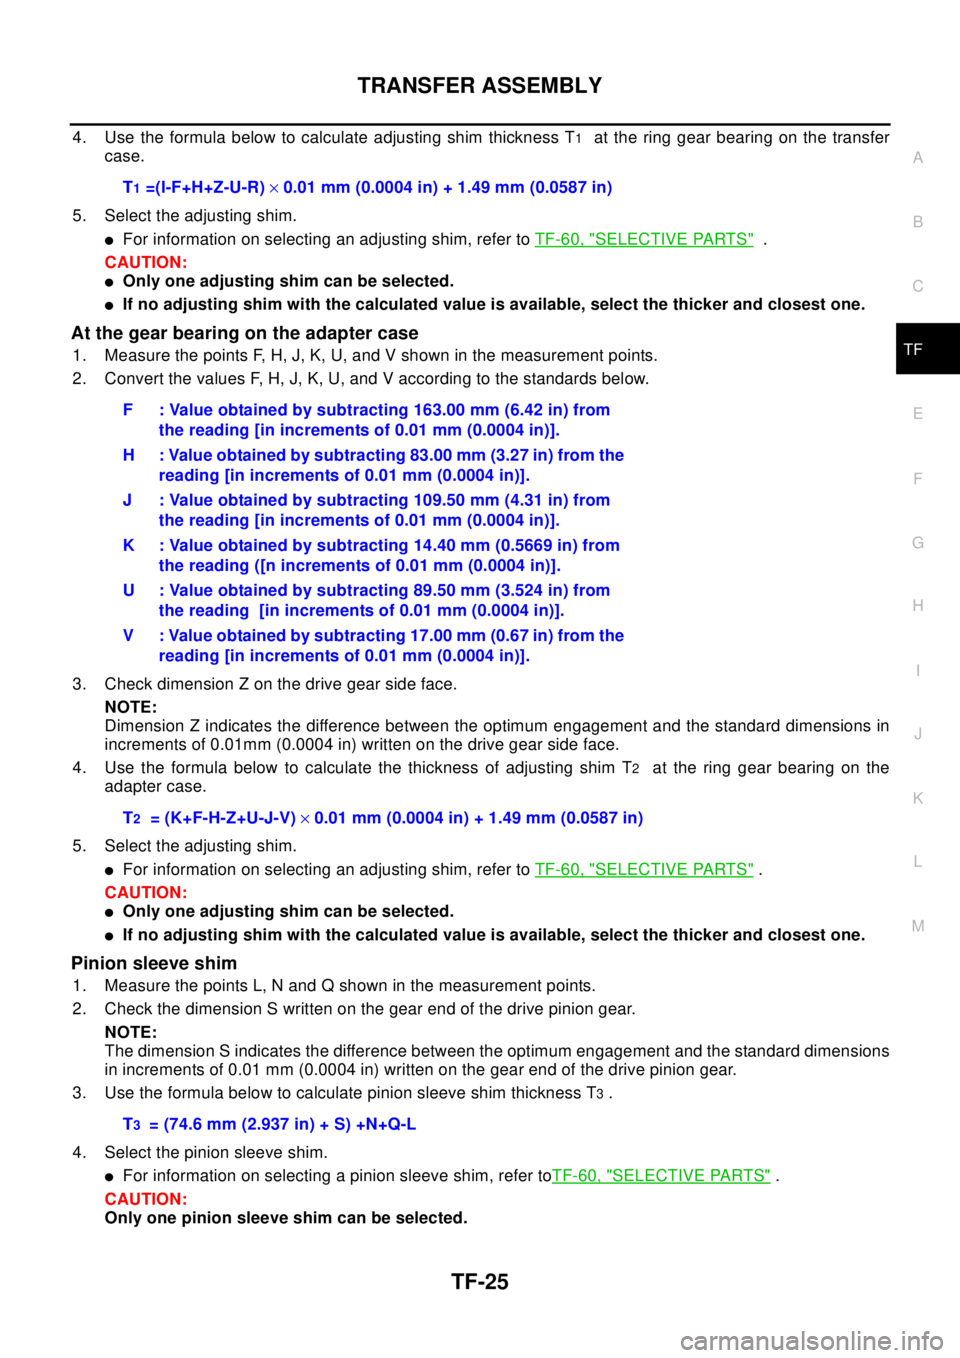
4. Use the formula below to calculate adjusting shim thickness T1at the ring gear bearing on the transfer
case.
5. Select the adjusting shim.
lFor information on selecting an adjusting shim, refer toTF-60, "SELECTIVE PARTS".
CAUTION:
lOnly one adjusting shim can be selected.
lIf no adjusting shim with the calculated value is available, select the thicker and closest one.
At the gear bearing on the adapter case
1. Measure the points F, H, J, K, U, and V shown in the measurement points.
2. Convert the values F, H, J, K, U, and V according to the standards below.
3. Check dimension Z on the drive gear side face.
NOTE:
Dimension Z indicates the difference between the optimum engagement and the standard dimensions in
increments of 0.01mm (0.0004 in) written on the drive gear side face.
4. Use the formula below to calculate the thickness of adjusting shim T
2attheringgearbearingonthe
adapter case.
5. Select the adjusting shim.
lFor information on selecting an adjusting shim, refer toTF-60, "SELECTIVE PARTS".
CAUTION:
lOnly one adjusting shim can be selected.
lIf no adjusting shim with the calculated value is available, select the thicker and closest one.
Pinion sleeve shim
1. Measure the points L, N and Q shown in the measurement points.
2. Check the dimension S written on the gear end of the drive pinion gear.
NOTE:
The dimension S indicates the difference between the optimum engagement and the standard dimensions
in increments of 0.01 mm (0.0004 in) written on the gear end of the drive pinion gear.
3. Use the formula below to calculate pinion sleeve shim thickness T
3.
4. Select the pinion sleeve shim.
lFor information on selecting a pinion sleeve shim, refer toTF-60, "SELECTIVE PARTS".
CAUTION:
Only one pinion sleeve shim can be selected.T
1=(I-F+H+Z-U-R)´0.01 mm (0.0004 in) + 1.49 mm (0.0587 in)
F : Value obtained by subtracting 163.00 mm (6.42 in) from
the reading [in increments of 0.01 mm (0.0004 in)].
H : Value obtained by subtracting 83.00 mm (3.27 in) from the
reading [in increments of 0.01 mm (0.0004 in)].
J : Value obtained by subtracting 109.50 mm (4.31 in) from
the reading [in increments of 0.01 mm (0.0004 in)].
K : Value obtained by subtracting 14.40 mm (0.5669 in) from
the reading ([n increments of 0.01 mm (0.0004 in)].
U : Value obtained by subtracting 89.50 mm (3.524 in) from
the reading [in increments of 0.01 mm (0.0004 in)].
V : Value obtained by subtracting 17.00 mm (0.67 in) from the
reading [in increments of 0.01 mm (0.0004 in)].
T
2= (K+F-H-Z+U-J-V)´0.01 mm (0.0004 in) + 1.49 mm (0.0587 in)
T
3= (74.6 mm (2.937 in) + S) +N+Q-L