Atc NISSAN X-TRAIL 2003 Electronic Repair Manual
[x] Cancel search | Manufacturer: NISSAN, Model Year: 2003, Model line: X-TRAIL, Model: NISSAN X-TRAIL 2003Pages: 3066, PDF Size: 51.47 MB
Page 1 of 3066
MODEL T30 SERIES
2001 NISSAN EUROPE N.V.
All rights reserved. No part of this Electronic Service Manual may be reproduced or stored in a retrieval system, or transmitted in any
form, or by any means, electronic, mechanical, photocopying, recording or otherwise, without the prior written permission of Nissan
Europe N.V., Paris, France.
A GENERAL INFORMATION
B ENGINE
C TRANSMISSION/
TRANSAXLE
D DRIVELINE/AXLE
E SUSPENSION
F BRAKES
G STEERING
H RESTRAINTS
I BODY
J AIR CONDITIONER
K ELECTRICAL
L MAINTENANCE
M INDEXGI General Information
EM Engine Mechanical
LU Engine Lubrication System
CO Engine Cooling System
EC Engine Control System
FL Fuel System
EX Exhaust System
ACC Accelerator Control System
CL Clutch
MT Manual Transaxle
AT Automatic Transaxle
TF Transfer
PR Propeller Shaft
RFD Rear Final Drive
FAX Front Axle
RAX Rear Axle
FSU Front Suspension
RSU Rear Suspension
WT Road Wheels & Tires
BR Brake System
PB Parking Brake System
BRC Brake Control System
PS Power Steering System
SB Seat Belts
SRS Supplemental Restraint System (SRS)
BL Body, Lock & Security System
GW Glasses, Window System & Mirrors
RF Roof
EI Exterior & Interior
IP Instrument Panel
SE Seat
ATC Automatic Air Conditioner
MTC Manual AIr Conditioner
SC Starting & Charging System
LT Lighting System
DI Driver Information System
WW Wiper, Washer & Horn
BCS Body Control System
LAN LAN System
AV Audio, Visual & Telephone System
PG Power Supply, Ground & Circuit Elements
MA Maintenance
IDX Alphabetical Index
QUICK REFERENCE INDEX
A
B
C
D
E
F
G
H
I
J
K
L
M
Page 35 of 3066
OVERALL SYSTEM
AT-29
D
E
F
G
H
I
J
K
L
MA
B
AT
Control MechanismECS004QF
LINE PRESSURE CONTROL
TCM has various line pressure control characteristics to match the driving conditions.
An ON-OFF duty signal is sent to the line pressure solenoid valve based on TCM characteristics.
Hydraulic pressure on the clutch and brake is electronically controlled through the line pressure solenoid valve
to accommodate engine torque. This results in smooth shift operation.
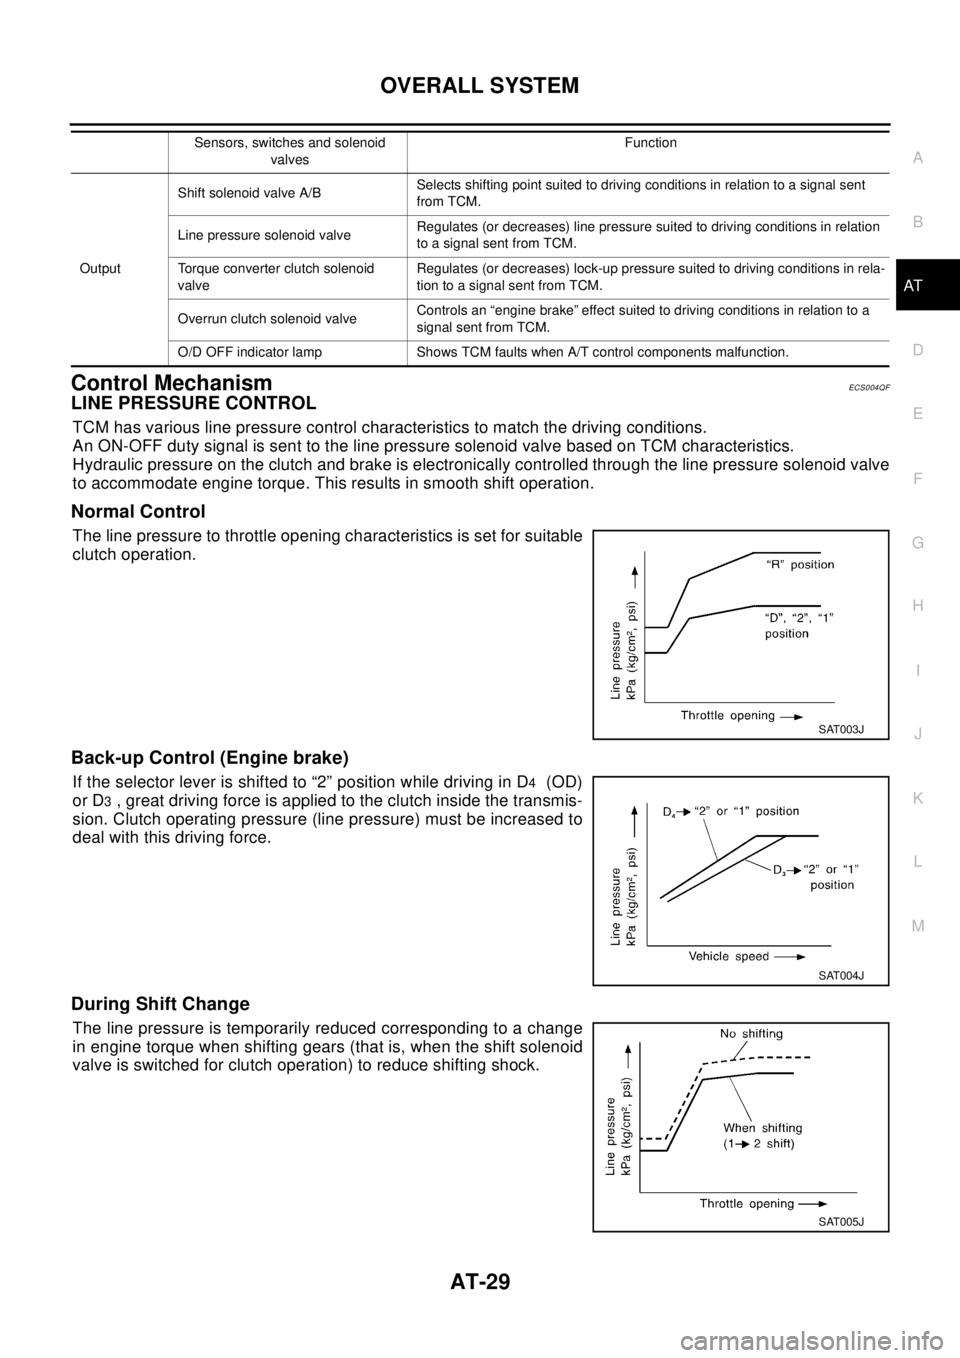
Normal Control
The line pressure to throttle opening characteristics is set for suitable
clutch operation.
Back-up Control (Engine brake)
If the selector lever is shifted to “2” position while driving in D4(OD)
or D
3, great driving force is applied to the clutch inside the transmis-
sion. Clutch operating pressure (line pressure) must be increased to
deal with this driving force.
During Shift Change
The line pressure is temporarily reduced corresponding to a change
in engine torque when shifting gears (that is, when the shift solenoid
valve is switched for clutch operation) to reduce shifting shock.
OutputShift solenoid valve A/BSelects shifting point suited to driving conditions in relation to a signal sent
from TCM.
Line pressure solenoid valveRegulates (or decreases) line pressure suited to driving conditions in relation
to a signal sent from TCM.
Torque converter clutch solenoid
valveRegulates (or decreases) lock-up pressure suited to driving conditions in rela-
tion to a signal sent from TCM.
Overrun clutch solenoid valveControls an “engine brake” effect suited to driving conditions in relation to a
signal sent from TCM.
O/D OFF indicator lamp Shows TCM faults when A/T control components malfunction.Sensors, switches and solenoid
valvesFunction
SAT003J
SAT004J
SAT005J
Page 161 of 3066
![NISSAN X-TRAIL 2003 Electronic Repair Manual DTC P0731 A/T 1ST GEAR FUNCTION
AT-155
[EURO-OBD]
D
E
F
G
H
I
J
K
L
MA
B
AT
Diagnostic ProcedureECS004RC
1.CHECK SHIFT SOLENOID VALVE
1. Remove control valve assembly. Refer toAT-454, "
Control Valve](/img/5/57402/w960_57402-160.png "NISSAN X-TRAIL 2003 Electronic Repair Manual DTC P0731 A/T 1ST GEAR FUNCTION
AT-155
[EURO-OBD]
D
E
F
G
H
I
J
K
L
MA
B
AT
Diagnostic ProcedureECS004RC
1.CHECK SHIFT SOLENOID VALVE
1. Remove control valve assembly. Refer toAT-454, \"
Control Valve")
DTC P0731 A/T 1ST GEAR FUNCTION
AT-155
[EURO-OBD]
D
E
F
G
H
I
J
K
L
MA
B
AT
Diagnostic ProcedureECS004RC
1.CHECK SHIFT SOLENOID VALVE
1. Remove control valve assembly. Refer toAT-454, "
Control Valve Assembly and Accumulators".
2. Check shift solenoid valve operation.
lShift solenoid valve A
lShift solenoid valve B
Refer to “Component Inspection”,AT- 1 5 6 , "
Component Inspection".
OK or NG
OK >> GOTO2
NG >> Repair or replace shift solenoid valve assembly.
2.CHECK CONTROL VALVE
1. Disassemble control valve assembly. Refer to “Control Valve Assembly”,AT-489, "
Control Valve Assem-
bly".
2. Check to ensure that:
lValve, sleeve and plug slide along valve bore under their own weight.
lValve, sleeve and plug are free from burrs, dents and scratches.
lControl valve springs are free from damage, deformation and fatigue.
lHydraulic line is free from obstacles.
OK or NG
OK >> GOTO3
NG >> Repair control valve assembly.
SCIA0755E
SAT367H
Page 168 of 3066
![NISSAN X-TRAIL 2003 Electronic Repair Manual AT-162
[EURO-OBD]
DTCP0732A/T2NDGEARFUNCTION
Diagnostic Procedure
ECS004RG
1.CHECK SHIFT SOLENOID VALVE
1. Remove control valve assembly. Refer toAT-454, "
REMOVAL".
2. Check shift solenoid valve oper](/img/5/57402/w960_57402-167.png "NISSAN X-TRAIL 2003 Electronic Repair Manual AT-162
[EURO-OBD]
DTCP0732A/T2NDGEARFUNCTION
Diagnostic Procedure
ECS004RG
1.CHECK SHIFT SOLENOID VALVE
1. Remove control valve assembly. Refer toAT-454, \"
REMOVAL\".
2. Check shift solenoid valve oper")
AT-162
[EURO-OBD]
DTCP0732A/T2NDGEARFUNCTION
Diagnostic Procedure
ECS004RG
1.CHECK SHIFT SOLENOID VALVE
1. Remove control valve assembly. Refer toAT-454, "
REMOVAL".
2. Check shift solenoid valve operation.
lShift solenoid valve B
Refer to “Component Inspection”,AT-163, "
Component Inspection".
OK or NG
OK >> GO TO 2
NG >> Repair or replace shift solenoid valve assembly.
2.CHECK CONTROL VALVE
1. Disassemble control valve assembly. Refer to “Control Valve Assembly”,AT-489, "
Control Valve Assem-
bly".
2. Check to ensure that:
lValve, sleeve and plug slide along valve bore under their own weight.
lValve, sleeve and plug are free from burrs, dents and scratches.
lControl valve springs are free from damage, deformation and fatigue.
lHydraulic line is free from obstacles.
OK or NG
OK >> GO TO 3
NG >> Repair control valve assembly.
SCIA0758E
SAT367H
Page 175 of 3066
![NISSAN X-TRAIL 2003 Electronic Repair Manual DTC P0733 A/T 3RD GEAR FUNCTION
AT-169
[EURO-OBD]
D
E
F
G
H
I
J
K
L
MA
B
AT
Diagnostic ProcedureECS004RK
1.CHECK SHIFT SOLENOID VALVE
1. Remove control valve assembly. Refer toAT-454, "
REMOVAL".
2. C](/img/5/57402/w960_57402-174.png "NISSAN X-TRAIL 2003 Electronic Repair Manual DTC P0733 A/T 3RD GEAR FUNCTION
AT-169
[EURO-OBD]
D
E
F
G
H
I
J
K
L
MA
B
AT
Diagnostic ProcedureECS004RK
1.CHECK SHIFT SOLENOID VALVE
1. Remove control valve assembly. Refer toAT-454, \"
REMOVAL\".
2. C")
DTC P0733 A/T 3RD GEAR FUNCTION
AT-169
[EURO-OBD]
D
E
F
G
H
I
J
K
L
MA
B
AT
Diagnostic ProcedureECS004RK
1.CHECK SHIFT SOLENOID VALVE
1. Remove control valve assembly. Refer toAT-454, "
REMOVAL".
2. Check shift solenoid valve operation.
lShift solenoid valve A
Refer to “Component Inspection” below.
OK or NG
OK >> GO TO 2
NG >> Repair or replace shift solenoid valve assembly.
2.CHECK CONTROL VALVE
1. Disassemble control valve assembly. Refer to “Control Valve Assembly”,AT-489, "
Control Valve Assem-
bly".
2. Check to ensure that:
lValve, sleeve and plug slide along valve bore under their own weight.
lValve, sleeve and plug are free from burrs, dents and scratches.
lControl valve springs are free from damage, deformation and fatigue.
lHydraulic line is free from obstacles.
OK or NG
OK >> GO TO 3
NG >> Repair control valve assembly.
SCIA0722E
SAT367H
Page 183 of 3066
![NISSAN X-TRAIL 2003 Electronic Repair Manual DTC P0734 A/T 4TH GEAR FUNCTION
AT-177
[EURO-OBD]
D
E
F
G
H
I
J
K
L
MA
B
AT
4.CHECK CONTROL VALVE
1. Disassemble control valve assembly.
Refer to $$$$$.
2. Check to ensure that:
lValve, sleeve and plu](/img/5/57402/w960_57402-182.png "NISSAN X-TRAIL 2003 Electronic Repair Manual DTC P0734 A/T 4TH GEAR FUNCTION
AT-177
[EURO-OBD]
D
E
F
G
H
I
J
K
L
MA
B
AT
4.CHECK CONTROL VALVE
1. Disassemble control valve assembly.
Refer to $$$$$.
2. Check to ensure that:
lValve, sleeve and plu")
DTC P0734 A/T 4TH GEAR FUNCTION
AT-177
[EURO-OBD]
D
E
F
G
H
I
J
K
L
MA
B
AT
4.CHECK CONTROL VALVE
1. Disassemble control valve assembly.
Refer to $$$$$.
2. Check to ensure that:
lValve, sleeve and plug slide along valve bore under their own weight.
lValve, sleeve and plug are free from burrs, dents and scratches.
lControl valve springs are free from damage, deformation and fatigue.
lHydraulic line is free from obstacles.
OK or NG
OK >> GO TO 5
NG >> Repair control valve.
5.CHECK SHIFT UP (D3TO D4)
Does A/T shift from D
3to D4at the specified speed?
OK or NG
OK >> GO TO 9
NG >> Check control valve again. Repair or replace control valve assembly.
6.CHECK LINE PRESSURE SOLENOID VALVE
1. Remove control valve assembly.
Refer toAT- 4 5 4 , "
REMOVAL".
2. Refer to “Component Inspection”,AT- 1 7 9 , "
Component Inspec-
tion".
OK or NG
OK >> GO TO 7
NG >> Replace solenoid valve assembly.
SCIA0745E
Page 506 of 3066
![NISSAN X-TRAIL 2003 Electronic Repair Manual AT-500
[ALL]
REPAIR FOR COMPONENT PARTS
INSPECTION
Valve Spring
lMeasure free length and outer diameter of each valve spring.
Also check for damage or deformation.
lReplace valve springs if deformed o](/img/5/57402/w960_57402-505.png "NISSAN X-TRAIL 2003 Electronic Repair Manual AT-500
[ALL]
REPAIR FOR COMPONENT PARTS
INSPECTION
Valve Spring
lMeasure free length and outer diameter of each valve spring.
Also check for damage or deformation.
lReplace valve springs if deformed o")
AT-500
[ALL]
REPAIR FOR COMPONENT PARTS
INSPECTION
Valve Spring
lMeasure free length and outer diameter of each valve spring.
Also check for damage or deformation.
lReplace valve springs if deformed or fatigued.
Control Valves
lCheck sliding surfaces of valves, sleeves and plugs.
ASSEMBLY
lLay control valve body down when installing valves. Do not
stand the control valve body upright.
1. Lubricate the control valve body and all valves with ATF. Install
control valves by sliding them carefully into their bores.
lBe careful not to scratch or damage valve body.
lWrap a small screwdriver with vinyl tape and use it to insert
the valves into their proper positions. Inspection standard :Refer toAT-563, "
SERVICE
DATA AND SPECIFICATIONS
(SDS)".
SAT138D
SAT139D
SAT140DA
SAT141D
Page 579 of 3066

ATC-1
AUTOMATIC AIR CONDITIONER
J AIR CONDITIONER
CONTENTS
C
D
E
F
G
H
I
K
L
M
SECTION
A
B
AT C
AUTOMATIC AIR CONDITIONER
PRECAUTIONS .......................................................... 4
Precautions for Supplemental Restraint System
(SRS) “AIR BAG” and “SEAT BELT PRE-TEN-
SIONER” .................................................................. 4
Precautions for Working with HFC-134a (R-134a)..... 4
General Refrigerant Precautions .............................. 4
Lubricant Precautions .............................................. 5
Precautions for Refrigerant Connection ................... 5
FEATURES OF NEW TYPE REFRIGERANT
CONNECTION ...................................................... 5
O-RING AND REFRIGERANT CONNECTION..... 6
Precautions for Servicing Compressor ..................... 7
Precautions for Service Equipment .......................... 8
RECOVERY/RECYCLING EQUIPMENT .............. 8
ELECTRONIC LEAK DETECTOR ........................ 8
VACUUM PUMP ................................................... 8
MANIFOLD GAUGE SET ...................................... 8
SERVICE HOSES ................................................. 9
SERVICE COUPLERS .......................................... 9
REFRIGERANT WEIGHT SCALE ........................ 9
CALIBRATING ACR4 WEIGHT SCALE ................ 9
CHARGING CYLINDER ...................................... 10
Precautions for Leak Detection Dye ....................... 10
IDENTIFICATION ................................................ 10
IDENTIFICATION LABEL FOR VEHICLE ........... 10
Wiring Diagrams and Trouble Diagnosis ................ 10
PREPARATION ..........................................................11
Special Service Tools ..............................................11
WITH GASOLINE ENGINE (CWV-615M COM-
PRESSOR) ..........................................................11
WITH DIESEL ENGINE (DKV-11G COMPRES-
SOR) ....................................................................11
HFC-134a (R-134a) Service Tools and Equipment... 12
REFRIGERATION SYSTEM ..................................... 16
Refrigerant Cycle ................................................... 16
REFRIGERANT FLOW ....................................... 16
FREEZE PROTECTION (WITH GASOLINE
ENGINE: CWV-615M COMPRESSOR) .............. 16
Refrigerant System Protection ............................... 16
REFRIGERANT PRESSURE SENSOR (WITHGASOLINE ENGINE: CWV-615M COMPRES-
SOR) ................................................................... 16
DUAL-PRESSURE SWITCH (WITH DIESEL
ENGINE: DKV-11G COMPRESSOR) .................. 16
PRESSURE RELIEF VALVE (WITH GASOLINE
ENGINE: CWV-615M COMPRESSOR) .............. 16
V-6 Variable Displacement Compressor (With Gas-
oline Engine: CWV-165M Compressor) .................. 17
GENERAL INFORMATION ................................. 17
DESCRIPTION .................................................... 17
Component Layout ................................................. 20
LUBRICANT .............................................................. 21
Maintenance of Lubricant Quantity in Compressor... 21
LUBRICANT ........................................................ 21
LUBRICANT RETURN OPERATION .................. 21
LUBRICANT ADJUSTING PROCEDURE FOR
COMPONENTS REPLACEMENT EXCEPT
COMPRESSOR .................................................. 22
LUBRICANT ADJUSTING PROCEDURE FOR
COMPRESSOR REPLACEMENT ....................... 22
AIR CONDITIONER CONTROL ............................... 24
Overview Air Conditioner LAN Control System ...... 24
System Construction .............................................. 24
OPERATION ........................................................ 24
TRANSMISSION DATA AND TRANSMISSION
ORDER ............................................................... 25
AIR MIX DOOR CONTROL (AUTOMATIC TEM-
PERATURE CONTROL) ..................................... 25
FAN SPEED CONTROL ...................................... 26
INTAKE DOOR CONTROL ................................. 26
OUTLET DOOR CONTROL ................................ 26
MAGNET CLUTCH CONTROL ........................... 26
SELF-DIAGNOSTIC SYSTEM ............................ 26
Overview of Control system .................................... 26
Control Operation ................................................... 27
DISPLAY SCREEN .............................................. 27
AUTO SWITCH ................................................... 27
TEMPERATURE DIAL (POTENTIO TEMPERA-
TURE CONTROL) ............................................... 27
A/C SWITCH ....................................................... 27
Page 580 of 3066

ATC-2
DEFROSTER (DEF) SWITCH ............................. 27
MODE SWITCH ................................................... 27
FAN SWITCH ...................................................... 27
OFF SWITCH ...................................................... 27
FRESH (FRE) SWITCH ....................................... 27
RECIRCULATION (REC) SWITCH ..................... 27
Discharge Air Flow ................................................. 28
System Description ................................................. 29
SWITCHES AND THEIR CONTROL FUNCTION... 29
TROUBLE DIAGNOSIS ............................................ 30
How to Perform Trouble Diagnoses for Quick and
Accurate Repair ...................................................... 30
WORK FLOW ...................................................... 30
SYMPTOM TABLE .............................................. 30
Component Parts and Harness Connector Location... 31
ENGINE COMPARTMENT .................................. 31
PASSENGER COMPARTMENT .......................... 32
Circuit Diagram ....................................................... 33
WITH GASOLINE ENGINE ................................. 33
WITH DIESEL ENGINE ....................................... 34
Wiring Diagram ....................................................... 35
WITH DASOLINE ENGINE ................................. 35
WITH DIESEL ENGINE ....................................... 38
Auto Amp. Terminals and Reference Value ............ 41
PIN CONNECTOR TERMINAL LAYOUT ............ 41
AUTO AMP. INSPECTION TABLE ...................... 41
Self-diagnosis Function .......................................... 42
DESCRIPTION .................................................... 42
PROCEDURE ...................................................... 43
AUXILIARY MECHANISM: TEMPERATURE
SETTING TRIMMER ........................................... 49
AUXILIARY MECHANISM: FOOT POSITION
SETTING TRIMMER ........................................... 50
AUXILIARY MECHANISM: INLET PORT MEM-
ORY FUNCTION (FOR LHD MODELS) .............. 51
Operational Check .................................................. 51
CHECKING MEMORY FUNCTION ..................... 51
CHECKING BLOEWER ....................................... 52
CHECKING DISCHARGE AIR ............................ 52
CHECKING RECIRCULATION ............................ 52
CHECKING TEMPERATURE DECREASE ......... 53
CHECKING TEMPERATURE INCREASE .......... 53
CHECKING AUTO MODE ................................... 53
Power Supply and Ground Circuit for Auto Amp. ... 53
INSPECTION FLOW ........................................... 54
COMPONENT DESCRIPTION ............................ 54
DIAGNOSTIC PROCEDURE .............................. 55
LAN System Circuit ................................................ 56
DIAGNOSTIC PROCEDURE .............................. 56
Mode Door Motor Circuit ........................................ 58
INSPECTION FLOW ........................................... 59
SYSTEM DESCRIPTION .................................... 60
COMPONENT DESCRIPTION ............................ 61
DIAGNOSTIC PROCEDURE .............................. 61
Air Mix Door Motor Circuit ...................................... 61
INSPECTION FLOW ........................................... 62
SYSTEM DESCRIPTION .................................... 62
COMPONENT DESCRIPTION ............................ 64DIAGNOSTIC PROCEDURE ...............................64
Intake Door Motor Circuit ........................................64
INSPECTION FLOW ............................................65
SYSTEM DESCRIPTION .....................................65
COMPONENT DESCRIPTION ............................66
DIAGNOSTIC PROCEDURE ...............................67
Blower Motor Circuit ................................................67
INSPECTION FLOW ............................................68
SYSTEM DESCRIPTION .....................................69
COMPONENT DESCRIPTION ............................70
DIAGNOSTIC PROCEDURE ...............................70
COMPONENT INSPECTION ...............................73
Magnet Clutch Circuit ..............................................73
INSPECTION FLOW ............................................74
SYSTEM DESCRIPTION .....................................74
DIAGNOSTIC PROCEDURE ...............................75
COMPONENT INSPECTION ...............................80
Insufficient Cooling ..................................................81
INSPECTION FLOW ............................................82
PERFORMANCE TEST DIAGNOSES ................83
PERFORMANCE CHART ....................................84
TROUBLE DIAGNOSES FOR ABNORMAL
PRESSURE .........................................................86
Insufficient Heating .................................................89
INSPECTION FLOW ............................................90
Noise .......................................................................91
INSPECTION FLOW ............................................91
Self-diagnosis .........................................................92
INSPECTION FLOW ............................................92
Memory Function ....................................................92
INSPECTION FLOW ............................................93
Ambient Sensor Circuit ...........................................93
COMPONENT DESCRIPTION ............................93
AMBIENT TEMPERATURE INPUT PROCESS...93
DIAGNOSTIC PROCEDURE ...............................94
COMPONENT INSPECTION ...............................95
In-vehicle Sensor Circuit .........................................95
COMPONENT DESCRIPTION ............................95
DIAGNOSTIC PROCEDURE ...............................96
COMPONENT INSPECTION ...............................97
Sunload Sensor Circuit ...........................................98
COMPONENT DESCRIPTION ............................98
SUNLOAD INPUT PROCESS .............................98
DIAGNOSTIC PROCEDURE ...............................98
COMPONENT INSPECTION ............................. 100
Intake Sensor Circuit ............................................. 101
COMPONENT DESCRIPTION .......................... 101
DIAGNOSTIC PROCEDURE ............................. 101
CONTROLLER ........................................................ 104
Removal and Installation ....................................... 104
Disassembly and Assembly .................................. 104
AMBIENT SENSOR ................................................ 105
Removal and Installation ....................................... 105
IN-VEHICLE SENSOR ............................................ 106
Removal and Installation ....................................... 106
SUNLOAD SENSOR ............................................... 107
Removal and Installation ....................................... 107
Page 581 of 3066

ATC-3
C
D
E
F
G
H
I
K
L
MA
B
AT C INTAKE SENSOR CIRCUIT ................................... 108
Removal and Installation ...................................... 108
BLOWER UNIT ....................................................... 109
Removal and Installation ...................................... 109
REMOVAL ......................................................... 109
INSTALLATION ................................................. 109
Disassembly and Assembly ................................. 109
BLOWER MOTOR ................................................... 111
Removal and Installation ...................................... . 111
INTAKE DOOR MOTOR .......................................... 112
Removal and Installation ....................................... 112
FAN CONTROL AMPLIFIER ................................... 113
Removal and Installation ....................................... 113
VENTILATION AIR FILTER ..................................... 114
Removal and Installation ....................................... 114
Function ................................................................ 114
Replacement Timing ............................................. 114
Replacement Procedures ...................................... 114
HEATER & COOLING UNIT ASSEMBLY ............... 115
Removal and Installation ....................................... 115
REMOVAL .......................................................... 115
INSTALLATION .................................................. 116
Disassembly and Assembly .................................. 116
MODE DOOR MOTOR ............................................ 118
Removal and Installation ....................................... 118
AIR MIX DOOR MOTOR .......................................... 119
Removal and Installation ....................................... 119
HEATER CORE ...................................................... 120
Removal and Installation ...................................... 120
DUCTS AND GRILLES .......................................... 121
Removal and Installation ...................................... 121
Ventilator Duct, Defroster Nozzle and Defroster
Ducts .................................................................... 121
Center Ventilator Grille ......................................... 121
Side Ventilator Grille ............................................. 121
Foot Duct .............................................................. 122
Floor duct ............................................................. 122
REFRIGERANT LINES ........................................... 123
HFC-134a (R-134a) Service Procedure ............... 123
SETTING OF SERVICE TOOLS AND EQUIP-
MENT ................................................................ 123
Components ......................................................... 125
Removal and Installation for Compressor ............ 126REMOVAL .........................................................126
INSTALLATION .................................................128
Removal and Installation for Compressor Clutch . 129
REMOVAL .........................................................129
INSTALLATION .................................................132
Removal and Installation for Low-pressure flexible
hose ......................................................................135
REMOVAL .........................................................135
INSTALLATION .................................................136
Removal and Installation for High-pressure flexible
hose ......................................................................136
REMOVAL .........................................................136
INSTALLATION .................................................136
Removal and Installation for High-pressure pipe ..137
REMOVAL .........................................................137
INSTALLATION .................................................137
Removal and Installation for Refrigerant Pressure
Sensor ..................................................................137
Removal and Installation for Dual-pressure Switch.138
Removal and Installation for Condenser ..............138
REMOVAL .........................................................138
INSTALLATION .................................................138
Removal and Installation for Evaporator ..............139
REMOVAL .........................................................139
INSTALLATION .................................................139
Removal and Installation for Expansion Valve ......140
Removal and Installation for Desiccant Assembly. 140
REMOVAL .........................................................140
INSTALLATION .................................................140
Checking for Refrigerant Leaks ............................140
Checking System for Leaks Using the Fluorescent
Leak Detector .......................................................141
Dye Injection .........................................................141
Electronic Refrigerant Leak Detector ....................141
PRECAUTIONS FOR HANDLING LEAK
DETECTOR .......................................................141
CHECKING PROCEDURE ...............................142
Service Data and Specifications (SDS) ................143
COMPRESSOR ................................................143
LUBRICANT ......................................................144
REFRIGERANT .................................................144
ENGINE IDLING SPEED ..................................144
BELT TENSION .................................................144