NISSAN X-TRAIL 2003 Service Repair Manual
X-TRAIL 2003
NISSAN
NISSAN
https://www.carmanualsonline.info/img/5/57404/w960_57404-0.png
NISSAN X-TRAIL 2003 Service Repair Manual
Trending: battery replacement, change wheel, cruise control, open hood, horn, Atf, spark plugs
Page 3541 of 4179
REFRIGERANT LINES
ATC-145
C
D
E
F
G
H
I
K
L
MA
B
AT C
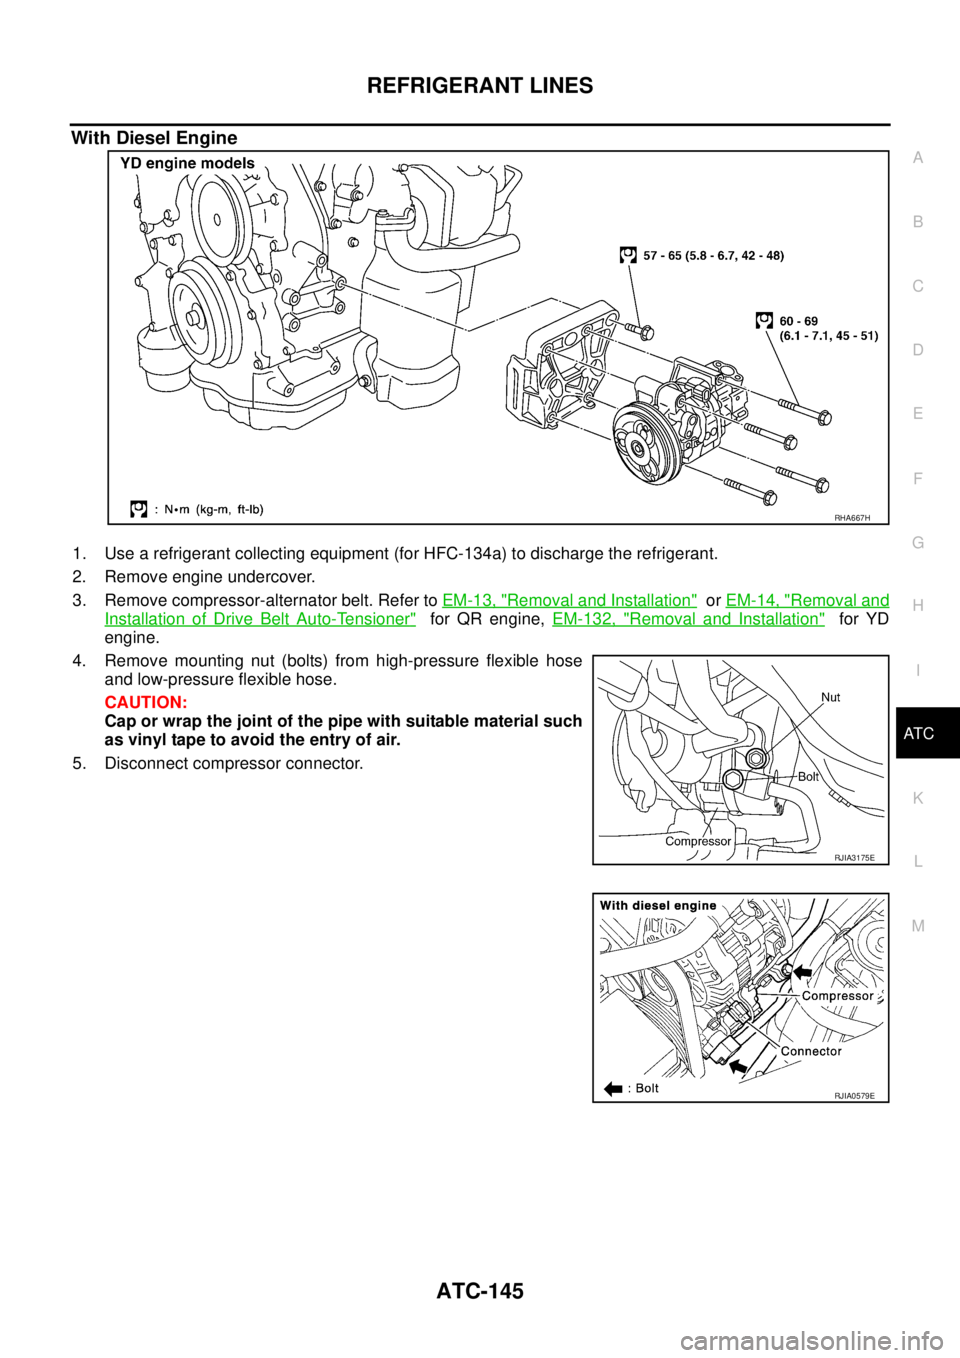
With Diesel Engine
1. Use a refrigerant collecting equipment (for HFC-134a) to discharge the refrigerant.
2. Remove engine undercover.
3. Remove compressor-alternator belt. Refer to EM-13, "
Removal and Installation" or EM-14, "Removal and
Installation of Drive Belt Auto-Tensioner" for QR engine, EM-132, "Removal and Installation" for YD
engine.
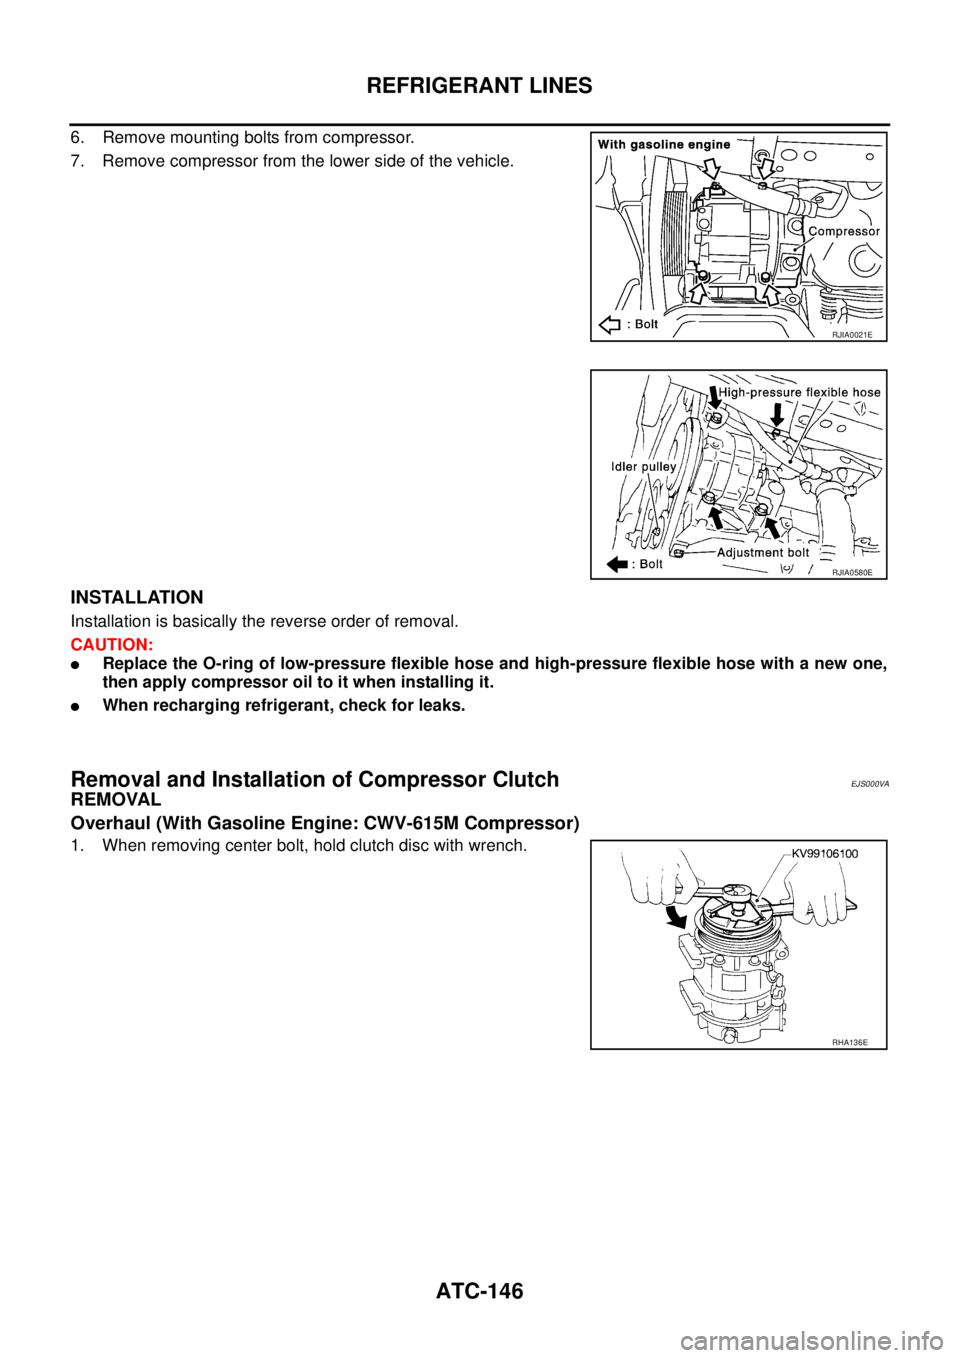
4. Remove mounting nut (bolts) from high-pressure flexible hose
and low-pressure flexible hose.
CAUTION:
Cap or wrap the joint of the pipe with suitable material such
as vinyl tape to avoid the entry of air.
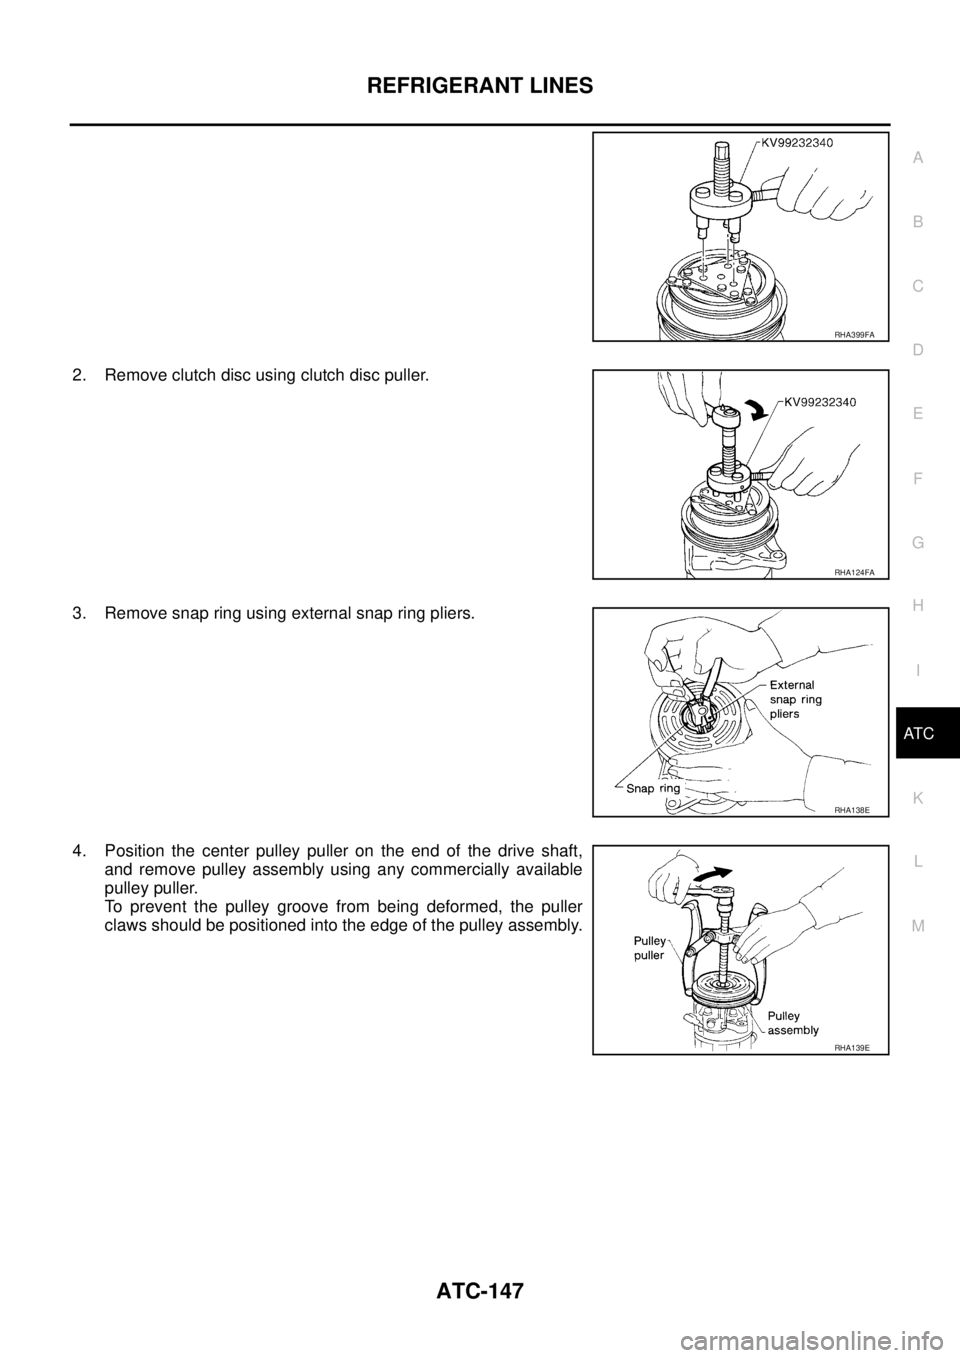
5. Disconnect compressor connector.
RHA667H
RJIA3175E
RJIA0579E
Page 3542 of 4179
ATC-146
REFRIGERANT LINES
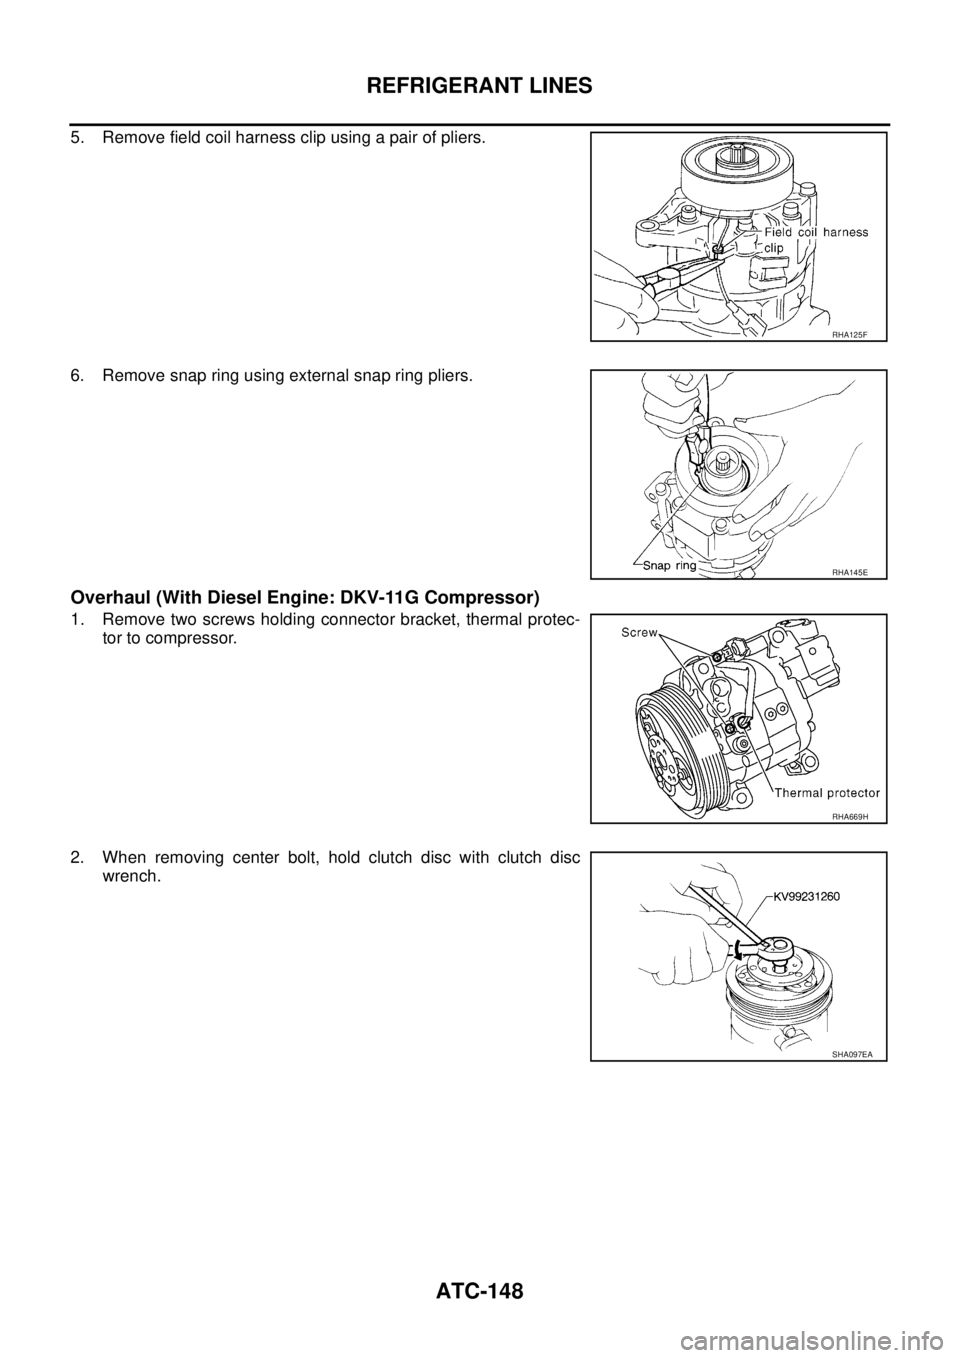
6. Remove mounting bolts from compressor.
7. Remove compressor from the lower side of the vehicle.
INSTALLATION
Installation is basically the reverse order of removal.
CAUTION:
�Replace the O-ring of low-pressure flexible hose and high-pressure flexible hose with a new one,
then apply compressor oil to it when installing it.
�When recharging refrigerant, check for leaks.
Removal and Installation of Compressor ClutchEJS000VA
REMOVAL
Overhaul (With Gasoline Engine: CWV-615M Compressor)
1. When removing center bolt, hold clutch disc with wrench.
RJIA0021E
RJIA0580E
RHA136E
Page 3543 of 4179
REFRIGERANT LINES
ATC-147
C
D
E
F
G
H
I
K
L
MA
B
AT C
2. Remove clutch disc using clutch disc puller.
3. Remove snap ring using external snap ring pliers.
4. Position the center pulley puller on the end of the drive shaft,
and remove pulley assembly using any commercially available
pulley puller.
To prevent the pulley groove from being deformed, the puller
claws should be positioned into the edge of the pulley assembly.
RHA399FA
RHA124FA
RHA138E
RHA139E
Page 3544 of 4179
ATC-148
REFRIGERANT LINES
5. Remove field coil harness clip using a pair of pliers.
6. Remove snap ring using external snap ring pliers.
Overhaul (With Diesel Engine: DKV-11G Compressor)
1. Remove two screws holding connector bracket, thermal protec-
tor to compressor.
2. When removing center bolt, hold clutch disc with clutch disc
wrench.
RHA125F
RHA145E
RHA669H
SHA097EA
Page 3545 of 4179
REFRIGERANT LINES
ATC-149
C
D
E
F
G
H
I
K
L
MA
B
AT C
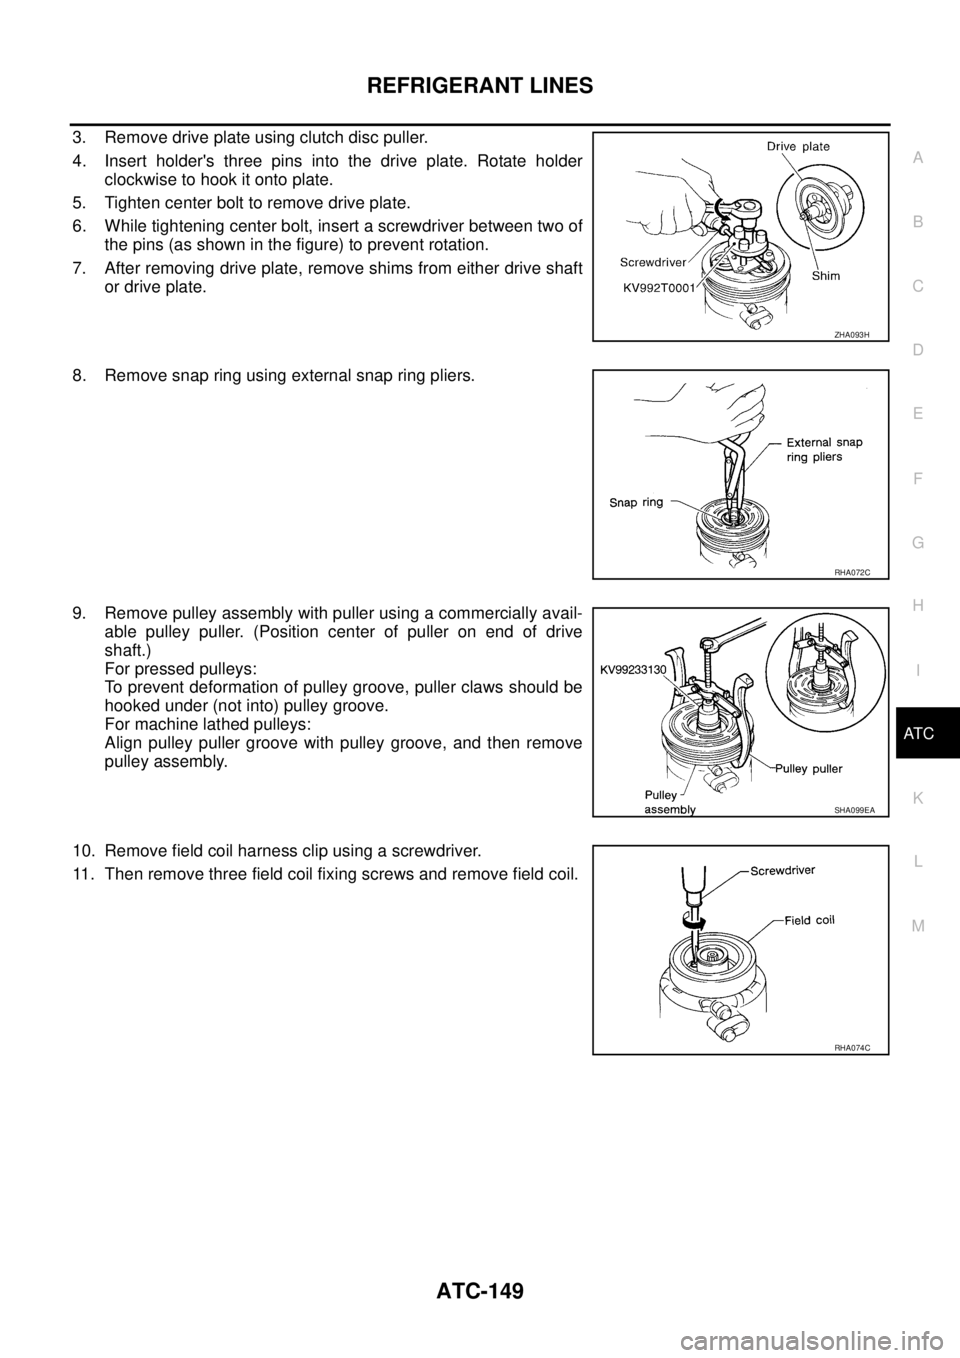
3. Remove drive plate using clutch disc puller.
4. Insert holder's three pins into the drive plate. Rotate holder
clockwise to hook it onto plate.
5. Tighten center bolt to remove drive plate.
6. While tightening center bolt, insert a screwdriver between two of
the pins (as shown in the figure) to prevent rotation.
7. After removing drive plate, remove shims from either drive shaft
or drive plate.
8. Remove snap ring using external snap ring pliers.
9. Remove pulley assembly with puller using a commercially avail-
able pulley puller. (Position center of puller on end of drive
shaft.)
For pressed pulleys:
To prevent deformation of pulley groove, puller claws should be
hooked under (not into) pulley groove.
For machine lathed pulleys:
Align pulley puller groove with pulley groove, and then remove
pulley assembly.
10. Remove field coil harness clip using a screwdriver.
11. Then remove three field coil fixing screws and remove field coil.
ZHA093H
RHA072C
SHA099EA
RHA074C
Page 3546 of 4179
ATC-150
REFRIGERANT LINES
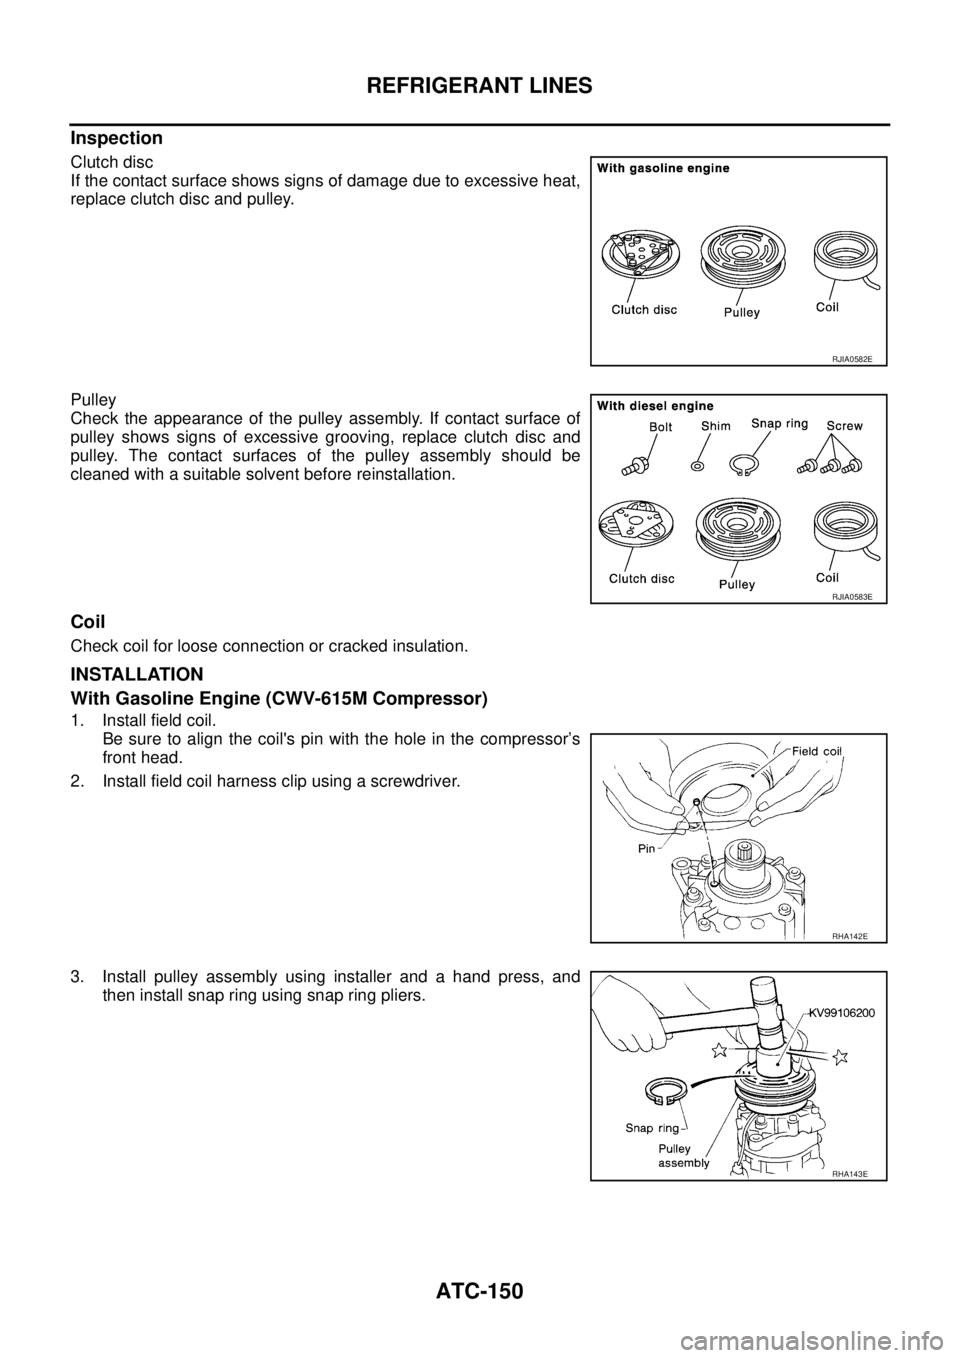
Inspection
Clutch disc
If the contact surface shows signs of damage due to excessive heat,
replace clutch disc and pulley.
Pulley
Check the appearance of the pulley assembly. If contact surface of
pulley shows signs of excessive grooving, replace clutch disc and
pulley. The contact surfaces of the pulley assembly should be
cleaned with a suitable solvent before reinstallation.
Coil
Check coil for loose connection or cracked insulation.
INSTALLATION
With Gasoline Engine (CWV-615M Compressor)
1. Install field coil.
Be sure to align the coil's pin with the hole in the compressor’s
front head.
2. Install field coil harness clip using a screwdriver.
3. Install pulley assembly using installer and a hand press, and
then install snap ring using snap ring pliers.
RJIA0582E
RJIA0583E
RHA142E
RHA143E
Page 3547 of 4179
REFRIGERANT LINES
ATC-151
C
D
E
F
G
H
I
K
L
MA
B
AT C
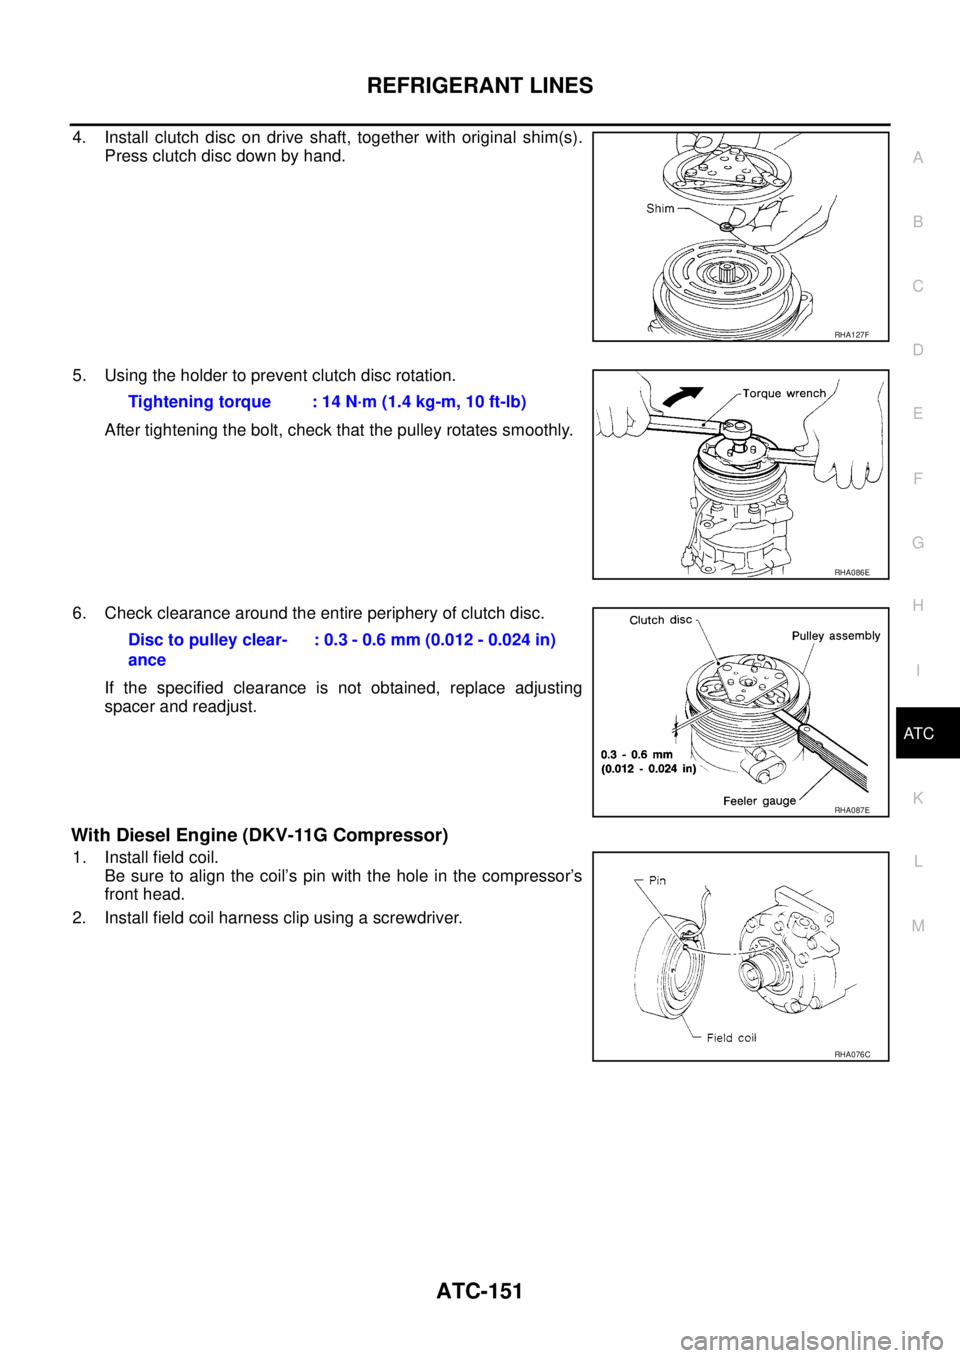
4. Install clutch disc on drive shaft, together with original shim(s).
Press clutch disc down by hand.
5. Using the holder to prevent clutch disc rotation.
After tightening the bolt, check that the pulley rotates smoothly.
6. Check clearance around the entire periphery of clutch disc.
If the specified clearance is not obtained, replace adjusting
spacer and readjust.
With Diesel Engine (DKV-11G Compressor)
1. Install field coil.
Be sure to align the coil’s pin with the hole in the compressor’s
front head.
2. Install field coil harness clip using a screwdriver.
RHA127F
Tightening torque : 14 N·m (1.4 kg-m, 10 ft-lb)
RHA086E
Disc to pulley clear-
ance: 0.3 - 0.6 mm (0.012 - 0.024 in)
RHA087E
RHA076C
Page 3548 of 4179
ATC-152
REFRIGERANT LINES
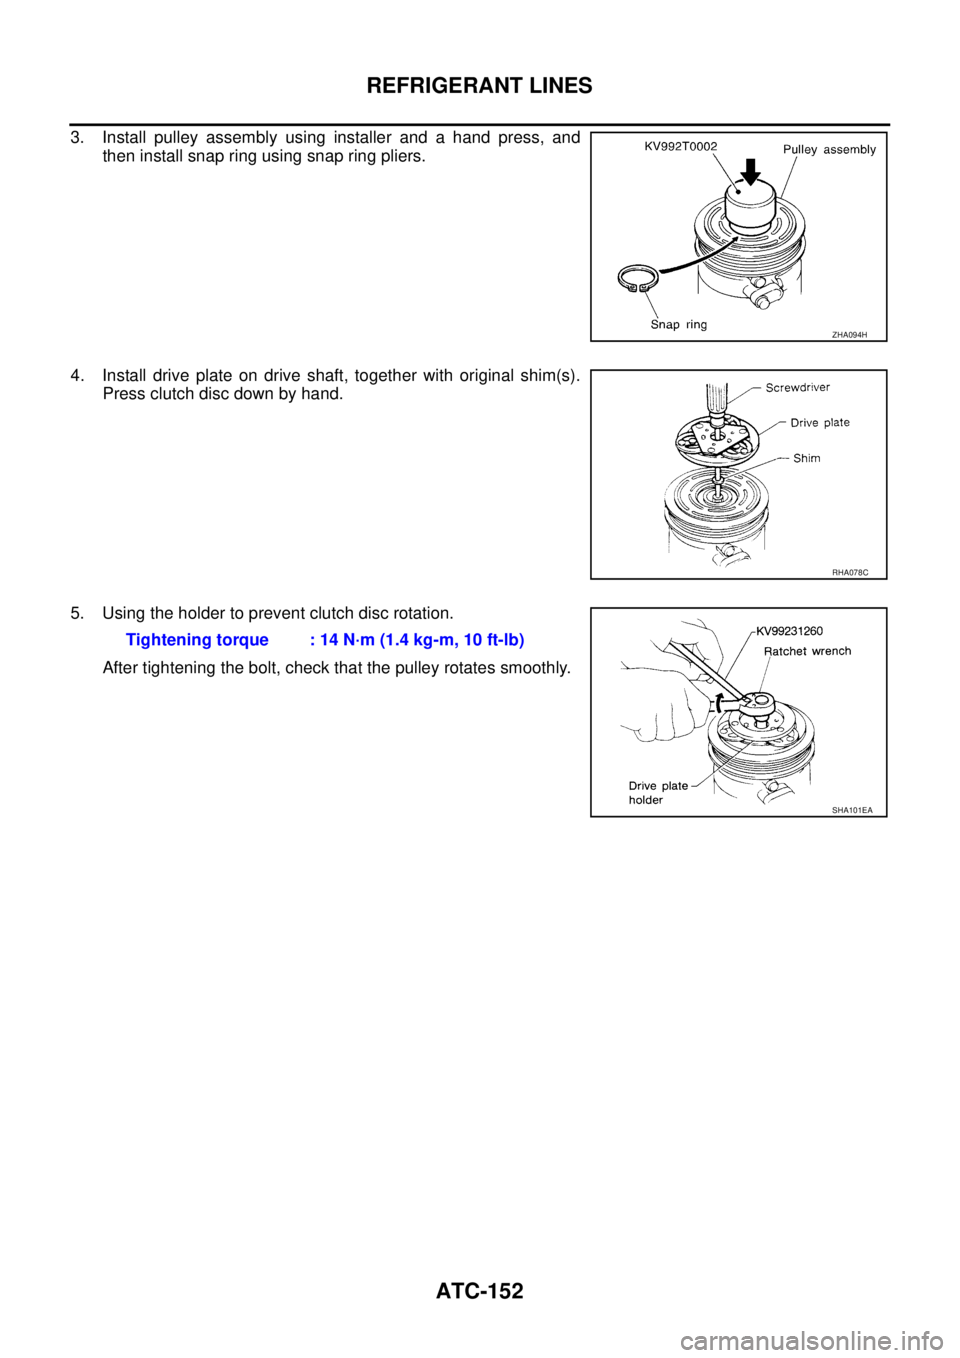
3. Install pulley assembly using installer and a hand press, and
then install snap ring using snap ring pliers.
4. Install drive plate on drive shaft, together with original shim(s).
Press clutch disc down by hand.
5. Using the holder to prevent clutch disc rotation.
After tightening the bolt, check that the pulley rotates smoothly.
ZHA094H
RHA078C
Tightening torque : 14 N·m (1.4 kg-m, 10 ft-lb)
SHA101EA
Page 3549 of 4179
REFRIGERANT LINES
ATC-153
C
D
E
F
G
H
I
K
L
MA
B
AT C
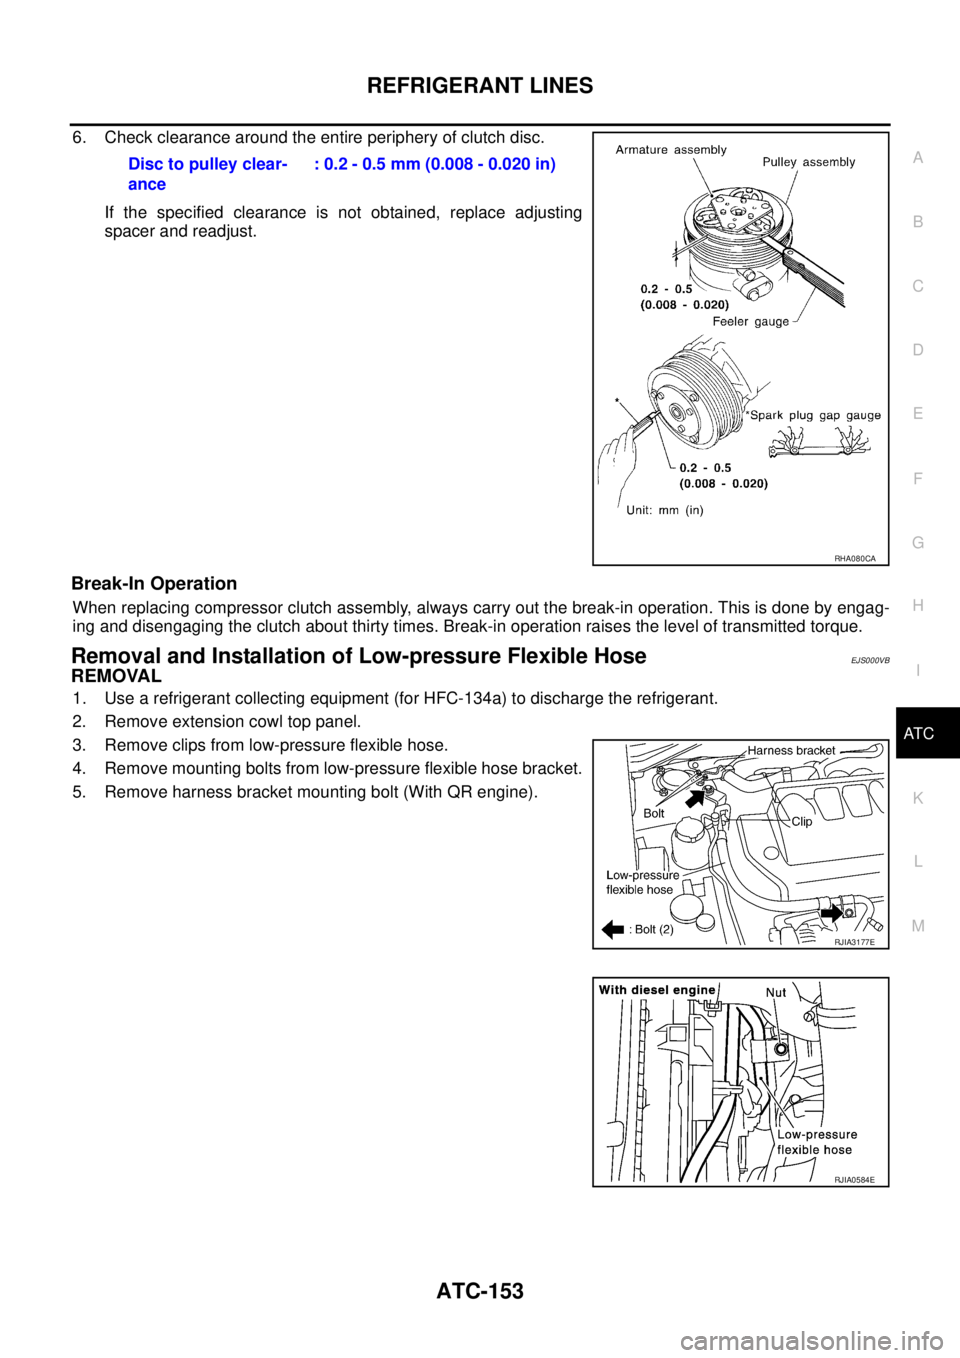
6. Check clearance around the entire periphery of clutch disc.
If the specified clearance is not obtained, replace adjusting
spacer and readjust.
Break-In Operation
When replacing compressor clutch assembly, always carry out the break-in operation. This is done by engag-
ing and disengaging the clutch about thirty times. Break-in operation raises the level of transmitted torque.
Removal and Installation of Low-pressure Flexible HoseEJS000VB
REMOVAL
1. Use a refrigerant collecting equipment (for HFC-134a) to discharge the refrigerant.
2. Remove extension cowl top panel.
3. Remove clips from low-pressure flexible hose.
4. Remove mounting bolts from low-pressure flexible hose bracket.
5. Remove harness bracket mounting bolt (With QR engine).Disc to pulley clear-
ance: 0.2 - 0.5 mm (0.008 - 0.020 in)
RHA080CA
RJIA3177E
RJIA0584E
Page 3550 of 4179
ATC-154
REFRIGERANT LINES
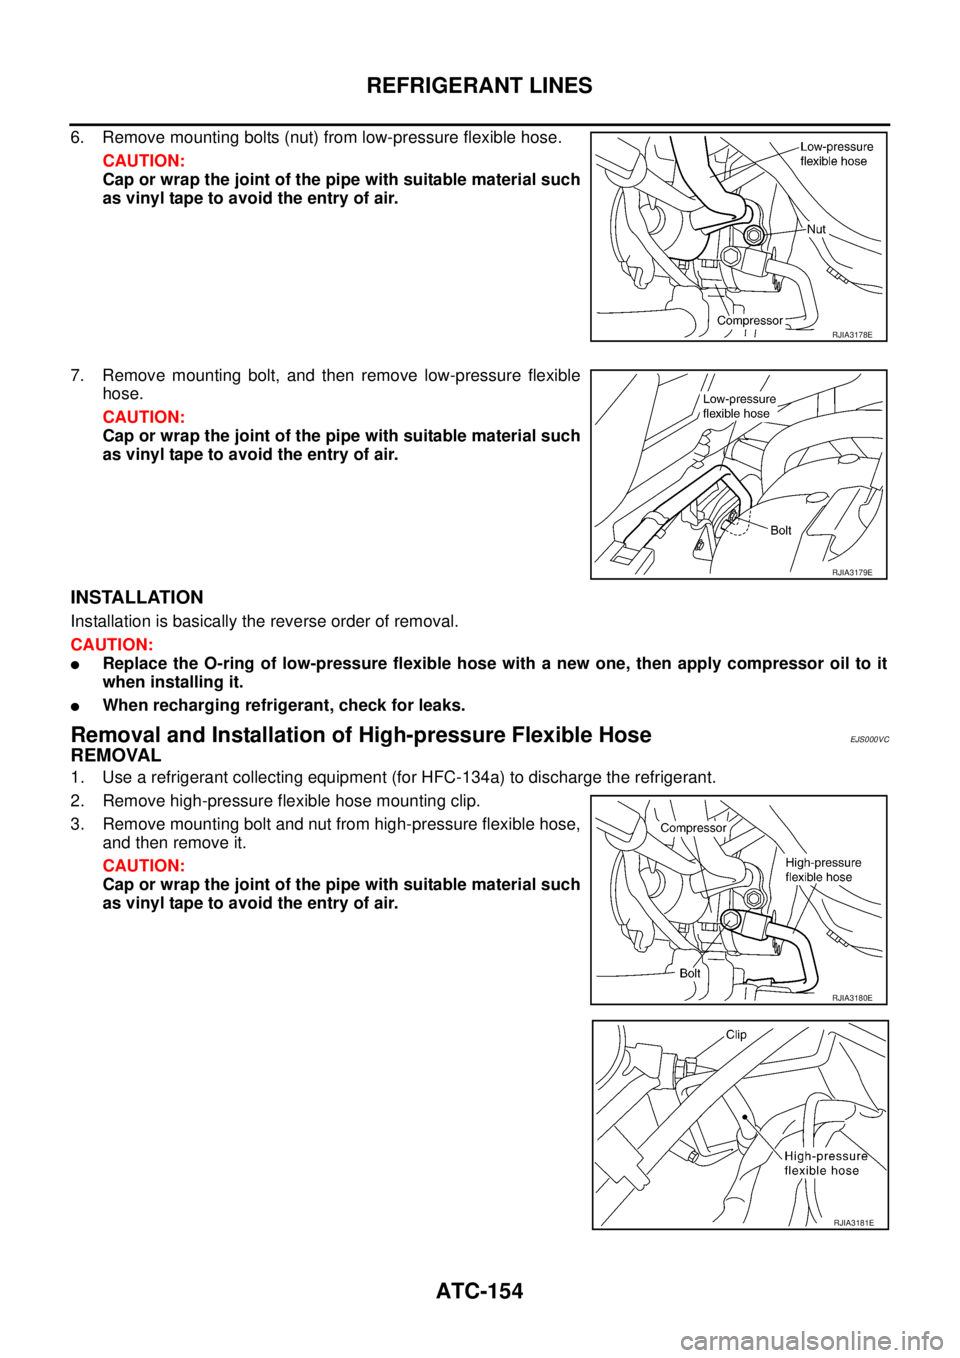
6. Remove mounting bolts (nut) from low-pressure flexible hose.
CAUTION:
Cap or wrap the joint of the pipe with suitable material such
as vinyl tape to avoid the entry of air.
7. Remove mounting bolt, and then remove low-pressure flexible
hose.
CAUTION:
Cap or wrap the joint of the pipe with suitable material such
as vinyl tape to avoid the entry of air.
INSTALLATION
Installation is basically the reverse order of removal.
CAUTION:
�Replace the O-ring of low-pressure flexible hose with a new one, then apply compressor oil to it
when installing it.
�When recharging refrigerant, check for leaks.
Removal and Installation of High-pressure Flexible HoseEJS000VC
REMOVAL
1. Use a refrigerant collecting equipment (for HFC-134a) to discharge the refrigerant.
2. Remove high-pressure flexible hose mounting clip.
3. Remove mounting bolt and nut from high-pressure flexible hose,
and then remove it.
CAUTION:
Cap or wrap the joint of the pipe with suitable material such
as vinyl tape to avoid the entry of air.
RJIA3178E
RJIA3179E
RJIA3180E
RJIA3181E
Trending: checking oil, auxiliary battery, fuse box, wheel torque, ignition, overheating, oil pressure
