reset OLDSMOBILE AURORA 2003 User Guide
[x] Cancel search | Manufacturer: OLDSMOBILE, Model Year: 2003, Model line: AURORA, Model: OLDSMOBILE AURORA 2003Pages: 387, PDF Size: 18.05 MB
Page 162 of 387
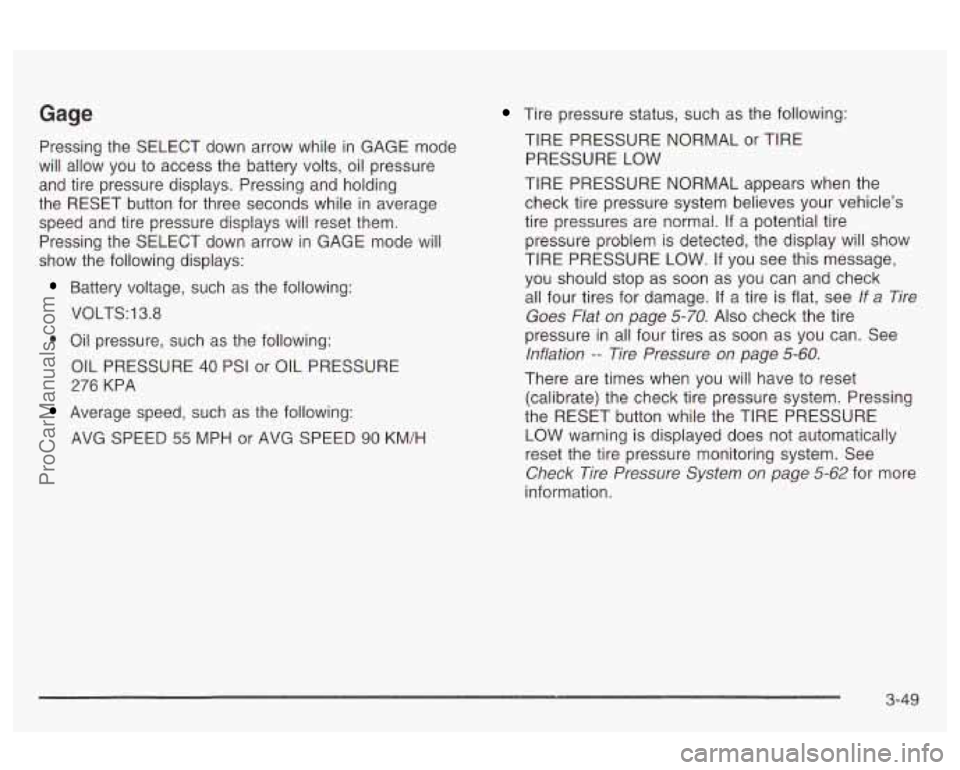
Gage Tire pressure status, such as the following:
TIRE PRESSURE NORMAL or TIRE
PRESSURE LOW
TIRE PRESSURE NORMAL appears when the
check tire pressure system believes your vehicle’s
tire pressures are normal.
if a potential tire
pressure problem is detected, the display will show
TIRE PRESSURE LOW. If you see this message,
you should stop
as soon as you can and check
all four tires for damage.
If a tire is flat, see If a Tire
Goes Flat on page 5-70.
Also check the tire
pressure in all four tires as soon as you can. See
lnflation -- Tire Pressure on page 5-60.
Pressing the SELECT down arrow while in GAGE mode
will allow you to access the battery volts, oil pressure
and tire pressure displays. Pressing and holding
the RESET button for three seconds while
in average
speed and tire pressure displays will reset them.
Pressing the SELECT down arrow in GAGE mode will
show the following displays:
Battery voltage, such as the following:
VOLTS:
13.8
0 Oil pressure, such as the following:
OIL PRESSURE
40 PSI or OIL PRESSURE
276 KPA
Average speed, such as the following:
AVG SPEED
55 MPH or AVG SPEED 90 KM/H There
are times when you will have to reset
(calibrate) the check tire pressure system. Pressing
the RESET button while the TIRE PRESSURE
LOW warning is displayed does not automatically
reset the tire pressure monitoring system. See
Check Tire Pressure System on page 5-62 for more
information.
3-49
ProCarManuals.com
Page 163 of 387
DIC Warnings and Messages
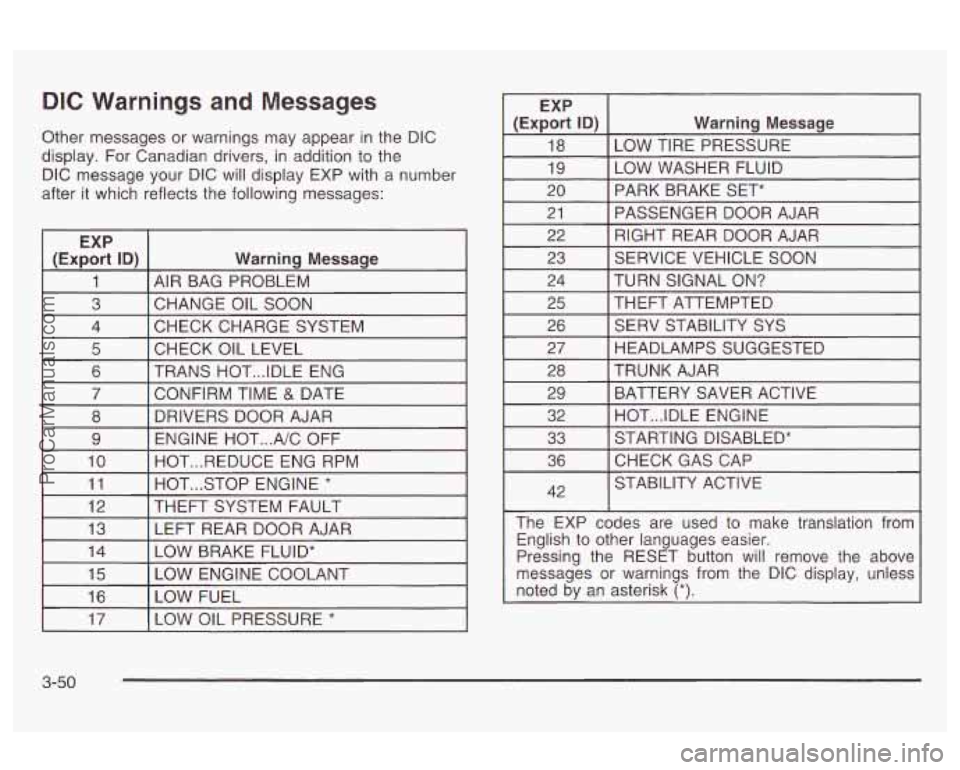
Other messages or warnings may appear in the DIC
display.
For Canadian drivers, in addition to the
DIC message your DIC will display EXP with
a number
after it which reflects the following messages:
EXP
(Export ID)
Warning Message
1 AIR BAG PROBLEM
3 CHECK CHARGE SYSTEM
4
CHANGE OIL SOON
I 5 I CHECK OIL LEVEL I I
6 I TRANS HOT ... IDLE ENG
I 7 I CONFIRM TIME & DATE I
8
ENGINE HOT
... A/C OFF
9 DRIVERS DOOR AJAR
10 HOT
... STOP ENGINE * 11 HOT
... REDUCE ENG RPM
I 12 I THEFT SYSTEM
FAULT I I
13 I LEFT REAR DOOR AJAR
I (ExE% ID) I Warning Message
18
LOW WASHER FLUID
19 LOW TIRE PRESSURE
20 PASSENGER DOOR AJAR
21 PARK BRAKE SET*
RIGHT REAR DOOR AJAR
22
23
TURN SIGNAL
ON? 24 SERVICE VEHICLE
SOON
I 25 I THEFT ATTEMPTED I I
26 [ SERV STABILITY SYS
I 27 I HEADLAMPS SUGGESTED I
28
BATTERY SAVER ACTIVE
29 TRUNK AJAR
32 STARTING DISABLED*
33 HOT
... IDLE ENGINE
36
42 CHECKGASCAP
STABILITY ACTIVE
The EXP codes are used to make translation from English to other languages easier.
Pressing the RESET button will remove the above
messages or warnings from the DIC display, unless
noted by an asterisk
(*).
I 17 I LOW OIL PRESSURE * I
3-50
ProCarManuals.com
Page 164 of 387
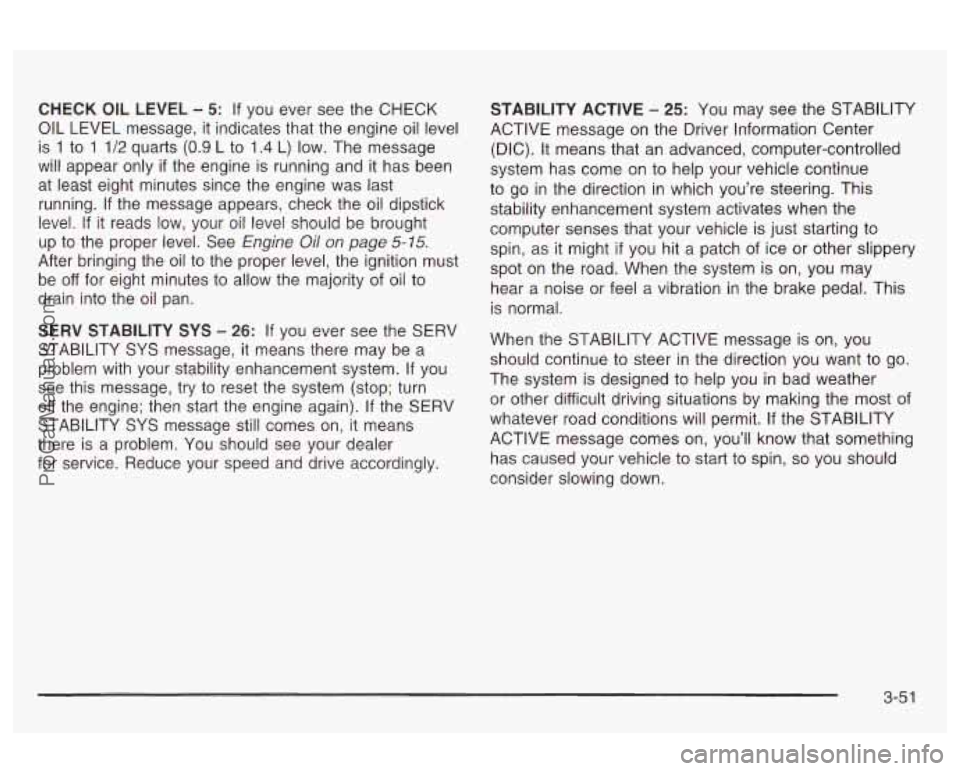
CHECK OIL LEVEL - 5: If you ever see the CHECK
OIL LEVEL message, it indicates that the engine oil level
is
1 to 1 1/2 quarts (0.9 L to 1.4 L) low. The message
will appear only
if the engine is running and it has been
at least eight minutes since the engine was last
running. If the message appears, check the oil dipstick
level.
If it reads low, your oil level should be brought
up
to the proper level. See Engine Oil on page 5-15.
After bringing the oil to the proper level, the ignition must
be
off for eight minutes to allow the majority of oil to
drain into the oil pan.
SERV STABILITY SYS
- 26: If you ever see the SERV
STABILITY SYS message, it means there may be a
problem with your stability enhancement system.
If you
see this message,
try to reset the system (stop; turn
off the engine; then start the engine again). If the SERV
STABILITY SYS message still comes on, it means
there is a problem. You should see your dealer
for service. Reduce your speed and drive accordingly. STABILITY ACTIVE
- 25: You may
see the STABILITY
ACTIVE message on the Driver Information Center
(DIC). It means that an advanced, computer-controlled
system has come on to help your vehicle continue
to go in the direction in which you’re steering. This
stability enhancement system activates when the
computer senses that your vehicle is just starting to
spin, as
it might if you hit a patch of ice or other slippery
spot on the road. When the system is on, you may
hear a noise or feel a vibration in the brake pedal. This is normal.
When the STABILITY ACTIVE message is on, you
should continue to steer in the direction you want to
The system is designed to help you in bad weather
or other difficult driving situations by making the most of
whatever road conditions will permit.
If the STABILITY
ACTIVE message comes
on, you’ll know that something
has caused your vehicle to start to spin,
so you should
consider slowing down.
3-5 1
ProCarManuals.com
Page 174 of 387
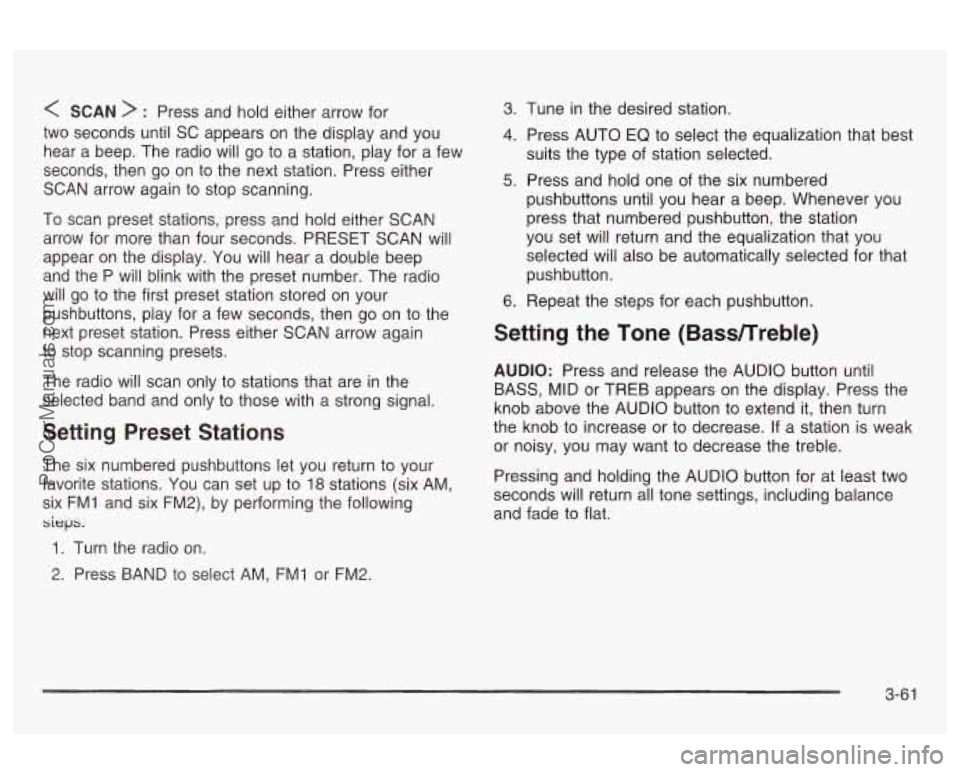
< SCAN > : Press and hold either arrow for
two seconds until
SC appears on the display and you
hear a beep. The radio will go to a station, play for a few
seconds, then go on to the next station. Press either
SCAN arrow again to stop scanning.
To scan preset stations, press and hold either SCAN
arrow for more than four seconds. PRESET SCAN will
appear on the display. You will hear a double beep
and the P will blink with the preset number. The radio
will go to the first preset station stored on your
pushbuttons, play for a few seconds, then go on to the
next preset station. Press either SCAN arrow again
to stop scanning presets.
The radio will scan only to stations that are in the
selected band and only to those with a strong signal.
Setting Preset Stations
The six numbered pushbuttons let you return to your
favorite stations. You can set up to
18 stations (six AM.
six FMI and six FM2), by performing the following
sieps.
1. Turn the radio on.
2. Press BAND to select AM, FMI or FM2.
3. 1-une in the desired station.
4. Press AUTO EQ to select the equalization that best
suits the type of station selected.
5. Press and hold one of the six numbered
pushbuttons until you hear a beep. Whenever you
press that numbered pushbutton, the station
you set will return and the equalization that you
selected will also be automatically selected for that
pushbutton.
6. Repeat the steps for each pushbutton.
Setting the Tone (Bassnreble)
AUDIO: Press and release the AUDIO button until
BASS, MID or TREB appears on the display. Press the
knob above the AUDIO button to extend it, then turn
the knob to increase or to decrease. If a station is weak
or noisy, you may want to decrease the treble.
Pressing and holding the AUDIO button for at least two
seconds will return all tone settings, including balance
and fade to flat.
3-6 1
ProCarManuals.com
Page 175 of 387
AUTO EQ (Automatic Equalizer): Press this button to
choose bass, midrange and treble equalization
settings designed for country, jazz, talk, pop, rock and
classical program types.
To return to the manual mode, press the AUTO EQ
button until MANUAL appears on the display. Then you
will be able to manually adjust the bass, midrange
and treble using the AUDIO button.
If your vehicle has the Bose radio, the AUTO EQ button
will work the same, except ,the radio will display EQ1
through EQ6 as the choices instead of displaying
the equalization setting names. These settings can be
used while listening to the radio or the CD player.
The radio will save separate AUTO EQ settings for each
preset and source.
Adjusting the Speakers (Balance/Fade)
AUDIO: To adjust the balance between the right
and the left speakers, press and release the AUDIO
button until BAL appears on the display. Press the knob
above the AUDIO button to extend it, then turn the
knob to move the sound toward the left or the right
speakers. To
adjust the fade between the front and the rear
speakers, press and release the AUDIO button until
FAD appears on the display. Press the knob above the
AUDIO button to extend it, then turn the knob to
move the sound toward the front or the rear speakers.
Pressing and holding the AUDIO button for at least
two seconds will return all tone settings, including bass
and treble to flat.
Using RDS
Your audio system is equipped with a Radio Data
System (RDS). RDS features are available for use only
on
FM stations that broadcast RDS information.
Using this system, the radio can do the following:
e
e
e
Seek to stations broadcasting the selected type of
programming,
receive announcements concerning local and
national emergencies,
display messages from radio stations, and
seek
to stations with traffic announcements.
This system relies upon receiving specific information
from these stations and will only work when the
information is available. In rare cases, a radio station
may broadcast incorrect information that will cause
the radio features to work improperly. If this happens,
contact the radio station.
3-62
ProCarManuals.com
Page 177 of 387
BAND (Alternate Frequency): Alternate frequency
allows the radio to switch to a stronger station with the
same program type. Press and hold BAND for two
seconds to turn alternate frequency on. AF ON
will appear on the display. The radio may switch to
stronger stations. Press and hold BAND again for two
seconds to turn alternate frequency
off. AF OFF
will appear on the display. The radio will not switch to
other stations. When you turn the ignition off and then on
again, the alternate frequency feature will automatically
be turned on.
Setting Preset PTYs
The six numbered pushbuttons let you return to your
favorite program types (PTYs). These pushbuttons have
factory PTY presets. You can set up to 12 PTYs
(six FMI and six FM2) by performing the following steps:
1. Press BAND to select FMI or FM2.
2. Press the P-TYPE button to activate program type
select mode.
3. Turn the P-TYPE knob to select a PTY.
4. Press and hold one of the six numbered
pushbuttons until you hear a beep. Whenever you
press that numbered pushbutton, the PTY you
set will return.
RDS Messages
ALERT!: Alert warns of local or national emergencies.
When an alert announcement comes on the current
radio station, ALERT! will appear on the display. You will
hear the announcement, even
if the volume is muted
or a cassette tape or compact disc is playing. If the
cassette tape or compact disc player is playing, play will
stop during the announcement. You will not be able
to turn
off alert announcements.
ALERT! will not be affected by tests of the emergency
broadcast system. This feature is not supported by
all RDS stations.
INFO (Information): If the current station has a
message, INFO will appear on the display. Press this
button to see the message. The message may display
the artist and song title, call in phone numbers, etc.
If the whole message is not displayed, parts of it
will appear every three seconds. To scroll through the
message at your own speed, press the INFO button
repeatedly. A new group of words will appear on
the display with each press. Once the complete
message has been displayed, INFO will disappear from
the display until another new message is received.
The old message can be displayed by pressing
the INFO button until a new message is received or a
different station is tuned to.
5. Repeat the steps for each pushbutton.
3-64
ProCarManuals.com
Page 186 of 387

If any error occurs repeatedly or if an error cannot be
corrected, contact your dealer. If your radio displays an
error number, write it down and provide it to your
dealership when reporting the problem.
If your vehicle has this feature it will enable two drivers
to store and recall personal settings for radio presets,
last tuned station, volume, tone and audio source (radio,
cassette or CD).
The memory buttons
(1 or 2) for this feature are located
on the driver’s door panel and correspond to the
numbers
(1 or 2) found on the back of each remote
keyless entry transmitter.
To recall audio sources, press the unlock button on the
remote keyless entry transmitter and turn the ignition
on. The source
last listened to will be recalled for
the identified driver
(1 or 2).
To program this feature, do the following:
1. Set all radio preferences. For more information see
“Setting Preset Stations” and “Setting the Tone”
listed for your particular radio.
2. Locate the memory buttons on the driver’s door
panel.
3. Press one of the memory buttons (1 or 2) until you
hear two beeps. The beeps confirm that your
selection has been saved and can now be recalled.
Follow these steps each time you want to change the
stored settings.
Theft-Deterrent Feature
THEFTLOCK@ is designed to discourage theft of your
radio. It works by using a secret code to disable all radio
functions whenever battery power is removed and the
radio
is placed in a different vehicle. This feature
requires
no user input to be activated. It is automatically
armed when it is put into the vehicle for the first time.
When the radio is turned off, the blinking red light
indicates that THEFTLOCK@ is armed.
If THEFTLOCK@ is activated, your radio will not operate
if stolen. The radio will display LOCKED and a red
LED indicator light will come on above the
THEFTLOCK”
logo to indicate a locked condition. If this
occurs, the radio will need to be returned to the
dealer.
3-73
ProCarManuals.com
Page 187 of 387
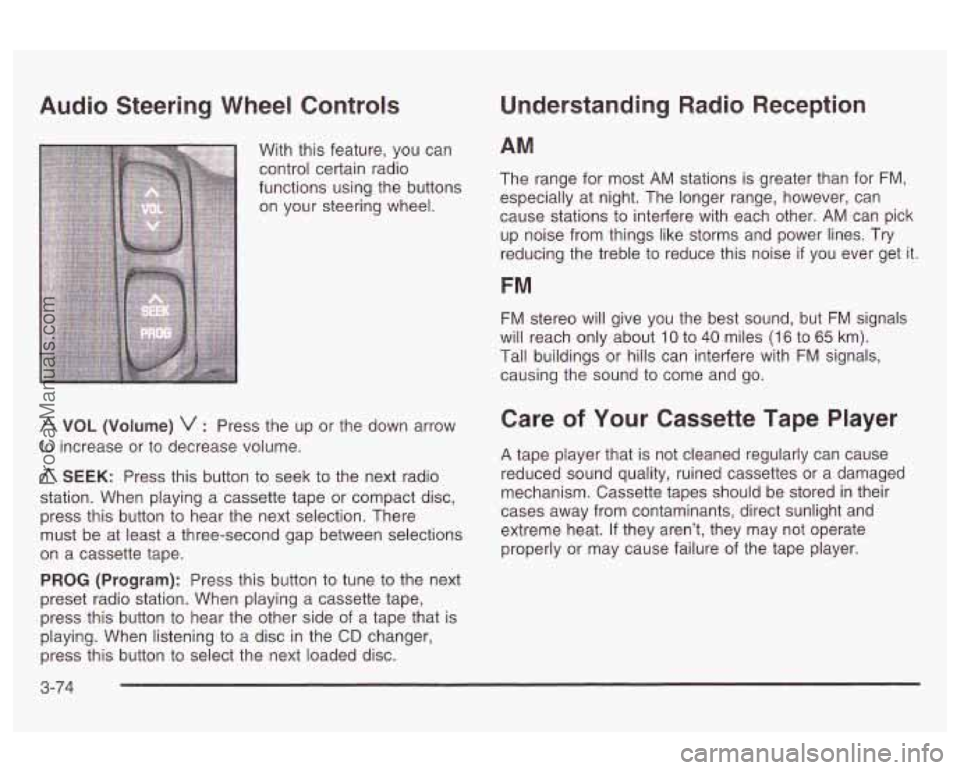
Audio Steering Wheel Controls
With this feature, you can
control certain radio
functions using the buttons
on your steering wheel.
A VOL (Volume) v : Press the up or the down arrow
to increase or to decrease volume.
A SEEK: Press this button to seek to the next radio
station. When playing a cassette tape or compact disc,
press this button to hear the next selection. There
must be at least a three-second gap between selections
on a cassette tape.
PROG (Program): Press this button to tune to the next
preset radio station. When playing a cassette tape,
press this button
to hear the other side of a tape that is
playing. When listening to a disc in the
CD changer,
press this button to select the next loaded disc.
Understanding Radio Reception
AM
The range for most AM stations is greater than for FM,
especially at night. The longer range, however, can
cause stations
to interfere with each other. AM can pick
up noise from things like storms and power lines.
Try
reducing the treble to reduce this noise if you ever get it.
FM
FM stereo will give you the best sound, but FM signals
will reach only about
10 to 40 miles (1 6 to 65 km).
Tall buildings or hills can interfere with
FM signals,
causing the sound to come and go.
Care of Your Cassette Tape Player
A tape player that is not cleaned regularly can cause
reduced sound quality, ruined cassettes or a damaged
mechanism. Cassette tapes should be stored in their
cases away from contaminants, direct sunlight and
extreme heat.
If they aren’t, they may not operate
properly or may cause failure of the tape player.
3-74
ProCarManuals.com
Page 188 of 387
Your tape player should be cleaned regularly after every
50 hours of use. Your radio may display CLEAN
PLAYR to indicate that you have used your tape player
for
50 hours without resetting the tape clean timer. If
this message appears on the display, your cassette tape
player needs to be cleaned. It will still play tapes, but
you should clean it as soon as possible
to prevent
damage to your tapes and player. If you notice a
reduction in sound quality, try a known good cassette to
see
if the tape or the tape player is at fault. If this
other cassette has no improvement in sound quality,
clean the tape player.
For best results, use a scrubbing action, non-abrasive
cleaning cassette with pads which scrub the tape
head as the hubs of the cleaner cassette turn. The
recommended cleaning cassette is available through
your dealership.
The cut tape detection feature of your cassette tape
player may identify the cleaning cassette as a damaged
tape, in error. To prevent the cleaning cassette from
being ejected, use the following steps.
1. Turn the ignition on.
2. Turn the radio off.
3. Press and hold the TP CD button for five seconds.
4. Insert the scrubbing action cleaning cassette.
5. Eject the cleaning cassette after the manufacturer’s
recommended cleaning time. You may
also choose a non-scrubbing action, wet-type
cleaner which uses a cassette with a fabric belt to
clean the tape head. This type of cleaning cassette will
not eject on its own. A non-scrubbing action cleaner
may not clean as thoroughly as the scrubbing type
cleaner. The use of a non-scrubbing action, dry-type
cleaning cassette is not recommended.
After you clean the player, press and hold the eject
button for five seconds to reset the CLEAN PLAYR
indicator. The radio will display CLEANED to show the
indicator was reset.
Cassettes are subject to wear and the sound quality
may degrade over time. Always make sure the cassette
tape is in good condition before you have your tape
player serviced.
Care of Your CDs
Handle discs carefully. Store them in their original cases
or other protective cases and away from direct sunlight
and dust. If the surface of a disc is soiled, dampen
a clean,
soft cloth in a mild, neutral detergent solution
and clean it, wiping from the center to the edge.
Be sure never to touch the side without writing when
handling discs. Pick up discs by graspin9 the outer
edges or the edge of the hole and the outer edge.
3-75
ProCarManuals.com
Page 252 of 387
As in the chart shown previously, SAE 5W-30 is the
only viscosity grade recommended for your vehicle. You
should look for and use only oils which have the API
Starburst symbol and which are also identified as
SAE 5W-30.
If you cannot find such SAE 5W-30 oils,
you can use an SAE IOW-30 oil which has the API
Starburst symbol,
if it's going to be 0°F (-18°C)
or above. Do not use other viscosity grade oils, such as
SAE
1OW-40 or SAE 2OW-50 under any conditions.
Notice: Use only engine oil with the American
Petroleum Institute Certified For Gasoline Engines
starburst symbol. Failure to use the recommended
oil can result in engine damage not covered by
your warranty.
GM Goodwrench@ oil meets all the requirements for
your vehicle.
If you are in an area of extreme cold, where the
temperature falls below
-20°F (-29"C), it is
recommended that you use either an SAE 5W-30
synthetic oil or an SAF OW-30 nil Roth will prnvide
easier cold starting and better protection for your engine
at extremely low temperatures.
Engine Oil Additives
Don't add anything to your oil. The recommended oils
with the starburst symbol are all you will need for
good performance and engine protection.
When to Change
Life SystemTM) Engine Oil (GM Oil
Your
vehicle has a computer system that lets you know
when to change the engine oil and filter. This is
based on engine revolutions and engine temperature,
and not on mileage. Based on driving conditions,
the mileage at which an oil change will be indicated can
vary considerably. For the
oil life system to work
properly, you must reset the system every time the oil is
changed.
When the system has calculated that oil life has been
diminished, it will indicate that an oil change is
necessary. A CHANGE
OIL SOON message will come
on. Change your oil as soon as possible within the
next two times you stop for fuel. It is possible that,
if you
are driving under the best conditions, the oil life
system may not indicate that an
oil change is necessary
for over a year. However, your engine oil and filter
must be changed at least once a year and at this time
check your oil regularly and keep it at the proper level.
If the system is ever reset accidentally, you must
change your oil at 3,000 miles (5
000 km) since your
last oil change. Remember to reset the oil life system
whenever the
ei! is changed.
the ysk?!?? !??est be reset. !t Is a!sc iy!crtm! ?c
5-1 9
ProCarManuals.com