service reset OLDSMOBILE AURORA 2003 Owners Manual
[x] Cancel search | Manufacturer: OLDSMOBILE, Model Year: 2003, Model line: AURORA, Model: OLDSMOBILE AURORA 2003Pages: 387, PDF Size: 18.05 MB
Page 149 of 387
A PARK BRAKE SET message will be displayed on the
Driver Information Center (DIC) while the parking
brake is set and the vehicle is moving. The message
will not come on
if the transaxle is in PARK (P).
If the light comes on while you are driving, pull
off the
road and stop carefully. You may notice that the pedal is
harder
to push. Or, the pedal may go closer to the
floor. It may take longer
to stop. If the light is still on,
have the vehicle towed for service. See
Towing
Your Vehicle
on page 4-33.
Your brake system may not be working
properly
if the brake system warning light is
on. Driving with the brake system warning light
on can lead to an accident.
If the light is still
on after you’ve pulled
off the road and stopped
carefully, have the vehicle towed for service.
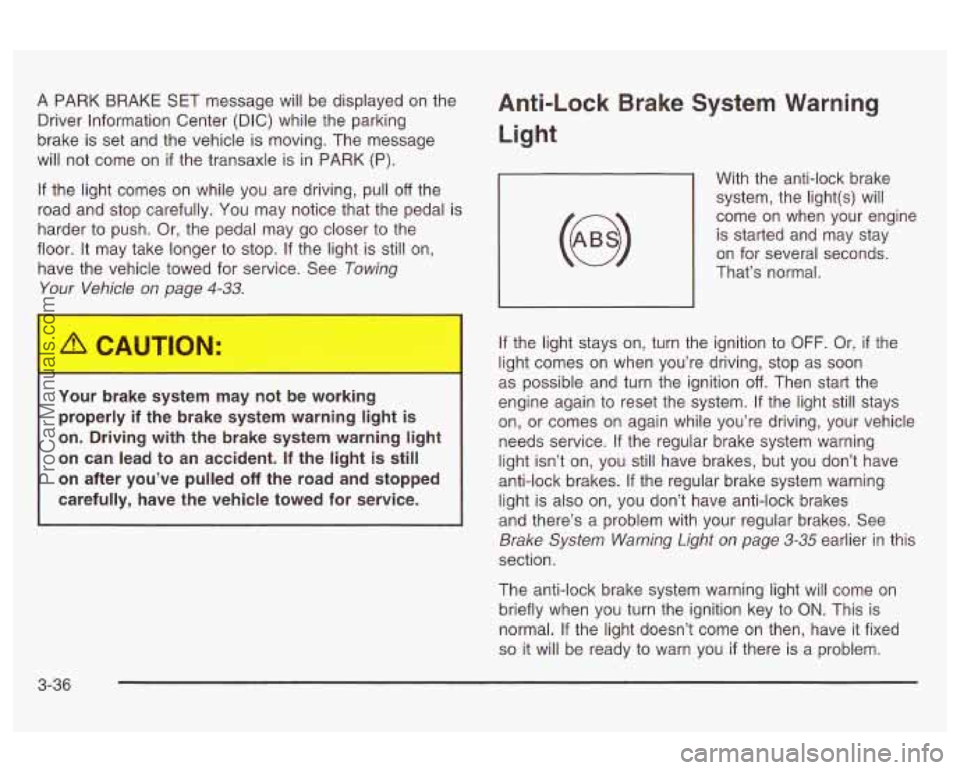
Anti-Lock Brake System Warning
Light
With the anti-lock brake
system, the light(s) will
come on when your engine is started and may stay
on for several seconds.
That’s normal.
If the light stays on, turn the ignition to
OFF. Or, if the
light comes on when you’re driving, stop as soon
as possible and turn the ignition
off. Then start the
engine again to reset the system.
If the light still stays
on, or comes on again while you’re driving, your vehicle
needs service.
If the regular brake system warning
light isn’t on, you still have brakes, but you don’t have
anti-lock brakes.
If the regular brake system warning
light is also on, you don’t have anti-lock brakes
and there’s a problem with your regular brakes. See
Brake System Warning Light on page 3-35 earlier in this
section.
The anti-lock brake system warning light will come on
briefly when you turn the ignition key to
ON. This is
normal.
If the light doesn’t come on then, have it fixed
so it will be ready to warn you if there is a problem.
3-36
ProCarManuals.com
Page 163 of 387
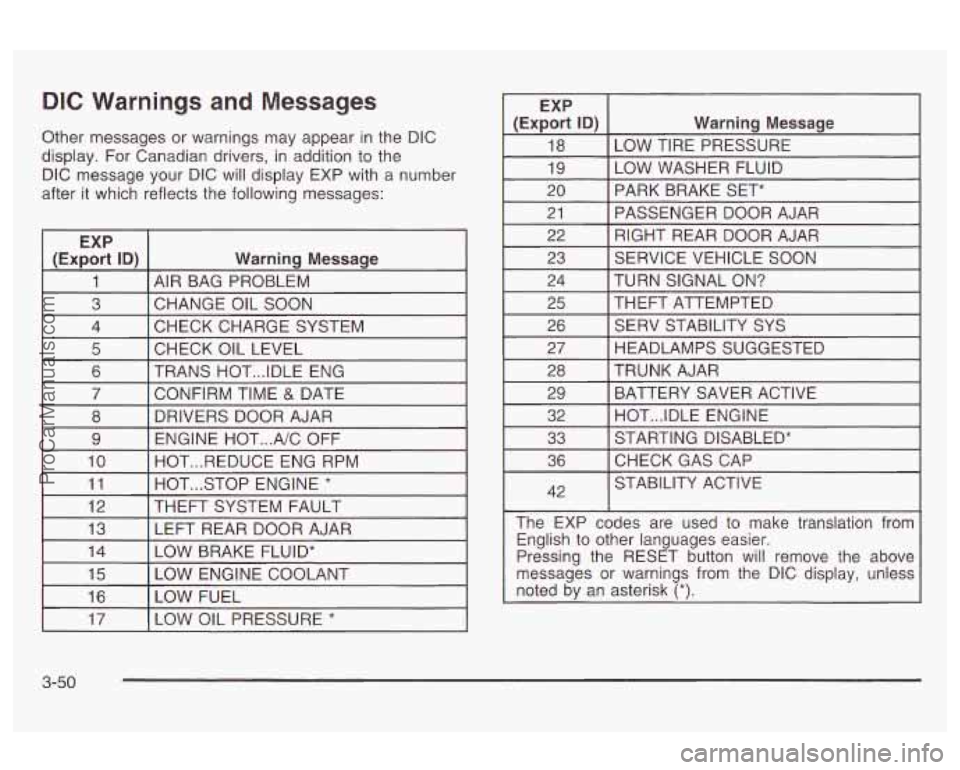
DIC Warnings and Messages
Other messages or warnings may appear in the DIC
display.
For Canadian drivers, in addition to the
DIC message your DIC will display EXP with
a number
after it which reflects the following messages:
EXP
(Export ID)
Warning Message
1 AIR BAG PROBLEM
3 CHECK CHARGE SYSTEM
4
CHANGE OIL SOON
I 5 I CHECK OIL LEVEL I I
6 I TRANS HOT ... IDLE ENG
I 7 I CONFIRM TIME & DATE I
8
ENGINE HOT
... A/C OFF
9 DRIVERS DOOR AJAR
10 HOT
... STOP ENGINE * 11 HOT
... REDUCE ENG RPM
I 12 I THEFT SYSTEM
FAULT I I
13 I LEFT REAR DOOR AJAR
I (ExE% ID) I Warning Message
18
LOW WASHER FLUID
19 LOW TIRE PRESSURE
20 PASSENGER DOOR AJAR
21 PARK BRAKE SET*
RIGHT REAR DOOR AJAR
22
23
TURN SIGNAL
ON? 24 SERVICE VEHICLE
SOON
I 25 I THEFT ATTEMPTED I I
26 [ SERV STABILITY SYS
I 27 I HEADLAMPS SUGGESTED I
28
BATTERY SAVER ACTIVE
29 TRUNK AJAR
32 STARTING DISABLED*
33 HOT
... IDLE ENGINE
36
42 CHECKGASCAP
STABILITY ACTIVE
The EXP codes are used to make translation from English to other languages easier.
Pressing the RESET button will remove the above
messages or warnings from the DIC display, unless
noted by an asterisk
(*).
I 17 I LOW OIL PRESSURE * I
3-50
ProCarManuals.com
Page 164 of 387
CHECK OIL LEVEL - 5: If you ever see the CHECK
OIL LEVEL message, it indicates that the engine oil level
is
1 to 1 1/2 quarts (0.9 L to 1.4 L) low. The message
will appear only
if the engine is running and it has been
at least eight minutes since the engine was last
running. If the message appears, check the oil dipstick
level.
If it reads low, your oil level should be brought
up
to the proper level. See Engine Oil on page 5-15.
After bringing the oil to the proper level, the ignition must
be
off for eight minutes to allow the majority of oil to
drain into the oil pan.
SERV STABILITY SYS
- 26: If you ever see the SERV
STABILITY SYS message, it means there may be a
problem with your stability enhancement system.
If you
see this message,
try to reset the system (stop; turn
off the engine; then start the engine again). If the SERV
STABILITY SYS message still comes on, it means
there is a problem. You should see your dealer
for service. Reduce your speed and drive accordingly. STABILITY ACTIVE
- 25: You may
see the STABILITY
ACTIVE message on the Driver Information Center
(DIC). It means that an advanced, computer-controlled
system has come on to help your vehicle continue
to go in the direction in which you’re steering. This
stability enhancement system activates when the
computer senses that your vehicle is just starting to
spin, as
it might if you hit a patch of ice or other slippery
spot on the road. When the system is on, you may
hear a noise or feel a vibration in the brake pedal. This is normal.
When the STABILITY ACTIVE message is on, you
should continue to steer in the direction you want to
The system is designed to help you in bad weather
or other difficult driving situations by making the most of
whatever road conditions will permit.
If the STABILITY
ACTIVE message comes
on, you’ll know that something
has caused your vehicle to start to spin,
so you should
consider slowing down.
3-5 1
ProCarManuals.com
Page 188 of 387
Your tape player should be cleaned regularly after every
50 hours of use. Your radio may display CLEAN
PLAYR to indicate that you have used your tape player
for
50 hours without resetting the tape clean timer. If
this message appears on the display, your cassette tape
player needs to be cleaned. It will still play tapes, but
you should clean it as soon as possible
to prevent
damage to your tapes and player. If you notice a
reduction in sound quality, try a known good cassette to
see
if the tape or the tape player is at fault. If this
other cassette has no improvement in sound quality,
clean the tape player.
For best results, use a scrubbing action, non-abrasive
cleaning cassette with pads which scrub the tape
head as the hubs of the cleaner cassette turn. The
recommended cleaning cassette is available through
your dealership.
The cut tape detection feature of your cassette tape
player may identify the cleaning cassette as a damaged
tape, in error. To prevent the cleaning cassette from
being ejected, use the following steps.
1. Turn the ignition on.
2. Turn the radio off.
3. Press and hold the TP CD button for five seconds.
4. Insert the scrubbing action cleaning cassette.
5. Eject the cleaning cassette after the manufacturer’s
recommended cleaning time. You may
also choose a non-scrubbing action, wet-type
cleaner which uses a cassette with a fabric belt to
clean the tape head. This type of cleaning cassette will
not eject on its own. A non-scrubbing action cleaner
may not clean as thoroughly as the scrubbing type
cleaner. The use of a non-scrubbing action, dry-type
cleaning cassette is not recommended.
After you clean the player, press and hold the eject
button for five seconds to reset the CLEAN PLAYR
indicator. The radio will display CLEANED to show the
indicator was reset.
Cassettes are subject to wear and the sound quality
may degrade over time. Always make sure the cassette
tape is in good condition before you have your tape
player serviced.
Care of Your CDs
Handle discs carefully. Store them in their original cases
or other protective cases and away from direct sunlight
and dust. If the surface of a disc is soiled, dampen
a clean,
soft cloth in a mild, neutral detergent solution
and clean it, wiping from the center to the edge.
Be sure never to touch the side without writing when
handling discs. Pick up discs by graspin9 the outer
edges or the edge of the hole and the outer edge.
3-75
ProCarManuals.com
Page 253 of 387
How to Reset the Oil Life System
The GM Oil Life SystemTM calculates when to change
your engine oil and filter based on vehicle use. Anytime
your oil is changed, reset the system
so it can
calculate when the next oil change is required.
If a
situation occurs where you change your oil prior to a
CHANGE OIL SOON message being turned on,
reset the system.
Always reset the engine Oil Life System to
100% after
every oil change. It will not reset itself.
To reset the OIL LIFE reminder, do the following:
1. With the ignition on, press the SELECT right arrow
on the DIC until you enter the OIL mode. The
current OIL LIFE percentage will be displayed.
2. Press and hold the DIC RESET button for about
five seconds. After five seconds, the display will
show OIL LIFE
XXX%. If OIL LIFE XXX% does not
appear on the display after about five seconds,
see your dealer for service. After you release the
DIC RESET button,
OIL LIFE 100% will appear
on the display.
What to Do with Used Oil
Used engine oil contains certain elements that may be
unhealthy for your skin and could even cause cancer.
Don’t let used oil stay on your skin for very long. Clean
your skin and nails with soap and water, or a good
hand cleaner. Wash or properly dispose of clothing or
rags containing used engine oil. See the manufacturer’s
warnings about the use and disposal of oil products.
Used oil can be a threat to the environment.
If you
change your own oil, be sure to drain all the oil from the
filter before disposal. Never dispose of oil by putting
it
in the trash, pouring it on the ground, into sewers, or into
streams or bodies of water. Instead, recycle it by
taking it to a place that collects used oil.
If you have a
problem properly disposing of your used oil, ask
your dealer, a service station or a local recycling center
for help.
5-20
ProCarManuals.com
Page 283 of 387

Headlamp Aiming
Your vehicle has a visual optical headlamp aiming
system equipped with horizontal aim indicators. The aim
has been preset at the factory and should need no
further adjustment. This is true even though your
horizontal aim indicators may not fall exactly on the
“0 (zero) marks on their scales.
If your vehicle is damaged in an accident, the headlamp
aim may be affected. Aim adjustment to the low beam
may be necessary
if it is difficult to see lane markers (for
horizontal aim),
or if oncoming drivers flash their high
beams at you (for vertical aim).
If you believe your
headlamps need to be re-aimed, we recommend that
you take your vehicle to your dealer for service.
However, it is possible for you to re-aim your headlamps
as described
in the following procedure.
Notice: To make sure your headlamps are aimed
properly, read all the instructions before beginning.
Failure to follow these instructions could cause
damage to headlamp parts.
The vehicle should be properly prepared as follows:
The vehicle should be placed so the headlamps are
25 ft. (7.6 m) from a light colored wall or other flat
surface.
The vehicle must have all four tires on a perfectly
level surface which is level all the way to the wall
or other flat surface.
The vehicle should be placed so it is perpendicular
to the wall or other flat surface.
The vehicle should not have any snow, ice or mud
attached to it.
The vehicle should be fully assembled and all other
work stopped while headlamp aiming is being done.
full tank of fuel and one person or 160
Ibs (75 kg) on
the driver’s seat.
The vehicle should be normally loaded with a
Tires should be properly inflated.
5-50
ProCarManuals.com
Page 295 of 387

Check Tire Pressure System
The check tire pressure system can alert you to a large
change in the pressure of one tire. The system won’t
alert you before you drive that a tire is low or flat.
You must begin driving before the system will work
properly.
The
LOW TIRE PRESSURE message will appear on
the Driver Information Center (DIC)
if pressure difference
(low pressure) is detected in one tire. The check tire
pressure system may not alert you
if:
more than one tire is low,
the vehicle is moving faster than 65 mph (105 km/h),
the system is not yet calibrated,
the tire treadwear is uneven,
the compact spare tire is installed,
tire chains are being used, or
the vehicle is being driven on a rough or
frozen road.
If the anti-lock brake system warning light comes on,
the check tire pressure system may not be working
properly. See your dealer for service.
Also, see
Anti-Lock Brake System Warning Light on page 3-36.
The check tire pressure system detects differences
in tire rotation speeds that are caused by changes in tire
pressure. The system can alert you about a low
tire
- but it doesn’t replace normal tire maintenance.
See
Tires on page 5-60.
When the LOW TIRE PRESSURE message appears on
the Driver Information Center, you should stop as
soon as you can and check all your tires for damage. If
a tire is flat, see
If a Tire Goes Flat on page 5-70.
Also check the tire pressure in all four tires as soon as
you can. See
Inflation -- Tire Pressure on page 5-60.
Any time you adjust a tire’s pressure or have one
or more tires repaired or replaced, you’ll need to reset
(calibrate) the check tire pressure system. You’ll
also need to reset the system whenever you rotate the
tires, buy new tires and install or remove the compact
spare.
Don’t reset the check tire pressure system without first
correcting the cause of the problem and checking
and adjusting the pressure in all four tires.
If you reset
the system when the tire pressures are incorrect,
the check tire pressure system will not work properly
and may not alert you when a tire is low or high.
5-62
ProCarManuals.com
Page 296 of 387

To reset (calibrate) the system:
1. Turn the ignition switch to ON.
2. Press the SELECT right arrow on the DIC until you
enter the GAGE mode. Then press the SELECT
down arrow until TIRE PRESSURE appears on the
display.
3. Press and hold the DIC RESET button for about
five seconds. After five seconds, the display will
show TIRE PRESSURE RESET. If TIRE
PRESSURE RESET does not appear on the
display after about five seconds, see your dealer for
service. After you release the DIC RESET button,
TIRE PRESSURE NORMAL will appear on the
display.
The system completes the calibration process during
driving. Calibration time can take
45 to 90 minutes,
depending on your driving habits. After the system has
been calibrated, the system will alert the driver that
a tire is low, up to a maximum speed of
65 mph
(1 05 km/h).
Tire Inspection and Rotation
Tires should be rotated every 7,500 miles (1 2 500 km).
Any time you notice unusual wear, rotate your tires
as soon as possible and check wheel alignment. Also
check for damaged tires or wheels. See
When It Is Time
for New Tires on page 5-65 and Wheel Replacement
on page
5-68 for more information.
The purpose
of regular rotation is to achieve more
uniform wear for all tires on the vehicle. The first rotation
is the most important. See “Part A: Scheduled
Maintenance Services,” in Section
6, for scheduled
rotation intervals.
When rotating your tires, always use the correct rotation
pattern shown here.
5-63
ProCarManuals.com
Page 340 of 387
Scheduled Maintenance
The services shown in this schedule up to 100,000 miles
(166 000 km) should be repeated after
100,000 miles
(166
000 km) at the same intervals for the life of
this vehicle. The services shown at 150,000 miles
(240 000 km) should be repeated at the same interval
after 150,000 miles
(240 000 km) for the life of this
vehicle.
See
Part 5: Owner Checks and Services on page 6-9
and Part C: Periodic Maintenance Inspections on
page
6- 13.
Footnotes
t The U.S. Environmental Protection Agency or the
California Air Resources Board has determined that the
failure to perform this maintenance item will not nullify
the emission warranty or limit recall liability prior to
the completion of the vehicle
's useful life. We, however,
urge that all recommended maintenance services be
periormea at tne inuicateti intervais anti tne
maintenance be recorded.
@ Whenever the tires are rotated, the Check Tire
Pressure System must be reset.
+A good ti.me to check your brakes is duri.ng tire
rotation. See Brake System Inspection on page 6-14.
Engine Oil Scheduled Maintenance
Change engine oil and filter as indicated by the GM
Oil Life SystemTM (or every 12 months, whichever
occurs first). Reset the system.
Your vehicle has a computer system that lets you know
when to change the engine oil and filter. This is
based on engine revolutions and engine temperature,
and not on mileage. Based on driving conditions,
the mileage at which an oil change will be indicated can
vary considerably. For the oil life system to work
properly, you must reset the system every time the oil is
changed.
When the system has calculated that oil life has been
diminished, it will indicate that an oil change is
necessary. A CHANGE
OIL SOON light will come on.
Change your oil as
soon as possible within the next two
times you stop for fuel.
It is possible that, if you are
driving under the best conditions, the oil life system may
not indicate that an oil change is necessary for over a
year. However, your engine oil and filter must be
must be reset. It is
also important to check your oil
regularly and keep it at the proper level.
If the system is ever reset accidentally, you must
change your oil at
3,000 miles (5 000 km) since your
last oil change. Remember to reset the
oil life system
whenever the oil is changed. See
Engine Oil on
page
5-15 for information on resetting the system.
nh-nnnr-4 qt Inrrrt nnnn q
nqv Qnrl rrt thio t;-m th- rrnrrrtmm WI IUI uyuu UL IUUUL VI lWcI u yuul UI IU UL LI Ilr) tIIIIc, LI Ic, G)yr)LOIl1
6-5
ProCarManuals.com
Page 376 of 387

Seats Head Restraints
............................................ 1-7
Heated Seats
............................................... 1-5
Manual Lumbar
............................................. 1-3
Manual Passenger
......................................... 1-2
Memory
..................................................... 2-48
Power Lumbar
.......................................... 1-4
Power Seats
.................. ................... 1-2
Reclining Seatbacks
...................................... 1-5
Securing a Child Restraint
Designed for the LATCH System
................... 1-42
Rear Seat Position
...................................... 1-42
Right Front Seat Position
.............................. 1-44
Security Feedback
.................................... 2-8, 3-56
Security While You Travel
.................................. 7-5
Sensors
......................................................... 3-25
Service
........................................................... 5-3
Adding Equipment to the Outside of Your
Vehicle
.................................................. 5-4
Doing Your Own Work
................................... 5-4
Engine Soon Light
....................................... 3-39
Publications Ordering Information
..................... 7-9
Service Manuals
............................................... 7-9
Setting Preset Stations
.................................... 3-61
Setting Preset PTYs
........................................ 3-64
3tiVibt UUiIC11113 /-1u P-.- ..-- n . .II-L.-- 7 4n .............................................
Setting the Time .......................................... 3-59 Setting
the Tone (Bassnreble)
........... .... 3-61
Sheet Metal Damage
........................ .... 5-87
Shifting Into Park (P)
....................................... 2-30
Shifting Out
of Park (P) ................................... 2-32
Skidding
........................................................ 4-15
Some Other Rainy Weather Tips
....................... 4-20
Specifications. Capacities
............................... 5-1 00
Speedometer .................................................. 3-32
Starter Switch Check
....................................... 6-11
Starting Your Engine
....................................... 2-24
Steering
........................................................ 4-10
Steering in Emergencies
.................................. 4-12
Steering, Suspension and Front Drive Axle Boot
and Seal Inspection
..................................... 6-13
Steering Tips
.................................................. 4-11
Steering Wheel Climate Controls
....................... 3-28
Steering Wheel Controls, Audio
......................... 3-74
Storage Areas
Convenience Net
......................................... 2-46
Front Storage Area
...................................... 2-45
Glove
Box .................................................. 2-45
Rear Storage Area
....................................... 2-46
~LWIIII~ ii-e rrat III~: a~lu loois 3-f~
Storing the Spare Tire and Tools ....................... 5-80
Stuck in Sand, Mud, Ice or Snow
...................... 4-32
Sun Visors
............................... ........... 2-18
Sunroof
................................... ....... 2-47
n1 .... Pl~ I T . IT - -- ..........................
13
ProCarManuals.com