turn signal OLDSMOBILE BRAVADA 1994 Owners Manual
[x] Cancel search | Manufacturer: OLDSMOBILE, Model Year: 1994, Model line: BRAVADA, Model: OLDSMOBILE BRAVADA 1994Pages: 248, PDF Size: 14.54 MB
Page 15 of 248

Vehide Symbols
These are some of the symbols you
will find on your vehicle. For
example, these symbols are used on
an original battery:
Caution Possible Injury
Protect Eyes by
Shielding
Caustic Battery Acid
Could Cause Burns
Avoid Sparks or Flames Spark or Flame Could Explode Battery A
8
These symbols are important for you
and your passengers whenever your
vehicle is driven:
Fasten Safety Belts
Door LocklUnlock
These symbols have to do with your
lights:
Master Lighting Switch
Turn Signal Direction
Hazard Warning Flashers
A
Headlight High Beam
Parking Lights
Fog Lights
pf
$0
ProCarManuals.com
Page 43 of 248

Here you can learn about the many standard and optional features on
your Oldsmobile. and information on
starting. shifting and braking
. Also
explained are the instrument panel
and the warning systems that tell you
if everything is working properly -
and what to do if you have a problem .
Part 2
Features & Controls
Keys ........................................................................\
.......................................... .. ....... 38
Locks ........................................................................\
.................................................. 39
Remote Lock Control
........................................................................\
........................ 40
Tailgate ........................................................................\
.............................................. 42
Ignition ........................................................................\
.............................................. 45
Starting Your Engine ........................................................................\
........................ 45
Shifting the Transmission ........................................................................\
................. 48
Parking Brake ........................................................................\
.................................... 51
Shifting into Park ........................................................................\
.............................. 51
Horn ........................................................................\
................................................... 54
Tilt Steering Wheel ........................................................................\
............................ 55
Windows ........................................................................\
............................................ 55
Turn Signal/Multifunction Lever ........................................................................\
..... 55
Windshield Wipers and Washer ........................................................................\
........ 57
Cruise Control ........................................................................\
................................... 59
Headlights
........................................................................\
.......................................... 62
Fog Lights ........................................................................\
.......................................... 63
Overhead Console
........................................................................\
............................. 64
Sun Visors
........................................................................\
......................................... 69
Mirrors
........................................................................\
............................................... 69
Storage Compartments
........................................................................\
..................... 71
Ashtrays and Lighter
........................................................................\
......................... 73
Luggage Carrier ........................................................................\
................................. 74
Warning Lights, Gages and Indicators
..................................................................... 80
Instrument Panel ........................................................................\
............................... 76
37
ProCarManuals.com
Page 61 of 248

Tilt Steering Wheel
A tilt steering wheel allows you to
adjust the steering wheel before you
drive. You can also raise it to the
highest level to give your legs more
room when you exit and enter the
vehicle.
To tilt the wheel, hold the steering
wheel and pull the lever. Move the
steering wheel
to a comfortable level,
then release the lever to lock the wheel
in place.
Power Windows
Switches on the driver's door control
each of the windows when the ignition
is on. In addition, each passenger door
has a control switch for its own
.- window.
'I- I
4 Turn SignullMukifinction
Lever
The lever on the left side of the steering
column includes your:
Turn Signal and Lane Change
Cruise Control
Headlight High-Low Beam
Windshield Wipers
Windshield Washer
The High-Low Beam feature is
discussed under
Headlights. See the
Index under Headlights.
Indicator
3
55
ProCarManuals.com
Page 62 of 248

Features & Controls
56
Operation of Lights
Although your vehicle’s lighting system (headlights, parking lights, fog lamps,
side marker lights and taillights) meets
all applicable federal lighting
requirements, certain states and
provinces may apply their
own lighting
regulations that may require special
attention before
you operate these lights.
For example, some jurisdictions may
require that you operate your fog lamps
only when your lower beam headlights
are also on, or that headlights be
turned
on whenever you must use your
windshield wipers. In addition, most
jurisdictions prohibit driving solely
with parking lights, especially at dawn
or dusk. It is recommended that you
check with your own state or provincial
highway authority for applicable
lighting regulations.
U
0
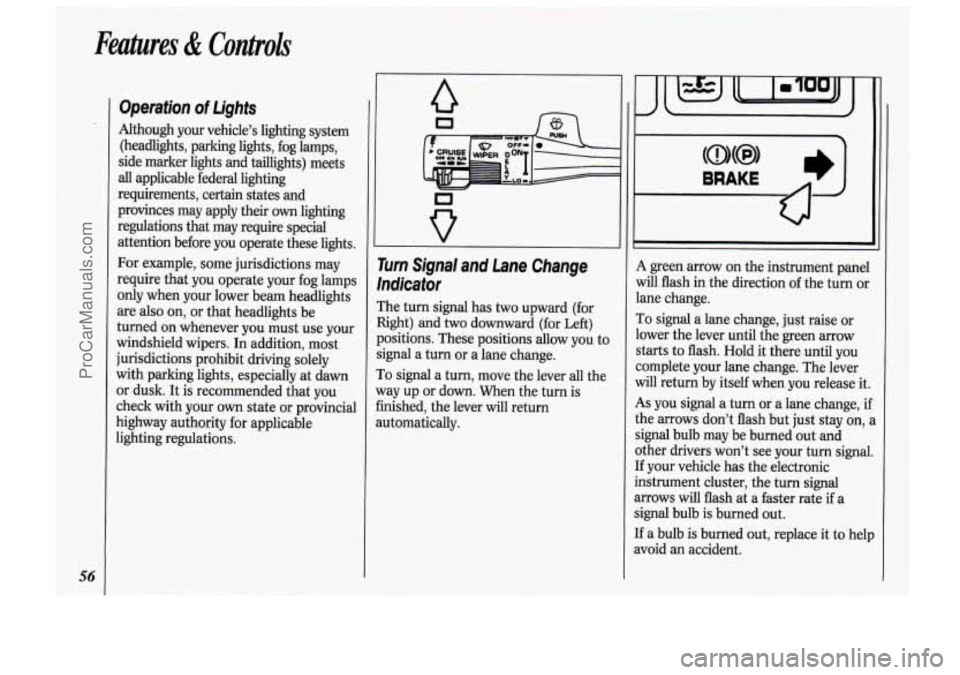
rurn Signal and Lane Change
’ndicator
The turn signal has two upward (for
light) and
two downward (for Left)
)ositions. These positions allow you to
ignal a turn or a lane change.
To signal a turn, move the lever all the
yay up or down. When the turn is
inished, the lever will return
lutomatically.
A green arrow on the instrument panel
will flash in the direction of the turn or
lane change.
To signal a lane change, just raise or
lower the lever until the green arrow
starts to flash. Hold it there until
you
complete your lane change. The lever
will return by itself when you release it.
As you signal a turn or a lane change, ij
the arrows don’t flash but just stay on,
signal bulb may be burned out and
other drivers won’t see your turn signal
If your vehicle has the electronic
instrument cluster, the turn signal
arrows will flash at a faster rate
if a
signal bulb is burned out.
If a bulb is burned out, replace it to hell
avoid an accident.
ProCarManuals.com
Page 63 of 248

If the green arrows don’t go on at all
when
you signal a turn, check the fuse
(see the
Index under Fuses G Circuit
Breakers) and for burned-out bulbs.
If you have a trailer towing option with
added wiring for the trailer lights, a
different turn signal flasher is used.
With this flasher installed, the signal
indicator will flash even if a turn signal
bulb is burned out. Check the front and
rear turn signal lights regularly to make
sure they are working.
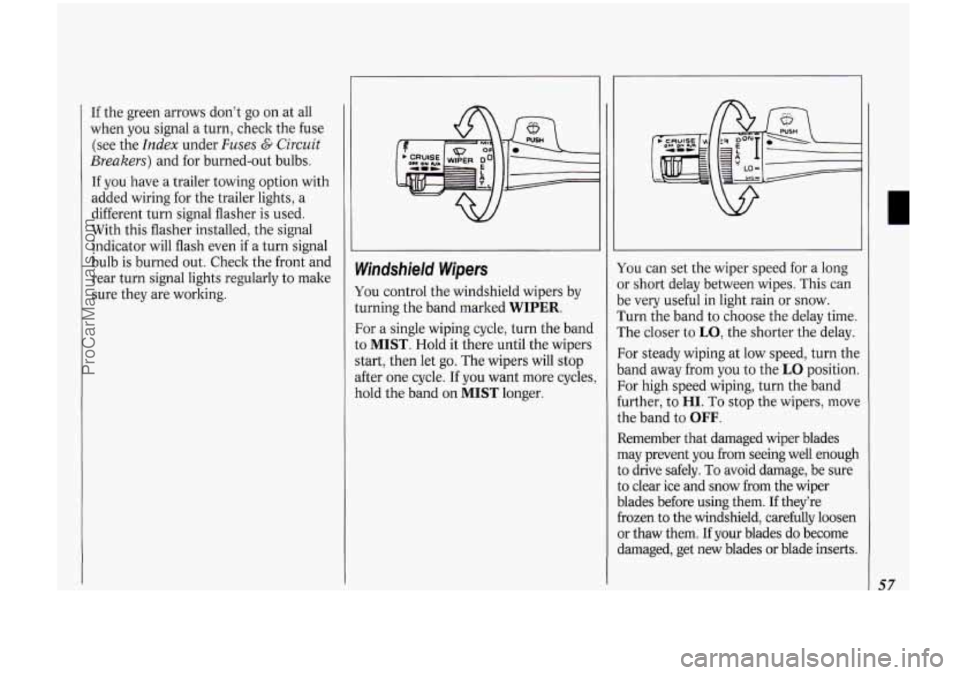
Windshield Wipers
You control the windshield wipers by
turning the band marked WIPER.
For a single wiping cycle, turn the band
to
MIST. Hold it there until the wipers
start, then let go. The wipers will stop
after one cycle. If you want more cycles,
hold the band on
MIST longer. You
can set the wiper speed for a long
or short delay between wipes. This can
be very useful in light rain or snow.
Turn the band to choose the delay time.
The closer to
LO, the shorter the delay.
For steady wiping at low speed, turn the
band away from you
to the LO position.
For high speed wiping, turn the band
further, to
HI. To stop the wipers, move
the band to
OFF.
Remember that damaged wiper blades
may prevent you from seeing well enough
to drive safely.
To avoid damage, be sure
to clear ice and snow from the wiper
blades before using them.
If they’re
frozen
to the windshield, carefully loosen
or thaw them.
If your blades do become
damaged, get new blades or blade inserts.
57
ProCarManuals.com
Page 64 of 248

Features & Controls
Heavy snow or ice can overload your
wipers.
A circuit breaker will stop them
until the motor cools. Clear away snow
or ice to prevent an overload.
Windshield Washer
4t the top of the turn signal/multifunction
ever there’s a paddle with the word
PUSH on it. To spray washer fluid on
:he windshield, push the paddle.
rhe wipers will clear the window and
:hen either stop or return to your preset
;peed.
See the
Index under Windshield
flasher Fluid.
Driving without washer fluid can be
dangerous. A bad mud splash can block
your vision.
You could hit another
vehicle or go off the road. Check your
washer fluid level often.
NOTICE:
When using concentrated washer
fluid, follow the manufacturer’s
instructions for adding water.
Don’t mix water with ready-to-
use washer fluid. Water can cause
the solution to freeze and damage
your washer fluid tank and other
parts of the washer system. Also,
water doesn’t clean as well as
washer fluid.
Fill your washer fluid tank only
3/4 full when it’s very cold. This
allows for expansion, which could
damage the tank if it is
completely full.
Don’t use radiator antifreeze in
your windshield washer. It can
damage your washer system and
paint.
ProCarManuals.com
Page 68 of 248

Features & Controh
62
Headlights
Push the switch marked pe to turn on:
Parking Lights
Side Marker Lights
Taillights
Instrument Panel Lights
II I II I LIGHTS
Push the -:Q- switch to turn on the
headlights, together with:
Parking Lights
Side Marker Lights
Taillights
Instrument Panel Lights
Pull the switch or press
OFF to turn off
the lights.
Lights on Reminder
If you open the door while leaving the
lights
on, you will hear a warning tone.
Headlight High-Low Beam
To change the headlights from low
beam to high
or high to low, pull the
turn signal lever all the way toward
you.
Then release it.
When the high beams are on,
a blue
light
on the instrument panel also will
be on.
ProCarManuals.com
Page 83 of 248

The Instrument Panel-Your
Information System
Your instrument panel is designed to let
you know at a glance how your vehicle
is running. You’ll know how fast you’re
going, how much fuel you’re using, and
many other things you’ll need to drive
safely and economically.
The main components
of your
instrument panel are:
1. Side Vents
2. Side Window Defogger
3. Rear Window Wipermasher
4. Rear Window Defogger
5. Light Controls
6. Tilt Steering Wheel Lever
7. Instrument Cluster
8. Gearshift Lever
9. Climate Controls
IO. Lighter
11. Center Vents
12. Glove Box
13. Side Window Defogger
14. Side Vents
15. Audio System
16. Ashtray
17. Tailgate Window Release
18. Power Remote Control Mirrors
19. Ignition Switch
20. Hazard Warning Flashers Switch
21. Horn
22. Fuse Panel (under instrument
panel)
23. Hood Release
24. Turn Signal/Multifunction Lever
25. Parking Brake Release
77
ProCarManuals.com
Page 86 of 248

Features & Controls
80
I Warning Lights, Gages and
Indicators
This section describes the warning
lights and gages that may be on your
vehicle. The pictures will help you
locate them.
Warning lights and gages can signal that
something is wrong before it becomes
serious enough to cause an expensive
repair or replacement. Paying attention
to your warning lights and gages could
also save you or others from injury.
Warning lights go on when there may
be or is a problem with one of your
vehicle's functions.
As you will see in
the details on the next few pages, some
warning lights come on briefly when
you turn the ignition key just to let you
know they're working.
If you are
familiar with this section, you should
not be alarmed when this happens. Gages
can indicate when there may be
or is a problem with one of your
vehicle's functions. Often gages and
warning lights work together to let you
know when there's a problem with
your vehicle.
When one of the warning lights comes
on and stays on when you are driving,
or when one of the gages shows there
may be a problem, check the section
that tells you what to do about it.
Please follow the manual's advice.
Waiting to do repairs can be costly
-
and even dangerous. So please get to
know your warning lights and gages.
They're a big help.
F I
I
I' I Speedometer (STANDARD CLUSTER)
our speedometer lets you see your
jeed in both miles per hour (mph) and
ilometers per hour (ldh).
ProCarManuals.com
Page 103 of 248

AmSt: When you’re tuned to an AM
station that broadcasts
in stereo, the
STEREO light will come on. If the
signal is weak, press
AmSt to turn the
feature
off. You’ll get better reception.
Press
AmSt again to turn the feature
back on for strong signals.
SEEK Each time you press SEEK, you
will tune
in the next station on the AM
or FM radio band.
SCAN: Press to listen for a few seconds
to the next station on the AM or FM
band; the scan
will continue every few
seconds until you either press
SCAN
again or press the VOLBAL knob to
stop on a particular station.
To Preset Radio Stations:
The four pushbuttons can be used to
preset up to
14 radio stations (seven
AM and seven FM stations).
1. Turn the lower control knob (TUNE)
to the station you want.
2. Press SET. The SET indicator will
appear
on the digital screen for five
seconds.
3. While the SET indicator is displayed,
press one of the four pushbuttons.
The station is now preset. You can
tune to it immediately by pressing the
same button.
4. Repeat steps 1-3 for each of four AM
and four FM stations. ~. ,.I
Up to three additional stati6flS bn.each
band may be preset by “pairing”
pushbuttons:
1. Tune in the desired station.
2. Press SET, and within five seconds
press any two adjacent pushbuttons
at the same time.
3. The station can be tuned in when the
same
two pushbuttons are pressed at
the same time.
To Play a Cassette Tape:
Press PWR (Power) to turn the radio
on. Then push a cassette into the
cassette entry door (the tape side goes
in first). Using tapes that are longer
than
90 minutes (45 minutes on each
side) is not recommended.
FWD (Fast Forward): Press to advance
the tape rapidly; press again to play.
REV (Reverse): Press to reverse the
tape rapidly; press again to play tape.
SEARCH: Push this switch to the right
and the
FWD and REV buttons will
function as a “music search,” stopping
the tape at the next selection on the
tape. (There must be at least a 3-second
gap between selections
on the tape.)
The
ON light will indicate the music
search is selected.
Program: Press the VOL-BAL knob to
change the side of tape being played.
When the arrow pointing up is lighted,
the selections listed on the top side of
the tape are played. When the
arrow
pointing down is lighted, selections
listed on the bottom side of the tape are
played. The tape player automatically
begins playing the other side when
it
reaches the end of the tape.
Cr02: This button sets tape bias. When
playing high bias chrome or metal tapes,
press the button to turn the button light
on. When playing standard tapes, press
again to turn the light
off.
EJECT Press to have the cassette tape
ejected (the radio will then play). The
cassette tape
will be ejected automatically
when the radio is turned
off.
L
97
ProCarManuals.com