Oldsmobile Cutlass Supreme 1994 Owner's Manuals
Manufacturer: OLDSMOBILE, Model Year: 1994, Model line: Cutlass Supreme, Model: Oldsmobile Cutlass Supreme 1994Pages: 276, PDF Size: 14.73 MB
Page 111 of 276
Steering Wheel Touch Controls
for Climate Control
(OPTION)
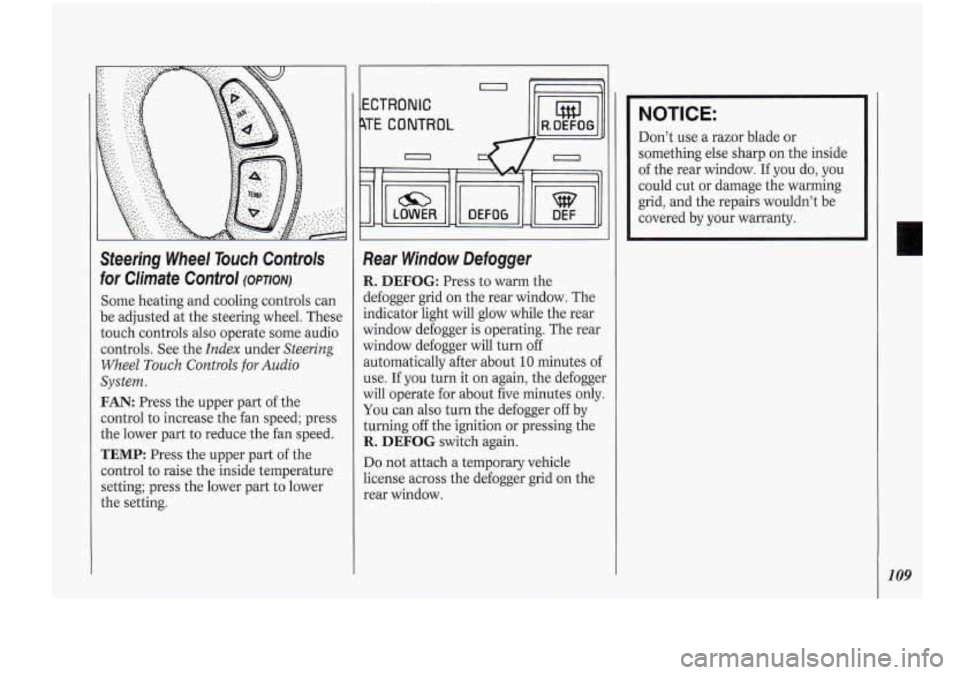
Some heating and cooling controls can
be adjusted at the steering wheel. These
touch controls also operate some audio
controls. See the
Index under Steering
Wheel
Touch Controls for Audio
System.
FAN: Press the upper part of the
control to increase the fan speed; press
the lower part to reduce the fan speed.
TEMP: Press the upper part of the
control to raise the inside temperature
setting; press the lower part to lower
the setting.
b
ECTRONIC
TE CONTROL I lW1,
Rear Window Defogger
R. DEFOG: Press to warm the
defogger grid on the rear window. The
indicator light will glow while the rear
window defogger is operating. The rear
window defogger will turn
off
automatically after about 10 minutes of
use. If you turn it on again, the defogger
will operate for about five minutes only.
You can also turn the defogger off by
turning off the ignition or pressing the
R. DEFOG switch again.
Do not attach a temporary vehicle
license across the defogger grid on the
rear window.
NOTICE:
Don’t use a razor blade or
something else sharp on the inside
of the rear window.
If you do, you
could cut or damage the warming
grid, and the repairs wouldn’t be
covered by your warranty.
109
Page 112 of 276
Comfort Controls &Audio Systems
I
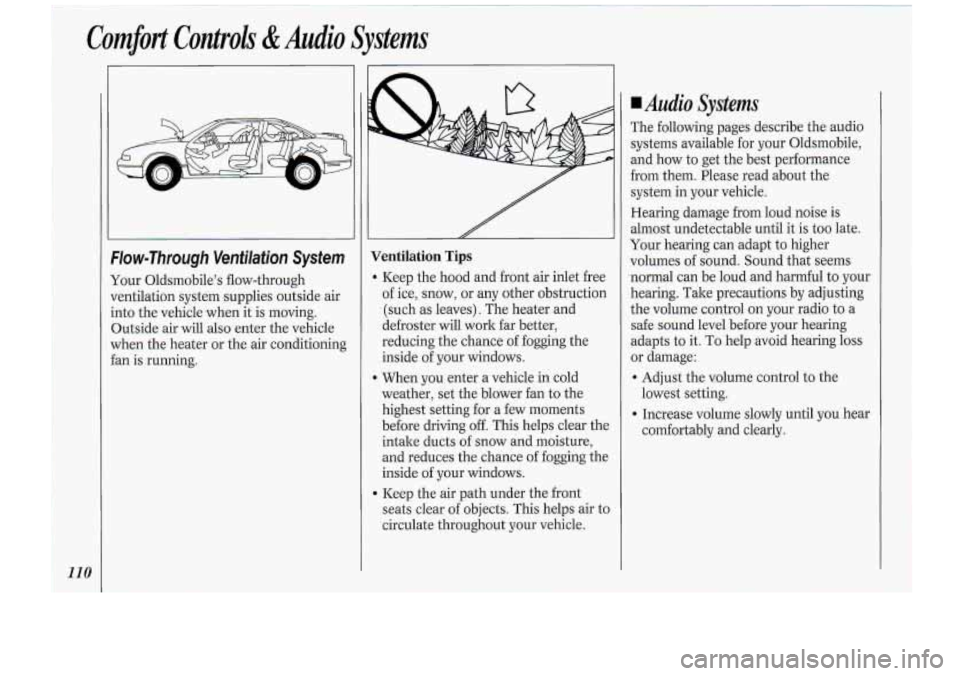
‘Flow-Through Venfilafiun System
Your 01dsmbde’:s flow-though
ventilation systemsupgfiies miside air
into. the vehicle when it is moving
Outside air will also enter the vehicle
when the heater ~OT the air conditi,oning
fan is running.
Page 113 of 276
NOTICE:
Before you add any sound
equipment
to your vehicle - like a
tape player, CB radio, mobile
telephone or two-way radio
- be
sure you can add what
you want. If
you can, it's very important to do it
properly. Added sound equipment
may interfere with the operation of
your vehicle's engine, Delco@ radio or other systems, and even damage
them. And, your vehicle's systems
may interfere with the operation of
sound equipment that has been
added improperly.
So, before
adding sound equipment, check
with your dealer and be sure to
check Federal rules covering mobile
radio and telephone units.
I I I OBlCD I
AUTO REVERSE
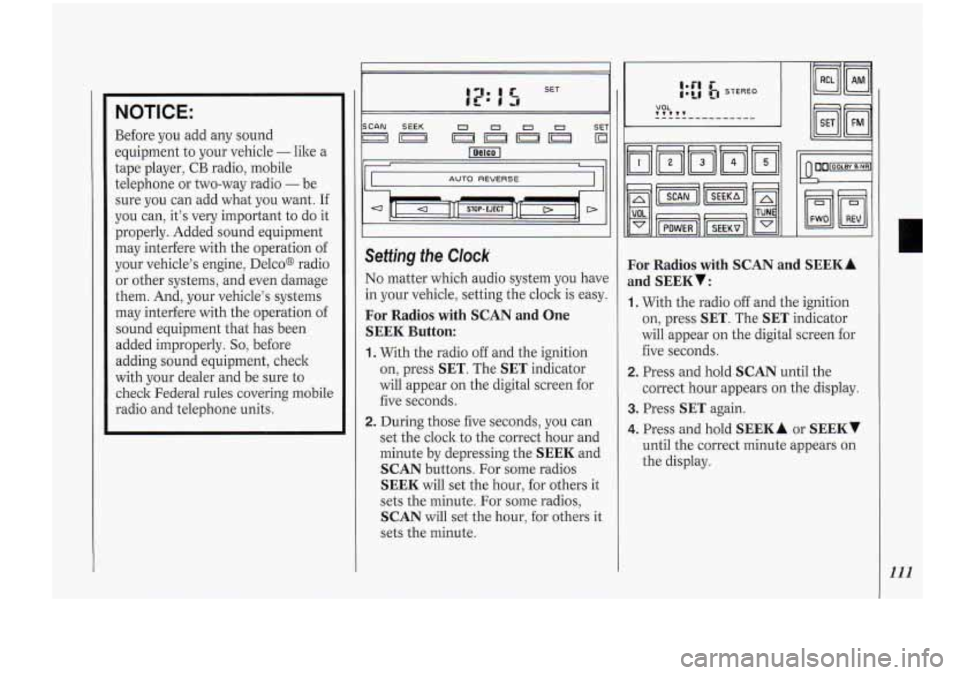
Setting the Clock
No matter which audio system you have
in your vehicle, setting the clock
is easy.
For Radios with SCAN and One
SEEK Button:
1. With the radio off and the ignition
on, press
SET. The SET indicator
will appear on the digital screen for
five seconds.
2. During those five seconds, you can
set the clock to the correct hour and
minute by depressing the
SEEK and
SCAN buttons. For some radios
SEEK will set the hour, for others it
sets the minute. For some radios,
SCAN will set the hour, for others it
sets the minute.
For Radios with SCAN and
and
SEEKY:
~
SEEKA
1. With the radio off and the ignition
on, press
SET. The SET indicator
will appear on the digital screen for
five seconds.
2. Press and hold SCAN until the
correct hour appears on the display.
3. Press SET again.
4. Press and hold SEEK A or SEEKv
until the correct minute appears on
the display.
111
Page 114 of 276
Comfort Controls &Audio Systems
112
VOLUME
TUNE
TREB
BASS
II II
SCAN SEEK 1 23 4 SET
I”) lol
II I
I/ I
I II
I ll 1 I
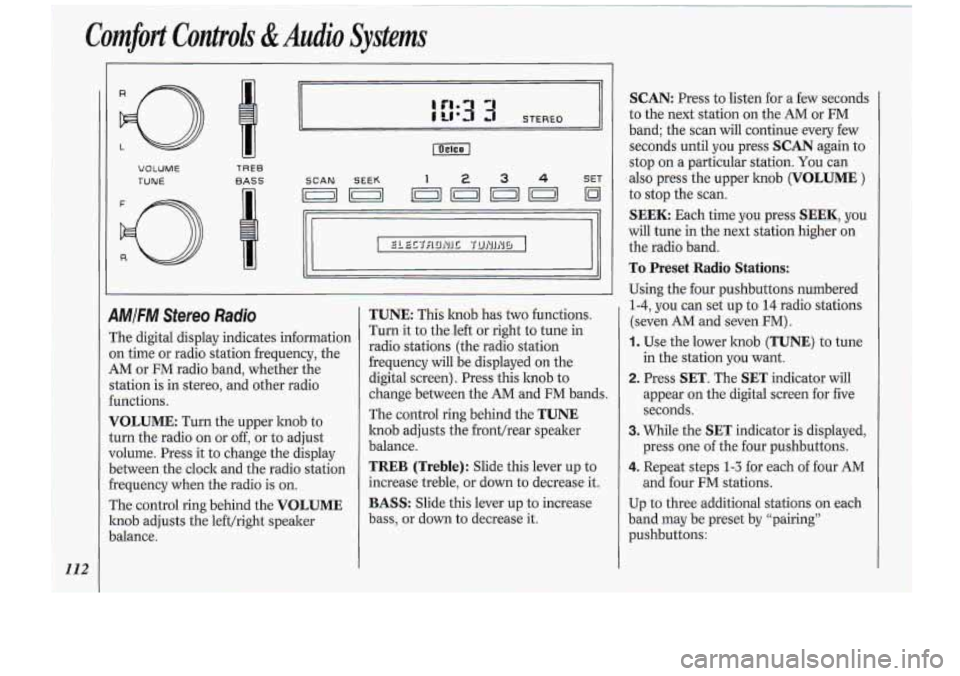
9MIFM Sfereo Radio
The digital display indicates information
on time or radio station frequency, the
AM or FM radio band, whether the
station is in stereo, and other radio
€unctions.
VOLUME: Turn the upper knob to
turn the radio on or
off, or to adjust
volume. Press it to change the display
between the clock and the radio station
frequency when the radio is on.
The control ring behind the
VOLUME
knob adjusts the left/right speaker
Jalance.
TUNE: This lmob has two functions.
Turn it to the.left or right to tune in
radio stations (the radio station
frequency will be .displayed on the
digital screen). Press this hob to
change between the
AM and FM bands.
The control ring behind the
TUNE
knob adjusts the front/rear speaker
balance.
TREB (Treble): Slide this lever up to
increase treble, or down to decrease it.
BASS: Slide this lever up to increase
bass, or down to decrease it.
SCAN: Press to listen for a few seconds
to the next station on the AM or
FM
band; the scan will continue every few
seconds until you press
SCAN again to
stop on a particular station. You can
also press the upper hob (VOLUME )
to stop the scan.
SEEK: Each time you press SEEK, you
will tune in the next station higher on
the radio band.
To Preset Radio Stations:
Using the four pushbuttons numbered
1-4, you can set up to 14 radio stations
(seven AM and seven FM)
.
1. Use the lower knob (TUNE) to tune
in the station you want.
2. Press SET. The SET indicator will
appear on the digital screen for five
seconds.
3. While the SET indicator is displayed,
press one of the four pushbuttons.
4. Repeat steps 1-3 for each of four AM
and four FM stations.
Up to three additional stations on each
band may be preset by “pairing”
pushbuttons:
Page 115 of 276
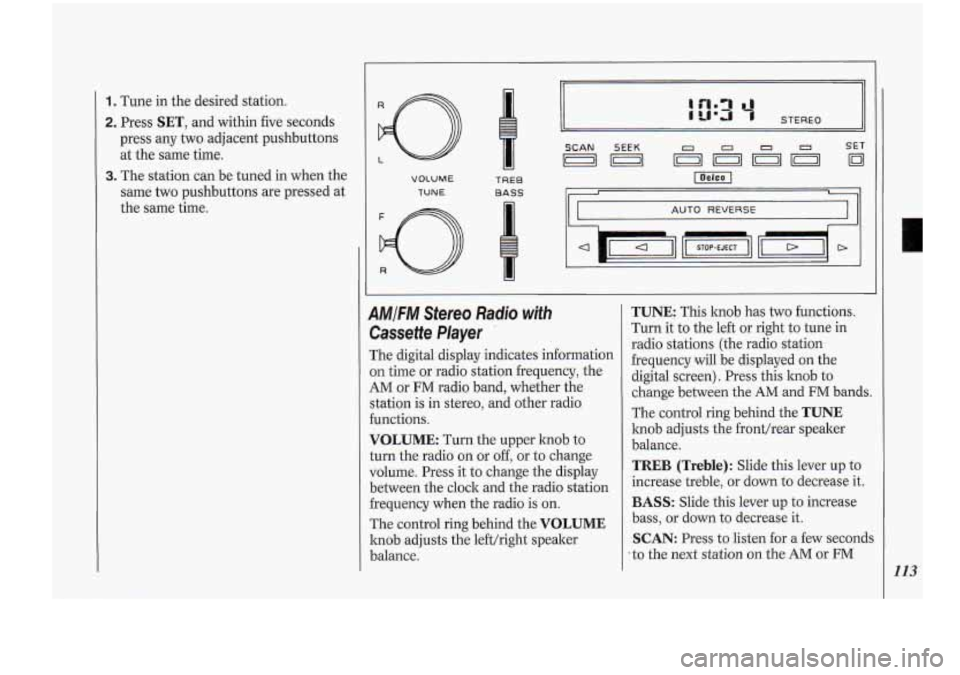
1. Tune in the desired station.
2. Press SET, and within five seconds
press any two adjacent pushbuttons
at the same time.
3. The station can be tuned in when the
same two pushbuttons are pressed at
the same time. f
VOLUME
TUNE
TREB
BASS
I/ STEREO
AUTO
REVERSE
AMIFM Stereo Radio with
Cassette Player
The digital display indicates information
on time or radio station frequency, the
AM or FM radio band, whether the
station is in stereo, and other radio
functions.
VOLUME: Turn the upper knob to
turn the radio on or
off, or to change
volume. Press it to change the display
between the clock and the radio station
frequency when the radio is on.
The control ring behind the
VOLUME
knob adjusts the lefthight speaker
balance.
TUNE: This knob has two functions.
Turn it to the left or right to tune in
radio stations (the radio station
frequency .will be displayed on the
digital screen). Press this knob to
change between the AM and FM bands.
The control ring behind the
TUNE
knob adjusts the fronthear speaker
balance.
TREB (Treble): Slide this lever up to
increase treble, or down to decrease it.
BASS: Slide this lever up to increase
bass, or down to decrease it.
SCAN: Press to listen for a few seconds
:to the next station on the AM or FM
-
113
Page 116 of 276
Comfort Controls &Audio Systems
band; the scan will continue every few
seconds until you press
SCAN again to
stop on a particular station. You can
also press the upper knob
(VOLUME )
to stop the scan.
SEEK Each time you press SEEK, you
will tune in the next station higher on
the radio band.
To Preset Radio Stations:
Using the four pushbuttons below the
digital display, you can set up to
14
radio stations (seven AM and seven
FM).
1. Use the lower hob (TUNE) to tune
in the station you want.
2. Press SET. The SET indicator will
appear on the digital screen for five
seconds.
3. While the SET indicator is displayed,
press one of the four pushbuttons.
4. Repeat steps 1-3 for each of four AM
and four FM stations.
Up to three additional stations on each
band may be preset by “pairing”
pushbuttons:
1. Tune in the desired station.
2. Press SET, and within five seconds
press any two adjacent pushbuttons
at the same time.
3. The station can be tuned in when the
same two pushbuttons are pressed at
the same time.
To Play a Cassette Tape:
With the power on, insert a tape into
the cassette door. Using tapes that are
longer than
90 minutes (45 minutes on
each side) is not recommended.
When the right indicator arrow is lit,
selections listed on the bottom side of
the cassette are playing. When the left
arrow is lit, selections listed on the top
side of the cassette are playing.
To
change sides of the tape, press the
upper control hob
(VOLUME) while
the cassette is playing. The tape player
automatically begins playing the other
side when it reaches the end of the tape.
Fast Forward: Press the button with
the arrow pointing in the same direction
that the tape is playing.
To stop fast
forward, press the
STOP-EJECT
button.
Reverse: Press the button with the
arrow pointing in the opposite direction
that the tape is playing.
To stop reverse,
press the
STOP-EJECT button.
STOP-EJECT: To stop playing a tape,
fully press this button. The cassette will
be partially ejected, and the radio will
begin playing.
Page 117 of 276
ll
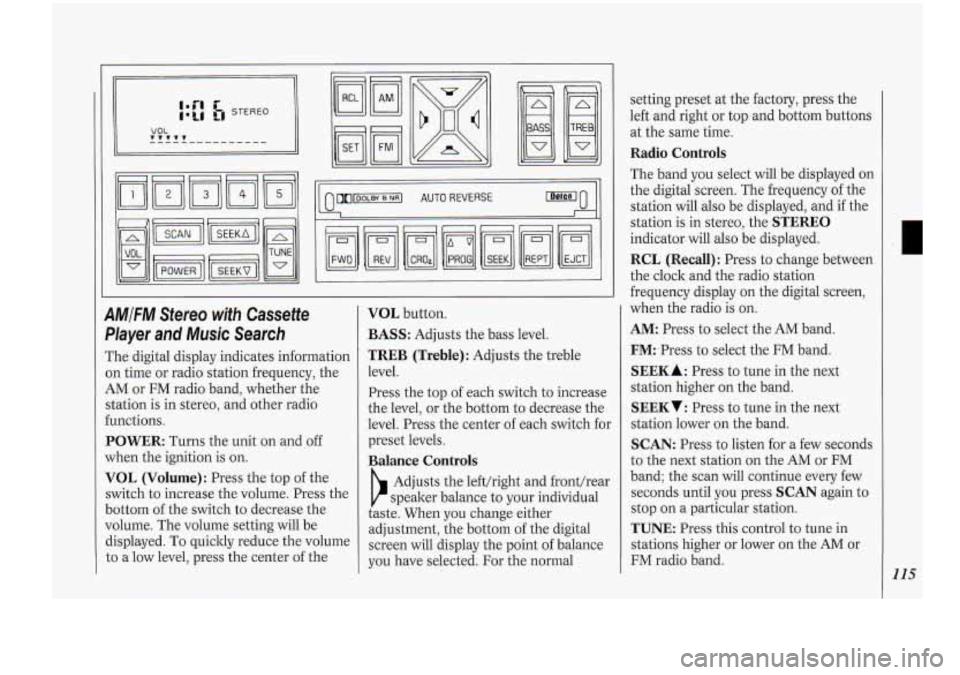
9MlFM Stereo with Cassette
Dlayer
and Music Search
The digital display indicates information
In time or radio station frequency, the
4M or FM radio band, whether the
;tation is in stereo, and other radio
:unctions.
POWER: Turns the unit on and off
when the ignition
is on.
VOL (Volume): Press the top of the
;witch to increase the volume. Press the
Jottom of the switch to decrease the
Jolume. The volume setting will be
%splayed. To quickly reduce the volume
;o a low level, press the center of the
VOL button.
BASS: Adjusts the bass level.
TREB (Treble): Adjusts the treble
level.
Press the top of each switch to increase
the level,
or the bottom to decrease the
level. Press the center of each switch for
preset levels.
Balance Controls
b
Adjusts the lefthight and fronthear
speaker balance to your individual
taste. When you change either
adjustment, the bottom of the digital
screen will display the point
of balance
you have selected.
For the normal setting preset
at the factory, press the
left and right or top and bottom buttons
at the same time.
Radio Controls
The band you select will be displayed on
the digital screen. The frequency of the
station will also be displayed, and
if the
station is in stereo, the
STEREO
indicator. will also be displayed.
RCL (Recall): Press to change between
the clock and the radio station
frequency display on the digital screen,
when the radio is on.
AM:. Press to select, the AM band.
FM:-Press to select the FM band.
SEEK A : Press to tune in the next
station higher on the band.
SEEKT: Press to tune in the next
station lower on the band.
SCAN: Press to listen for a few seconds
to the next station on the AM or FM
band; the scan will continue every few
seconds until you press
SCAN again to
stop on a particular station.
TUNE: Press this control to tune in
stations higher or lower on the AM or
FM radio band.
115
Page 118 of 276
Comfort Controls & Audio.Systems
To Preset Radio Stations:
You can preselect up to 10 radio
stations (five
AM and five FM) and
tune to any
of them by pushing a single
button. Here’s how.
1. Tune to a desired station with the
lower knob.
2. Press SET.
3. Within about five seconds, press one
of the five numbered pushbuttons.
The station you selected will be
automatically tuned whenever you
press this button again.
4. Repeat for up to four more stations
on the same band, and up to five
on
the other band.
To Play a Cassette Tape:
Your cassette tape player is designed to
work best with tapes that play for
30 to
45 minutes per side. Tapes that run
longer than that are
so thin they may
not work well in this player.
With the unit on, press a cassette into
the slot marked
AUTO REVERSE,
tape side first. Adjust volume, balance,
fade and tone as described earlier.
Here .are your other tape player
controls:
PROG (Program): Press to switch
from one side of the tape to the other.
The unit switches automatically at the
end of a side.
CR02: Press to adjust the. unit for high
bias chrome or metal tapes. For
standard bias tapes, press again to
return to the factory-preset adjustment.
REV (Reverse): Press to rewind the
tape rapidly. The tape will stop at the
end, or when you press
REV or PROG
lightly. The radio will play while the
tape is rewinding.
FWD (Forward): Press to advance the
tape rapidly. The tape will stop at the
end, or when you press
FWD or PROG
lightly. The radio will play while the
tape is advancing.
SEEK: Press to advance to the next
selection or passage. The tape will fast-
forward and stop either at the first four- second
quiet spot or when
you press
SEEK again (or PROG) .
REPT (Repeat): Press to repeat a
selection. The tape will rewind to the
first four-second quiet spot or until you
press
REPT (or PROG) again.
EJCT: Press to remove the tape.
Page 119 of 276
250Hz 3.5KHz
60Hz lKHz lOKHr
AMIFM Stereo with Cassette
Player
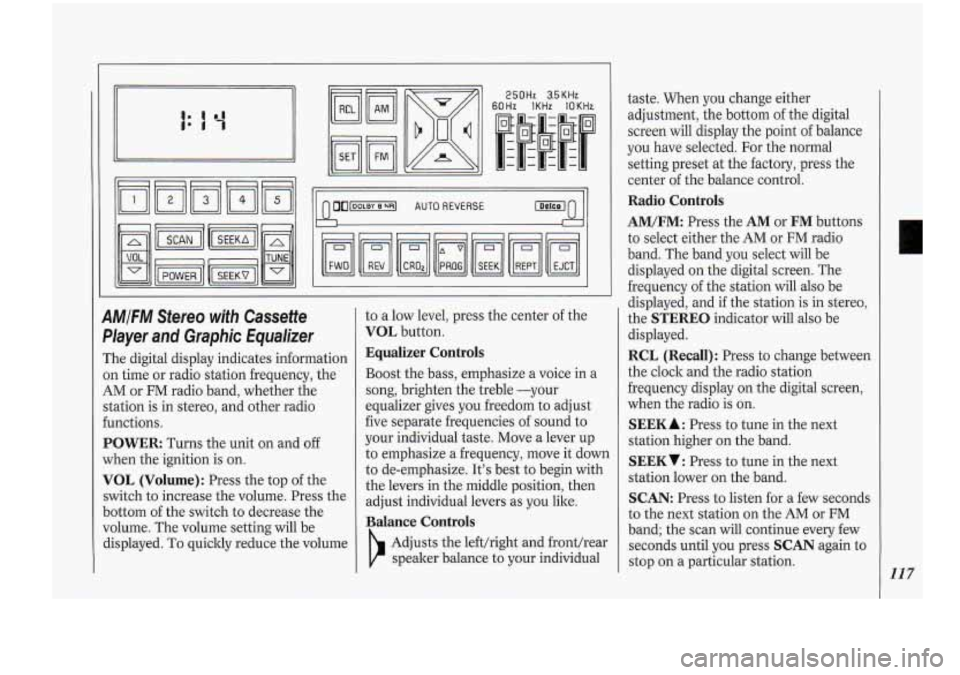
and Graphic Equalizer
The digital display indicates information
on time or radio station frequency, the
AM or FM radio band, whether the
station is in stereo, and other radio
€unctions.
POWER Turns the unit on and off
when the ignition is
on.
VOL (Volume): Press the top of the
switch to increase the volume. Press the
bottom
of the switch to decrease the
volume. The volume setting will be
displayed.
To quickly reduce the volume to
a low level,
press the center of the
VOL button.
Equalizer Controls
Boost the bass, emphasize a voice in a
song, brighten the treble -your
equalizer gives you freedom to adjust
five separate frequencies of sound to
your individual taste. Move a lever up
to emphasize a frequency, move
it down
to de-emphasize. It's best to begin with
the levers in the middle position, then
adjust individual levers as you like.
Balance Controls
Adjusts the lefthight and fronthear
speaker b.alance to your individual taste.
When you change either
adjustment, the bottom of the digital
screen will display the point of balance
you have selected. For the normal
setting preset at the factory, press the
center of the balance control.
Radio Controls
AM/FM: Press the AM or FM buttons
to select either the AM or
FM radio
band. The band you select will be
displayed on the digital screen. The
frequency of the station will also be
displayed, and
if the station is in stereo,
the
STEREO indicator will also be
displayed.
RCL (Recall): Press to change between
the clock and the radio station
frequency display
on the digital screen,
when the radio is on.
SEEK A : Press to tune in the next
station higher on the band.
SEEKV: Press to tune in the next
station lower on the band.
SCAN: Press to listen for a few seconds
to the next station on the
AM or FM
band; the scan will continue every few
seconds until you press
SCAN again to
stop on a particular station.
117
Page 120 of 276
Comfort.Controls &Audio Systems
TUNE: Press this control to tune in
stations higher or lower
on the AM or
FM radio band.
To Preset Radio Stations:
The five pushbuttons (numbered 1-5)
can be used to preset up to ten radio
stations (five
AM and five FM) .
1. Tune the digital display to the station
you want.
2. Press SET. The SET indicator will
appear on the digital screen for five
seconds.
3. While the SET indicator is displayed,
press one
of the five pushbuttons.
4. Repeat steps 1-3 for each of five AM
and five FM stations.
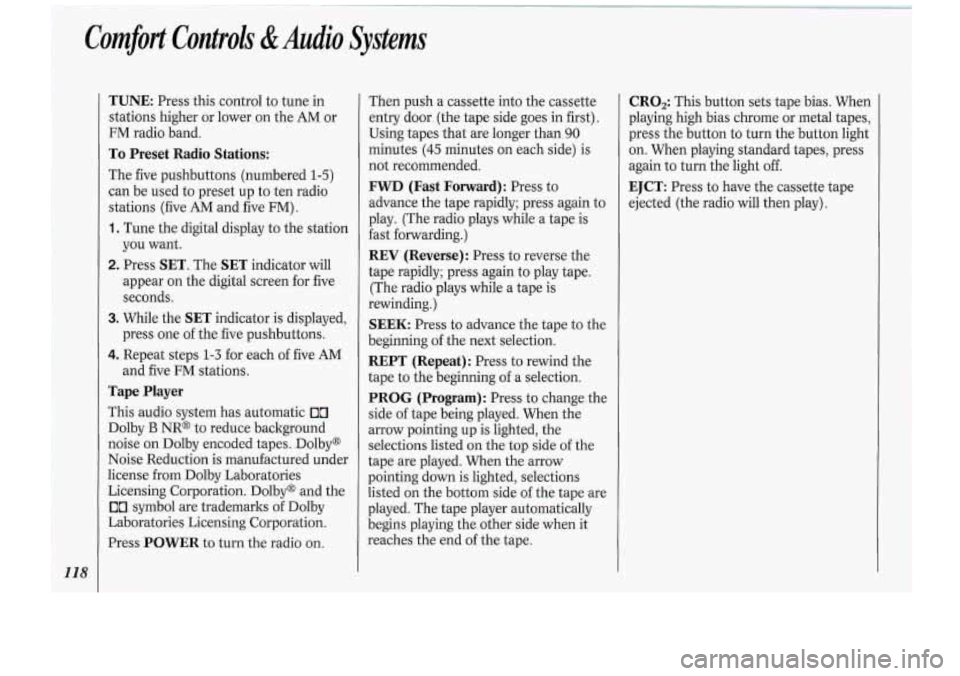
Tape Player
This audio system has automatic Ix7
Dolby B NR@ to reduce background
noise on Dolby encoded .tapes. Dolby@
Noise Reduction is manufactured under
license from Dolby Laboratories
Licensing Corporation. Dolby@ and the
00 symbol are trademarks of Dolby
Laboratories Licensing Corporation.
Press
POWER to turn the radio on. Then push a cassette
into the cassette
entry door. (the tape side goes in first).
Using tapes that are longer than
90
minutes (45 minutes on each side) is
not recommended.
FWD (Fast Forward): Press to
advance the tape rapidly; press again to
play. (The radio plays while a tape is
fast forwarding.)
REV (Reverse): Press to reverse the
tape rapidly; press again to play tape.
(The radio plays while a tape is
rewinding.)
SEEK: Press to advance the tape to the
beginning
of the next selection.
REPT (Repeat): Press to rewind the
tape to the beginning of a selection.
PROG (Program): Press to change. the
side of tape being played. When the
arrow pointing up is lighted, the
selections listed on the top side
of the
tape are played. When the arrow
pointing down is lighted, selections
listed on the bottom side of the tape are
played. The tape player automatically
begins playing the other side when it
reaches the end of the tape.
CRO,: This button sets tape bias. When
playing high bias chrome
or metal tapes,
press the button to turn the button light
on. When playing standard tapes, press
again to turn the light
off.
EJCT: Press to have the cassette tape
ejected (the radio will then play).