ECU OLDSMOBILE SILHOUETTE 2003 Service Manual
[x] Cancel search | Manufacturer: OLDSMOBILE, Model Year: 2003, Model line: SILHOUETTE, Model: OLDSMOBILE SILHOUETTE 2003Pages: 466, PDF Size: 21.55 MB
Page 364 of 466
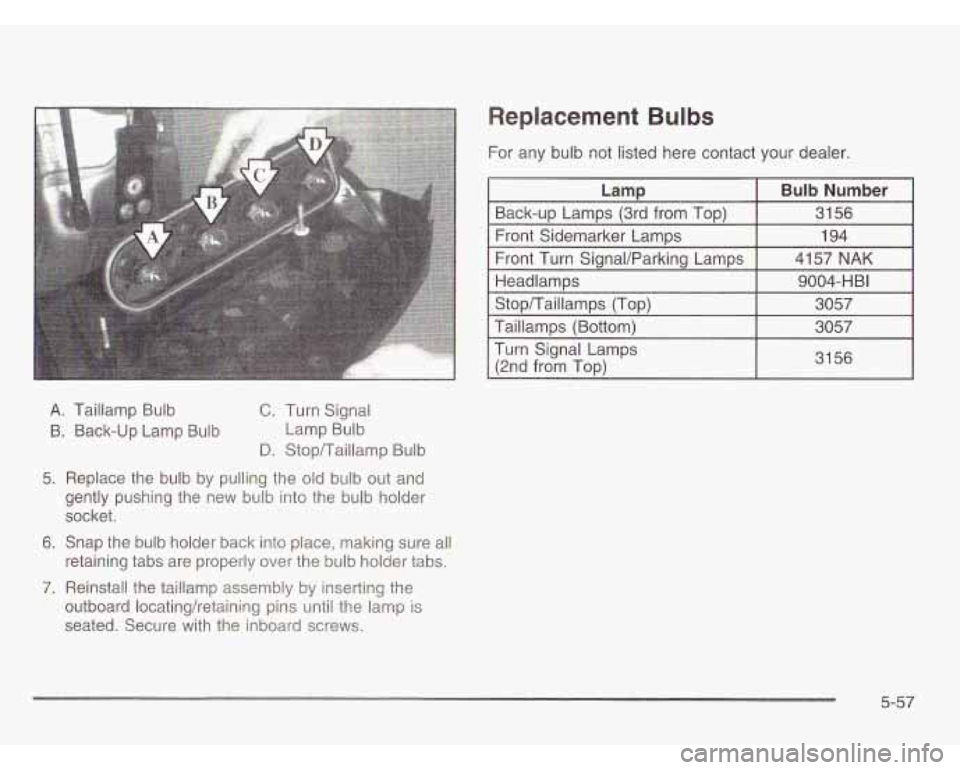
A. Taillamp Bulb
6. Back-up Lamp Bulb
C. Turn Signal
Lamp Bulb
D. StopTTailIamp Bulb
5. Replace the bulb by pulling the old bulb out and
gently pushing the new bulb into the bulb holder
socket.
6. Snap the bulb holder back into place, making sure all
retaining tabs are properly over the bulb holder tabs.
7. Reinstall the taillamp assembly by inserting the
outboard locatingh-etaining pins until the lamp is
seated. Secure with the inboard screws.
Replacement Bulbs
For any bulb not listed here contact your dealer.
I Lamp I Bulb Number I
I Back-ur, Lamps (3rd from Tor,) I 31 56 I
I
Front Sidemarker Lamps I 194 I
Front Turn SignaVParking Lamps
Headlamps 4157 NAK
9004-HBI
I
Turn
Signal Lamps
(2nd from
Top) I 3156
5-57
Page 366 of 466
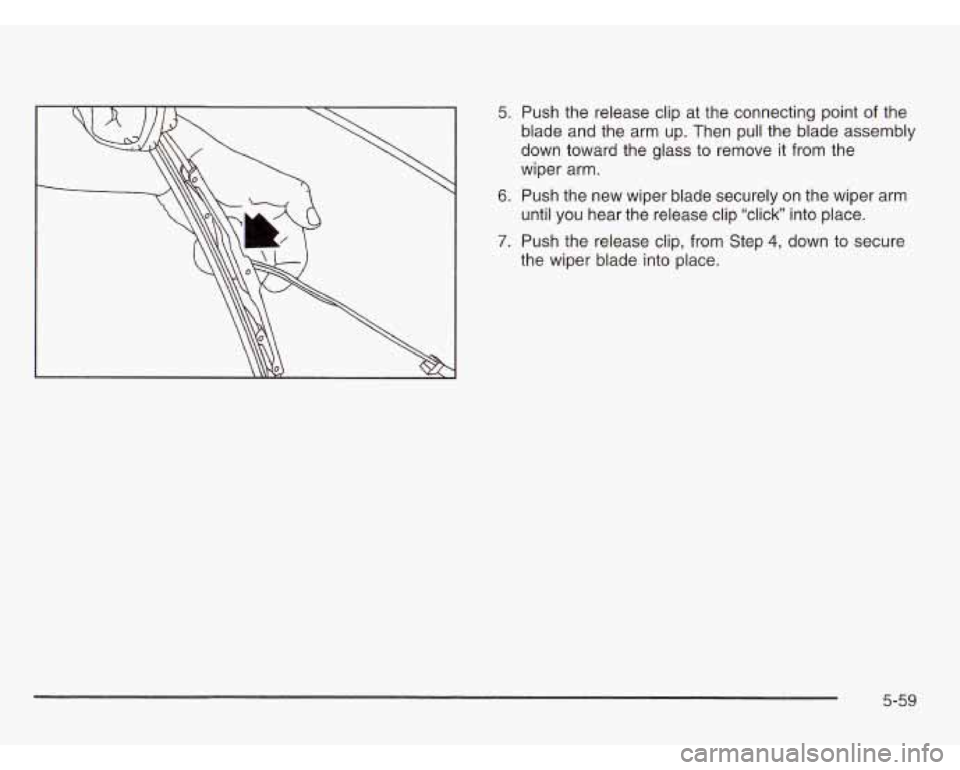
5. Push the release clip at the connecting point of the
blade and the arm up. Then pull the blade assembly
down toward the glass to remove it from the
wiper arm.
6. Push the new wiper blade securely on the wiper arm
until you hear the release clip “click” into place.
7. Push the release clip, from Step 4, down to secure
the wiper blade into place.
5-59
Page 369 of 466
Tire Inspection and Rotation
Tires should be rotated every 7,500 miles (12 500 km).
Any time you notice unusual wear, rotate your tires
as soon as possible and check wheel alignment. Also
check for damaged tires or wheels. See
When It Is Time
for New Tires on page
5-63 and Wheel Replacement
on page
5-66 for more information.
Make sure the spare tire is stored securely. Push, pull,
and then try to rotate or turn the tire,
If it moves, use the
folding wrench to tighten the cable. See
Changing a Flat
Tire on page
5-70.
The purpose of regular rotation is to achieve more
uniform wear for all tires on the vehicle. The first rotation
is the most important. See “Part A: Scheduled
Maintenance Services,” in Section
6, for scheduled
rotation intervals.
I,‘
/I
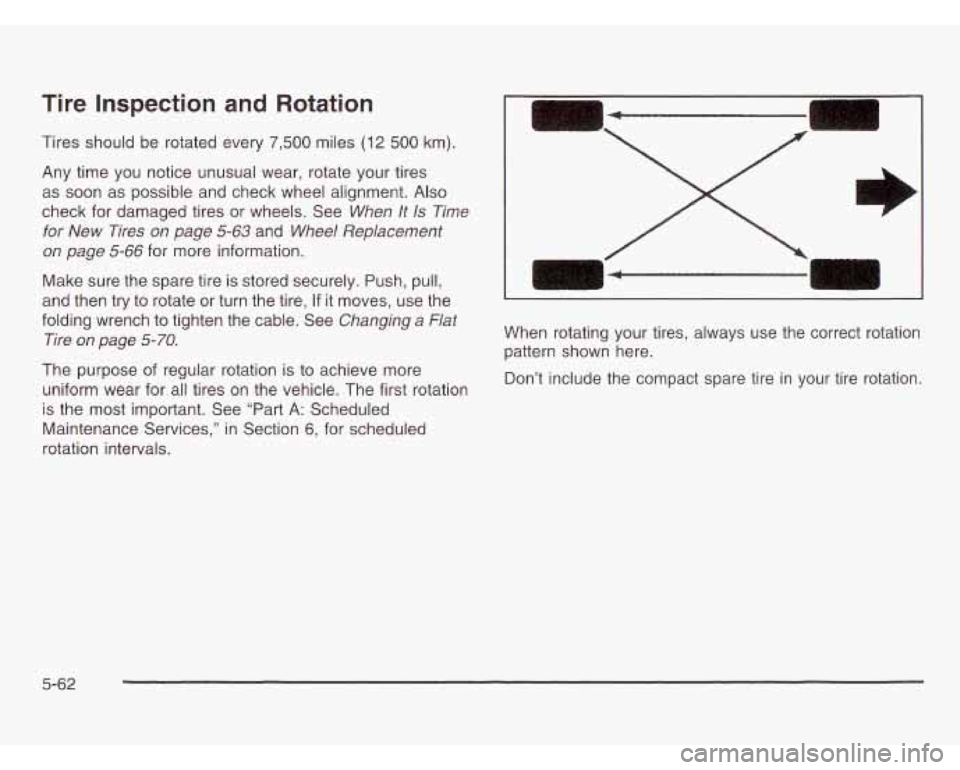
When rotating your tires, always use the correct rotation
pattern shown here.
Don’t include the compact spare tire in your tire rotation.
5-62
Page 374 of 466
If you need to replace any of your wheels, wheel bolts or
wheel nuts, replace them only with new GM original
equipment parts. This way, you will be sure to have the
Using the wrong replacement wheels, wheel
bolts or wheel nuts on your vehicle can be
dangerous.
It could affect the braking and
handling of your vehicle, make your tires lose
air and make you lose control. You could have
a collision in which you or others could be
injured. Always use the correct wheel, wheel
bolts and wheel nuts for replacement.
I
Notice: The wrong wheel can also cause problems
with bearing life, brake cooling, speedometer or odometer calibration, headlamp aim, bumper height,
vehicle ground clearance and tire or tire chain
clearance to the body and chassis.
See
Changing a Flat Tire on page 5-70 for more
information.
Used Replacement WI els
Putting a used wheel on your vehicle is
dangerous. You can’t know how it’s been used
or how far it’s been driven. It could fail suddenly
and cause a crash. If you have to replace a
wheel, use a new
GM original equipment wheel.
Tire Chains
Notice: Use tire chains only where legal and only
when you must. Use only SAE Class
“S” type chains
that are the proper size for your tires. Install them
on the front tires and tighten them as tightly
as possible with the ends securely fastened.
Drive slowly and follow the chain manufacturer’s
your vehicle, stop and retighten them. If the contact continues, slow down until
it stops. Driving too
fast or spinning the wheels with chains on will
damage your vehicle.
!-- -I-~---I’- ~- - If . L IL- -L-.-- --.-*-.-a:--. I~IS1ruC;LIVIIs. II yuu ual~ Ileal ~lle Glla~llb GUIILQ~LII~~
5-67
Page 376 of 466
Your air inflator will automatically shut off after about
10 minutes. The light in the switch will blink. After about
one minute you can use the system again. Press the
inflator switch and the indicator light will come on.
Notice: Don’t run your air inflator for longer than
30 minutes at one time. If you do, you may damage
the system.
After running the air inflator for
30 minutes, wait at least
10 minutes before restarting the air inflator.
To turn off the inflator, do the following:
1. Press the switch and detach the hose, first from the
2. Put the protective cap back on.
3. Place the inflator kit tools in the pouch, and store in
inflated
object, then from the outlet.
the glove box.
To put the cover back on, line up the tabs at the back
of the cover and put it in place. Push down the tab
to secure the cover.
If a Tire Goes Flat
It’s unusual for a tire to “blow out” while you’re driving,
especially
if you maintain your tires properly. If air
goes out of a tire, it’s much more likely to leak out
slowly. But if you should ever have a “blowout”, here are
a few tips about what to expect and what to do:
If a front tire fails, the flat tire will create a drag that
pulls the vehicle toward that side. Take your foot
off the
accelerator pedal and grip the steering wheel firmly.
Steer to maintain lane position, and then gently brake
to a stop well out of the traffic lane.
A rear blowout, particularly on a curve, acts much like
a skid and may require the same correction you’d use
in a skid. In any rear blowout, remove your foot from
the accelerator pedal. Get the vehicle under control by
steering the way you want the vehicle to go. It may
be very bumpy and noisy, but you can still steer.
Gently brake to a stop
- well off the road if possible.
If a tire goes flat, the next part shows how to use
your jacking equipment to change a flat tire safely.
5-69
Page 387 of 466
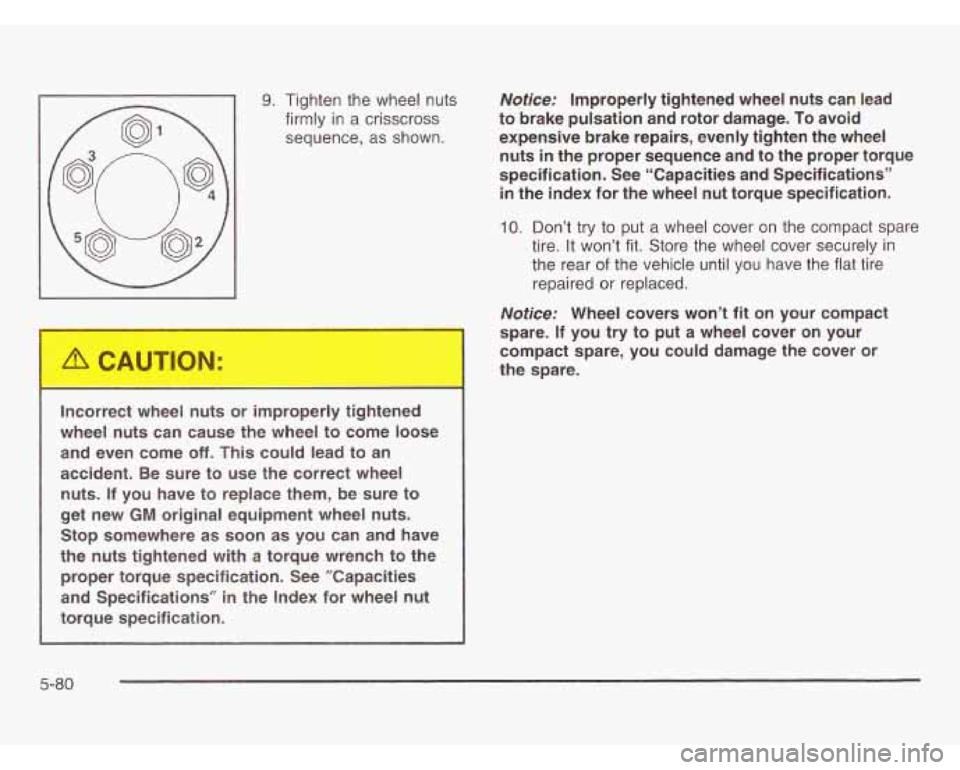
9. Tighten the wheel nuts
firmly in a crisscross
sequence, as shown.
Incorrect wheel nuts or improperly tightened
wheel nuts can cause the wheel
to come loose
and even come
off. This could lead to an
accident. Be sure to use the correct wheel
nuts. If you have to replace them, be sure to
get new
GM original equipment wheel nuts.
Stop somewhere as soon as you can and have
the nuts tightened with a torque wrench to the
proper torque specification. See ”Capacities
and Specifications”
in the Index for wheel nut
torque specification.
Nofice: Improperly tightened wheel nuts can lead
to brake pulsation and rotor damage.
To avoid
expensive brake repairs, evenly tighten the wheel
nuts
in the proper sequence and to the proper torque
specification. See “Capacities and Specifications”
in the index for the wheel nut torque specification.
10. Don’t try to put a wheel cover on the compact spare
tire. It won’t fit. Store the wheel cover securely in
the rear of the vehicle until you have the flat tire
repaired or replaced.
Notice: Wheel covers won’t fit on your compact
spare.
If you try to put a wheel cover on your
compact spare, you could damage the cover or
the spare.
5-80
Page 389 of 466
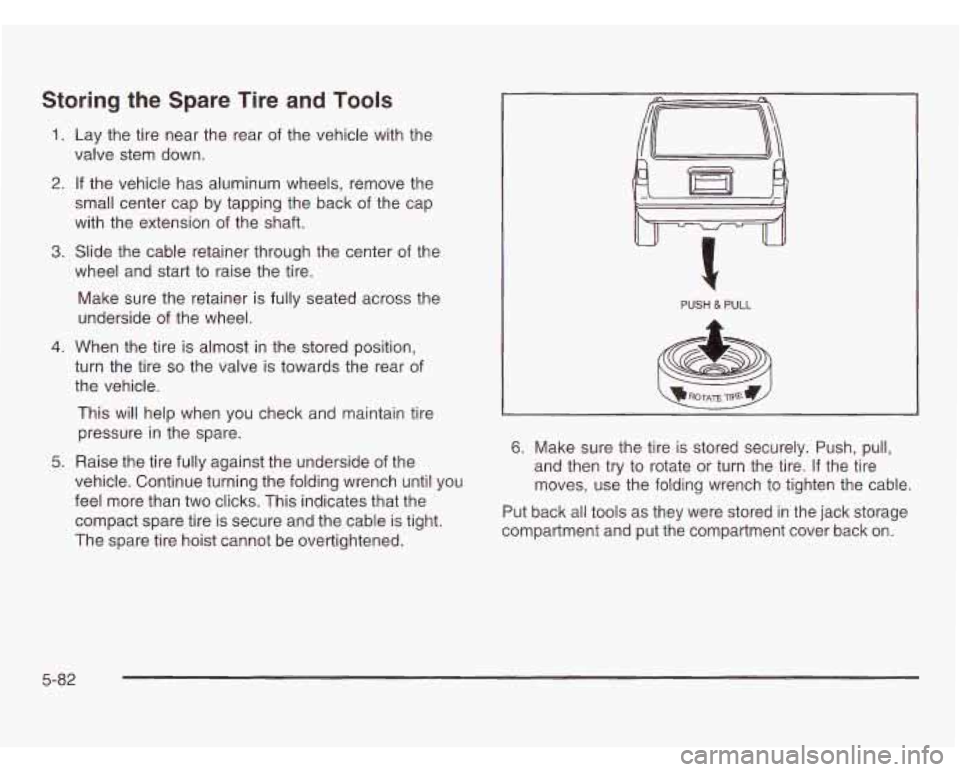
Storing the Spare Tire and Tools
1. Lay the tire near the rear of the vehicle with the
valve stem down.
2. If the vehicle has aluminum wheels, remove the
small center cap by tapping the back of the cap
with the extension of the shaft.
3. Slide the cable retainer through the center of the
wheel and start to raise the tire.
Make sure the retainer is fully seated across the
underside
of the wheel.
4. When the tire is almost in the stored position,
turn the tire
so the valve is towards the rear of
the vehicle.
This will help when you check and maintain tire
pressure in the spare.
5. Raise the tire fully against the underside of the
vehicle. Continue turning the folding wrench until you
feel more than two clicks. This indicates that the
compact spare tire is secure and the cable is tight.
The spare tire hoist cannot be overtightened.
PUSH & PULL
6. Make sure the tire is stored securely. Push, pull,
and then try to rotate or turn the tire.
If the tire
moves, use the folding wrench to tighten the cable.
Put back all tools as they were stored in the jack storage
compartment and put the compartment cover back
on.
5-82
Page 390 of 466
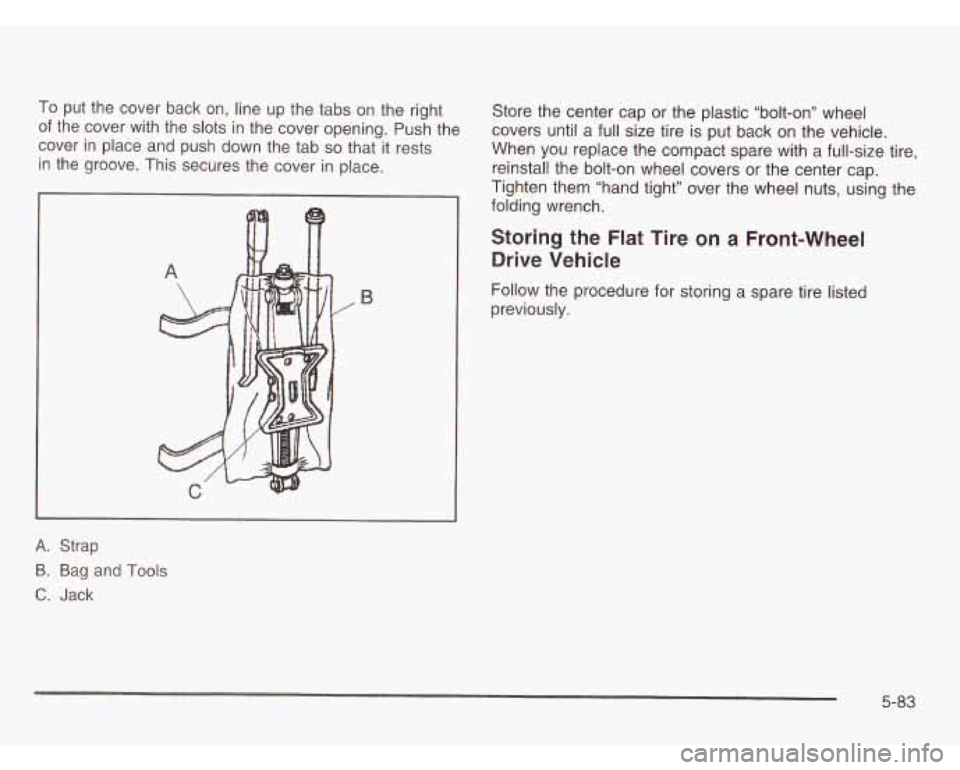
To put the cover back on, line up the tabs on the right
of the cover with the slots in the cover opening. Push the
cover in place and push down the tab
so that it rests
in the groove. This secures the cover in place.
B
Store the center cap or the plastic “bolt-on” wheel
covers until a full size tire is put back on the vehicle.
When you replace the compact spare with a full-size tire,
reinstall the bolt-on wheel covers or the center cap.
Tighten them “hand tight” over the wheel nuts, using the
folding wrench.
Storing the Flat Tire on a Front-Wheel
Drive Vehicle
Follow the procedure for storing a spare tire listed
previously.
A. Strap
9. Bag and Tools
C. Jack
5-83
Page 392 of 466
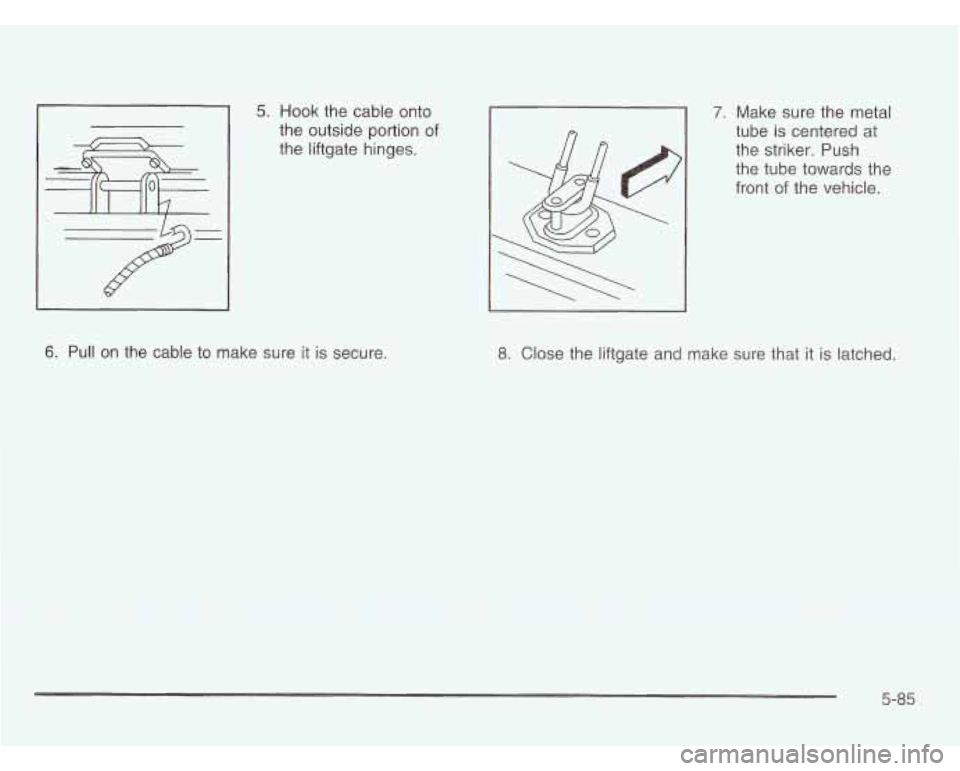
5. Hook the cable onto
the outside portion of
the liftgate hinges. 7. Make sure the metal
tube is centered at
the striker. Push
the tube towards the
front
of the vehicle.
6. Pull on the cable to make sure it is secure. 8. Close the liftgate and make sure that it is latched.
5-85
Page 408 of 466
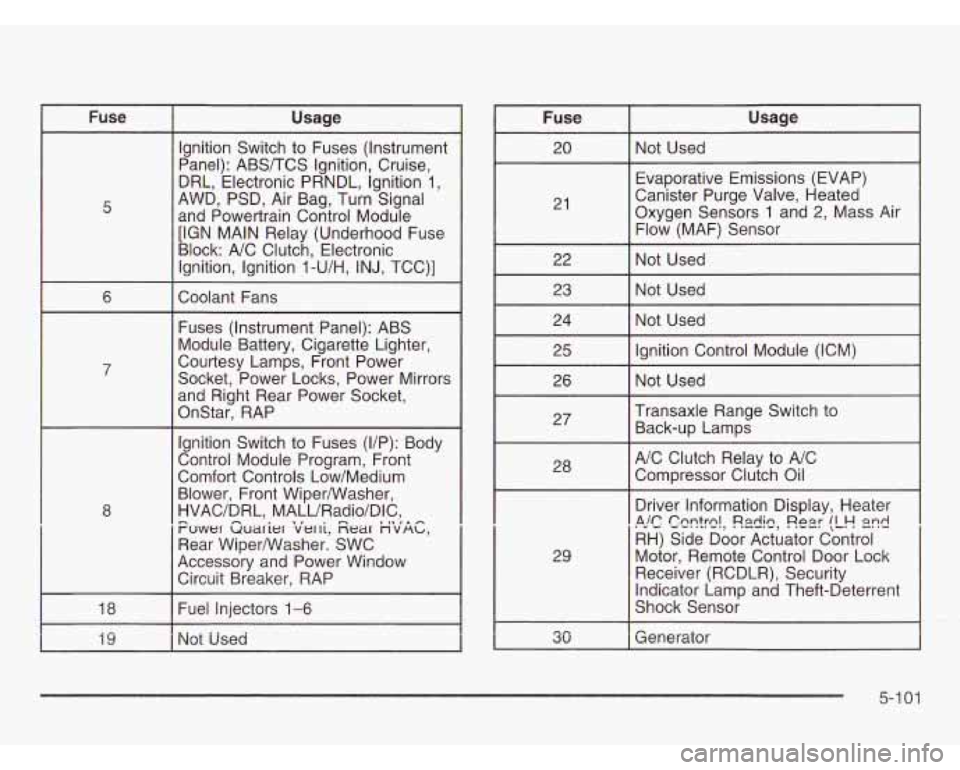
Fuse Usage
5 Ignition
Switch to Fuses (Instrument
Panel): ABS/TCS Ignition, Cruise,
DRL, Electronic PRNDL, Ignition 1,
AWD, PSD, Air Bag, Turn Signal
and Powertrain Control Module
[IGN MAIN Relay (Underhood Fuse
Block: A/C Clutch, Electronic
Ignition, Ignition
l-U/H, INJ, TCC)]
I 6 I Coolant Fans I
Fuses (Instrument Panel): ABS
Module Battery, Cigarette Lighter,
Courtesy Lamps, Front Power
Socket, Power Locks, Power Mirrors
and Right Rear Power Socket,
OnStar, RAP
Ignition Switch to Fuses (VP): Body
Control Module Program, Front
Comfort Controls Low/Medium
Blower, Front WiperANasher,
HVAC/DRL, MALURadio/DIC,
Puwer Guarier iierri, Zear nvnb,
Rear Wiper/Washer. SWC
Accessory and Power Window Circuit Breaker, RAP
I I. ,n -
I 18 I Fuel Injectors 1-6 I
Fuse Usage
21 Evaporative Emissions (EVAP)
Canister Purge Valve, Heated
Oxygen Sensors 1 and 2, Mass Air
Flow (MAF) Sensor
I 22 I Not Used I
23 I Not Used
I 24 I Not Used I
I 25 I Ignition Control Module (ICM) I
I
26 I Not Used I
I 27 I
Transaxle Range Switch to
Back-up Lamps
I 28 I
A/C Clutch Relay to A/C
Compressor Clutch Oil
29
I I’ *ulc CQr?!!3!, !?.ldiQ, Re2r !L!-! 2nd , I
Driver Information Display, Heater
RH) Side Door Actuator Control
Motor, Remote Control Door Lock
Receiver (RCDLR), Security
Indicator Lamp and Theft-Deterrent
Shock Sensor
5-1
01