tow OLDSMOBILE SILHOUETTE 2003 Repair Manual
[x] Cancel search | Manufacturer: OLDSMOBILE, Model Year: 2003, Model line: SILHOUETTE, Model: OLDSMOBILE SILHOUETTE 2003Pages: 466, PDF Size: 21.55 MB
Page 385 of 466
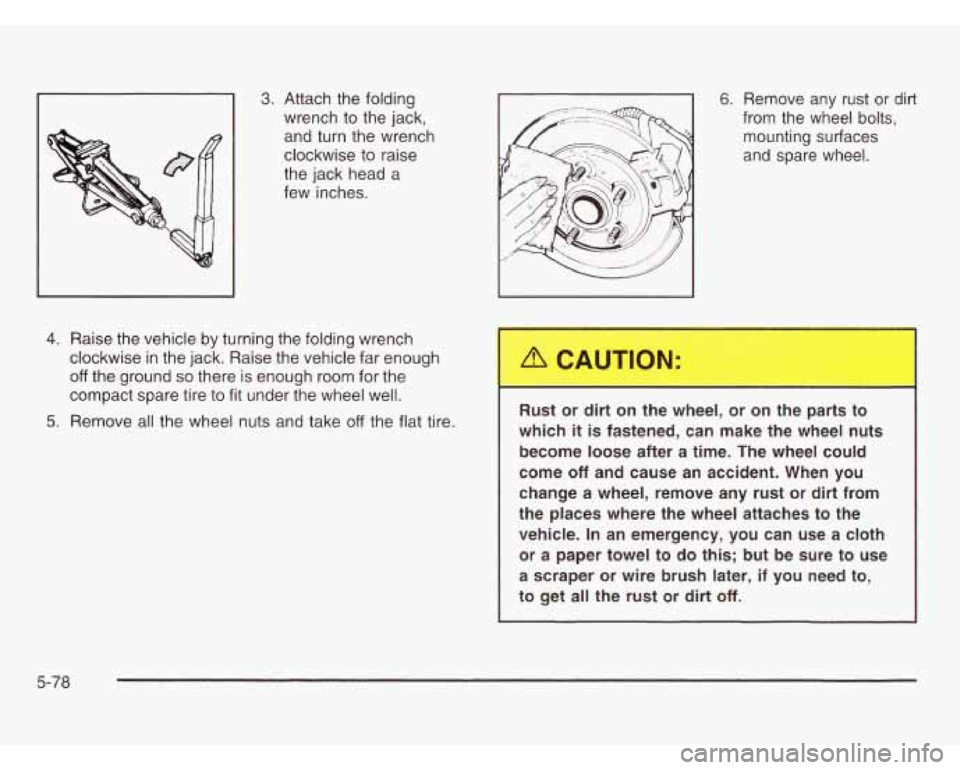
3. Attach the folding
wrench to the jack,
and turn the wrench
clockwise to raise
the jack head a
few inches.
4. Raise the vehicle by turning the folding wrench
clockwise in the jack. Raise the vehicle far enough
off the ground so there is enough room for the
compact spare tire to
fit under the wheel well.
5. Remove all the wheel nuts and take off the flat tire.
6. Remove any rust or dirt
from the wheel bolts, mounting surfaces
and spare wheel.
Rust or dirt on the wheel, or on the parts to
which
it is fastened, can make the wheel nuts
become loose after a time. The wheel could
come
off and cause an accident. When you
change a wheel, remove any rust or dirt from
the places where the wheel attaches
to the
vehicle.
In an emergency, you can use a cloth
or a paper towel to do this;
but be sure to use
a scraper or wire brush later, if you need to,
to get all the
rust or dirt off.
5-78
Page 386 of 466
I
Nev,. use oil or grease on st,,s or nuts. If you
do, the nuts might come loose. Your wheel
could fall
off, causing a serious accident.
7. Install the compact spare tire and put the wheel
nuts back on with the rounded end
of the nuts
toward the wheel. Tighten each nut by hand until
the wheel is held against the hub.
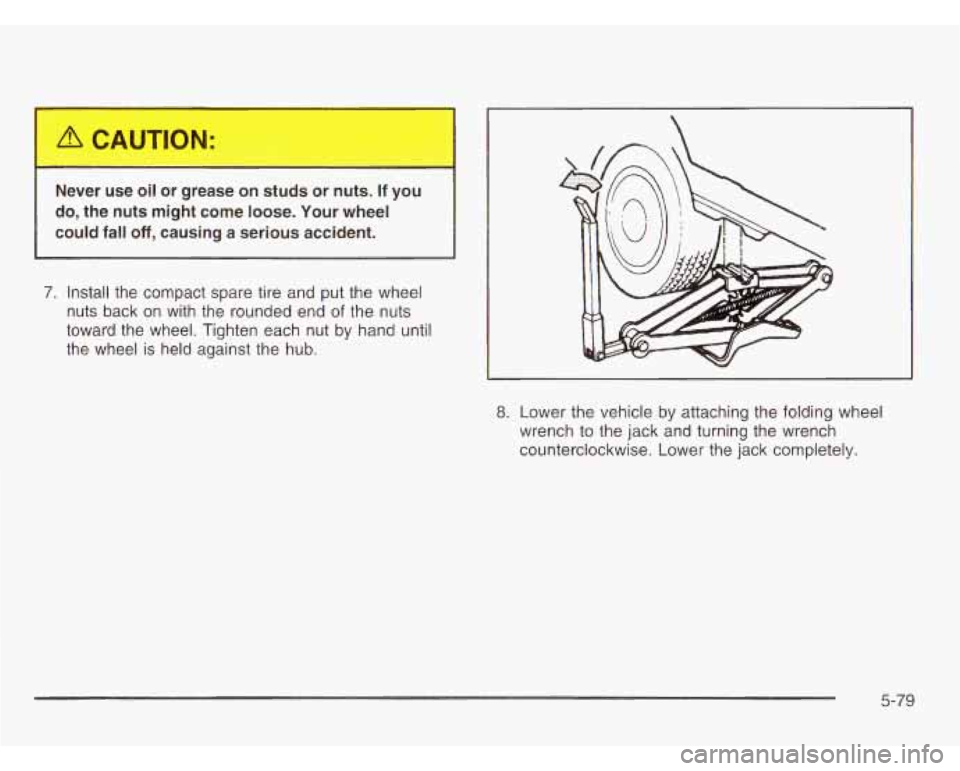
8. Lower the vehicle by attaching the folding wheel
wrench to the jack and turning the wrench
counterclockwise. Lower the jack completely.
5-79
Page 389 of 466
Storing the Spare Tire and Tools
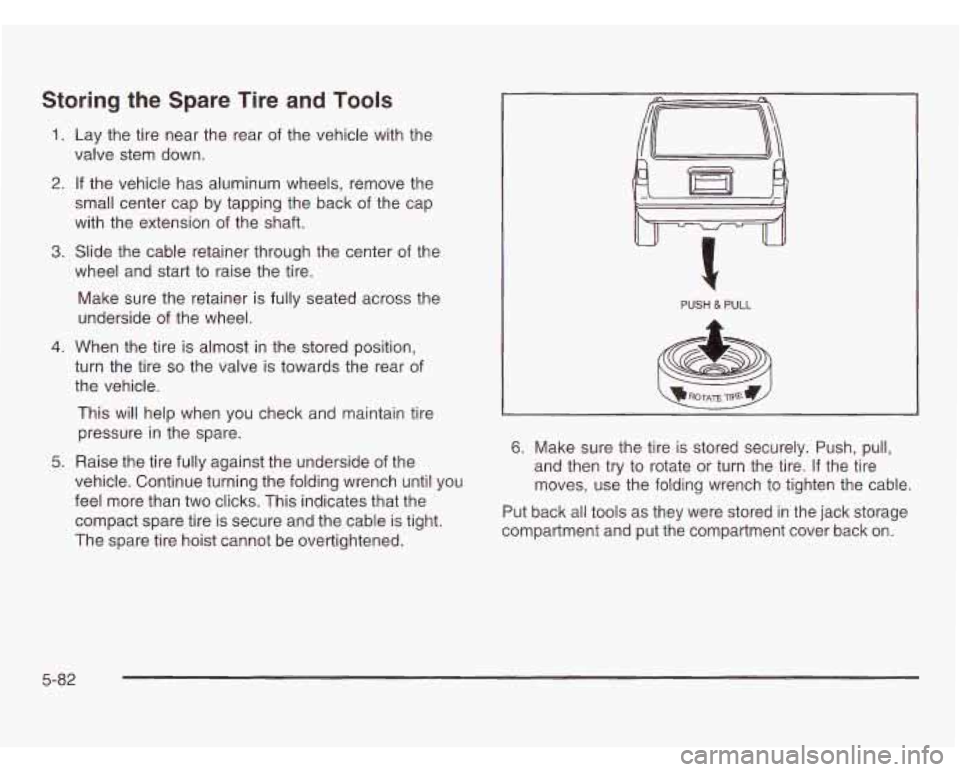
1. Lay the tire near the rear of the vehicle with the
valve stem down.
2. If the vehicle has aluminum wheels, remove the
small center cap by tapping the back of the cap
with the extension of the shaft.
3. Slide the cable retainer through the center of the
wheel and start to raise the tire.
Make sure the retainer is fully seated across the
underside
of the wheel.
4. When the tire is almost in the stored position,
turn the tire
so the valve is towards the rear of
the vehicle.
This will help when you check and maintain tire
pressure in the spare.
5. Raise the tire fully against the underside of the
vehicle. Continue turning the folding wrench until you
feel more than two clicks. This indicates that the
compact spare tire is secure and the cable is tight.
The spare tire hoist cannot be overtightened.
PUSH & PULL
6. Make sure the tire is stored securely. Push, pull,
and then try to rotate or turn the tire.
If the tire
moves, use the folding wrench to tighten the cable.
Put back all tools as they were stored in the jack storage
compartment and put the compartment cover back
on.
5-82
Page 391 of 466
Storing the Flat Tire on an All-Wheel-Drive
Vehicle
1. Remove the tire storage bag and cable package
from the jack storage area.
2. If the vehicle has aluminum wheels, remove the
small center cap by tapping the back
of the cap
with the extension of the shaft.
3. Put the flat tire in the tire storage bag and place il
in the rear storage area with the valve stem
pointing toward the front of the vehicle.
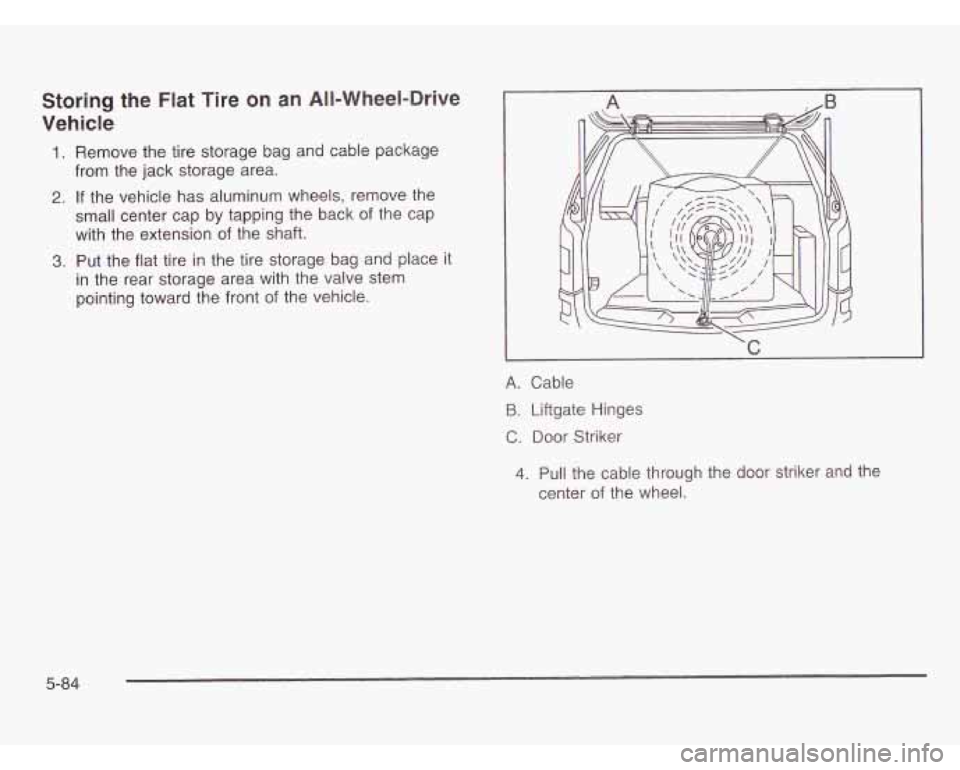
A. Cable
B. Liftgate Hinges
C. Door Striker
4. Pull the cable through the door striker and the
center
of the wheel.
5-84
Page 392 of 466
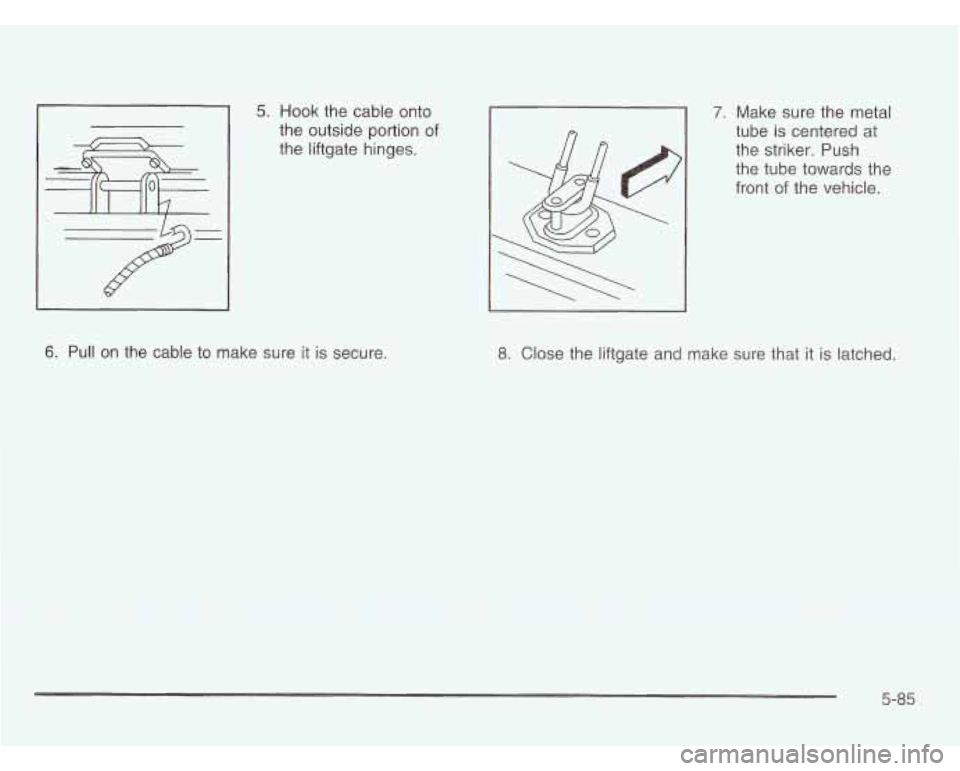
5. Hook the cable onto
the outside portion of
the liftgate hinges. 7. Make sure the metal
tube is centered at
the striker. Push
the tube towards the
front
of the vehicle.
6. Pull on the cable to make sure it is secure. 8. Close the liftgate and make sure that it is latched.
5-85
Page 395 of 466
Here are some cleaning tips:
0 Always read the instructions on the cleaner label.
Clean up stains as soon as you can - before
Carefully scrape off any excess stain.
they
set.
* Use a clean cloth or sponge, and change to a clean
area often. A soft brush may be used
if stains are
stubborn.
If a ring forms on fabric after spot cleaning, clean
the entire area immediately or it will set.
Using Cleaner on Fabric
1. Vacuum and brush the area to remove any loose dirt.
2. Always clean a whole trim panel or section.
Mask surrounding trim along stitch or welt lines.
3. Follow the directions on the container label.
4. Apply cleaner with a clean sponge. Don’t saturate
5. As soon as you’ve cleaned the section, use a
6. Wipe cleaned area with a clean, water-dampened
7. Wipe with a clean cloth and let dry.
the
material and don’t rub it roughly.
sponge to remove any excess cleaner.
towel or cloth.
Special Fabric Cleaning Problems
Stains caused by such things as catsup, coffee (black),
egg, fruit, fruit juice, milk, soft drinks, vomit, urine
and blood can be removed as follows:
1. Carefully scrape off excess stain, then sponge the
soiled area with cool water.
2. If a stain remains, follow the cleaner instructions
3. If an odor lingers after cleaning vomit or urine,
described earlier.
treat the area with a water/baking soda solution:
1 teaspoon (5 ml) of baking soda to 1 cup (250 ml)
of lukewarm water.
4. Let dry.
Stains caused by candy, ice cream, mayonnaise, chili
sauce and unknown stains can be removed as follows:
1. Carefully scrape off excess stain.
2. Clean with cool water and allow to dry completely.
3. If a stain remains, follow the cleaner instructions
described earlier.
5-88
Page 397 of 466
Care of Safety Belts
Keep belts clean and dry.
Do not bleach or dye safety belts. If you do,
it may severely weaken them. In a crash,
they might not be able to provide adequate
protection. Clean safety belts only with mild
soap and lukewarm water.
Weatherstrips
Silicone grease on weatherstrips will make them last
longer, seal better, and not stick or squeak. Apply
silicone grease with a clean cloth at least every six
months. During very cold, damp weather more frequent
application may be required. See
Part D: Recommended
Fluids and Lubricants on page
6- 16.
Cleaning the Outside of Your Vehicle
The paint finish on your vehicle provides beauty, depth
of color, gloss retention and durability.
Washing Your Vehicle
The best way to preserve your vehicle’s finish is to keep it
clean by washing it often with lukewarm or cold water.
Don’t wash your vehicle in the direct rays of the sun.
Use a car washing soap. Don’t use strong soaps or
chemical detergents. Be sure to rinse the vehicle well,
removing all soap residue completely. You can get
GM-approved cleaning products from your dealer.
See GM
Vehicle Care/Appearance Materials on
page 5-93. Don’t use cleaning agents that are petroleum
based, or that contain acid or abrasives.
All cleaning
agents should be flushed promptly and not allowed
to dry
on the surface, or they could stain. Dry the finish with a
soft, clean chamois or an all-cotton towel
to avoid surface
scratches and water spotting.
Before you enter an automatic car wash,
if your vehicle
is equipped with the optional power sliding door, be
sure to have the switch for the power sliding door
override feature enabled. See
Power Sliding Door (PSD)
on page 2- 16.
High pressure car washes may cause water to enter
your vehicle.
5-90
Page 399 of 466
Aluminum Wheels
Keep your wheels clean using a soft clean cloth
with mild soap and water. Rinse with clean water.
After rinsing thoroughly, dry with a soft clean towel.
A wax may then be applied.
The surface of these wheels is similar to the painted
surface of your vehicle. Don’t use strong soaps,
chemicals, abrasive polishes, abrasive cleaners,
cleaners with acid, or abrasive cleaning brushes on
them because you could damage the surface.
Do not
use chrome polish on aluminum wheels.
Don’t take your vehicle through an automatic car wash
that has silicone carbide tire cleaning brushes. These
brushes can also damage the surface of these wheels
Tires
To clean your tires, use a stiff brush with tire cleaner.
Notice: When applying a tire dressing, always take
care to wipe
off any overspray or splash from all
painted surfaces on the body or wheels of the
vehicle. Petroleum-based products may damage the
paint finish and tires.
Sheet Metal Damage
If your vehicle is damaged and requires sheet metal
repair or replacement, make sure the body repair shop
applies anti-corrosion material to parts repaired or
replaced to restore corrosion protection.
Original manufacturer replacement parts will provide the
corrosion protection while maintaining the warranty.
Finish Damage
Any stone chips, fractures or deep scratches in the
finish should be repaired right away. Bare metal
will corrode quickly and may develop into major repair
expense.
Minor chips and scratches can be repaired with touch-up
materials avaliable from your dealer or other service
outlets. Larger areas
of finish damage can be corrected
in your dealer’s body and paint shop.
5-92
Page 420 of 466
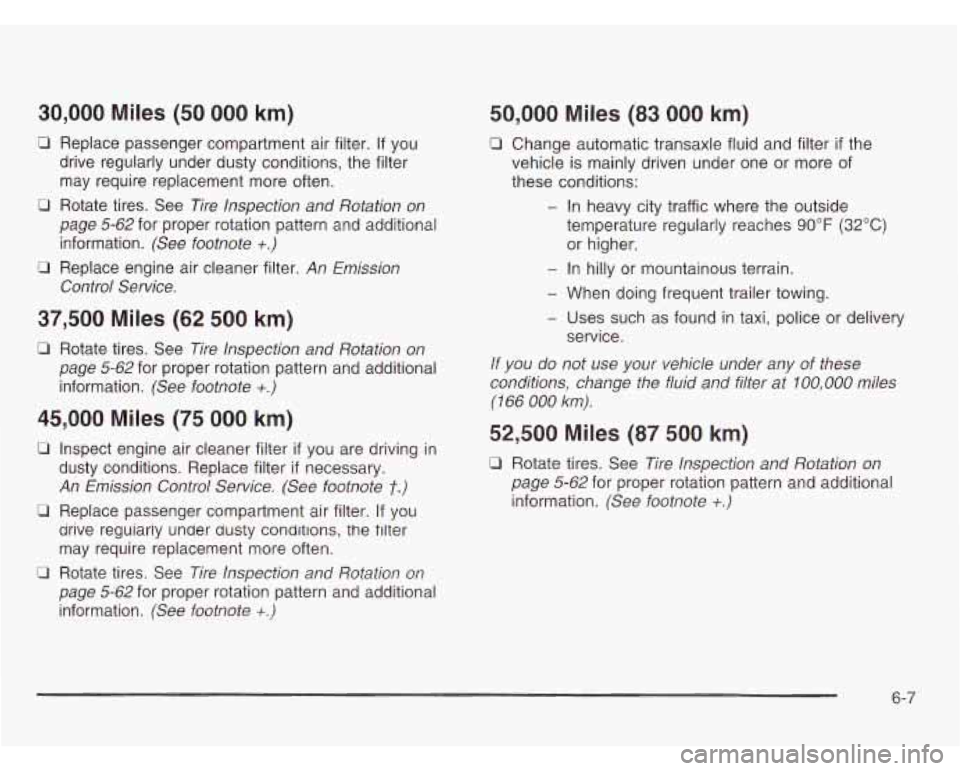
30,000 Miles (50 000 km)
0 Replace passenger compartment air filter. If you
drive regularly under dusty conditions, the filter
may require replacement more often.
0 Rotate tires. See Tire Inspection and Rotation on
page
5-62for proper rotation pattern and additional
information.
(See footnote +.)
Control Service.
0 Replace engine air cleaner filter. An Emission
37,500 Miles (62 500 km)
c3 Rotate tires. See Tire Inspection and Rotation on
page
5-62 for proper rotation pattern and additional
information.
(See footnote +.)
45,000 Miles (75 000 km)
0 Inspect engine air cleaner filter if you are driving in
dusty conditions. Replace filter if necessary.
An Emission Control Service. (See footnote t.)
50,000 Miles (83 000 km)
c1 Change automatic transaxle fluid and filter if the
vehicle is mainly driven under one or more of
these conditions:
- In heavy city traffic where the outside
temperature regularly reaches
90°F (32°C)
or higher.
- In hilly or mountainous terrain.
- When doing frequent trailer towing.
- Uses such as found in taxi, police or delivery
service.
If you do not use your vehicle under any of these
conditions, change the fluid and filter at
100,000 miles
(1 66 000 km).
52,500 Miles (87 500 km)
0 Replace passenger compartment air filter. If you
arive reguiariy unuer Uusty
conditions, the filter
may require replacement more often.
0 Rotate tires. See Tire Inspection and Rotation on
page
5-62 for proper rotation pattern and additional
information.
(See footnote +.)
0 Rotate tires. See Tire Inspection and Rotation on
page
5-62 for proper rotation pattern and additional
information.
(See footnote +.)
6-7
Page 422 of 466
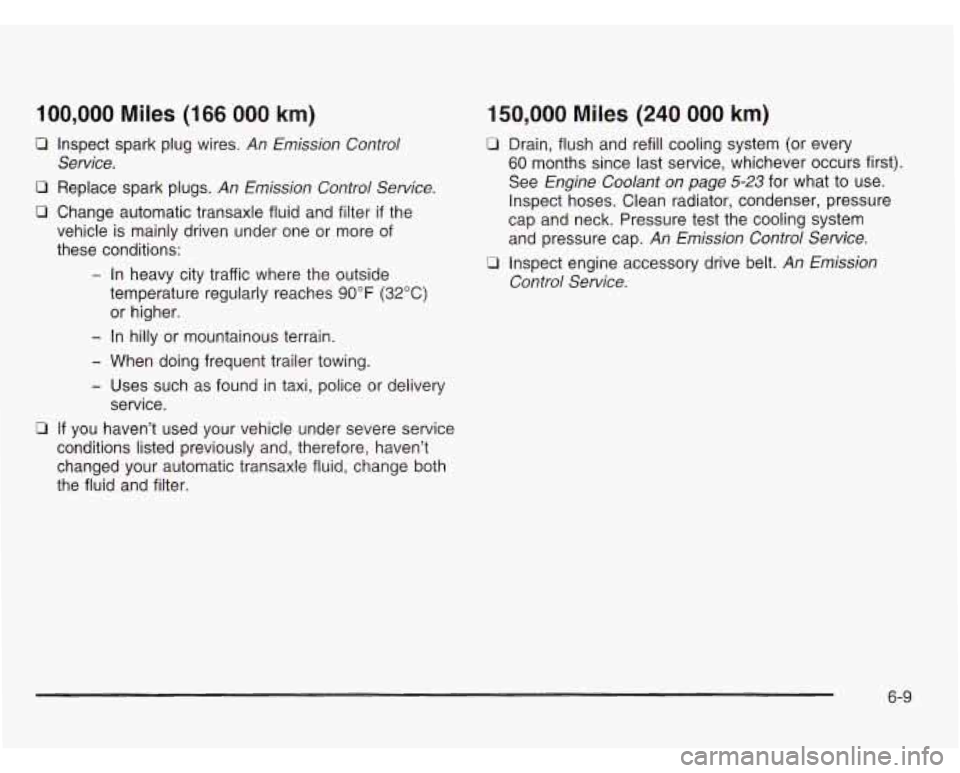
100,000 Miles (166 000 km)
0 Inspect spark plug wires. An Emission Control
0 Replace spark plugs. An Emission Control Service.
Service.
0 Change automatic transaxle
fluid and filter if the
vehicle is mainly driven under one or more of
these conditions:
- In heavy city traffic where the outside
temperature regularly reaches
90°F (32°C)
or higher.
- In hilly or mountainous terrain.
- When doing frequent trailer towing.
- Uses such as found in taxi, police or delivery
service.
0 If you haven’t used your vehicle under severe service
conditions listed previously and, therefore, haven’t
changed your automatic transaxle fluid, change both
the fluid and filter.
150,000 Miles (240 000 km)
U Drain, flush and refill cooling system (or every
60 months since last service, whichever occurs first).
See
Engine Coolant on page 5-23 for what to use.
Inspect hoses. Clean radiator, condenser, pressure
cap and neck. Pressure test the cooling system
and pressure cap.
An Emission Control Service.
0 Inspect engine accessory drive belt. An Emission
Control Service.
6-9