tow OPEL ANTARA 2017.5 Manual user
[x] Cancel search | Manufacturer: OPEL, Model Year: 2017.5, Model line: ANTARA, Model: OPEL ANTARA 2017.5Pages: 225, PDF Size: 6.2 MB
Page 15 of 225
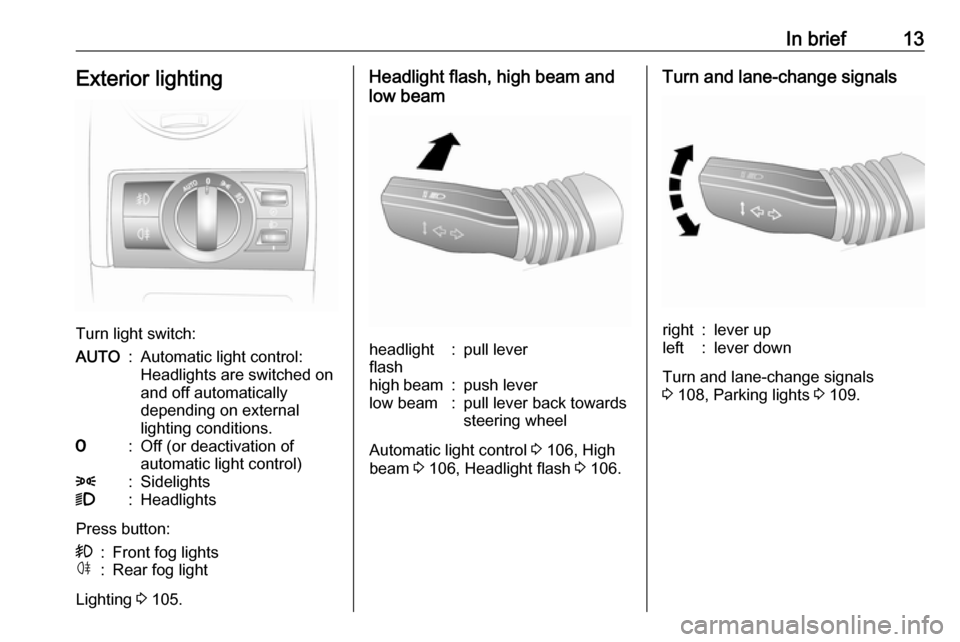
In brief13Exterior lighting
Turn light switch:
AUTO:Automatic light control:
Headlights are switched on
and off automatically
depending on external
lighting conditions.7:Off (or deactivation of
automatic light control)8:Sidelights9:Headlights
Press button:
>:Front fog lightsø:Rear fog light
Lighting 3 105.
Headlight flash, high beam and
low beamheadlight
flash:pull leverhigh beam:push leverlow beam:pull lever back towards
steering wheel
Automatic light control 3 106, High
beam 3 106, Headlight flash 3 106.
Turn and lane-change signalsright:lever upleft:lever down
Turn and lane-change signals
3 108, Parking lights 3 109.
Page 18 of 225
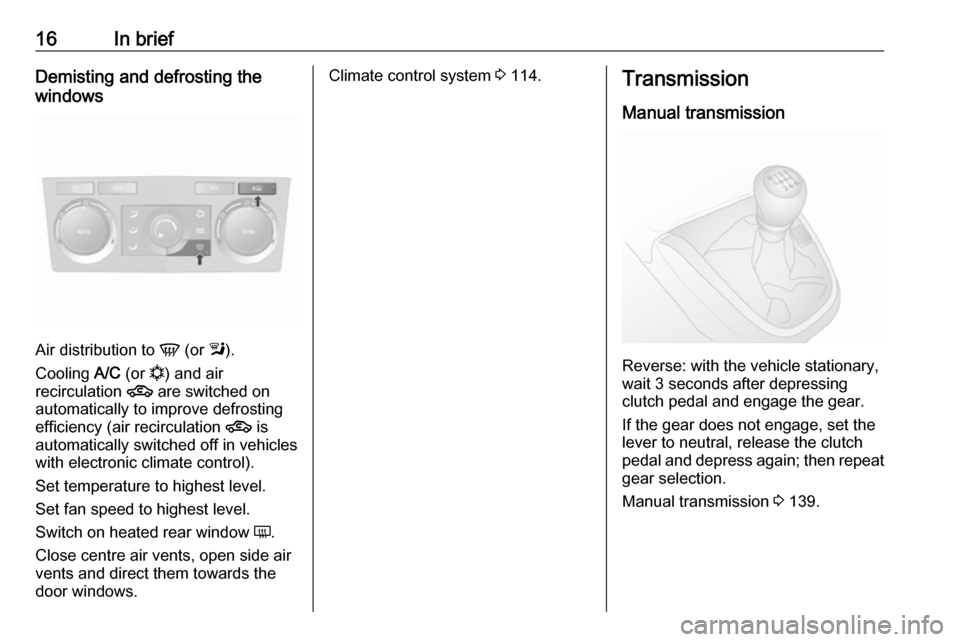
16In briefDemisting and defrosting the
windows
Air distribution to V (or l).
Cooling A/C (or n) and air
recirculation 4 are switched on
automatically to improve defrosting
efficiency (air recirculation 4 is
automatically switched off in vehicles
with electronic climate control).
Set temperature to highest level.
Set fan speed to highest level.
Switch on heated rear window Ü.
Close centre air vents, open side air vents and direct them towards the
door windows.
Climate control system 3 114.Transmission
Manual transmission
Reverse: with the vehicle stationary,
wait 3 seconds after depressing
clutch pedal and engage the gear.
If the gear does not engage, set the
lever to neutral, release the clutch
pedal and depress again; then repeat
gear selection.
Manual transmission 3 139.
Page 20 of 225
18In briefStop-start system
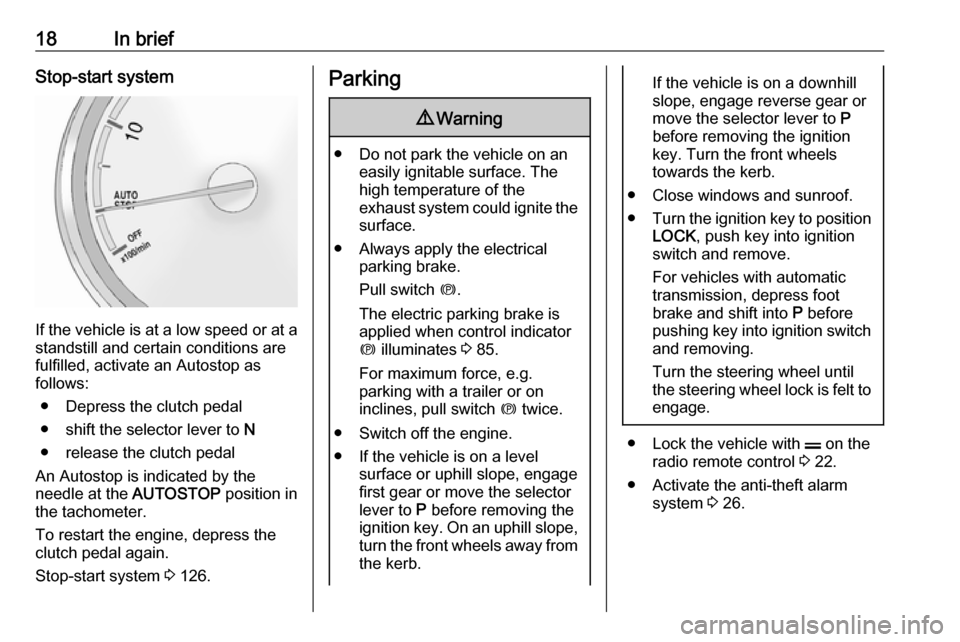
If the vehicle is at a low speed or at astandstill and certain conditions are
fulfilled, activate an Autostop as
follows:
● Depress the clutch pedal
● shift the selector lever to N
● release the clutch pedal
An Autostop is indicated by the
needle at the AUTOSTOP position in
the tachometer.
To restart the engine, depress the clutch pedal again.
Stop-start system 3 126.
Parking9 Warning
● Do not park the vehicle on an
easily ignitable surface. The
high temperature of the
exhaust system could ignite the
surface.
● Always apply the electrical parking brake.
Pull switch m.
The electric parking brake is
applied when control indicator
m illuminates 3 85.
For maximum force, e.g.
parking with a trailer or on
inclines, pull switch m twice.
● Switch off the engine. ● If the vehicle is on a level surface or uphill slope, engage
first gear or move the selector
lever to P before removing the
ignition key. On an uphill slope, turn the front wheels away from
the kerb.
If the vehicle is on a downhill
slope, engage reverse gear or
move the selector lever to P
before removing the ignition
key. Turn the front wheels
towards the kerb.
● Close windows and sunroof.
● Turn the ignition key to position
LOCK , push key into ignition
switch and remove.
For vehicles with automatic
transmission, depress foot
brake and shift into P before
pushing key into ignition switch and removing.
Turn the steering wheel until
the steering wheel lock is felt to
engage.
● Lock the vehicle with p on the
radio remote control 3 22.
● Activate the anti-theft alarm system 3 26.
Page 28 of 225
26Keys, doors and windowsActivating
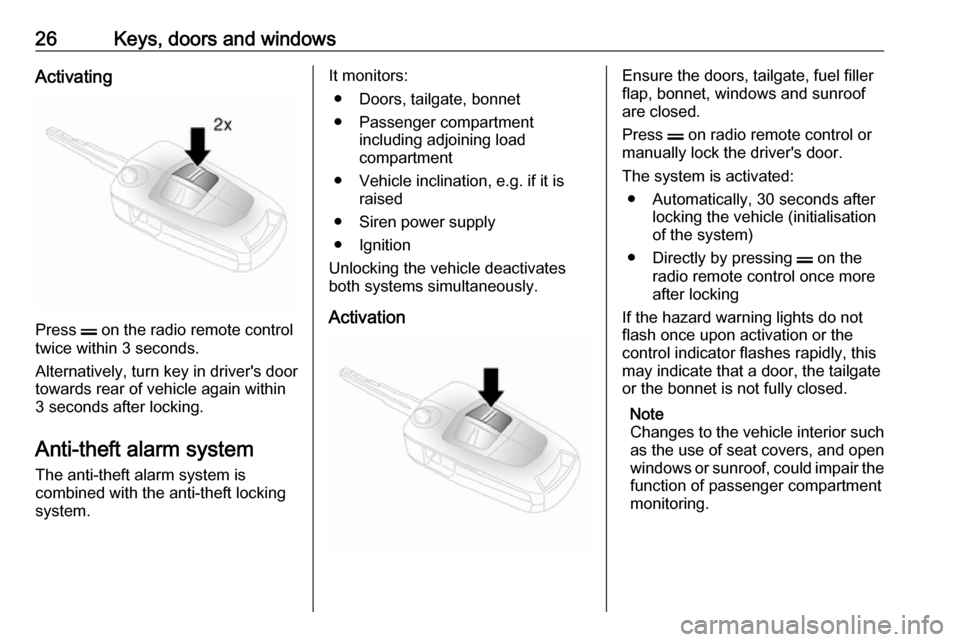
Press p on the radio remote control
twice within 3 seconds.
Alternatively, turn key in driver's door
towards rear of vehicle again within
3 seconds after locking.
Anti-theft alarm system The anti-theft alarm system is
combined with the anti-theft locking
system.
It monitors:
● Doors, tailgate, bonnet
● Passenger compartment including adjoining load
compartment
● Vehicle inclination, e.g. if it is raised
● Siren power supply
● Ignition
Unlocking the vehicle deactivates both systems simultaneously.
ActivationEnsure the doors, tailgate, fuel filler
flap, bonnet, windows and sunroof
are closed.
Press p on radio remote control or
manually lock the driver's door.
The system is activated: ● Automatically, 30 seconds after locking the vehicle (initialisation
of the system)
● Directly by pressing p on the
radio remote control once more
after locking
If the hazard warning lights do not flash once upon activation or the
control indicator flashes rapidly, this
may indicate that a door, the tailgate
or the bonnet is not fully closed.
Note
Changes to the vehicle interior such
as the use of seat covers, and open
windows or sunroof, could impair the
function of passenger compartment
monitoring.
Page 38 of 225
36Seats, restraintsStow head restraints securely in load
compartment.
Active head restraints
In the event of a rear-end impact, the active head restraints automatically
tilt forwards. Thus the head is
supported so that the risk of whiplash
injury is reduced.
Note
Do not attach objects or components that are not approved for your
vehicle to the head restraints. These
affect the protective effect of the
head restraints and can be propelled
through the vehicle in an
uncontrolled manner if the driver
brakes hard or an accident occurs.
Note
Approved accessories may only be
attached if the seat is not in use.Front seats
Seat position9 Warning
Only drive with the seat correctly
adjusted.
9 Danger
Do not sit nearer than 25 cm from
the steering wheel, to permit safe
airbag deployment.
9 Warning
Never adjust seats while driving as
they could move uncontrollably.
9 Warning
Never store any objects under the
seats.
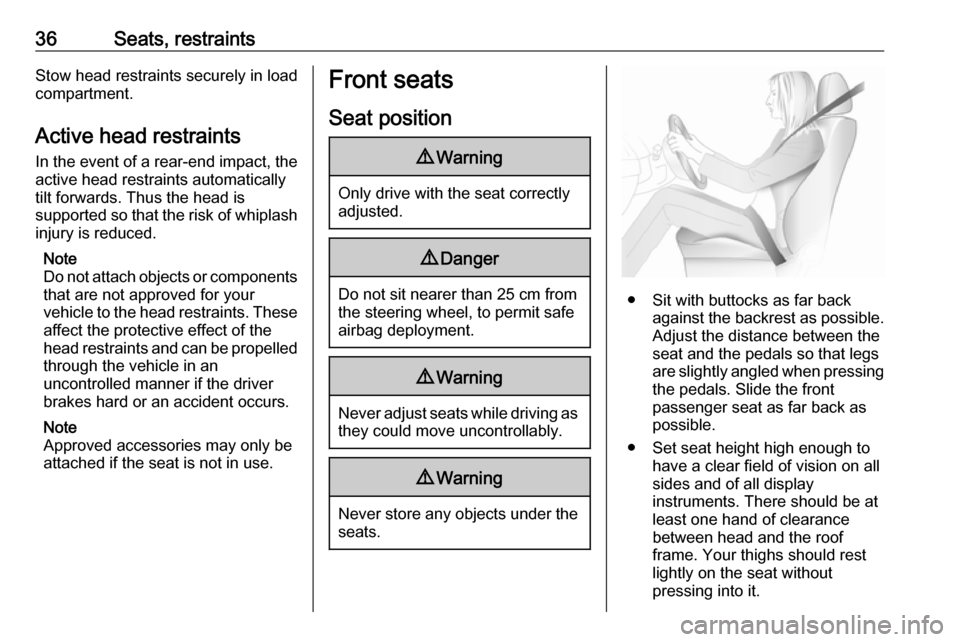
● Sit with buttocks as far back against the backrest as possible.
Adjust the distance between the
seat and the pedals so that legs
are slightly angled when pressing the pedals. Slide the front
passenger seat as far back as
possible.
● Set seat height high enough to have a clear field of vision on allsides and of all display
instruments. There should be at
least one hand of clearance
between head and the roof
frame. Your thighs should rest
lightly on the seat without
pressing into it.
Page 48 of 225

46Seats, restraintsоборудованном фронтальной
подушкой безопасности, если
ПОДУШКА НЕ ОТКЛЮЧЕНА! Это
может привести к СМЕРТИ или
СЕРЬЕЗНЫМ ТРАВМАМ
РЕБЕНКА.
NL: Gebruik NOOIT een achterwaarts
gericht kinderzitje op een stoel met een ACTIEVE AIRBAG ervoor, om
DODELIJK of ERNSTIG LETSEL van het KIND te voorkomen.
DA: Brug ALDRIG en bagudvendt
autostol på et forsæde med AKTIV
AIRBAG, BARNET kan komme I
LIVSFARE eller komme ALVORLIGT
TIL SKADE.
SV: Använd ALDRIG en bakåtvänd
barnstol på ett säte som skyddas med en framförvarande AKTIV AIRBAG.
DÖDSFALL eller ALLVARLIGA
SKADOR kan drabba BARNET.
FI: ÄLÄ KOSKAAN sijoita taaksepäin
suunnattua lasten turvaistuinta
istuimelle, jonka edessä on
AKTIIVINEN TURVATYYNY, LAPSI
VOI KUOLLA tai VAMMAUTUA
VAKAVASTI.NO: Bakovervendt
barnesikringsutstyr må ALDRI brukes
på et sete med AKTIV
KOLLISJONSPUTE foran, da det kan
føre til at BARNET utsettes for
LIVSFARE og fare for ALVORLIGE
SKADER.
PT: NUNCA use um sistema de
retenção para crianças voltado para
trás num banco protegido com um
AIRBAG ACTIVO na frente do
mesmo, poderá ocorrer a PERDA DE VIDA ou FERIMENTOS GRAVES na
CRIANÇA.
IT: Non usare mai un sistema di
sicurezza per bambini rivolto
all'indietro su un sedile protetto da
AIRBAG ATTIVO di fronte ad esso:
pericolo di MORTE o LESIONI
GRAVI per il BAMBINO!
EL: ΠΟΤΕ μη χρησιμοποιείτε παιδικό
κάθισμα ασφαλείας με φορά προς τα πίσω σε κάθισμα που προστατεύεται
από μετωπικό ΕΝΕΡΓΟ ΑΕΡΟΣΑΚΟ, διότι το παιδί μπορεί να υποστεί
ΘΑΝΑΣΙΜΟ ή ΣΟΒΑΡΟ
ΤΡΑΥΜΑΤΙΣΜΟ.PL: NIE WOLNO montować fotelika
dziecięcego zwróconego tyłem do
kierunku jazdy na fotelu, przed
którym znajduje się WŁĄCZONA
PODUSZKA POWIETRZNA.
Niezastosowanie się do tego
zalecenia może być przyczyną
ŚMIERCI lub POWAŻNYCH
OBRAŻEŃ u DZIECKA.
TR: Arkaya bakan bir çocuk emniyet
sistemini KESİNLİKLE önünde bir
AKTİF HAVA YASTIĞI ile
korunmakta olan bir koltukta
kullanmayınız. ÇOCUK ÖLEBİLİR
veya AĞIR ŞEKİLDE
YARALANABİLİR.
UK: НІКОЛИ не використовуйте
систему безпеки для дітей, що
встановлюється обличчям назад,
на сидінні з УВІМКНЕНОЮ
ПОДУШКОЮ БЕЗПЕКИ, інакше це
може призвести до СМЕРТІ чи
СЕРЙОЗНОГО ТРАВМУВАННЯ
ДИТИНИ.
HU: SOHA ne használjon hátrafelé
néző biztonsági gyerekülést előlről
AKTÍV LÉGZSÁKKAL védett ülésen,
mert a GYERMEK HALÁLÁT vagy
KOMOLY SÉRÜLÉSÉT okozhatja.
Page 59 of 225

Storage57Glovebox
The glovebox will illuminate when
opened.
The glovebox partition can be
removed from its groove. Store the
partition in the groove on the far left- hand side of the glovebox.
The glovebox should be closed whilst driving.
Lockable glovebox Lock and unlock the glovebox with thekey.
Cupholders
Cupholders are located in the front ofthe centre console.
The cupholder is flexible, allowing
different size drink containers to be
stored.
Additional cupholders are located in
the centre rear seat armrest. Fold
down the armrest to access the
cupholder.
Sunglasses storage
To open: push the rear part of the
cover.
To close: pull up cover and push it
until it latches into place.
Do not use for storing heavy objects.
Underseat storage Front passenger seat undertray
Pull up on front of tray then pull it
forwards. Push the tray towards the
seat to return it to its original position.
Page 69 of 225

Storage67Raise the release lever and hold. Lift
the system slightly and push it into the
bumper until it engages.
Release lever must return to original
position.9 Warning
If the system cannot be correctly
engaged, please seek the
assistance of a workshop.
Load compartment
Storage compartments in the load compartment
Located on both sides of the load
compartment floor.
Load compartment cover
Do not place any objects on the cover.
Closing the cover
Pull load compartment cover towards rear of vehicle using handle and insert
retainers into brackets on either side
of load compartment.
Opening the cover
Remove load compartment cover
from side brackets. The cover rolls up automatically.
Page 70 of 225

68StorageRemoving the cover
Open load compartment cover. Pull
socket on either side of cover towards
centre of vehicle, lift and remove
cover from the side guides.
Fit in reverse order.
Rear floor storage cover
To access the rear floor storage
compartment, pull floor cover handle upwards.
Depending on version, to access the
rear floor storage compartment, push
both levers on the floor cover towards the handle and pull up the cover by
the handle.
Where present, hang the hook to the
upper part of the tailgate opening.
Caution
Only use the hook for hanging up
the rear floor cover and the height
adjustable cover.
Page 71 of 225

Storage69Caution
Do not allow objects to protrude
above the top of the rear floor
storage compartment, to avoid
damage to the storage area and
the load compartment floor.
Jack and vehicle tools 3 179.
Tyre repair kit 3 187.
Temporary spare wheel 3 193.
Lashing eyes
The lashing eyes are designed to
secure items against slippage, e.g.
using lashing straps or a luggage floor
net.
Two additional lashing eyes are
located in front of the rear seats.
Designed for carrying small, light
items only, a luggage floor net helps
keep loads from moving during sharp turns or quick starts and stops.
To install: attach the four net hooks to
the lashing eyes mounted on the load
compartment floor.
Warning triangle Stow the warning triangle below the
floor cover in the load compartment.
First aid kit Stow the first aid kit below the floorcover in the load compartment.
Fire extinguisher Stow the fire extinguisher securely in
the load compartment.Roof rack system
Roof rack
For safety reasons and to avoid
damage to the roof, the vehicle
approved roof rack system is
recommended. For further
information contact a workshop.
Fasten the roof rack to the roof rails
following the instructions that
accompany the system, ensuring that
the roof load is evenly distributed over the side or cross rails.
Loads must not be placed on the roof
surface. To prevent damage or loss,
check frequently that roof loads are
securely fastened.
Driving with a roof load affects the
vehicle centre of gravity; drive
carefully in crosswinds and do not
drive at high speeds.
Remove the roof rack when not in
use.