ignition OPEL FRONTERA 1998 Workshop Manual
[x] Cancel search | Manufacturer: OPEL, Model Year: 1998, Model line: FRONTERA, Model: OPEL FRONTERA 1998Pages: 6000, PDF Size: 97 MB
Page 4723 of 6000

6E–66
ENGINE DRIVEABILITY AND EMISSIONS
Poor connection at PCM. Inspect the harness
connectors for backed-out terminals, improper mating,
broken locks, improperly formed or damage terminals,
and a poor terminal-to-wire connection.
Damaged harness. Inspect the wiring harness for
damage. If the harness is not damaged, observe an
affected sensor’s displayed value on the Tech 2 with
the ignition “ON” and the engine “OFF” while you move
the connectors and the wiring harnesses related to the
following sensors:
IAT
ECT
TP
MAP
EGR
TFT
Multiple PCM Information Sensor DTCs Set
StepActionVa l u e ( s )Ye sNo
1Was the “On-Board Diagnostic (OBD) System Check”
performed?
—Go to Step 2
Go to OBD
System
Check
21. Turn the ignition “OFF,” disconnect the PCM.
2. Turn the ignition “ON,” check the 5 volt reference A
circuit for the following conditions:
A poor connection at the PCM.
An open between the PCM connector and the
splice.
A short to ground.
A short to voltage.
Is there an open or short?
—Go to Step 3Go to Step 4
3Repair the open or short.
Is the action complete?
—Verify repair—
4Check the sensor ground circuit for the following
conditions:
A poor connection at the PCM or the affected
sensors.
An open between the PCM connector and the
affected sensors.
Is there an open or a poor connection?
—Go to Step 5Go to Step 6
5Repair the open or the poor connection.
Is the action complete?
—Verify repair—
6Measure the voltage between the EGR pintle position
sensor signal circuit at the PCM harness connector and
ground.
Does the voltage measure near the specified value?
0 VGo to Step 7Go to Step 12
7Measure the voltage between the MAP sensor signal
circuit at the PCM harness connector and ground.
Does the voltage measure near the specified value?
0 VGo to Step 8Go to Step 15
8Measure the voltage between the TP sensor signal
circuit at the PCM harness connector and ground.
Does the voltage measure near the specified value?
0 VGo to Step 9Go to Step 16
9Measure the voltage between the IAT sensor signal
circuit at the PCM harness connector and ground.
Does the voltage measure near the specified value?
0 VGo to Step 10Go to Step 17
10Measure the voltage between the ECT sensor signal
circuit at the PCM harness connector and ground.
Does the voltage measure near the specified value?
0 VGo to Step 11Go to Step 18
Page 4726 of 6000

6E–69 ENGINE DRIVEABILITY AND EMISSIONS
HO2S BANK2, SEN. 1—Tech 2 Range 0-1132 mV—
Represents the fuel control exhaust oxygen sensor
output voltage. Should fluctuate constantly within a range
between 10mV (lean exhaust) and 1000 mV (rich
exhaust) while operating in closed loop.
HO2S BANK 1, SEN. 1—Tech 2 Displays NOT
READY or READY—
Indicates the status of the exhaust oxygen sensor. The
Tech 2 will indicate that the exhaust oxygen sensor is
ready when the PCM detects a fluctuating HO2S voltage
sufficient to allow closed loop operation. This will not
occur unless the exhaust oxygen sensor is warmed up.
HO2S BANK 2, SEN. 1 — Tech 2 Displays NOT
READY or READY —
Indicates the status of the exhaust oxygen sensor. The
Tech 2 will indicate that the exhaust oxygen sensor is
ready when the PCM detects a fluctuating HO2S voltage
sufficient to allow closed loop operation. This will not
occur unless the exhaust oxygen sensor is warmed up.
HO2S WARM UP TIME BANK 1, SEN. 1/BANK 2
SEN. 1 — Tech 2 Range 00:00:00-99:99:99
HRS:MIN:SEC —
Indicates warm-up time for each HO2S. The HO2S
warm-up time is used for the HO2S heater test. The PCM
will run the heater test only after a cold start (determined
by engine coolant and intake air temperature at the time
of start-up) and only once during an ignition cycle. When
the engine is started the PCM will monitor the HO2S
voltage. When the HO2S voltage indicates a sufficiently
active sensor, the PCM looks at how much time has
elapsed since start-up. If the PCM determines that too
much time was required for the HO2S to become active,
a DTC will set. If the engine was warm when started,
HO2S warm-up will the display “00:00:00”.
IAC POSITION — Tech 2 Range 0-255 Counts —
Displays the commanded position of the idle air control
pintle in counts. A larger number of counts means that
more air is being commanded through the idle air
passage. Idle air control should respond fairly quickly to
changes in engine load to maintain desired idle RPM.
IAT (INTAKE AIR TEMPERATURE) — Tech 2 Range
–40
C to 151C (–40F to 304F) —
The PCM converts the resistance of the intake air
temperature sensor to degrees. Intake air temperature
(IAT) is used by the PCM to adjust fuel delivery and spark
timing according to incoming air density.
IGNITION 1 — Tech 2 Range 0-25.5 Volts —
This represents the system voltage measured by the
PCM at its ignition feed.
INJ. PULSE BANK 1/INJ. PULSE BANK 2 — Tech 2
Range 0-1000 msec. —
Indicates the amount of time the PCM is commanding
each injector “ON” during each engine cycle. A longer
injector pulse width will cause more fuel to be delivered.
Injector pulse width should increase with increased
engine load.KS NOISE CHANNEL (Knock Sensor) —
Indicates the output from the KS noise channel. There is
always some electrical noise in an engine compartment
and to avoid mistaking this as engine knock, the output
from the knock sensor is compared to the output from the
noise channel. A knock condition is not set unless the
knock sensor output is greater than the noise channel
output.
LONG TERM FUEL TRIM BANK 1/BANK 2 —
The long term fuel trim is derived from the short term fuel
trim values and represents a long term correction of fuel
delivery for the bank in question. A value of 0% indicates
that fuel delivery requires no compensation to maintain
the PCM commanded air/fuel ratio. A negative value
significantly below 0% indicates that the fuel system is
rich and fuel delivery is being reduced (decreased injector
pulse width). A positive value significantly greater than
0% indicates that a lean condition exists and the PCM is
compensating by adding fuel (increased injector pulse
width). Because long term fuel trim tends to follow short
term fuel trim, a value in the negative range due to
canister purge at idle should not be considered unusual.
Fuel trim values at maximum authority may indicate an
excessively rich or lean system.
LOOP STATUS — Tech 2 Displays OPEN or
CLOSED —
“CLOSED” indicates that the PCM is controlling fuel
delivery according to oxygen sensor voltage. In “OPEN”
the PCM ignores the oxygen sensor voltage and bases
the amount of fuel to be delivered on TP sensor, engine
coolant, and MAF sensor inputs only.
MAF — Tech 2 Range 0.0-512 gm/s —
MAF (mass air flow) is the MAF input frequency
converted to grams of air per second. This indicates the
amount of air entering the engine.
MAP — Tech 2 Range 10-105 kPa (0.00-4.97 Volts)
—
The manifold absolute pressure (MAP) sensor measures
the change in the intake manifold pressure from engine
load, EGR flow, and speed changes. As intake manifold
pressure increases, intake vacuum decreases, resulting
in a higher MAP sensor voltage and kPa reading. The
MAP sensor signal is used to monitor intake manifold
pressure changes during the EGR flow test, to update the
BARO reading, and as an enabling factor for several of
the diagnostics.
MIL — Tech 2 Displays ON or OFF —
Indicates the PCM commanded state of the malfunction
indicator lamp.
POWER ENRICHMENT — Tech 2 Displays ACTIVE
or INACTIVE —
“ACTIVE” displayed indicates that the PCM has detected
conditions appropriate to operate in power enrichment
mode. The PCM will command power enrichment mode
when a large increase in throttle position and load is
detected. While in power enrichment mode, the PCM will
increase the amount of fuel delivered by entering open
loop and increasing the injector pulse width. This is done
to prevent a possible sag or hesitation from occurring
during acceleration.
Page 4729 of 6000

6E–72
ENGINE DRIVEABILITY AND EMISSIONS
Te c h 2
ParameterRefer To Typical Data
Va l u e s
(2500 RPM) Typical Data
Values (IDLE) Units
Displayed Data List
HO2S Bank 2
Sen.1 (millivolts)O2 Sensor
DataMillivolts50-950 changing
quickly50-950 changing
quicklyGeneral Description and
Operation, Fuel Control
HO2S
HO2S Bank 1
Sen.1
(ready/not
ready)O2 Sensor
DataReady
Ye s / N oReady
Ye sReady
Ye sGeneral Description and
Operation, Fuel Control
HO2S; DTC: P0135
HO2S Bank 2
Sen.1
(ready/not
ready)O2 Sensor
DataReady
Ye s / N oReady
Ye sReady
Ye sGeneral Description and
Operation, Fuel Control
HO2S
HO2S Warm-Up
Time Bank 1
Sen.1O2 Sensor
DataSeconds25-4525-45General Description and
Operation, Fuel Control
HO2S
HO2S Warm-Up
Time Bank 2
Sen.1O2 Sensor
DataSeconds25-4525-45General Description and
Operation, Fuel Control
HO2S
IAT (Intake Air
Te m p )EngineDegrees C,
Degrees F0-100C,
depends on
underhood0-80C, depends
on underhoodGeneral Description and
Operation, Intake Air
Temperature (IAT) Sensor
Ignition VoltageEngineVo l t s12.8-14.112.8-14.1General Description and
Operation, Electronic
Ignition System
Inj. Pulse Bank
1EngineMillisecond
s2.0-4.02.5-4.0General Description, Fuel
Metering, Fuel Injector
Inj. Pulse Bank
2EngineMillisecond
s2.0-4.02.5-4.0General Description, Fuel
Metering, Fuel Injector
KS Noise
Channel (Knock
Sensor)EngineVo l t s0.10-0.400.50-1.75General Description and
Operation, Knock Sensor
Purpose and Operation;
DTCs: P0352, P0327
Loop StatusEngineOpen/Clos
edClosedClosedGeneral Description and
Operation, Fuel Metering
System; DTCs:
P0125-P0155
MAF (Mass Air
Flow)EngineGrams per
second2.85-6.659.5-16.5General Description and
Operation, MAF; DTCs:
P101, P0102, P0103
MAP kPa
(Manifold
Absolute
Pressure)EngineKilopascals
——
General Description and
Operation, Manifold
Absolute Pressure (MAP)
Sensor; DTCs: P0106,
P0107, P0108
MILEngineOn/OffOffOffOn-Board Diagnostic
System Check
Power
EnrichmentEngineInactive/Ac
tiveInactiveInactiveGeneral Description and
Operation, Acceleration
Mode
Spark
(Advance)EngineDegrees
Before Top
Dead
Center15-2234-44General Description and
Operation, Electronic
Ignition System
Page 4731 of 6000

6E–74
ENGINE DRIVEABILITY AND EMISSIONS
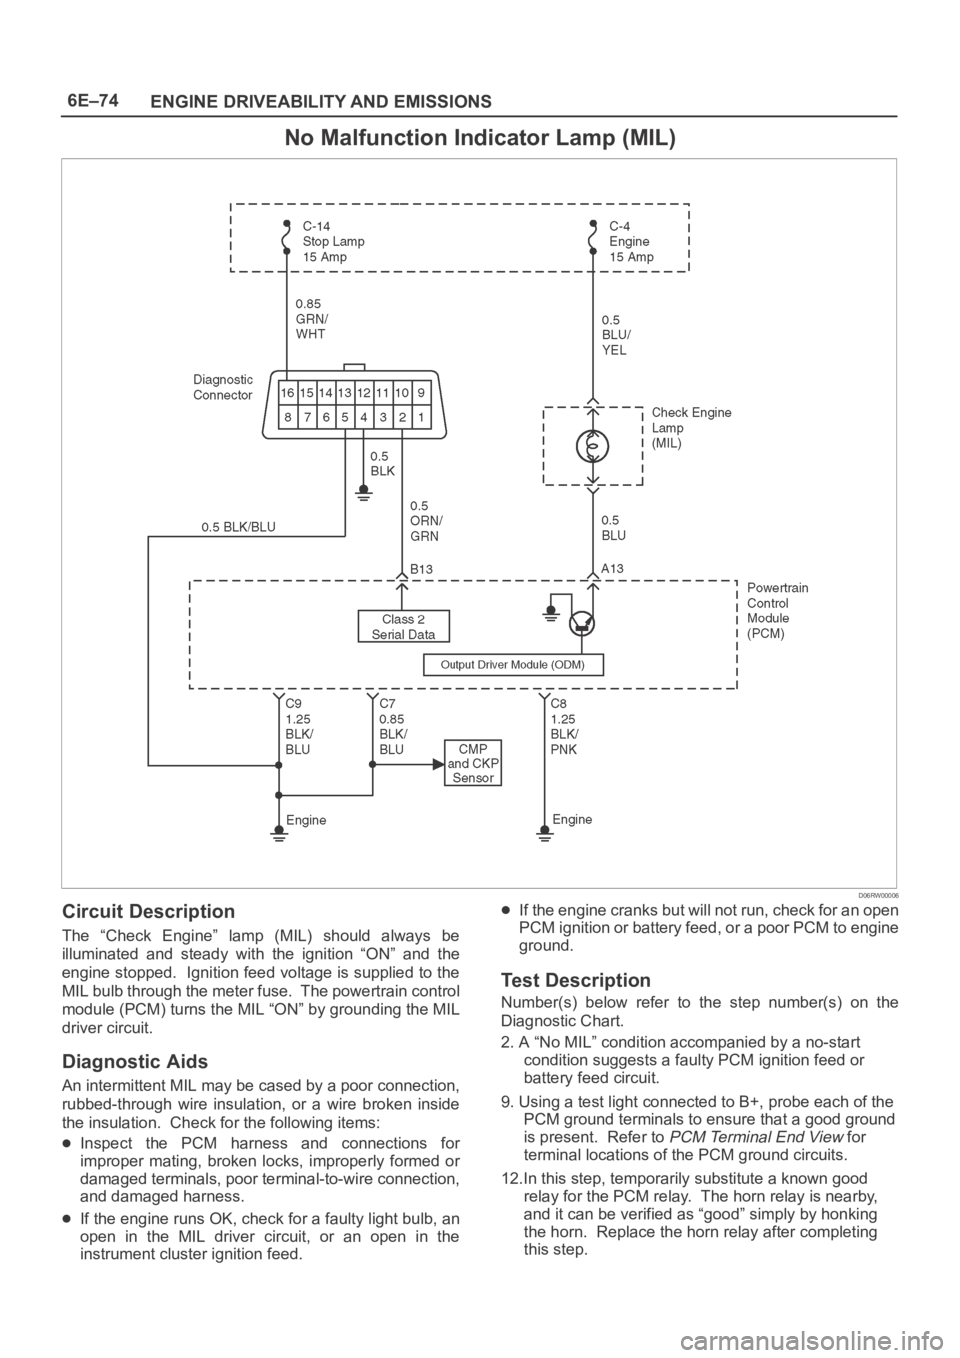
No Malfunction Indicator Lamp (MIL)
D06RW00006
Circuit Description
The “Check Engine” lamp (MIL) should always be
illuminated and steady with the ignition “ON” and the
engine stopped. Ignition feed voltage is supplied to the
MIL bulb through the meter fuse. The powertrain control
module (PCM) turns the MIL “ON” by grounding the MIL
driver circuit.
Diagnostic Aids
An intermittent MIL may be cased by a poor connection,
rubbed-through wire insulation, or a wire broken inside
the insulation. Check for the following items:
Inspect the PCM harness and connections for
improper mating, broken locks, improperly formed or
damaged terminals, poor terminal-to-wire connection,
and damaged harness.
If the engine runs OK, check for a faulty light bulb, an
open in the MIL driver circuit, or an open in the
instrument cluster ignition feed.
If the engine cranks but will not run, check for an open
PCM ignition or battery feed, or a poor PCM to engine
ground.
Test Description
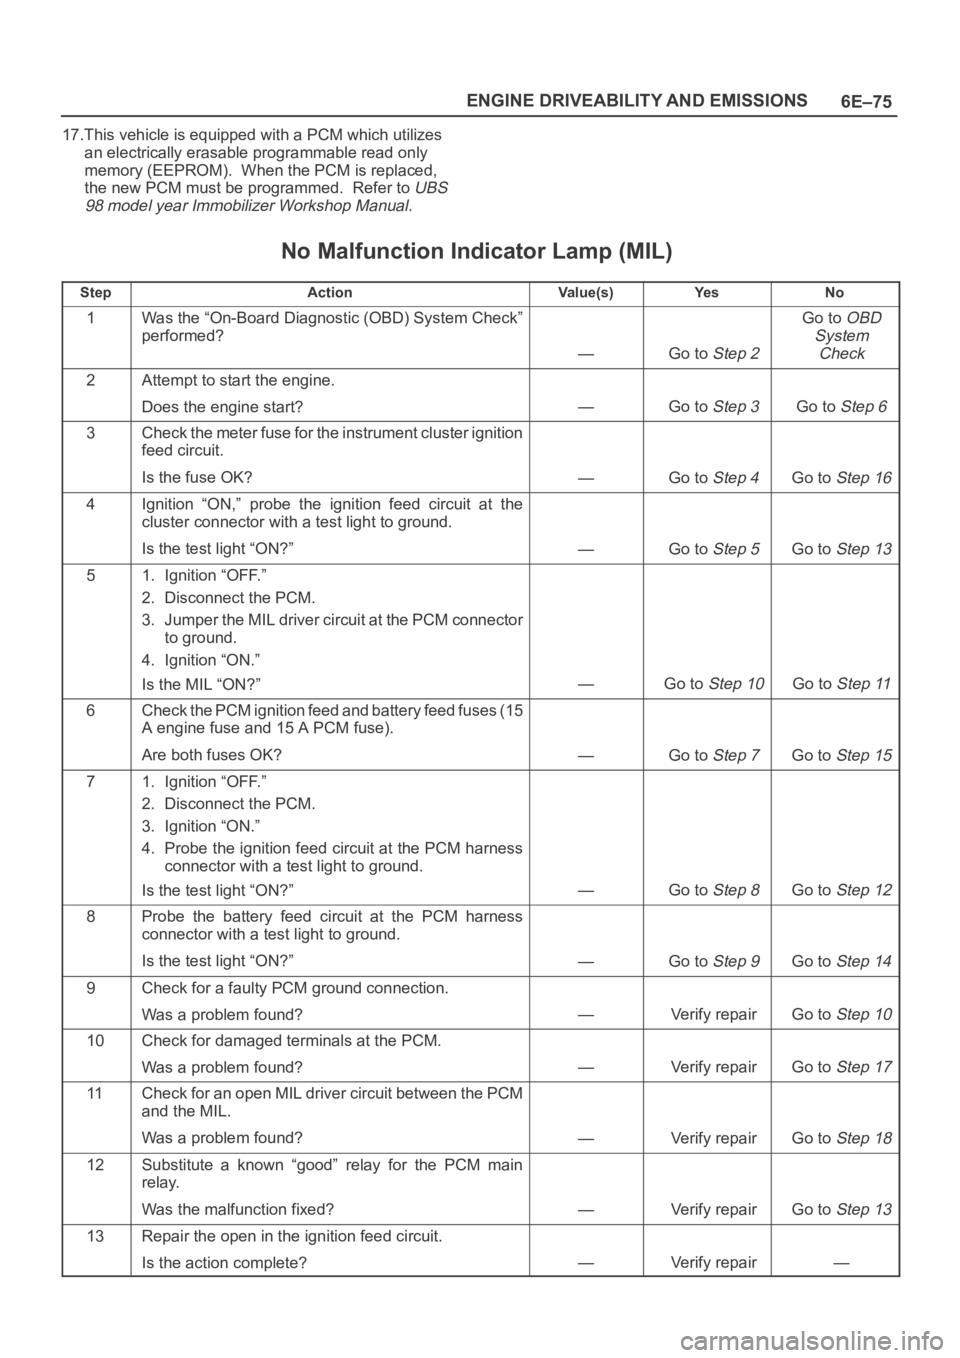
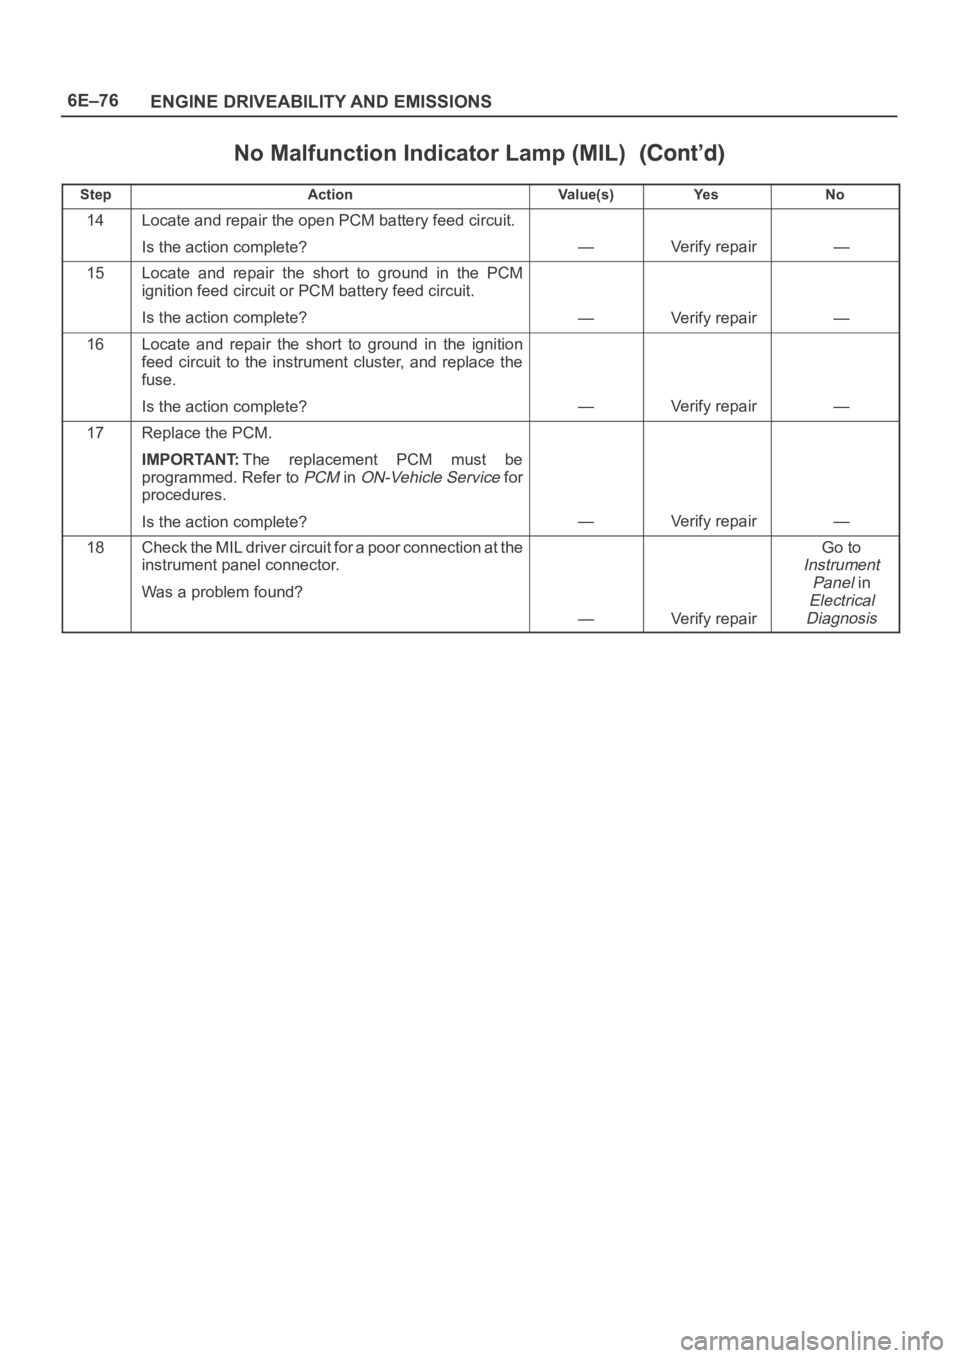
Number(s) below refer to the step number(s) on the
Diagnostic Chart.
2. A “No MIL” condition accompanied by a no-start
condition suggests a faulty PCM ignition feed or
battery feed circuit.
9. Using a test light connected to B+, probe each of the
PCM ground terminals to ensure that a good ground
is present. Refer to
PCM Terminal End View for
terminal locations of the PCM ground circuits.
12.In this step, temporarily substitute a known good
relay for the PCM relay. The horn relay is nearby,
and it can be verified as “good” simply by honking
the horn. Replace the horn relay after completing
this step.
Page 4732 of 6000

6E–75 ENGINE DRIVEABILITY AND EMISSIONS
17.This vehicle is equipped with a PCM which utilizes
an electrically erasable programmable read only
memory (EEPROM). When the PCM is replaced,
the new PCM must be programmed. Refer to
UBS
98 model year Immobilizer Workshop Manual.
No Malfunction Indicator Lamp (MIL)
StepActionVa l u e ( s )Ye sNo
1Was the “On-Board Diagnostic (OBD) System Check”
performed?
—Go to Step 2
Go to OBD
System
Check
2Attempt to start the engine.
Does the engine start?
—Go to Step 3Go to Step 6
3Check the meter fuse for the instrument cluster ignition
feed circuit.
Is the fuse OK?
—Go to Step 4Go to Step 16
4Ignition “ON,” probe the ignition feed circuit at the
cluster connector with a test light to ground.
Is the test light “ON?”
—Go to Step 5Go to Step 13
51. Ignition “OFF.”
2. Disconnect the PCM.
3. Jumper the MIL driver circuit at the PCM connector
to ground.
4. Ignition “ON.”
Is the MIL “ON?”
—Go to Step 10Go to Step 11
6Check the PCM ignition feed and battery feed fuses (15
A engine fuse and 15 A PCM fuse).
Are both fuses OK?
—Go to Step 7Go to Step 15
71. Ignition “OFF.”
2. Disconnect the PCM.
3. Ignition “ON.”
4. Probe the ignition feed circuit at the PCM harness
connector with a test light to ground.
Is the test light “ON?”
—Go to Step 8Go to Step 12
8Probe the battery feed circuit at the PCM harness
connector with a test light to ground.
Is the test light “ON?”
—Go to Step 9Go to Step 14
9Check for a faulty PCM ground connection.
Was a problem found?
—Verify repairGo to Step 10
10Check for damaged terminals at the PCM.
Was a problem found?
—Verify repairGo to Step 17
11Check for an open MIL driver circuit between the PCM
and the MIL.
Was a problem found?
—Verify repairGo to Step 18
12Substitute a known “good” relay for the PCM main
relay.
Was the malfunction fixed?
—Verify repairGo to Step 13
13Repair the open in the ignition feed circuit.
Is the action complete?
—Verify repair—
Page 4733 of 6000

6E–76
ENGINE DRIVEABILITY AND EMISSIONS
No Malfunction Indicator Lamp (MIL)
StepNo Ye s Va l u e ( s ) Action
14Locate and repair the open PCM battery feed circuit.
Is the action complete?
—Verify repair—
15Locate and repair the short to ground in the PCM
ignition feed circuit or PCM battery feed circuit.
Is the action complete?
—Verify repair—
16Locate and repair the short to ground in the ignition
feed circuit to the instrument cluster, and replace the
fuse.
Is the action complete?
—Verify repair—
17Replace the PCM.
IMPORTANT:The replacement PCM must be
programmed. Refer to
PCM in ON-Vehicle Service for
procedures.
Is the action complete?
—Verify repair—
18Check the MIL driver circuit for a poor connection at the
instrument panel connector.
Was a problem found?
—Verify repair
Go to
Instrument
Panel
in
Electrical
Diagnosis
Page 4734 of 6000

6E–77 ENGINE DRIVEABILITY AND EMISSIONS
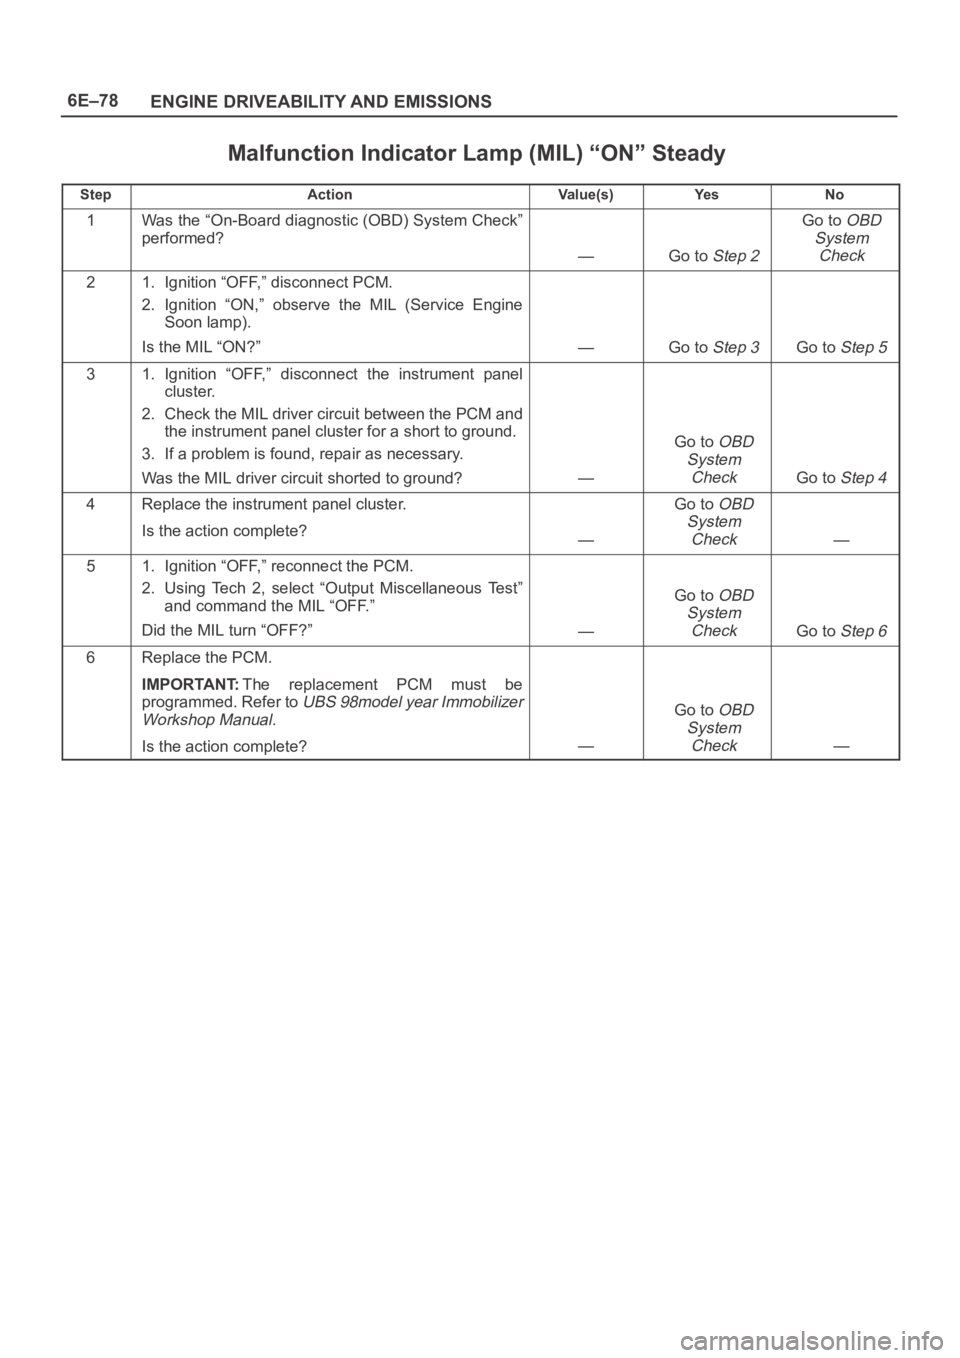
Malfunction Indicator Lamp (MIL) “ON” Steady
D06RW00007
Circuit description
The malfunction indicator lamp (MIL) should always be
illuminated and steady with ignition “ON” and the engine
stopped. Ignition feed voltage is supplied directly to the
MIL indicator. The powertrain control module (PCM)
turns the MIL “ON” by grounding the MIL driver circuit.
The MIL should not remain “ON” with the engine running
and no DTC(s) set. A steady MIL with the engine running
and no DTC(s) suggests a short to ground in the MIL
driver circuit.
Diagnostic Aids
An intermittent may be caused by a poor connection,
rubbed-through wire insulation, or a wire broken inside
the insulation. Check for the following items:
Poor connection or damaged harness – Inspect the
PCM harness and connectors for improper mating,
broken locks, improperly formed or damaged
terminals, poor terminal-to-wire connection, and
damaged harness.
Test Description
Number(s) below refer to the step number(s) on the
Diagnostic Chart.
2. If the MIL does not remain “ON” when the PCM is
disconnected, the MIL driver wiring is not faulty.
3. If the MIL driver circuit is OK, the instrument panel
cluster is faulty.
6. This vehicle is equipped with a PCM which utilizes
an electrically erasable programmable read only
memory (EEPROM). When the PCM is replaced,
the new PCM must be programmed. Refer to
UBS
98 model year Immobilizer Workshop Manual.
Page 4735 of 6000

6E–78
ENGINE DRIVEABILITY AND EMISSIONS
Malfunction Indicator Lamp (MIL) “ON” Steady
StepActionVa l u e ( s )Ye sNo
1Was the “On-Board diagnostic (OBD) System Check”
performed?
—Go to Step 2
Go to OBD
System
Check
21. Ignition “OFF,” disconnect PCM.
2. Ignition “ON,” observe the MIL (Service Engine
Soon lamp).
Is the MIL “ON?”
—Go to Step 3Go to Step 5
31. Ignition “OFF,” disconnect the instrument panel
cluster.
2. Check the MIL driver circuit between the PCM and
the instrument panel cluster for a short to ground.
3. If a problem is found, repair as necessary.
Was the MIL driver circuit shorted to ground?
—
Go to OBD
System
Check
Go to Step 4
4Replace the instrument panel cluster.
Is the action complete?
—
Go to OBD
System
Check
—
51. Ignition “OFF,” reconnect the PCM.
2. Using Tech 2, select “Output Miscellaneous Test”
and command the MIL “OFF.”
Did the MIL turn “OFF?”
—
Go to OBD
System
Check
Go to Step 6
6Replace the PCM.
IMPORTANT:The replacement PCM must be
programmed. Refer to
UBS 98model year Immobilizer
Workshop Manual.
Is the action complete?—
Go to OBD
System
Check
—
Page 4737 of 6000

6E–80
ENGINE DRIVEABILITY AND EMISSIONS
Circuit Description
The electronic Ignition system uses a coil-at-plug method
of spark distribution. In this type of ignition system, the
powertrain control module (PCM) triggers the correct
driver inside the ignition coil, which then triggers the
correct ignition coil based on the 58X signal received from
the crankshaft position sensor (CKP). The spark plug
connected to the coil fires when the ICM opens the ground
circuit for the coil’s primary circuit.
During crank, the PCM monitors the CKP 58X signal. The
CKP signal is used to determine which cylinder will fire
first. After the CKP 58X signal has been processed by the
PCM, it will command all six injectors to allow a priming
shot of fuel for all the cylinders. After the priming, the
injectors are left “OFF” during the next six 58X reference
pulses from the CKP. This allows each cylinder a chance
to use the fuel from the priming shot. During this waiting
period, a camshaft position (CMP) signal pulse will have
been received by the PCM. The CMP signal allows the
PCM to operate the injectors sequentially based on
camshaft position. If the camshaft position signal is not
present at start-up, the PCM will begin sequential fuel
delivery with a 1-in-6 chance that fuel delivery is correct.
The engine will run without a CMP signal, but will set a
DTC code.
Diagnostic Aids
An intermittent problem may be caused by a poor
connection, rubbed-through wire insulation or a wire
broken inside the insulation. Check for the following
items:
Poor connection or damaged harness – Inspect the
PCM harness and connectors for improper mating,
broken locks, improperly formed or damaged
terminals, poor terminal-to-wire connection, and
damaged harness.
Faulty engine coolant temperature sensor – Using
Tech 2, compare engine coolant temperature with
intake air temperature on a completely cool engine.
Engine coolant temperature should be within 10
C of
intake air temperature. If not, replace the ECT sensor.
Test Description
Number(s) below refer to the step number(s) on the
Diagnostic Chart.
5. An obvious cause of low fuel pressure would be an
empty fuel tank.
6. The engine will easily start and run if a few injectors
are disabled. It is not necessary to test all injectors
at this time since this step is only a test to verify that
all of the injectors have not been disabled by fuel
contamination.
7. A blinking test light verifies that the PCM is
monitoring the 58X crankshaft reference signal and
is capable of activating the injectors. If there is an
open or shorted driver circuit, DTCs 201-206 should
be set.
19.By using a spark tester, each ignition coil’s ability to
produce 25,000 volts is verified.
25.If there is an open or shorted driver circuit, DTCs
201-206 should be set. All six injector driver circuits
can be checked at one time without removing the
intake manifold if a 5-8840-2636-0 test light is
available. This is the alternative procedure:
With the ignition “OFF,” disconnect the gray
connector located at the rear of the air filter, attached
to a bracket on the purge canister.
Connect test light 5-8840-2636-0 to the connector.
Do any of the light constantly illuminate or fail to blink
when the engine is cranked? If so, repair the short or
open circuit, or replace the PCM if indicated.
This procedure only tests the driver circuit as far as the
test connection, so step 31 is added to test the circuit all
the way to the injector.
Page 4738 of 6000

6E–81 ENGINE DRIVEABILITY AND EMISSIONS
Engine Cranks But Will Not Run
StepActionVa l u e ( s )Ye sNo
1Was the “On-Board Diagnostic (OBD) System Check”
performed?
—Go to Step 2
Go to OBD
System
Check
2Check the 15 A ignition coil fuse, the 15 A engine fuse,
and the 30 A PCM fuse.
Was a fuse blown?
—Go to Step 3Go to Step 4
3Check for a short to ground and replace the fuse.
Is the action complete?
—Verify repair—
41. Ignition “OFF,” install a fuel pressure gauge at the
test fitting on the fuel supply line in the engine
compartment. (Use a shop cloth to absorb any fuel
leakage while making the connection.)
2. Ignition “ON,” observe the fuel pressure.
Is the fuel pressure within the specified values, and
does it hold steady?
285-376 kPa
(43-55 psi)
Go to Step 6Go to Step 5
5Is any fuel pressure indicated?
—
Go to Fuel
System
Electrical TestGo to Fuel
System
Diagnosis
6Install an injector switch box to the injector test
connector, and attempt to operate the injector.
Did the fuel pressure drop when the injector is
operated?
—Go to Step 7Go to Step 12
7Install an injector test light at the #2 cylinder injector
harness connector.
Does the light blink when the engine is cranked?
—Go to Step 8Go to Step 18
81. Ignition “ON.”
2. While the coil connectors are disconnected, touch
each coil connector’s ignition feed terminal with a
grounded test light (the ignition feed wire is black
with orange tracer).
Did the test light illuminate?
—Go to Step 10Go to Step 9
9Repair the open ignition feed circuit.
Is the action complete?
—Verify repair—
10While the coil connectors are disconnected, touch
each connector’s secondary ground terminal with a
test light to B+. (The ground wires are black.)
Did the test light illuminate at each coil connector?
—Go to Step 12Go to Step 11
11Repair the open secondary ground circuit.
Is the action complete?
—Verify repair—
121. Test the fuel for contamination.
2. If a problem is found, clean the fuel system and
correct the contaminated fuel condition as
necessary. Replace the fuel filter and replace any
injectors that are not delivering fuel (see Injector
Balance Test).
Was a problem found?
—Verify repairGo to Step 13