lock OPEL FRONTERA 1998 Repair Manual
[x] Cancel search | Manufacturer: OPEL, Model Year: 1998, Model line: FRONTERA, Model: OPEL FRONTERA 1998Pages: 6000, PDF Size: 97 MB
Page 660 of 6000

4B2–89 DRIVE LINE CONTROL SYSTEM (TOD)
StepNo Ye s Action
131. Apply the brake and fully turn the steering to the left (or right)
end, and start the creep run.
Does the voltage between terminals 4 and 20 range between 0.1
and 1.0V?Repair the
transfer
assembly.
Go to Step 16The ECU has
failed. Replace
the ECU.
Go to Step 16
141. Shift the transfer lever to the high (TOD) position.
2. Fully turn the steering to the left (or right) end, and select the D
range and start the creep run.
Does the voltage between terminals 4 and 20 range between 0.1
and 1.0V?
Go to Step 15 Go to Step 13
151. Select the 4WD SW to the 2WD position.
2. Jack up the right front wheel.
Does the front tire rotate smoothly?
Repair the
transfer
assembly.
Go to Step 16
The phenomenon
is not
reproduced.
Refer to
“Troubles
intermittently
observed”.
Go to Step 16
16Check that all the parts are mounted.
Is this step complete?Repeat the
“Diagnosis Flow”.
Return to Step 16
*NOTE: Before checking this item, run the vehicle more
than 10 meters with the steering wheel in straight position
so that the 4L mechanical lock sleeve can be released
certainly.
Page 667 of 6000

4C–1 DRIVE SHAFT SYSTEM
DRIVELINE/AXLE
DRIVE SHAFT SYSTEM
CONTENTS
Service Precaution 4C–2. . . . . . . . . . . . . . . . . . . . . .
General Description 4C–2. . . . . . . . . . . . . . . . . . . . .
Diagnosis 4C–3. . . . . . . . . . . . . . . . . . . . . . . . . . . . . .
Rear Axle Shaft 4C–4. . . . . . . . . . . . . . . . . . . . . . . . .
Rear Axle Shaft and Associated Parts 4C–4. . . .
Removal 4C–4. . . . . . . . . . . . . . . . . . . . . . . . . . . . .
Inspection and Repair 4C–5. . . . . . . . . . . . . . . . . .
Oil Seal Replacement 4C–6. . . . . . . . . . . . . . . . . .
Installation 4C–6. . . . . . . . . . . . . . . . . . . . . . . . . . . .
Special Tools 4C–8. . . . . . . . . . . . . . . . . . . . . . . . . . .
Front Hub and Disc (with Shift on the Fly) 4C–9. .
Disassembled View 4C–9. . . . . . . . . . . . . . . . . . . .
Disassembly 4C–9. . . . . . . . . . . . . . . . . . . . . . . . . .
Inspection and Repair 4C–10. . . . . . . . . . . . . . . . . .
Reassembly 4C–11. . . . . . . . . . . . . . . . . . . . . . . . . .
Front Hub and Disc with Manual Locking Hub 4C–14
Disassembled View 4C–14. . . . . . . . . . . . . . . . . . . .
Disassembly 4C–14. . . . . . . . . . . . . . . . . . . . . . . . . .
Inspection and Repair 4C–16. . . . . . . . . . . . . . . . . .
Reassembly 4C–16. . . . . . . . . . . . . . . . . . . . . . . . . .
Main Data and Specifications 4C–20. . . . . . . . . . . . .
Special Tools 4C–21. . . . . . . . . . . . . . . . . . . . . . . . . . .
Front Drive Shaft Joint 4C–22. . . . . . . . . . . . . . . . . . .
Front Drive Shaft Joints Replacement 4C–22. . . .
Front Axle Drive Shaft 4C–23. . . . . . . . . . . . . . . . . . .
Front Axle Drive Shaft and Associated
Parts 4C–23. . . . . . . . . . . . . . . . . . . . . . . . . . . . . . . .
Disassembly 4C–24. . . . . . . . . . . . . . . . . . . . . . . . . .
Inspection and Repair 4C–25. . . . . . . . . . . . . . . . . .
Bushing Replacement 4C–25. . . . . . . . . . . . . . . . . . Reassembly 4C–26. . . . . . . . . . . . . . . . . . . . . . . . . .
Shift On The Fly System 4C–28. . . . . . . . . . . . . . . . .
Shift On The Fly System and Associated
Parts 4C–28. . . . . . . . . . . . . . . . . . . . . . . . . . . . . . . .
Disassembly 4C–28. . . . . . . . . . . . . . . . . . . . . . . . . .
Inspection and Repair 4C–30. . . . . . . . . . . . . . . . . .
Main Data and Specifications 4C–35. . . . . . . . . . .
Special Tools 4C–36. . . . . . . . . . . . . . . . . . . . . . . . . .
Front Propeller Shaft 4C–37. . . . . . . . . . . . . . . . . . . . .
General Description 4C–37. . . . . . . . . . . . . . . . . . . . .
Front Propeller Shaft and Associated Parts 4C–38
Removal 4C–38. . . . . . . . . . . . . . . . . . . . . . . . . . . . .
Installation 4C–39. . . . . . . . . . . . . . . . . . . . . . . . . . . .
Disassembly (Except TOD 4
4) 4C–40. . . . . . . . .
Universal Joint Disassembly 4C–41. . . . . . . . . . . .
Inspection and Repair 4C–42. . . . . . . . . . . . . . . . . .
Universal Joint Reassembly 4C–45. . . . . . . . . . . . .
Reassembly (Except TOD 4
4) 4C–46. . . . . . . . . .
Main Data and Specifications 4C–47. . . . . . . . . . .
Rear Propeller Shaft 4C–48. . . . . . . . . . . . . . . . . . . . .
General Description 4C–48. . . . . . . . . . . . . . . . . . . . .
Rear Propeller Shaft and Associated Parts 4C–48
Removal 4C–49. . . . . . . . . . . . . . . . . . . . . . . . . . . . .
Installation 4C–49. . . . . . . . . . . . . . . . . . . . . . . . . . . .
Disassembly 4C–50. . . . . . . . . . . . . . . . . . . . . . . . . .
Universal Joint Disassembly 4C–51. . . . . . . . . . . .
Inspection and Repair 4C–52. . . . . . . . . . . . . . . . . .
Universal Joint Reassembly 4C–53. . . . . . . . . . . . .
Reassembly 4C–54. . . . . . . . . . . . . . . . . . . . . . . . . .
Main Data and Specifications 4C–55. . . . . . . . . . .
Page 668 of 6000

4C–2
DRIVE SHAFT SYSTEM
Service Precaution
WARNING: IF SO EQUIPPED WITH A
SUPPLEMENTAL RESTRAINT SYSTEM (SRS),
REFER TO THE SRS COMPONENT AND WIRING
LOCATION VIEW IN ORDER TO DETERMINE
WHETHER YOU ARE PERFORMING SERVICE ON OR
NEAR THE SRS COMPONENTS OR THE SRS
WIRING. WHEN YOU ARE PERFORMING SERVICE
ON OR NEAR THE SRS COMPONENTS OR THE SRS
WIRING, REFER TO THE SRS SERVICE
INFORMATION. FAILURE TO FOLLOW WARNINGS
COULD RESULT IN POSSIBLE AIR BAG
DEPLOYMENT, PERSONAL INJURY, OR
OTHERWISE UNNEEDED SRS SYSTEM REPAIRS.
CAUTION: Always use the correct fastener in the
proper location. When you replace a fastener, use
ONLY the exact part number for that application.
ISUZU will call out those fasteners that require a
replacement after removal. ISUZU will also call out
the fasteners that require thread lockers or thread
sealant. UNLESS OTHERWISE SPECIFIED , do not
use supplemental coatings (Paints, greases, or other
corrosion inhibitors) on threaded fasteners or
fastener joint interfaces. Generally, such coatings
adversely affect the fastener torque and the joint
clamping force, and may damage the fastener. When
you install fasteners, use the correct tightening
sequence and specifications. Following these
instructions can help you avoid damage to parts and
systems.
General Description
This publication contains essential removal, installation,
adjustment and maintenance procedures.
The front axle utilizes a central disconnect type front
axle/transfer case system.
The drive axles are completely flexible assemblies,
consisting of inner and outer constant velocity (CV) drive
shaft joints connected by an axle shaft.
For description of propeller shaft and universal joint, refer
to Front/Rear Propeller Shaft in this section.
Page 670 of 6000

4C–4
DRIVE SHAFT SYSTEM
Rear Axle Shaft
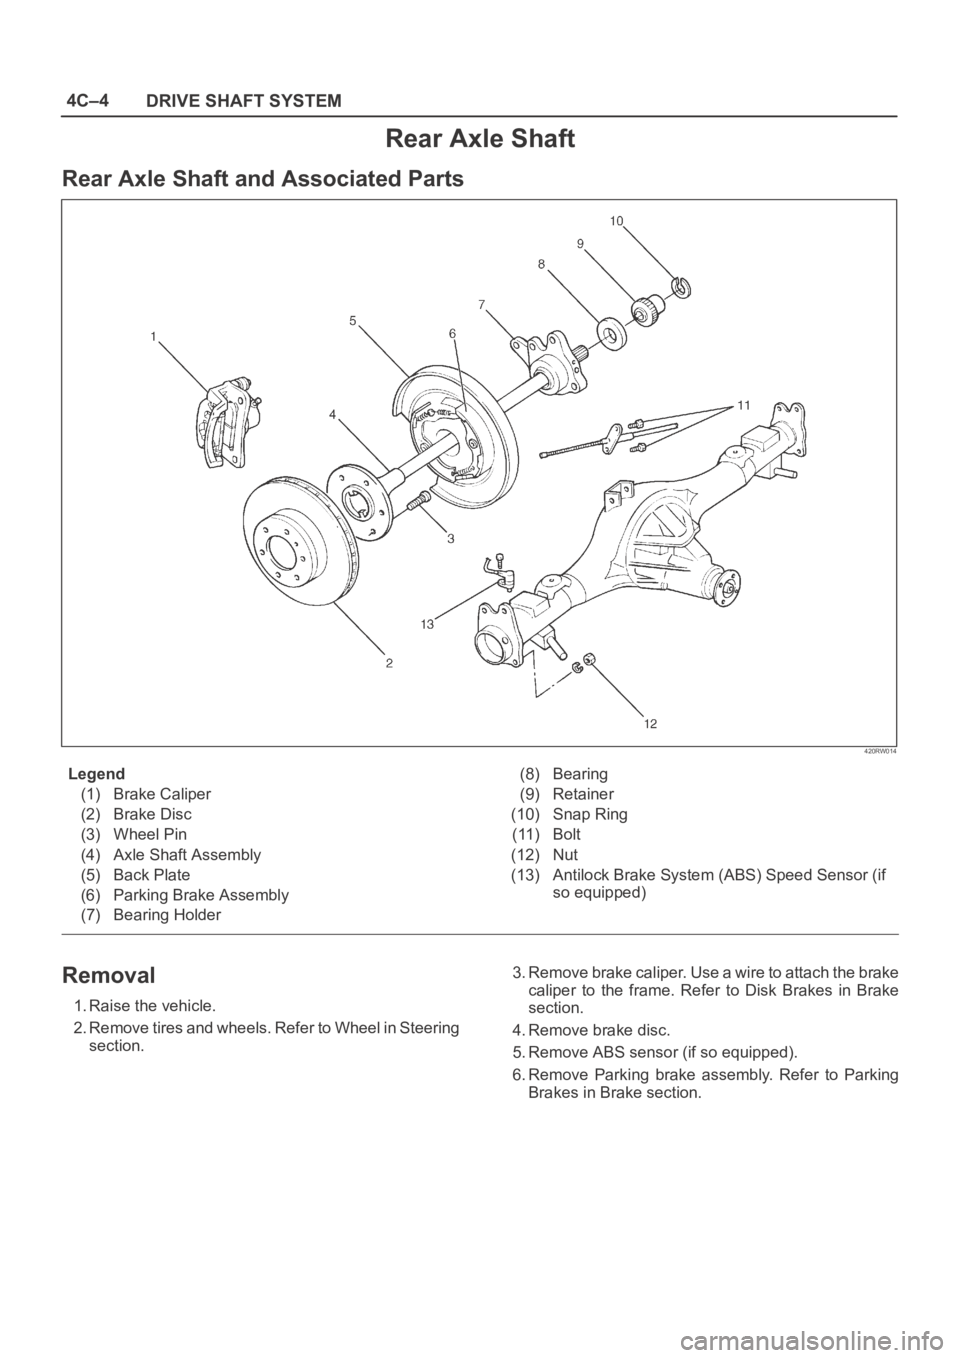
Rear Axle Shaft and Associated Parts
420RW014
Legend
(1) Brake Caliper
(2) Brake Disc
(3) Wheel Pin
(4) Axle Shaft Assembly
(5) Back Plate
(6) Parking Brake Assembly
(7) Bearing Holder(8) Bearing
(9) Retainer
(10) Snap Ring
(11) Bolt
(12) Nut
(13) Antilock Brake System (ABS) Speed Sensor (if
so equipped)
Removal
1. Raise the vehicle.
2. Remove tires and wheels. Refer to Wheel in Steering
section.3. Remove brake caliper. Use a wire to attach the brake
caliper to the frame. Refer to Disk Brakes in Brake
section.
4. Remove brake disc.
5. Remove ABS sensor (if so equipped).
6. Remove Parking brake assembly. Refer to Parking
Brakes in Brake section.
Page 673 of 6000

4C–7 DRIVE SHAFT SYSTEM
9. Fix the parking brake cable mounting bolt (Behind the
back plate).
10. Install parking brake assembly, refer to Parking
Brakes in Brake section.
11. Install antilock brake system sensor (if so equipped).
12. Install brake disc.
13. Install brake caliper, refer to Disk Brakes in Brake
section.
Page 675 of 6000

4C–9 DRIVE SHAFT SYSTEM
Front Hub and Disc (with Shift on the Fly)
Disassembled View
411RW001
Legend
(1) Bolt
(2) Cap
(3) Snap Ring and Shim
(4) Hub Flange
(5) Lock Washer and Lock Screw
(6) Hub Nut(7) Outer Bearing
(8) Bolt
(9) Hub and Disc Assembly
(10) Wheel Pin
(11) ABS Sensor Ring (If equipped)
(12) Inner Bearing
(13) Oil Seal
Disassembly
1. Before disassembly, select the 2WD position.
2. Jack up the front of vehicle and support frame with
jack stands.3. Remove the disc brake caliper assembly and hang it
on the frame with wires. Refer to Front Disc Brake
Caliper Assembly in Brakes section.
4. Remove bolt.
5. Remove cap.
6. Remove snap ring and shim.
7. Remove hub flange.
Page 676 of 6000

4C–10
DRIVE SHAFT SYSTEM
8. Remove lock washer and lock screw.
9. Use wrench 5–8840–2117–0, remove hub nut.
411RW005
10. Remove hub and disc assembly.
11. Remove ABS sensor ring (If equipped).
12. Remove outer bearing.
13. Remove oil seal.
14. Remove inner bearing.
15. Remove bolt , if necessary, replace the wheel pin in
the following manner.
Apply a scribe mark(1) to disc to hub.
Clamp the hub and disc assembly in a vise, using
protective pads. Remove the 6 disc–to–hub
retaining bolts.
411RS003
Place hub on a suitable work surface and remove
the studs by using a hammer.
411RS004
Inspection and Repair
Make necessary correction or parts replacement if wear,
damage, corrosion or any other abnormal conditions are
found through inspection.
Check the following parts:
Hub
Hub bearing oil seal
Knuckle spindle
Disc
Caliper
Shift on the fly system parts (Cap, Hub flange, Shim,
Snap ring)
ABS sensor ring (If equipped)
For inspection and servicing of disc caliper and related
parts, refer to Brakes section.
Page 677 of 6000

4C–11 DRIVE SHAFT SYSTEM
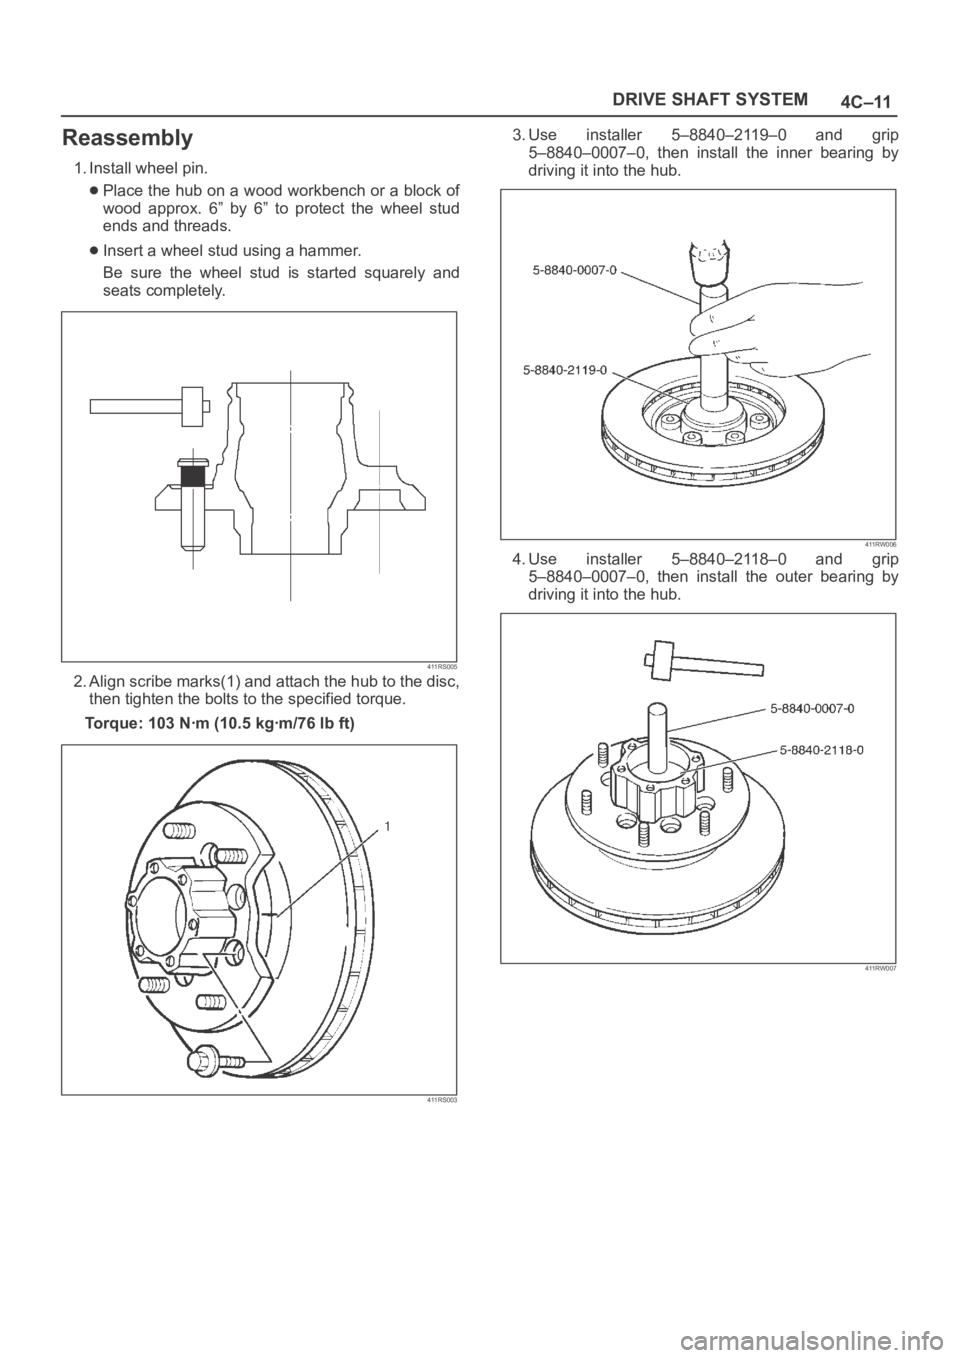
Reassembly
1. Install wheel pin.
Place the hub on a wood workbench or a block of
wood approx. 6” by 6” to protect the wheel stud
ends and threads.
Insert a wheel stud using a hammer.
Be sure the wheel stud is started squarely and
seats completely.
411RS005
2. Align scribe marks(1) and attach the hub to the disc,
then tighten the bolts to the specified torque.
Torque: 103 Nꞏm (10.5 kgꞏm/76 lb ft)
411RS003
3. Use installer 5–8840–2119–0 and grip
5–8840–0007–0, then install the inner bearing by
driving it into the hub.
411RW006
4. Use installer 5–8840–2118–0 and grip
5–8840–0007–0, then install the outer bearing by
driving it into the hub.
411RW007
Page 679 of 6000

4C–13 DRIVE SHAFT SYSTEM
9. Install lock washer and lock screw in the following
manner.
Turn the side with larger diameter of the tapered
bore to the vehicle outer side, then attach the
washer.
If the bolt holes in the lock plate are not aligned with
the corresponding holes in the nut, reverse the lock
plate.
If the bolt holes are still out of alignment, turn in the
nut just enough to obtain alignment.
Screw is to be fastened tightly so its head may
come lower than the surface of the washer.
411RS012
10. Apply adhesive (LOCTITE 515 or equivalent) to both
joining flange faces then install hub flange.
11. Install snap ring and shim.
Adjust the clearance between the free wheeling hub
body and the snap ring.
Clearance: 0 mm–0.3 mm (0 in–0.012 in)
Shims Available: 0.2 mm, 0.3 mm, 0.5 mm,
1.0 mm (0.008 in, 0.012 in, 0.020 in, 0.039 in)
411RW002
12. Install hub cap.
13. Tighten the bolts to the specified torque.
Torque: 59 Nꞏm (6.0 kgꞏm/43 lb ft)
Page 680 of 6000

4C–14
DRIVE SHAFT SYSTEM
Front Hub and Disc with Manual Locking Hub
Disassembled View
411RW009
Legend
(1) Bolt
(2) Cover Assembly
(3) Gasket
(4) Knob
(5) X–ring
(6) Detent Ball and Spring
(7) Snap Ring
(8) Clutch Assembly
(9) Compression Spring
(10) Follower
(11) Retaining Spring
(12) Snap Ring and Shim(13) Body Assembly
(14) Inner Assembly
(15) Spacer
(16) Ring
(17) Snap Ring
(18) Snap Ring
(19) Lock Washer and Lock Screw
(20) Hub Nut
(21) Hub and Disc Assembly
(22) Outer Bearing Outer Race
(23) ABS Sensor Ring (if so equipped)
(24) Inner Bearing Outer Race
(25) Oil Seal
Disassembly
1. Before disassembly, jack up the front of vehicle and
support frame with jack stands.2. Remove the disc brake caliper assembly and hang it
on the frame with wires. Refer to Front Disk Brake
Caliper Assembly in Brakes section.