battery OPEL FRONTERA 1998 Workshop Manual
[x] Cancel search | Manufacturer: OPEL, Model Year: 1998, Model line: FRONTERA, Model: OPEL FRONTERA 1998Pages: 6000, PDF Size: 97 MB
Page 251 of 6000
20
25
30AUT
O
4321
C01RW020
43
3 41
2 21
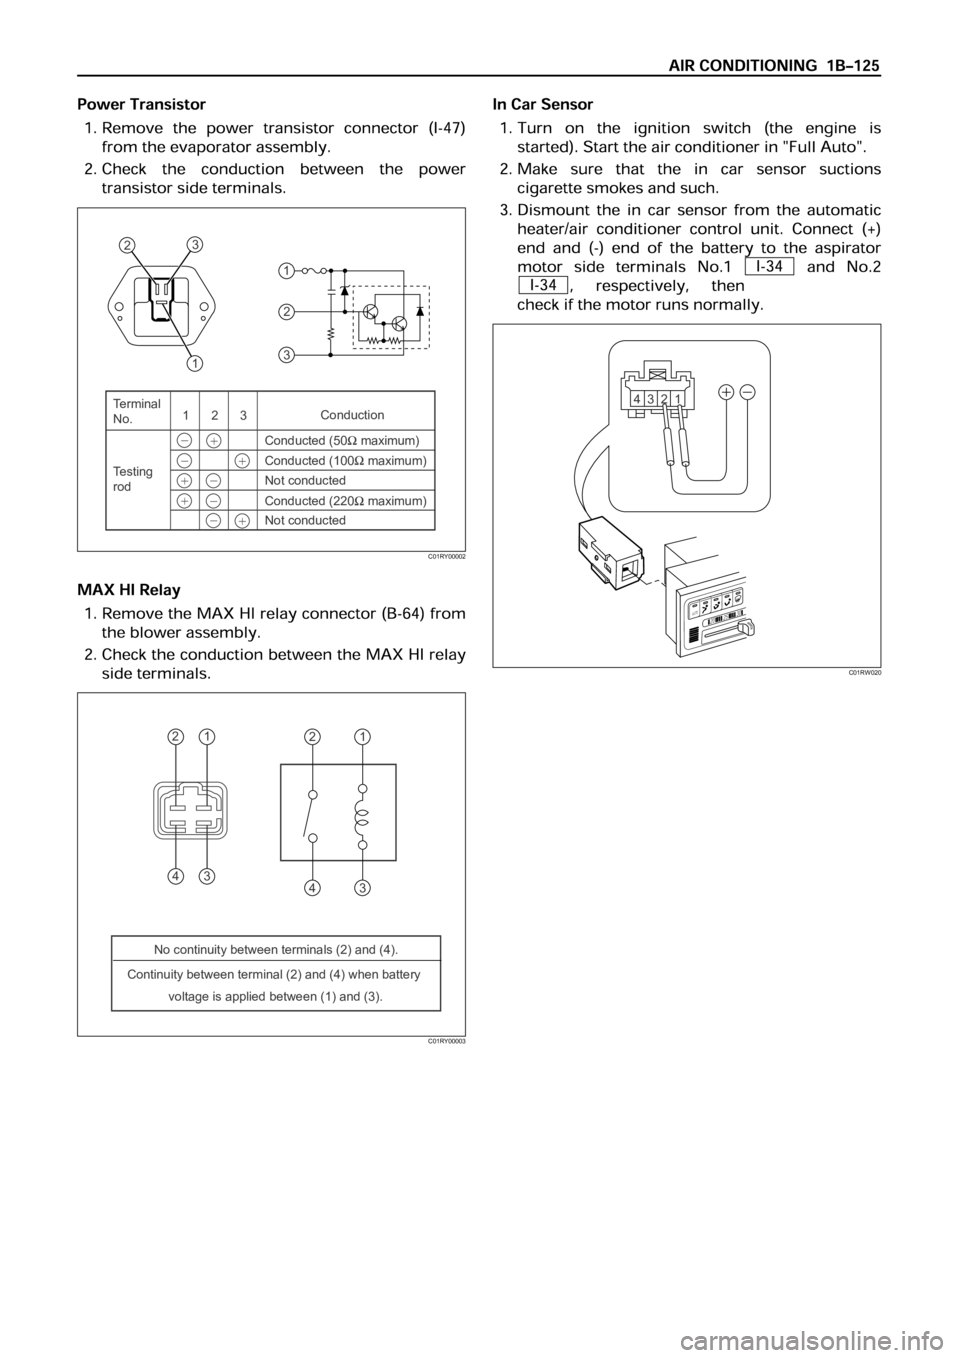
No continuity between terminals (2) and (4).
Continuity between terminal (2) and (4) when battery
voltage is applied between (1) and (3).
C01RY00003
1
2
3
Te r m i n a l
No.Conduction
Conducted (50
maximum)
Conducted (100
maximum)
Conducted (220
maximum) Not conducted
Not conducted 1
−
23
Te s t i n g
rod
−
−
−
−
+
+
+
+
+
1 23
C01RY00002
Page 538 of 6000
4B1–5 DRIVE LINE CONTROL SYSTEM (SHIFT ON THE FLY)
4. If vacuum is not applicable as much as –400mmHg,
and if there is resistance on the intake side, replace
with a new check valve.
VSV Assembly
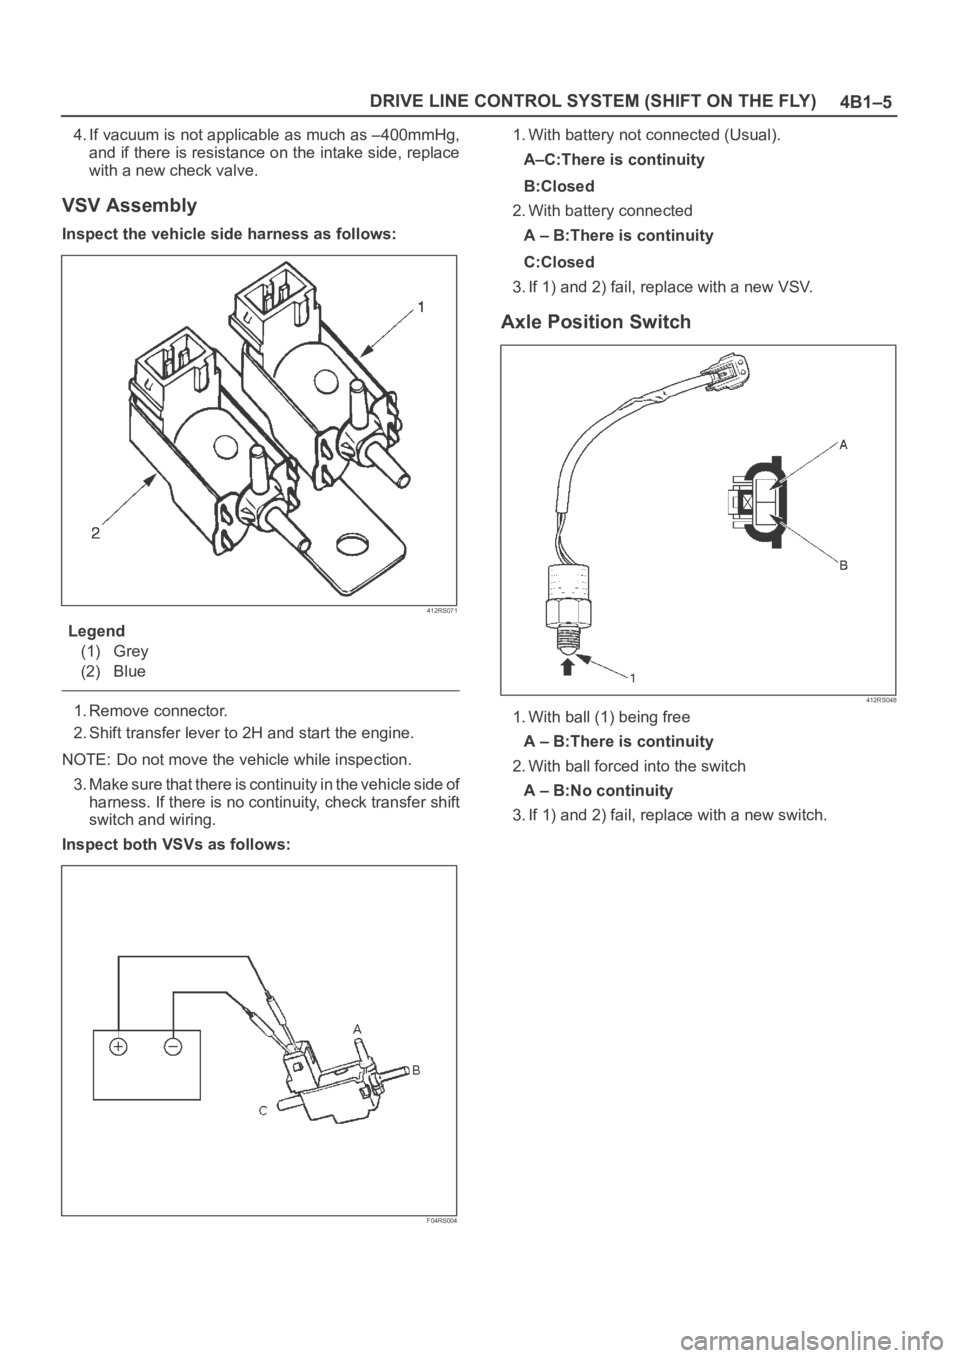
Inspect the vehicle side harness as follows:
412RS071
Legend
(1) Grey
(2) Blue
1. Remove connector.
2. Shift transfer lever to 2H and start the engine.
NOTE: Do not move the vehicle while inspection.
3. Make sure that there is continuity in the vehicle side of
harness. If there is no continuity, check transfer shift
switch and wiring.
Inspect both VSVs as follows:
F04RS004
1. With battery not connected (Usual).
A–C:There is continuity
B:Closed
2. With battery connected
A – B:There is continuity
C:Closed
3. If 1) and 2) fail, replace with a new VSV.
Axle Position Switch
412RS048
1. With ball (1) being free
A – B:There is continuity
2. With ball forced into the switch
A – B:No continuity
3. If 1) and 2) fail, replace with a new switch.
Page 567 of 6000
4B1–34
DRIVE LINE CONTROL SYSTEM (SHIFT ON THE FLY)
4. If vacuum is not applicable as much as –400mmHg,
and if there is resistance on the intake side, replace
with a new check valve.
VSV Assembly
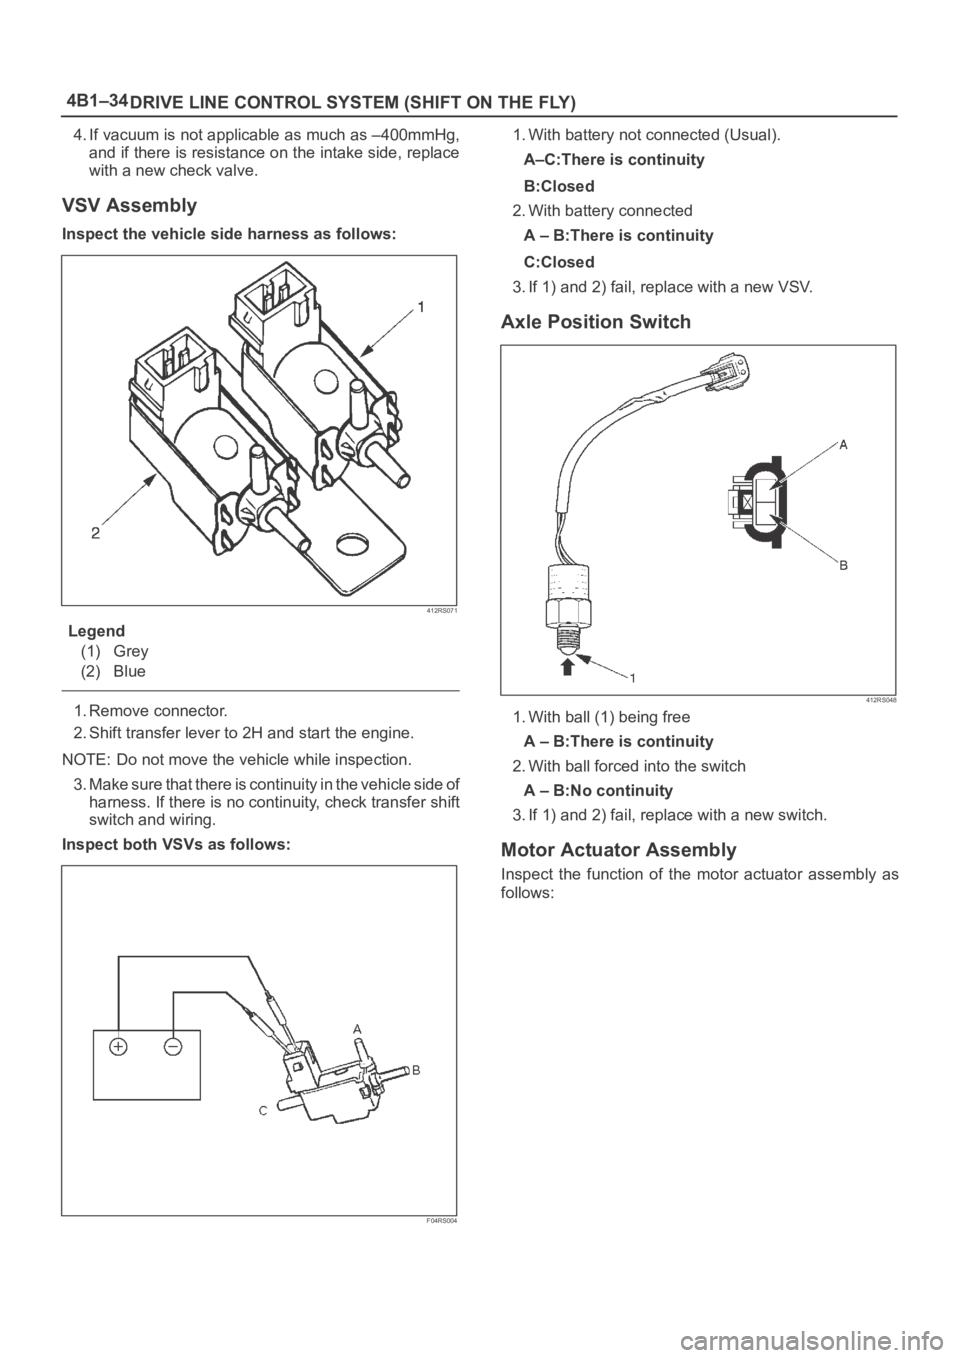
Inspect the vehicle side harness as follows:
412RS071
Legend
(1) Grey
(2) Blue
1. Remove connector.
2. Shift transfer lever to 2H and start the engine.
NOTE: Do not move the vehicle while inspection.
3. Make sure that there is continuity in the vehicle side of
harness. If there is no continuity, check transfer shift
switch and wiring.
Inspect both VSVs as follows:
F04RS004
1. With battery not connected (Usual).
A–C:There is continuity
B:Closed
2. With battery connected
A – B:There is continuity
C:Closed
3. If 1) and 2) fail, replace with a new VSV.
Axle Position Switch
412RS048
1. With ball (1) being free
A – B:There is continuity
2. With ball forced into the switch
A – B:No continuity
3. If 1) and 2) fail, replace with a new switch.
Motor Actuator Assembly
Inspect the function of the motor actuator assembly as
follows:
Page 588 of 6000
4B2–17 DRIVE LINE CONTROL SYSTEM (TOD)
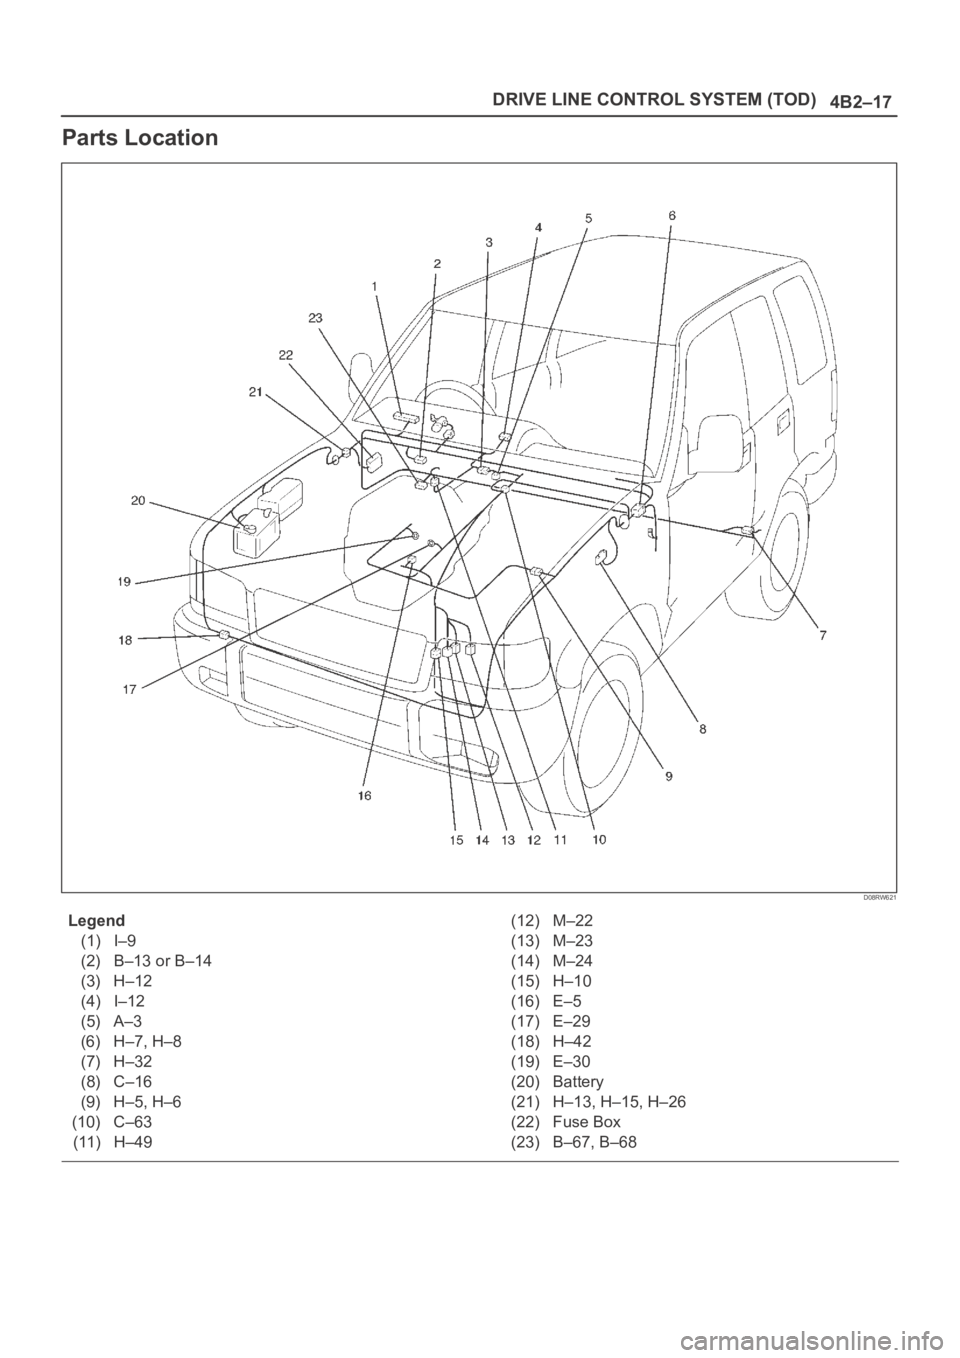
Parts Location
D08RW621
Legend
(1) I–9
(2) B–13 or B–14
(3) H–12
(4) I–12
(5) A–3
(6) H–7, H–8
(7) H–32
(8) C–16
(9) H–5, H–6
(10) C–63
(11) H–49(12) M–22
(13) M–23
(14) M–24
(15) H–10
(16) E–5
(17) E–29
(18) H–42
(19) E–30
(20) Battery
(21) H–13, H–15, H–26
(22) Fuse Box
(23) B–67, B–68
Page 597 of 6000
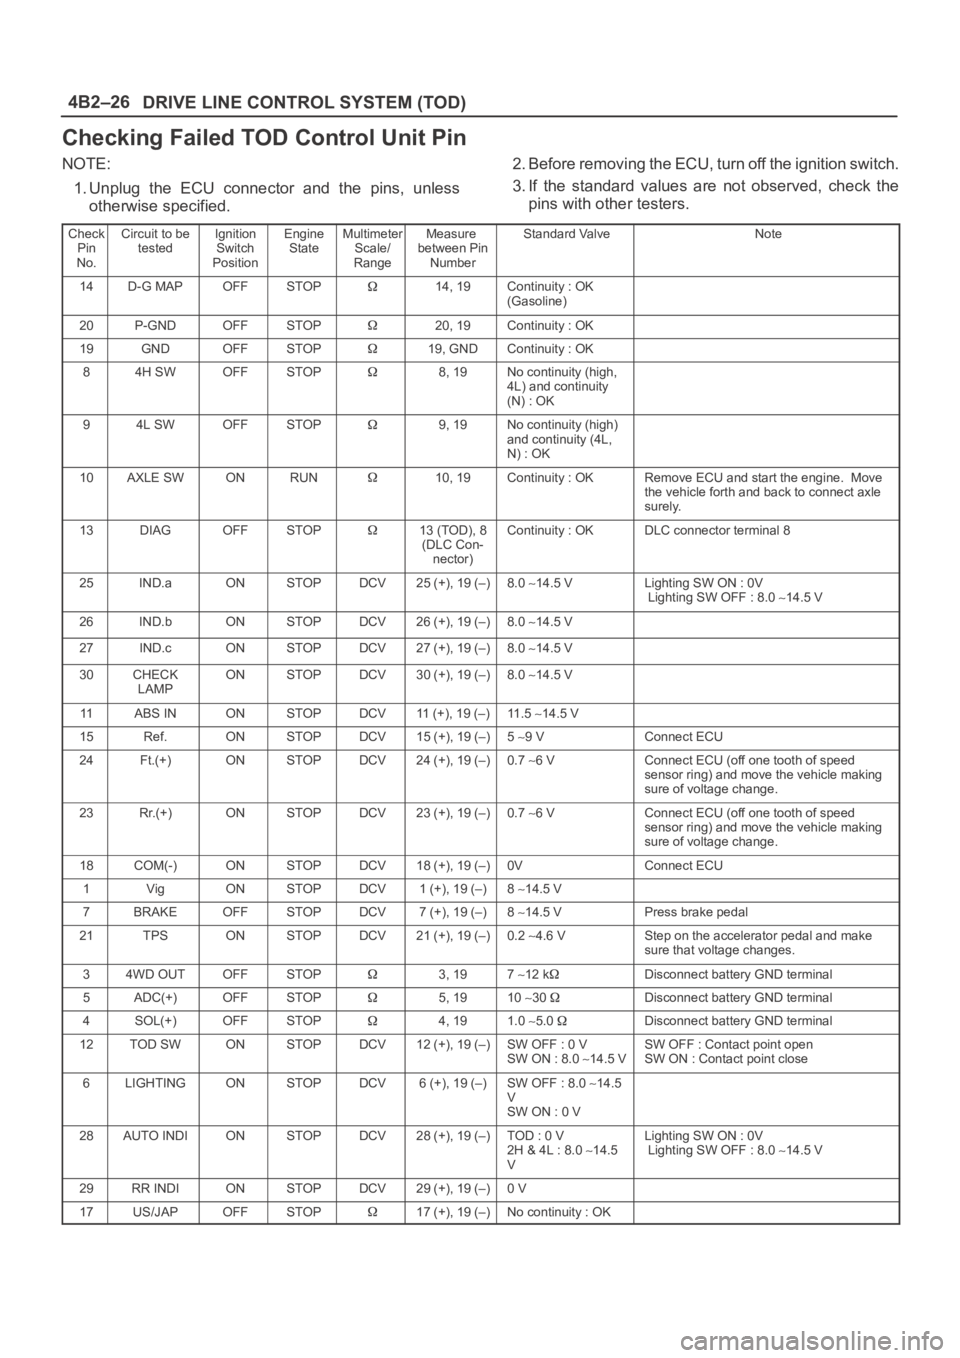
DRIVE LINE CONTROL SYSTEM (TOD) 4B2–26
Checking Failed TOD Control Unit Pin
NOTE:
1. Unplug the ECU connector and the pins, unless
otherwise specified.2. Before removing the ECU, turn off the ignition switch.
3. If the standard values are not observed, check the
pins with other testers.
Check
Pin
No.Circuit to be
testedIgnition
Switch
PositionEngine
StateMultimeter
Scale/
RangeMeasure
between Pin
NumberStandard ValveNote
14D-G MAPOFFSTOP14, 19Continuity : OK
(Gasoline)
20P-GNDOFFSTOP20, 19Continuity : OK
19GNDOFFSTOP19, GNDContinuity : OK
84H SWOFFSTOP8, 19No continuity (high,
4L) and continuity
(N) : OK
94L SWOFFSTOP9, 19No continuity (high)
and continuity (4L,
N) : OK
10AXLE SWONRUN10, 19Continuity : OKRemove ECU and start the engine. Move
the vehicle forth and back to connect axle
surely.
13DIAGOFFSTOP13 (TOD), 8
(DLC Con-
nector)Continuity : OKDLC connector terminal 8
25IND.aONSTOPDCV25 (+), 19 (–)8.0 14.5 VLighting SW ON : 0V
Lighting SW OFF : 8.0 14.5 V
26IND.bONSTOPDCV26 (+), 19 (–)8.0 14.5 V
27IND.cONSTOPDCV27 (+), 19 (–)8.0 14.5 V
30CHECK
LAMPONSTOPDCV30 (+), 19 (–)8.0 14.5 V
11ABS INONSTOPDCV11 (+), 19 (–)11 . 5 14.5 V
15Ref.ONSTOPDCV15 (+), 19 (–)5 9 VConnect ECU
24Ft.(+)ONSTOPDCV24 (+), 19 (–)0.7 6 VConnect ECU (off one tooth of speed
sensor ring) and move the vehicle making
sure of voltage change.
23Rr.(+)ONSTOPDCV23 (+), 19 (–)0.7 6 VConnect ECU (off one tooth of speed
sensor ring) and move the vehicle making
sure of voltage change.
18COM(-)ONSTOPDCV18 (+), 19 (–)0VConnect ECU
1VigONSTOPDCV1 (+), 19 (–)8 14.5 V
7BRAKEOFFSTOPDCV7 (+), 19 (–)8 14.5 VPress brake pedal
21TPSONSTOPDCV21 (+), 19 (–)0.2 4.6 VStep on the accelerator pedal and make
sure that voltage changes.
34WD OUTOFFSTOP3, 197 12 kDisconnect battery GND terminal
5ADC(+)OFFSTOP5, 1910 30 Disconnect battery GND terminal
4SOL(+)OFFSTOP4, 191.0 5.0 Disconnect battery GND terminal
12TOD SWONSTOPDCV12 (+), 19 (–)SW OFF : 0 V
SW ON : 8.0 14.5 VSW OFF : Contact point open
SW ON : Contact point close
6LIGHTINGONSTOPDCV6 (+), 19 (–)SW OFF : 8.0 14.5
V
SW ON : 0 V
28AUTO INDIONSTOPDCV28 (+), 19 (–)TOD : 0 V
2H & 4L : 8.0 14.5
VLighting SW ON : 0V
Lighting SW OFF : 8.0 14.5 V
29RR INDIONSTOPDCV29 (+), 19 (–)0 V
17US/JAPOFFSTOP17 (+), 19 (–)No continuity : OK
Page 611 of 6000
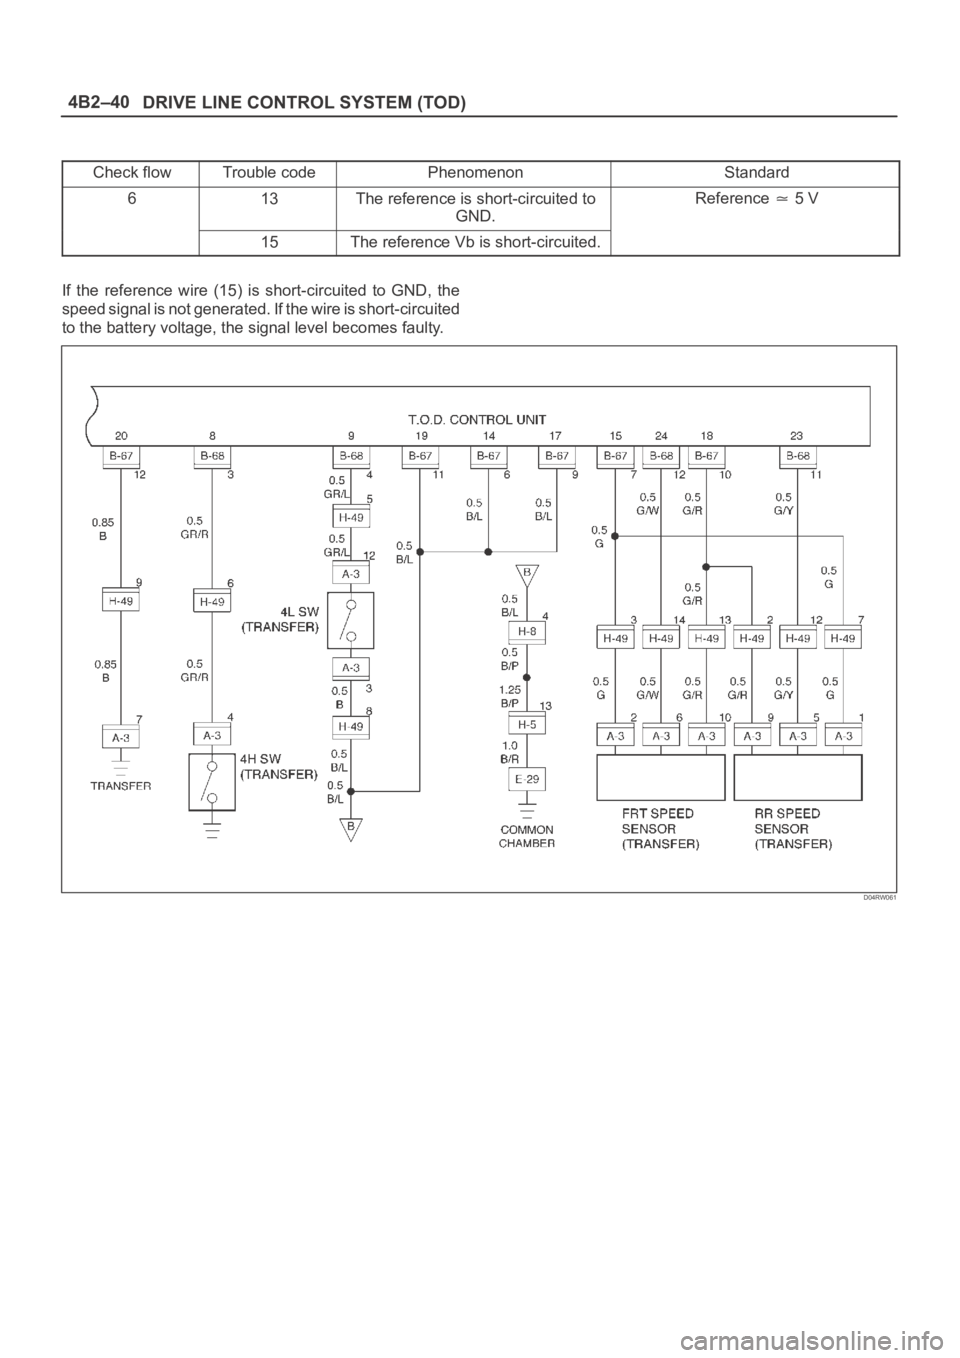
DRIVE LINE CONTROL SYSTEM (TOD) 4B2–40
Check flowTrouble codePhenomenonStandard
613The reference is short-circuited to
GND.Reference 5 V
15The reference Vb is short-circuited.
If the reference wire (15) is short-circuited to GND, the
speed signal is not generated. If the wire is short-circuited
to the battery voltage, the signal level becomes faulty.
D04RW061
Page 612 of 6000
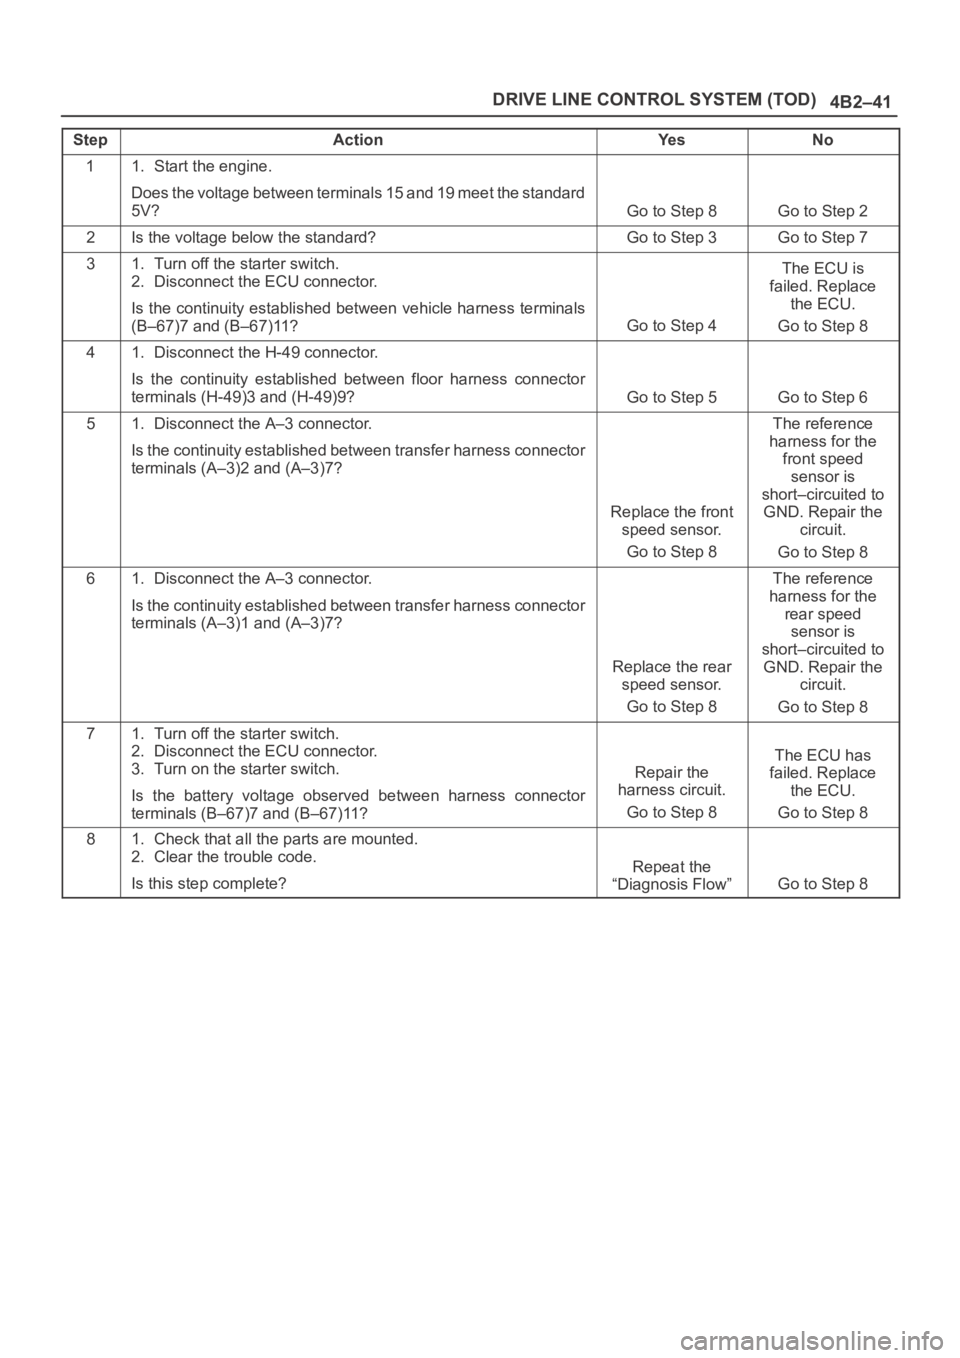
4B2–41 DRIVE LINE CONTROL SYSTEM (TOD)
StepActionYe sNo
11. Start the engine.
Does the voltage between terminals 15 and 19 meet the standard
5V?
Go to Step 8Go to Step 2
2Is the voltage below the standard?Go to Step 3Go to Step 7
31. Turn off the starter switch.
2. Disconnect the ECU connector.
Is the continuity established between vehicle harness terminals
(B–67)7 and (B–67)11?
Go to Step 4
The ECU is
failed. Replace
the ECU.
Go to Step 8
41. Disconnect the H-49 connector.
Is the continuity established between floor harness connector
terminals (H-49)3 and (H-49)9?
Go to Step 5Go to Step 6
51. Disconnect the A–3 connector.
Is the continuity established between transfer harness connector
terminals (A–3)2 and (A–3)7?
Replace the front
speed sensor.
Go to Step 8
The reference
harness for the
front speed
sensor is
short–circuited to
GND. Repair the
circuit.
Go to Step 8
61. Disconnect the A–3 connector.
Is the continuity established between transfer harness connector
terminals (A–3)1 and (A–3)7?
Replace the rear
speed sensor.
Go to Step 8
The reference
harness for the
rear speed
sensor is
short–circuited to
GND. Repair the
circuit.
Go to Step 8
71. Turn off the starter switch.
2. Disconnect the ECU connector.
3. Turn on the starter switch.
Is the battery voltage observed between harness connector
terminals (B–67)7 and (B–67)11?
Repair the
harness circuit.
Go to Step 8
The ECU has
failed. Replace
the ECU.
Go to Step 8
81. Check that all the parts are mounted.
2. Clear the trouble code.
Is this step complete?
Repeat the
“Diagnosis Flow”
Go to Step 8
Page 614 of 6000
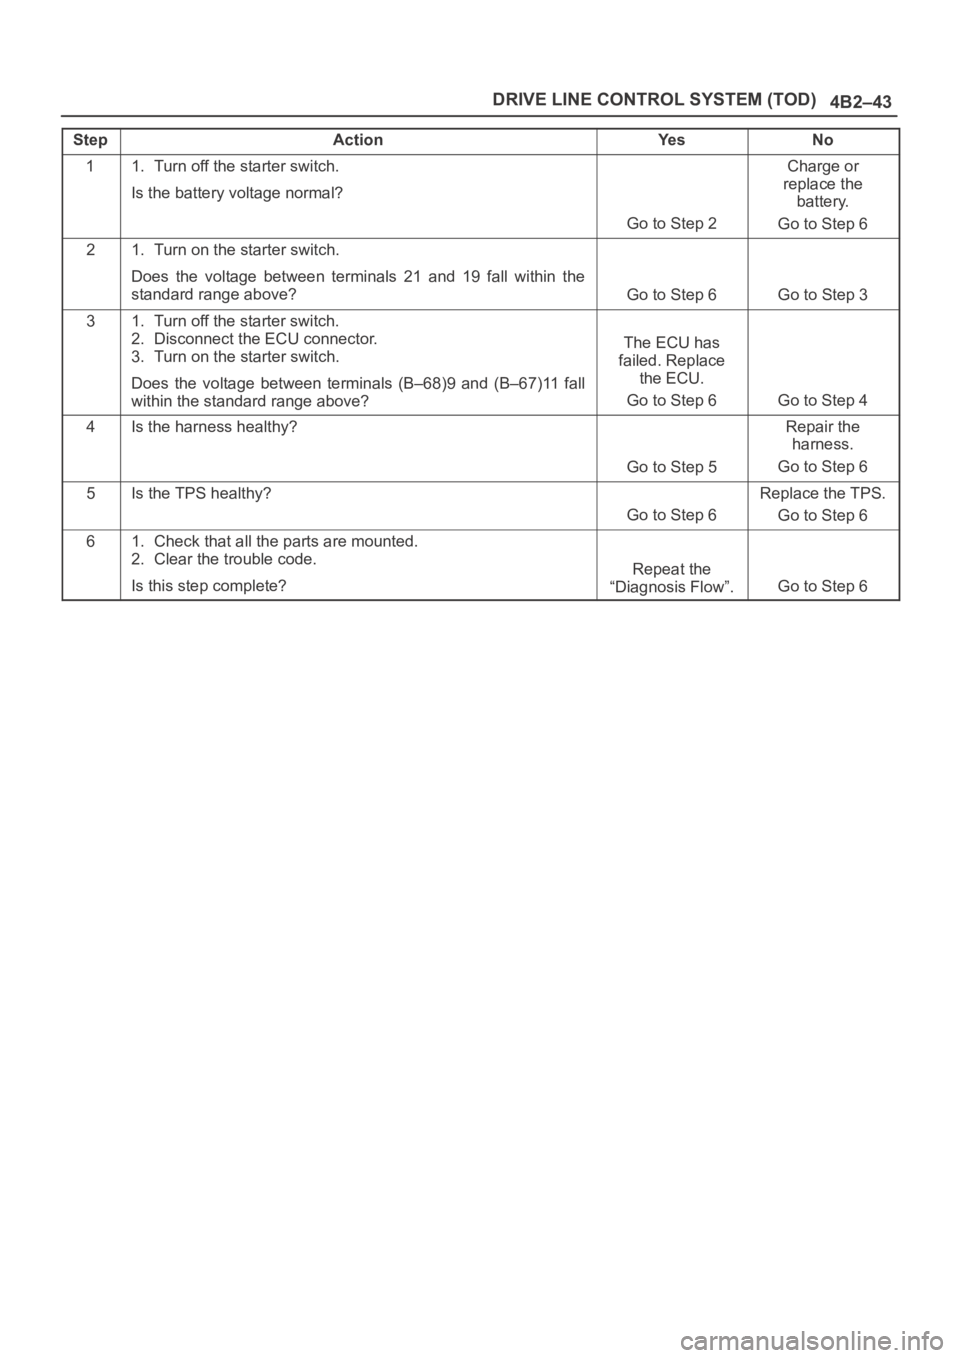
4B2–43 DRIVE LINE CONTROL SYSTEM (TOD)
StepActionYe sNo
11. Turn off the starter switch.
Is the battery voltage normal?
Go to Step 2
Charge or
replace the
battery.
Go to Step 6
21. Turn on the starter switch.
Does the voltage between terminals 21 and 19 fall within the
standard range above?
Go to Step 6Go to Step 3
31. Turn off the starter switch.
2. Disconnect the ECU connector.
3. Turn on the starter switch.
Does the voltage between terminals (B–68)9 and (B–67)11 fall
within the standard range above?
The ECU has
failed. Replace
the ECU.
Go to Step 6
Go to Step 4
4Is the harness healthy?
Go to Step 5
Repair the
harness.
Go to Step 6
5Is the TPS healthy?
Go to Step 6
Replace the TPS.
Go to Step 6
61. Check that all the parts are mounted.
2. Clear the trouble code.
Is this step complete?
Repeat the
“Diagnosis Flow”.
Go to Step 6
Page 618 of 6000
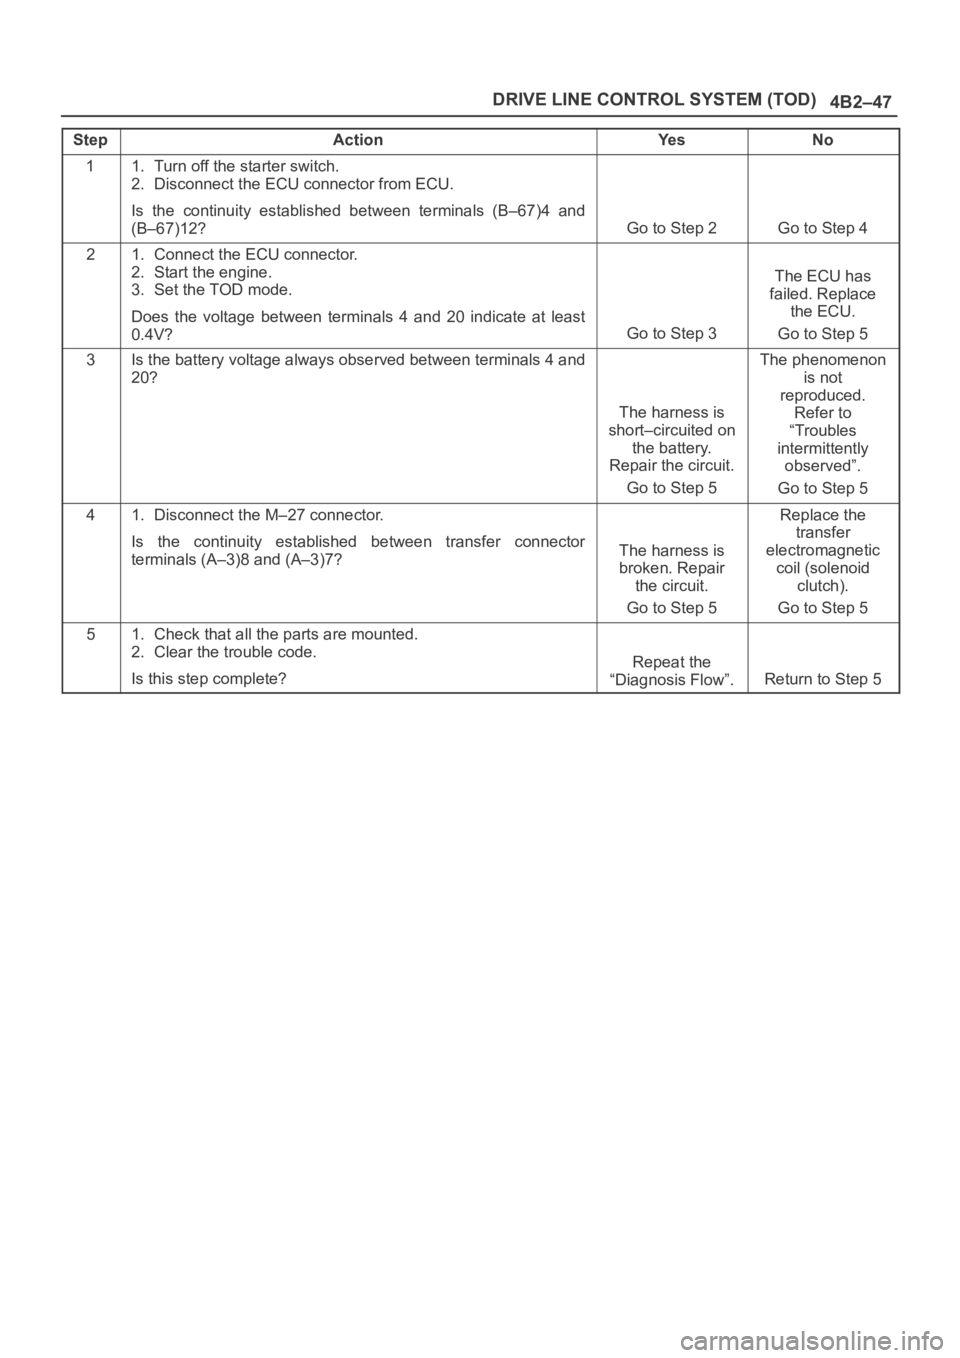
4B2–47 DRIVE LINE CONTROL SYSTEM (TOD)
StepActionYe sNo
11. Turn off the starter switch.
2. Disconnect the ECU connector from ECU.
Is the continuity established between terminals (B–67)4 and
(B–67)12?
Go to Step 2Go to Step 4
21. Connect the ECU connector.
2. Start the engine.
3. Set the TOD mode.
Does the voltage between terminals 4 and 20 indicate at least
0.4V?
Go to Step 3
The ECU has
failed. Replace
the ECU.
Go to Step 5
3Is the battery voltage always observed between terminals 4 and
20?
The harness is
short–circuited on
the battery.
Repair the circuit.
Go to Step 5
The phenomenon
is not
reproduced.
Refer to
“Troubles
intermittently
observed”.
Go to Step 5
41. Disconnect the M–27 connector.
Is the continuity established between transfer connector
terminals (A–3)8 and (A–3)7?
The harness is
broken. Repair
the circuit.
Go to Step 5
Replace the
transfer
electromagnetic
coil (solenoid
clutch).
Go to Step 5
51. Check that all the parts are mounted.
2. Clear the trouble code.
Is this step complete?
Repeat the
“Diagnosis Flow”.
Return to Step 5
Page 622 of 6000
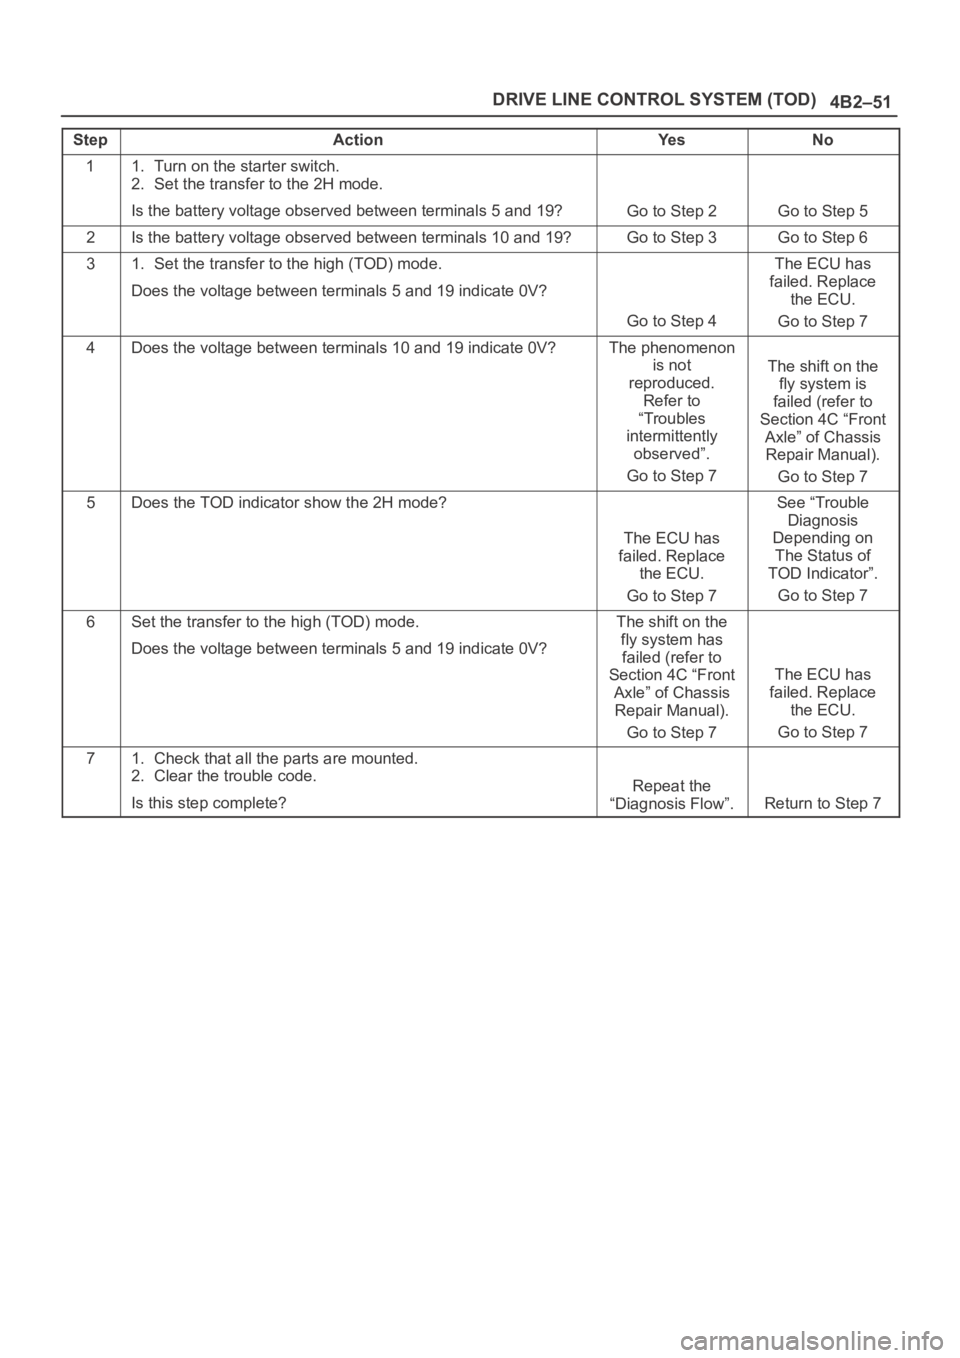
4B2–51 DRIVE LINE CONTROL SYSTEM (TOD)
StepActionYe sNo
11. Turn on the starter switch.
2. Set the transfer to the 2H mode.
Is the battery voltage observed between terminals 5 and 19?
Go to Step 2Go to Step 5
2Is the battery voltage observed between terminals 10 and 19?Go to Step 3Go to Step 6
31. Set the transfer to the high (TOD) mode.
Does the voltage between terminals 5 and 19 indicate 0V?
Go to Step 4
The ECU has
failed. Replace
the ECU.
Go to Step 7
4Does the voltage between terminals 10 and 19 indicate 0V?The phenomenon
is not
reproduced.
Refer to
“Troubles
intermittently
observed”.
Go to Step 7
The shift on the
fly system is
failed (refer to
Section 4C “Front
Axle” of Chassis
Repair Manual).
Go to Step 7
5Does the TOD indicator show the 2H mode?
The ECU has
failed. Replace
the ECU.
Go to Step 7
See “Trouble
Diagnosis
Depending on
The Status of
TOD Indicator”.
Go to Step 7
6Set the transfer to the high (TOD) mode.
Does the voltage between terminals 5 and 19 indicate 0V?The shift on the
fly system has
failed (refer to
Section 4C “Front
Axle” of Chassis
Repair Manual).
Go to Step 7
The ECU has
failed. Replace
the ECU.
Go to Step 7
71. Check that all the parts are mounted.
2. Clear the trouble code.
Is this step complete?
Repeat the
“Diagnosis Flow”.
Return to Step 7